Jinnai
-
Posts
141 -
Joined
-
Last visited
Content Type
Profiles
Forums
Events
Gallery
Everything posted by Jinnai
-
Reissue of the Strike and Super Valkyrie, two versions in the one box. Only comes with A and S heads. Markings only for Max, Hikaru and Roy. Kakizaki gets shafted. http://www3.hlj.com/shs/sf/pictures/dsc04330.html
-
Huh.. Back in Feb, there was another #Ask_Jerry chat with Jerry Chu, and he announced that the Zeta DVD boxset would be released on the 7th of September. As for price, it was labled around $200+ for the entire series. The news has been around for a while.. I'm more curious about what happened to F91, since it was supposed to have a theatrical release at the end of THIS month, and since tomorrow is the 31st..
-
Official Transformers Alternators and more thread.
Jinnai replied to David Hingtgen's topic in Anime or Science Fiction
Makinen retired from WRC at the end of last year, so chances are pretty high that this car will just be Solberg, and therefore (slightly) reduce the collectibility of Monte Carlo 2003 car No.7 Smokescreen from last year. Then again, I think Solberg was running car no.1 at this years Monte Carlo.. so it's interesting to see. -
It's not supposed to be a seam, it's a panel line, since the nose folds back in on itself, like the YF-19. At first I didn't think it was supposed to be there. It wasn't until after I started looking around more, that I noticed it was supposed to be there. But, go back to my first pages, and I state that there is a displacement between the nose and the fuselage. I had to sand that back evenly, so I filled the gap while I was at it. I'm in the process of rescribing the line, like I am with rescribing the landing gear doors. But work only gives me a small amount of time to model, and presently I'm sitting at home right now with a bad case of pink eye, and one eye is completely shut tight with crap, so I can't do much right now.
-
So, the Mr. Surfacer was dry, and straight away I hooked back into getting this area fixed up. I made a small sanding instrument to get into that smaller area by folding open one paperclip, and cutting a strip of 400 grit sandpaper that was about 7mm wide. This fit between the raised detail perfectly, and made it easier for me to sand in that area. Kudo's to Mikado-sama for helping me with that. So I finally got this part flush. Time to do another test prime, to make sure. Then, rescribing. More to come. Damn work is keeping me busy already.
-
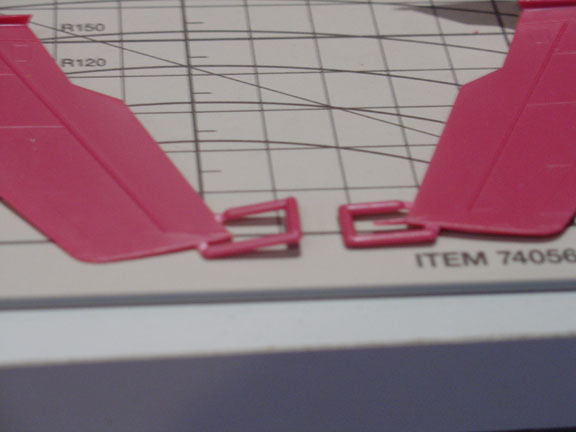
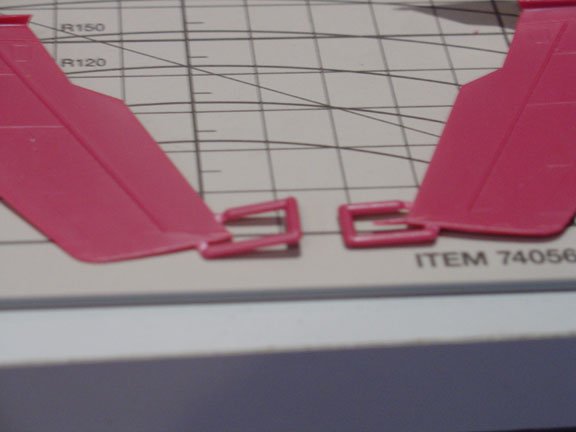
And here's the (almost) finished result. The part needs sanding slightly to give it a bit more rounded appearance, and have the little bevel scribed into the part that joints to the tip. I may just tear this tip off, and strengthen it with CA and 1mm rod. Not sure if I will yet or not, depends if the part snaps off again on me. And it has once already. BTW, my fabricated part is on the left, the kit part is on the right. Can you tell?
-
We all have spare sprue lying around, why not use that sprue? I stuck to the old fashioned way of making antennae, by heating up sprue with an open flame, and gently stretching it out to the desired thickness. It took a little bit for me to get the correct taper on the point, but I kinda got it in the end.

-
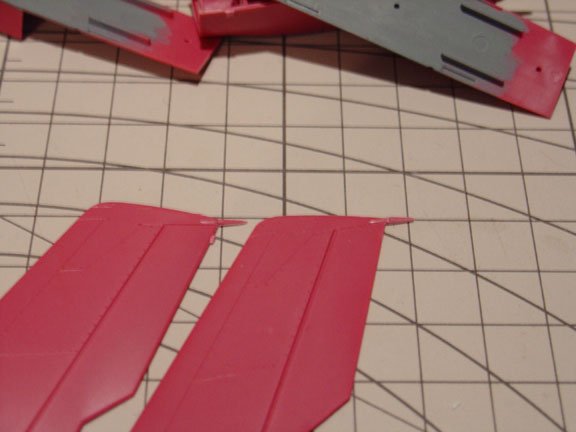
So since the nose was giving me so much strife, while Mr. Surfacer was drying I thought I'd tackle an issue that arrived with this kit: the little wingtip broke off in shipping, and it was nowhere to be seen inside the plastic bags that held the sprues inside the box. I thought about approaching this from several different angles, when I realised that the easiest way to replace this was so simple.
-
The same nose problem, just on the other side. Time to break out the Mr. Surfacer 500 again.
-
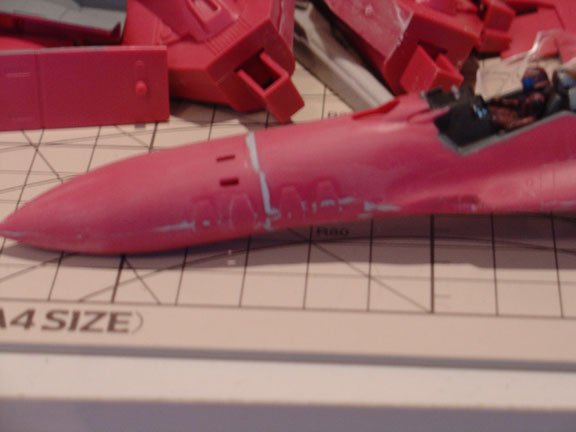
Another problem area that I thought I had eliminated.. I need to find some way of removing that seam in the middle of the circle. The photo hasegawa provides on the side of their box has that seam shown, and naturally I can't leave it there.
-
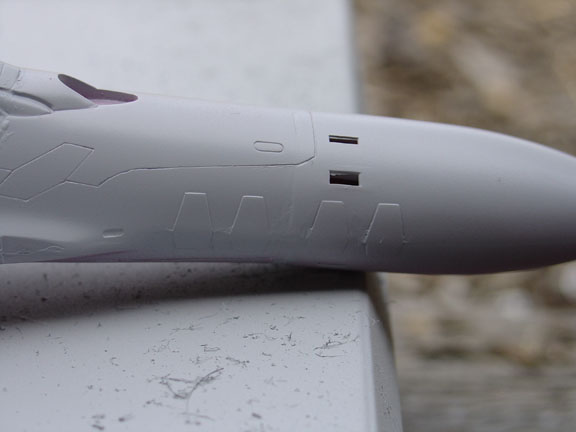
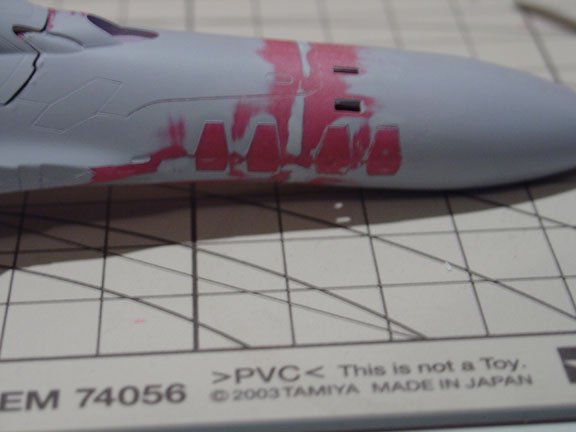
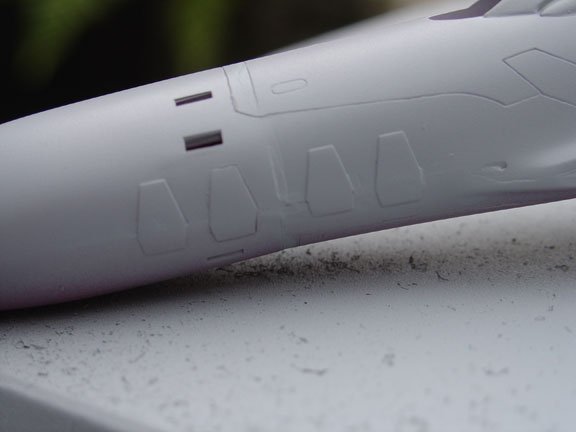
And sure enough.. the primer coat shows all. The nose isn't flush, on top of that, there are still seams between the raised detailed panels that need more work. I'm really scared at this point of sanding off the panels. I was half tempted to scribe around the panels, then not care and sand them off, and replace later with plastic sheet. But then I'd be admitting defeat, and I won't let this kit kick my arse.

-
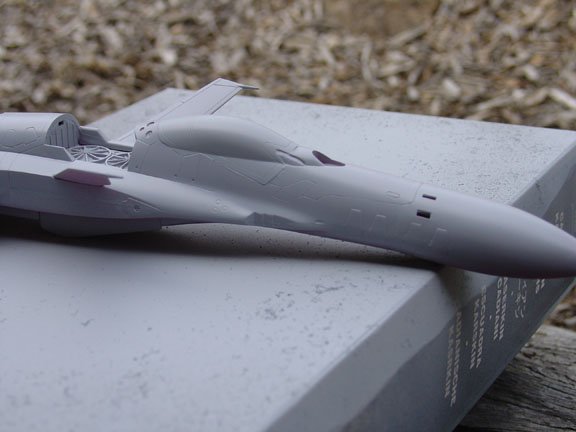
So I thought I had the nose flush, at least.. it looked like it to me. Same with some other areas. So the only way to be 100% certain was to do a prime. Usually I won't prime until all other areas of the kit are ready, but (except for the weapons) nearly all the parts have very minor sanding/filling to be done, the main fuselage is what is giving me trouble. Primer is Mr. Surfacer 1000 spray. I save the 1200 for my miniatures now.
-
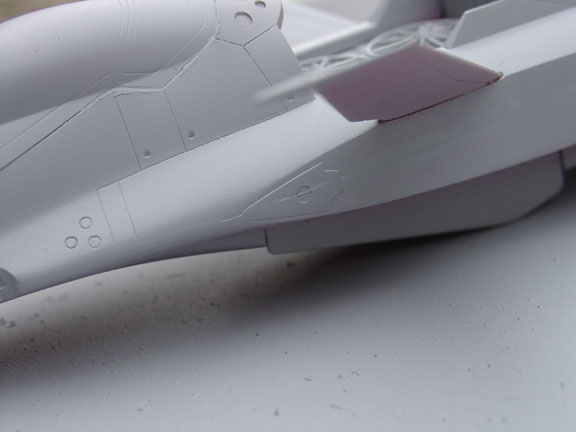
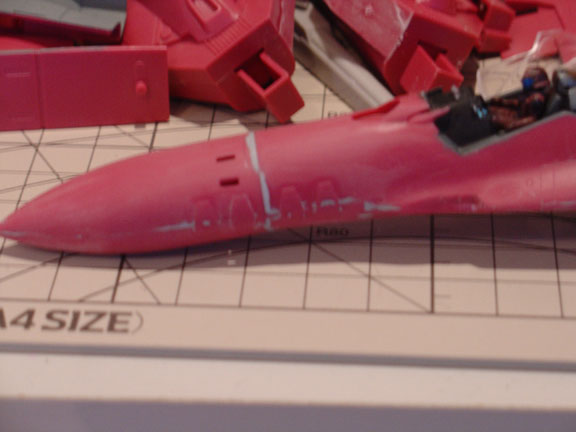
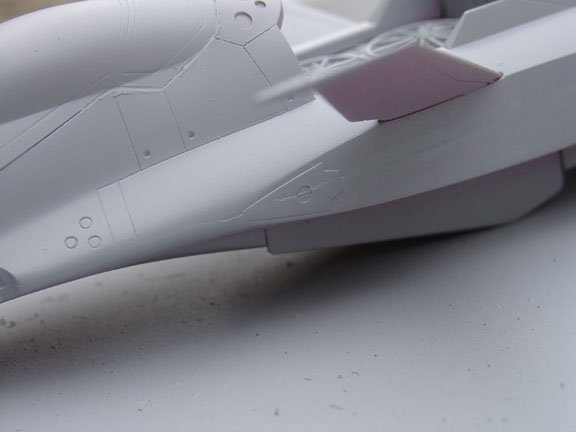
And I didn't realise how much those nose would annoy me.. I'm not 100% sure on how the fit turned into something so bad, but as I stated earlier I had about a 2mm gap between the nose and the main fuselage. I'm fairly certain it was due to closing the landing gear, but I can't be certain. The way the lower fuselage is attached to the upper piece can cause fit problems, but I did dry fits with the nose the whole time I was gluing, so really.. I'm not sure what caused so much trouble. I've sanded back to 1000 grit here, starting with 400, wetsanding the whole time. This was.. HELL. Pure and simple. That, and I was very scared of sanding off the raised detail.
-
I'm back with more progress.. I actually could have posted this last week, however having an active social life took it's toll on me, and I ended up going out more on my last week of holidays than sitting in front of the computer. Forgive the blurred pic, I really need a tripod, and I'm a smoker. So naturally I have the shakes. Shown here is the fuselage and legs with my Mr. Surfacer painted on for seam filling. I've used a lot around the nose to get that area flush, and at this point I had no worries about sanding near those raised areas.. didn't last for long though.. On the legs I've also put a bit of Mr. Surfacer 500 over the landing gear doors to keep it flush, and eliminate a rather large gap that was apparant after gluing.
-
Whoops.. double.. please delete.
-
I don't think I'd get as much enjoyment out of stripping the Yamato toy, disassembling it, repainting and reassembling it. I'm definately sticking by my order.
-
I've found through my years of snipping/cutting various different kits (and materials), the clippers Games Workshop sells have by far been the best I've ever used. I've tried different brands, cheapies, sissors, nail cutters, you name it.. and yet for some reason I've still found these clippers to be the best. They also usually last me over a year or longer before the spring in the middle wears out, they're still fine after that, but then you need to manually pull them apart. Blade has never gone dull on me either, and I constantly use them to clip resin/plastic/paper clips (for resin pinning). Not sure as to how much they cost overseas, but I pay $24 AUD each time I buy a new pair (and I'm anal.. as soon as that spring goes, I give them away to one of the kids that frequent my local GW store and buy a new pair).
-
The Strike does indeed come with the 2nd Micro Missile pod, as well as the Strike Cannon. But the Strike only has a 1S head. As well, the decal sheet for the Fighter 1S Strike has Max, Hikaru and Roy markings. The previously released Super kit has the two Micro Missile pods, markings for Hikaru, Max and Kakizaki, as well as a 1A and 1J head. So for an extra 800 yen, I'm expecting all 3 heads, with a big enough decal sheet to cover Max, Hikaru, Roy AND Kakizaki. No Kakizaki = sadness.
-
Two seater nose with the head of the -0D.. Well this makes tooling the 0D easier, all they'd have to do now is the legs and wing. I was hoping the 17th release was the 0D, but I can wait. The Strike was one of the original 5 kits that were discontinued if I remember correctly. Although for 2800, I would certainly hope it has different options to the normal Strike: either photoetch, pilot and weapons, or a larger more detailed decal sheet.. 2800 is more expensive than the stock Strike, which is still available from most online stores.
-
Dobber, I think my fit problems around the nose are solely because I raised the landing gear. Either it's that, or I failed to get the parts aligned properly when I originally glued the nosecone together. But, I've gotten that part fixed up now (I did a test prime and retouched up with Mr. Surfacer 1000) which I'll show soon. I scared my client by spraying Mr. Surfacer directly onto the clear canopy. ^_~ As for seams, generally what I do is if I'm confused about a seam, I'll consult the painting guide as to where panel lines are, and if that doesn't help, I'll consult the finished pictures. Perfect example of this: the instructions show that there's a panel line running down where the nose attaches to fuselage, but on the finished kit it's not there. It's really up to you. I haven't decided if I'm going to fill the seams where the legs join the intakes, or use them as panel lines. As for turning this baby into Gerwalk, I have a mate working on it now, and it's quite, quite easy. Just make sure that the exhausts and the feet are lowered by about 5mm on the interior housing they attach to. Otherwise it'll look stumpy.
-
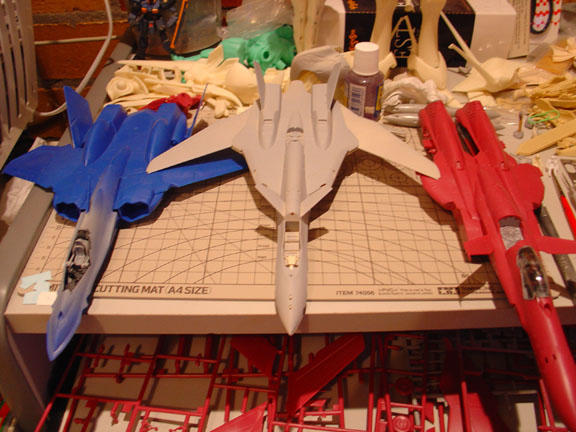
It's a good thing I did do a lot of dry fitting and seam elimination with glue before using filler, as there were some areas that really, really freaked me out, especially with sanding. I've just finished sanding back the most annoying area I've noticed sofar (where the nose joins the fuselage) and I started freaking thinking I had removed most of the raise panels around the end of the nose. After sanding back with 1000 grit, they were still very prominant. So I'm happy there, I'm about to do a test prime to see if I missed anywhere on the nose. As for the VTOL fans.. my client asked me if there was any way I could make the cowling for those fans to be opened and closed, but without fiddling around a lot, I couldn't. So I'm not painting them. Maybe on one of my own I will, but I'm fairly sure there's some scenes with D.D in gerwalk (either OVA 2 or 3) where the cover does go up during Gerwalk mode. With wings and the fuel/missile pods attached to the wings, she's a really, really big beast.. I just can't get over the size.
-
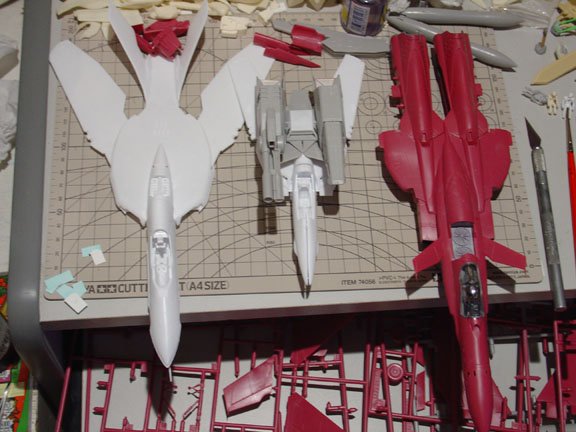
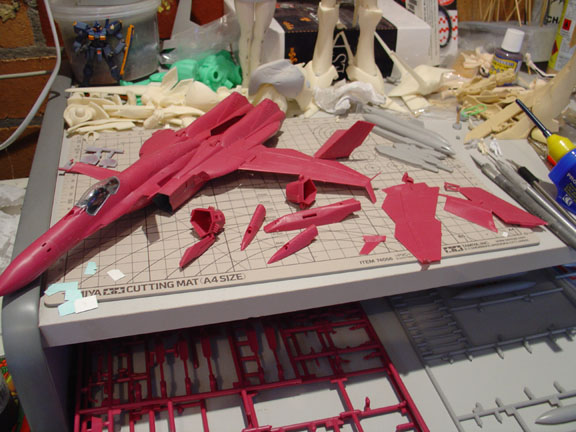
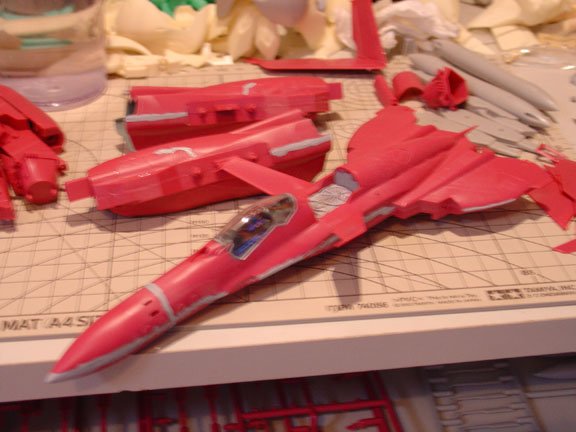
I blame compulsion for half of my kit purchases. And a lot of the time I'm the typical hoarder, or a pack rat. I will save them for a sunny day. A lot of my kits I've literally thrown to one side, to be so disappointed in my work with it that I'll never let it see the light of day. I also own a lot of duplicates, if I screw up something that badly that I can't fix it, the parts go into the drawers, and I buy a new kit and start from scratch. I have a fair bit to last me a long time.. work doesn't help my production either. Since my client is watching this thread, I thought I'd update a tiny bit. Presently the SV-51 is in the most annoying stage of assembly: primary gluing and seam filling. I'm getting most parts assembled and sanded back before I break out the Mr. Surfacer, but at times like this I address some problems I've been noticing during dry fitting stages. That's why you don't see the feet much in this picture, I have to do something about them.. More later.

-
http://jinnai.freewebspace.com/toomuch.jpg And that's about 1/3rd of my total collection. My job usually keeps me busy to the point where I rarely finish something. I'm actually surprised with the progress I've made sofar. That, and I'm on holidays. Generally I have more in progress than what I have finished, but my main love is miniatures, and I spend more time on them than what I do on my actual kits.
-
Ok, it just wasn't right to not include the Mac Plus 1/72's..

-
I think Claudia told Roy that flying a big VF-0S was overcompensating for a lack of something.. that's why he then moved into the VF-1S. I'll update more later, as I work on it.