zebu
-
Posts
34 -
Joined
-
Last visited
Content Type
Profiles
Forums
Events
Gallery
Everything posted by zebu
-
In a practical sense, (If I were to be a pilot to fly these things) I'd rather be on YF-19 because of its incorporated (retracted) pilot seat. That would increase survivability.. or at least increase when compared to FY-21 where pilot seat just hanging out in front (In fact, this is the most protruding point in the battledriod mode from side view). That!, to me, is not the most comfortable position I want to be in. Now in "Animation" terms, I prefer FY-21 because of its total evolutionary Brain Direct Interface to allow the pilot to operate the fighter with his thoughts alone. That!, my friends, alone win me over YF-19. Finally in "Toy" terms, I prefer FY-19 over FY-21 even though FY-21 is new to my collection (I always prefer new toys over old). With YF-19 Chest Mod I did, I find FY-19 is more poseable and balanced. I find FY-21 top heavy (Although much improved from old 1/72 scale). I also find that FY-19 serve as better toy for me. So the final verdict is….. YF-19 over FY-21 by two out of three categories I judged on. I would not give, trade, share neither one with anyone though, I love them both. Zebu
-
I did a trend search in Google. http://www.google.co.jp/trends?q=macross%2...=ytd&sort=0 It seems that in terms of "internet search" world wide, gundam wins... When comparing the most recent series Macross Frontier VS. Gundam 00, Gundam 00 seem to have lead over Macross Frontier when both series were on. However Macross Frontier passed Gundam 00 as of mid APR 08. http://www.google.co.jp/trends?q=macross+f...=ytd&sort=0 Then again , Gundam 00 ended around that time. This is just in one trend search..... zebu
-
12,600 Yen ~ 119 U.S $ (118.7676 U.S. dollars to be exact) Ha ha, Yamato will crap their pants if this price holds... Competition..., indeed a beautiful thing. zebu
-
Thanks all... I will do some more "adjustments" and take some pictures for the "Macross variable fighter/mecha pose" thread. Zebu
-
When is this thing due to hit the market anyway? Any creditable information yet (no speculation please)? Or do we simply don't know? Thanks Zebu
-
DONE!
-
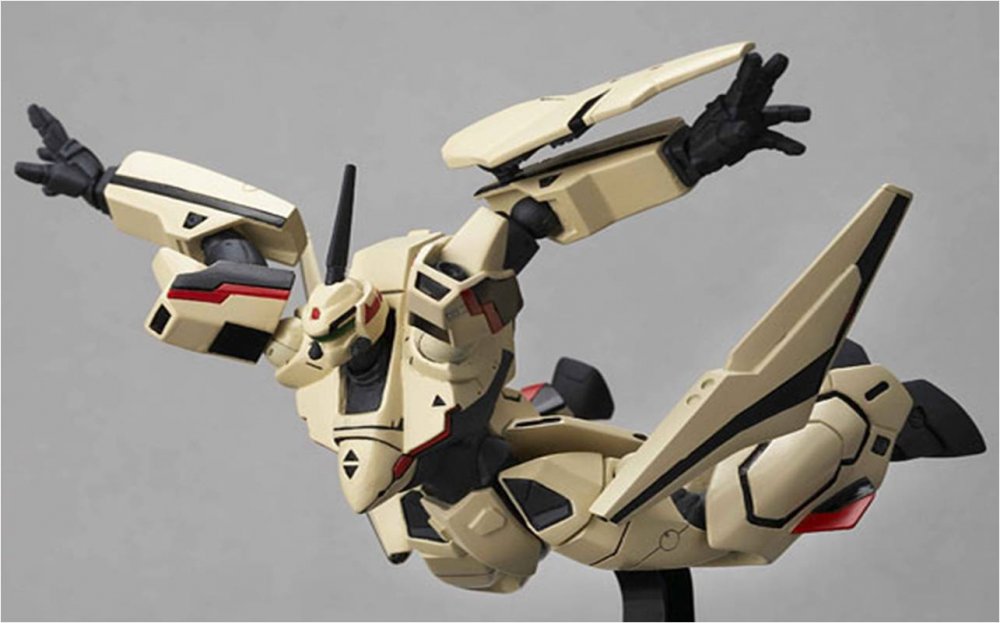
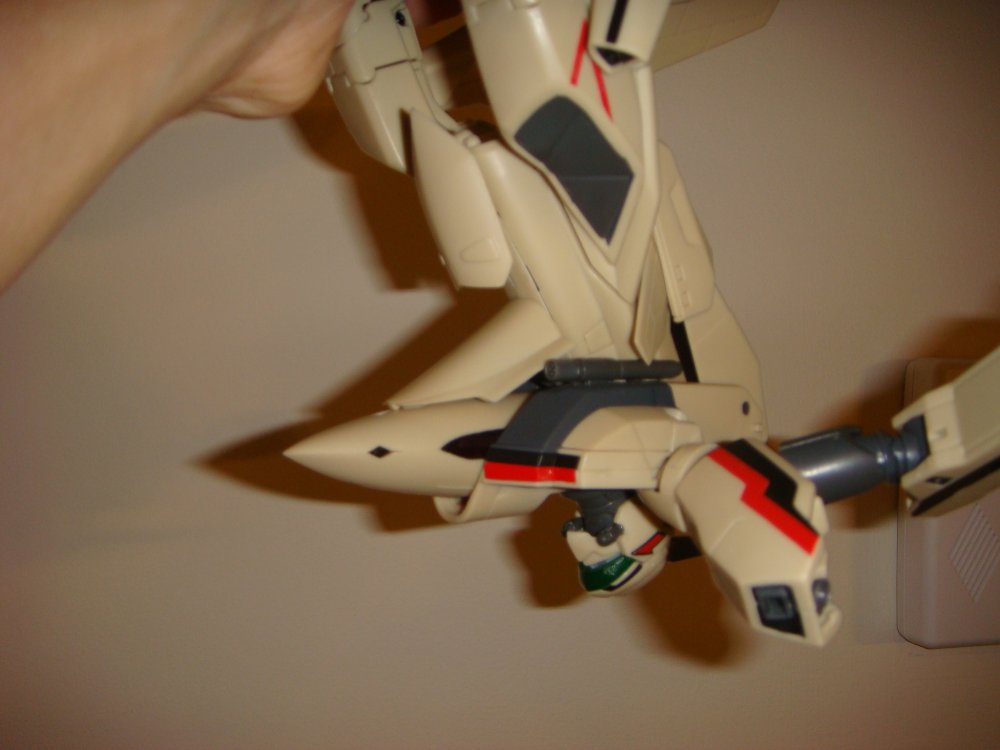
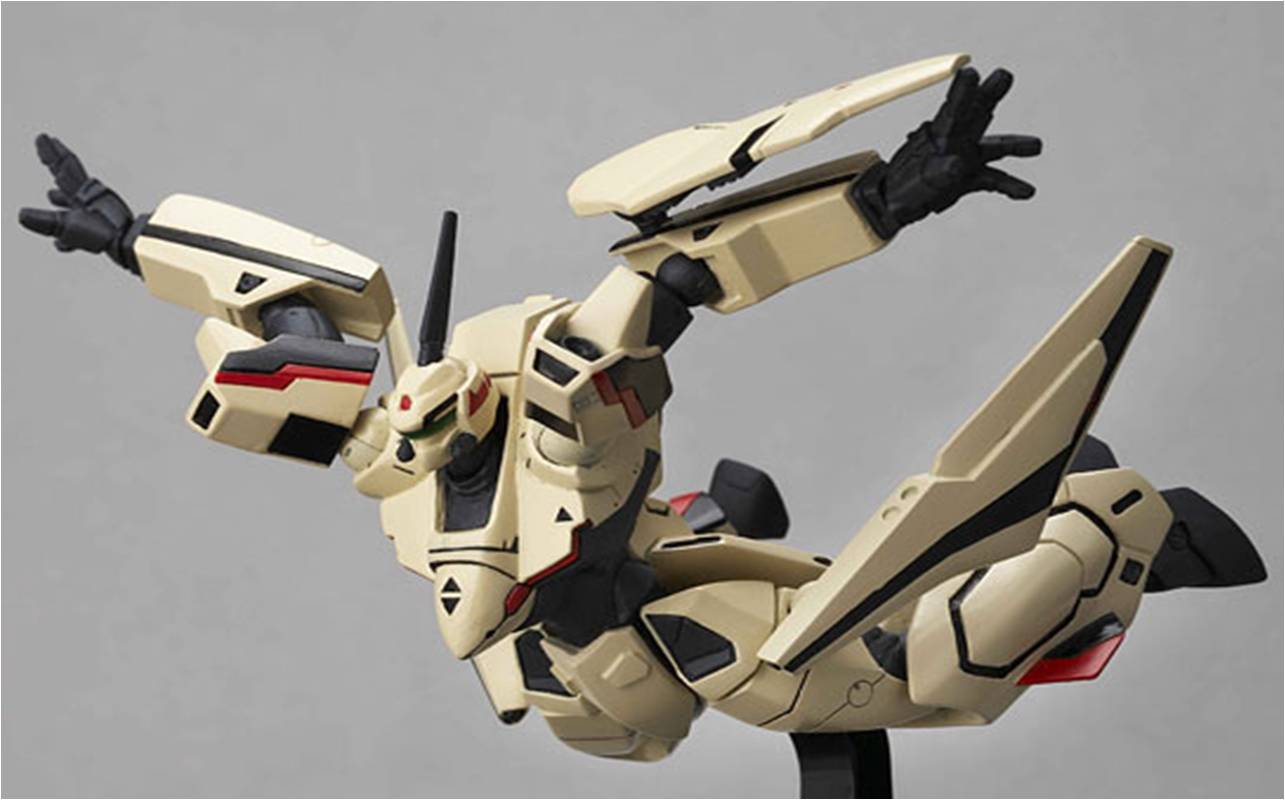
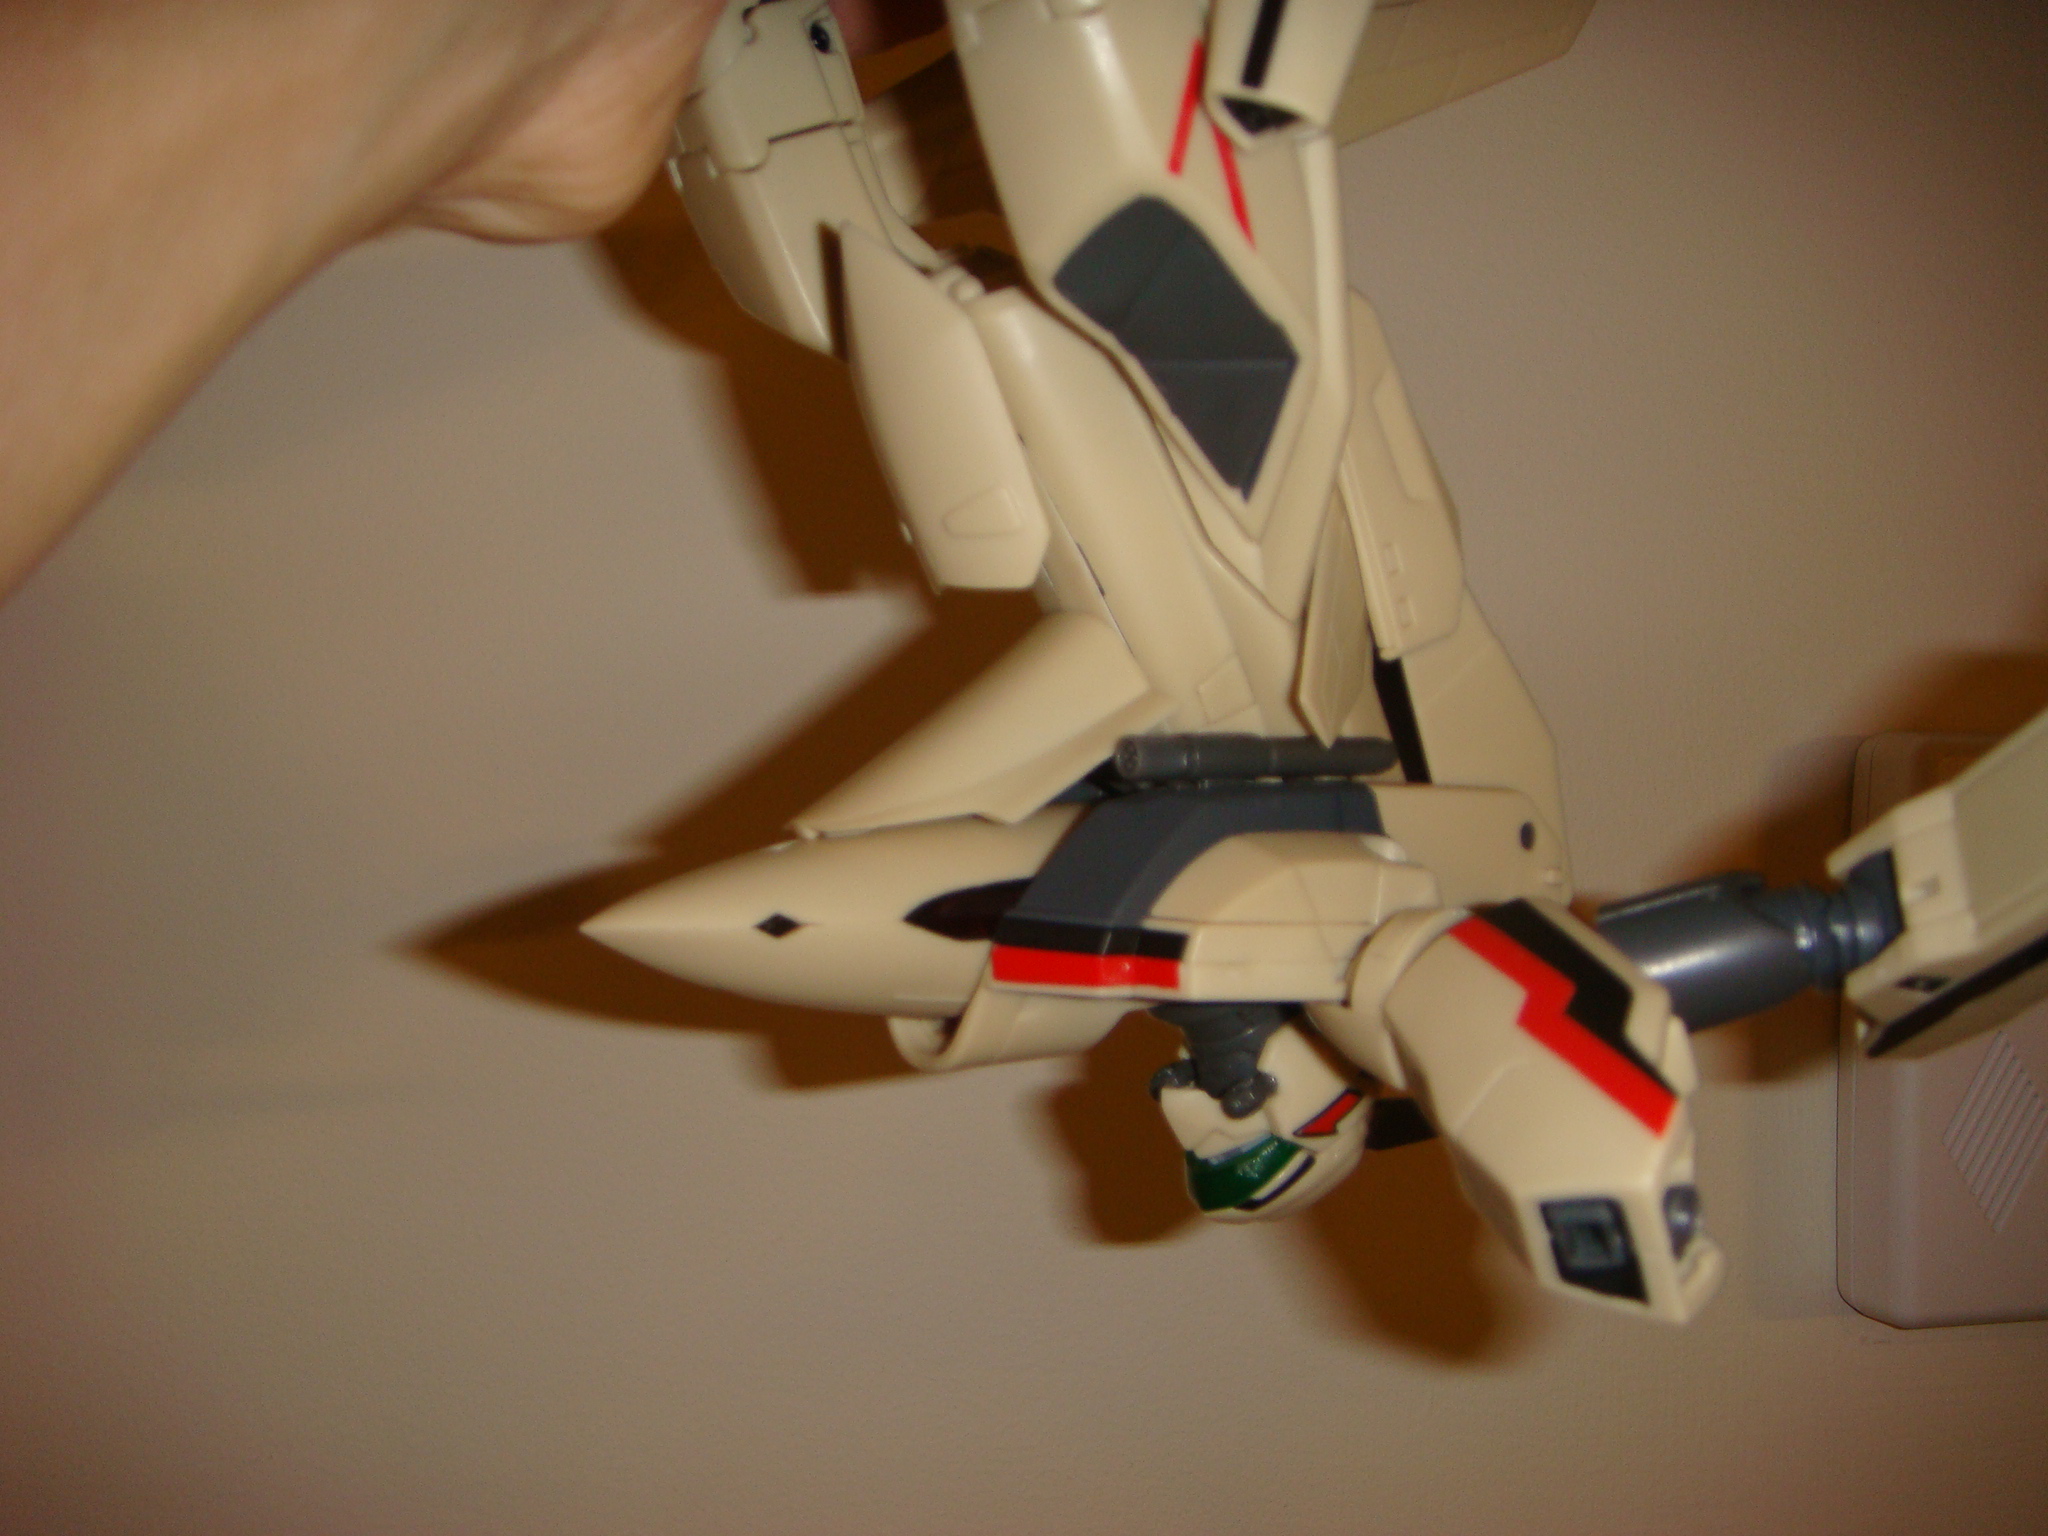
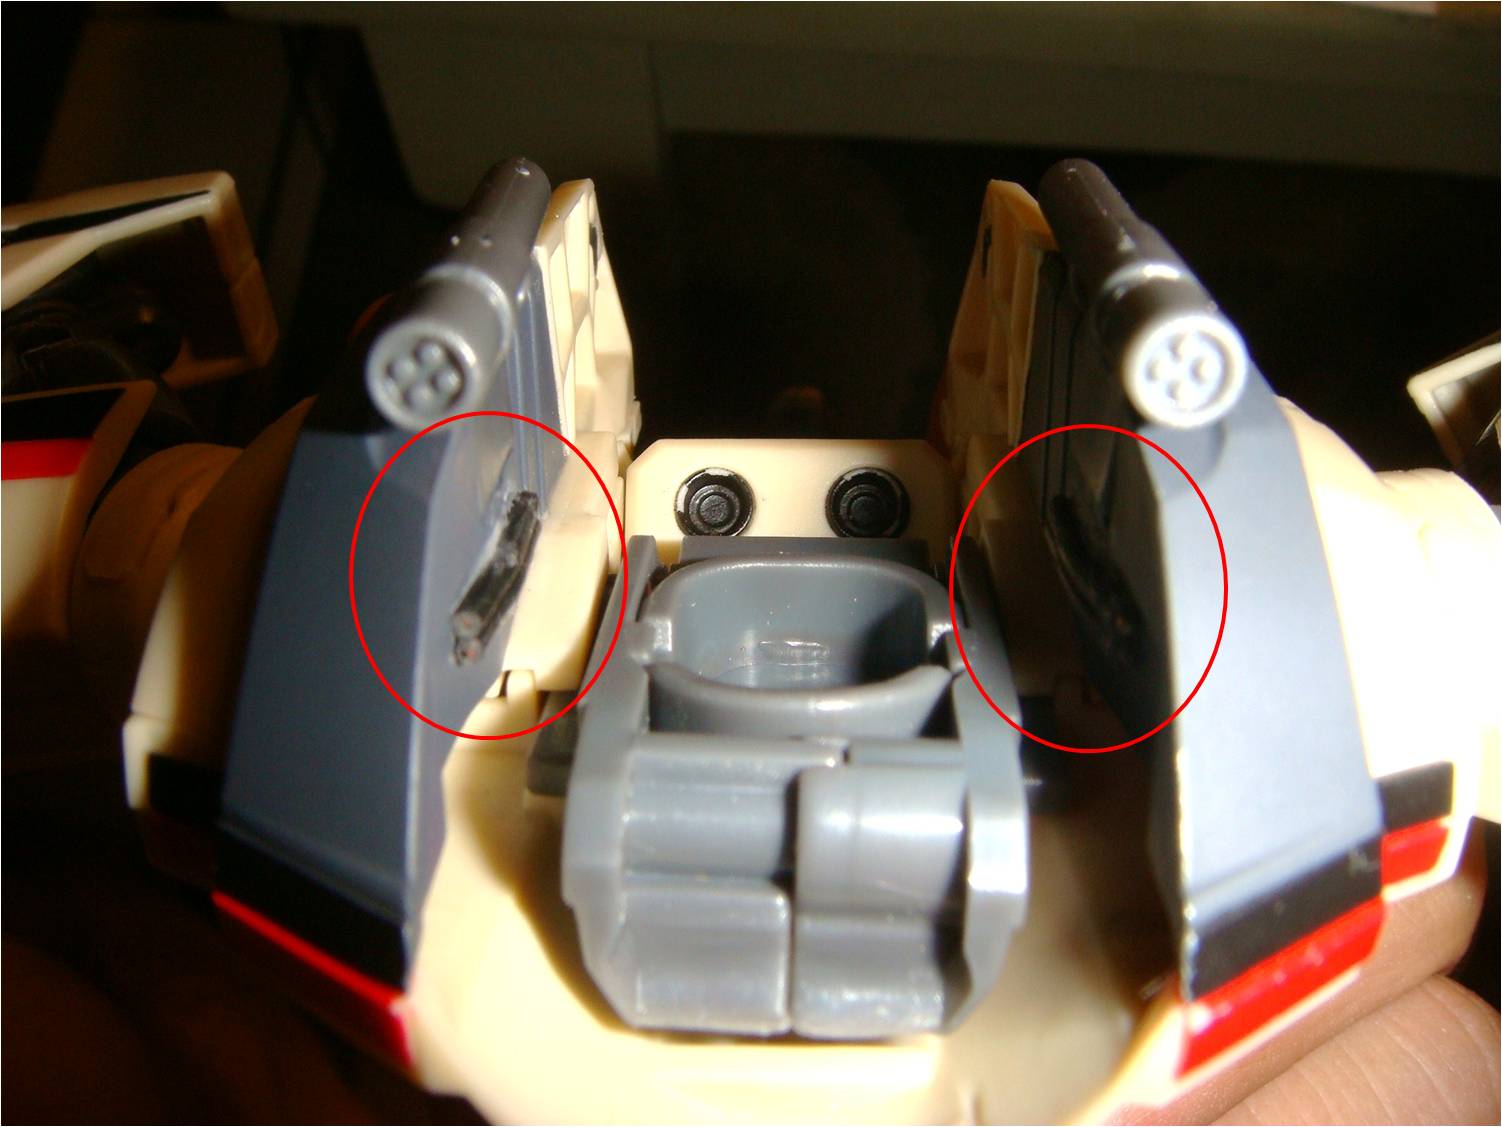
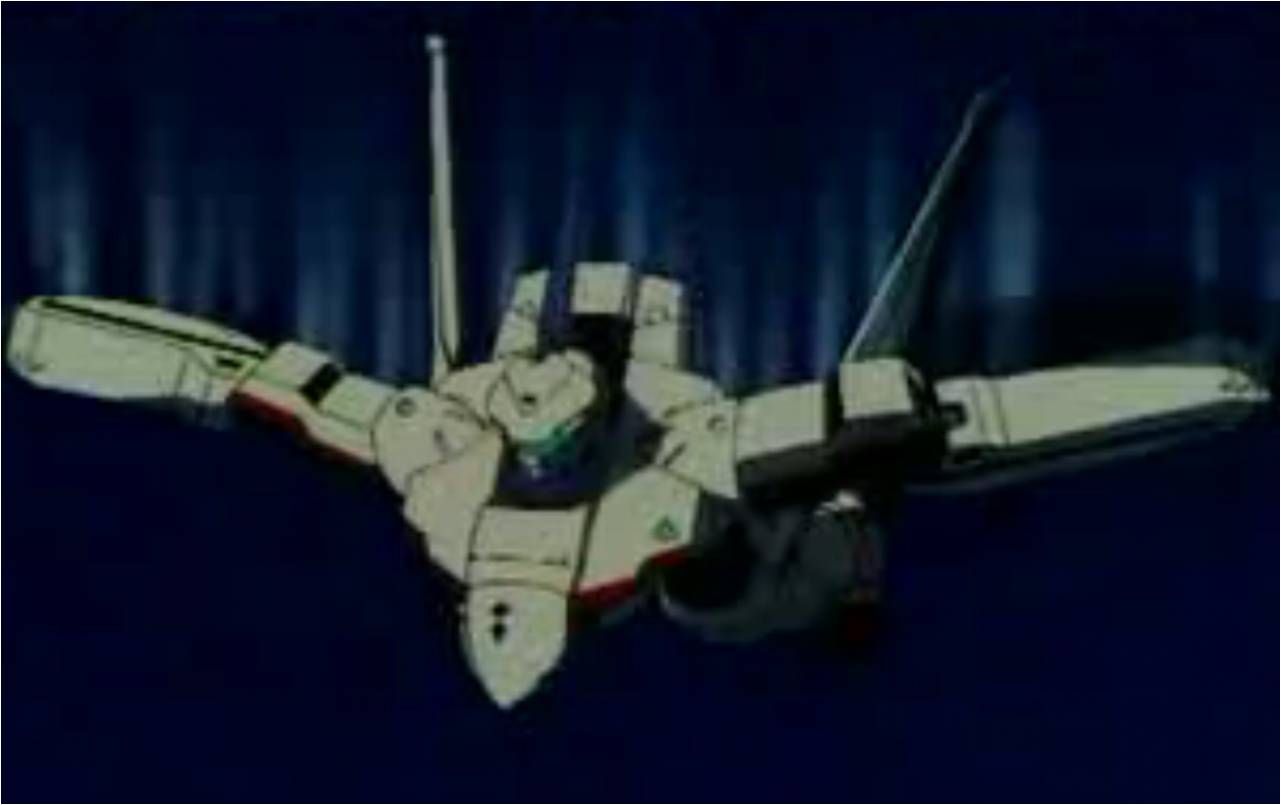
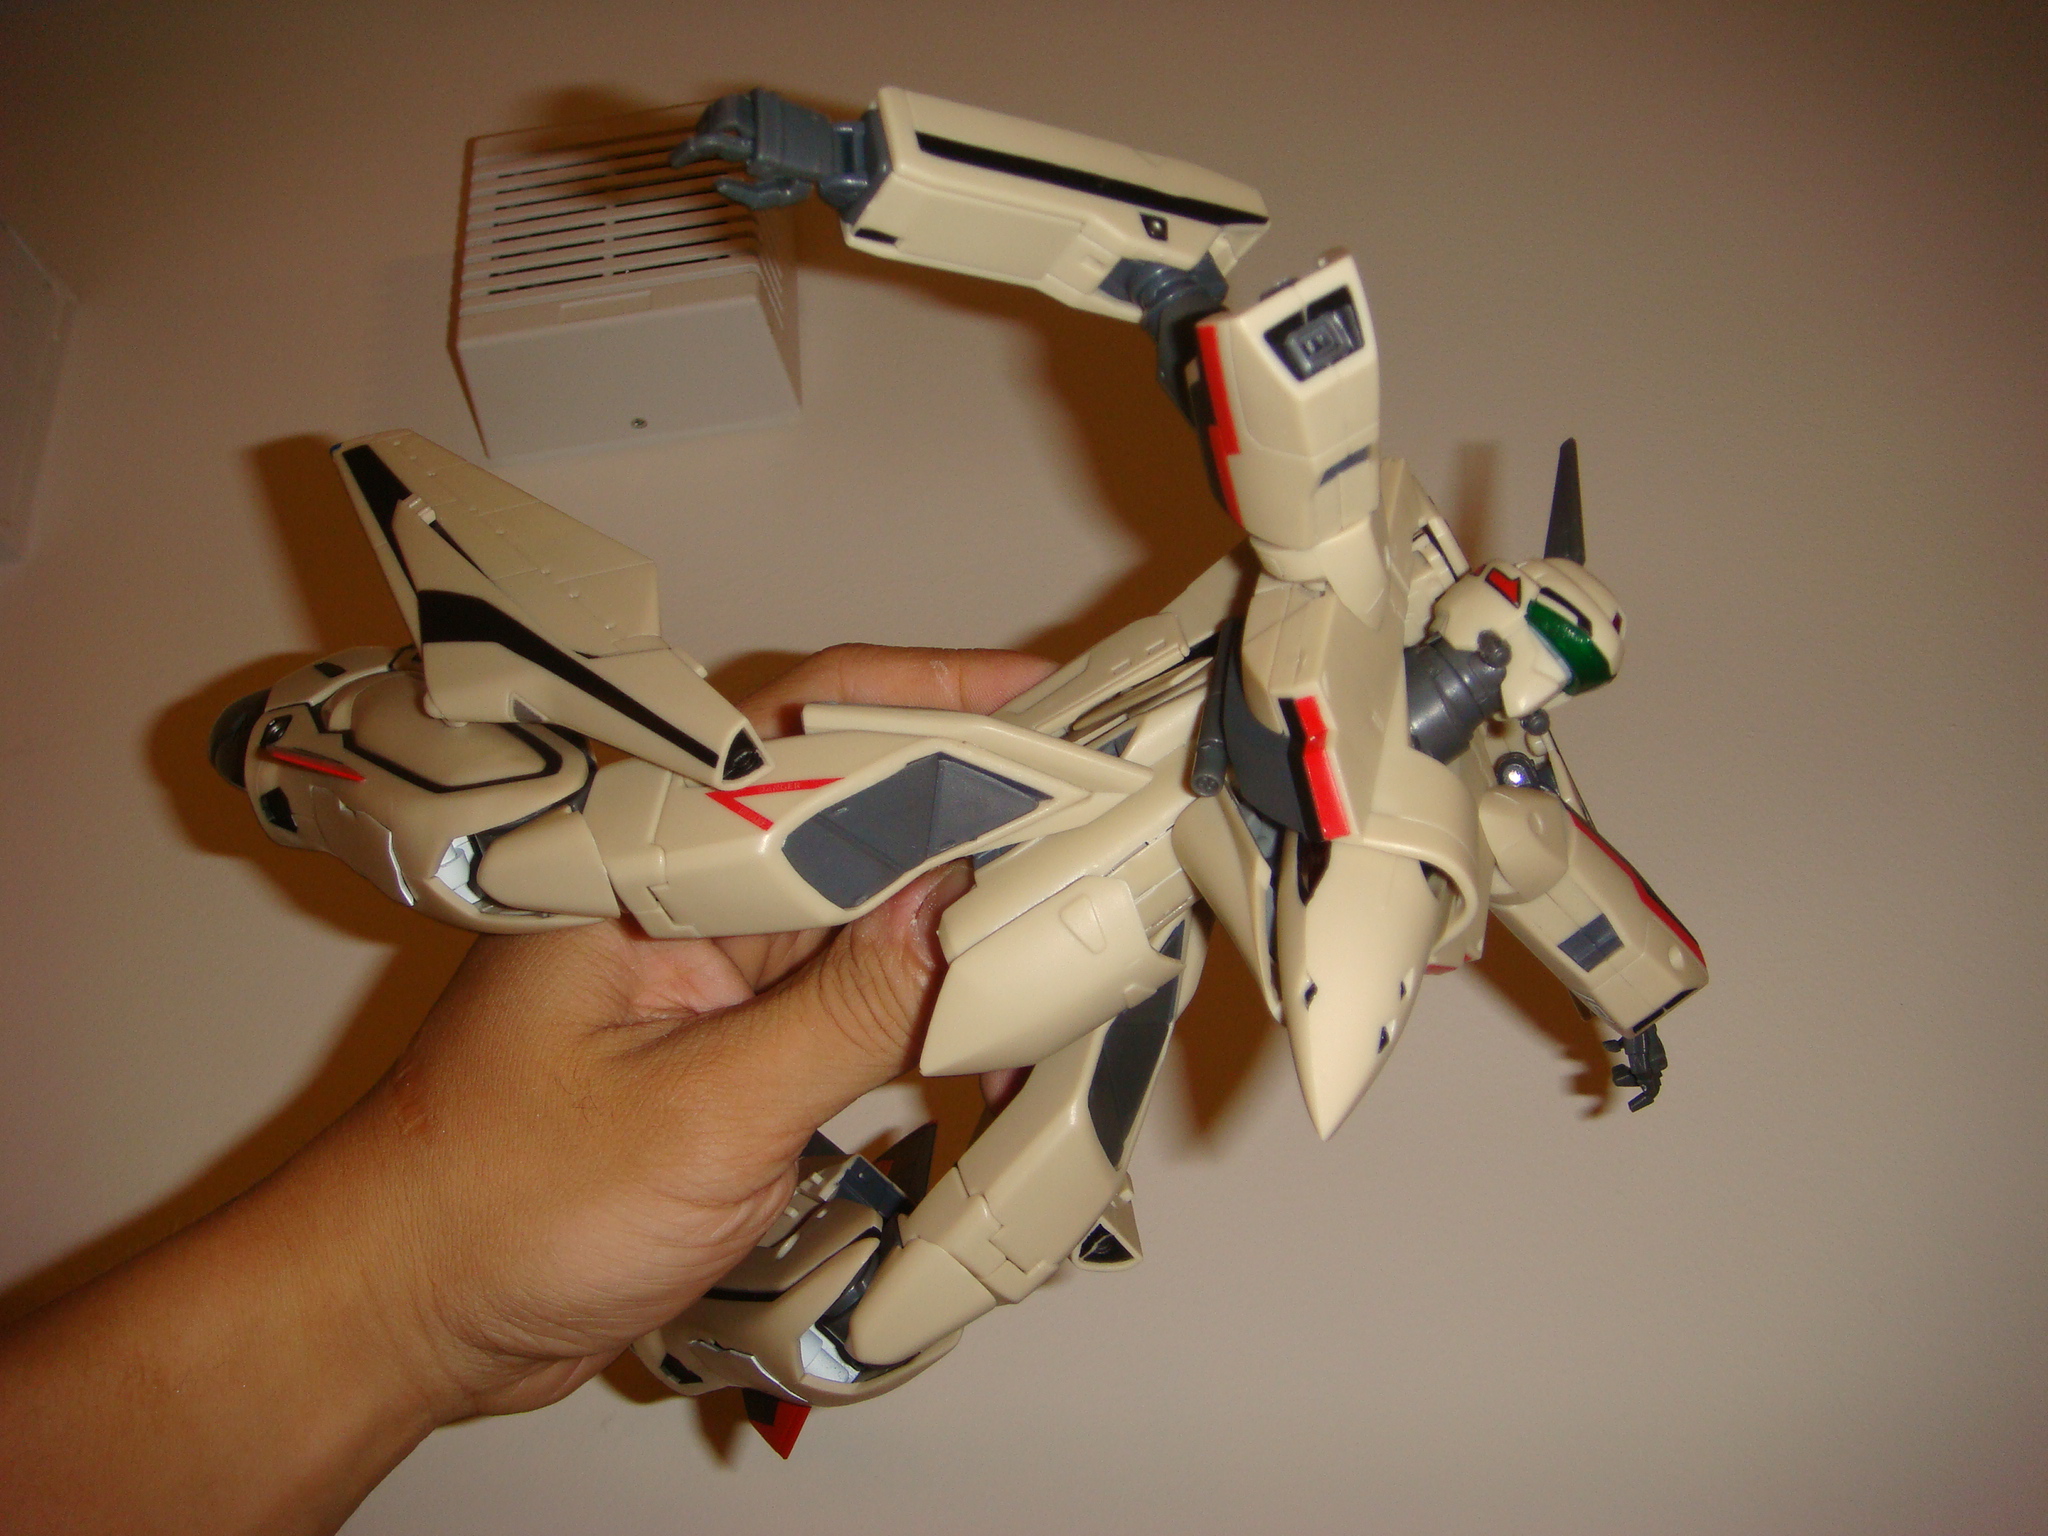
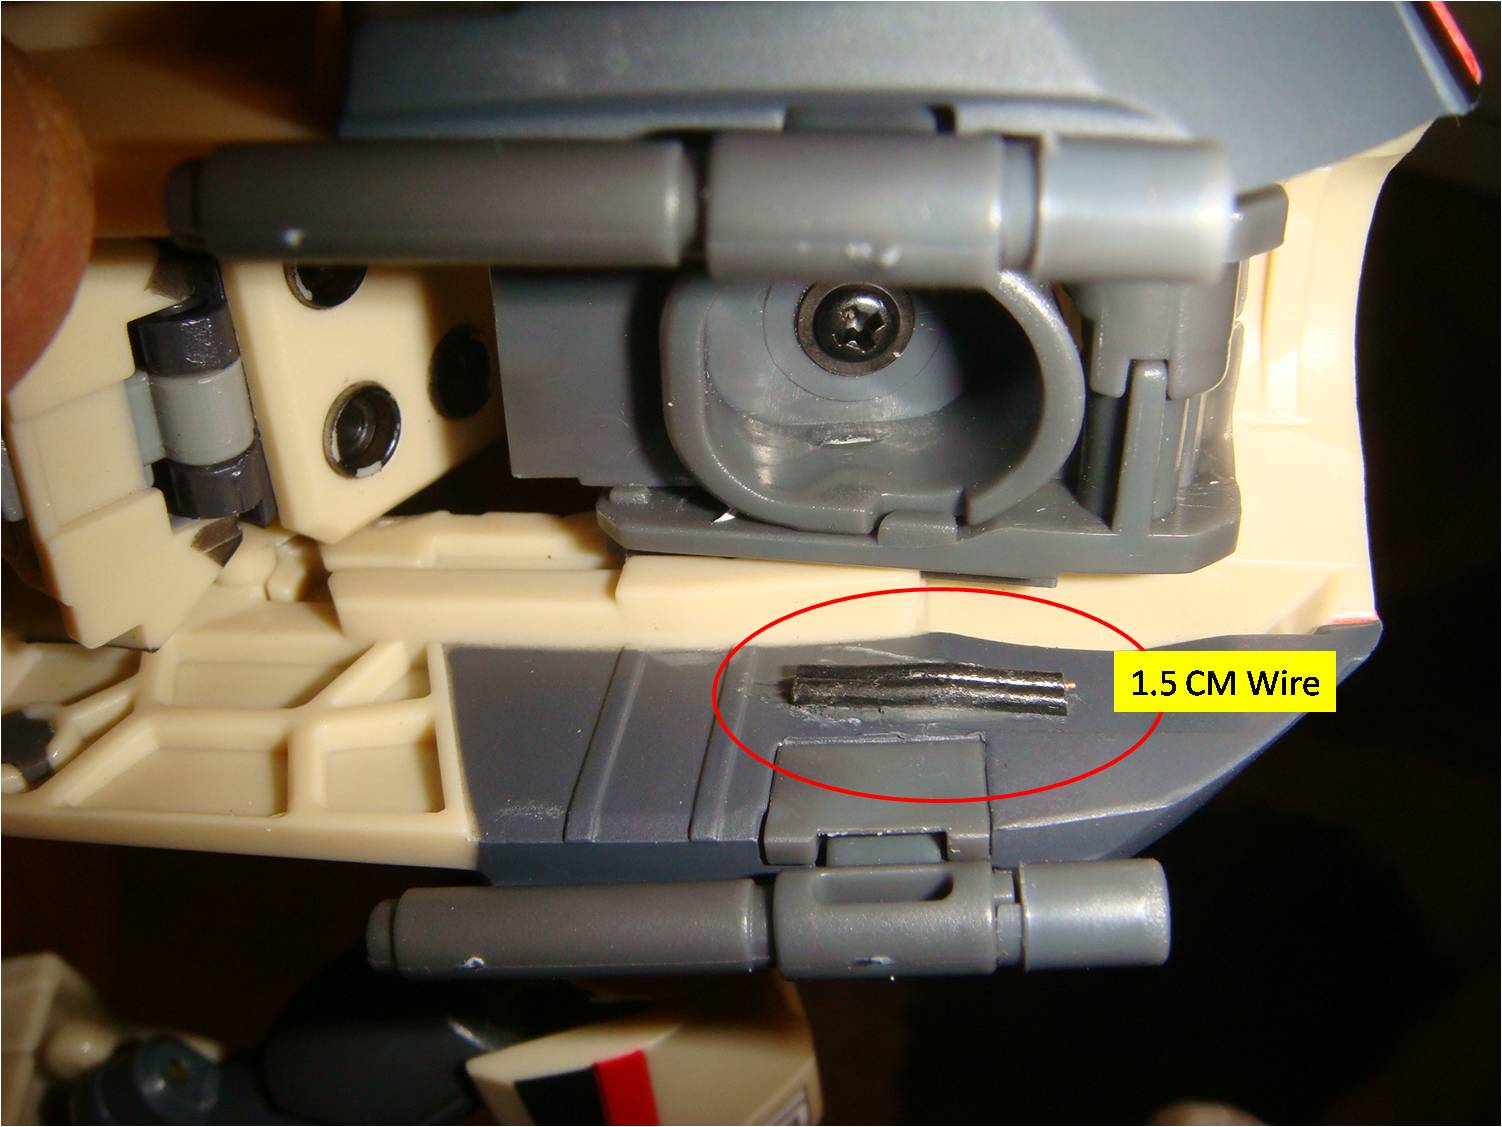
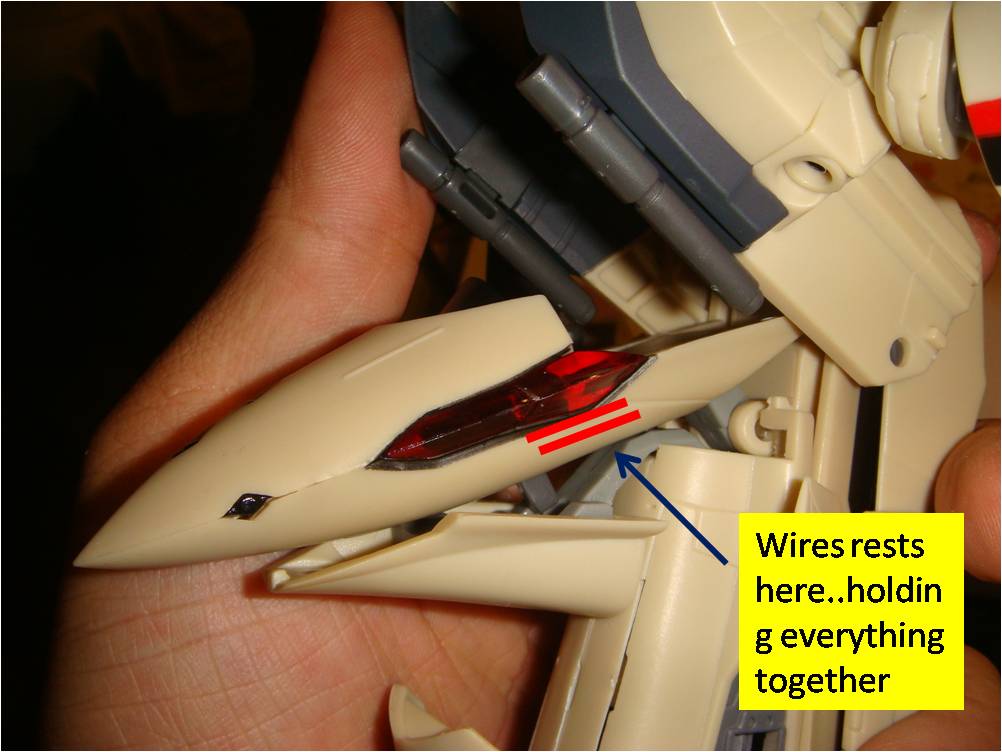
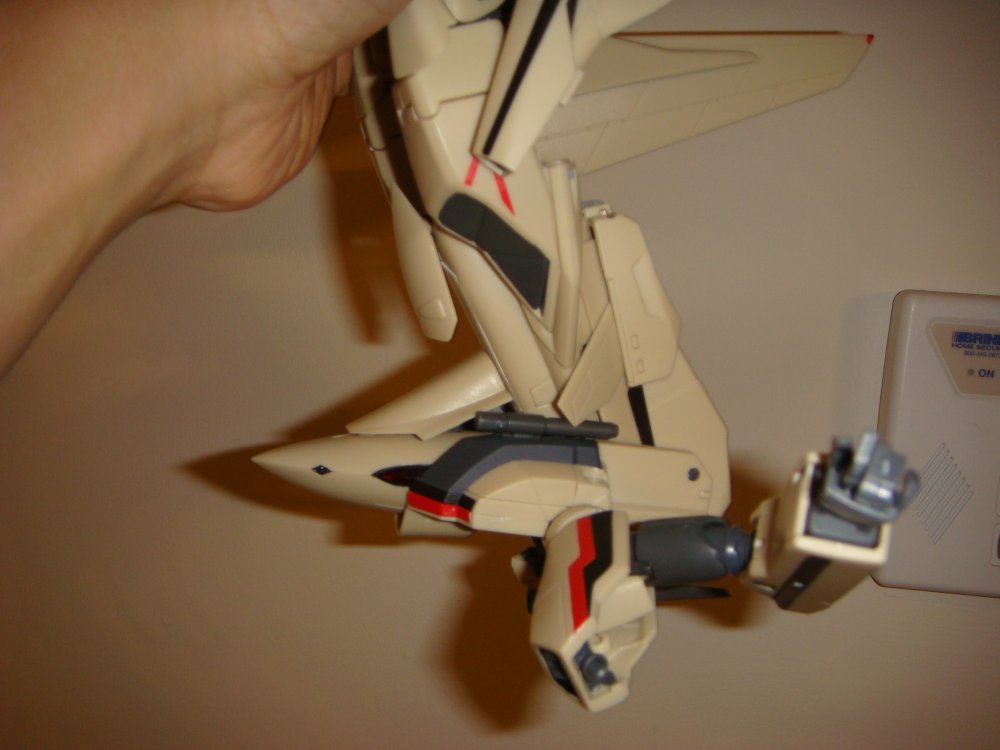
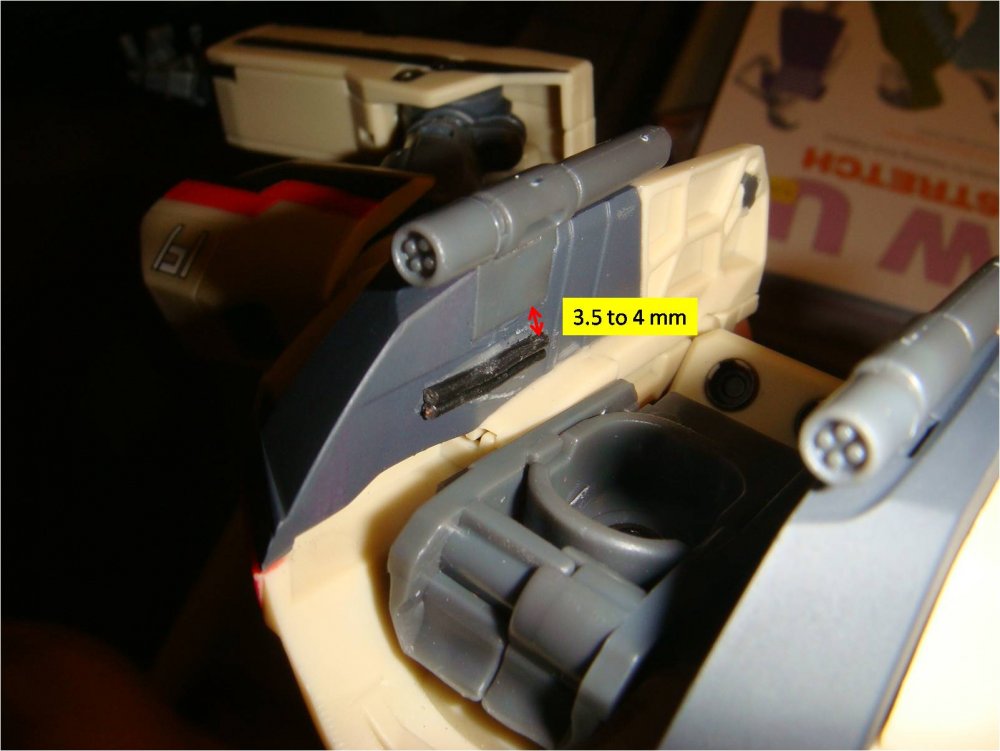
Posted per request from "Wicked Ace" Posted by "Zebu" ________________________________________________________ Howdy, I’m Newbie to this forum, so I would like to contribute to all. As you could've guessed from the title, this is about chest locking fix mod (possibly… you will be the judge of that). I've always been the fan of YF-19 and love 1/60 Yamato version. However, I also been extremely frustrated with the landing gear, gunpod, and chest locking issues it comes with it. After doing some researching on this forum and learning a lot, I decided to do my own mod for chest lock. Unlike the GERWALK Mod out there, I did not want to cut nor do any “carving of plastic”. Also one pose I really wanted my YF-19 to do is the free falling pose like the one shown on photo 01. As we all know by now, recently released yf-19 figure (not 1/60) can do this because it is not transforming, action figure (See photo 02). Now let’s get to the point here. Check out my photo 03 and see if you think I've came close. Now photo 4 and 5 is showing me holding the YF-19 by its leg and upside down (Without any mod, you all know what happens ). How did I do it? To do this you need, following supplies 1. super glue (don't be scared, you cannot see any glued parts from exterior view of the model as you can see) 2. wires (American wire gauge size 24, it is about the same size as little wires inside of your ethernet cable) 3. wire cutter and forceps (though not required) That is it. Obviously, the concept is to place the wire to aid the chest to lock. I decided to use wire because it easily mold to any curved surface, and the rubber covering give the necessary "softness" and do not cause any "grinding" of plastic parts. Photo 06 shows where the wires go. Cut about 1.5 cm of wires (I've used 2 rows to ensure it secures the chest tightly) and glued it just below the base of chest cannon plate as shown. Photo 06 should give you precise locations I am talking about. Photo 07 is shown from another view and with approximate distance from the cheat cannon base plate (3.5 - 4 mm below). Photo 08 shows what it looks like once is completed (frontal view) Finally, photo 09 explains the concept again. The wires are not pressing against the side of nose cone; rather, it is gripping the nose cone just below the radar sensors (shown as red lines in photo 08). Few advantages for this mod 1. Easy to do (once I figured out the correct reference and distance, it took me less than 5 minutes to complete the mod) 2. It does not interferes with any other mode (in fact, it hold the chest little tighter in GERWALK mode which is added bonus) 3. unless you flip the model and expose the location to show that you have glued these wires, these wires do not show in any views (people will never know if you ever did any mod to it) 4. If you do not like the mod and remove the wires or need to adjust the wires, it can be done with ease... also since wires are out of the sights, so are the glue marks. Few disadvantages 1. The reference points and distance of the wires must be exact in order to make the chest lock tight. 2. you are using glue so... it can be messy (again, you can't see them though) 3. this does not lock the bottom of nose cone (I am working on it) Try it.. I am completely satisfied with the result. Zebu


-
nope, after 20 stright transformations, no marks.. Any pressures that may placed on the nose cone are seemingly being absorbed by the rubber around the wires. zebu
-
Howdy, I’m Newbie to this forum, so I would like to contribute to all. As you could've guessed from the title, this is about chest locking fix mod (possibly… you will be the judge of that). I've always been the fan of YF-19 and love 1/60 Yamato version. However, I also been extremely frustrated with the landing gear, gunpod, and chest locking issues it comes with it. After doing some researching on this forum and learning a lot, I decided to do my own mod for chest lock. Unlike the GERWALK Mod out there, I did not want to cut nor do any “carving of plastic”. Also one pose I really wanted my YF-19 to do is the free falling pose like the one shown on photo 01. As we all know by now, recently released yf-19 figure (not 1/60) can do this because it is not transforming, action figure (See photo 02). Now let’s get to the point here. Check out my photo 03 and see if you think I've came close. Now photo 4 and 5 is showing me holding the YF-19 by its leg and upside down (Without any mod, you all know what happens ). How did I do it? To do this you need, following supplies 1. super glue (don't be scared, you cannot see any glued parts from exterior view of the model as you can see) 2. wires (American wire gauge size 24, it is about the same size as little wires inside of your ethernet cable) 3. wire cutter and forceps (though not required) That is it. Obviously, the concept is to place the wire to aid the chest to lock. I decided to use wire because it easily mold to any curved surface, and the rubber covering give the necessary "softness" and do not cause any "grinding" of plastic parts. Photo 06 shows where the wires go. Cut about 1.5 cm of wires (I've used 2 rows to ensure it secures the chest tightly) and glued it just below the base of chest cannon plate as shown. Photo 06 should give you precise locations I am talking about. Photo 07 is shown from another view and with approximate distance from the cheat cannon base plate (3.5 - 4 mm below). Photo 08 shows what it looks like once is completed (frontal view) Finally, photo 09 explains the concept again. The wires are not pressing against the side of nose cone; rather, it is gripping the nose cone just below the radar sensors (shown as red lines in photo 08). Few advantages for this mod 1. Easy to do (once I figured out the correct reference and distance, it took me less than 5 minutes to complete the mod) 2. It does not interferes with any other mode (in fact, it hold the chest little tighter in GERWALK mode which is added bonus) 3. unless you flip the model and expose the location to show that you have glued these wires, these wires do not show in any views (people will never know if you ever did any mod to it) 4. If you do not like the mod and remove the wires or need to adjust the wires, it can be done with ease... also since wires are out of the sights, so are the glue marks. Few disadvantages 1. The reference points and distance of the wires must be exact in order to make the chest lock tight. 2. you are using glue so... it can be messy (again, you can't see them though) 3. this does not lock the bottom of nose cone (I am working on it) Try it.. I am completely satisfied with the result. Zebu