wmkjr
-
Posts
3029 -
Joined
-
Last visited
Content Type
Profiles
Forums
Events
Gallery
Everything posted by wmkjr
-
http://www.macrossworld.com/mwf/index.php?showtopic=36541. It's a good read.
-
That lighting and metallic finish makes it pop!
-
Macross World Podcast - feedback & comments
wmkjr replied to Tochiro's topic in Movies and TV Series
Just finished listening to Episode 21. Great job guys! Haha! I remember those dollar bins at Jelly's buying whole series for the cheap! -
@ derex nice diamond! I don't have a Detolf but just got a teak curio display. I can currently fit 7 VF-1's on a Yetistand that takes up a little over half a shelf . 4 is doable. @ Saburo what type of adapter is that? The 5mm peg?
-
From the album: Yetistand
-
1/48+fp's, 1/60+fp's, 1/72, 1/2k, 1/3k,1/100 and now 1/144
wmkjr replied to VF-18S Hornet's topic in Toys
Pretty cool! -
You should check out the 1/100 Toynami thread in this section for more info on this line.
-
Your most recent Macross or toy purchase! General thread.
wmkjr replied to Gakken85's topic in Hall Of The Super Topics
Nice hauls everyone! -
It is nowadays if it's the weathered version set like it's listed and Arcadia ain't releasing sets to satisfy our demands for the regular S/S parts. The parts set alone must be around 18000 yen last check. Nice grabs at the expo and con.
-
Hmm, 19440 yen. Will have to think about this one.
-
Your most recent Macross or toy purchase! General thread.
wmkjr replied to Gakken85's topic in Hall Of The Super Topics
Nothing too spectacular. Might go with a MtF VF-1J and dunno if I can do it but either a VF-1X++ early version or later version for the other. As for the VF-1S, might do a low viz (since I don't have one) and the other one will leave for later. -
Very nice!
-
Your most recent Macross or toy purchase! General thread.
wmkjr replied to Gakken85's topic in Hall Of The Super Topics
Will do! -
Your most recent Macross or toy purchase! General thread.
wmkjr replied to Gakken85's topic in Hall Of The Super Topics
Thanks to lechuck and Froy I can try giving these customs a go.
-
Strange. I just ordered a Macross the ride visual book via Amazon Japan no problem with my US account. Shipped super fast too. Also got to place this preorder.
-
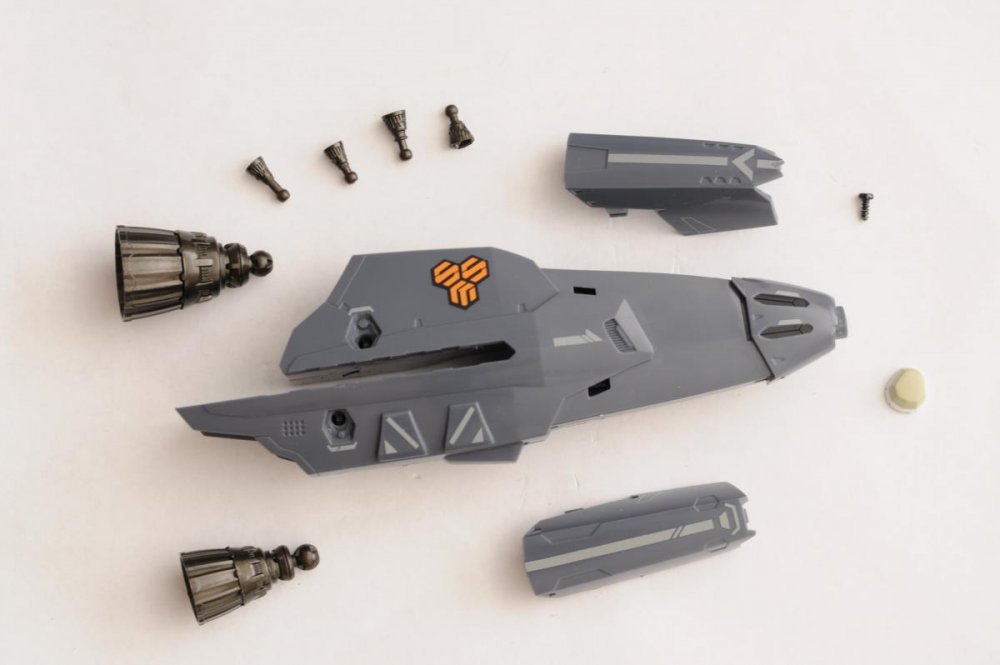
This is as far as I dare go. It's missing a thruster as I broke it while pulling it out. Didn't need it anyway. Locations for where I think are Cover plates for the screws on the other side. Cover plates (guessing):

-
This is only my guess but there are 3 screws that need to be taken out. The front half of the booster has two cover plates that can come off exposing one screw. The front tip can be removed by carefully using a exacto knife to help pry it out. The next two screws are guesstimates as I couldn't get to them as they are hidden behind two cover plates and might be glued. I'm basing my guess while prying the front a little I could see spots where two screws should be to connect both halves of the booster. They are both on the inner facing side of the boosters. One is on the bottom rear most trapezoid with the two white stripes you can tell because it is the only one that looks like it has a gap. The other one is a small trapeziod shape as it is the only one there. Hope this helps or if anyone figures out how to get to those two out please show us. Or if you're talking about the smaller thrusters, you can use a needle nose plier and slowly pull them out and avoid all the headache of getting the boosters apart.
-
This is a pretty cool project you got going on here. You should put this in the workshop section too.
-
Count me in for one.
-
That looks like the prototype on display at a store (Volks Hobby Heaven 5th floor?) not the final colored ones shown at Wonderfest. Here is the same one:
-
Does this actually provide materials and instruct you in the assembly or does it just goes into detail of a 1/2400 papercraft model that they built instead?
-
NIce and clean with those stands!
-
1/48+fp's, 1/60+fp's, 1/72, 1/2k, 1/3k,1/100 and now 1/144
wmkjr replied to VF-18S Hornet's topic in Toys
That was my big white boom stick. Here is my crayola paint brush special! lol... -
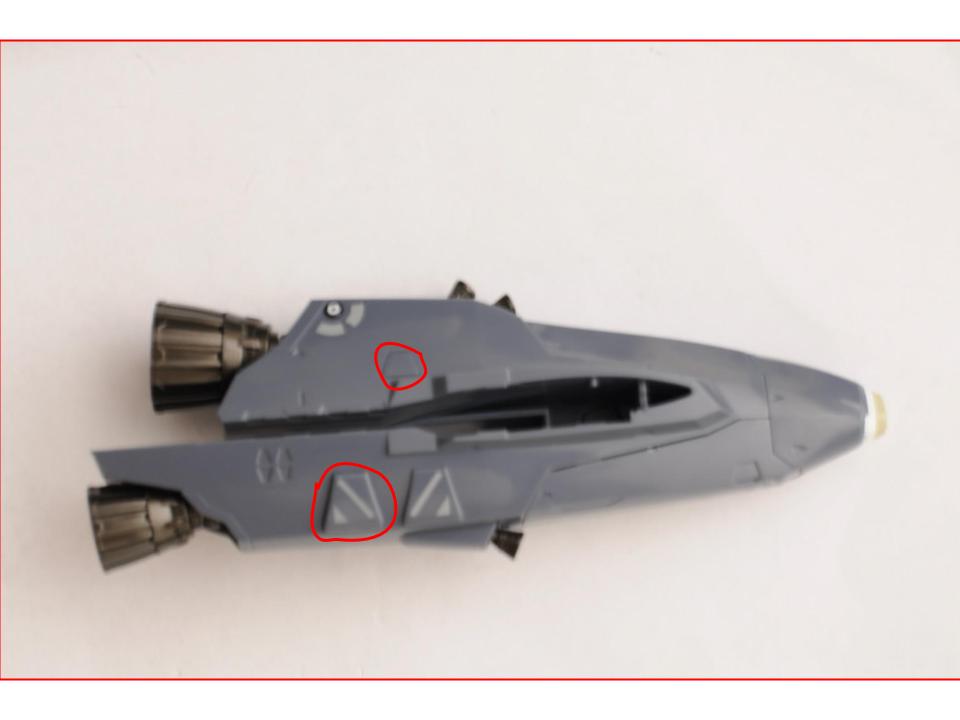
Those are screw hole area minus covers. Wouldn't make any sense to have a triangle that hides the rear knee joint in fighter but have three big holes on each leg for all to see. I hope they can release the armor set in the near future.
-
Ooh nice! Thank you!