

captain america
-
Posts
3563 -
Joined
-
Last visited
Content Type
Profiles
Forums
Events
Gallery
Everything posted by captain america
-
I haven't determined a specific time, but yes, Paypal is fine. Looks like there may be more demand than slots available, which is reassuring and preferable, since from experience, actual orders are always a bit lower than expressed interest. I call it market deviation
-
One week left til crunch day. Also, take notice that if/when I do take down-payments it'll be on an impartial first come, first served basis until the 20 slots are filled
-

Bandai 1/48 Scale Macross Frontier Model Kit Thread
captain america replied to azrael's topic in Model kits
Given Bandai's predictable marketing nature, it wouldn't be a static display model, but likely a PG grade, as some of us have surmised.My guess is that the photo is of a quick stereolithography mock-up that they put out to gauge public reception. -
The mock-up of the VF-25 in that pic doesn't look variable to me, but in as much as Bandai doesn't make pure model kits, the final product likely would transform. Is the 1/48 actually a confirmed release, or just a demo prototype?
-
Don't thank me just yet, we still have a few slots to fill Note to self: don't give stroke to customers... Oh, and if we do manage to get this donut rolling, I'll see if I can throw-in a pleasant surprise with the kit.
-
The kit'll be ready in about 3-4 days. Just kidding! Most likely early-mid July.
-
Yes, mega-spendy actually. It will require a LOT of resin, and the pricier type that cures very slowly too, which reduces turn-around time three-fold; combine that with the extra time it'll take to make jigs and inserts, it all adds up labor-wise.My mom says I'm worth it... But then again, she never bought any of my kits, so I have to wonder sometimes
-
Hi guys. Well a few people have asked for it, so here is the next project proposal, a 1/72 Tacticar Pod Graug. What do I foresee? A realistically-scaled Graug, complete with detailed cockpit and a seated Quamzin figure. How big would this sucker be? VERY big! Like 36cm tall, about 24cm deep, and almost 20cm wide... So big it almost needs its own zip code. It will also likely be quite an engineering challenge, requiring big honkin' metal screws, metal inserts, as well as the use of some extra tough polymers to combat sagging. As such, this will be a very labor and materials-intensive project, so I would limit the run to 20 kits. The damage? $390 with a mandatory deposit of $100 per kit ordered. The deposit would not be refundable, but would be transferable, should you decide to opt-out. Anyhoo, I will let this thread run until the 25th, at which point I will assess the matter and see if we have enough interested people to get a green light, so if it's a go, I would start collecting deposits the week of the 25th. As always, I'll do my best to answer questions if you have any
-
Holy guacamole, that chopper looks awesome! Love the camo paint scheme too, can't wait to see her done!
-
A valkyrie paint, should be opaque or should gloss????
captain america replied to akt_m's topic in Model kits
The YF-19 wasn't an in-service fighter, it was a prototype. Lots of experimental or prototype aircraft have semi-gloss or full-on gloss paint schemes. As mentioned above, most military aircraft start out in matt or satin finish, and end up a tad shinier in ceratain areas as a result of friction with the air, and also due to maintenance & cleaning. You can test this yourself by spraying a sheet of plastic or metal with a matt paint, and then just by rubbing it a few times with a cloth, you end up burnishing it. If you do that often enough, you can start to get quite a shine going. On a real fighter, it creates quite a visually-interesting texture/patina. So to answer the question of what kind of finish these aircraft have, I would say that it's generally matt, but with certain areas being almost semi-gloss, like the leading edges of wings and parts of the aircraft that are accessed/walked on frequently for maintenance. -
Whats Lying on your Workbench MKIII
captain america replied to HWR MKII's topic in Hall Of The Super Topics
Maybe one day I'll finish the 1/32 Legioss I started way back when. The micro-machines Legioss & Tread were made to accompany this sucker here...
-
Whats Lying on your Workbench MKIII
captain america replied to HWR MKII's topic in Hall Of The Super Topics
I've been rather busy with things myself, namely scratchbuilding an interlinking Legioss & Tread... ...In 1/350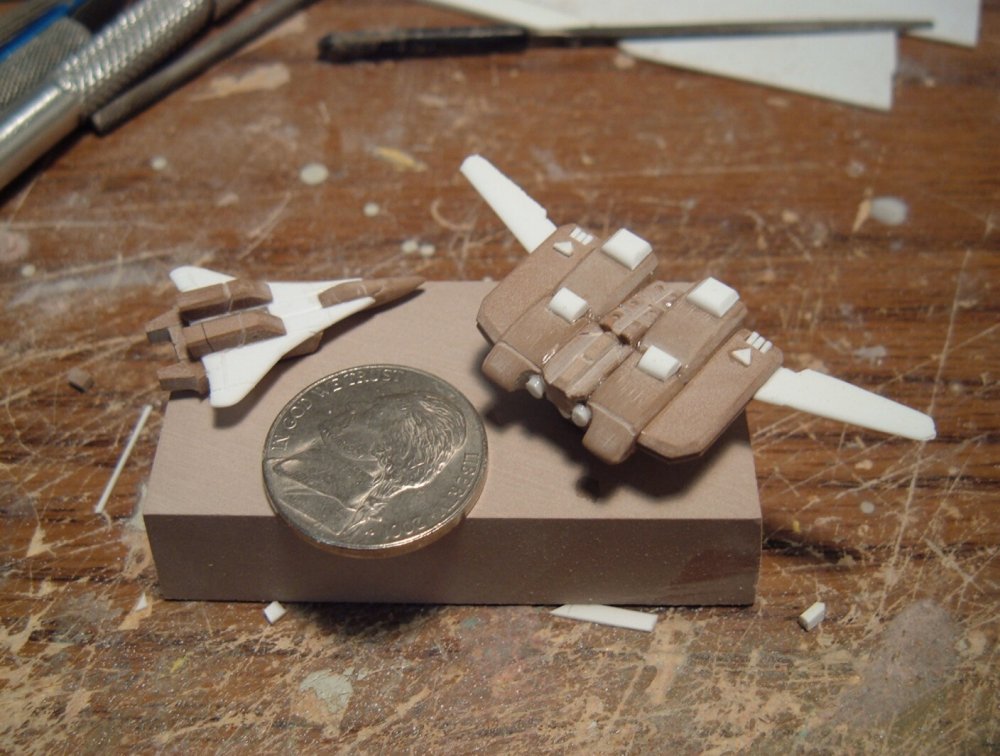
-
Battlestar Galactica Discussion III
captain america replied to kaiotheforsaken's topic in Hall Of The Super Topics
Best. Ending. Ever. -
Proportionally, the Grimlock sculpt is a home-run in my eyes, but the size is killing me. I would gladly have paid $200 if they had made Grimmy as tall as Prime in robot mode. Oh well, I guess they don't want my money that badly.
-
I freaking love it!! I'll have to build my own kit eventually, just out of pure jealousy! Ruben, I tip my hat to you, you make my models shine! P.S: be honest, now. Did you saw off the missiles and make your own with styrene?
-
Yup, that was mine. It was closer to 80% complete... Back then anyway.
-
1/35 Monster custom-made one-off? Sure, I'll do it. You picking up the tab? I'll probably revive the 1/32 Legioss before I get around to that though.
-
There are limitations and problems associated with making something like a 1/60 Monster out of PU resin, and to me, that simply wouldn't be practical. If you cast large parts solid, the exotherm created by the PU will cook itself in the mold and warp the part; if you cast parts hollow in certain areas and full in others, you end up with assymetrical shrinkage which brings about warpage... And that's not to speak of material sag over time, load-bearing matters and so on and so forth. I say just stick with Mike's 1/72 kit.
-
Sorry about the pour stubs; they really are my Achilles heel. Maybe an overall gunship grey to match what you see in the animation? I might eventually do mine in overall dark grey with a light compass ghost grey underbelly... Airwolf-style
-
The Commanchero project has been wrapped-up almost 2 months ago; the only reason people just recently received theirs was due to my own miscalculation in production & supply. A 1/72 Glaug is in the crosshairs for late March/early April.
-
Hello, my name is Stick Bernard.
captain america replied to Vostok 7's topic in Hall Of The Super Topics
Being somewhat of a grizzled old fart that's followed Mospeada since the 80s, I seem to remember something about TREAD standing for TRans EArth Deployment, or something to that effect. As for "LEGIOSS," I think that "legios" is latin for "link." I don't recall LEGIOSS being an acronym of any kind though. It's been a while since anything Mospeada and I have crossed paths -
Somewhat off-current-topic, does anyone know what a first-release MP-01 Takara Convoy that has been displayed is worth? I tried rummaging through the forums over at TFW2005.com but I couldn't seem to find an answer.
-
Hi guys. Not to worry, all kits have been shipped since mid last week, so it's just a matter of time before they show up at their respective destinations. 500+ kits shipped since 2004, and they never lost one yet Oh, and as for the Glaug, that won't be coming until late March/early April, so as to give everyone who wants one an opportunity to save-up.
-
Onezero has already expedited my canopies, so they should be here in a matter of days. After that, everyone's package will be shipped within 2-3 days at most; all I really have to do is separate the canopies, bag them & slip 'em in the box.
-
Believe it or not, I'm still waiting on the canopies! I'm hoping they weren't lost in transit or something, though it's likely just Canada Post taking their usual sweet time

