captain america
-
Posts
3548 -
Joined
-
Last visited
Content Type
Profiles
Forums
Events
Gallery
Everything posted by captain america
-

The making of a 1/72 Tacticar Pod Graug--the musical!
captain america replied to captain america's topic in Model kits
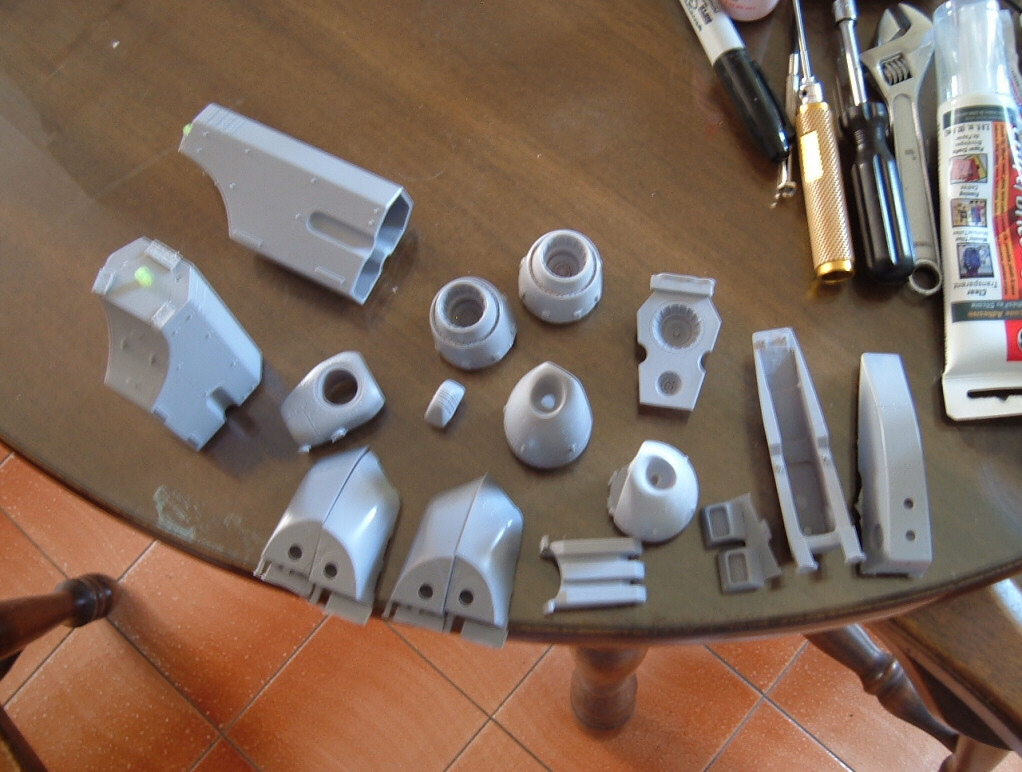
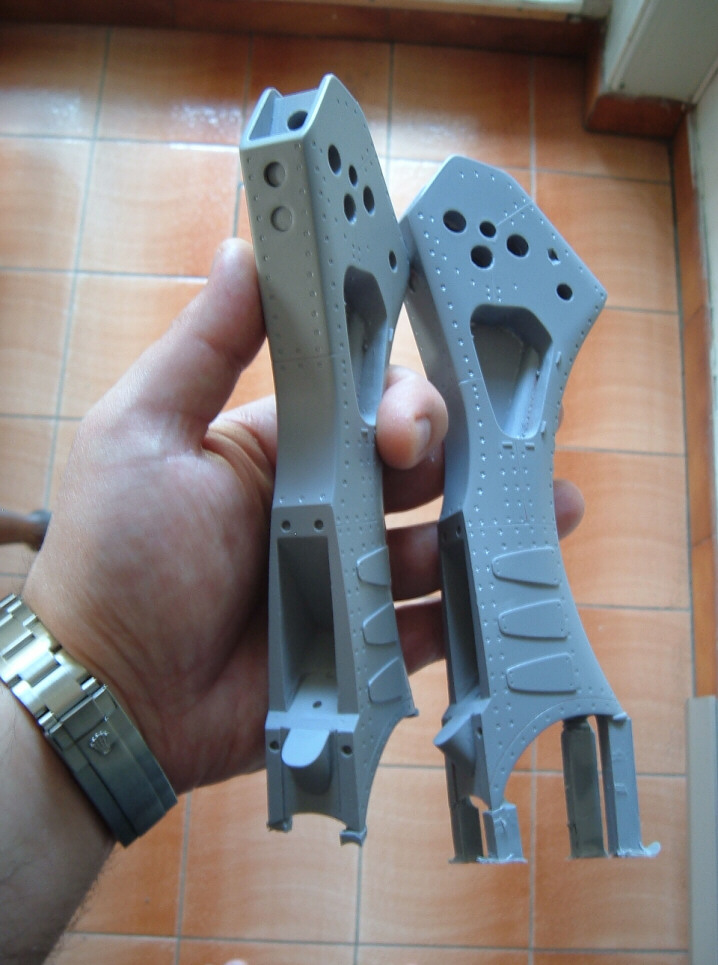
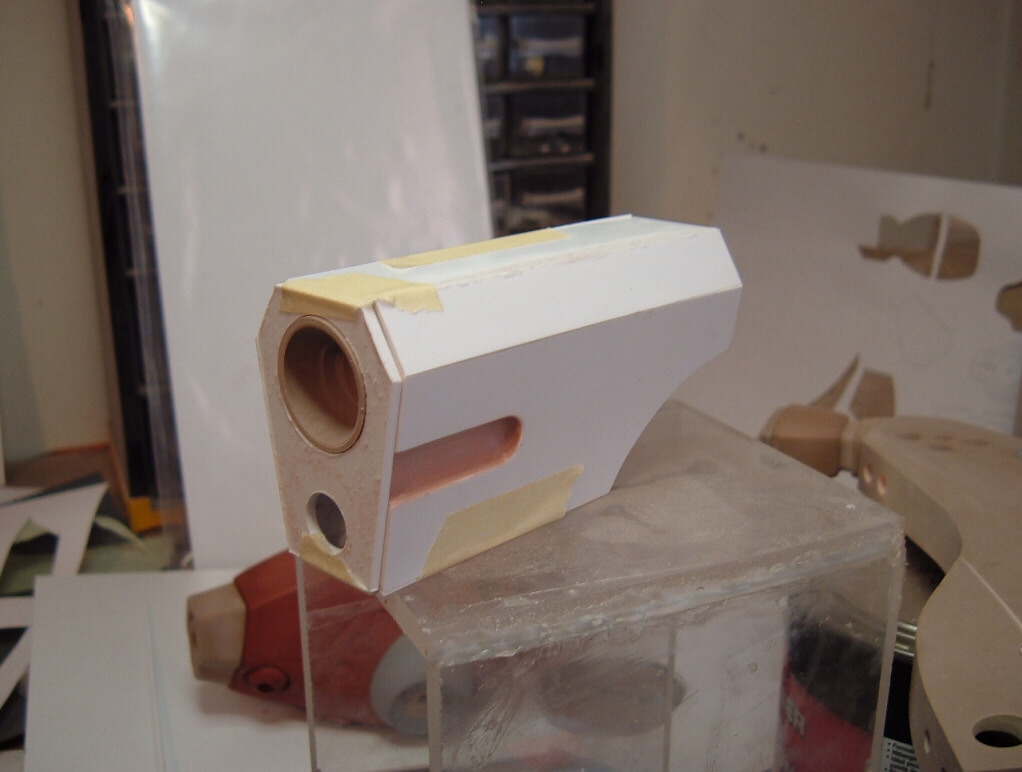
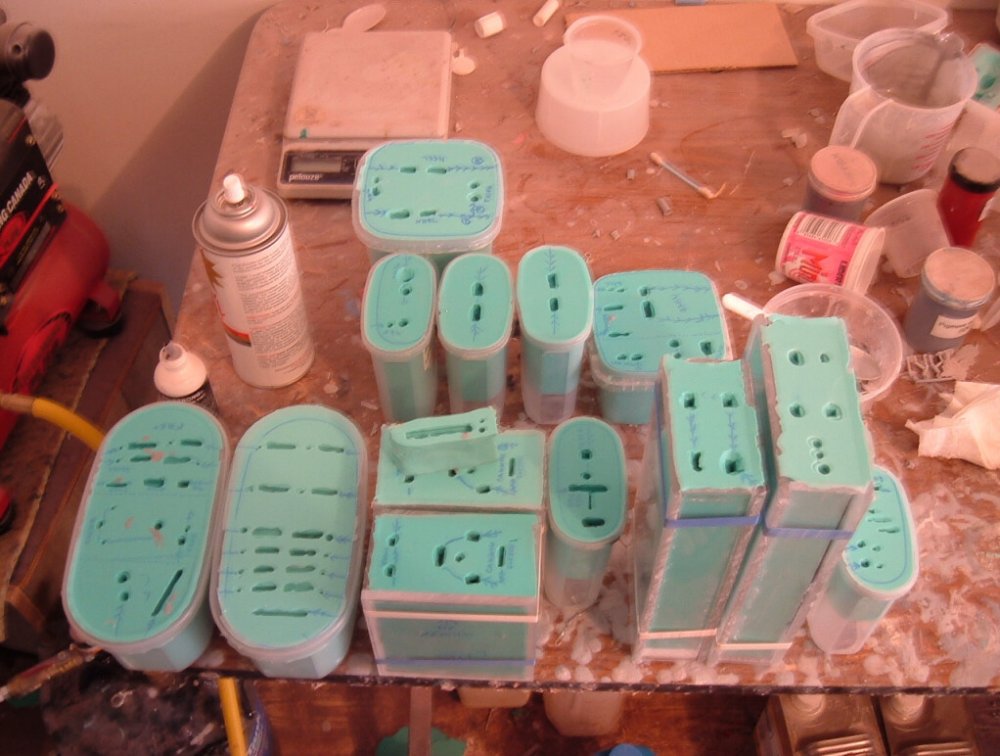
Hi everyone. Guess what? I'm not done yet I'm getting there, though. I can finally see the light at the end of the tunnel... Or is it the headlight of an oncoming train? Regardless, the devil's hands have not been idle and in fact, I was pulling extra hours to get the project to a more comfortable level of completion. This will be a mini-update until my projected completion of the masters, which I should have done by the 7th of this month. Right off the bat, I can say with complete confidence that this has probably been my most elaborate project since my 1/8 Indycars, and certainly the crown-jewel of my Macloss 1/72 line. So what have I been up to, you ask? Molding. Lots of molding. This is one of those rare projects where I felt compelled to start molding before all the masters were complete, simply because of the very high number of molds needed. This also gives me a much-needed break in the routine, and I am now able to concentrate on the cockpit details with my mind at ease. If you look at the first pic, you'll see a part that is being prepped for molding; one of many in a very long process that requires much attention to detail and concentration. As you can see, I begin by attaching the vents and gates to the part with some hot glue: I almost never attach the sprues/gates permanently, as their easy removal is a critical aspect of demolding that greatly facilitates the latter. This particular part (the main engine housing) is also one of many that requires what I call double-filling, due to it having cavities on opposing sides. As such, I must begin by using a small amount of mold rubber to fill one cavity, allow it to harden sufficiently, and then affix the part to the mold base and finish the pouring of the rubber.Roughly half of the parts I've molded so far required this technique, and then needed to be duplicated for the opposite side, which more than doubles my regular molding time. Pic 2: here are the molds I have so far, and as you can see, there are a lot---and I'm not done yet!! I estimate that the whole Graug will have 18-20 molds in total, and what I have so far required about 10-12kg of rubber. In addition, some of the parts (lower legs, cannons, etc) required me to custom-fabricate mold boxes from plexiglass, so that's another job that devours time. Pic 3: here are some preliminary test-shot pieces, which I'm happy to say, came out beautifully! Pic 4: the leg molds were the ones that worried me the most because of their size, the fact that they required a vertical molding, and lots of resin, but I'm happy that the extra time I invested to get them molded properly bore fruit. Notice the massive sprues at the bottom of the leg on the right. Pic 5: this is the left upper-thigh, one of the dozen or so components that will be cast in high-strength polymer. This particular part will also require acrylic inserts during the molding process. I made a backup copy of it because the molds were a bit touchy to make. That's about all I have to show for now. I will try to go a little bit deeper into the molding process for the next update, and hopefully by then I'll be showing-off the completed masters as well. Wish me luck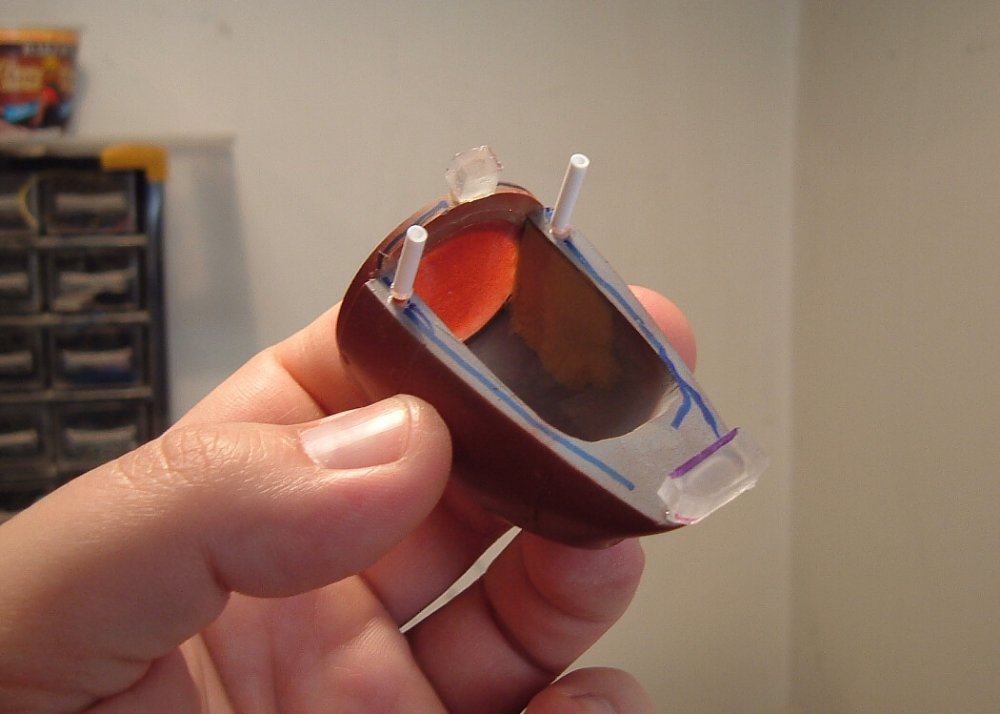


-
I love Regults! At some point, I'd like to do a version 2.0 kit with at least one of the two engines that has removeable panels to show-off the inner mechanism; useful for maintenance or battle-damage dios and such.
-
I haven't put nearly enough engrish verbage on my boxes lately, so hopefully you'll be happy to hear that I plan to reinstate my "pro-engrish" poricy for the Graug
-
The making of a 1/72 Tacticar Pod Graug--the musical!
captain america replied to captain america's topic in Model kits
Yeah, you just don't get any respect as a warmonger when you have to rely on public transit Ray, I absolutely love the colors you chose for the figure! Are these your own recipe, or straight out of the bottle? -
The making of a 1/72 Tacticar Pod Graug--the musical!
captain america replied to captain america's topic in Model kits
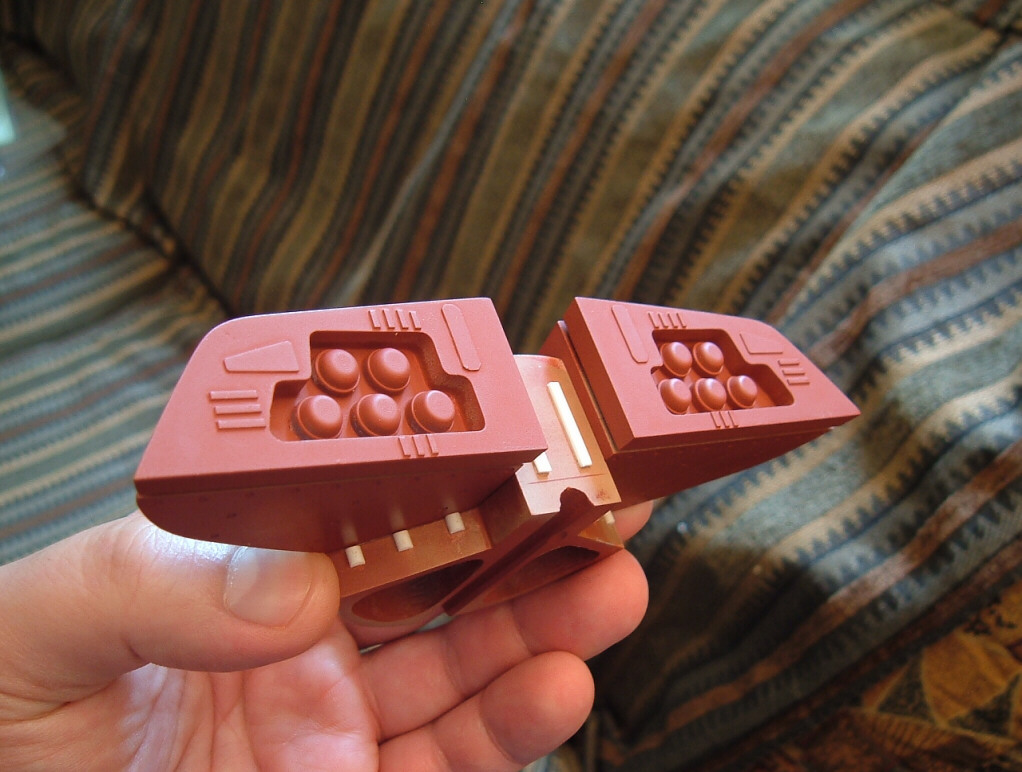
The arm cannons actually look a lot like funky speakers to me... And at that size, the speakers could probably do as much damage as a beam blast. "LISTEN TO MY SONG!!!!!!!" **BAM** -
The making of a 1/72 Tacticar Pod Graug--the musical!
captain america replied to captain america's topic in Model kits
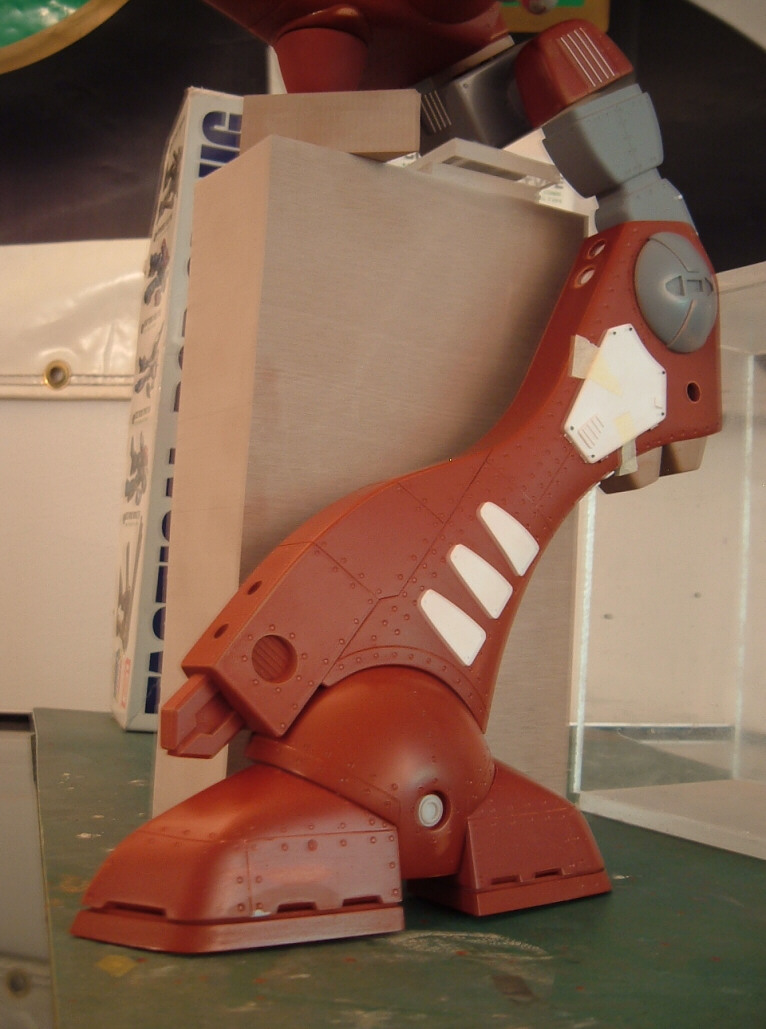
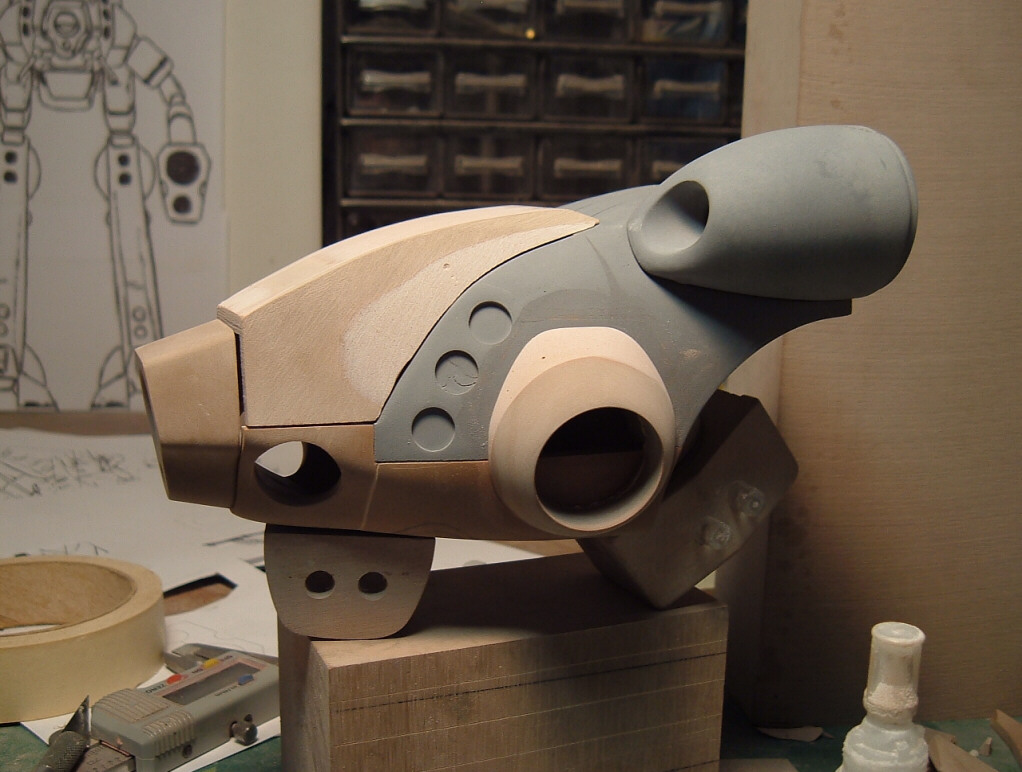
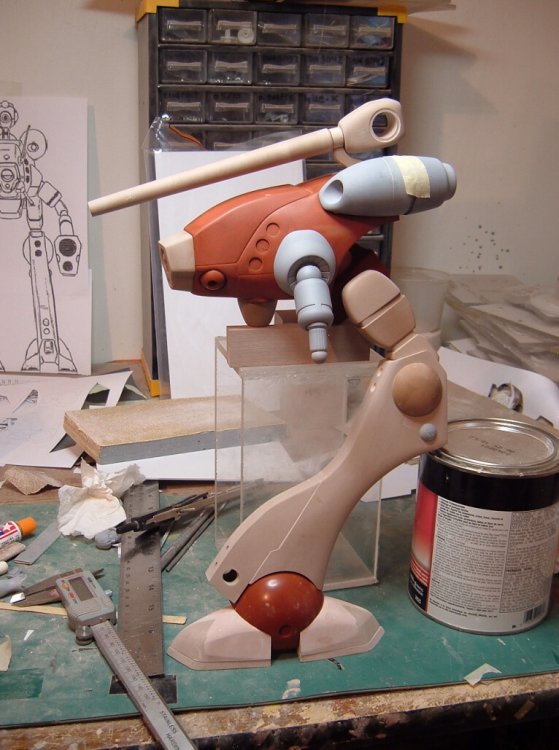
Interesting to note that I have strategically hollowed-out some parts of the leg, turning some of the obvious panel lines into hatches, just as I feel they would be on the real deal. There are actulally many detail pieces that I left off, simply because of the fragility of everything, and the fact that there are sooo many parts in the kit that it will be quite a challenge to keep track of. In fact, the Graug will have more parts than the full cockpit Regult, and 3 times as much resin. Joy!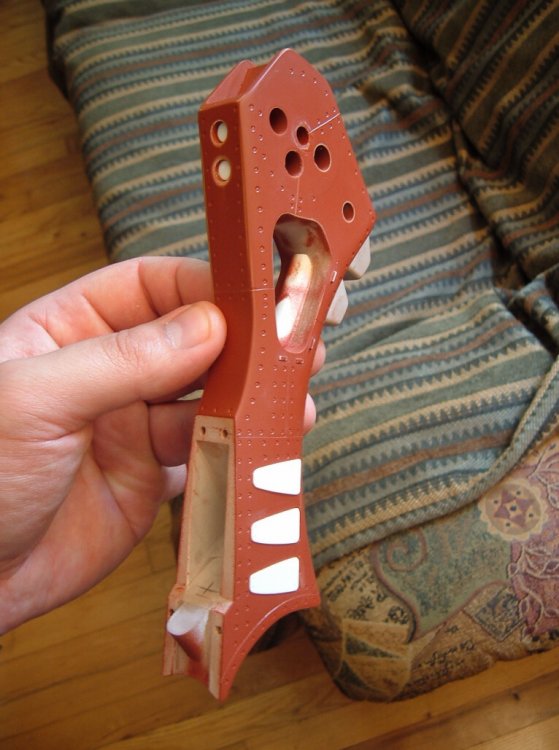
-
The making of a 1/72 Tacticar Pod Graug--the musical!
captain america replied to captain america's topic in Model kits
A closer look at some of the detail bits...

-
The making of a 1/72 Tacticar Pod Graug--the musical!
captain america replied to captain america's topic in Model kits
Once again, apologies for the poor quality of the pics. I don't have good lighting at my place for pics, and the red primer just makes it that much worse.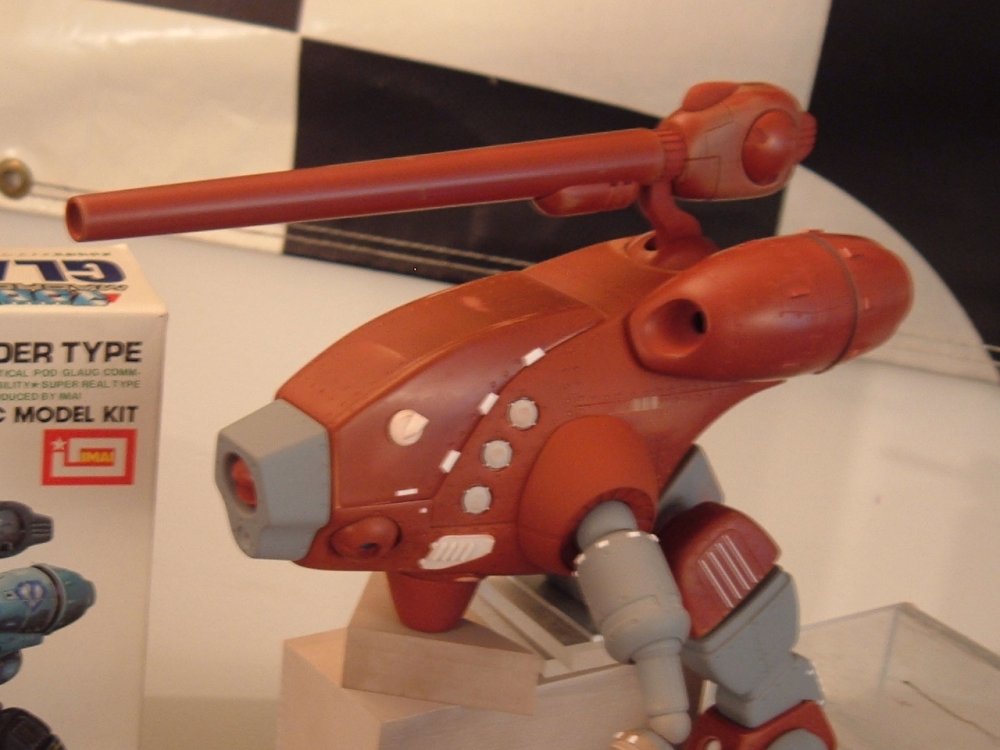


-
The making of a 1/72 Tacticar Pod Graug--the musical!
captain america replied to captain america's topic in Model kits
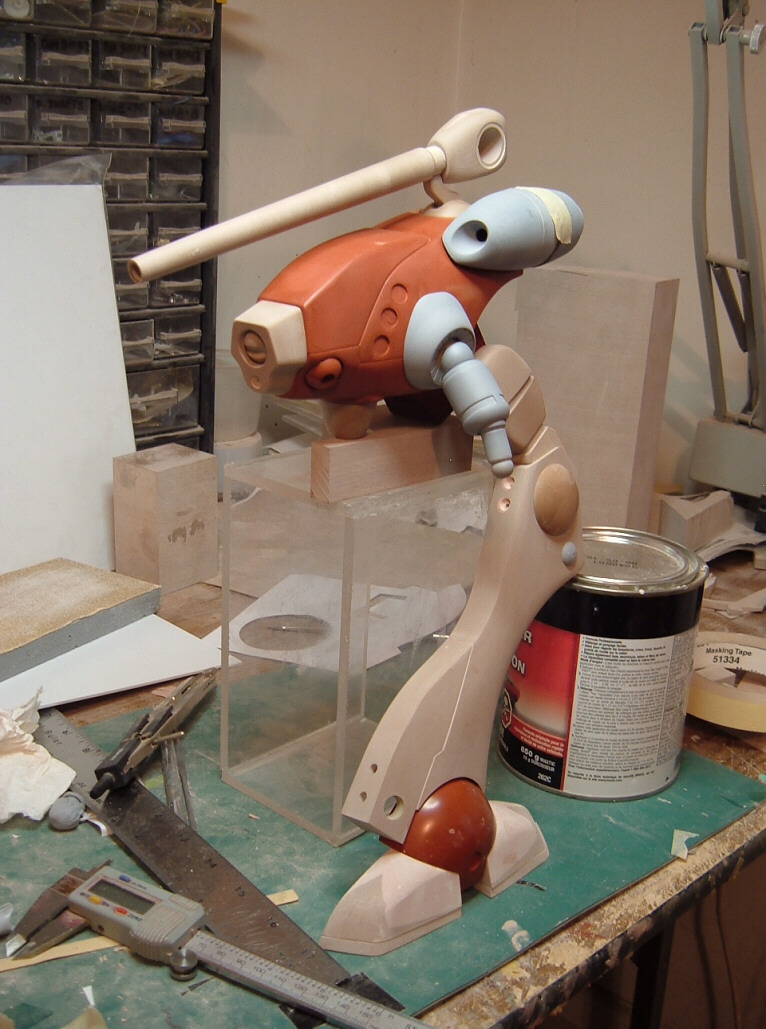
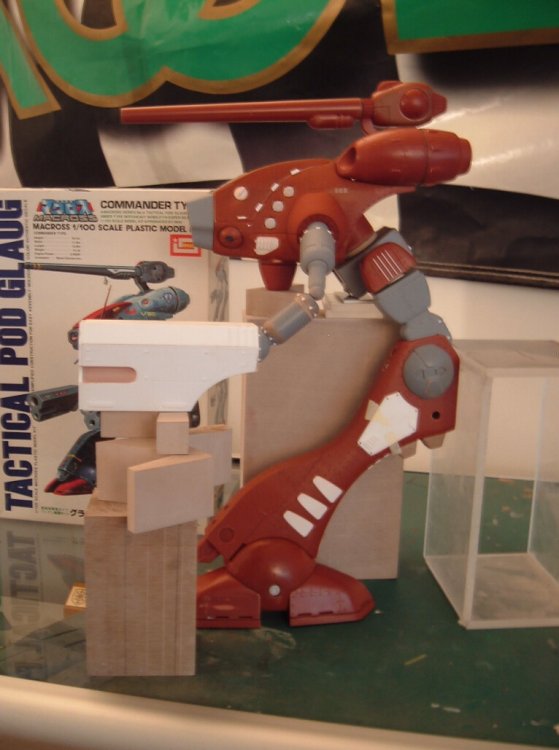
Hi folks! I realize that I've not been terribly present on the forums lately, but there's a good reason for it: I've been super-detailing the Glaug, and the process has been quite long. Nevertheless, I have a whole slew of (mediocre) pictures of my progress. I would have prefered to use more grey primer, since it photographs much better than the red stuff, but the local supplier was out... Essentially, I only have the cockpit thingamabobs left to do now, which I will get onto in parallel with my mold prep for the parts that need duplicating. It would be no exaggeration to say that one set of Glaug masters takes almost as much work as three Destloids... But it's worth it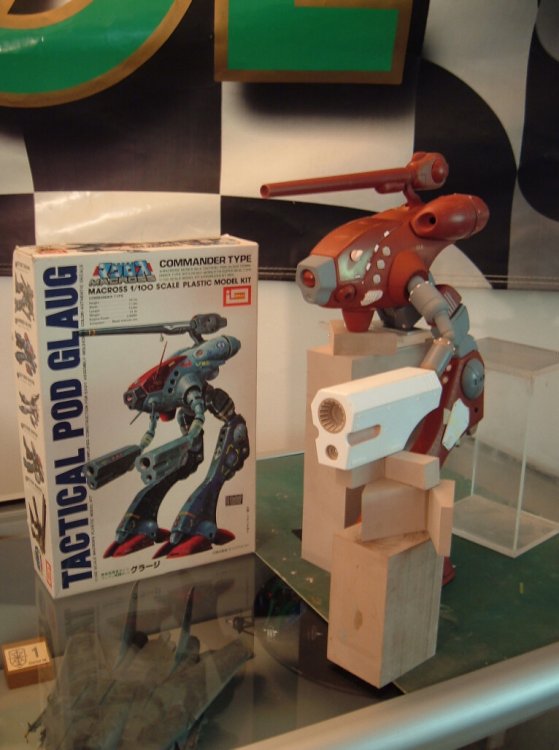


-
Oh, there are a LOT of differences. A buddy of mine still has his "1/72" ARII Glaug (unbuilt and still bagged, by the way), which I was looking over a couple weeks ago. I'll see if I can get him to lend it to me at some future point so that I can offer a comparison with my sculpt. I remember when I had that kit many years ago, and it seemed so huge at the time. The "cockpit" barely deserves that designation, it's just a one-piece tub/molded seat. THe Matchbox cockpit is actually more detailed, and yes, there is no way in H.E.L.L. that a 1/72 Zentran soldier could ever fit in there.... Unless he were miclonized Alas, the ARII kit fits with the "official" numerical measurements, and regardless, you did an excellent job bringing it to life. Love the colors you selected too!
-
Wow Ben, that looks kickass!! There's no way in heck that your build will ever be compared to a Matchbox anything, it's waaaaaay too well done.
-
The making of a 1/72 Tacticar Pod Graug--the musical!
captain america replied to captain america's topic in Model kits
If you're asking about the sanding/polishing of the masters in genaral, it's very straightforeward. -I bring the modelling board up to a basic finish with 320 grade (3M) sandpaper--wet, then 600 grit, also wet. -Apply primer (good ol' CANADIAN TIRE rattle can primer is my tool of choice.) -Depending on the part, I may leave the primer finish as-is, or give it a go with some 1000 grit. One again, wet-sanding. That's about all there is to it. The only parts that may get more attention are the masters for clear parts, which I coat with lacquer (Tamiya spray cans work great) and then proceed to some slight buffing with some 6000 grit and then some polishing compound on an old cotton t-shirt. I'm actually sort of at this step for some parts as i type this; I always get carried away with over-designing my kits, and now I have to prep all of those 800 bazillion pieces. Yay. -
Yup, and kitbashing 2 Hasegawa kits would still be cheaper than me doing a conversion kit to accomodate either the fighter or the battloid.
-
The making of a 1/72 Tacticar Pod Graug--the musical!
captain america replied to captain america's topic in Model kits
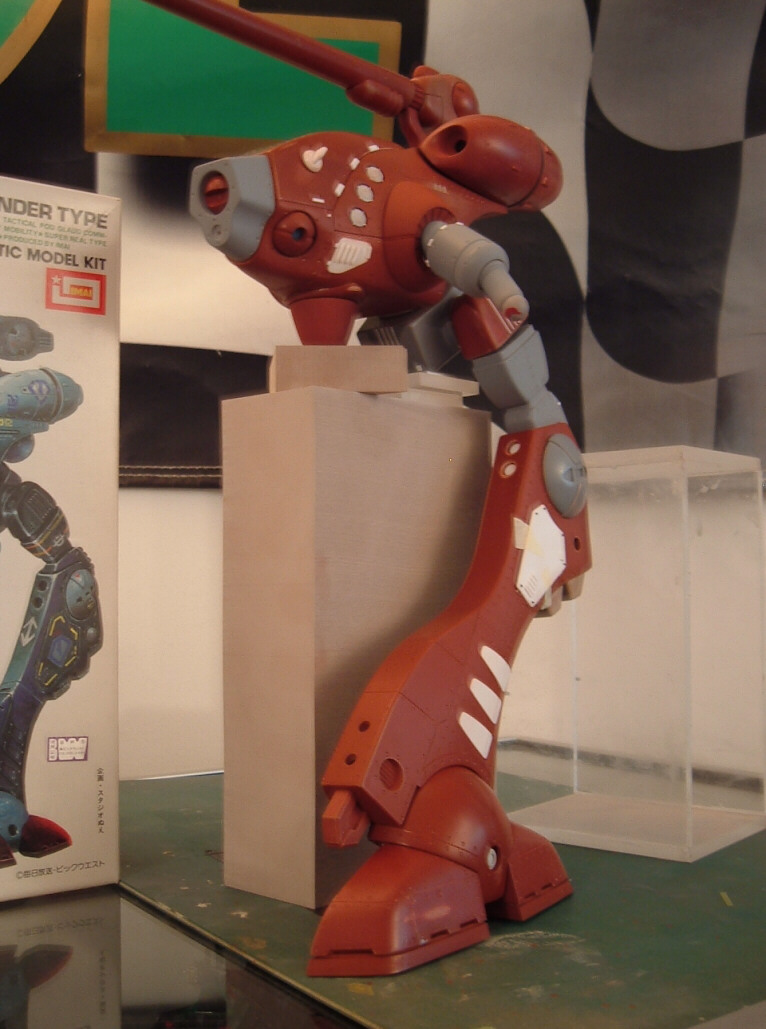
No articulation will be possible, I'm afraid, only the carefully-crafted appearance of articulation. It will be a hard-fought job just to combat the effects of gravity on a mecha design that, in and of itself, does not seem to take gravity into consideration. -
The Transformers 3 Thread--A Michael Bay Thread
captain america replied to areaseven's topic in Anime or Science Fiction
And that's precisely why Michael Bay has GOT to go... And if he doesn't remove himself willingly, I know some guys who can make him an offer he can't refuse. Capeesh? Serioulsly, the c0ck & b@lls crap is crude, immature, and is probably too low-brow even for folks who eat fried chicken out of a cardboard bucket... Or at least it should be. The writers aren't the problem, it really is Bay. That little stunt with him locking them (Orci Kurtzman) in their hotel room until they finished the script is precisely the kind of two-dimensional, last-century "motivation" that does NOT bring out the best in people, nor encourage them to do great things... And that's why ROTF is the unfulfilled piece of crap film that it is. The man seems to ruin everything he touches, and frankly, if he has anything to do with the third film, I'll not only NOT pay any of my hard-earned money to see it, I will do everything in my power to discourage as many people as I can from contributing financially to his next cruel-prank-on-celluloid. -
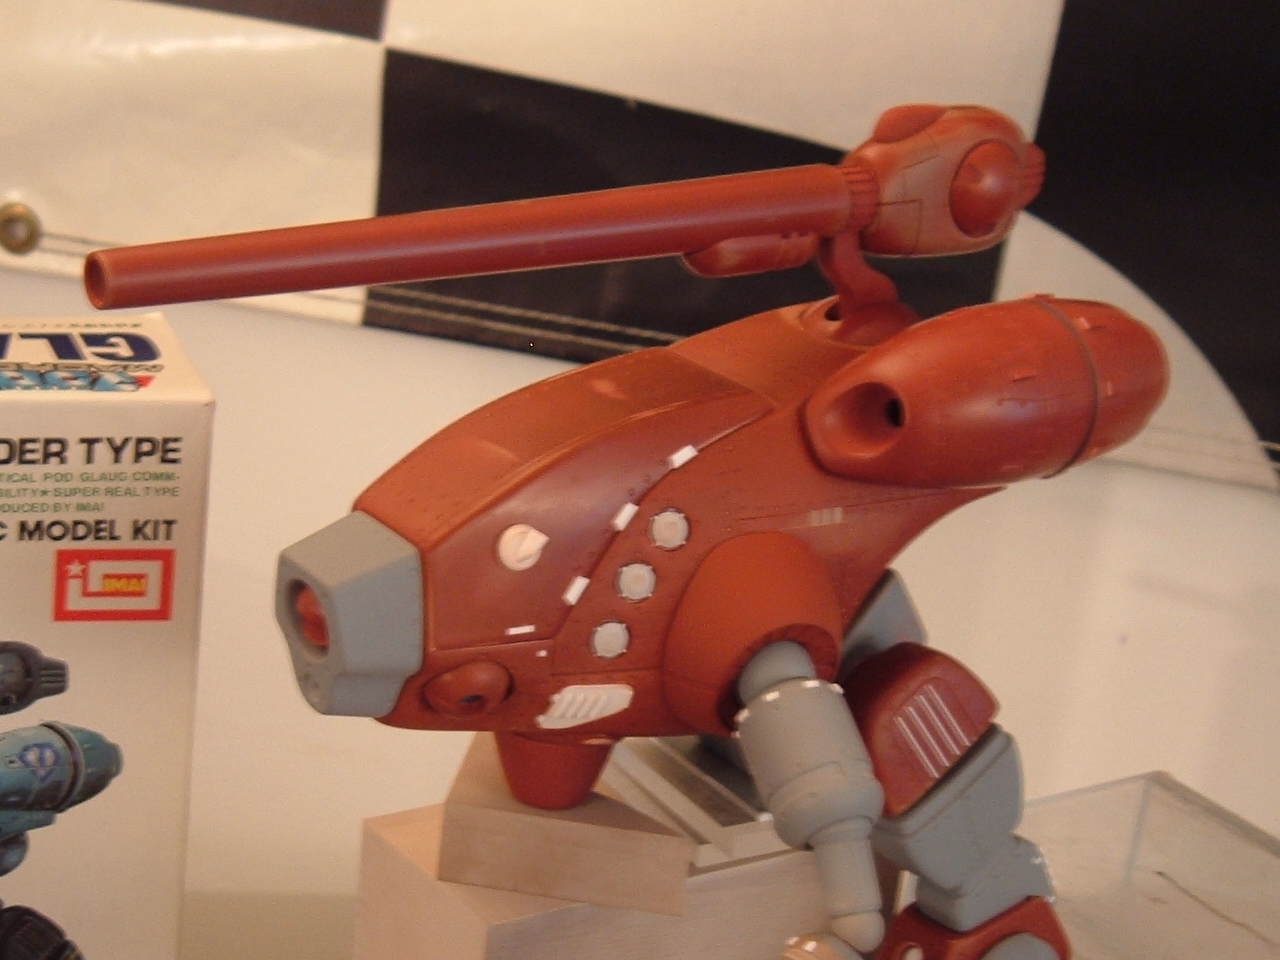
The making of a 1/72 Tacticar Pod Graug--the musical!
captain america replied to captain america's topic in Model kits
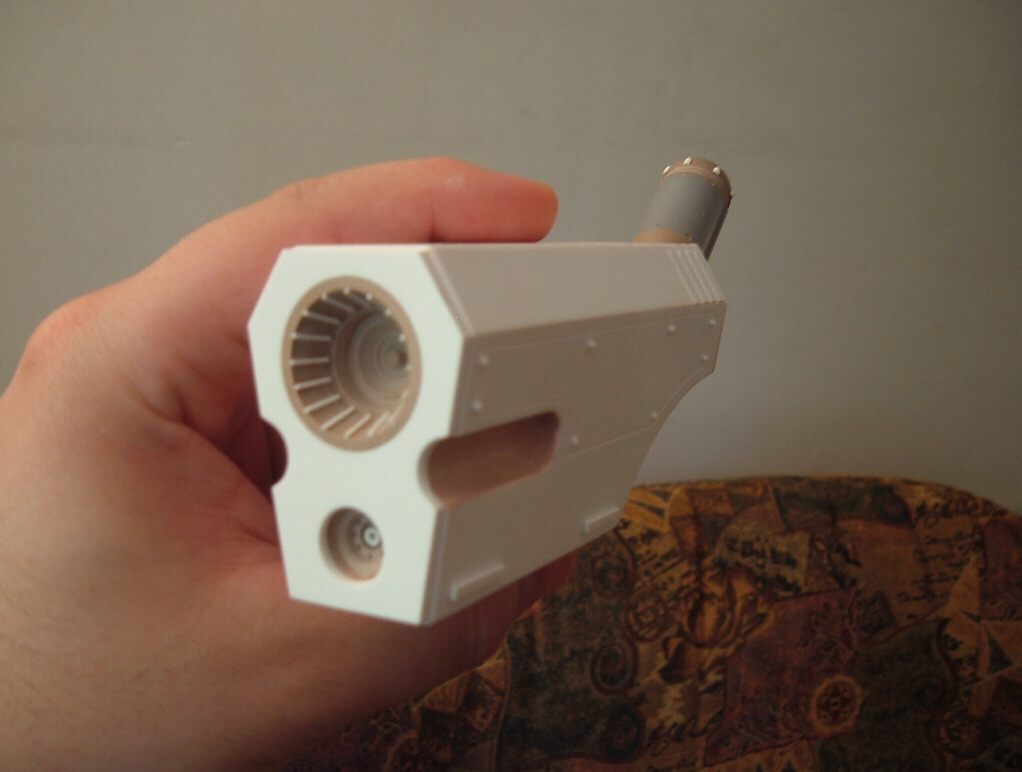
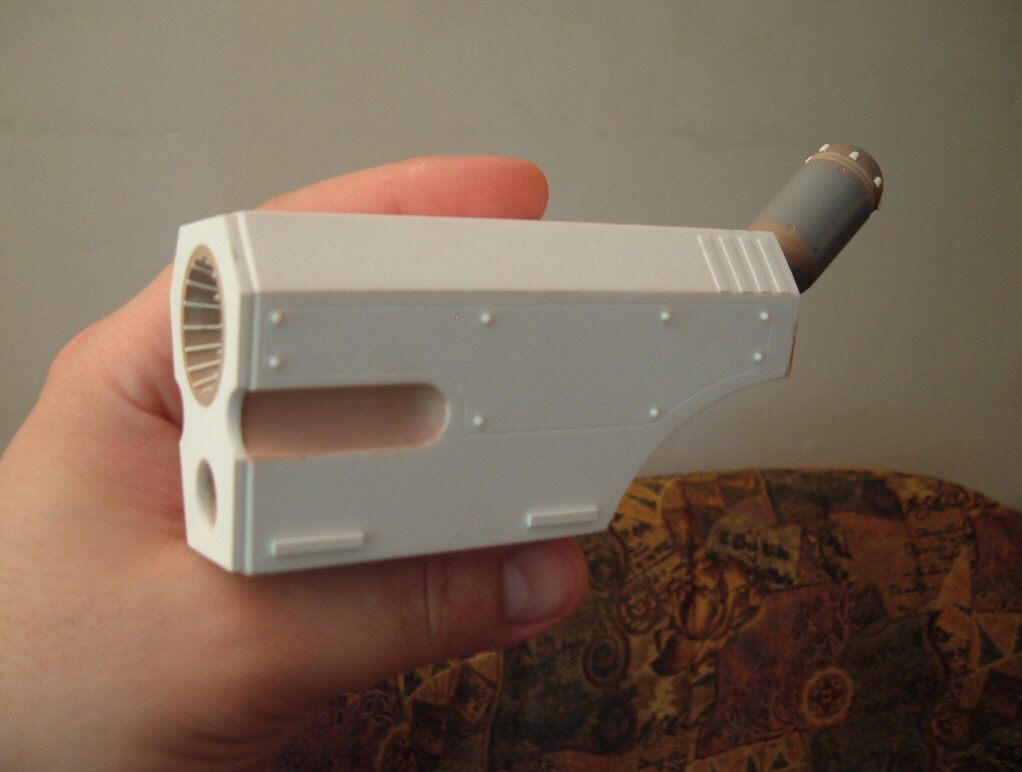
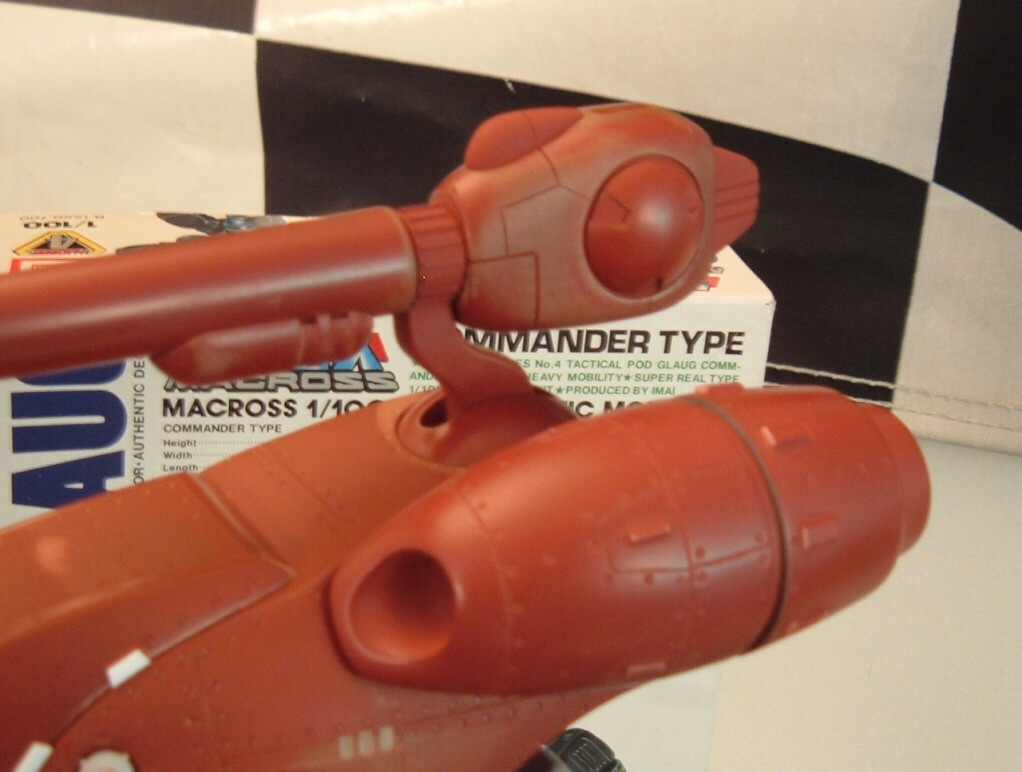
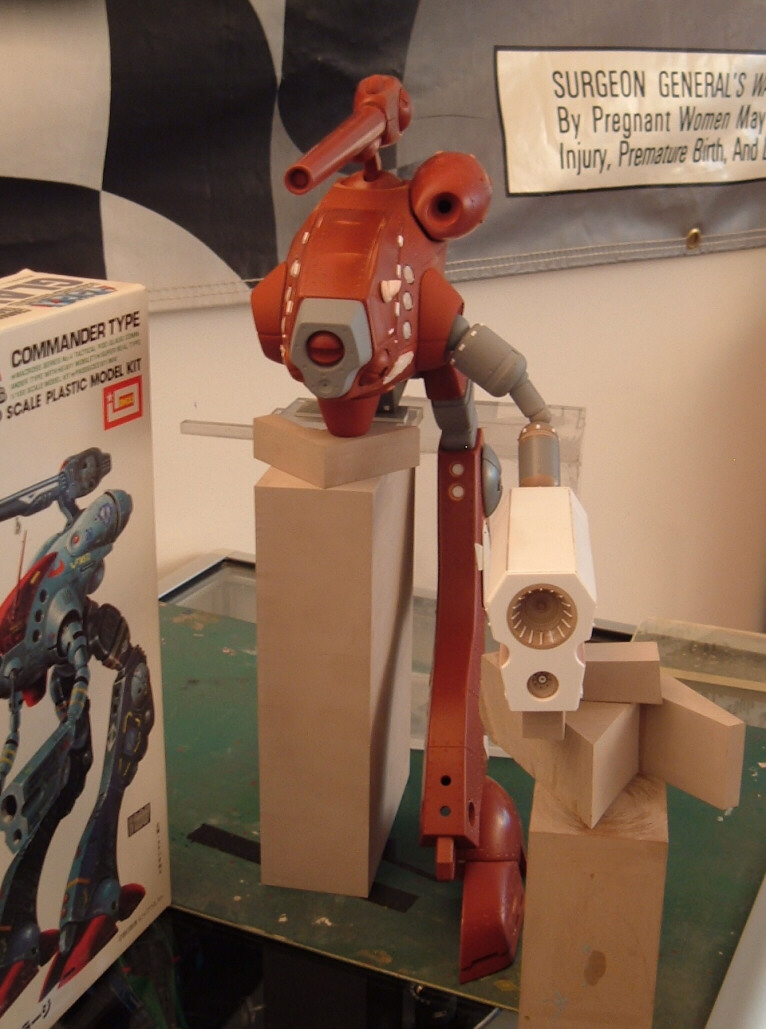
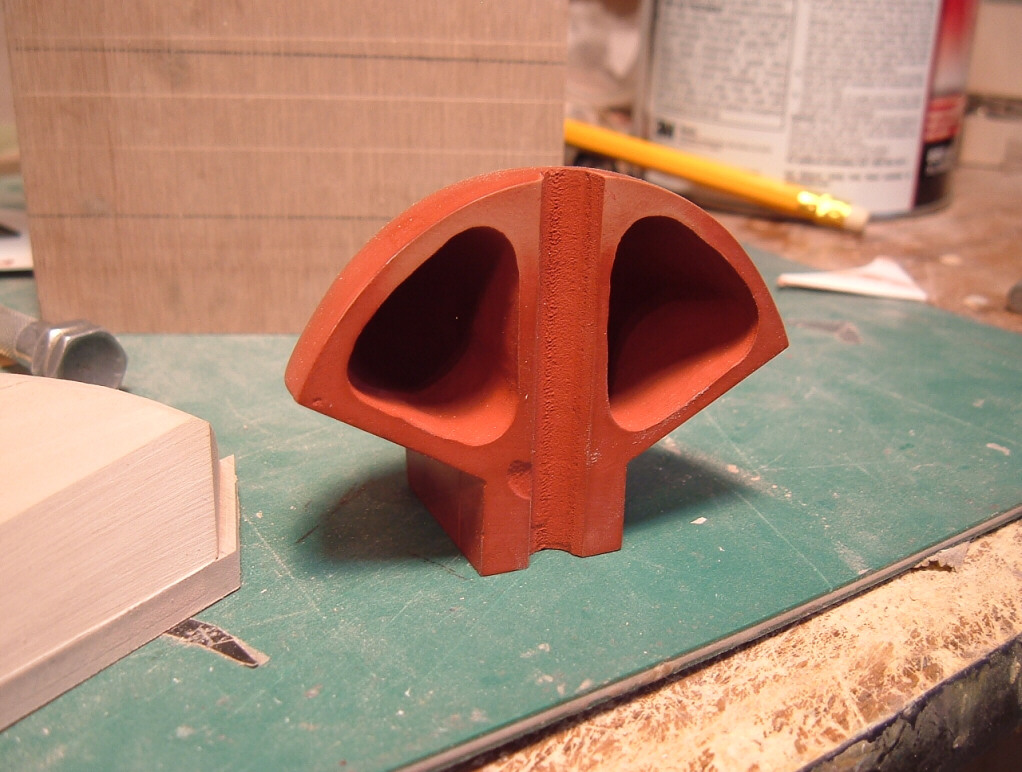
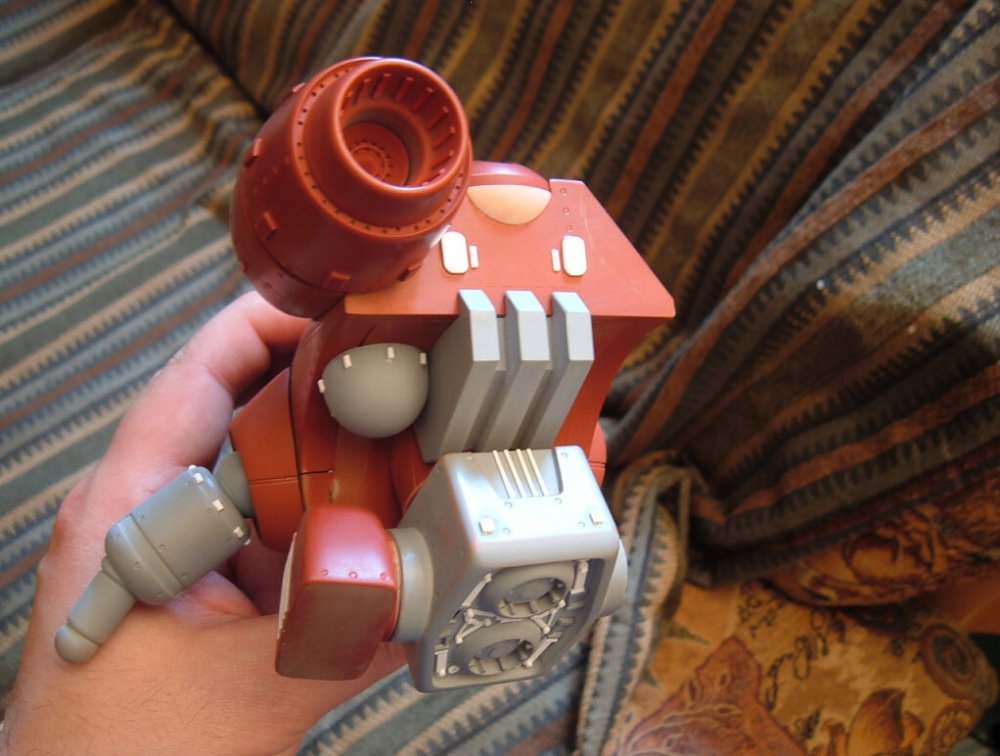
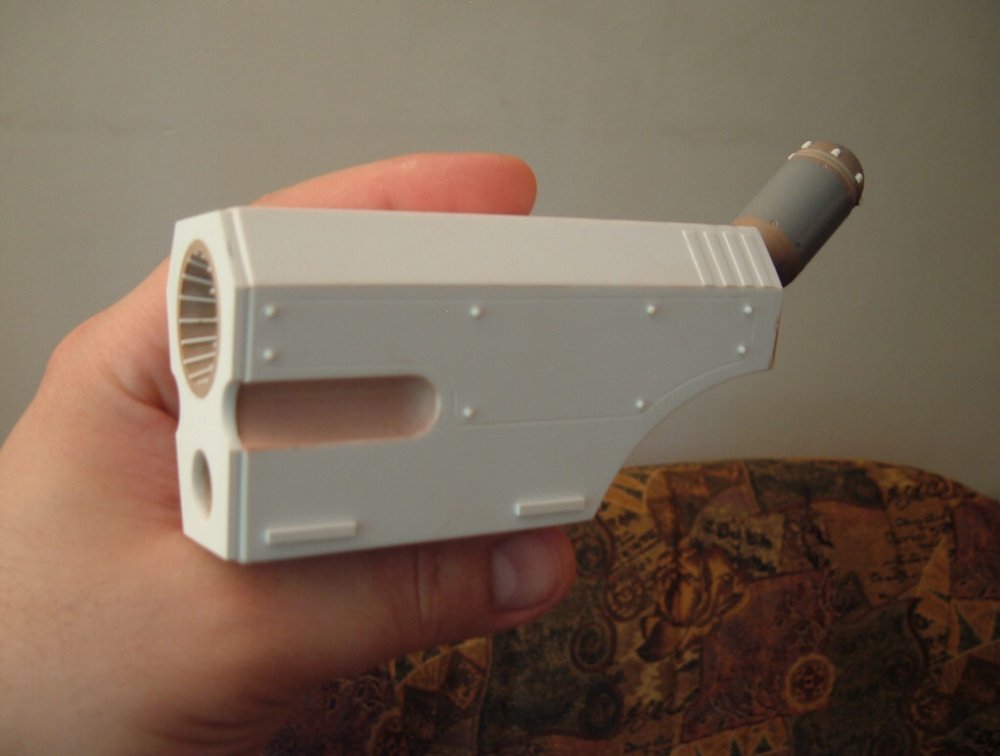
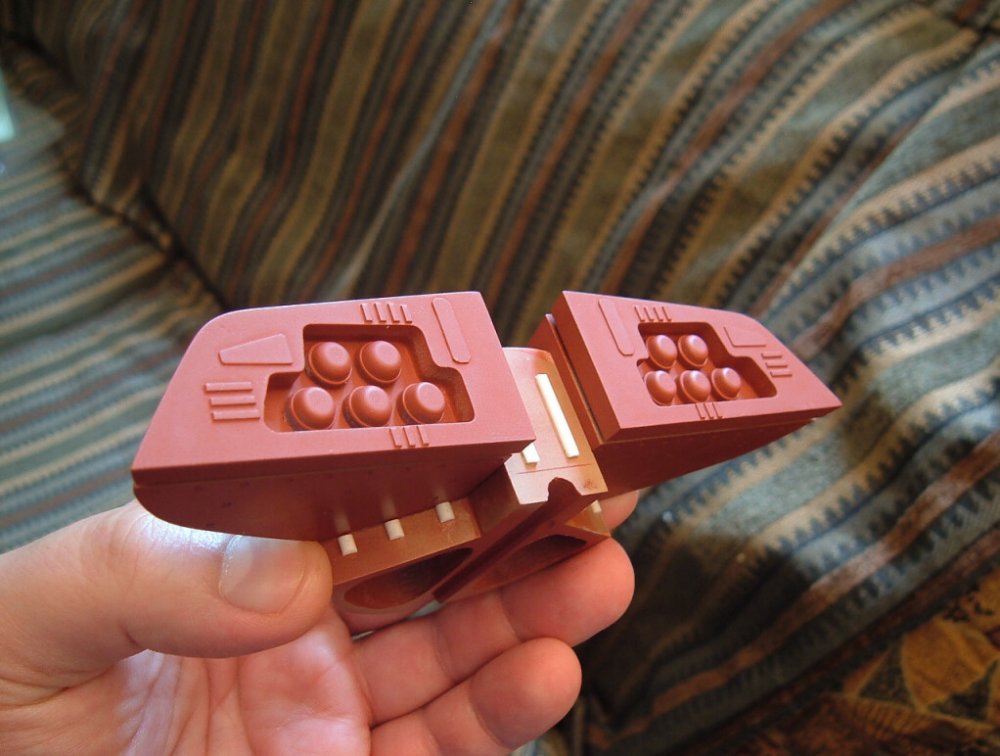
Pics 4 and 5: here is the main arm cannon assembly, being made from mostly 2.5mm styrene sheet, and is, just like certain other parts, designed to be hollow. This part will need it more than others, due to the bulbous nature of the gun pod and the flimsy design of the upper arm. Putty and Renshape are also used in strategic areas of the masters, depending on the specific shape requirements. Strangely enough, the particle beam (cannon) emitters kinda look like speakers! Pics 6 and 7: the overall beast, looking better and better with each passing day. I'm taking my sweet time with the design of the joints, as many of these will be load bearing and the design of which is critical to keeping the kit upright and sturdy when assembled. As always, I soldier onward. Things are going a bit slowly due to the recent festivities ("Quebec" day) and soon Canada day, as well as my trying to enjoy the summer while we have it. I will also likely be starting some preliminary mold-prep by the end of next week, so as to eventually get the necessary duplicates of the many parts I need for one whole model. Hope you enjoyed my little "show-and-tell" moment, and stay tuned for the next update!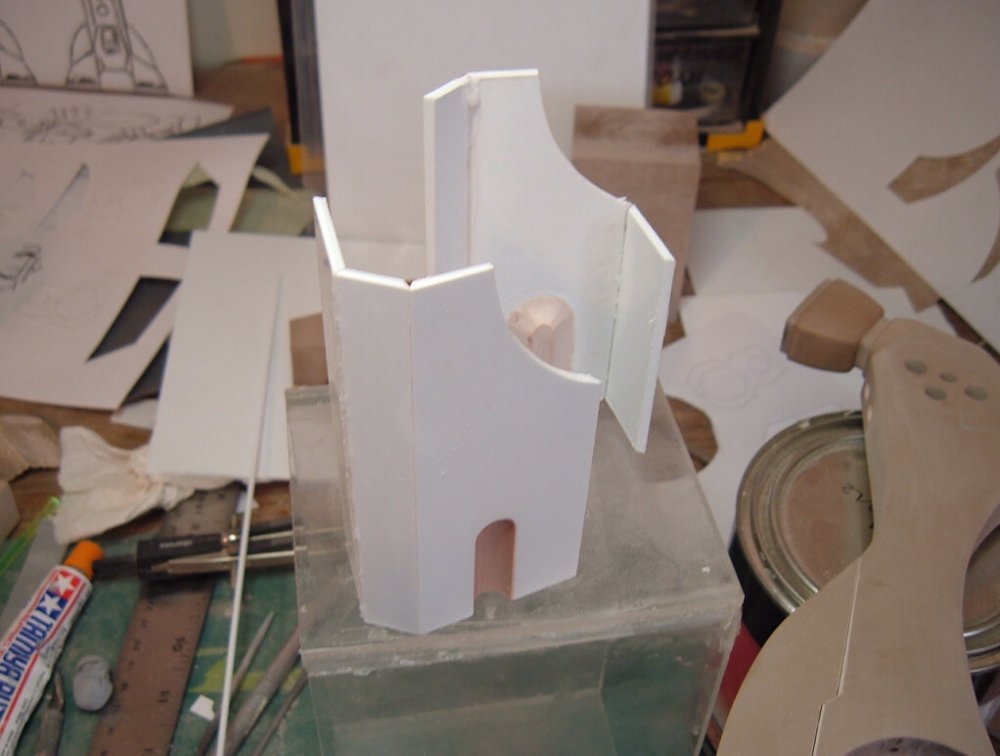


-
The making of a 1/72 Tacticar Pod Graug--the musical!
captain america replied to captain america's topic in Model kits
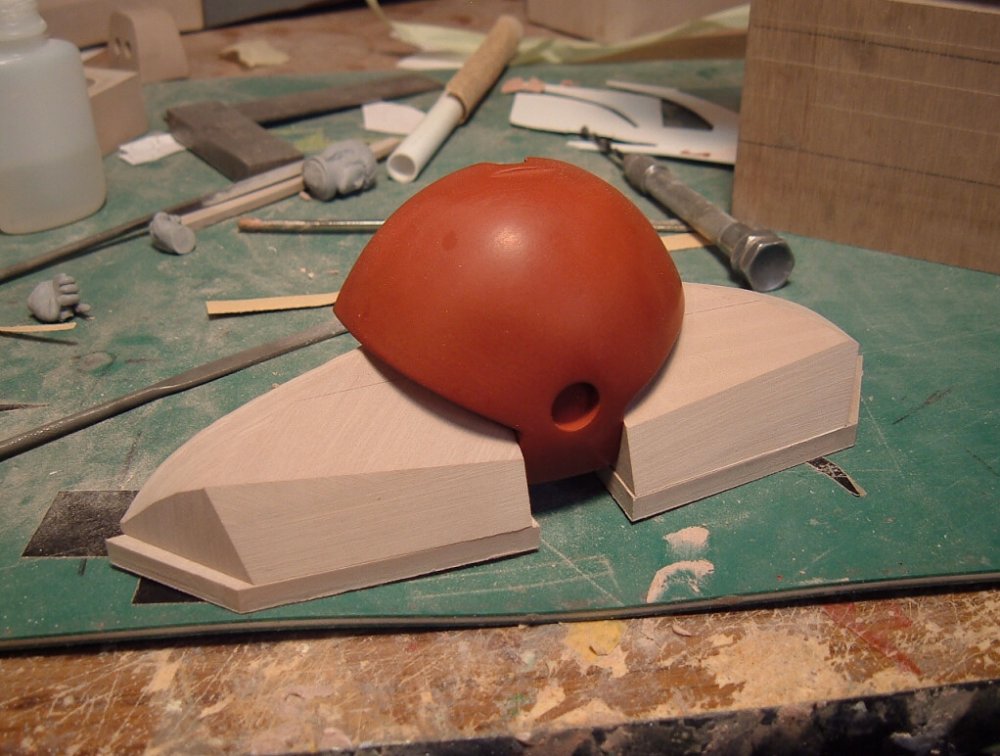
Time for the latest Do-It-Yourself-Glaug build update. Things have been progressing slowly but surely, and I should be done with all the main exterior parts in a few days. Once I've got those out of the way, I'll be able to concentrate on the details and the cockpit, which should take another 1.5 weeks. Not my fastest build, but certainly my biggest and most elaborate. Pic 1: here are the foot masters, freshly re-puttied. As the putty hardens, it goes into a flexible state in which it can be easily carved, which I did. This will save me some sanding later when it's sufficiently hardened. Bear in mind that this is merely half of one foot; a whole one (when complete) will probably take as much resin as an entire Commanchero kit, and could smash a Destroid into oblivion if used as a blunt weapon. I guarantee that no one will be scoffing at these ginormous clown feet of doom! Pics 2 and 3: with the rough stuff cleared away, the foot parts are almost ready to be primed. There will be, of course, under-foot detail, which is still in the planning stages. Just like the ball part, the "toes" will be strategically hollowed.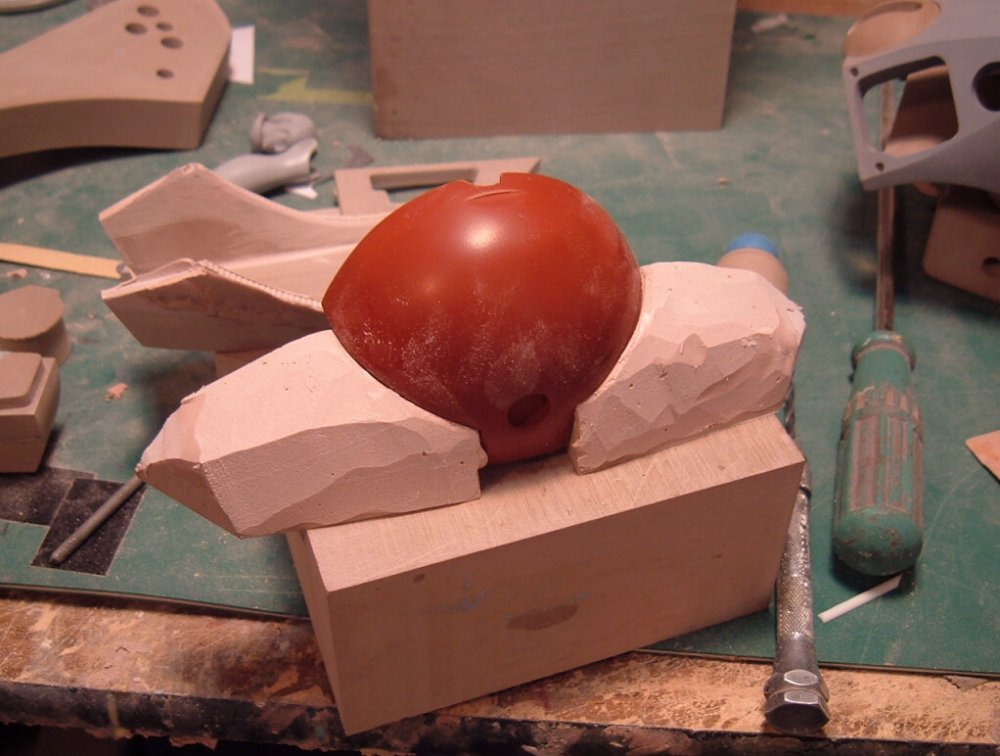


-
Fat chance, suckah!
-
The making of a 1/72 Tacticar Pod Graug--the musical!
captain america replied to captain america's topic in Model kits
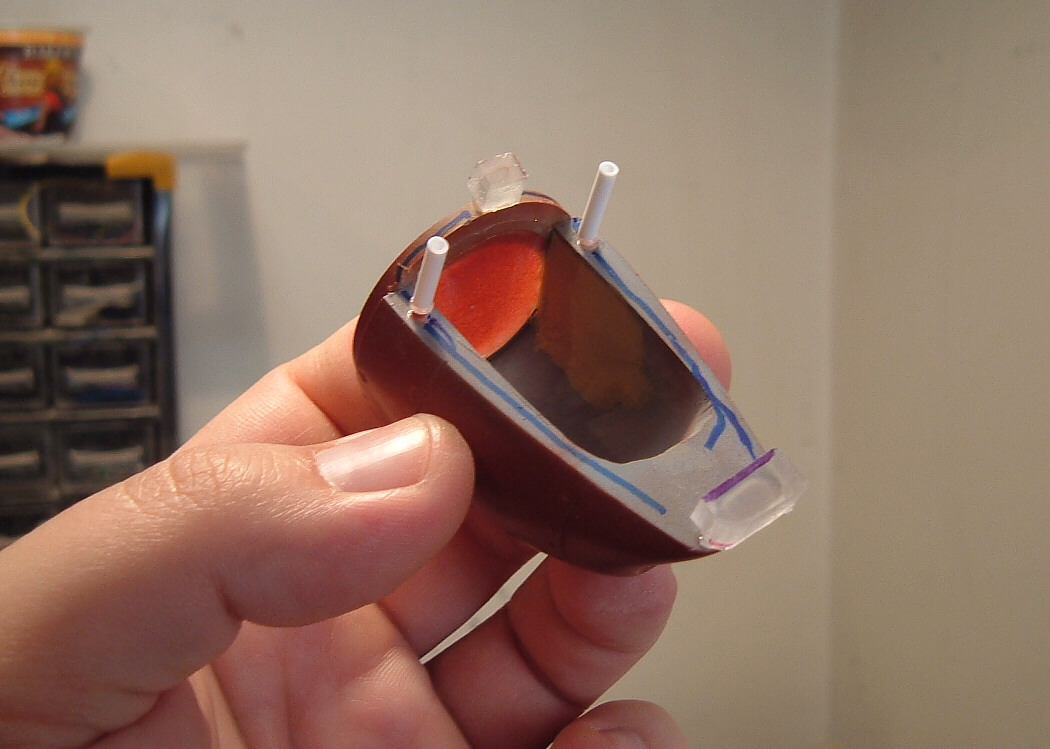
Actually, you may notice in some cockpit pics that there are two round "portals" hidden by the pod engines/thrusters that lead right into the cockpit. This was done intentionally so that if one wishes to light the engines, the same lighting source can be routed through those portals into the cockpit. Fuzzy dice are optional -
The making of a 1/72 Tacticar Pod Graug--the musical!
captain america replied to captain america's topic in Model kits
It's a bit difficult to compare Bondo and Renshape: the latter is more brittle and stable to carve, whereas the former, even when fully cured, remains a tad rubbery, but still sands very well and bonds splendidly. To be honest, I only use the Bondo because it's relatively inexpensive, easy to find and cures fast. The downside, like with any polyester putty, is that the odor is about as subtle as a punch in the face. This microballoon-filled, water-based acrylic putty intrigues me. Can you tell me more about it? -
The making of a 1/72 Tacticar Pod Graug--the musical!
captain america replied to captain america's topic in Model kits
I go from the 100-grit sandpaper that I use for shaping, to 320-grit wet-sanding to get a smooth finish. I then follow-up with a coat or two of primer to seal the modelling board. Depending on the texture I want, I sometimes give a light brushing of 600-grit over the primer. -
The making of a 1/72 Tacticar Pod Graug--the musical!
captain america replied to captain america's topic in Model kits
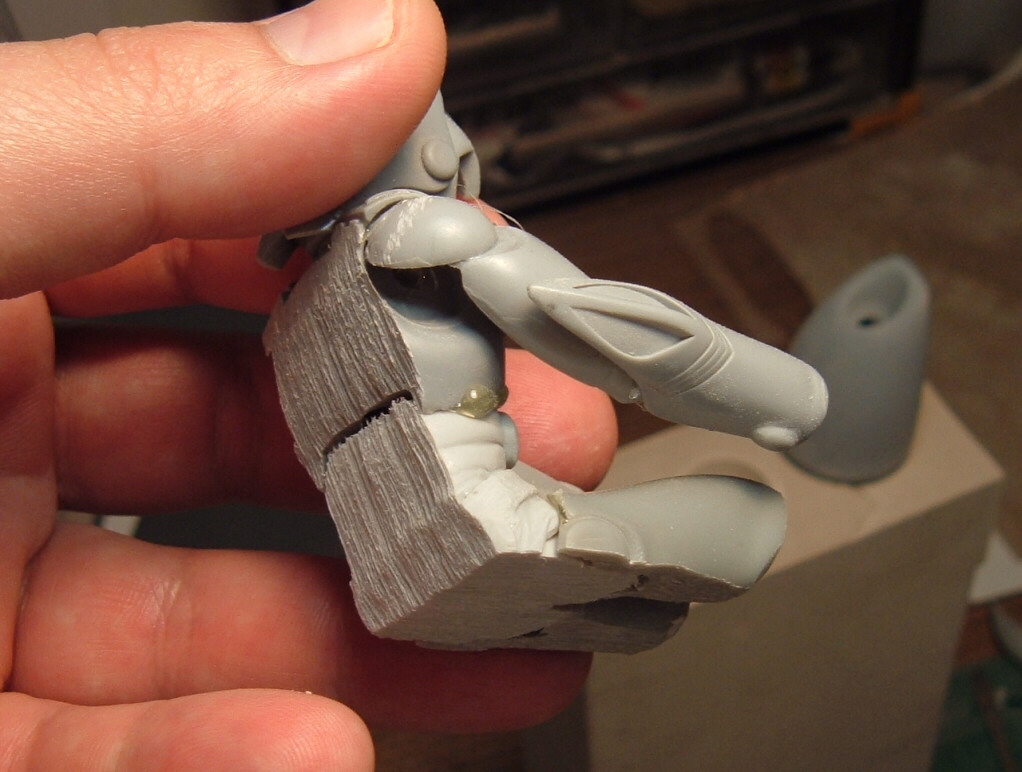
Correct. You also have to time the removal of the bondo very carefully. If you pull it up too quickly, it won't have hardened enough and will break-up. If you wait too long, mold release or not, it will bite into the surface and get stuck. Oh, as for the deal with the Quamzin cockpit pics, here's the bitty: I had to resort to some "anime magic" to get him to fit in the tub... By grinding-off most of his back, butt and thighs! No one noticed the foreshortening, even with the top off, leading me to conclude that my little forced-perspective project was successful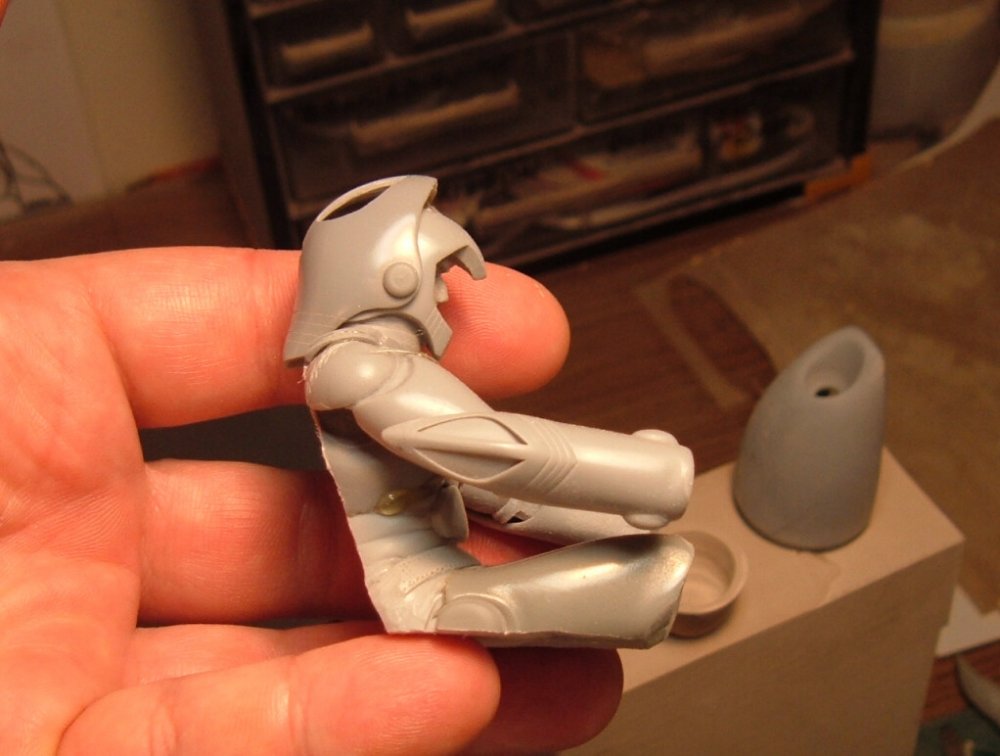

-
The making of a 1/72 Tacticar Pod Graug--the musical!
captain america replied to captain america's topic in Model kits
Interesting answer, but that's not quite it. In fact, the way his boots are designed, the knee-guard rides very high up the thigh. The knees are actually where they should be. -
The making of a 1/72 Tacticar Pod Graug--the musical!
captain america replied to captain america's topic in Model kits
Look at the pics carefully. Tell me if anything looks odd. If no one gets it, I'll divulge the answer later. -
The making of a 1/72 Tacticar Pod Graug--the musical!
captain america replied to captain america's topic in Model kits
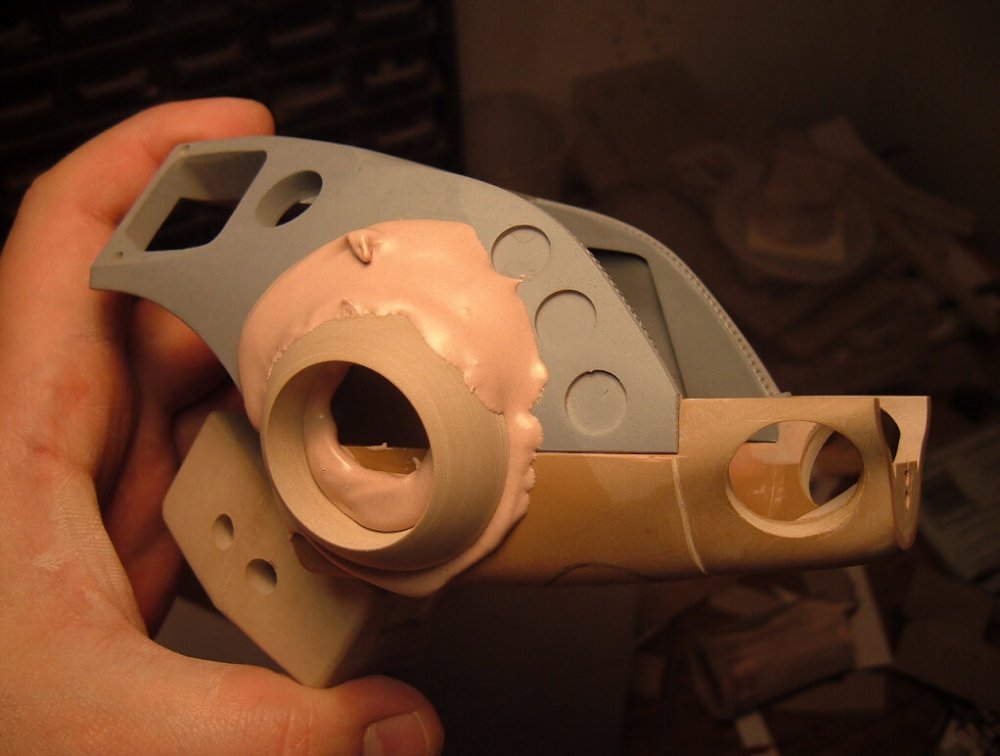
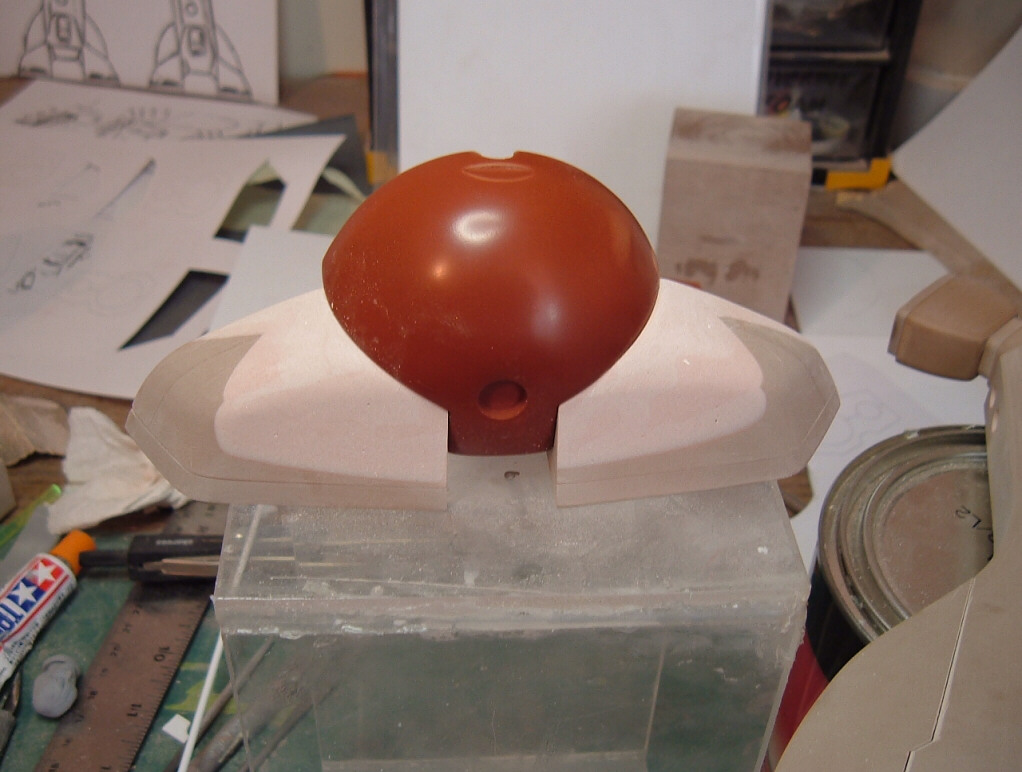
Pic 9: Remember the ball-part of the foo from previous updates? It has since undergone much refining. The cantilever-style design will allow it to be partially hollowed-out and still maintain its strength. Pic 10: The basic foot parts. This is one area where the style-sheet diagrams didn't line up, so I'll need to do a lot of puttying to reshape the toes. Pic 11: Speaking of putty, here it is at work! An aerosol mold release was applied to the hull parts, and then Bondo was slapped-on rather generously and then I smushed the shoulder armor into place and let it harden. It may look like a mess now, but with a bit of carving and sanding... It looks like what you see in pic 12. I haven't bothered with beauty shots for this update, since many of the key parts are in various states of completion. There are actually far more finished parts than I'm showing; they merely have yet to be fitted together. The good news is that aside from the arm cannons, most of the big structural parts are done, and you'll all have a substantially better view of things for the next update. Until then, please feel free to ask questions/post comments/hatemail