captain america
-
Posts
3563 -
Joined
-
Last visited
Content Type
Profiles
Forums
Events
Gallery
Everything posted by captain america
-
 What would've been ideal is if they had molded the missile launch housing separate, just a perforated plate molded in dark grey, and then mold the missiles all clustered together on a single back plate on a white sprue, then the modeler could combine them to have a more realistic loking missile set and container. Also much easier to paint. But hey, I'm not in charge at Bandai... Perhaps they will use a similar method if they end up making a perfect grade.
 -
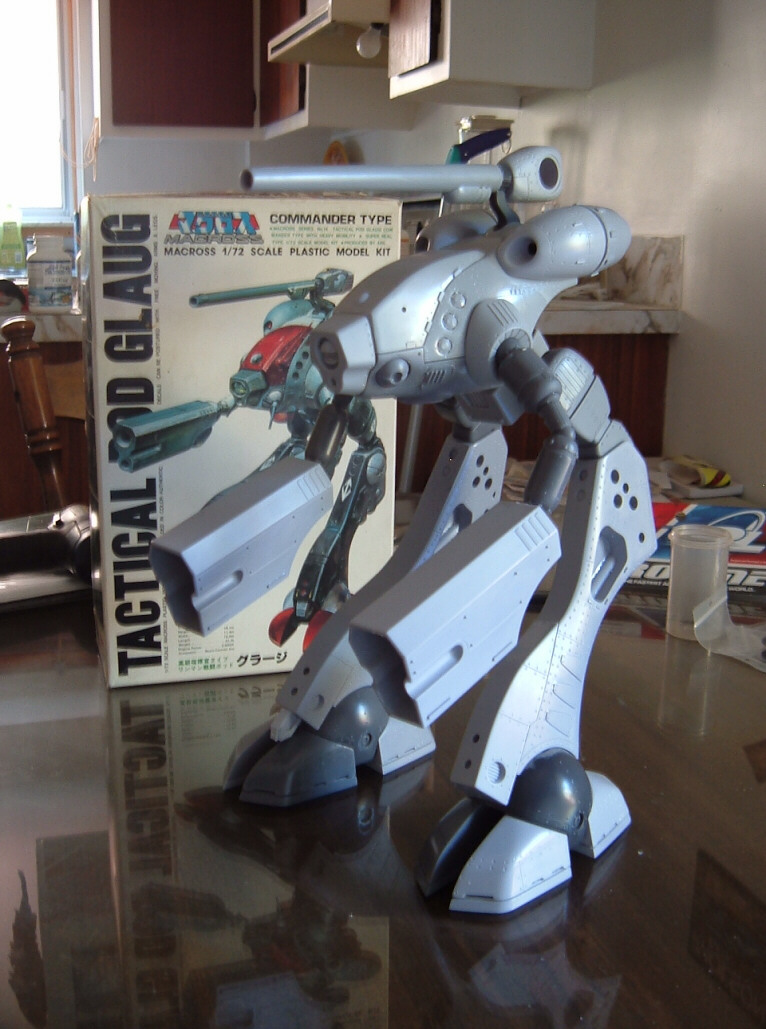
The making of a 1/72 Tacticar Pod Graug--the musical!
captain america replied to captain america's topic in Model kits
It's something to do with the formulation that Smooth-On uses for their silicone; I think they go cheap with certain additives. From my experience, the Bluestar rubber is more stable over the life of the mold, less likely to tear or chunk, and maintains better dimensional stability. Essentially, rather than degrade progressively like the Smooth-On stuff, the Bluestar mold remains almost perfect right up until the end, and fails more suddenly once you exceed the mold's threshold. The result? The 1st casting and the last casting are almost identical. Mold life will also vary greatly depending on the complexity of the part being molded, the quality of mold release, and even the resin: those 3 minute pot life resins are the absolute WORST for your molds, and degrade them much faster than the stuff I currently use. -
The making of a 1/72 Tacticar Pod Graug--the musical!
captain america replied to captain america's topic in Model kits
OMG I'm in PM hell! Ok, after some reshuffling and minor alterations, as of right now, I have the following MWers (aside from the depositees) on hold for one Graug each: -Valkyrie 13 -Ultimateone -Jardann -hodiod01 -Vermillion One -Evil Bones -Neova -Darrin G Assuming everything is set, that will close-out the run for the Graug. If for any reason someone wants to bail, make changes, etc. Please PM me. Oh, and I did a tally of all the parts... 122 total. No wonder it's taking me so long -
The making of a 1/72 Tacticar Pod Graug--the musical!
captain america replied to captain america's topic in Model kits
Check your local Yell-O-Pages for artist suppliers... Or you can contact Smooth-On directly and they can point you to the closest local distributor. Oh, and I don't use Smooth-On silicones for my molds, it's junk. Go with Bluestar instead. -
I won't presume to speak for anyone else, but theoretically, you could create masks for the missiles by punching the appropriate diameter hole through some masking tape and spray the desired color (say, white.) In the case of a two-toned tip, I would use the same hole puncher(belt strap punchers are awesome!) and use that to punch little red circles from a solid red decal sheet and apply those to the tips. It's a bit of a long PITA, but the results will be crisp and uniform... Just an opinion.
-
The making of a 1/72 Tacticar Pod Graug--the musical!
captain america replied to captain america's topic in Model kits
Consider it done! -
The death of an Australian Icon......
captain america replied to taksraven's topic in Anime or Science Fiction
The bird was in Mad Max?? -
The making of a 1/72 Tacticar Pod Graug--the musical!
captain america replied to captain america's topic in Model kits
Yes. I can literally wrap-up the full thirty by week's end, so folks have the all-clear to send payment. -
Bandai 1/48 Scale Macross Frontier Model Kit Thread
captain america replied to azrael's topic in Model kits
**Sniff-sniff** I smell mothballs... Normally, BanDai likes to release new "glimpses" of a given project in little monthly spurts and this time, they've gone 2 months without releasing anything at all for this puppy. I'm worried. -
Gauging Interest 1/72 Destoroido Tomahawk -Reissue!
captain america replied to Dax415's topic in Model kits
...And his blessing as well Technically, these aren't "recasts" (a kit made from a kit) but rather a reissue, made directly from the masters. -
The making of a 1/72 Tacticar Pod Graug--the musical!
captain america replied to captain america's topic in Model kits
I do, but it's in deep in my showcase and hard to access, so a side-by-side pic will have to wait. Oh, and it's official: I can now guarantee thirty kits, and the currently paid orders will all be shipped by Tuesday. -
The making of a 1/72 Tacticar Pod Graug--the musical!
captain america replied to captain america's topic in Model kits
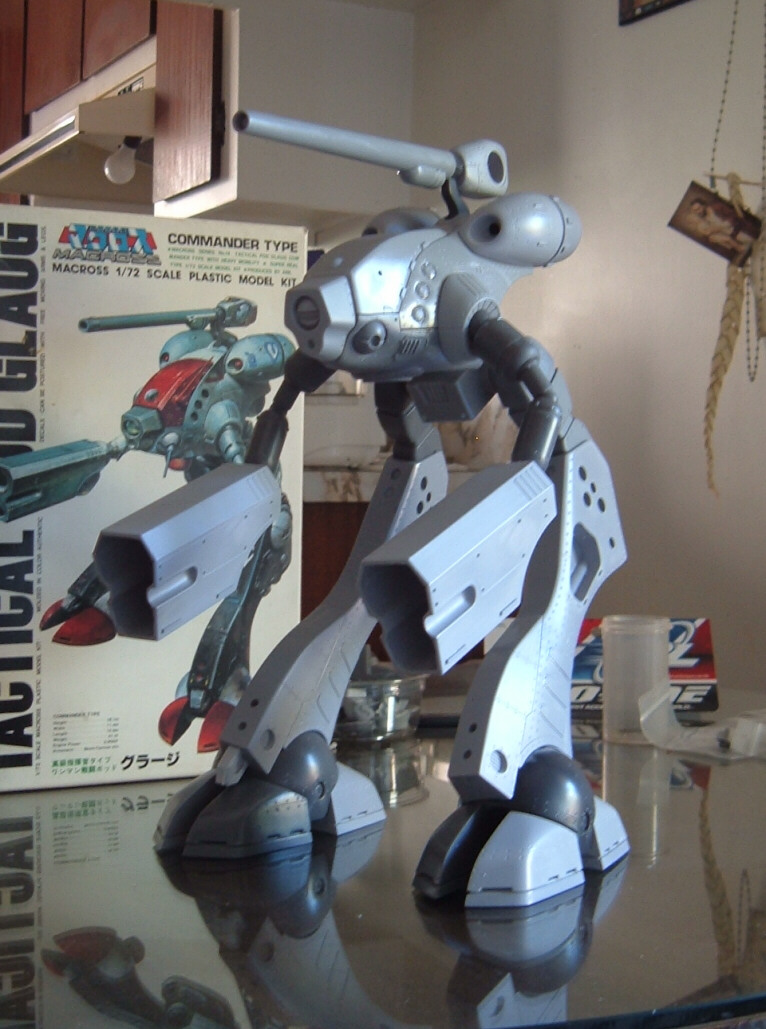
Oh, and just to make it official... The Graug WILL be free-standing. What's even more shocking is that I was able to get it to hold WITHOUT GLUING!! Mind you, I did add a bit of CA to the tabs to increase the friction with the corresponding grooves, but this is essentially a dry-fit. Gravity prevented me from positioning the arms/cannons out straight, but I would totally be able to do so with glue. The model is pretty darn solid too; more so than I was expecting it to be. If anything, I can tell you this: the Graug is a big-time attention getter, whether it's just meant for your own private showcase or a modelling competition, its size WILL turn heads! Also, the fact that I made it as big as I did and that it looms over the Regults... It just screams "I'm the leader!"

-
Gauging Interest 1/72 Destoroido Tomahawk -Reissue!
captain america replied to Dax415's topic in Model kits
Actually, the new price is still very reasonable. When I had made the run initially, I had slightly underestimated the sheer number of parts and labor involved. -
The making of a 1/72 Tacticar Pod Graug--the musical!
captain america replied to captain america's topic in Model kits
I'll advise on Monday. I've already poured the repair mold, and everything should be fine. Still, I like to play it safe. -
The making of a 1/72 Tacticar Pod Graug--the musical!
captain america replied to captain america's topic in Model kits
The first 15 models are being prepped for shipping as we speak. I will likely be able to get a few out tomorrow, and perhaps a few more on Saturday. Will commence work on destructions next week. -
The making of a 1/72 Tacticar Pod Graug--the musical!
captain america replied to captain america's topic in Model kits
Neko, you may be in luck: the new owner of the Pharanx masters seems to be working on a run as we speak--hopefully an official announcement wil be made. Oh, and back to the Graug... Ok, it's official: one of my molds gave up the ghost this morning, but I'm retooling it so that I can extend the run to 30. So far, I have the following members waiting for extras (in no particular order:) -ULTIMATEONE -VERMILLION ONE -EVIL BONES -KREMMEN -DARRIN G -JARDANN That's 6 so far, and I think I can accomodate 2 more, so if 1 or 2 more people want in, now's the time to speak up. Also, if your username appears on my list by mistake, just say the word and I'll correct it. Edit: for what it's worth, I've had a few people PM me asking about the Graug, but have zero forum posts and are otherwise unknown to me, so in the interest of fairness and security (namely mine), I will give priority to known forum members. -
The making of a 1/72 Tacticar Pod Graug--the musical!
captain america replied to captain america's topic in Model kits
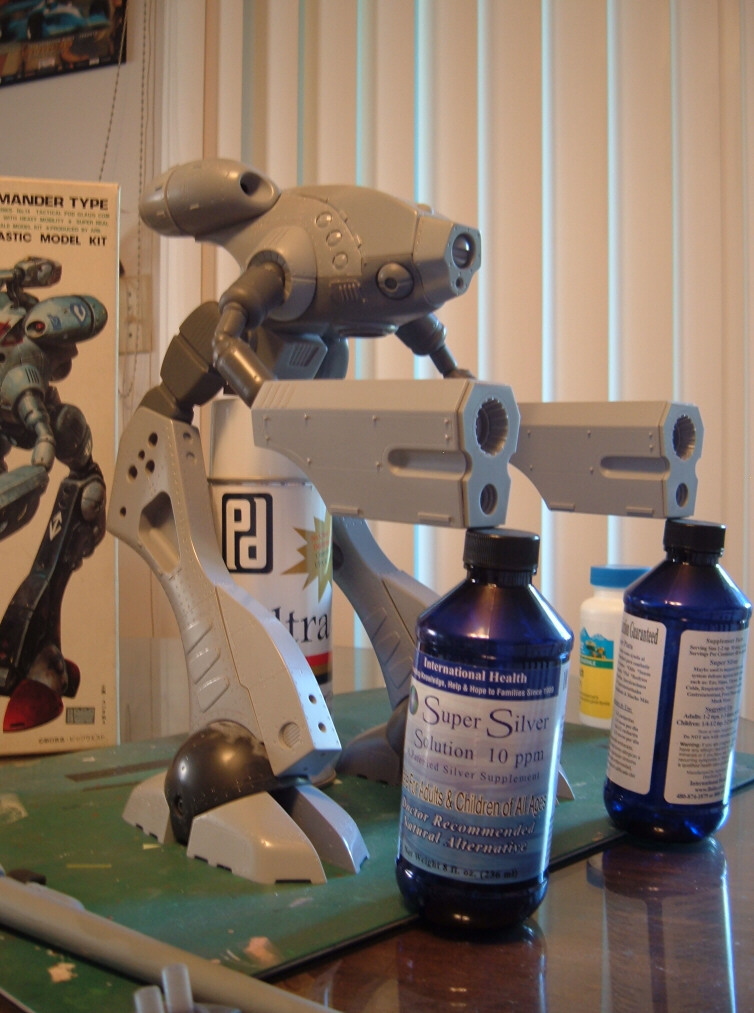
I'll be doing a dry-run in order to test-fit everything and produce the instructions, so yes, there will be a few more "eye candy" pics, but after all the casting is finished, the only thing I have planned is some much-needed rest and maybe a short stay in the insane assylum -
The making of a 1/72 Tacticar Pod Graug--the musical!
captain america replied to captain america's topic in Model kits
It's finally time for the obese Meltran to take the stage As things stand, I will have the full 20 Graugs done by mid next week. In the meantime, for those who would like to go ahead and send the balance of their payments, here is the info you need. THe kits are $390, minus the $100 deposit, so $290. Shipping: -$35.00 for up to 2 kits within North America. -$58.00 per kit for shipping anywhere else in the world. You can send payment via Paypal or an International Postal money-order in US funds. If you choose to pay via Paypal, you will need to add 4% to cover their fee. For example, for one kit needing to be shipped within North America, it breaks down like so: $290 +35.00 +4% = $338.00 As usual, if there's anything else, just PM me. P.S: several people have PMed me asking if I will make more than the 20 currently pre-sold. I will know this myself in a few days, and will post the news accordingly. -
Whats Lying on your Workbench MKIII
captain america replied to HWR MKII's topic in Hall Of The Super Topics
I've got this going on at the moment...
-
This probably isn't the best place to ask, but what happened to the 1/48 VF-25 thread? I can't seem to find it, and there doesn't seem to be any news on it.
-
The making of a 1/72 Tacticar Pod Graug--the musical!
captain america replied to captain america's topic in Model kits
It would be hard on the wallet, that much I can say. The booster hull would either have to be vac-formed, or laid-up in fiberglass--most likely the latter to get good detail, and probably $1200 apiece. Like I said, not a snowball's chance in Hell -
The making of a 1/72 Tacticar Pod Graug--the musical!
captain america replied to captain america's topic in Model kits
Not a snowball's chance in hell -
The making of a 1/72 Tacticar Pod Graug--the musical!
captain america replied to captain america's topic in Model kits
Oh, just for fun, here is a comparative example using two different "official" pieces of line-art. I scaled a side-view of the Graug to match the size chart: if you look at the Quamzin/pilot representation and side-view at right, you will see that for the sake of continuity, it is not physically possible to maintain size continuity, given the numerical values of the mech and pilot AND fitting a pilot inside the Graug.Also, you have to take battle armor into consideration, which makes the pilot bulkier, as well as slightly taller. Quite simply, they fudged it, and that's alright cos I like to fix things. Gotta remember that back in the day, the staff probably never expected the artwork to be scrutinized so closely, and have massive mass appeal 20 years+ onward, and also, marketing influences may or may not have played a role in the size of the mechs, and how they can be applied to product that has to meet a given price-point. When I did the Heavy Gear/Jovian Chronicles designs, I had to wing it proportionally too, because I simply didn't have time to be as elaborate as I would've liked to be. Anyway, here I am, 22 molds later, pouring 1.5kg of resin to get one Graug, made with far, far fewer concessions than the artwork it was derived from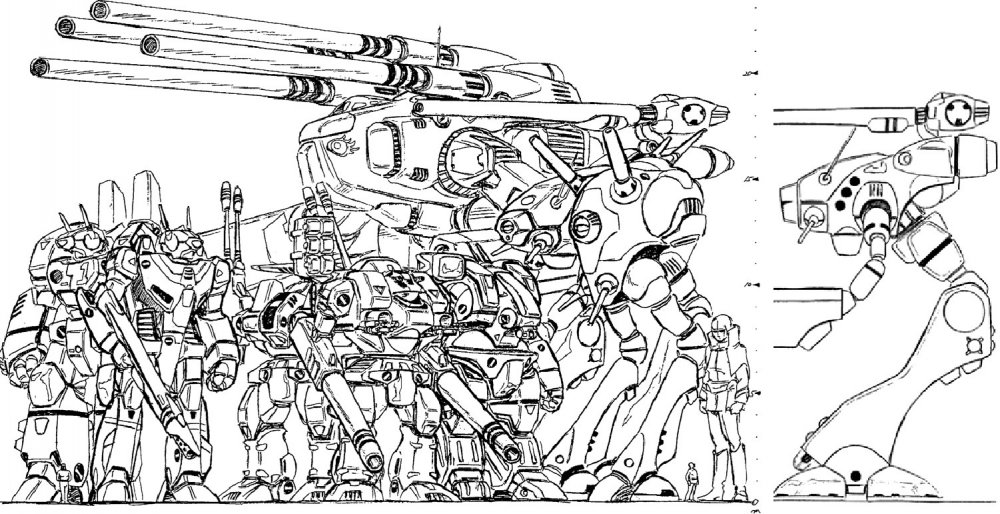
-
The making of a 1/72 Tacticar Pod Graug--the musical!
captain america replied to captain america's topic in Model kits
Yes! Yes I do. Roughly 35.5cm tall, or about 14 inches, if you prefer Imperial. -
The making of a 1/72 Tacticar Pod Graug--the musical!
captain america replied to captain america's topic in Model kits
Many. But if you have to ask at all, I take that as a good sign Truthfully, many of the "concessions" are in the cockpit area, as what you see in the line art and the dimensional shape of the cockpit conflict greatly; a little bit like if you were shown a small camping trailer from the outside, and then a photo of the inside, showing lots of space with a full kitchen and a waterfall; you know the two just don't add up.