captain america
-
Posts
3561 -
Joined
-
Last visited
Content Type
Profiles
Forums
Events
Gallery
Everything posted by captain america
-

The making of a 1/72 Tacticar Pod Graug--the musical!
captain america replied to captain america's topic in Model kits
Like the Graug, the Regult is larger than its plastic counterpart, but closer to "official" dimensions, while still being able to realistically cram a pilot figure inside. With the guns at the top of the head/pod, a Regult stands just a little shorter than a 1/48 VF-1 Battroid. Enclosed pic for size reference. Electric matthew, ahiachris, Kremmen, I will put you at the top of the tentative list. When I get around to the project in a month's time, hopefully there will be sufficient demand to warrant a green light.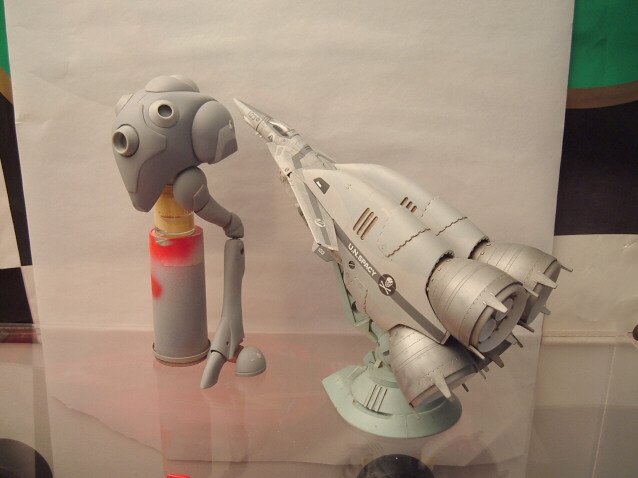
-
The making of a 1/72 Tacticar Pod Graug--the musical!
captain america replied to captain america's topic in Model kits
Super. I will only be offering a dozen of those tops anyway. I'll also be looking into having a set of decals come with it also. -
The making of a Tacticar Pod Graug: the Musical
captain america replied to captain america's topic in Model kits
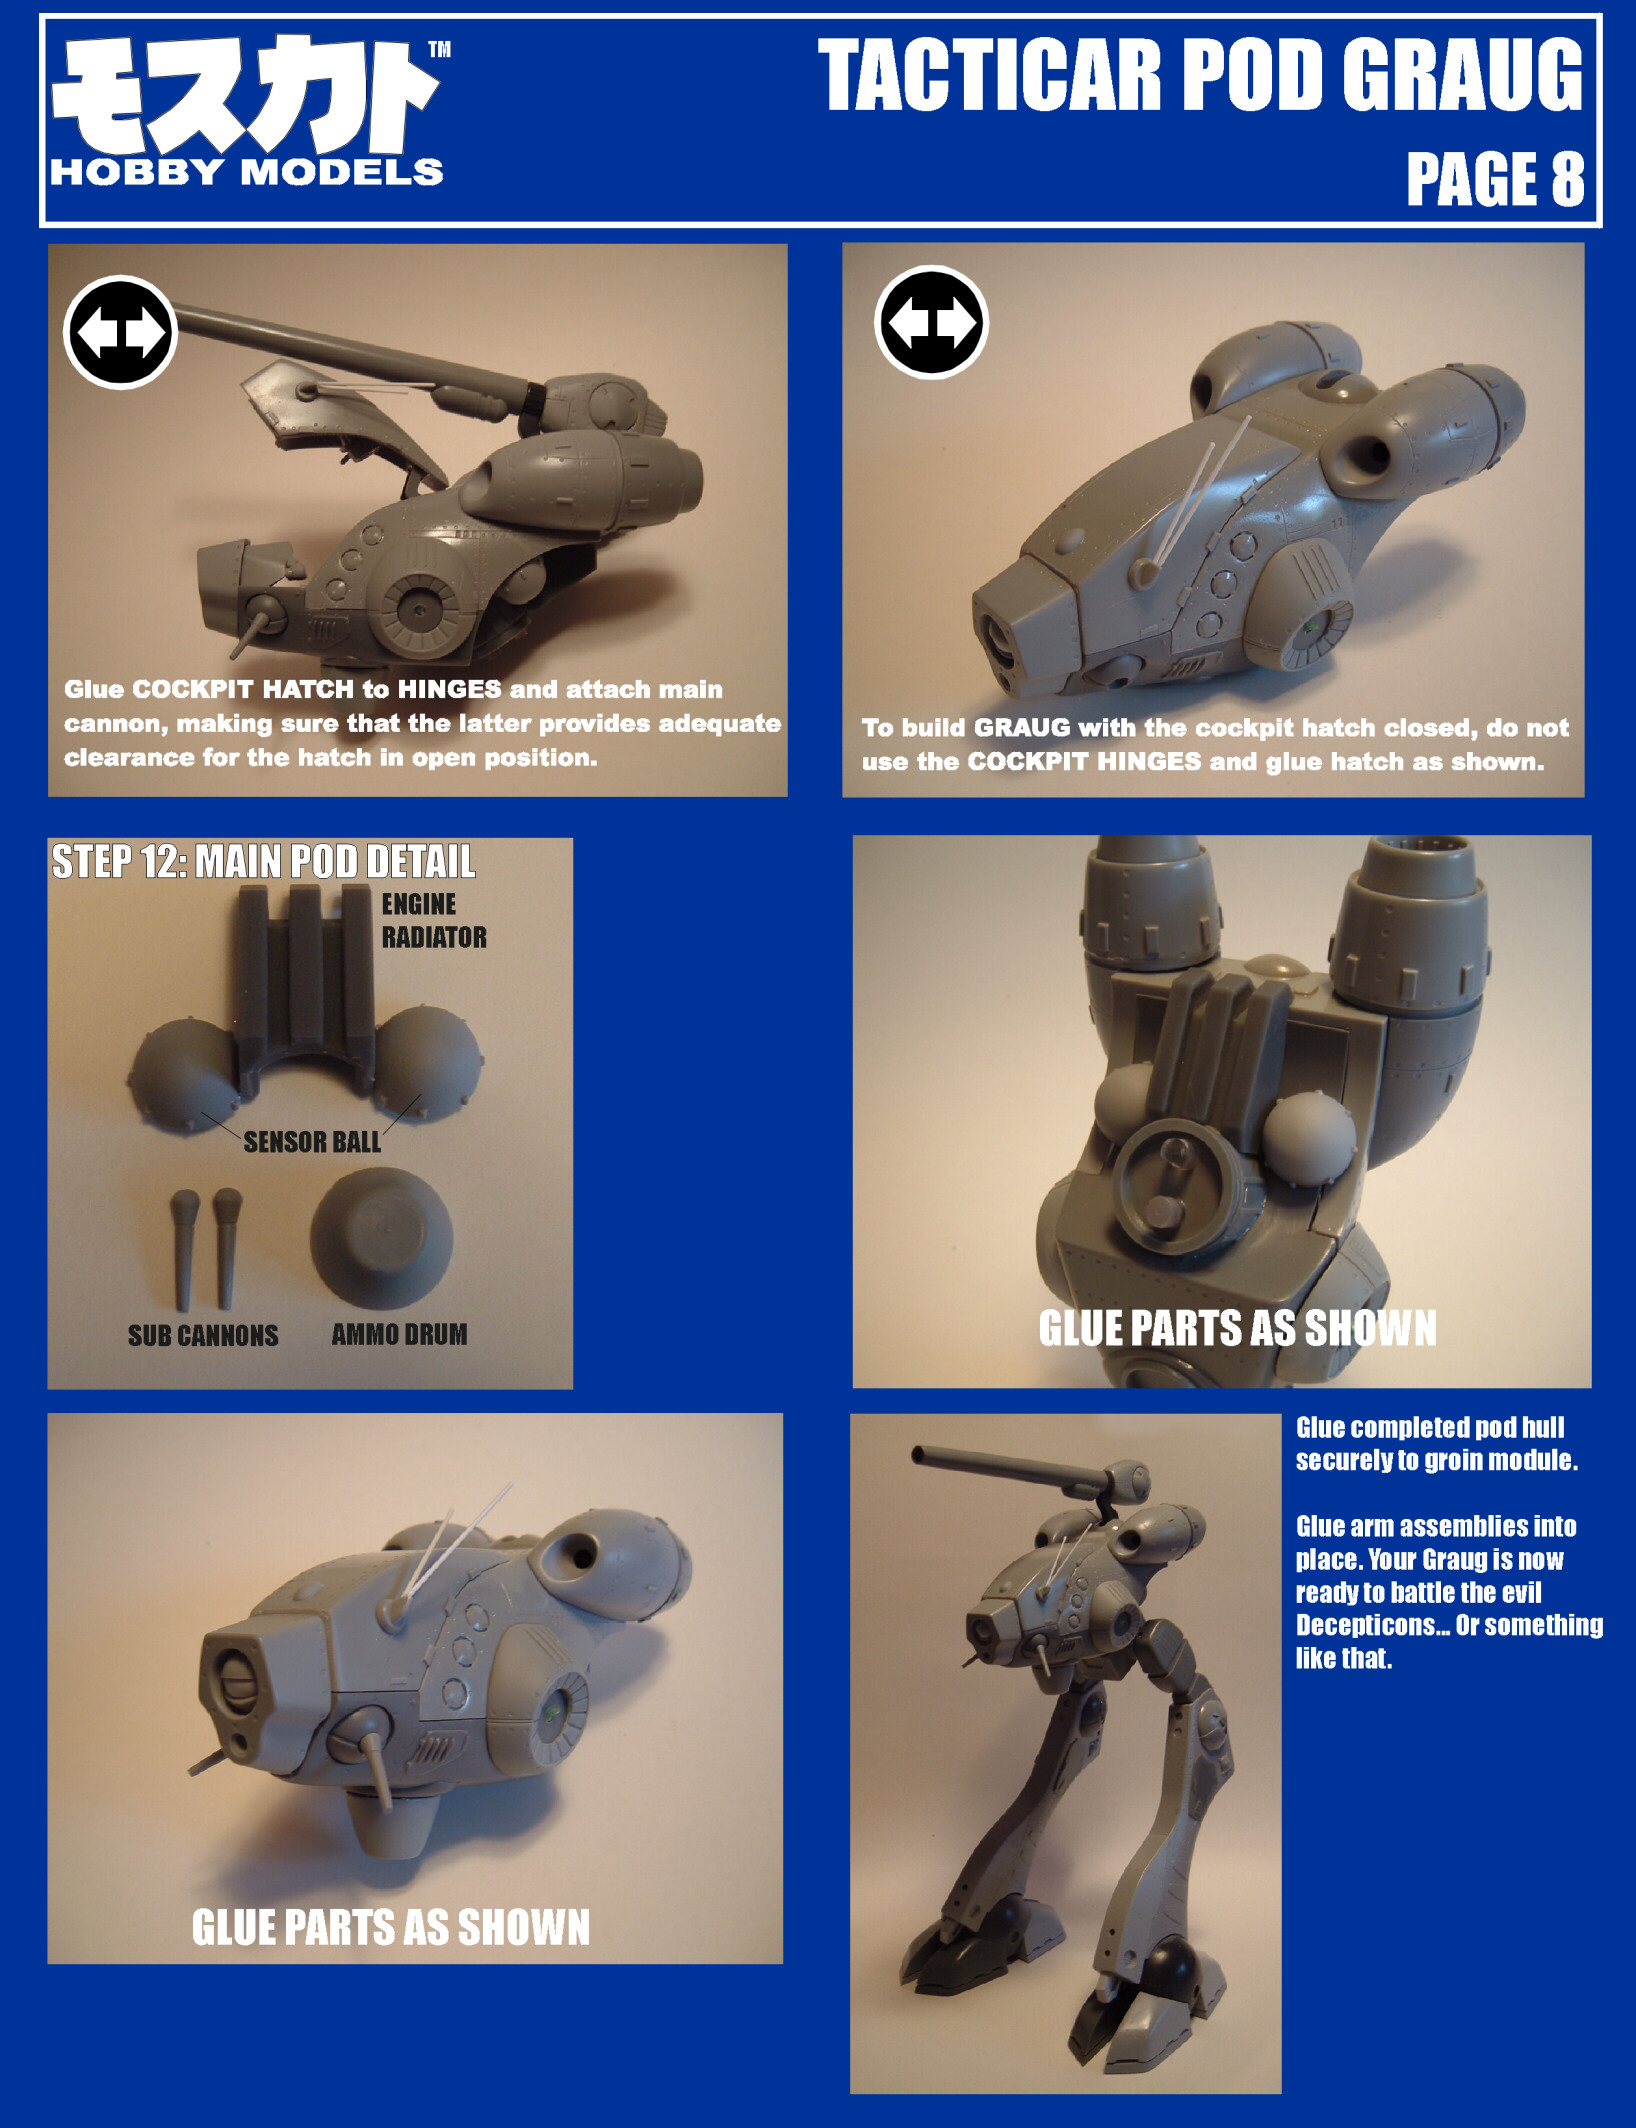
And the last two.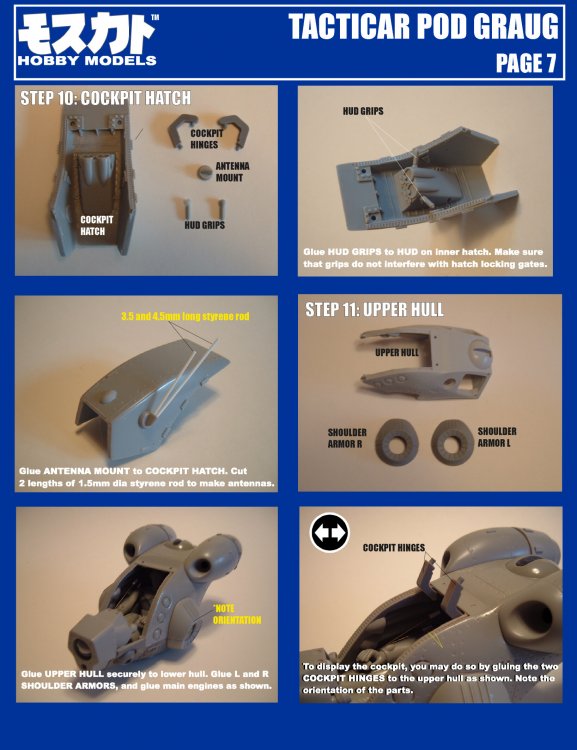
-
The making of a Tacticar Pod Graug: the Musical
captain america replied to captain america's topic in Model kits
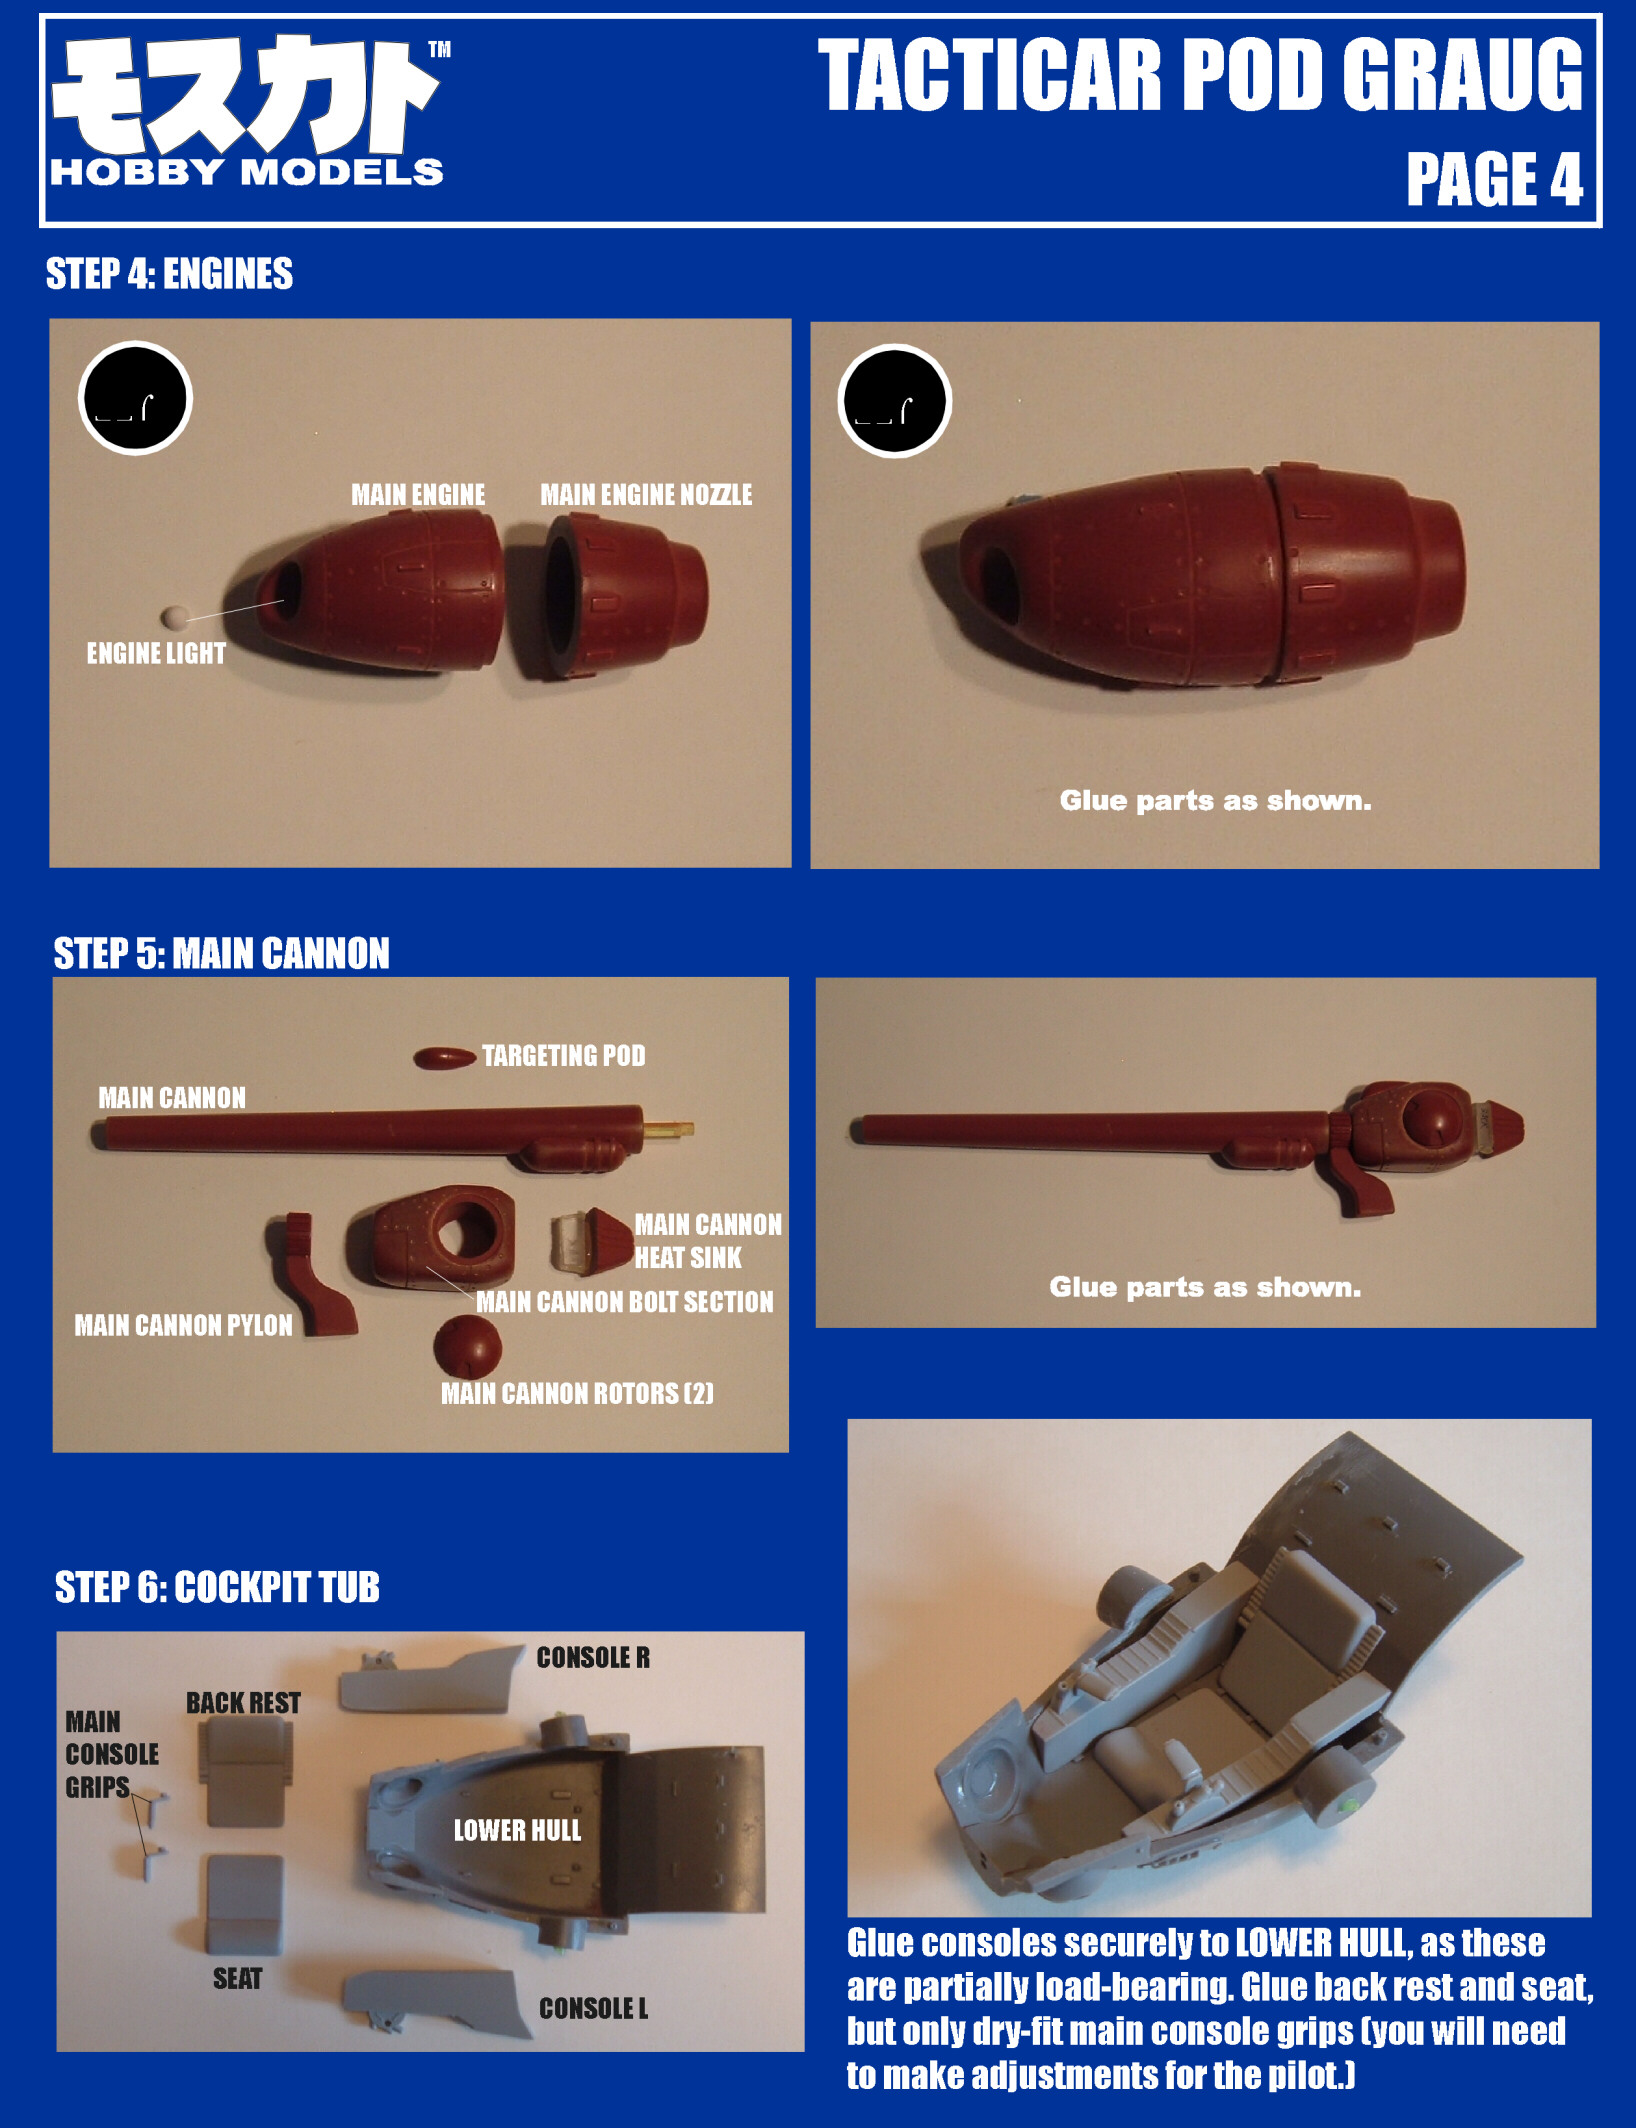
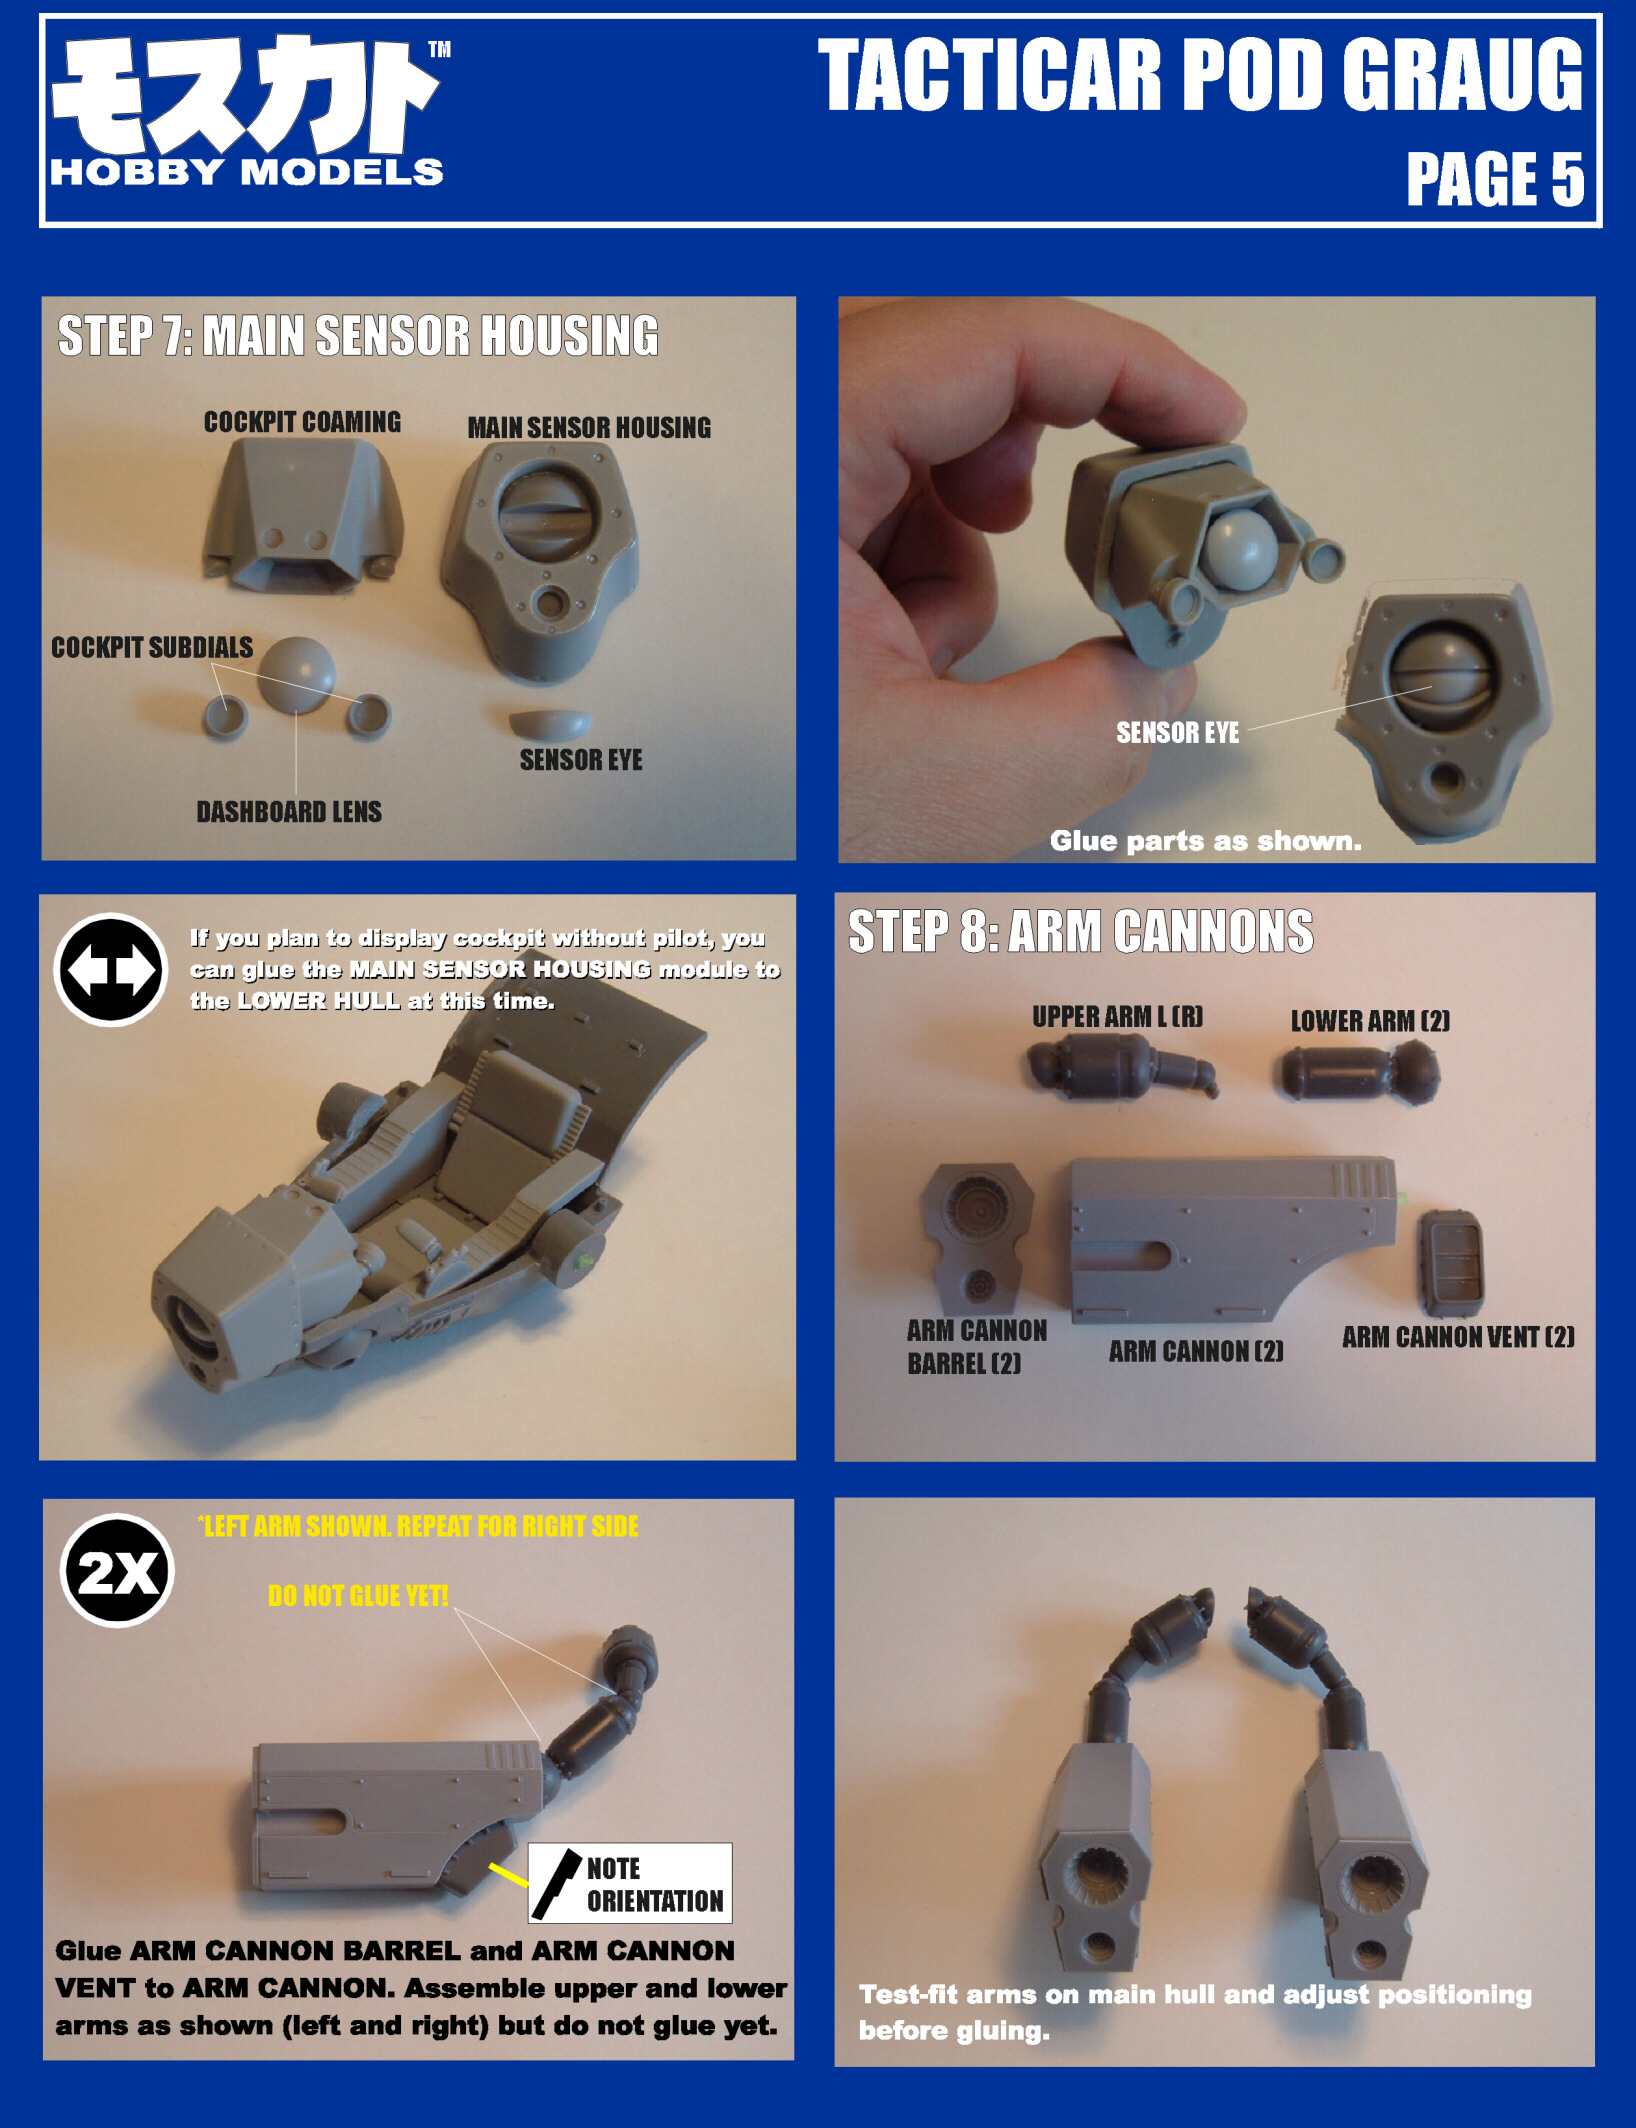
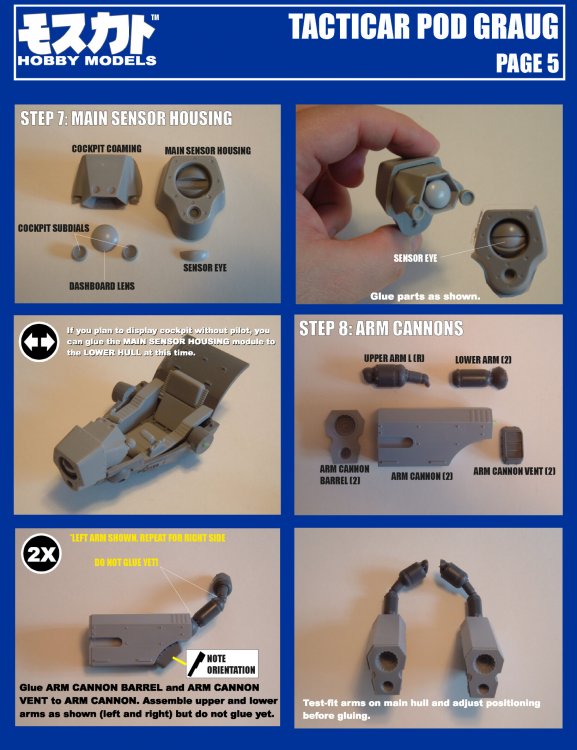
Pages 4, 5 and 6...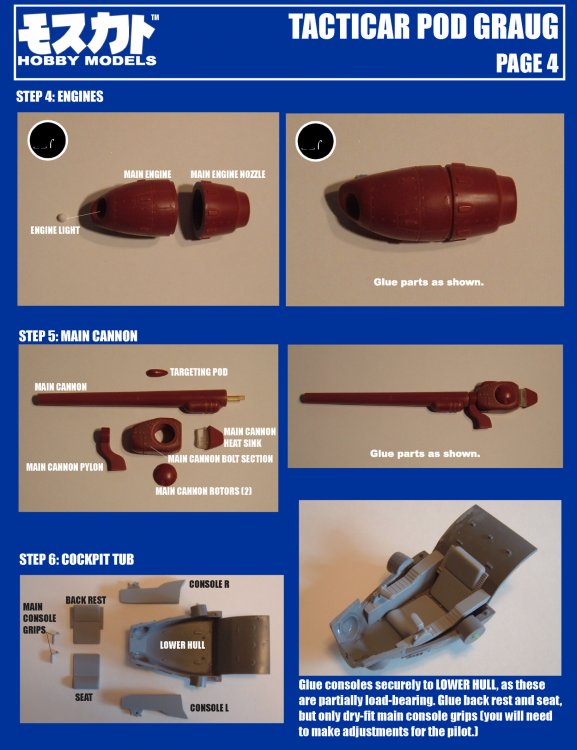

-
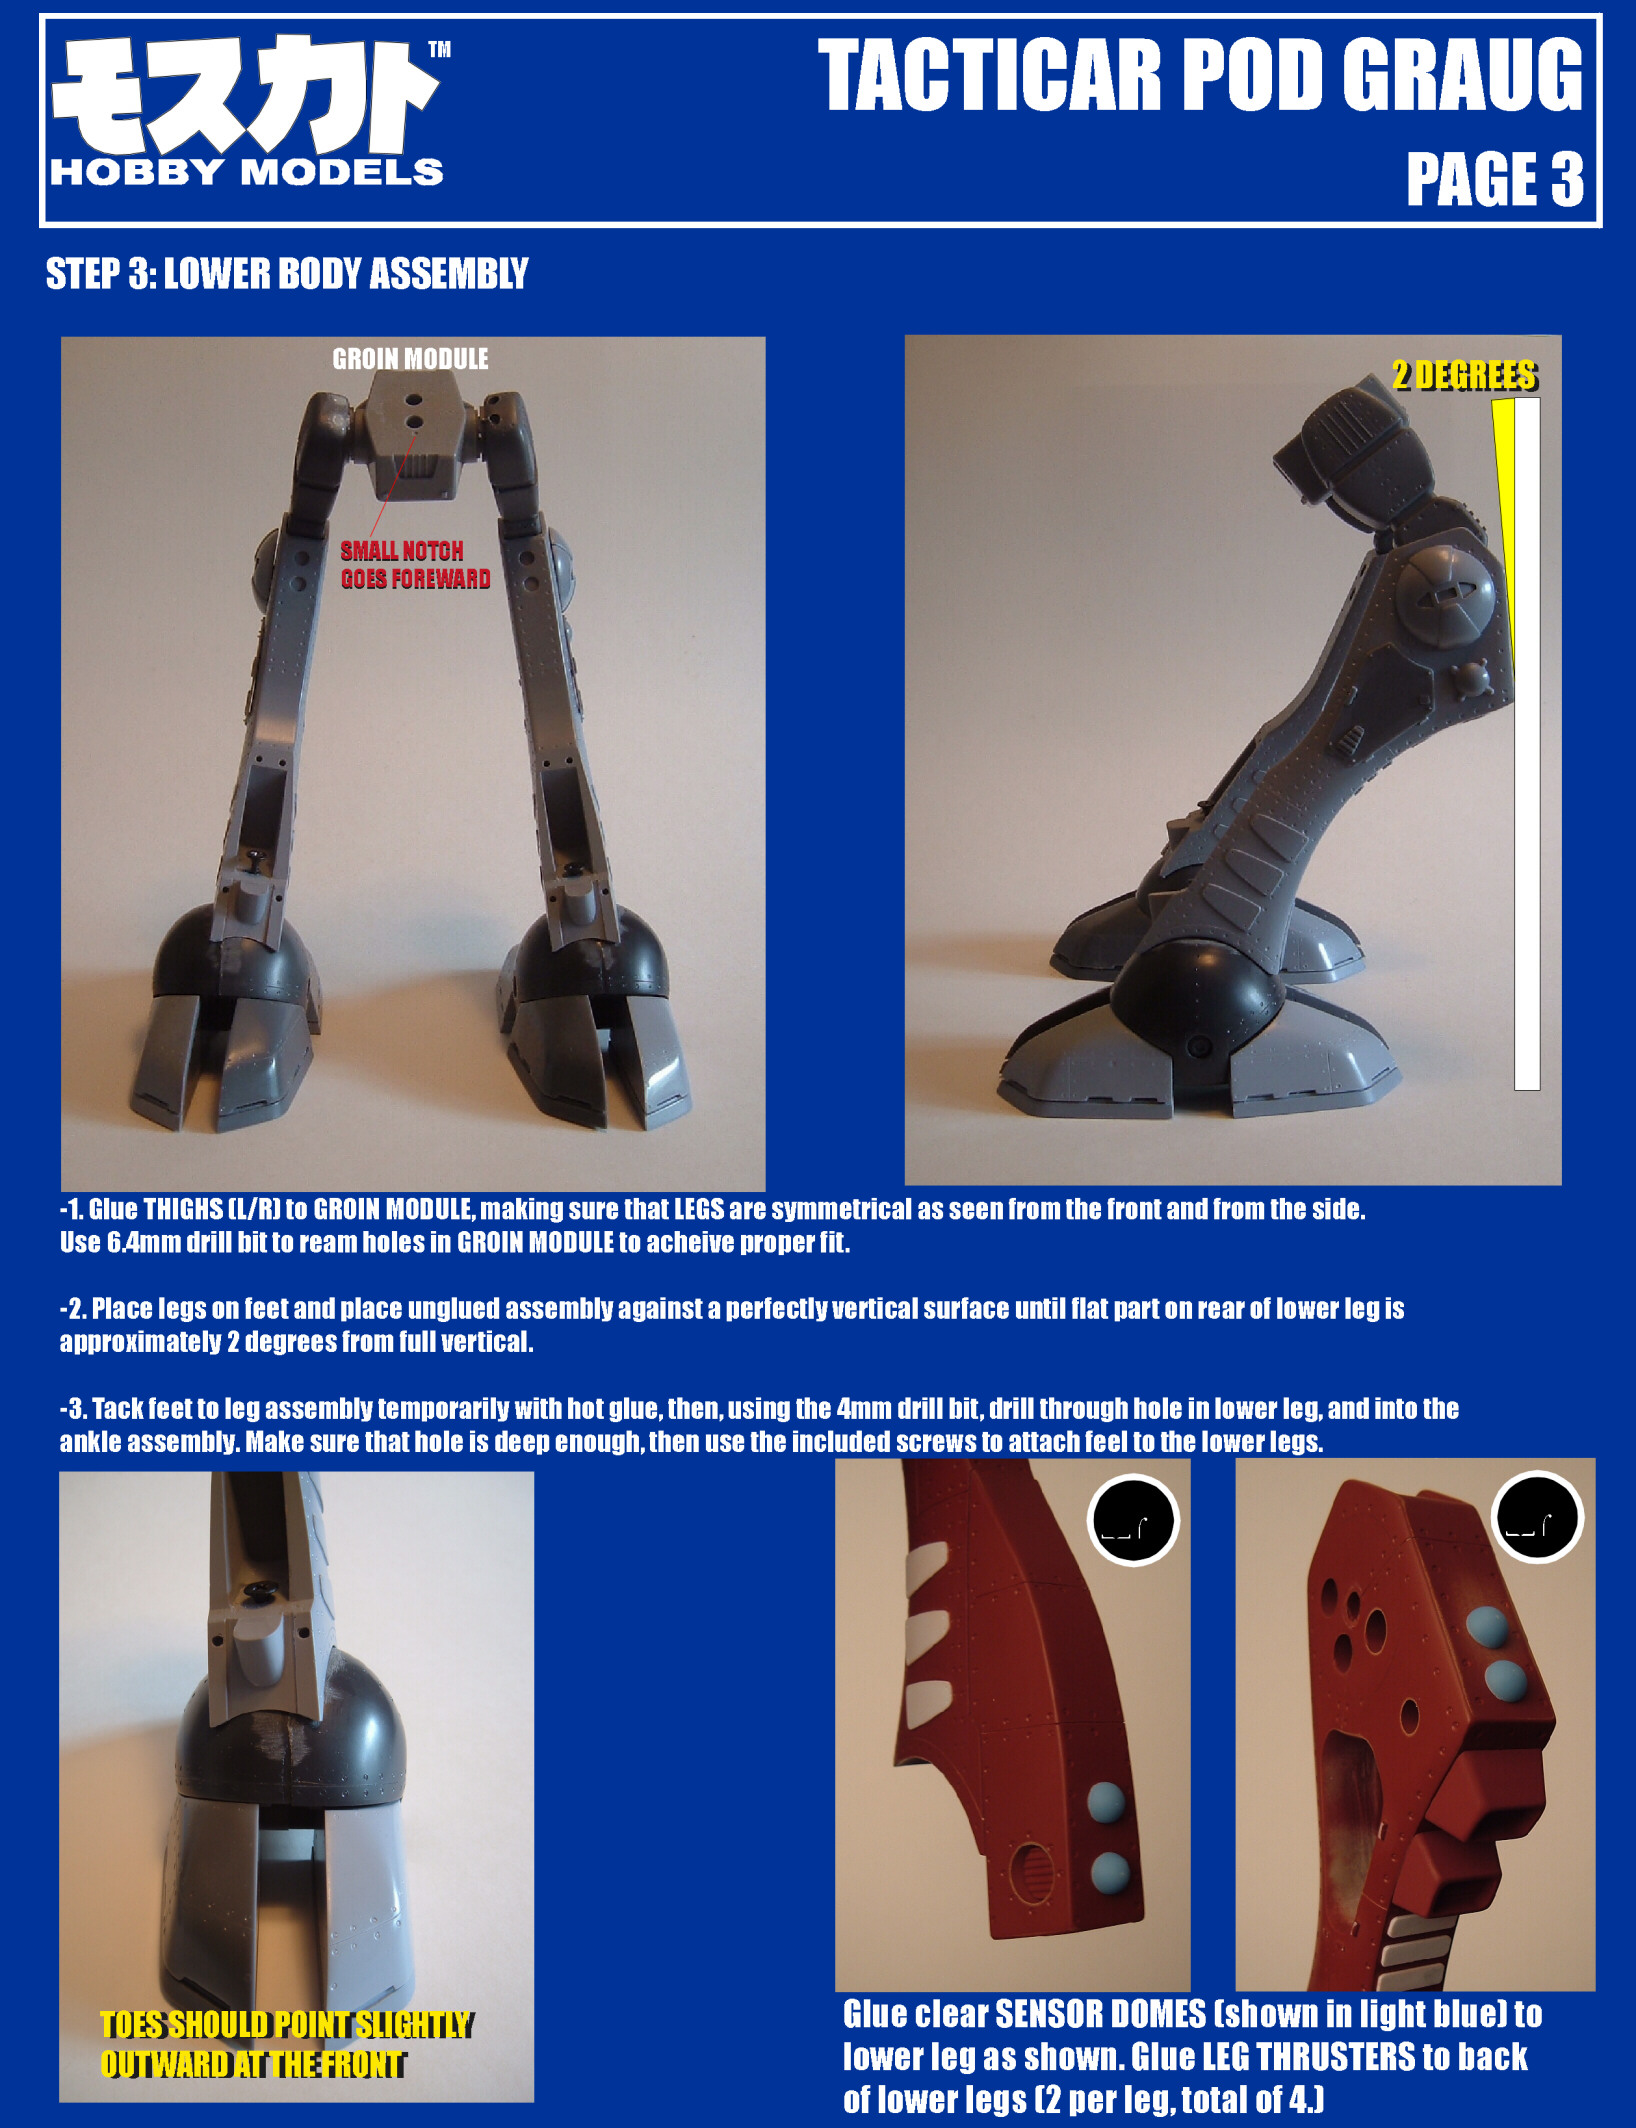
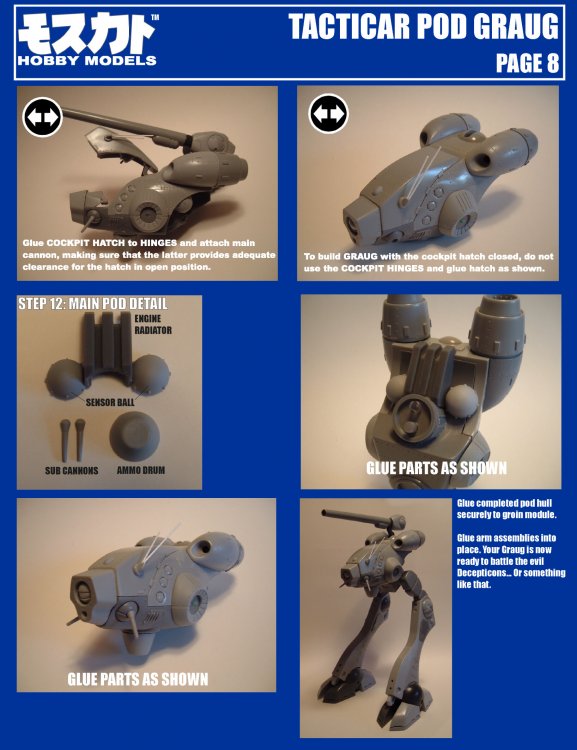
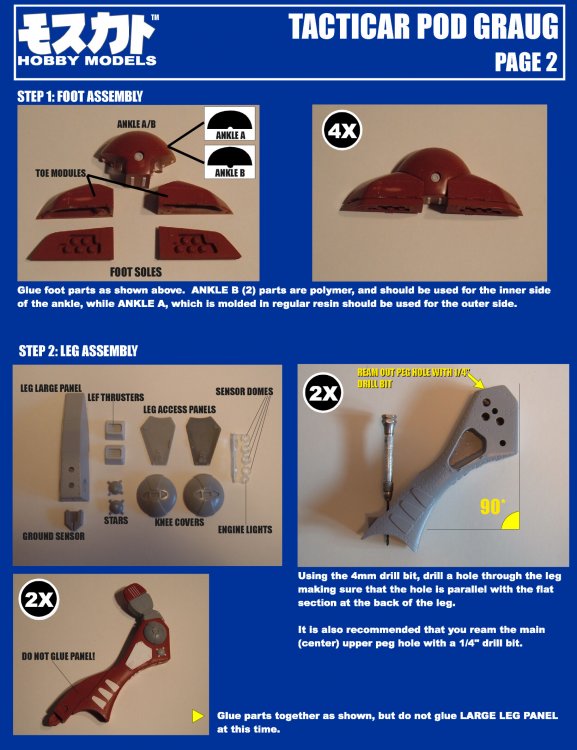
Ok, here are the instructions for the Graug. Feel free to download these for your viewing and building pleasure.


-
The making of a 1/72 Tacticar Pod Graug--the musical!
captain america replied to captain america's topic in Model kits
There's not enough demand for SC models to warrant the sculpt. My next project will likely be a re-issue of the full-cockpit Regult some time next month. -
The making of a 1/72 Tacticar Pod Graug--the musical!
captain america replied to captain america's topic in Model kits
What else would I pack my "titanic" monster model kits in? -
The making of a 1/72 Tacticar Pod Graug--the musical!
captain america replied to captain america's topic in Model kits
If it's any consolation, I've noticed that packages to Europe tend to go a bit slower than to other parts of the world. You should have it within a week or so. -
He hit the nail right on the head; it's a 1/48 kit for a mere fraction of the cost of a resin offering, and will make for a wonderful super-detailing opportunity. To expect anything more at the advertised price-point would be, IMHO, unrealistic. Too bad I despise the YF-19.
-
"Still working on it" is code for saying that they can't generate enough market interest to justify the tooling/production at this time; otherwise, they would have gone to production with it by now, and it was always supposed to be 1/72. Depending on what it ends up retailing at, folks might be better off opting for the re-issued MO-SUU-KAA-TOH HOBBY Tomahawk.
-
The making of a 1/72 Tacticar Pod Graug--the musical!
captain america replied to captain america's topic in Model kits
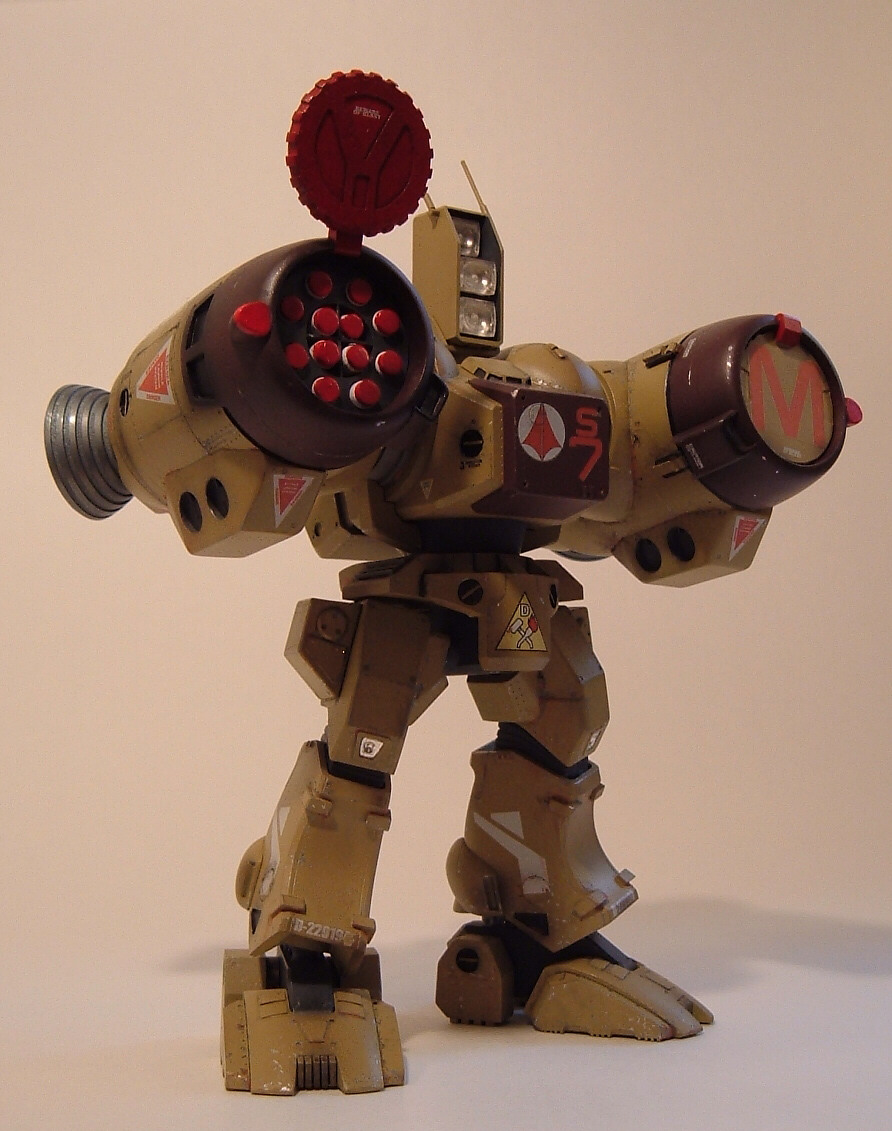
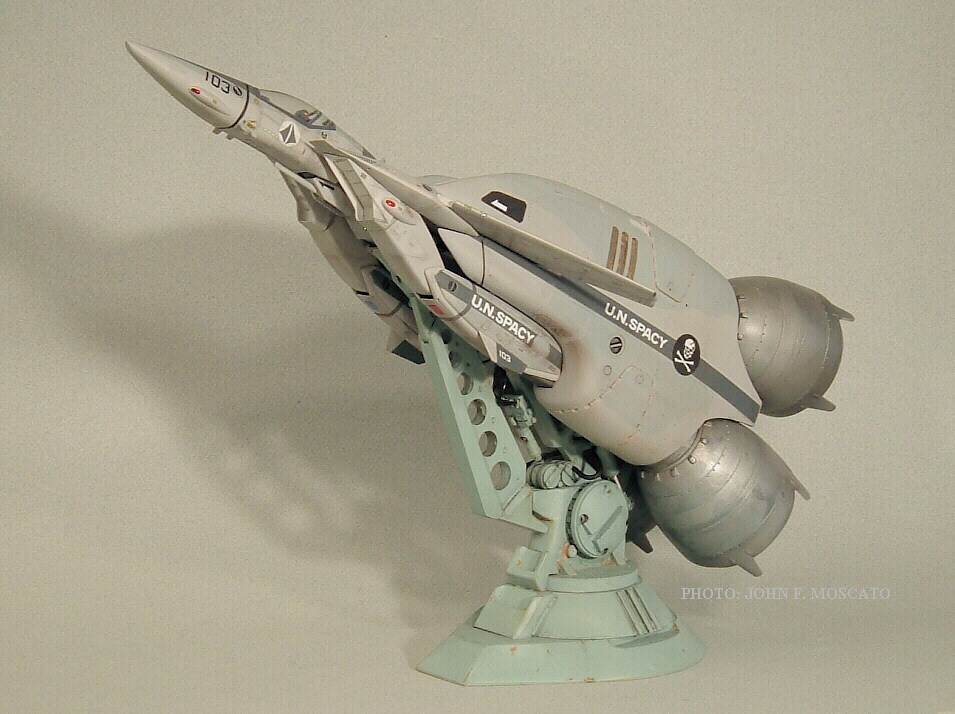
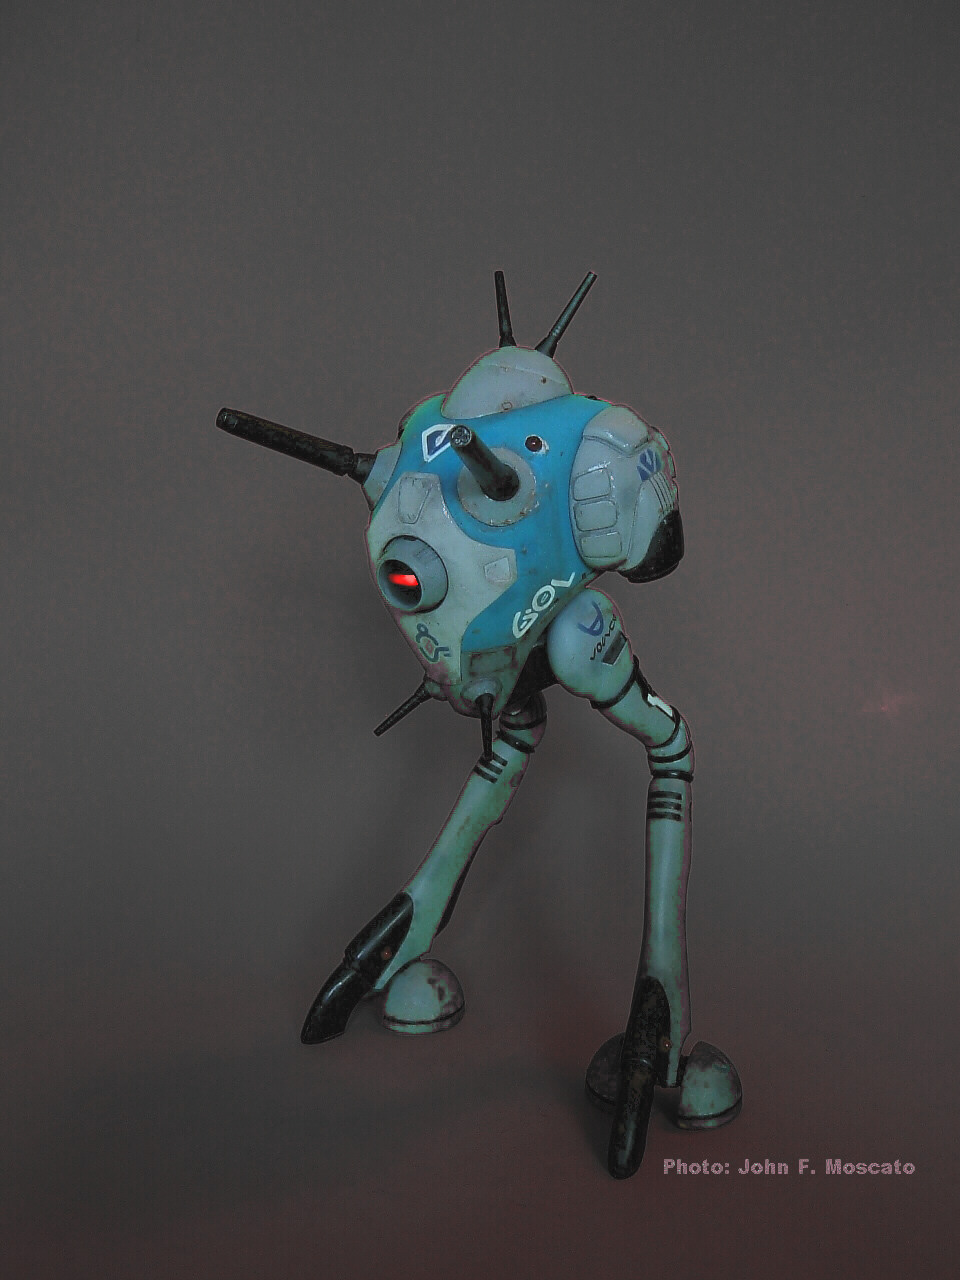
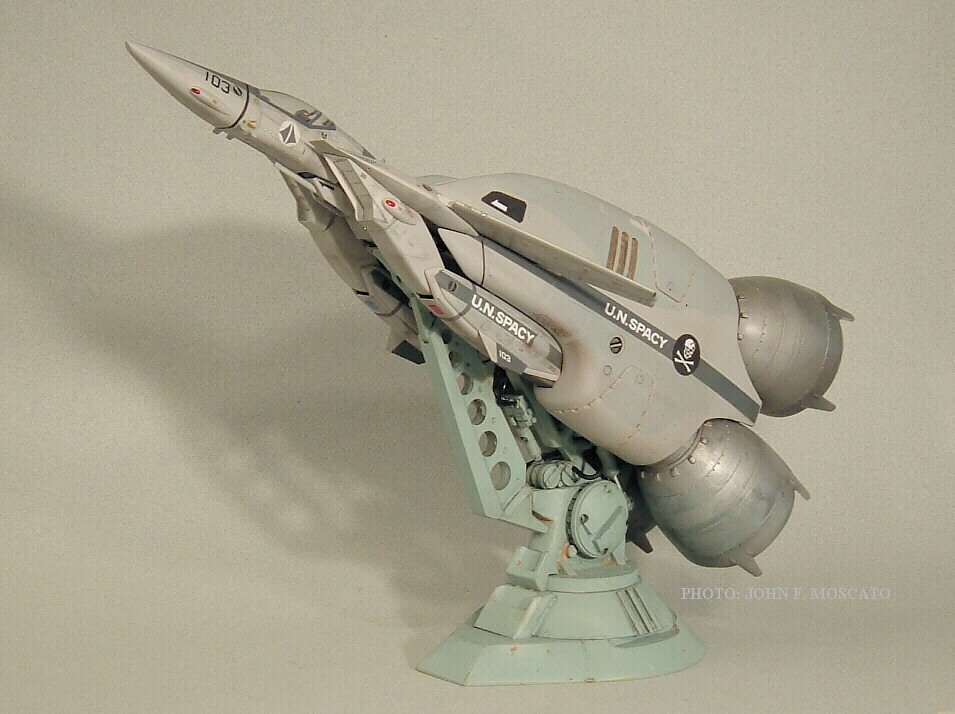
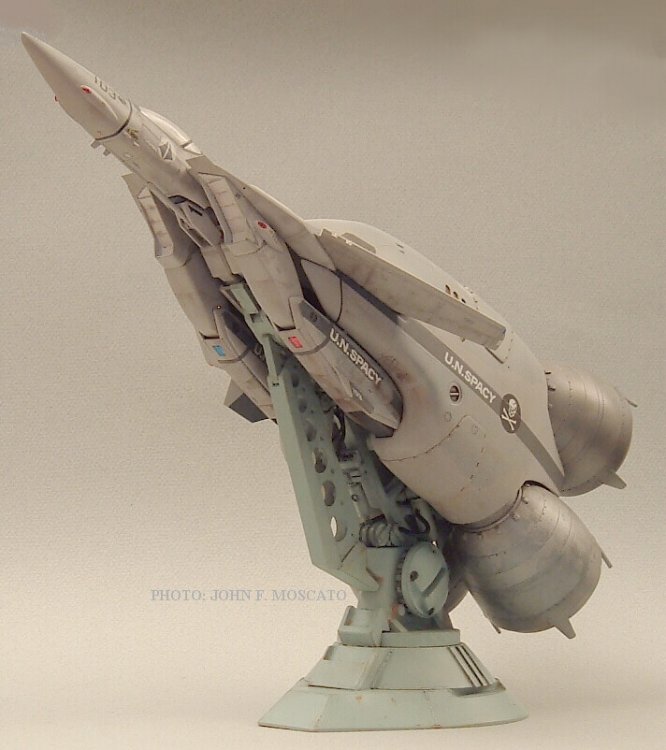
That depends on what you mean by "transforming kit." I've built many commercially-available variable model kits in my youth, and I also mastered the AFC-01 Armored fighter in 1/32 several years ago. It was made such that it could be built in any of the three modes, but not actually "transform," since that would mean sacrificing realism in key areas like joints, which goes against my philosophy. Oh, and as for finishing my own models, I've gotten around to a few (see pics below) but with my law and commercial studies in the last few years, my "just-for-me-model-building-time" has been almost nil. I told myself that rather than rushing a model and doing a half-a$$ed job, I'd just put them in storage until I have time to build them.

-
The making of a 1/72 Tacticar Pod Graug--the musical!
captain america replied to captain america's topic in Model kits
Truthfully, it was a more challenging and time-consuming bite to chew than I'm used to for a garage kit, but I have no regrets. Were I ever tackle something like that (or even more grandiose) I would do things differently. For example, if I ever get around to the 1/32 Legioss, because of its size, complexity, and likely high cost, I would break it down into several instalments over a number of months. Better for my psychological health, and better for everyone's wallet. Also, for the official record, I don't do these models for profit, and never have; all I've ever charged for is my labout and materials. No matter what, you gotta realize that what I'm doing now, I only dared to dream I could accomplish in my wettest fantasy as a boy, so I don't even really consider it work, more like full-blown arts-&-crafts with the occasional tedious step. -
The making of a 1/72 Tacticar Pod Graug--the musical!
captain america replied to captain america's topic in Model kits
I don't know if I'd necessarily call it an ordeal; that implies pain/suffering, which this was not, just very, very long. To give you an idea, I can generally pour all the molds for one average 1/72 model, say a Spartan or Regult, all in one shot. Basically, 1 kit = 1 pouring session. With the Graug, there were so many molds that it took 4 separate casting (pouring/pressurizing) sessions with both a 5 gallon & 2 gallong pressure tank just to make one kit. It might not make sense now, but once you have the actual model in hand and you lay out all the parts, it'll make sense... I hope -
I heard that it was supposed to be released this month, so hopefully they'll have something to show in the next couple of weeks. I have to say, I think that the Q-Rea's proportions are really a let-down though. Between the two, I actually think the 26 year-old Imai kit looks better(though that was the TV verson.)
-
The making of a 1/72 Tacticar Pod Graug--the musical!
captain america replied to captain america's topic in Model kits
Mini-update. -Am holding three non-deposit Graugs for MW members Ultimateone, Evil bones, and Hodiod01. -1 Graug still unclaimed... For now. Molds are going into the dumpster tonight, cos I'm finally done and so are the molds!! I will be shipping all currently-paid orders on Monday-Wednesday, and by Friday of next week, the destructions should be posted for download. The latter will be a welcome, theraputic change of pace for me. -
In reality, all of the VF designs are like that: they look good on screen, but they don't translate well (and by "well" I mean practical) into three dimensions. Blame the Hory froating Headd
-
Thanks guys. So in essence, much like his line drawings, his sense of storytelling is ambiguous, inconsistent and nonsensical. Got it
-
The making of a 1/72 Tacticar Pod Graug--the musical!
captain america replied to captain america's topic in Model kits
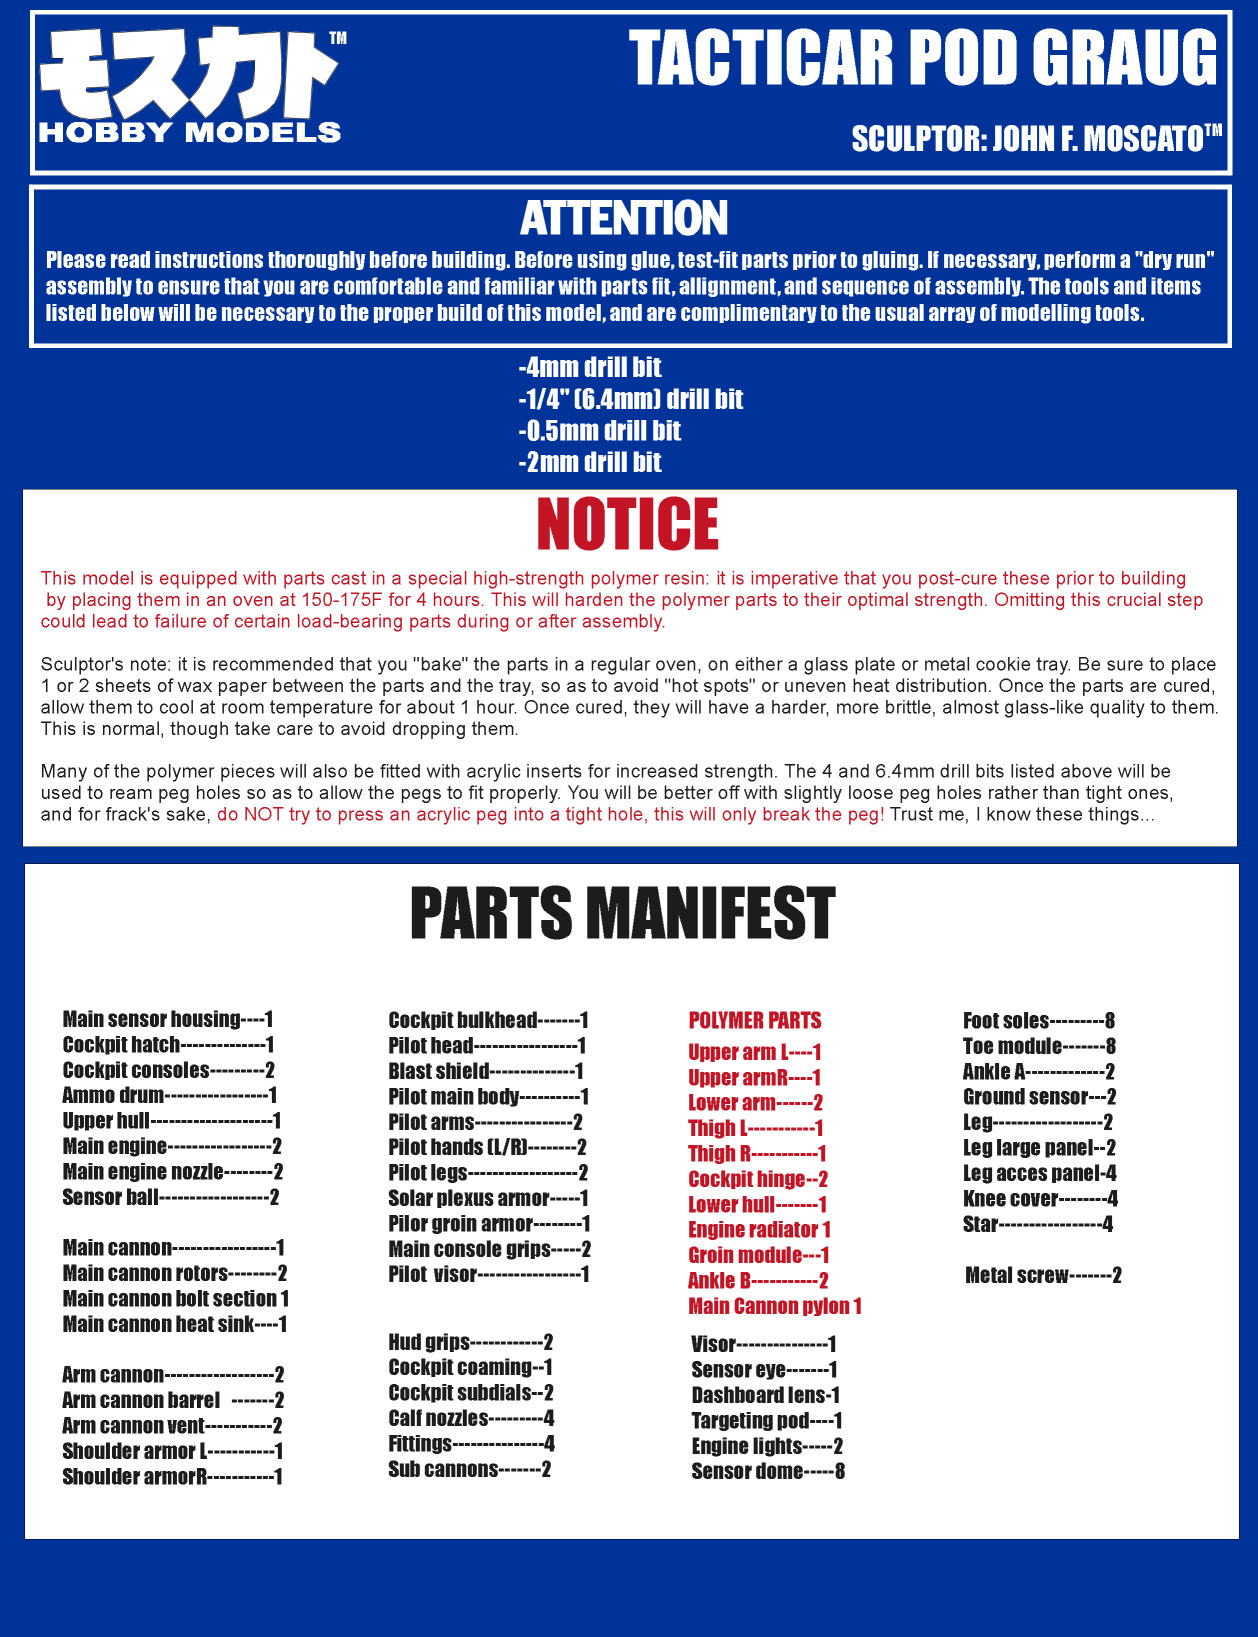
Yes, a lot of parts, but only the polymer parts need baking, which are all conveniently packaged in their own separate bag, save for the lower hull. Mind you, you can also bake the clear parts for half that time if they're still a bit soft. Why acrylic? Because it bonds better to the resin than brass would. Just me being anal and such Don't forget to post some pics if you can; it's always nice to see pics from unbiased third parties. P.S: did you get the metal screws in your kit? -
I have a question. I apologize in advance if it's been discussed previously; I went through roughly 10 pages of the thread and saw nothing about it. All of the "sequel" Macross series seem to be derivatives of DYRL more than the TV series; I'm basing myself off of, among other things, the fact that the Q-Rea in Flontier is much closer in design to the film Q-Rau than that of the TV series, as are the Queadluun suits in Mac 7. Further, the few flashback sequences we see in EP1 of Frontier are of the film and not the TV series. Has the TV series somehow been orphaned from the official timeline in favor of the movie, or am I missing something altogether?
-
See? See? I'm not the only one who struggles with line art inconsistency! By the way Chris, your vehicles are looking good; I encourage you to keep it up!
-
The making of a 1/72 Tacticar Pod Graug--the musical!
captain america replied to captain america's topic in Model kits
Honestly, I really don't know if there's some sort of "grace period" in which to cook the parts; the instructions seem to suggest doing it about an hour or two after removing the part from the mold, but I've been known to cook mine something like 2 months afterwards with no issues. You'd actually be better off cooking the parts before working on them: it makes the plastic easier to sand/dremel. I've found that you can still use the boiling water technique to soften/reshape parts even after you've cooked them too; it's really a great material all around. -
The making of a 1/72 Tacticar Pod Graug--the musical!
captain america replied to captain america's topic in Model kits
Ok, 17 Graugs shipped as of Yesterday. At least one of you should have it by today. There might be a slight delay in shipping the remaining 13 due to my having to get more gift boxes... I ran out Alas, I will try to find another source that can hopefully supply me with these quickly; the PaperMart option just ain't doing it for me anymore. I will also begin the destructions next Monday, but for now, I will post the 1st page, since it contains important info, as well as the parts manifest.
-
The making of a 1/72 Tacticar Pod Graug--the musical!
captain america replied to captain america's topic in Model kits
Preferably, yes. Depending on what you're molding and how big it is, and what kind of flaws you're willing to live with, you may be able to get away without it. Speaking purely from experience, molding/casting is something that doesn't lend itself to being done half-heartedly, and I feel that having the right tools is critical to getting it right. It might sound like a daunting task to degas the rubber, pressurize the resin, etc. But once you actually go and do it, you'll wonder what all the fuss was about. -
What would've been ideal is if they had molded the missile launch housing separate, just a perforated plate molded in dark grey, and then mold the missiles all clustered together on a single back plate on a white sprue, then the modeler could combine them to have a more realistic loking missile set and container. Also much easier to paint. But hey, I'm not in charge at Bandai... Perhaps they will use a similar method if they end up making a perfect grade.
-
The making of a 1/72 Tacticar Pod Graug--the musical!
captain america replied to captain america's topic in Model kits
It's something to do with the formulation that Smooth-On uses for their silicone; I think they go cheap with certain additives. From my experience, the Bluestar rubber is more stable over the life of the mold, less likely to tear or chunk, and maintains better dimensional stability. Essentially, rather than degrade progressively like the Smooth-On stuff, the Bluestar mold remains almost perfect right up until the end, and fails more suddenly once you exceed the mold's threshold. The result? The 1st casting and the last casting are almost identical. Mold life will also vary greatly depending on the complexity of the part being molded, the quality of mold release, and even the resin: those 3 minute pot life resins are the absolute WORST for your molds, and degrade them much faster than the stuff I currently use.