captain america
-
Posts
3549 -
Joined
-
Last visited
Content Type
Profiles
Forums
Events
Gallery
Everything posted by captain america
-
For reasons I cannot explain, Guyver projects, save for the OOC stand-alone OVA, don't seem to really catch on and end up being binned prematurely. Heck, even the VIZ release of the manga died out many, many moons ago. I think that even the Max Factory toy line is dead. Shame...
-

has anyone ever made a good MBR-07-Mk II Spartan toy?
captain america replied to pondo's topic in Toys
Nope. No one ever made a 'good' Spartan toy. -
The making of a 1/72 Tacticar Pod Graug--the musical!
captain america replied to captain america's topic in Model kits
Not that I necessarily want to bring the thread back on topic, but it looks like there might be another "opening" for one kit. Just wanted to put it out there, for those that might have wanted one and not been able to get "in" on time. -
Stop you from speaking the truth? Never! For what it's worth, the Long/Siembieda artwork has always made my skin crawl; they manage to take an otherwise good mecha concept and render it in the most unflattering way possible. Left unsupervised, I'm not surprised that they came up with that, that... Thing.
-
Indeed. I thought that this YF was supposed to be somewhat 'exclusive' though, but if it's not, so much the better. That having been said, the color choice and scheme can really make or break the look of a model. While all the VF-25s are essentially the same airframe with a few different details, the color scheme from Luca's plane seems to accentuate the battroid's shape the best, whereas ironically, the Ozma grey/white seems to flatter it the least.
-
I don't know if it's the paint scheme or the shape of the head, but it seems to "fill-out" the normally anorexic VF-25 rather nicely. I'll probably pick one up at some point if they make a normal production version.
-
The problems associated with doing something that's "far out there" are, among others: -not always popular subjects -incredibly difficult to mold/cast: concessions have to be made when you want to be able to mold and cast something a few dozen times. That having been said, I have my own mecha design that I've been massaging for the last 17 years, which I never got around to doing anything with. I had considered dusting that off at some point, but I don't know how well it would be received; most people would likely dismiss it as an "Eva ripoff on steroids" even though it was designed at least 3 years before Eva ever aired.
-
The making of a 1/72 Tacticar Pod Graug--the musical!
captain america replied to captain america's topic in Model kits
Afraid not. -
The making of a 1/72 Tacticar Pod Graug--the musical!
captain america replied to captain america's topic in Model kits
I will be casting both halves of the cockpit opaque, whereas one side was translucent on the original. I'll also likely be going to a different color of resin to distinguish it from the original... I might also make a few refinements here and there; nothing major. -
Gundam Plamodel Thread III
captain america replied to wraith1701's topic in Hall Of The Super Topics
HLJ can be a lot more expensive than e-bay for certain things and when you order from overseas, you will either get nailed by customs or the shipping charges, or both. Since you're a fellow Canuck, try looking here: http://www.scifianime.ca/ It's run by a buddy of mine, and he's probably got the best prices in Canada, or pretty darn close. -
Poll: Yamato 1/60 Legioss/TREAD Combo
captain america replied to Lonely Soldier Boy's topic in Anime or Science Fiction
I'll likely get lynched for saying so, but I think Yamato needs to make MOSPEADA toys like they need a hole in the head. It's not that they're not capable or competent, but the market for these items is just too small and already saturated to justify the engineering costs of YET ANOTHER Legioss... Because Toynami AND Aoshima AND CM are all essentially competing for the same real estate. Also, I think that the licence holders screwed the pooch by whoring out the licence for the series to everyone and their dog; all of the licencees producing skus too similar to each other and cannibalizing each others' market. Looking at it purely from a business perspective, it wouldn't make financial sense for Yamato. -
The making of a 1/72 Tacticar Pod Graug--the musical!
captain america replied to captain america's topic in Model kits
Not sure if I'm interpreting that correctly, but I never take it for granted that there will be sufficient response to a proposal. Heck, I remember trying to (rather unsuccessfully) get a 1/48 Inbit project off the ground last year. Some things are popular, others aren't. -
The making of a 1/72 Tacticar Pod Graug--the musical!
captain america replied to captain america's topic in Model kits
Yes, just the standard, non-heavy missile Regult... But I'd hardly call it vanilla -
The making of a 1/72 Tacticar Pod Graug--the musical!
captain america replied to captain america's topic in Model kits
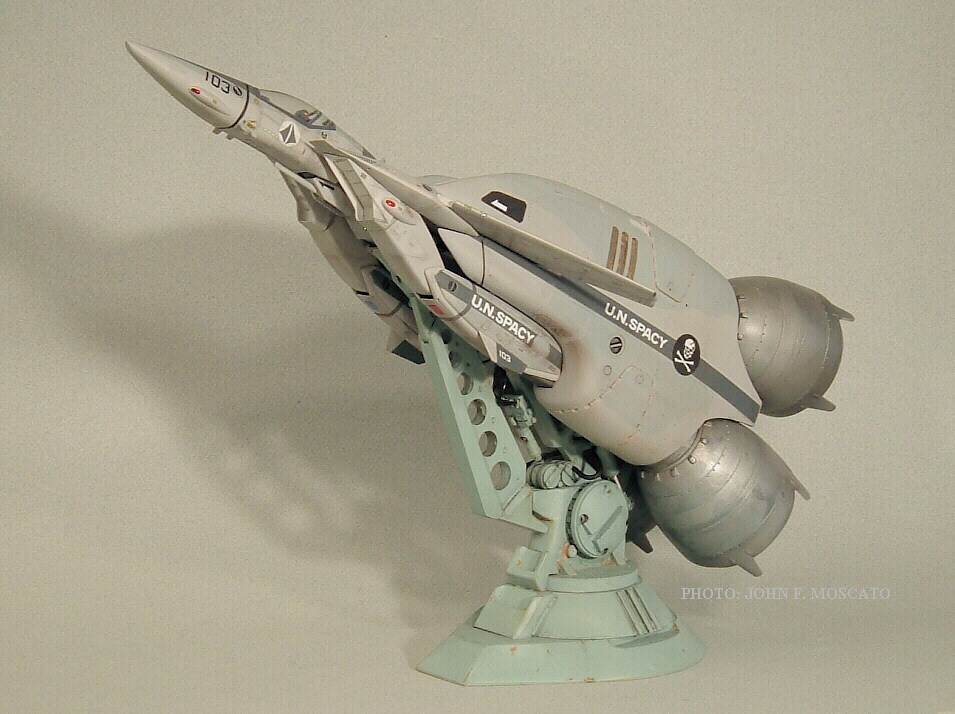
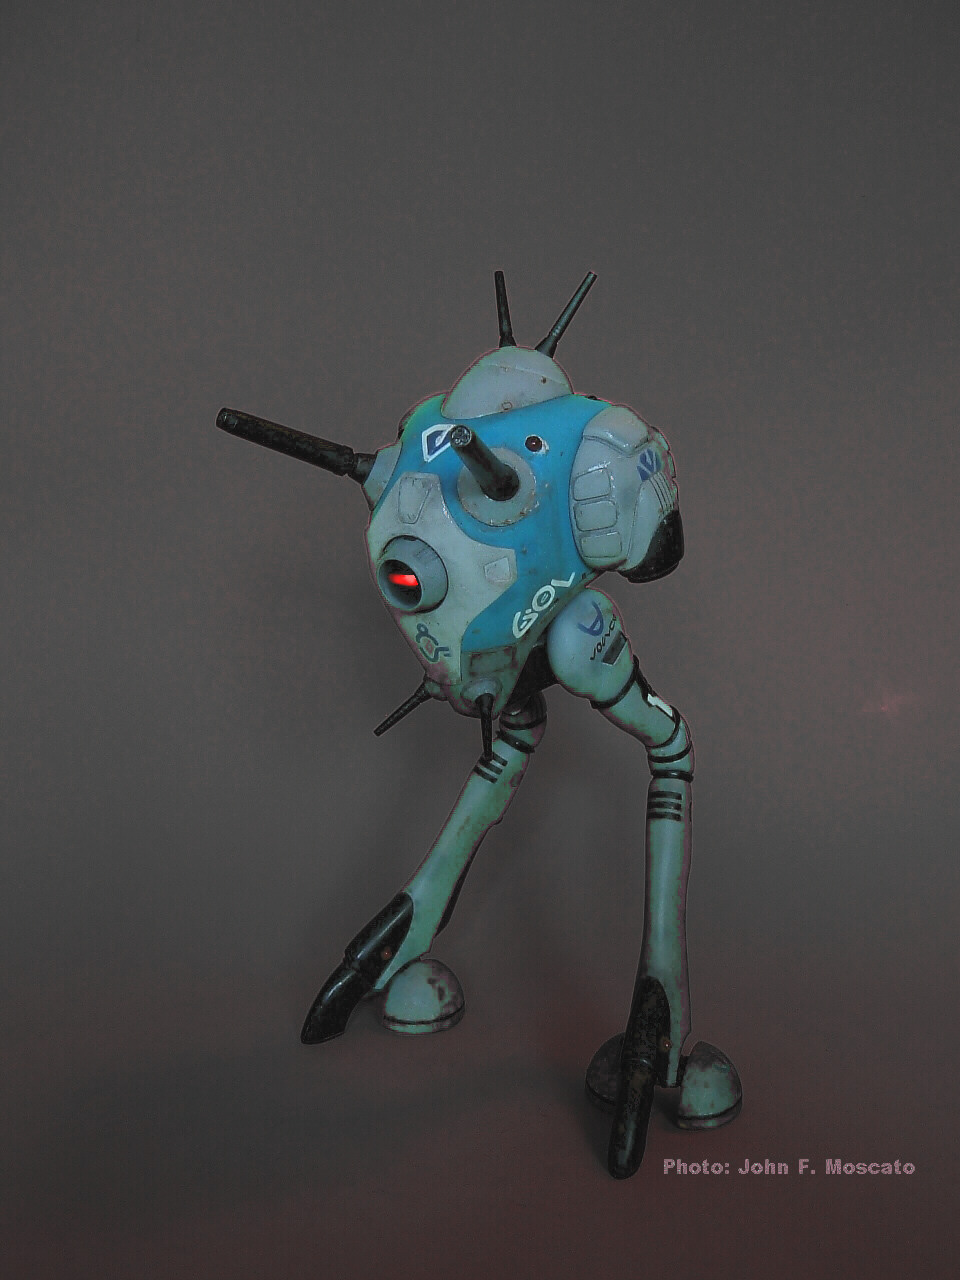
Like the Graug, the Regult is larger than its plastic counterpart, but closer to "official" dimensions, while still being able to realistically cram a pilot figure inside. With the guns at the top of the head/pod, a Regult stands just a little shorter than a 1/48 VF-1 Battroid. Enclosed pic for size reference. Electric matthew, ahiachris, Kremmen, I will put you at the top of the tentative list. When I get around to the project in a month's time, hopefully there will be sufficient demand to warrant a green light.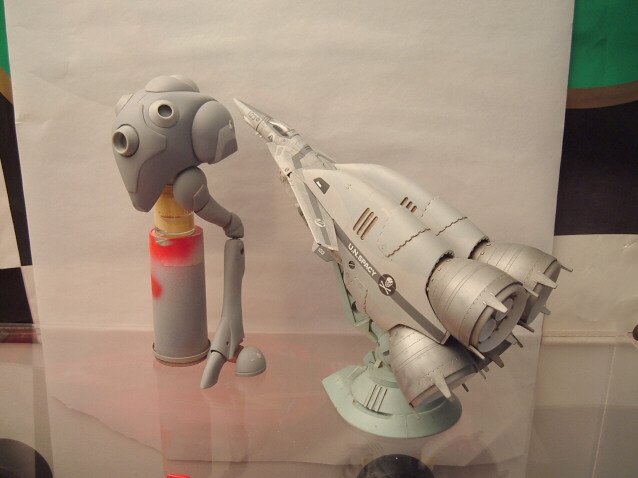
-
The making of a 1/72 Tacticar Pod Graug--the musical!
captain america replied to captain america's topic in Model kits
Super. I will only be offering a dozen of those tops anyway. I'll also be looking into having a set of decals come with it also. -
The making of a Tacticar Pod Graug: the Musical
captain america replied to captain america's topic in Model kits
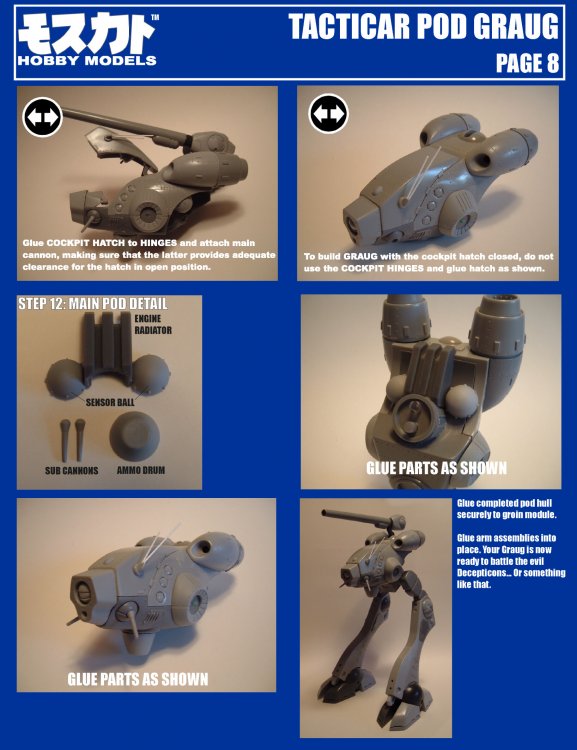
And the last two.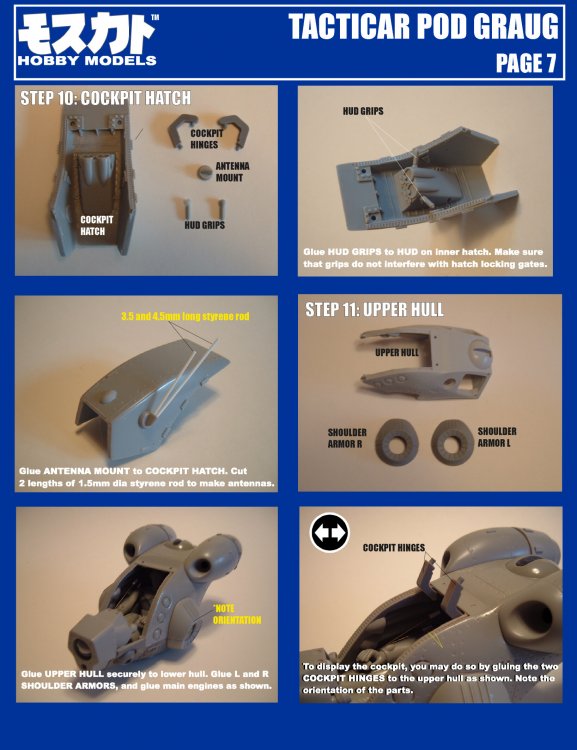
-
The making of a Tacticar Pod Graug: the Musical
captain america replied to captain america's topic in Model kits
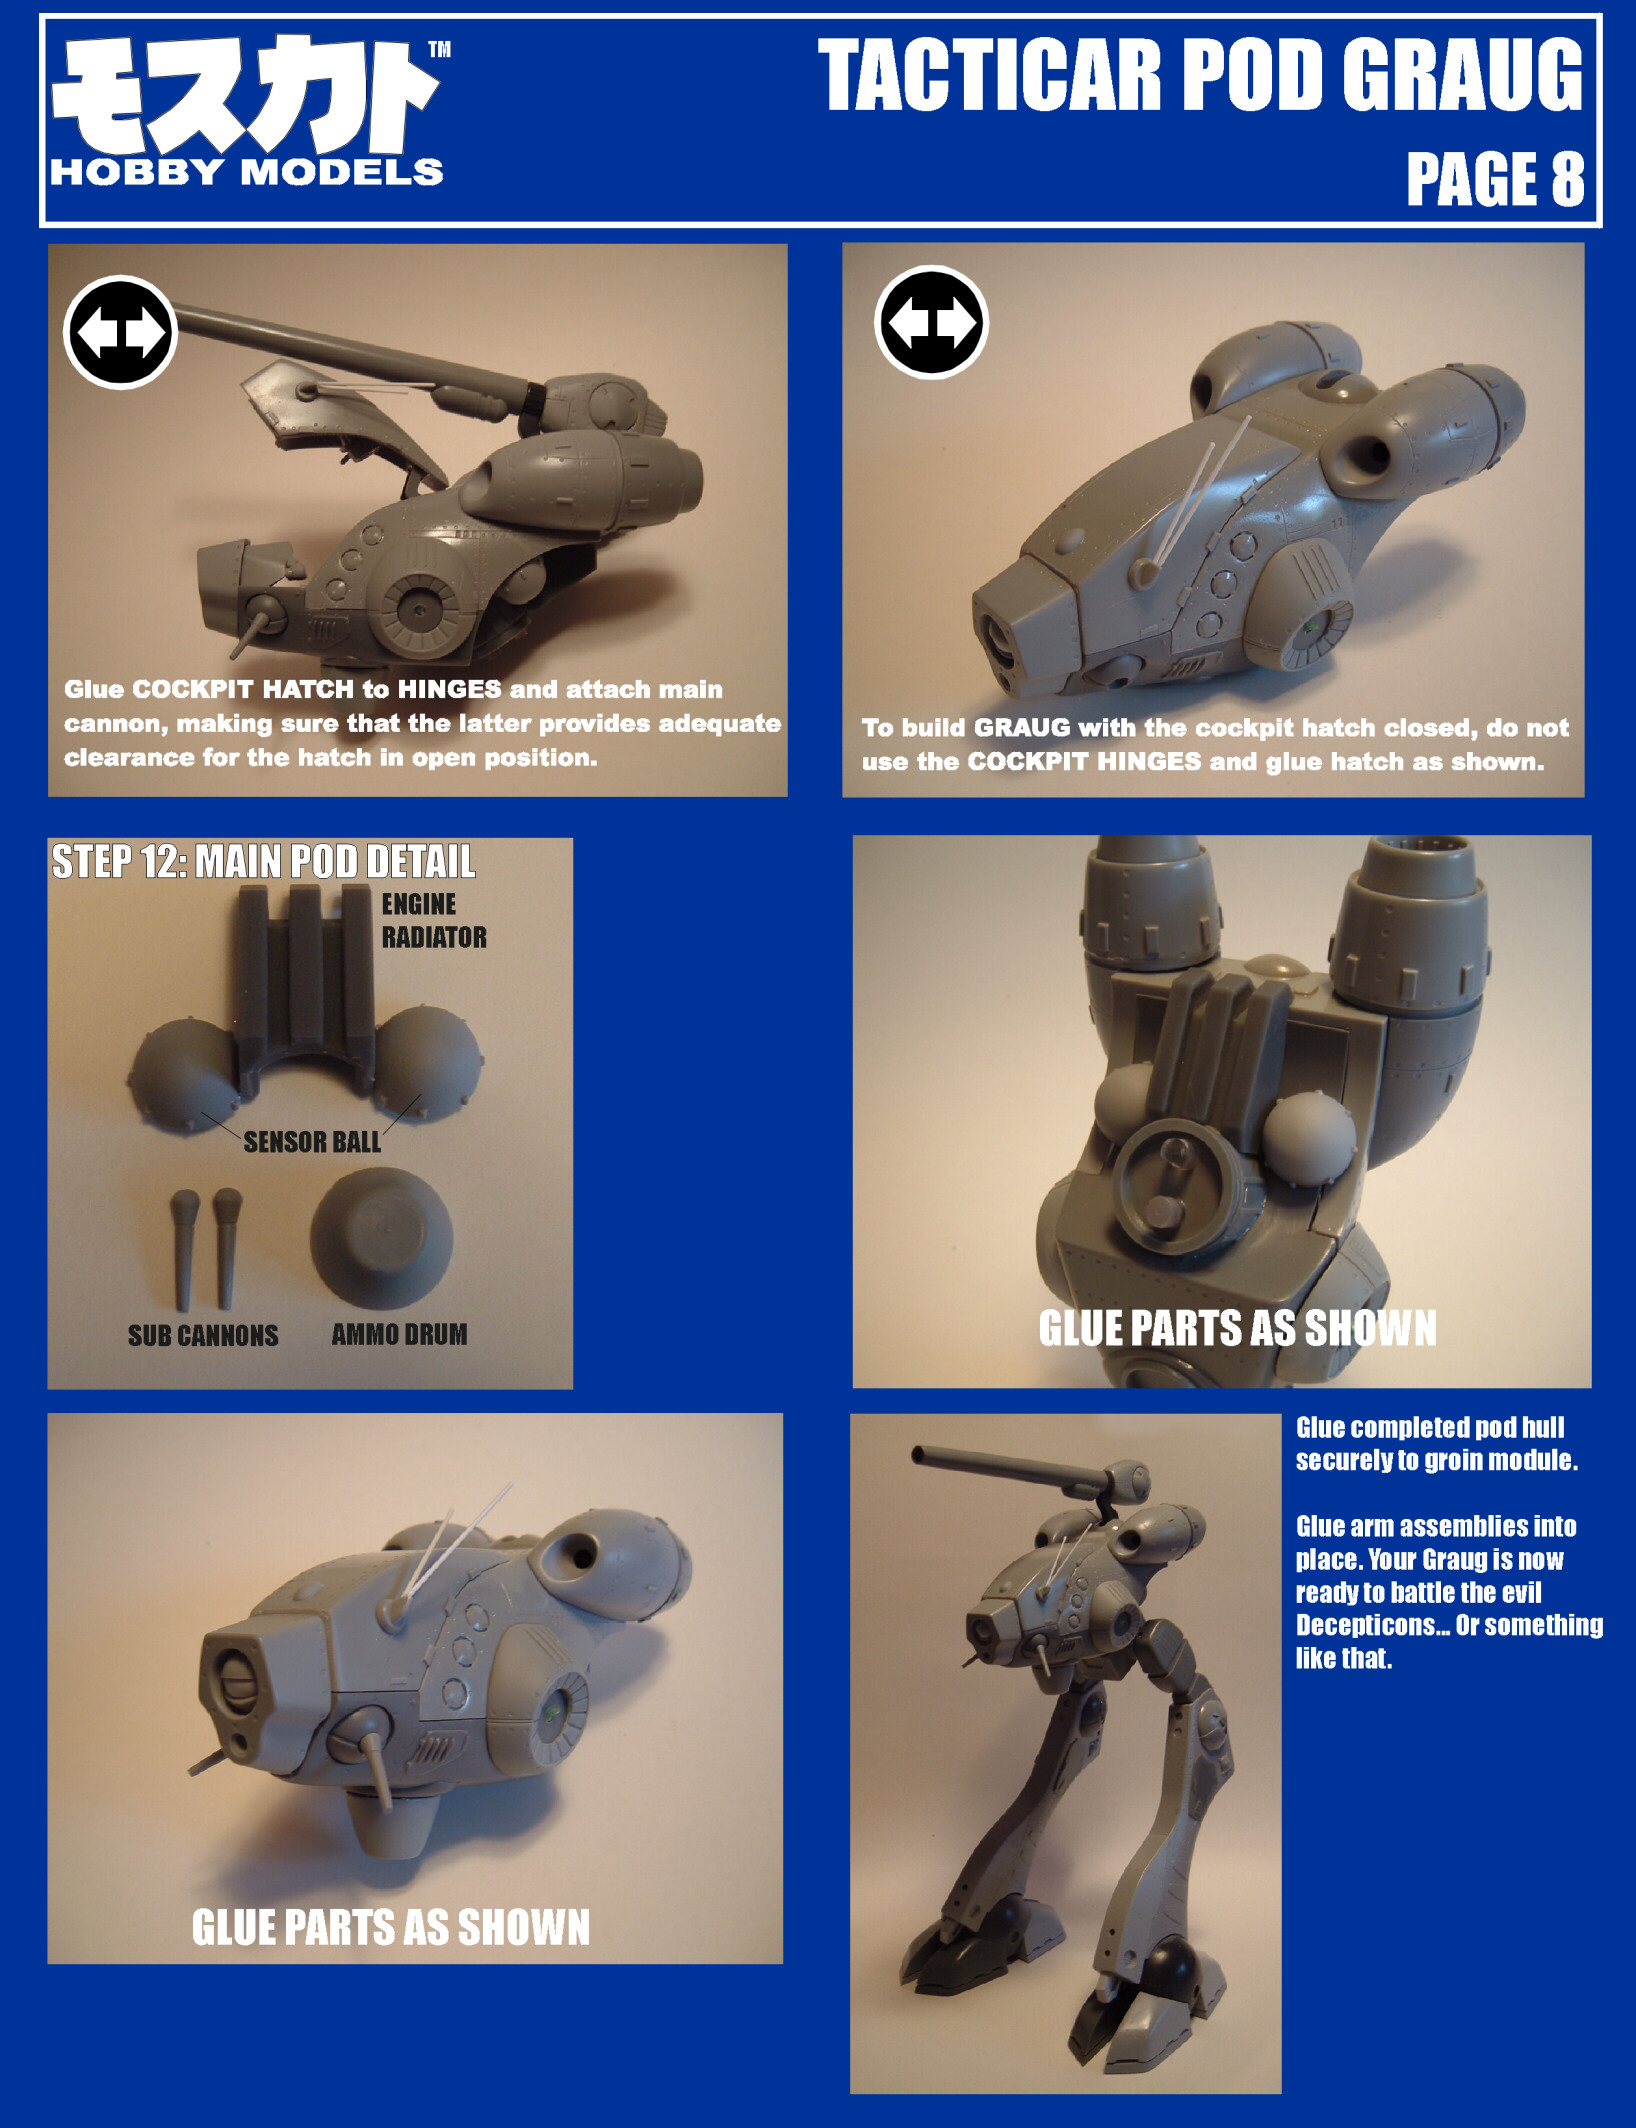
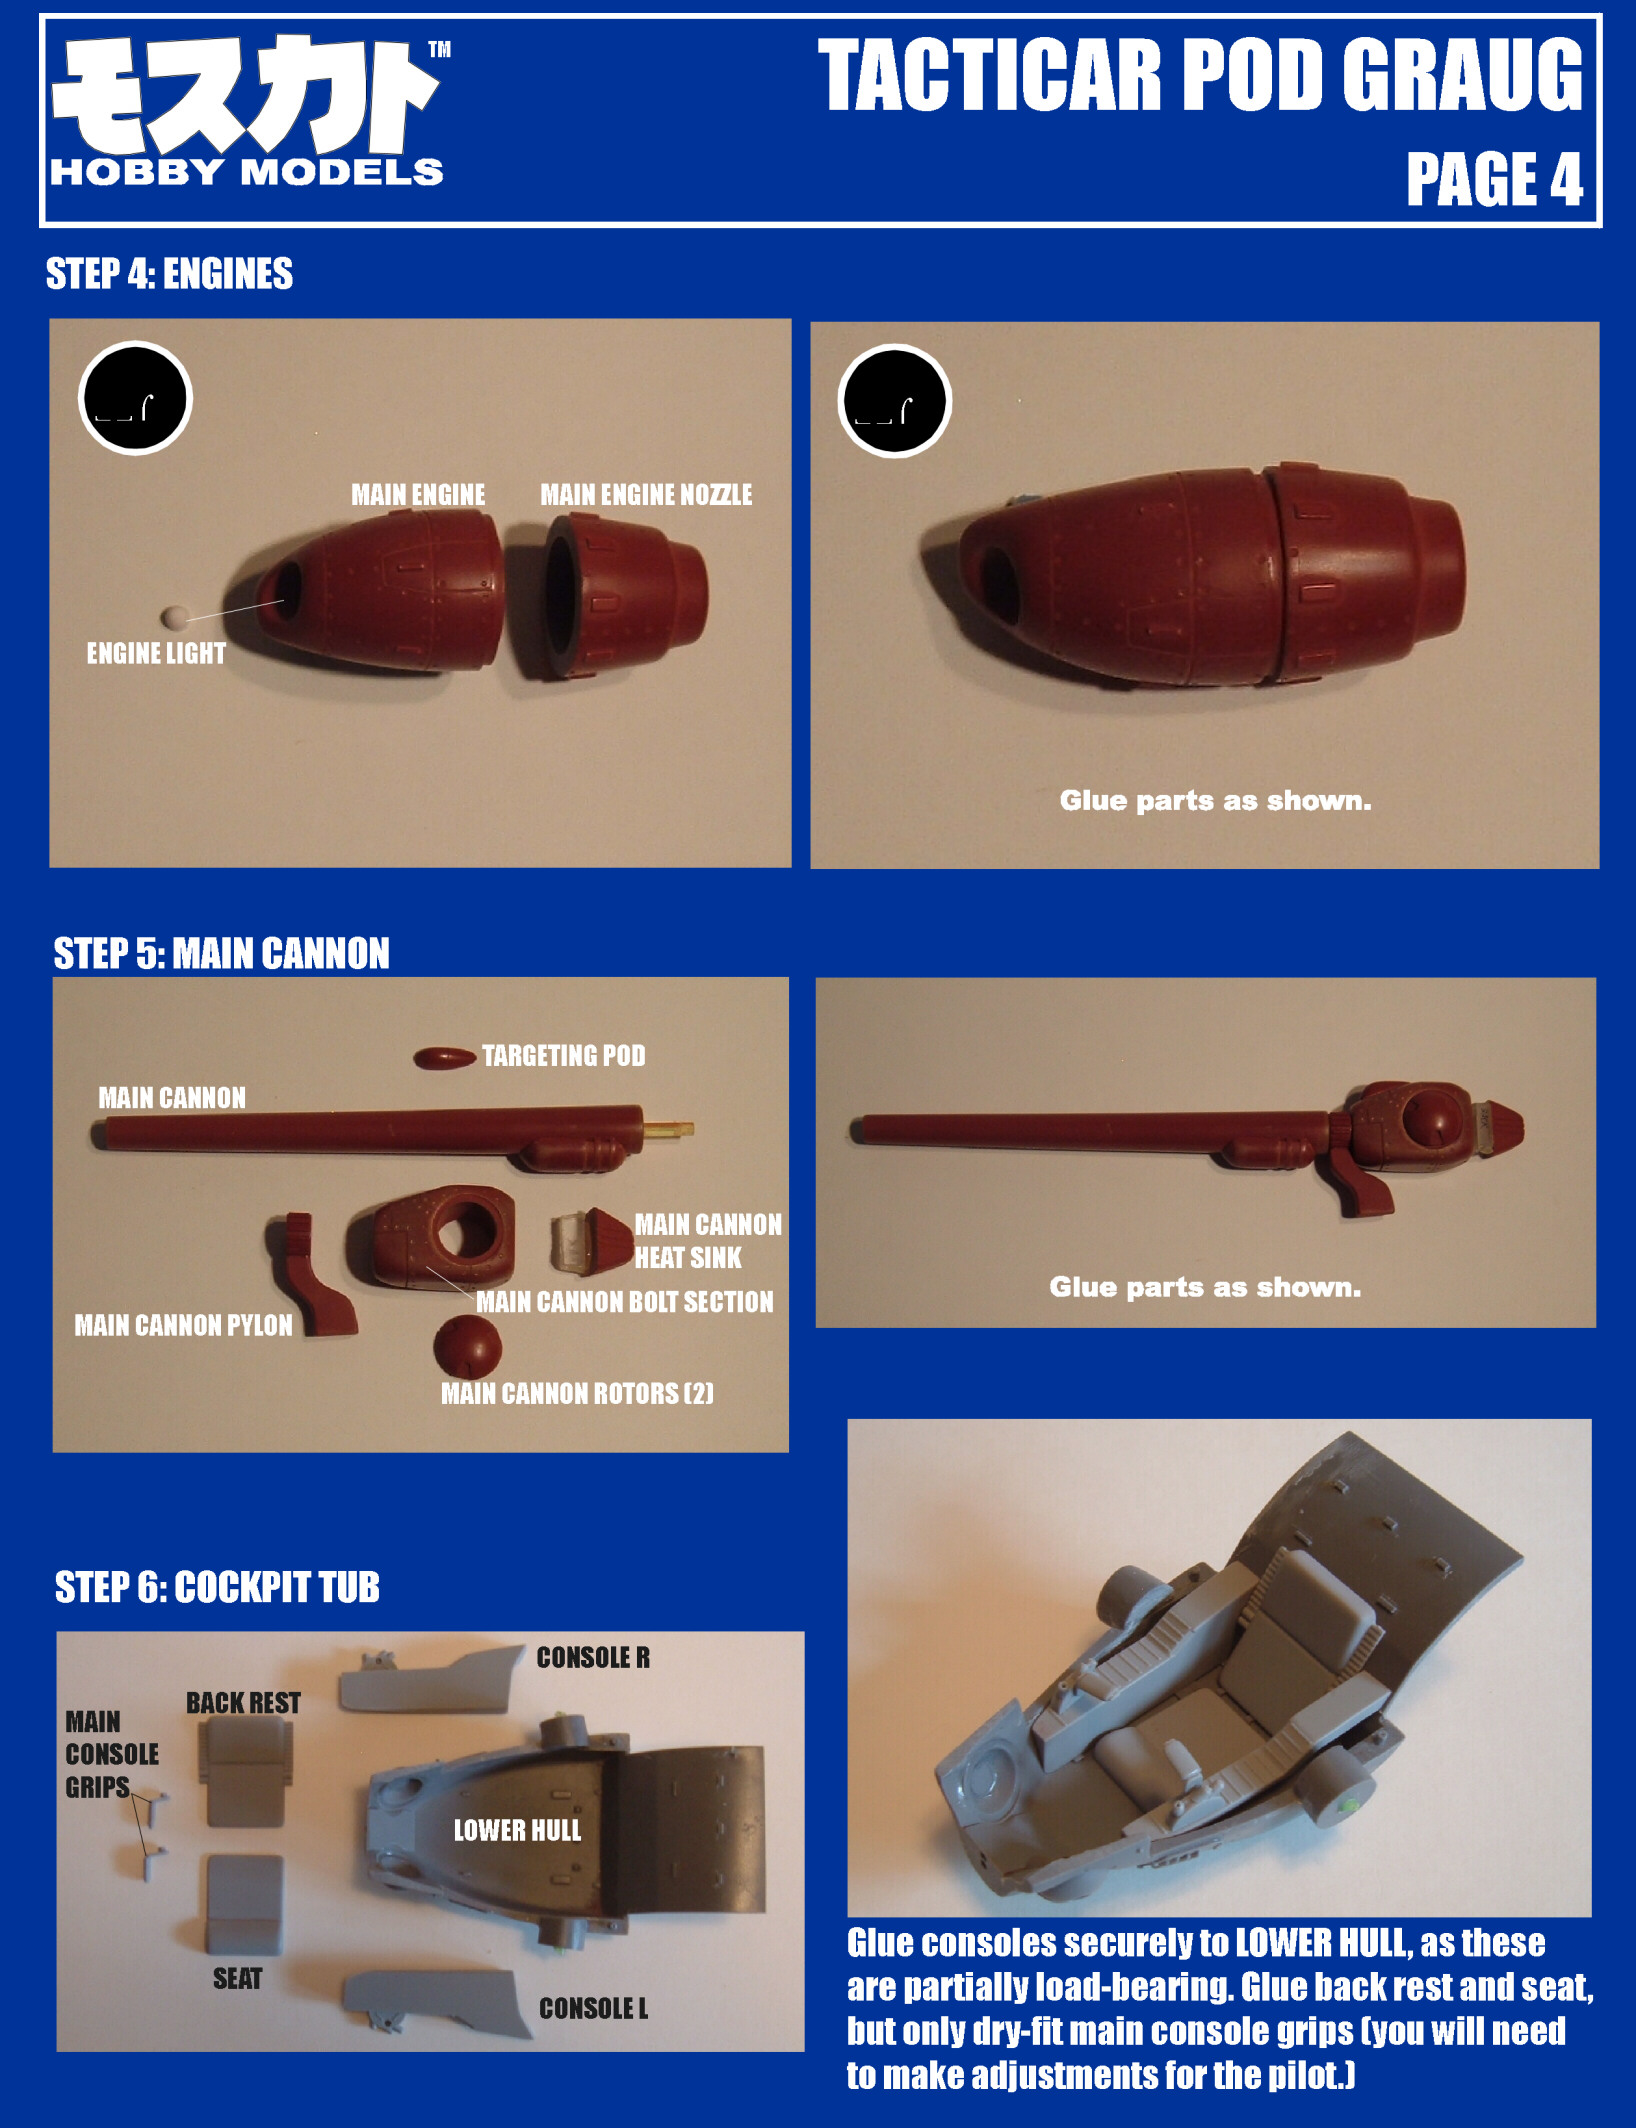
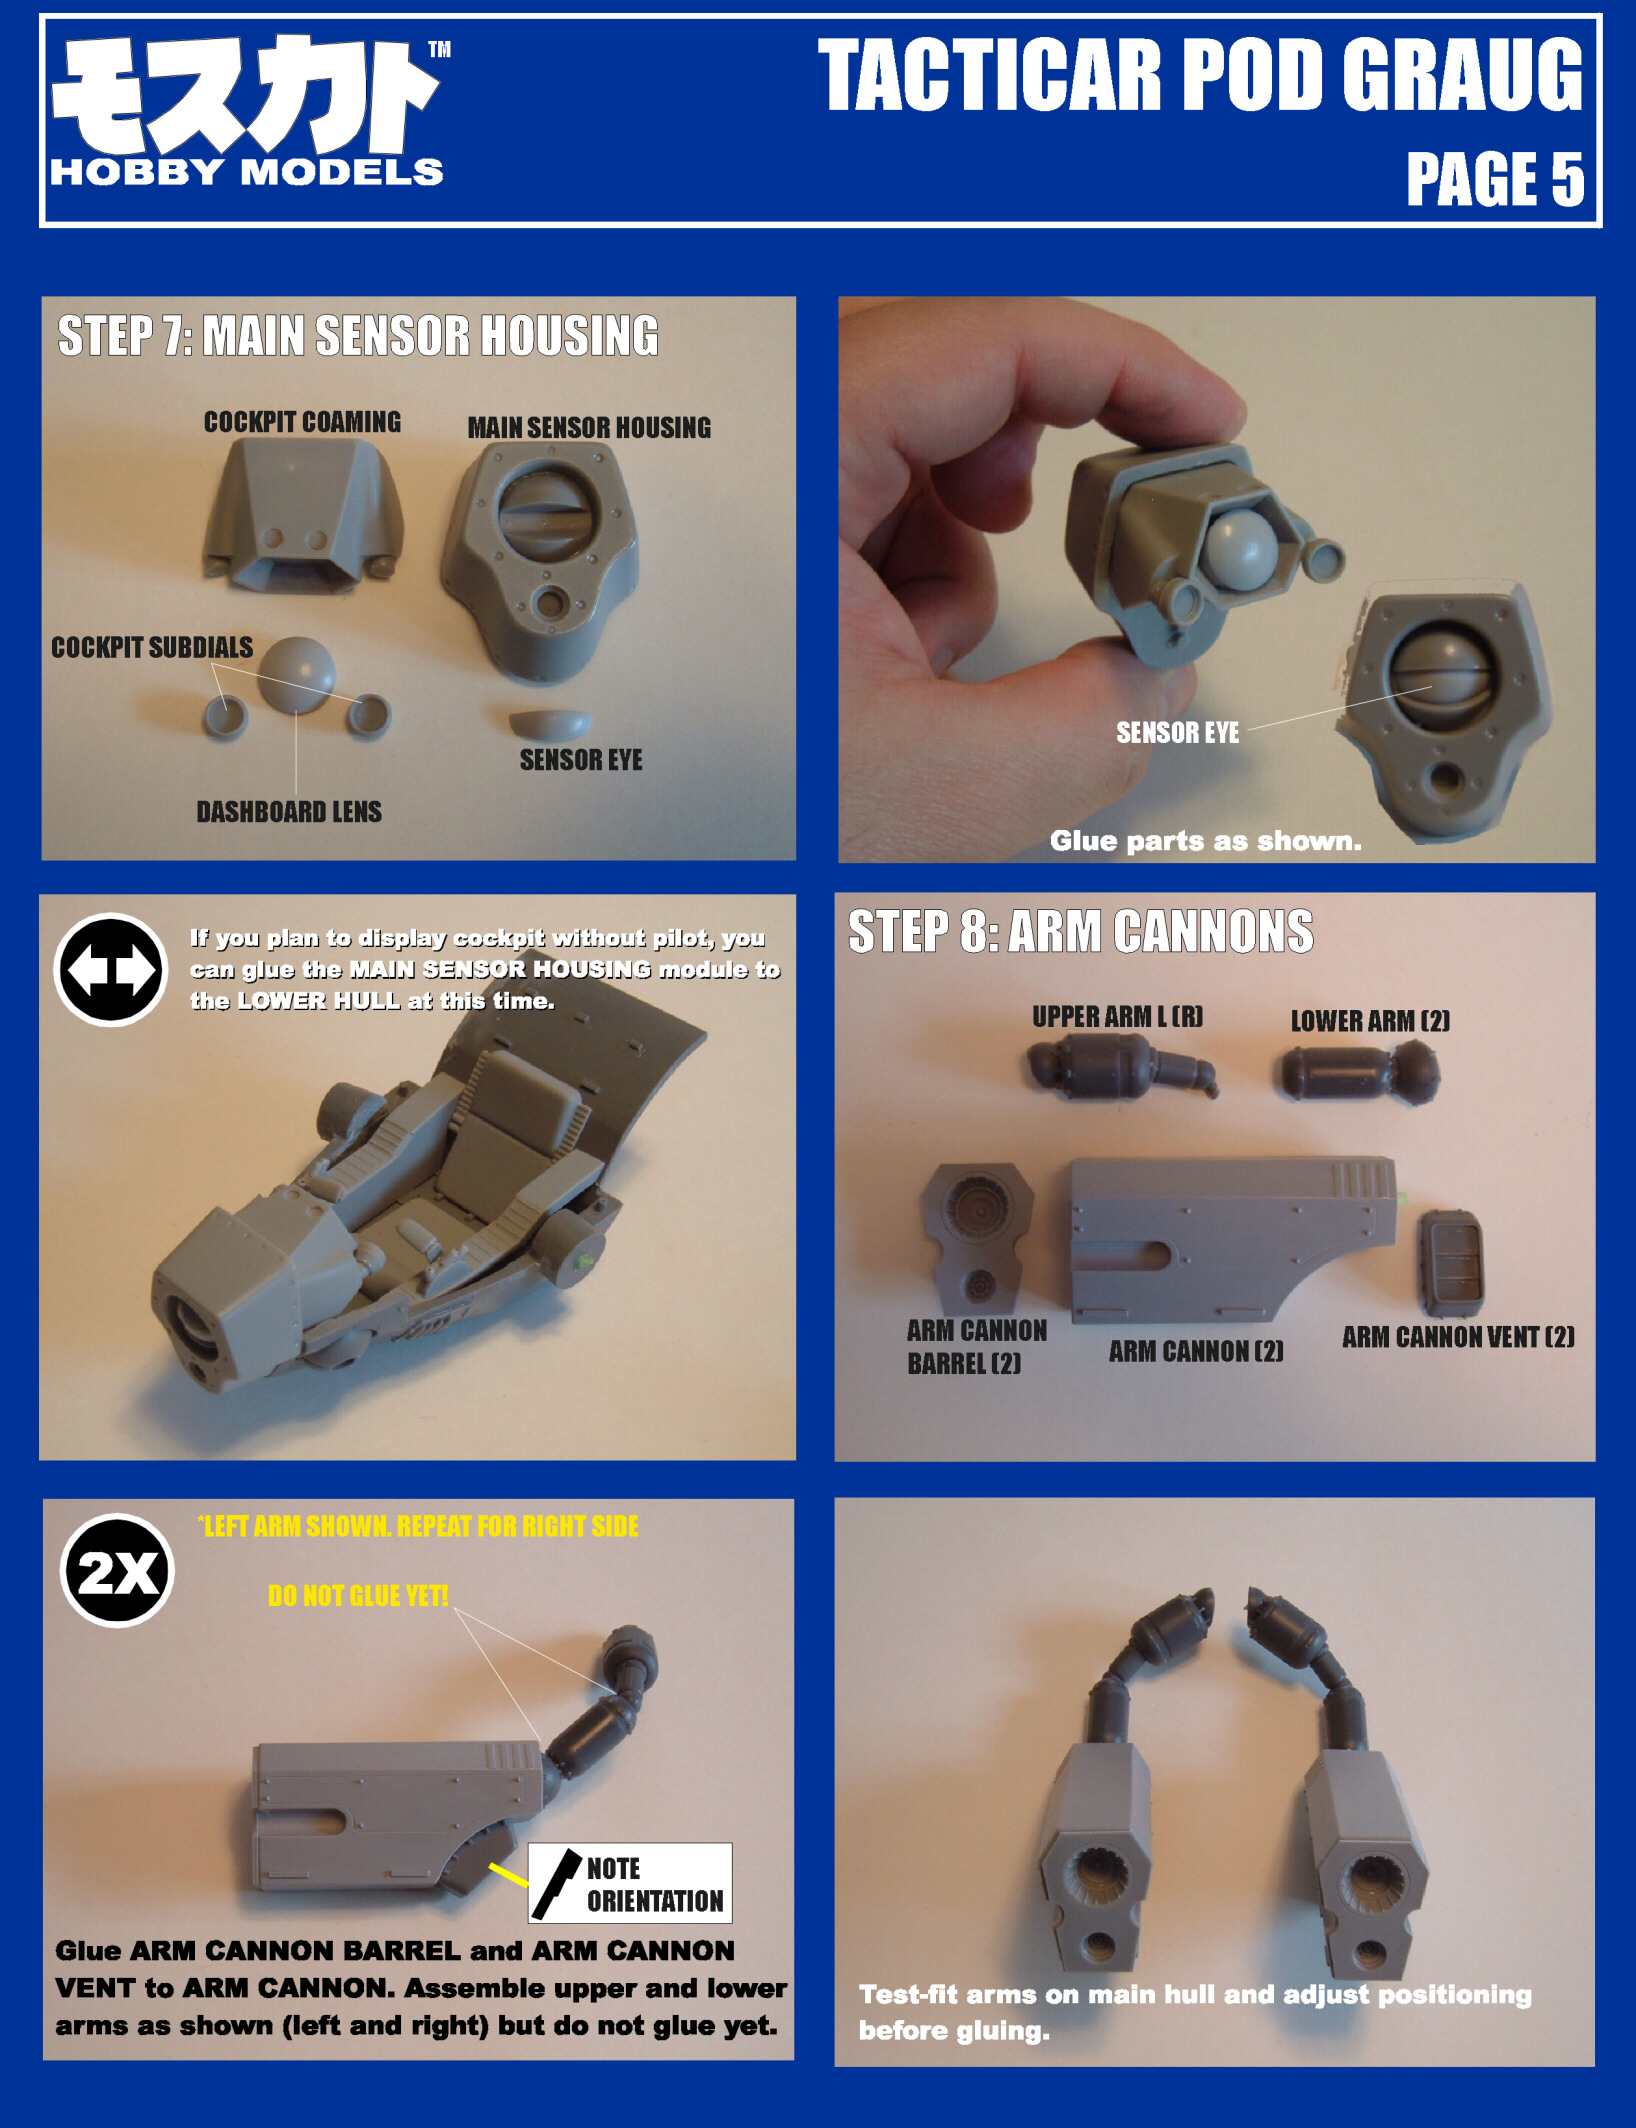
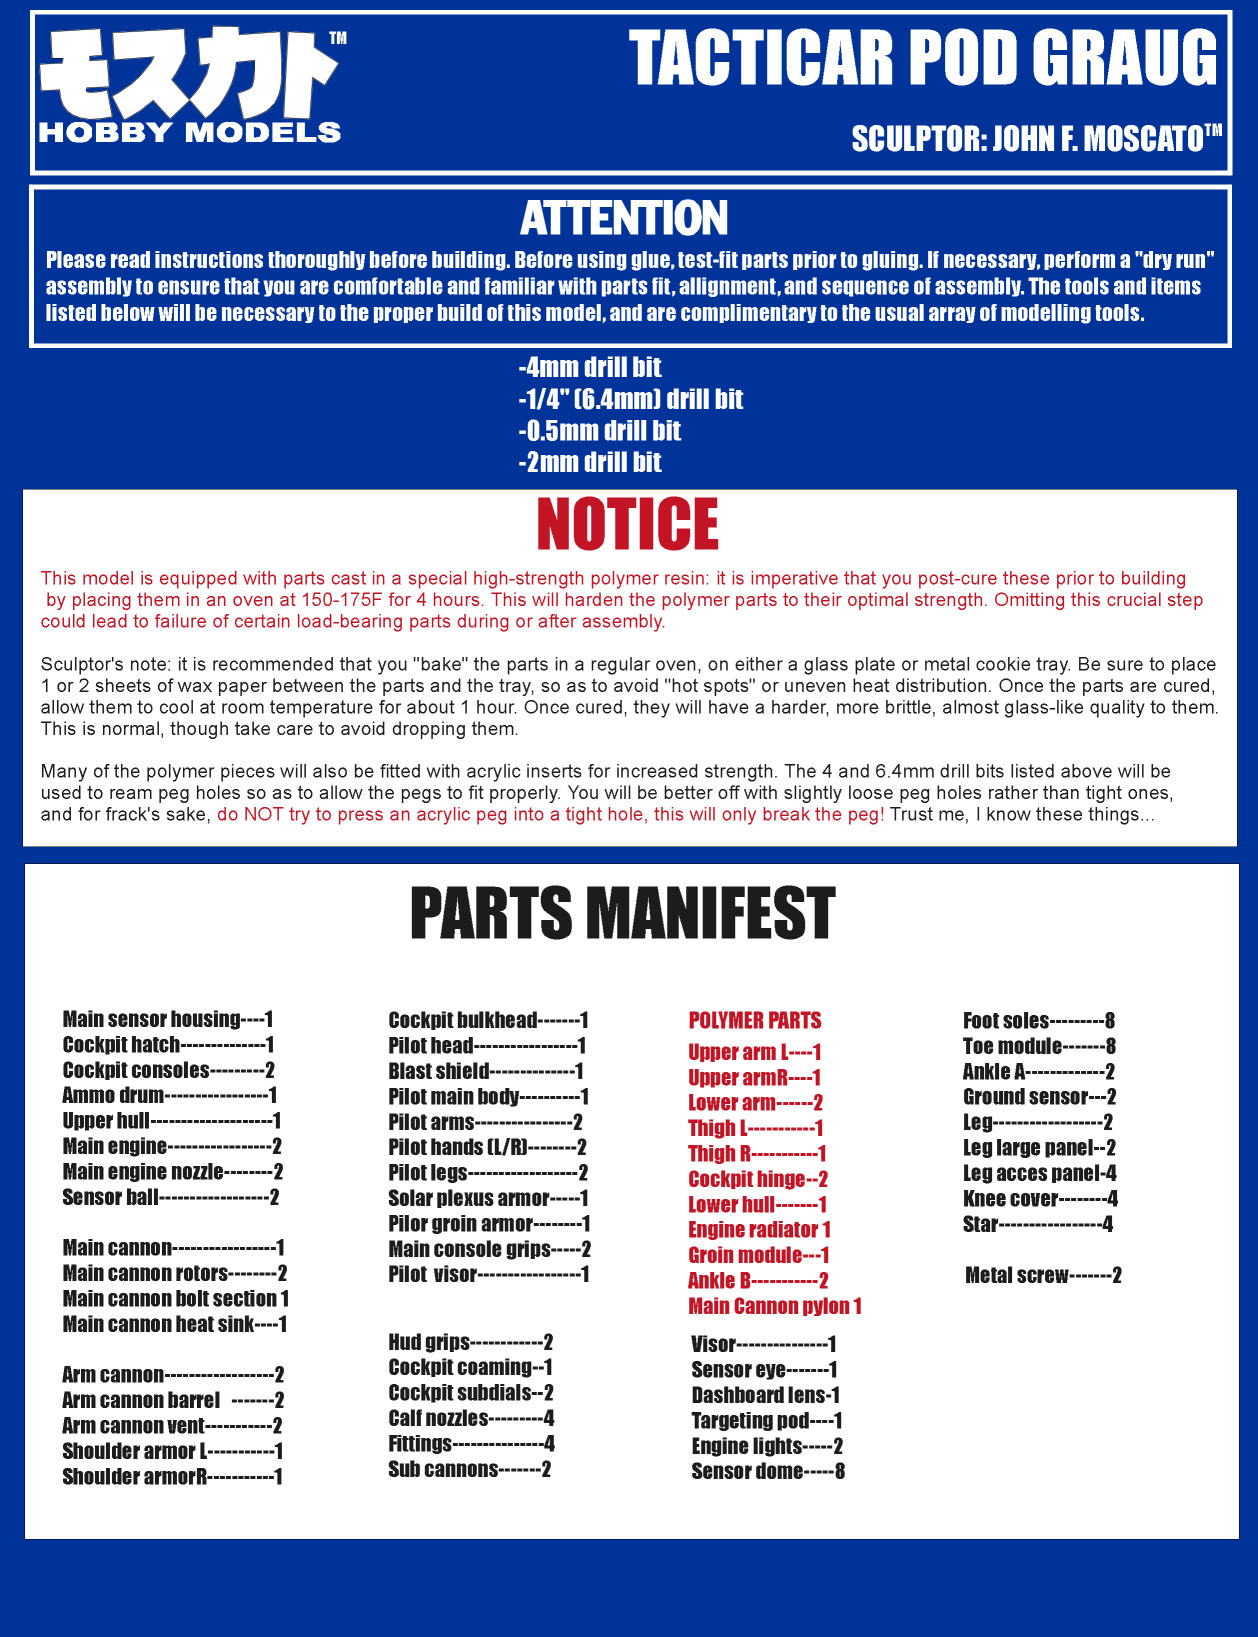
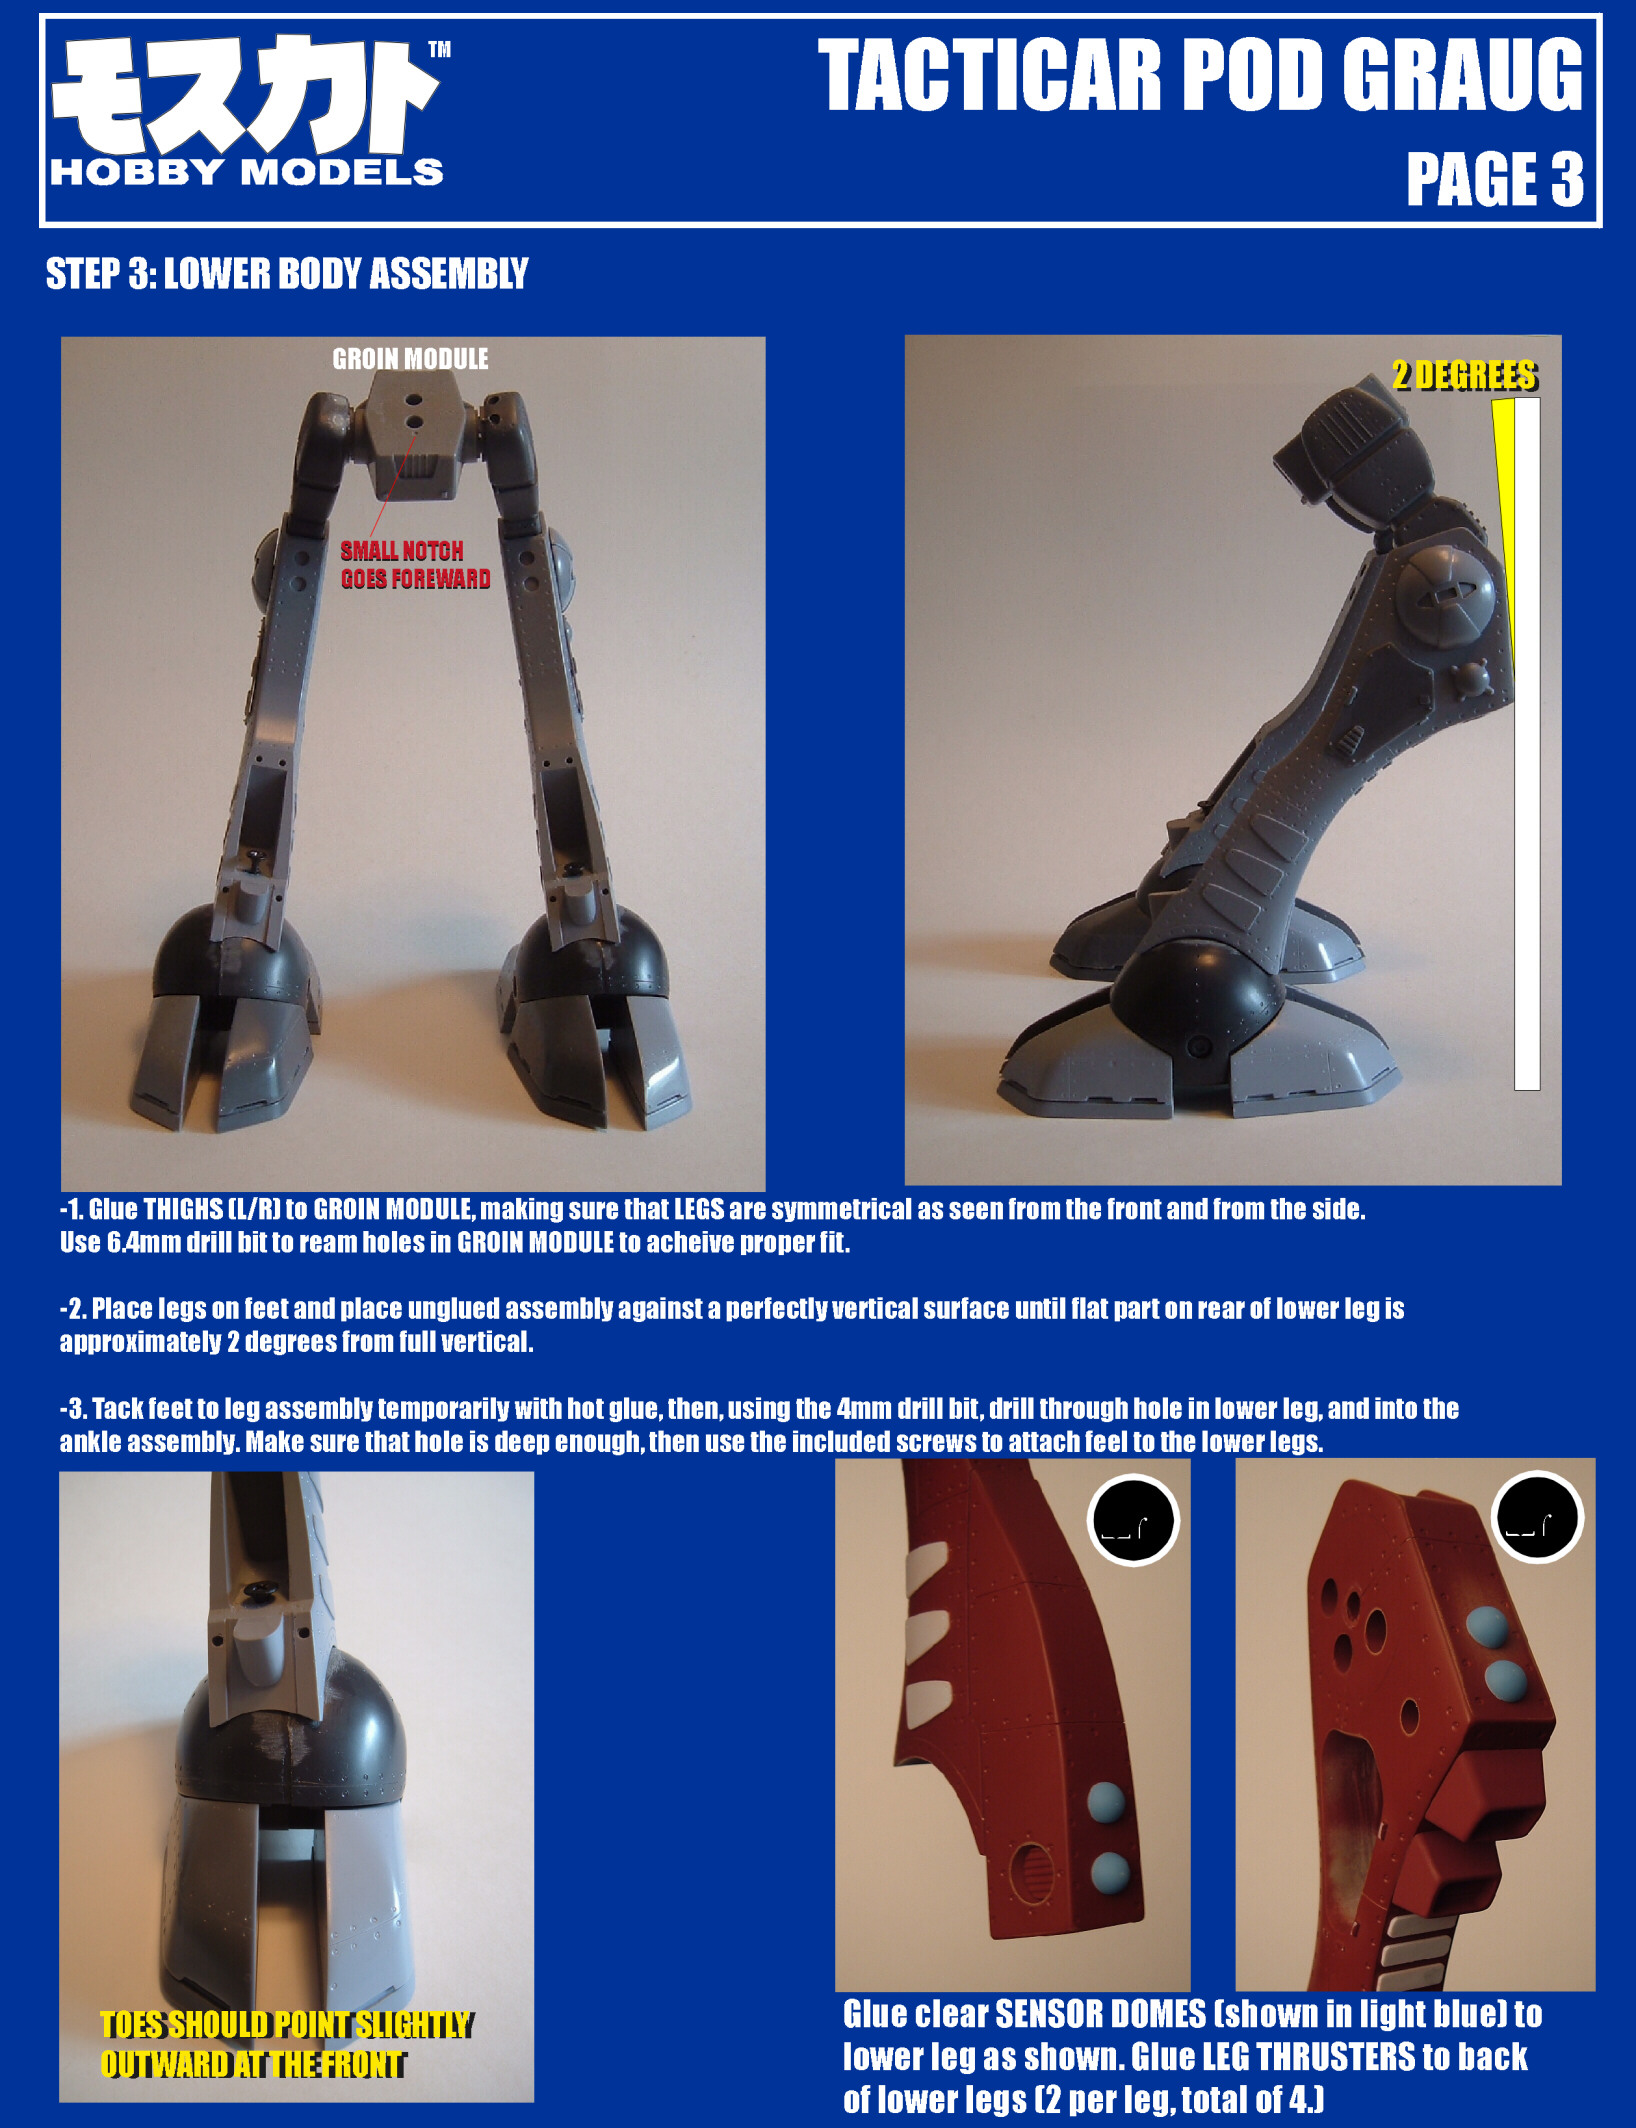
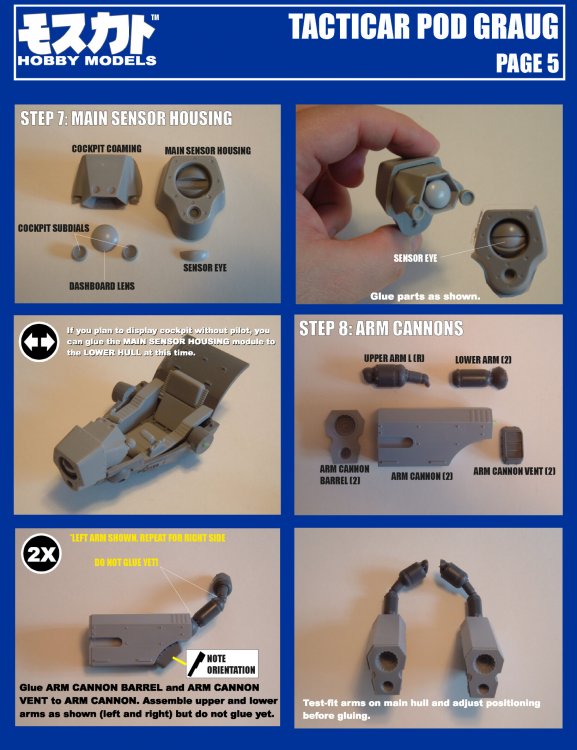
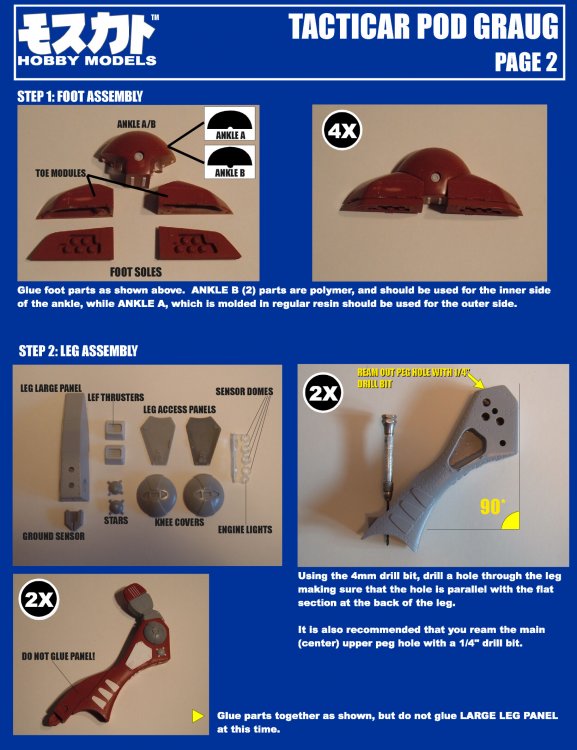
Pages 4, 5 and 6...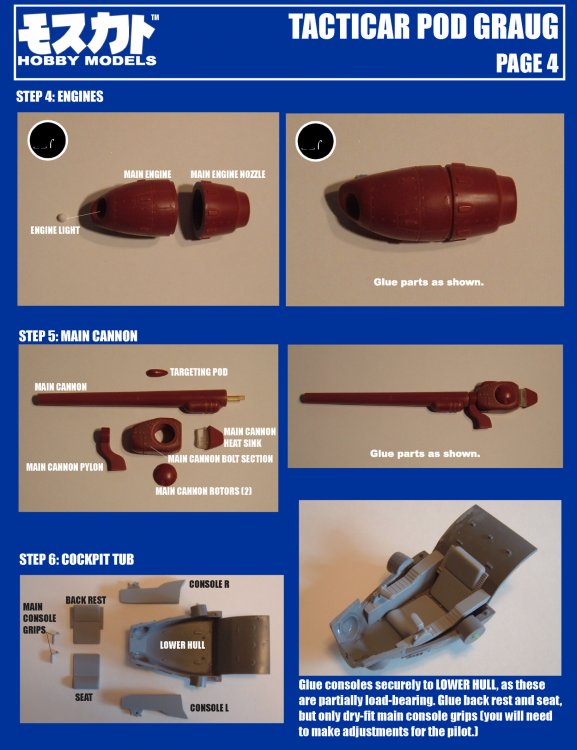

-
Ok, here are the instructions for the Graug. Feel free to download these for your viewing and building pleasure.


-
The making of a 1/72 Tacticar Pod Graug--the musical!
captain america replied to captain america's topic in Model kits
There's not enough demand for SC models to warrant the sculpt. My next project will likely be a re-issue of the full-cockpit Regult some time next month. -
The making of a 1/72 Tacticar Pod Graug--the musical!
captain america replied to captain america's topic in Model kits
What else would I pack my "titanic" monster model kits in? -
The making of a 1/72 Tacticar Pod Graug--the musical!
captain america replied to captain america's topic in Model kits
If it's any consolation, I've noticed that packages to Europe tend to go a bit slower than to other parts of the world. You should have it within a week or so. -
He hit the nail right on the head; it's a 1/48 kit for a mere fraction of the cost of a resin offering, and will make for a wonderful super-detailing opportunity. To expect anything more at the advertised price-point would be, IMHO, unrealistic. Too bad I despise the YF-19.
-
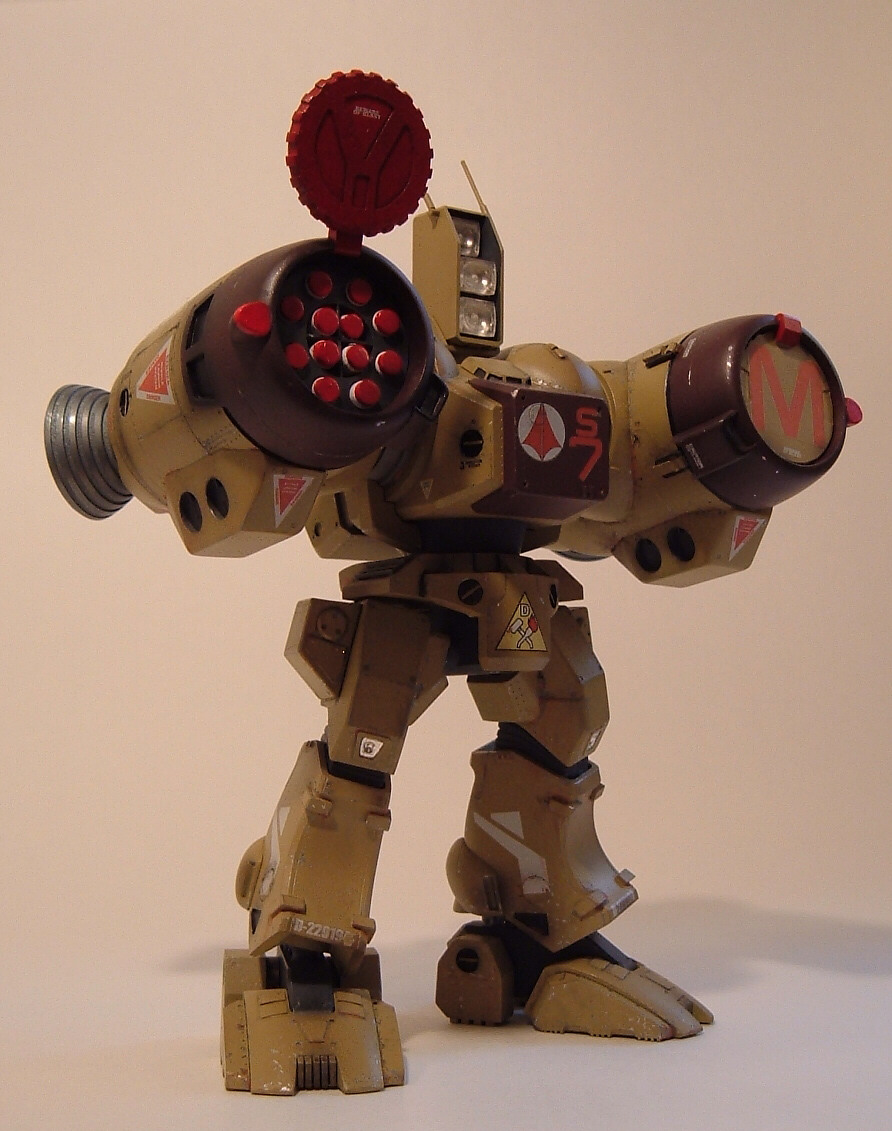
"Still working on it" is code for saying that they can't generate enough market interest to justify the tooling/production at this time; otherwise, they would have gone to production with it by now, and it was always supposed to be 1/72. Depending on what it ends up retailing at, folks might be better off opting for the re-issued MO-SUU-KAA-TOH HOBBY Tomahawk.
-
The making of a 1/72 Tacticar Pod Graug--the musical!
captain america replied to captain america's topic in Model kits
That depends on what you mean by "transforming kit." I've built many commercially-available variable model kits in my youth, and I also mastered the AFC-01 Armored fighter in 1/32 several years ago. It was made such that it could be built in any of the three modes, but not actually "transform," since that would mean sacrificing realism in key areas like joints, which goes against my philosophy. Oh, and as for finishing my own models, I've gotten around to a few (see pics below) but with my law and commercial studies in the last few years, my "just-for-me-model-building-time" has been almost nil. I told myself that rather than rushing a model and doing a half-a$$ed job, I'd just put them in storage until I have time to build them.

-
The making of a 1/72 Tacticar Pod Graug--the musical!
captain america replied to captain america's topic in Model kits
Truthfully, it was a more challenging and time-consuming bite to chew than I'm used to for a garage kit, but I have no regrets. Were I ever tackle something like that (or even more grandiose) I would do things differently. For example, if I ever get around to the 1/32 Legioss, because of its size, complexity, and likely high cost, I would break it down into several instalments over a number of months. Better for my psychological health, and better for everyone's wallet. Also, for the official record, I don't do these models for profit, and never have; all I've ever charged for is my labout and materials. No matter what, you gotta realize that what I'm doing now, I only dared to dream I could accomplish in my wettest fantasy as a boy, so I don't even really consider it work, more like full-blown arts-&-crafts with the occasional tedious step.