captain america
-
Posts
3563 -
Joined
-
Last visited
Content Type
Profiles
Forums
Events
Gallery
Everything posted by captain america
-
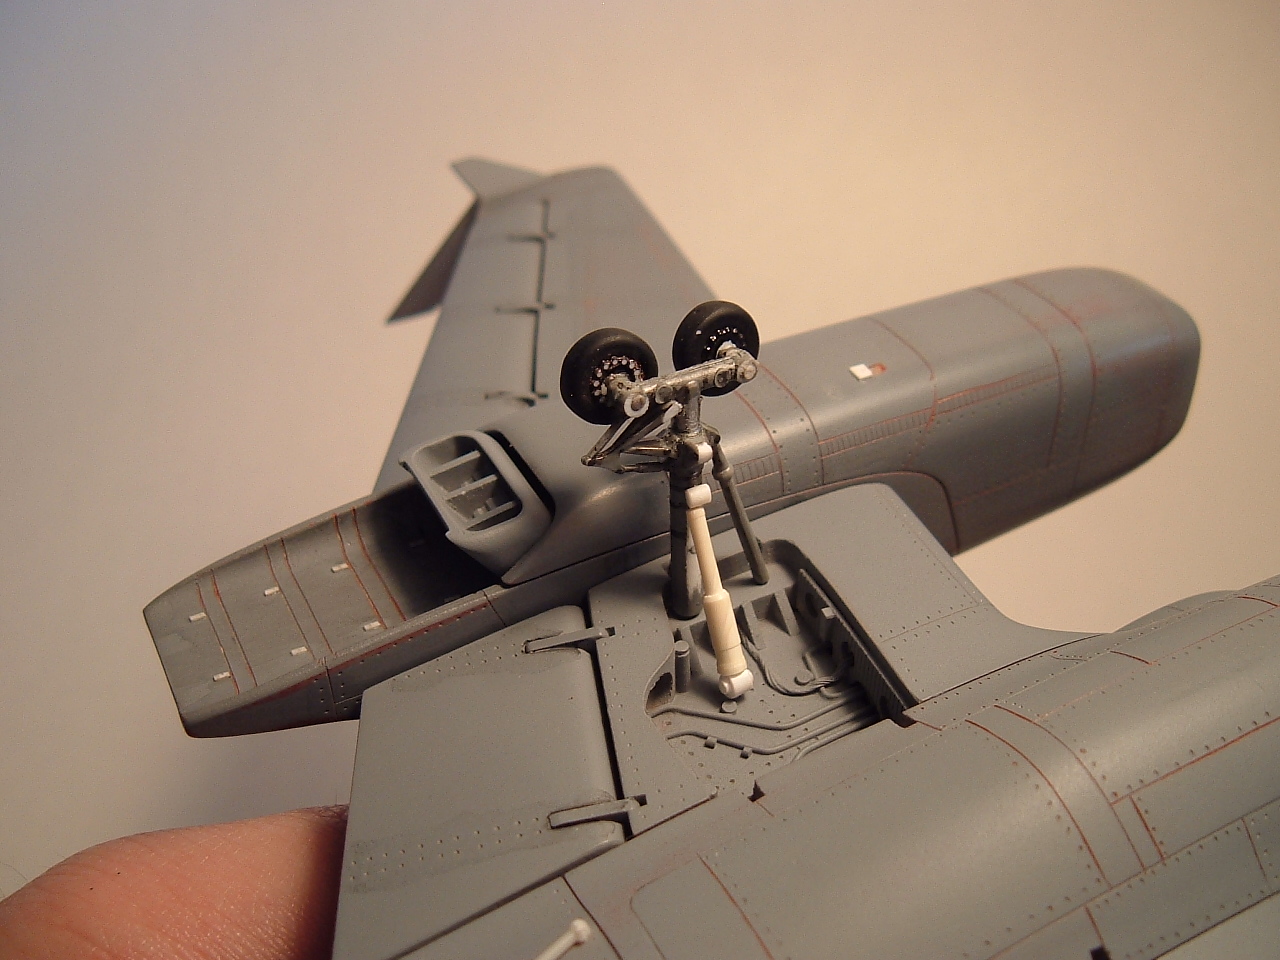
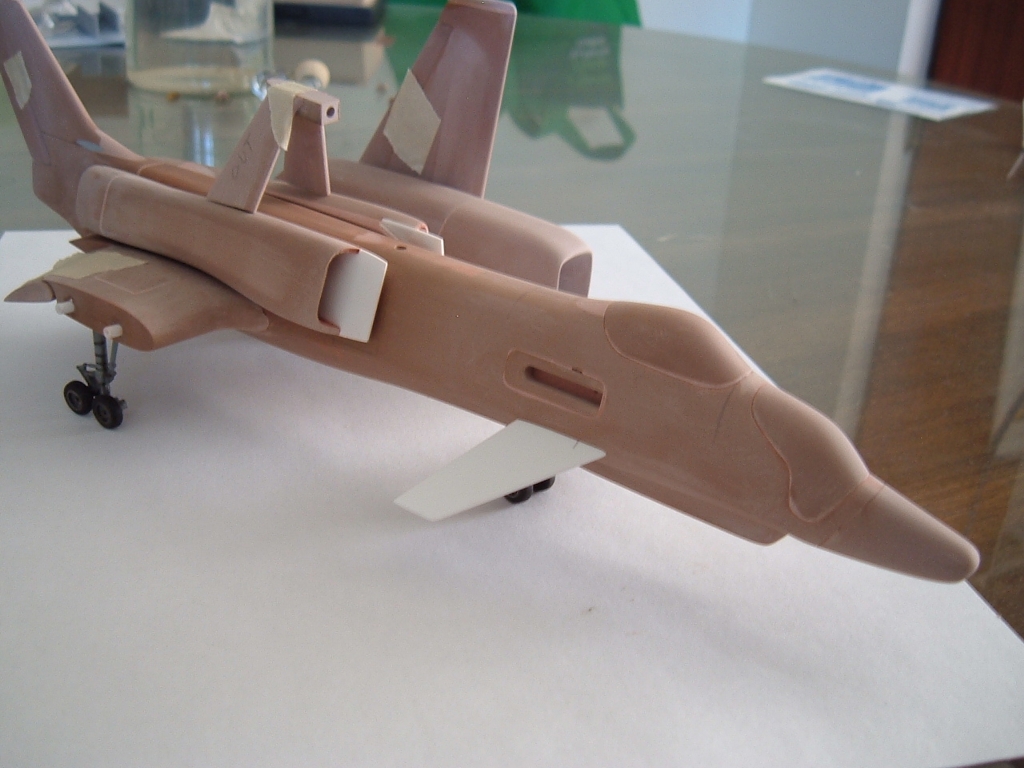
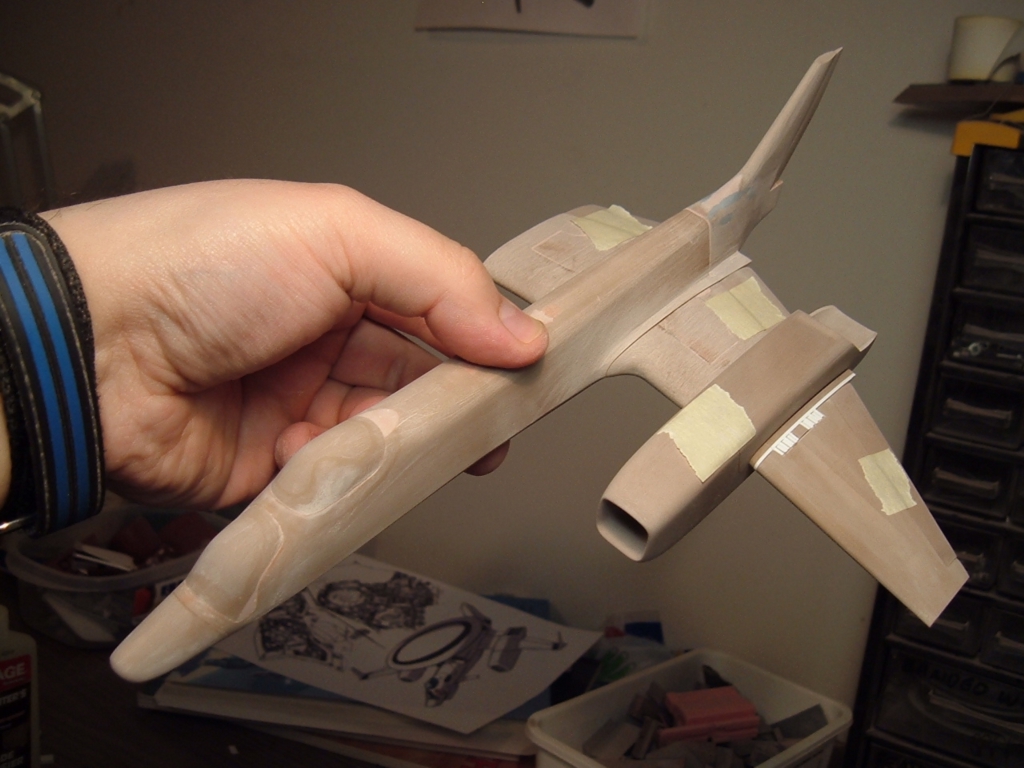
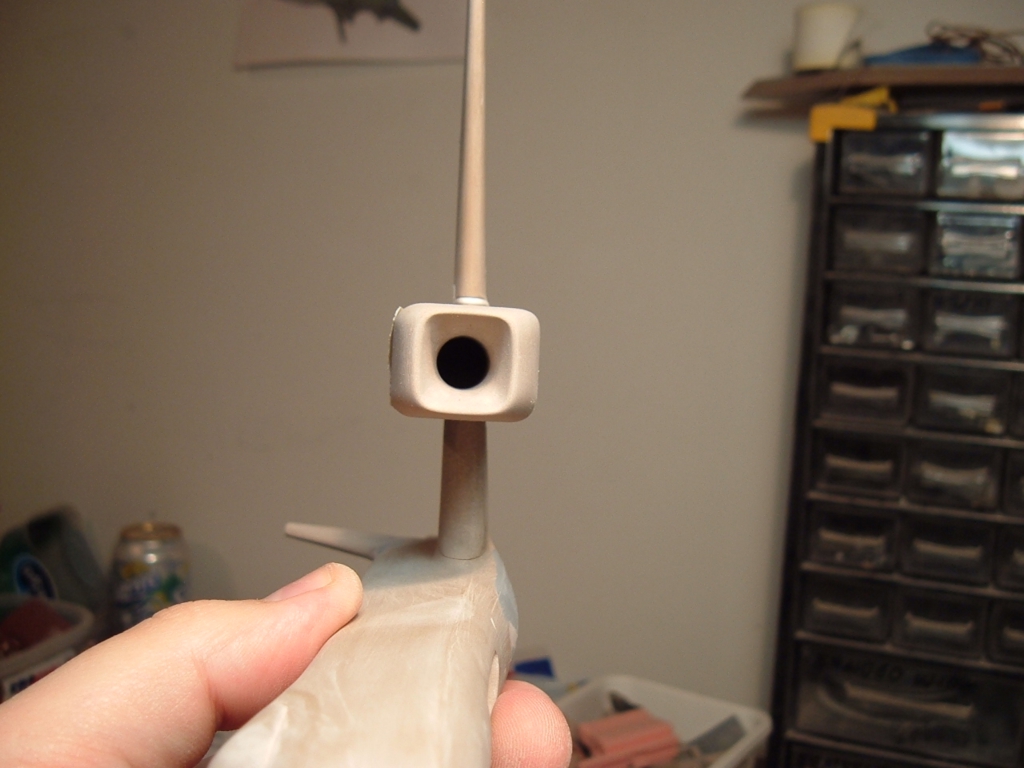
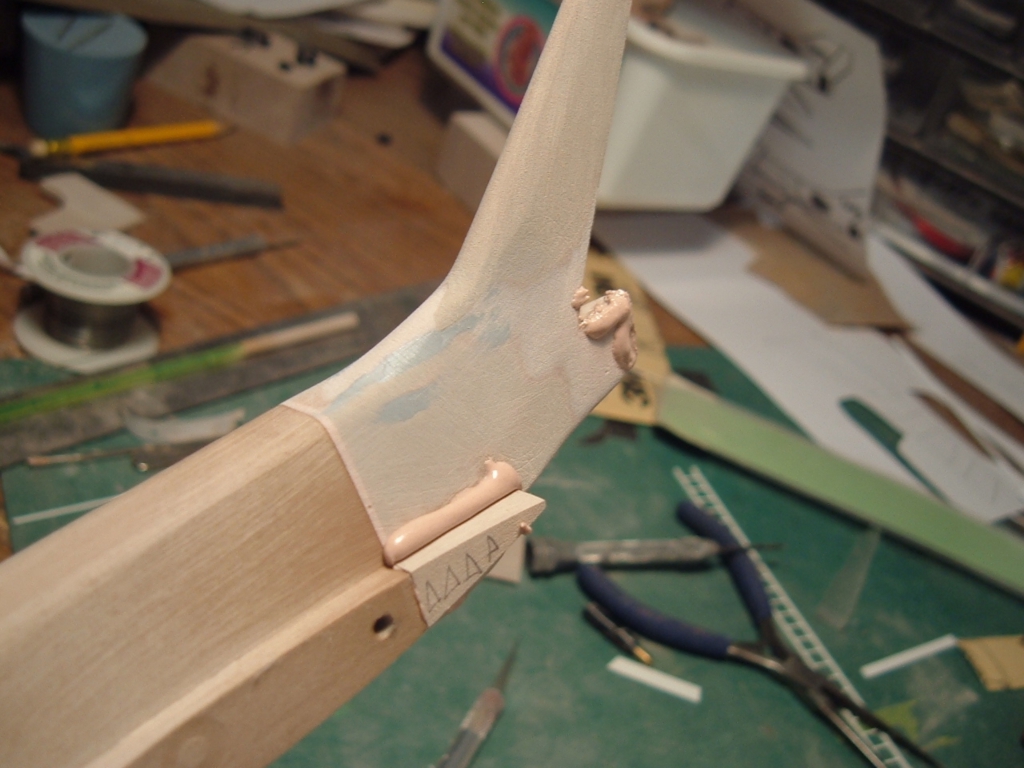
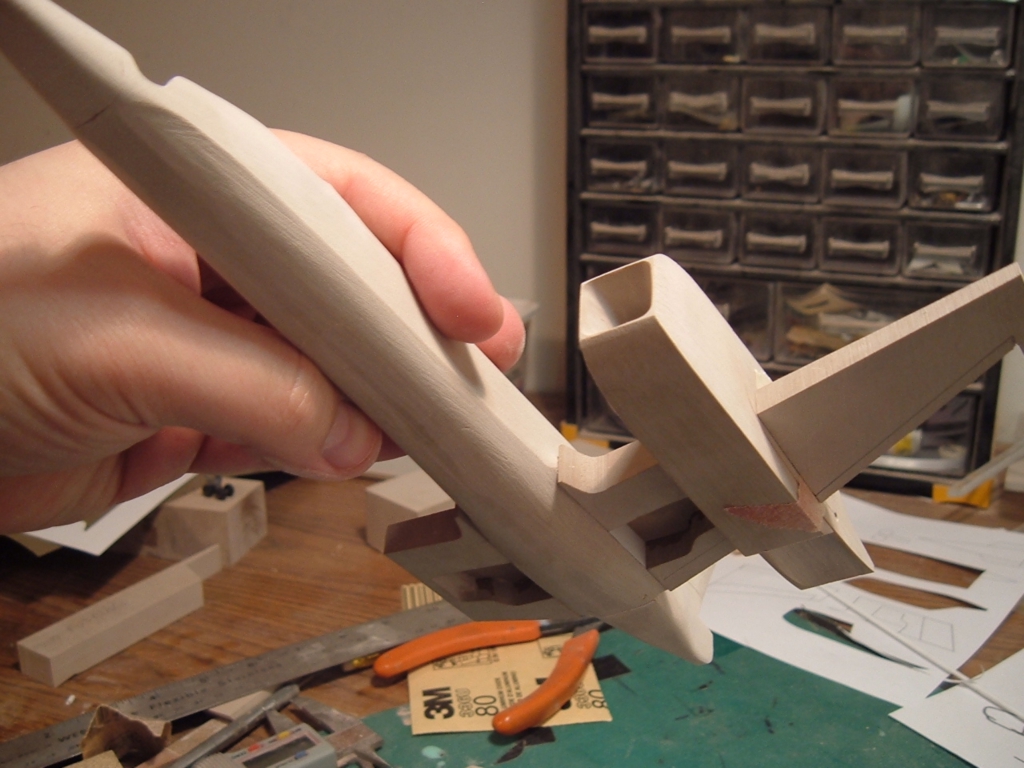
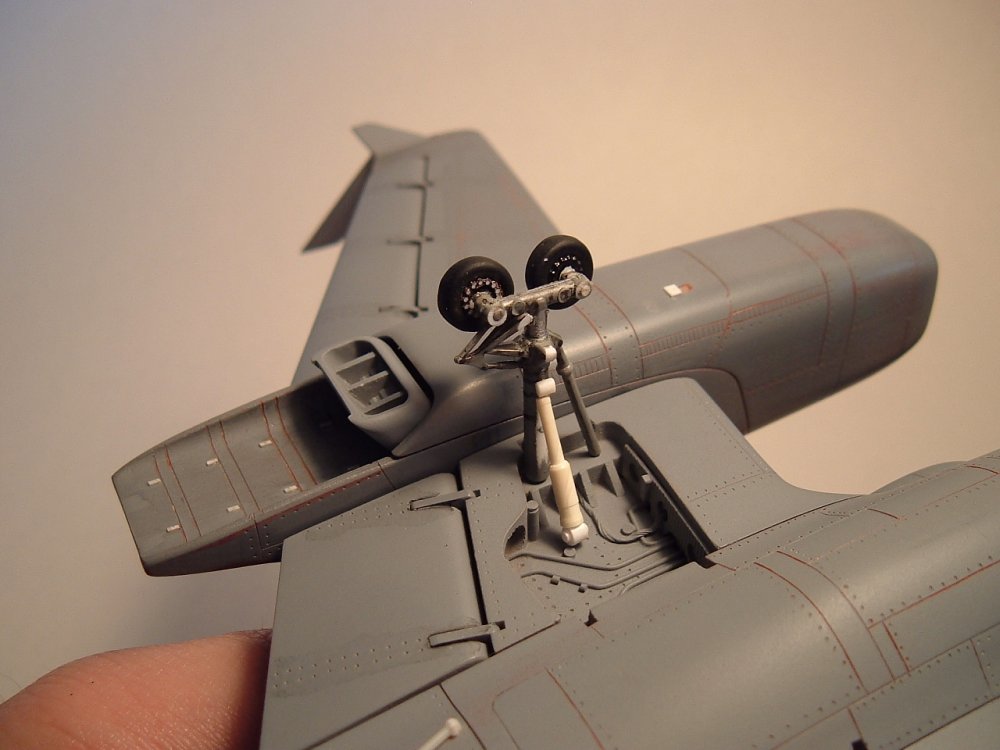
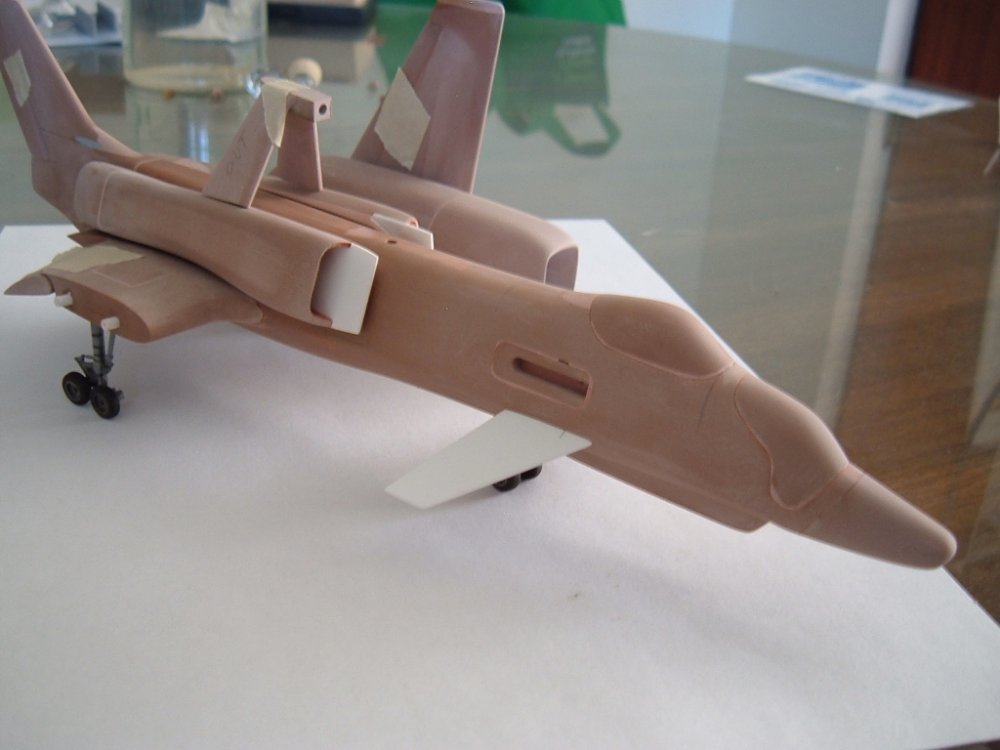
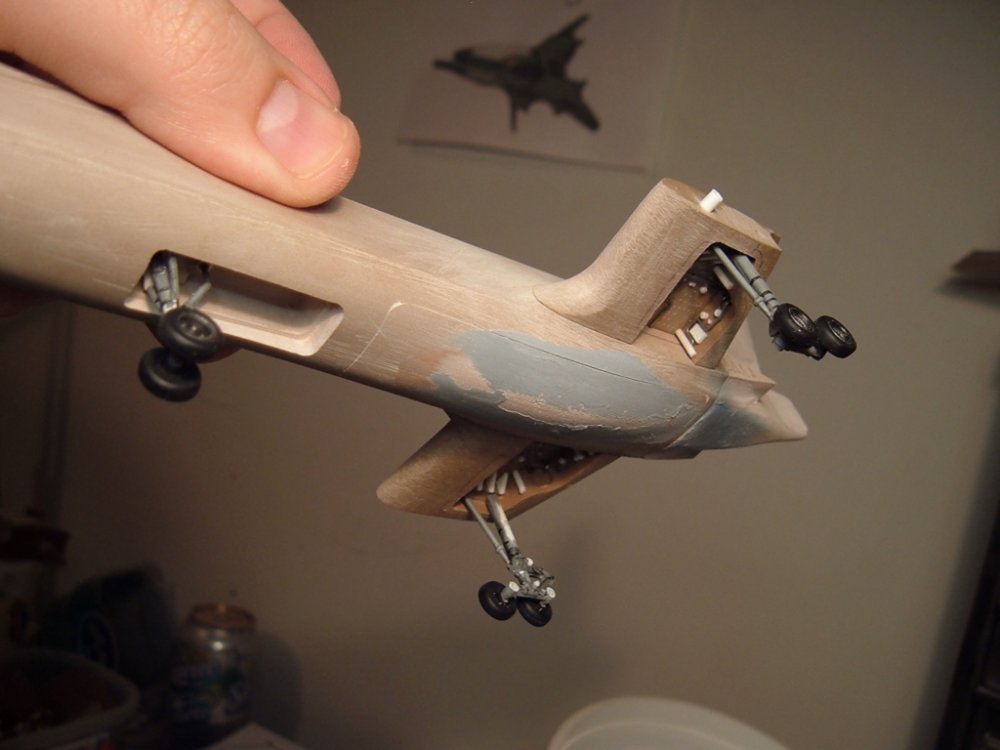
Landing gear and refueling probe. I opted to make the latter an "extender" version, since I feel it's important for the probe to be in the pilot's field of vision for obvious reasons, and the possible places to put it were very few, given the plane's design.

-
OK folks, here it is: the formidable Kaa 'Tsai master patterns. Finished!

-
Definitely. That's one of the problems with making a kit from a multiple-generation cast: the parts look OK to the naked eye, but there develops so much distortion with each generation that the parts no longer fit together. Putty, patience and prayer are the three pees needed for such kits Heads-up to everyone: the next update might have to wait a few days because I've got parts strewn about everywhere. The tiny detail stuff is the most challenging and time-consuming and I don't want to rush it.
-
Hi Petar. Excellent question, and you're right: you can't slide a piece of paper between them cos the parts fit together like a hand in a glove. The process I use to make the bucks fit so seamlessly is the same procedure I use whenever I have to mate two complex shapes together. I start by carving one shape (in this case, the cockpit tub) and make sure that the shape is just the way I want it. Next, I carve the canopy buck and get it to fit as closely as possible with machining and hand-carving. Next, I apply a spray mold release to the cockpit tub, then smear Bondo all over the mating side of the buck and squash it into the tub and wait about 3 minutes for the Bondo to start to firm-up. Then, I carefully pull the buck out, let it harden fully for a few hours, then do the final finishing. Not hard to do, just watch out for the putty fumes, they're nasty!
-
Panel lines: couldn't agree with you more, so lots of panels and lots of rivets (in the right places)are a must. Wing lights: not practical to make in clear resin due to size in this scale, but you can do this even better yourself by filling the light housings with white glue/Future floor wax and a bit of paint, or even using epoxy. In my 30+ years of modeling, those techniques yield better results than trying to file the flash and mold line off something the size of a large grain of sand. Dimensions: @ 28mm long, by 26mm wide. No idea how that compares to Tanmen's kit because I don't have it.
-
Last 4 pics.


-
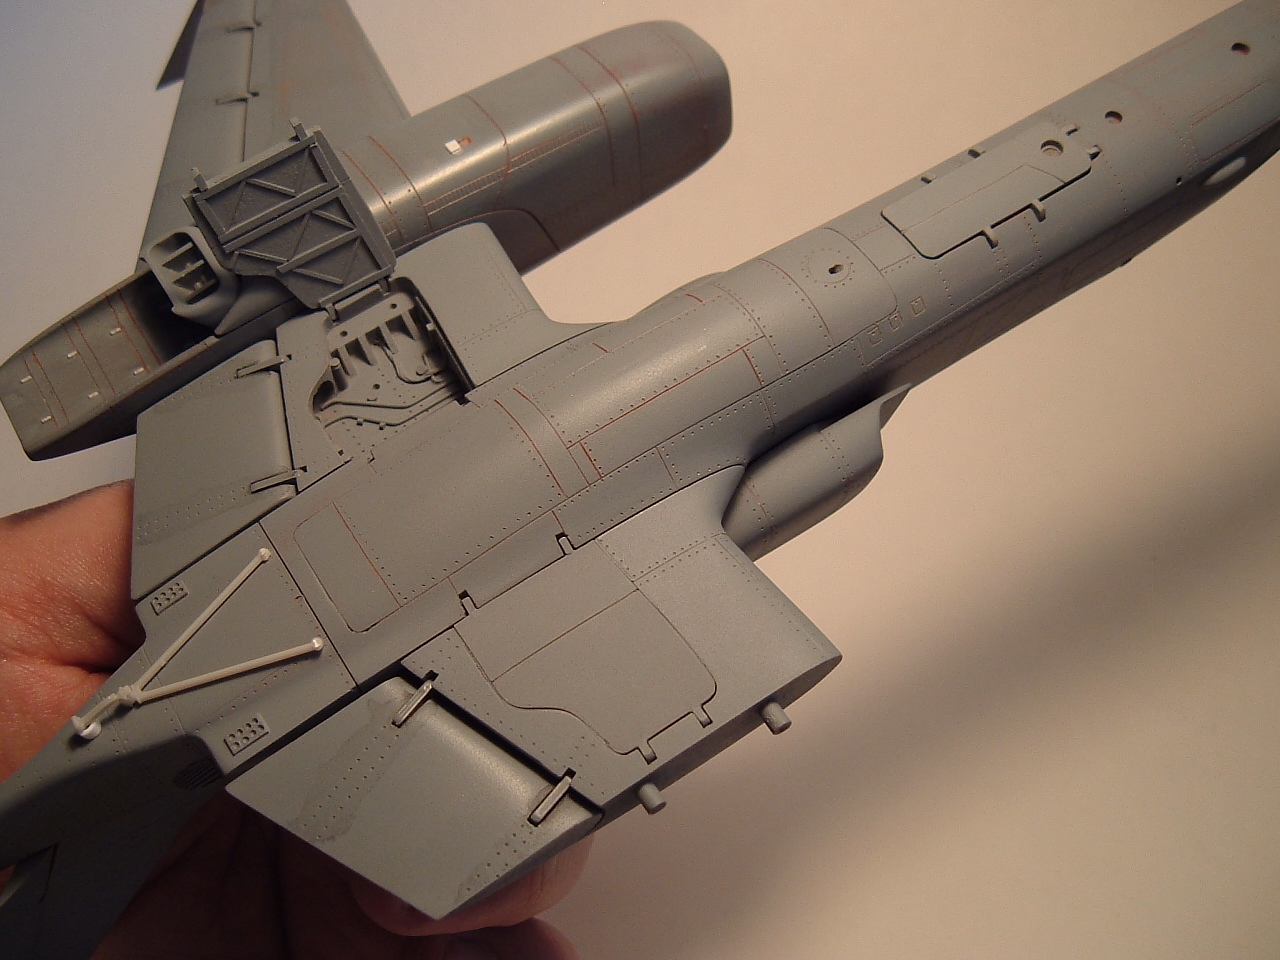
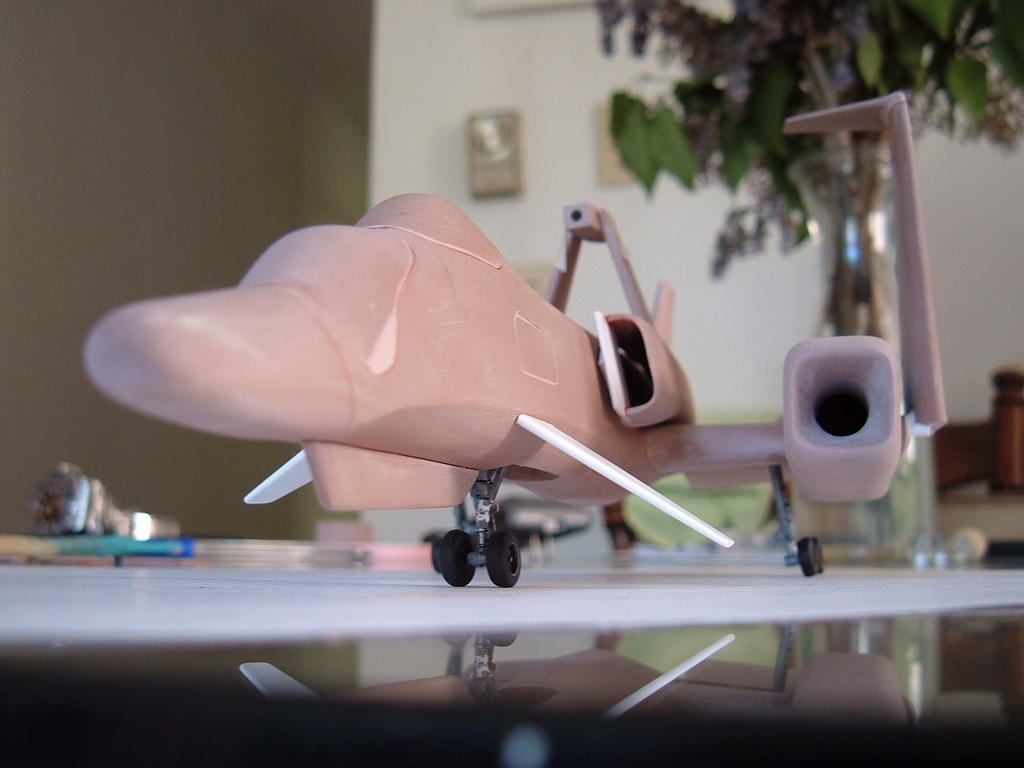
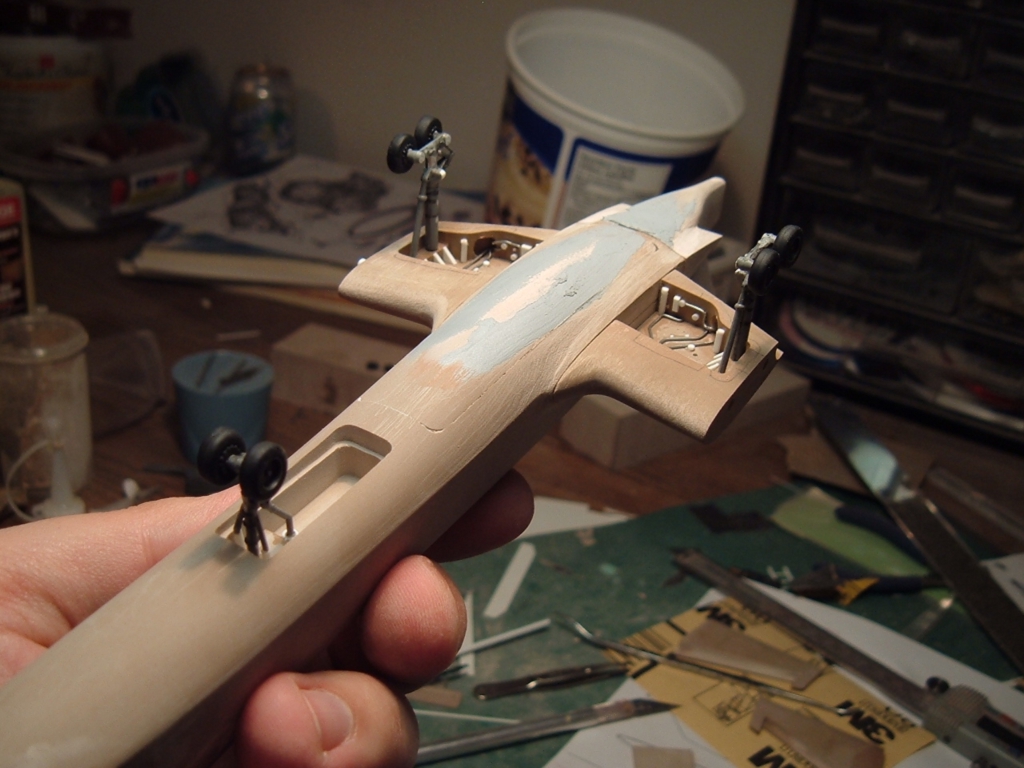
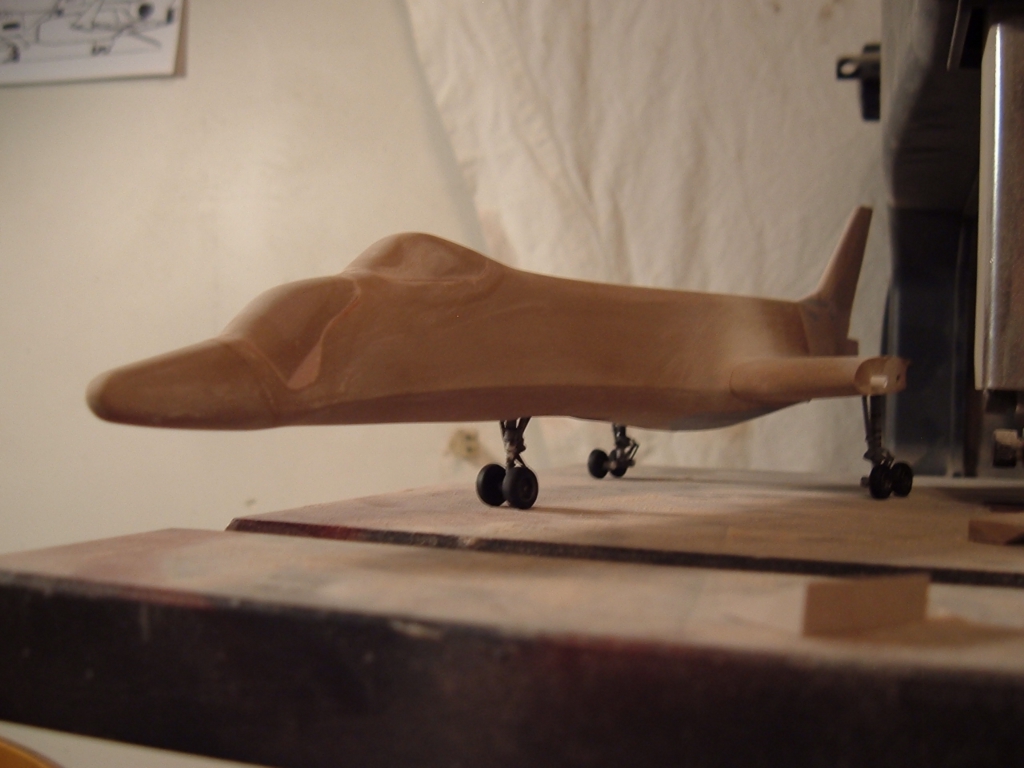
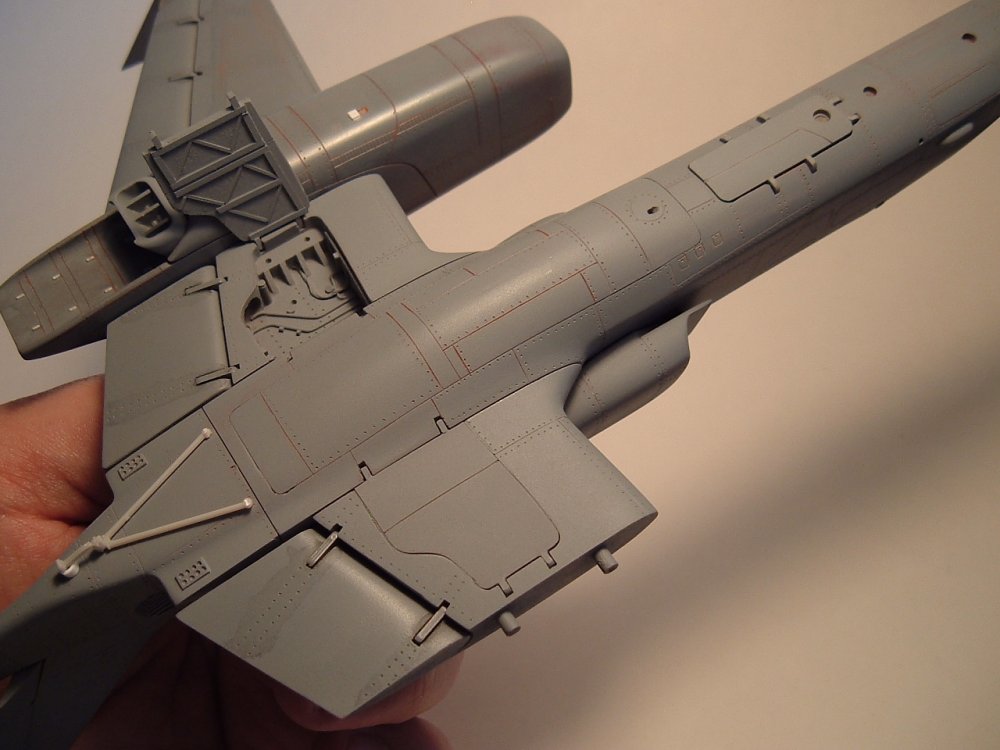
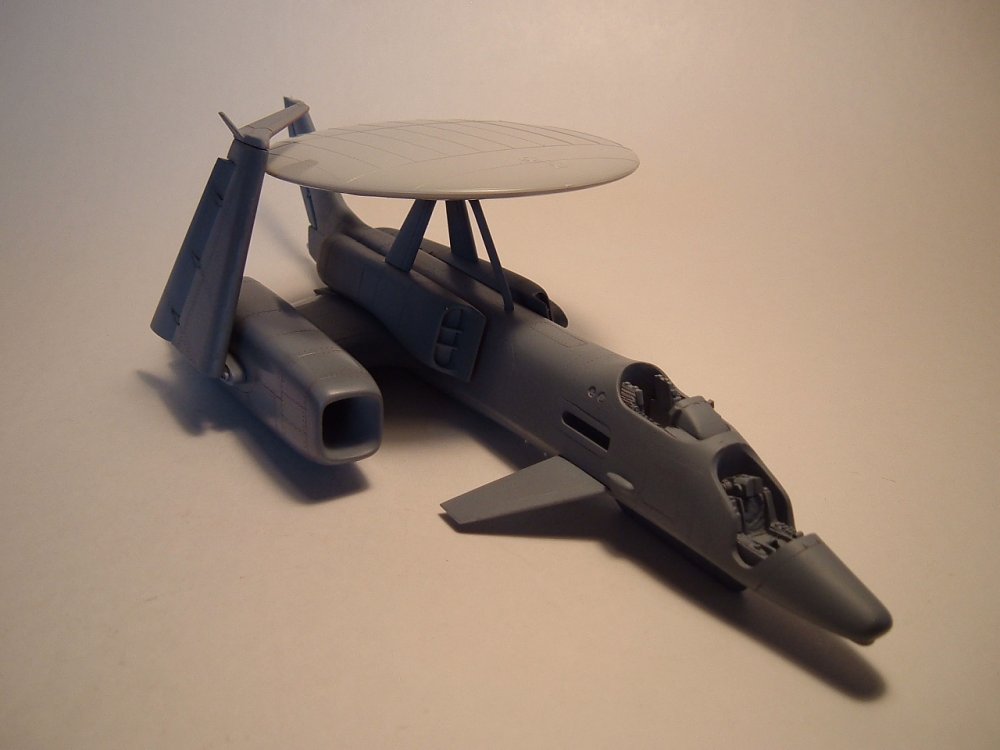
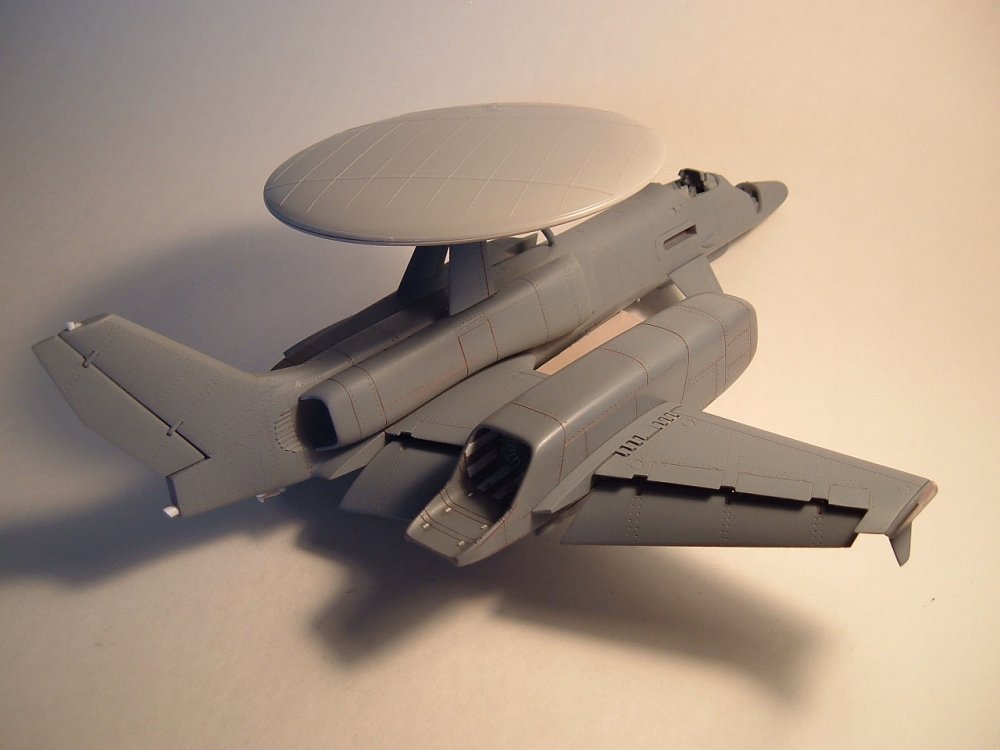
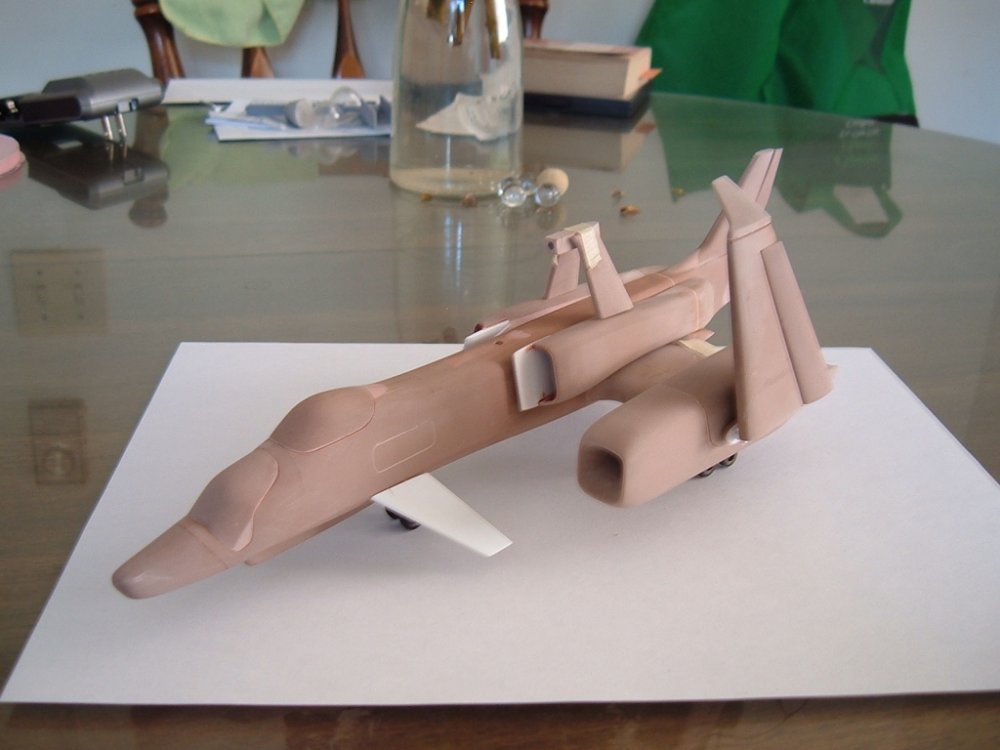
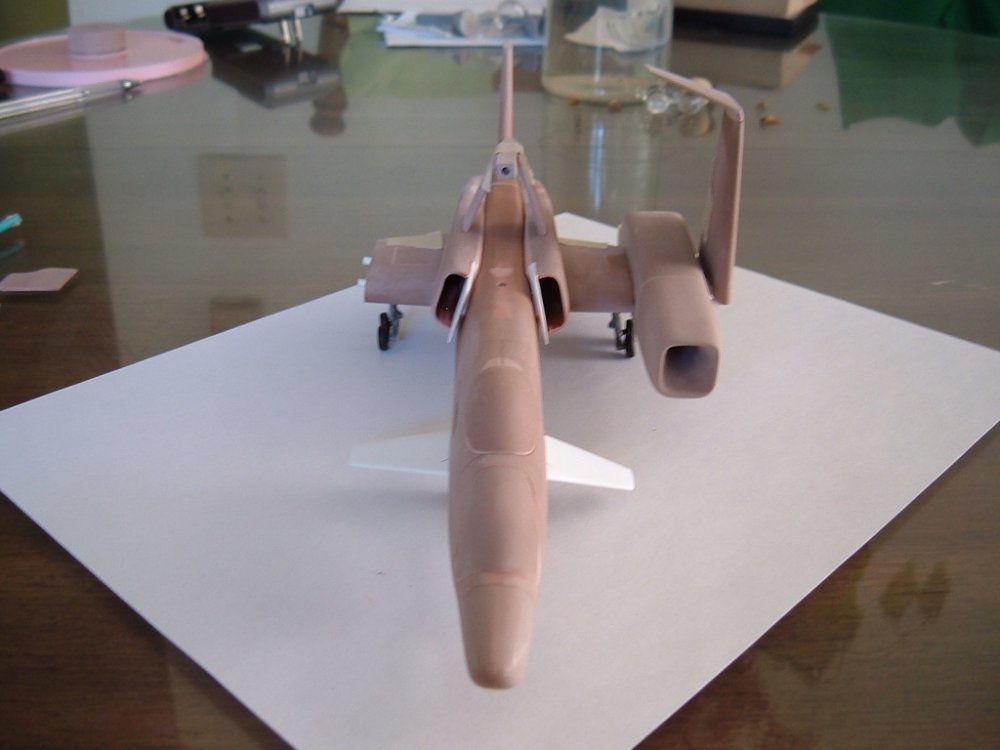
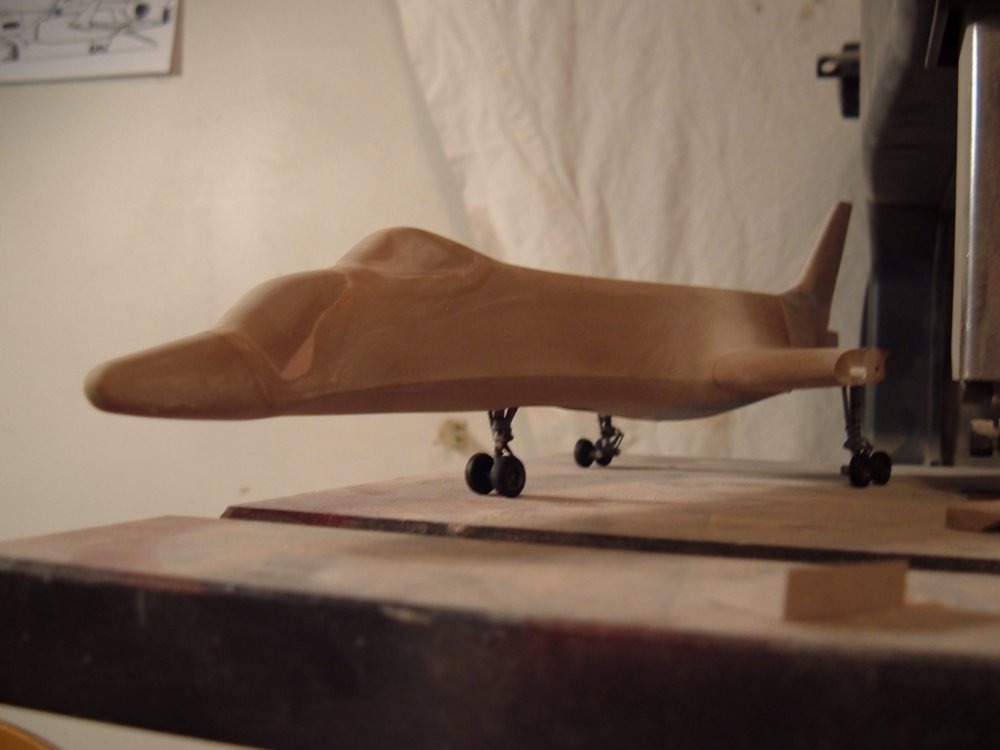
Captain's log, Friday, May 21st. She's almost done! There should be another two updates left and the Kaa 'Tsai will be ready to mold. In spite of the fact that it looks like a drunken sailor barely able to stand on his wobbly legs and just looking like total @$$ in the photos, I assure you that this is because it hasn't been primed yet, but the shape of the plane is there, and it's a beauty! Sadly, because of the delicate nature of the parts, it's rather challenging to get the whole thing to hold together without unsightly masking tape and a little drooping here & there, so I must ask that you bear with me just a little longer. I promise, it'll be worth it. While I won't go into another overly-verbose explanation of all the pics, I'll just touch on a few important pieces of info. -Radome: will be modified from a 1/72 E-2 plastic kit radome and will therefore be made hollow on the kit. -As mentioned previously, the landing gear will be reinforced with brass bars. -The rectangular opening on the starboard side, below and slightly aft of the rear canopy is the hatch for the mid-air refuelling probe, and you'll be able to build it recessed or deployed. -Canopies will be vac-formed, just like the Commanchero. -I'm exhausted, so I'm going to go have a little nap and maybe some ice cream later.


-
It'll be incorporated into the castings, just like with the Gnerl fighter pod.
-

1/72nd scale monster V2.0....any interest????
captain america replied to mslz22's topic in Model kits
:lol: :lol: -
Everyone knows that a unicorn is just a pony with a strap-on :lol:
-
Maybe it's just me, but I find the Regult sculpt to be a tad... Underwhelming? The eye is too small relative to the pod, and they adopted some wonky curvatures in some places. Just my two quatloos...
-
Brass rod inserts will do a better job than pewter any day of the week.
-
Seriously! That's the only model of interest to me that Bandai could make.
-
It seemed only natural, as all navalized aircraft have a Sto-wing mechanism to reduce their footprint shipboard. Gotta take into consideration that the Cat's Eye's wingspan is roughly 1.5 times that of the YF-23
-
Bandai planning to re-release more classic IMAI kits
captain america replied to AcroRay's topic in Model kits
Cheaper is debatable, since we have yet to see what the re-issued kits will retail for. Second, unlike "Gunpla" kits, the old Macross kits actually require considerably more dexterity and skills to put together, so the idea that they'd be aimed at a younger audience does not jive with me. Third, using the second point, the re-issues are also not molded in the component-specific proper colors like Gunpla, and because of all the puttying that's needed to get surfaces flush, they will need to be painted to look half-way decent, so when you factor in the cost of sanding supplies, putty and paints, it probably comes out to more than the cost of a similar size Gunpla kit. Then again, if you can get a young child to master those kits, they'll really develop excellent building/finishing skills that many of the current Gunpla-only youngsters have lost. -
Bandai planning to re-release more classic IMAI kits
captain america replied to AcroRay's topic in Model kits
Honestly, I don't see the point of these re-issues. The only reason I'd want the old kits is my nostalgic feelings for the original box art/layout. The kits themselves are badly proportioned, poorly (or not) articulated and just generally sub-standard compared to anything currently being offered, which is why I've been known to snap-up old kits, keep the boxes and dump the (useless) plastic contents on my friends. But not to fear, I'm sure that the re-issues will come at the newer, "correct" inflation-adjusted prices, even though the tooling was all paid for over a quarter-century ago. -
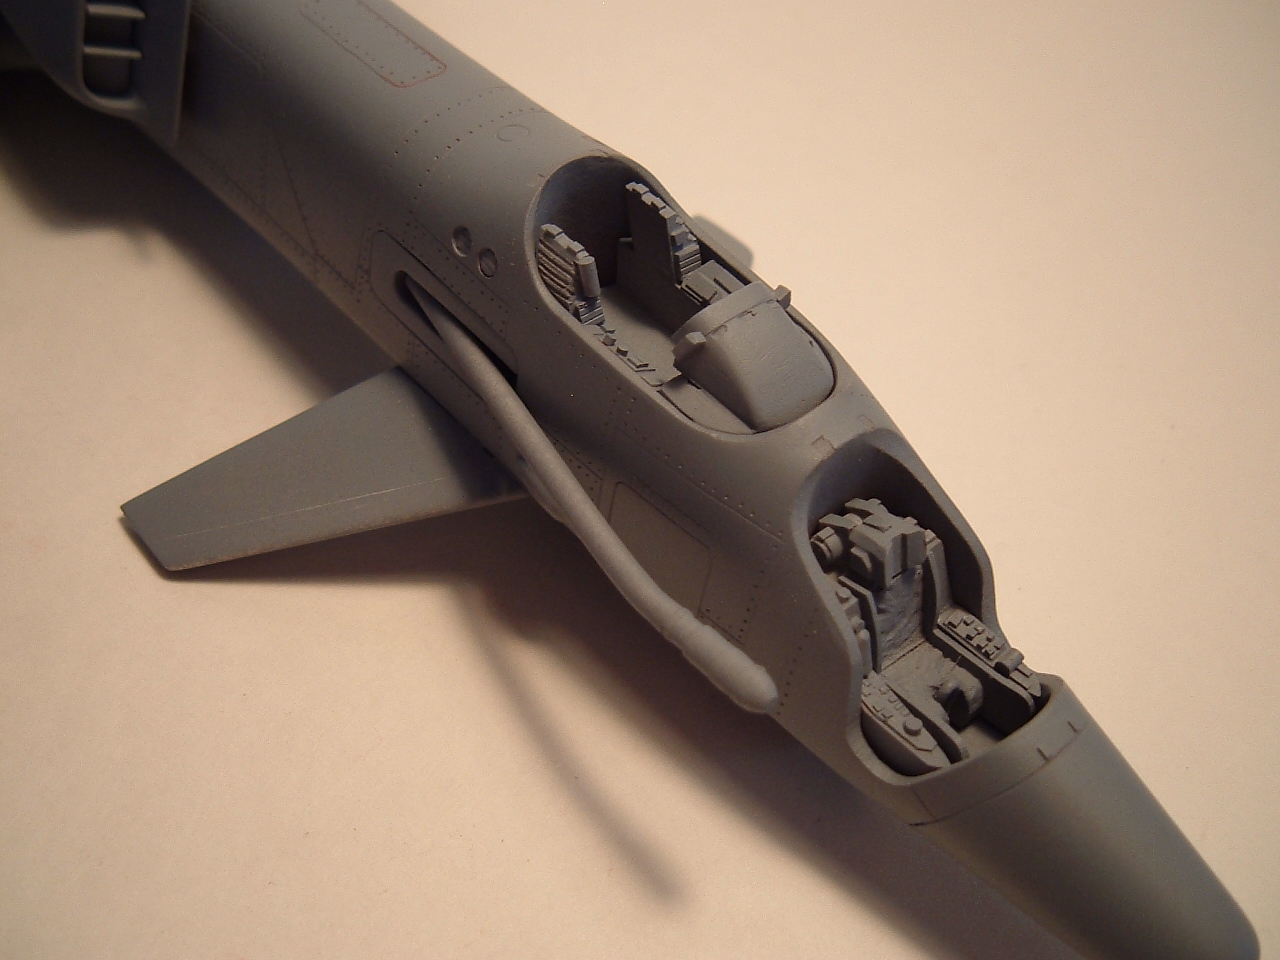
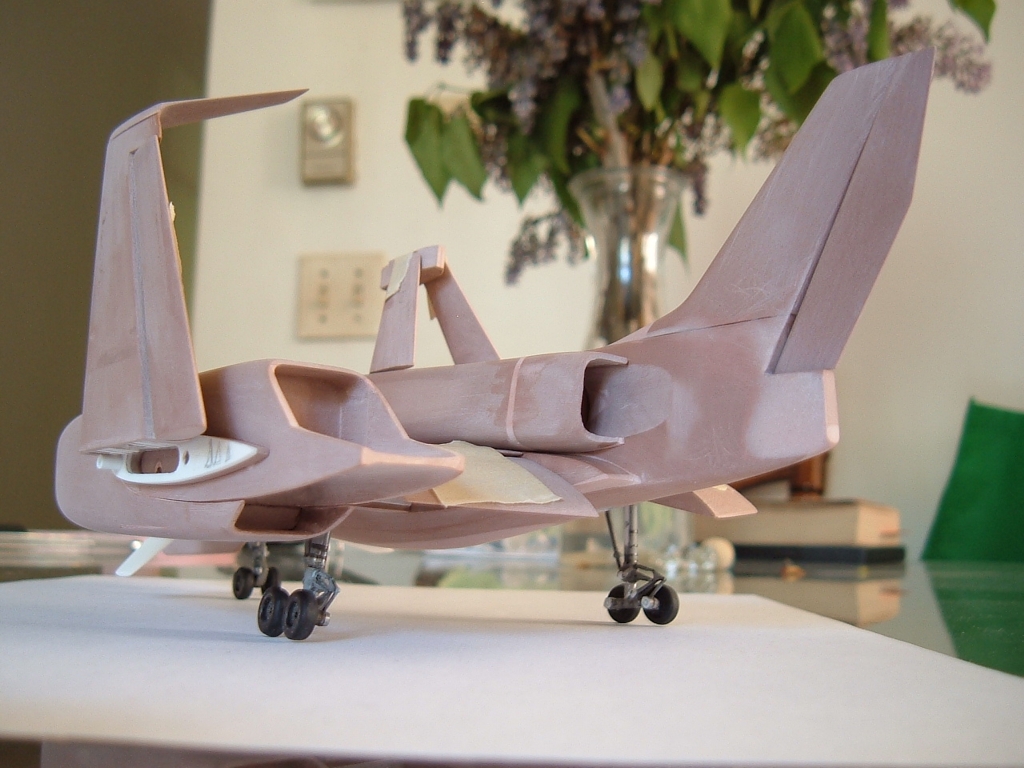
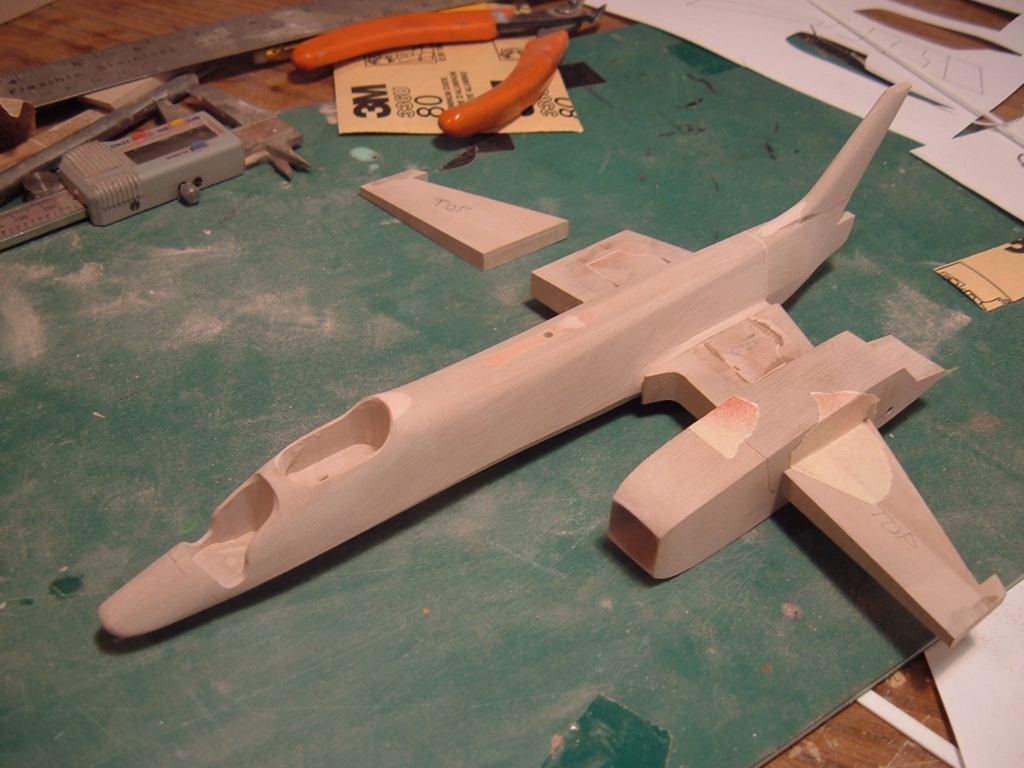
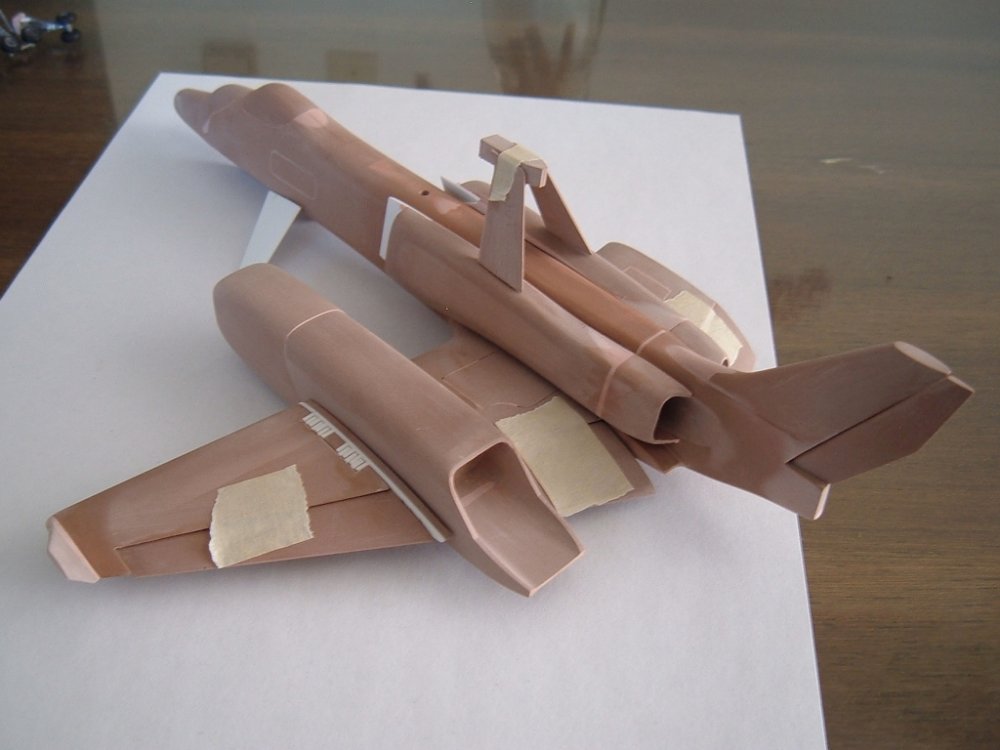
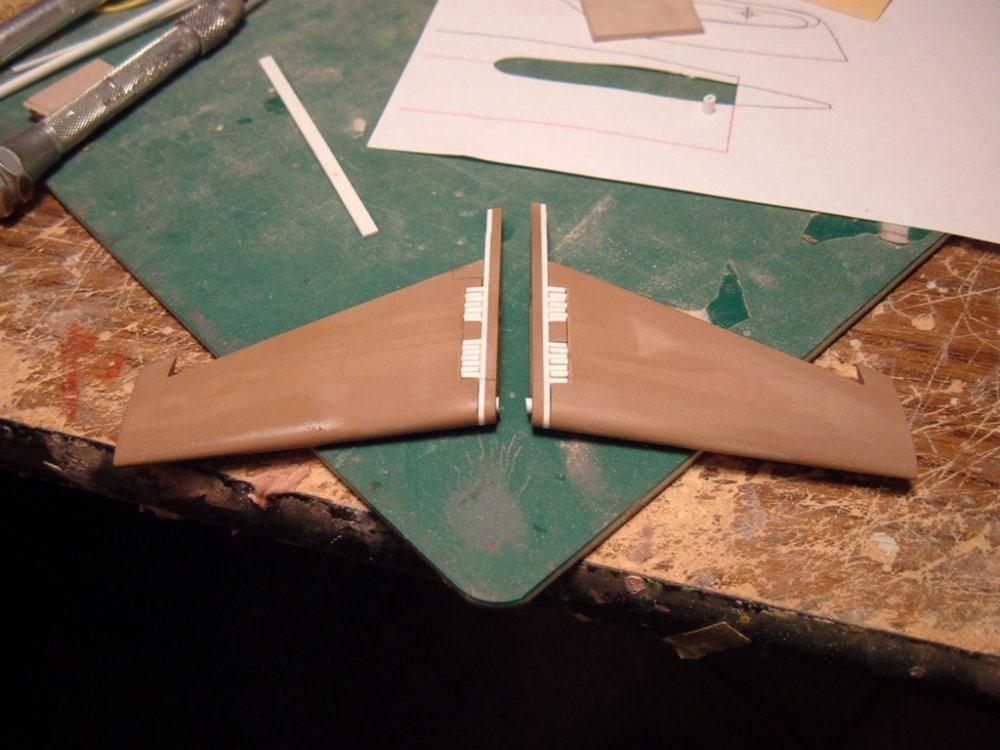
Pic 9: I'm test-fitting the main fuselage parts, and everything looks excellent! As you can see, the engine nacelle is now properly rounded. The main fuselage now sports the bucks for the canopies, and the wings have their trailing-edge flaps secured temporarily with tape. The rear V-tail also has a separate flap, so the builder will have the option to build the plane in flight (wheels up), on the ground with drooped flaps & wings extended, or on the ground w/wings in stowed (folded) position. Oh, did I mention that I plan to add a mid-air refueling probe? Just seemed like a natural (if not critical) thing for a carrier-based bird to have, so that's just one more display option... Now I just have to find a place to put it (those mid-fuselage intakes prohibit putting the probe in a more “conventional” location.) Pic 10: front view of the engine nacelle. I may still round the top & bottom slightly. Pic 11: a better view of the flaps. This bird's wings have absolutely MASSIVE chord!! I was contemplating leading edge slats, but trust me, she doesn't need 'em! In fact, I have to wonder if the drag they produce doesn't outweigh the lift benefits... Pic 12: here is the wing fold mechanism again, this time with the trailing edge flap attached. Not finished yet, but looking great so far. That's it for this week; I was going to do a comparison with the YF-23 as well as show a few “homemade” tools, but I think that can wait another week, seeing as how this was already a pretty dense update. Stay tuned for more next week


-
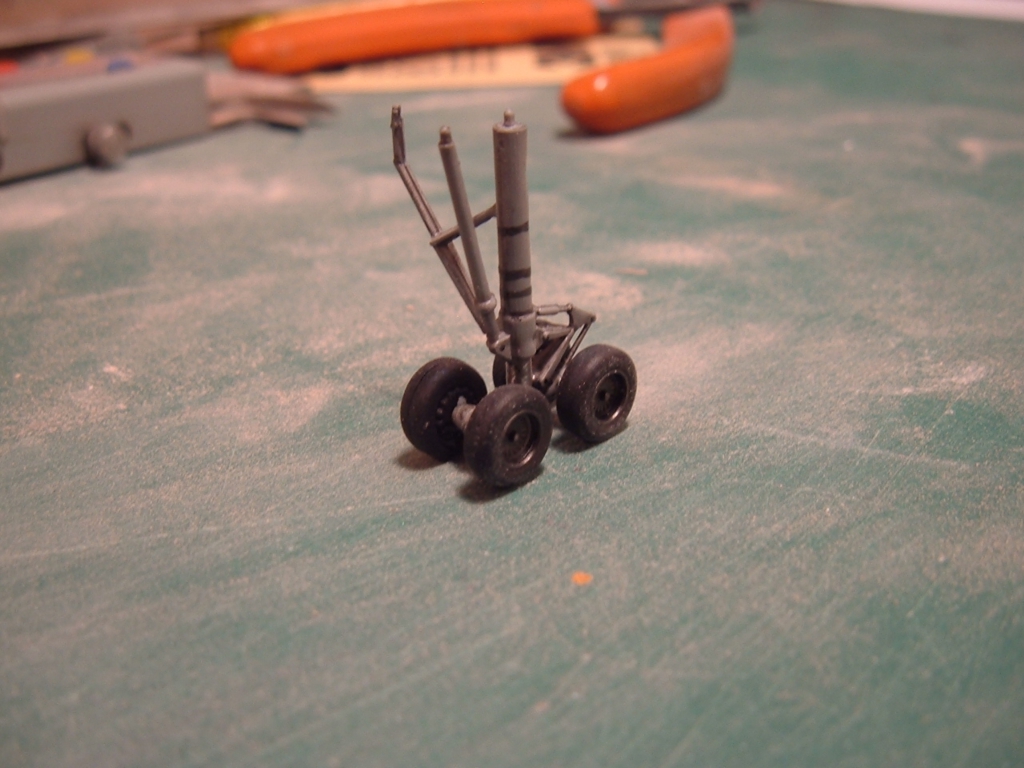
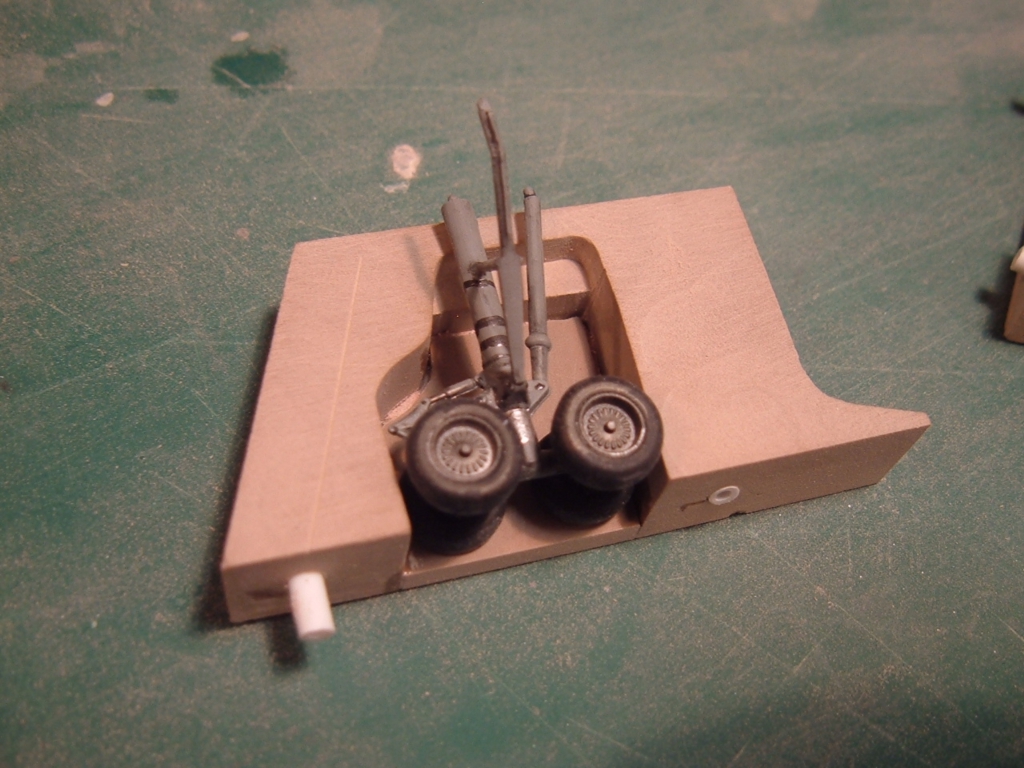
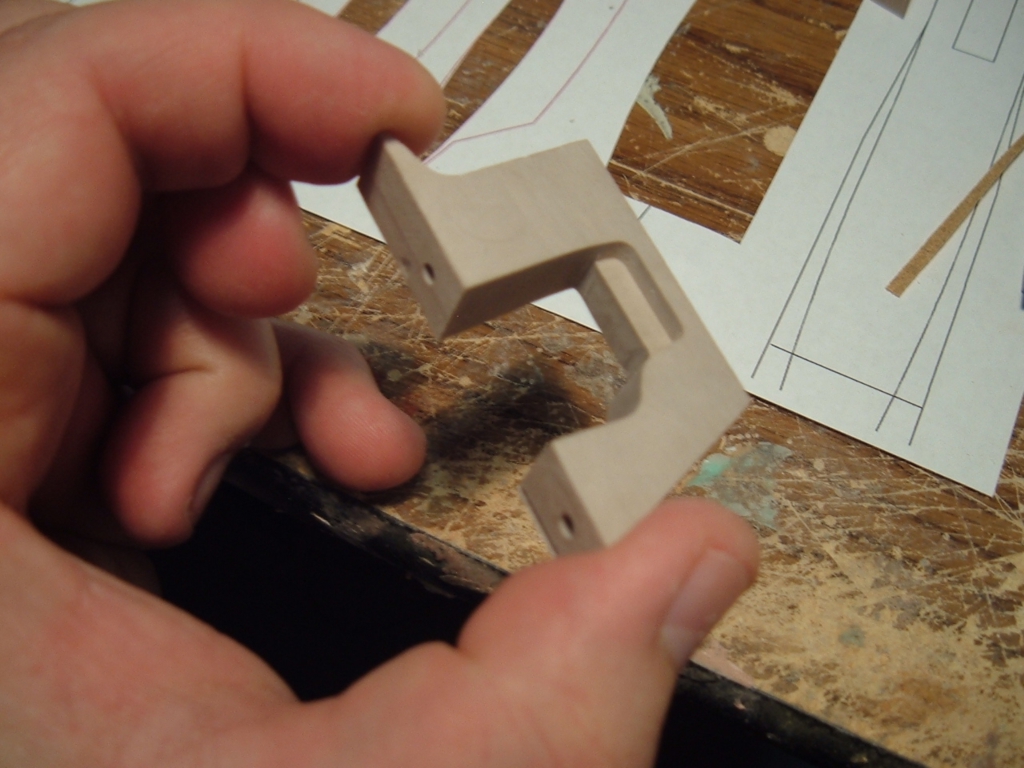
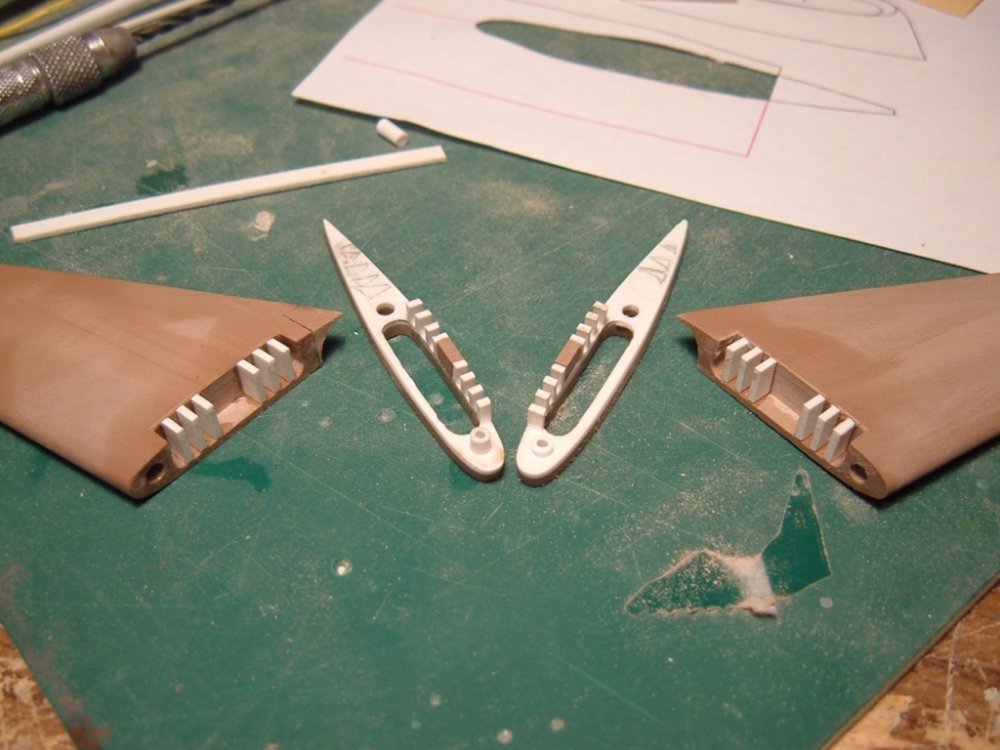
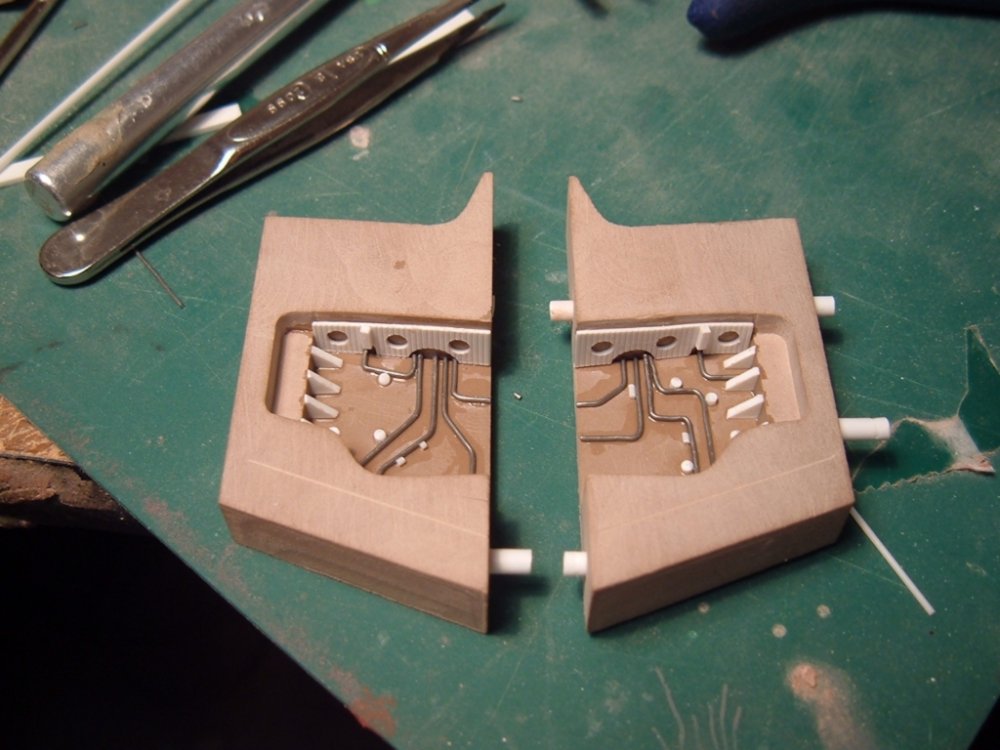
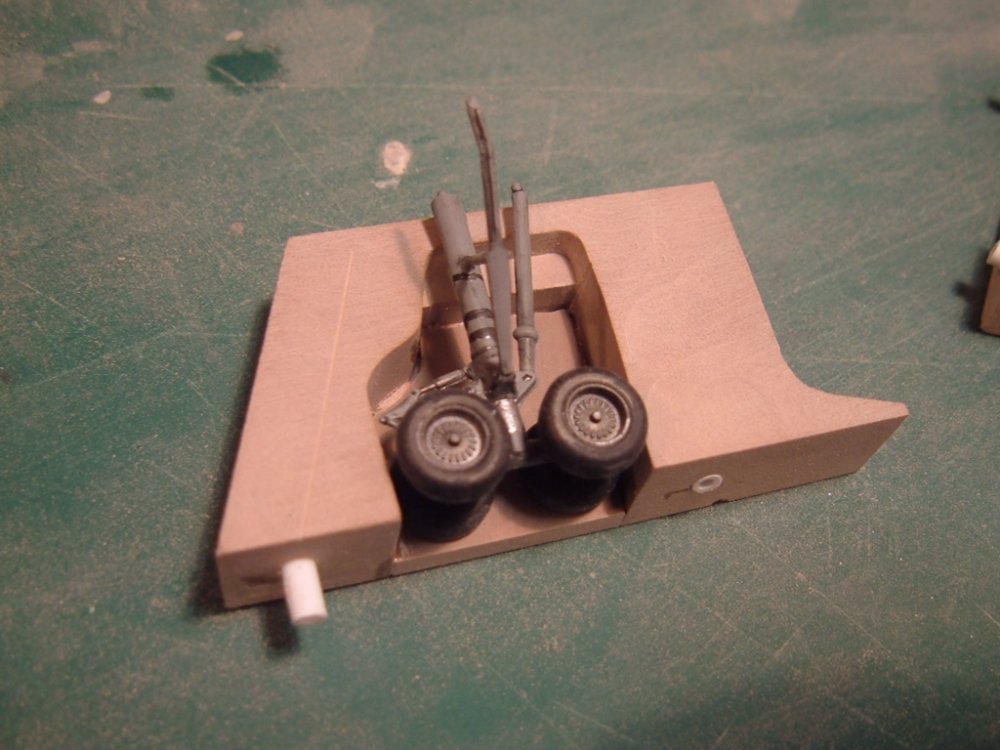
Pic 5: here, a more detailed view of the mechanism; the stub attaches to the engine nacelle. There will be a bit more detailing done to these parts, but not just yet. Pics 6 and 7: here we have the newly-converted double-bogey main gear and nose-gear being test-fitted. The struts themselves still need to have some parts & detail added, but for now I will content myself with the knowledge that everything fits. Pic 8: once again, testing for symmetry and fit. A-OK so far.

-
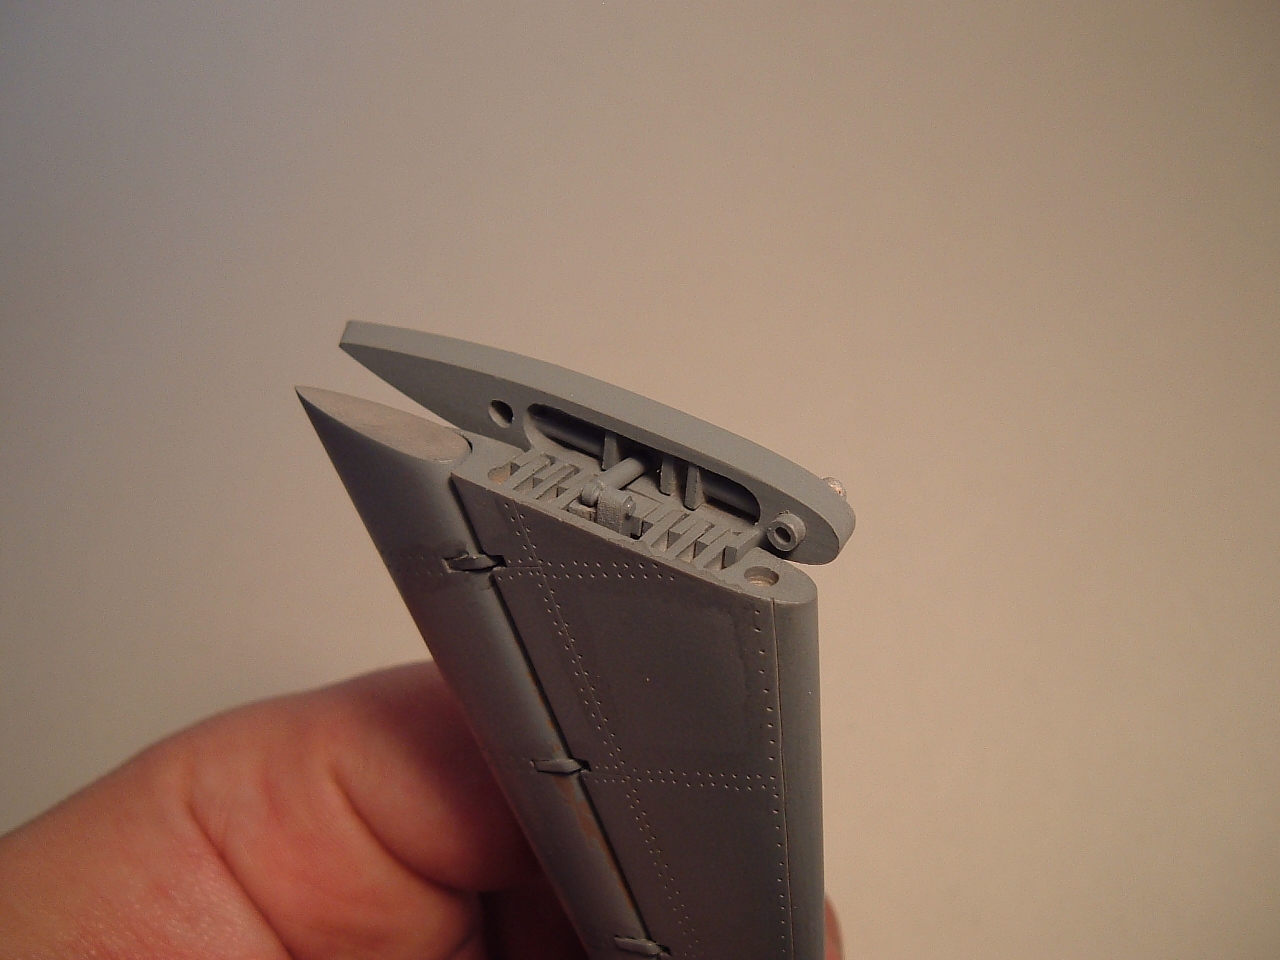
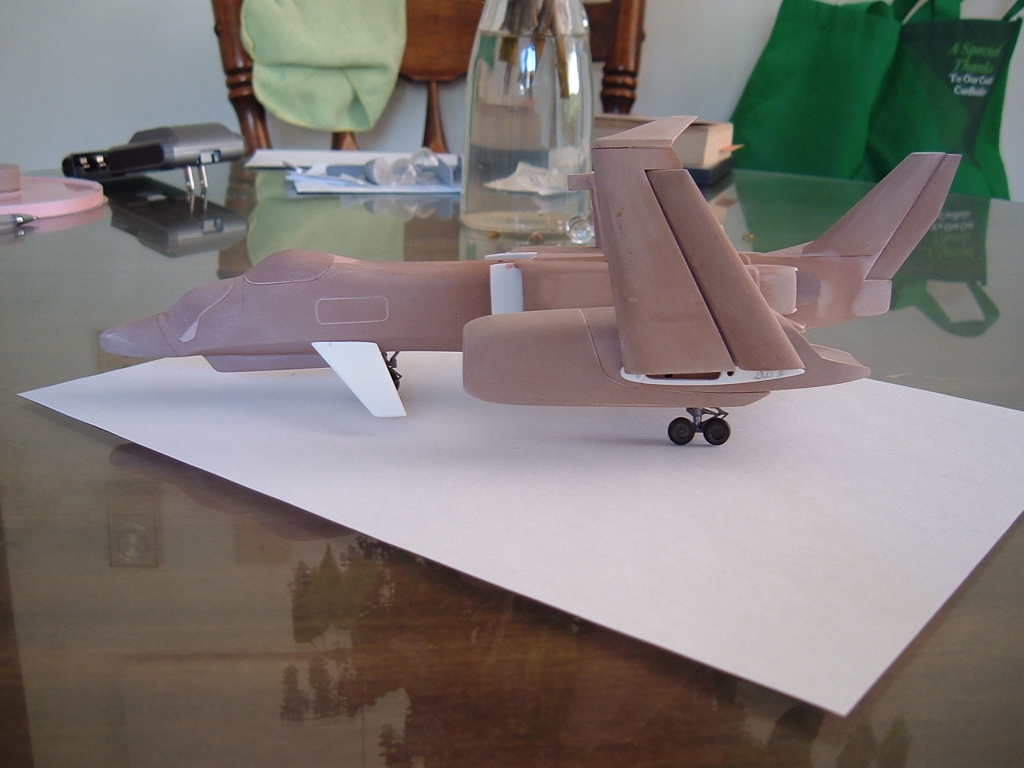
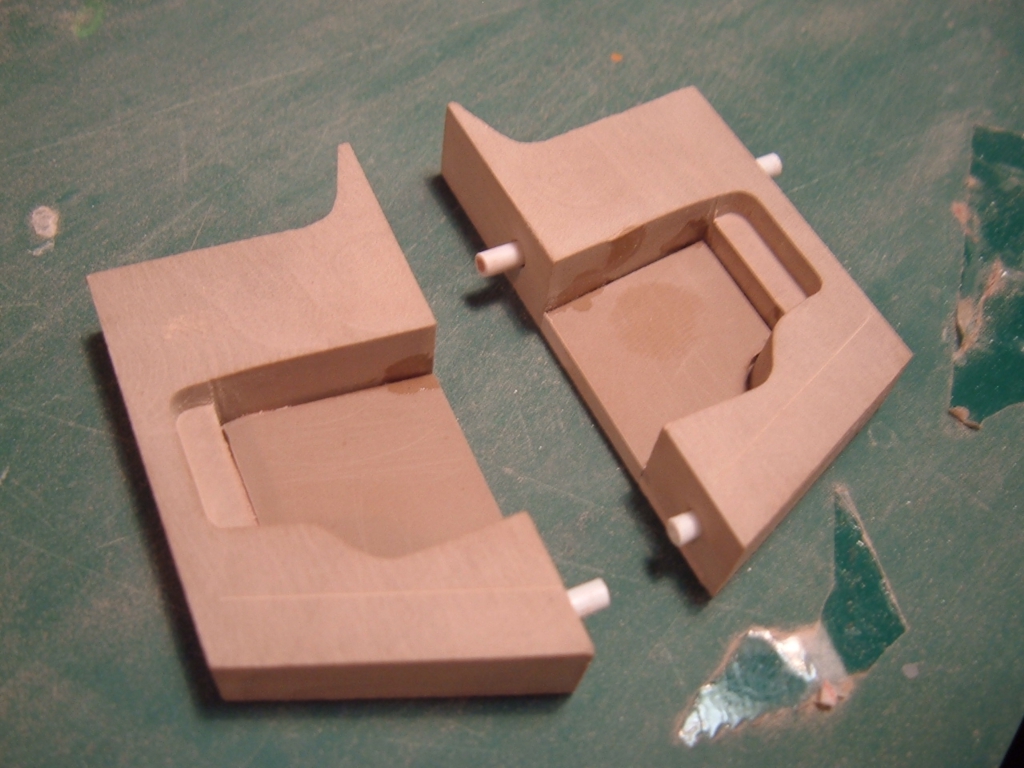
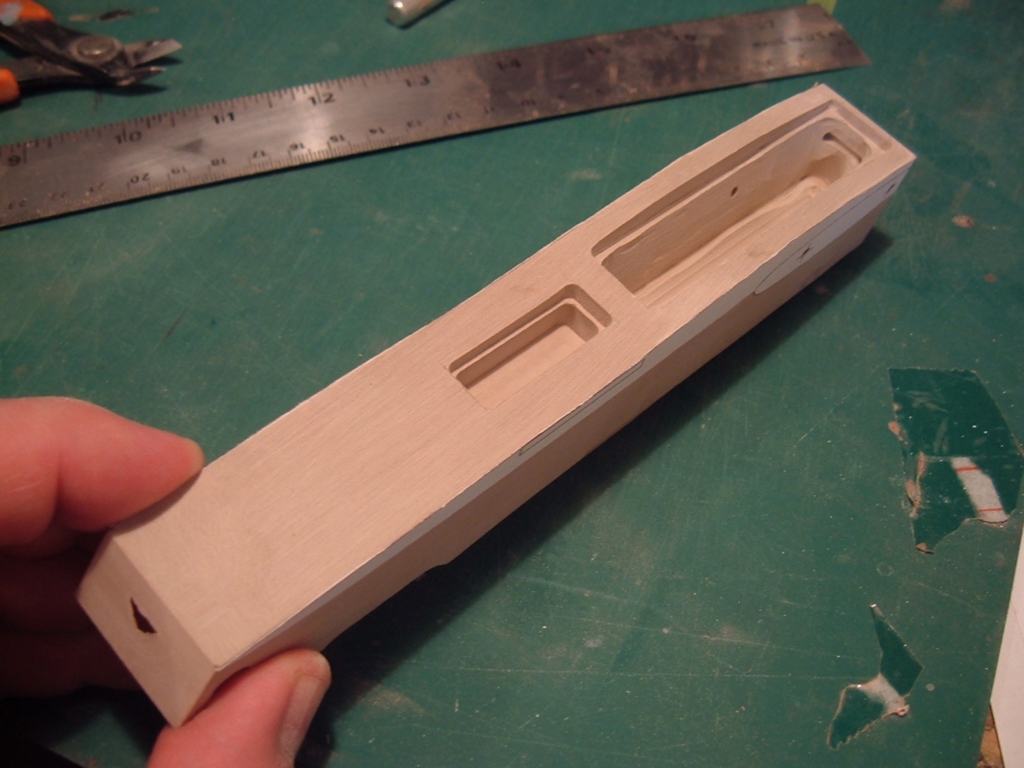
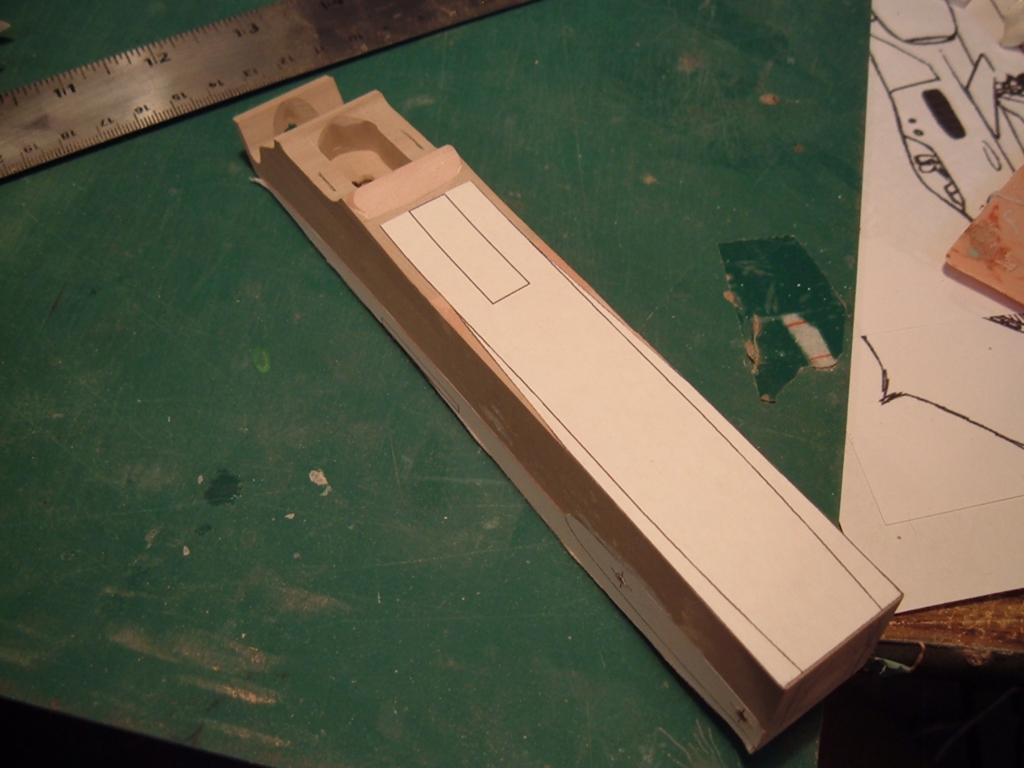
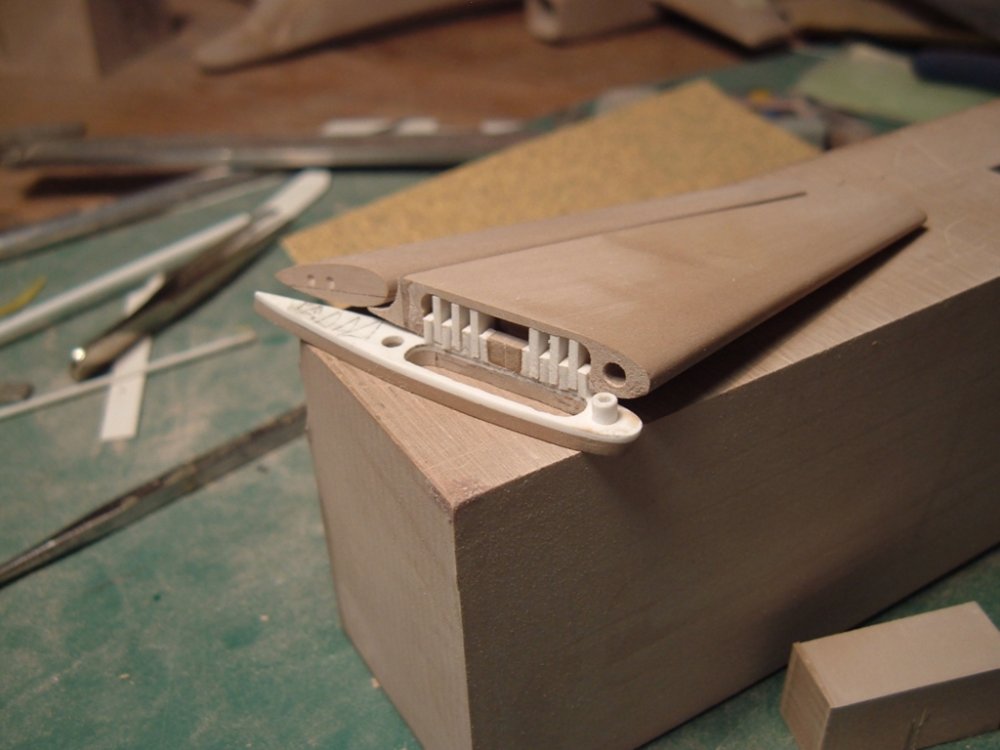
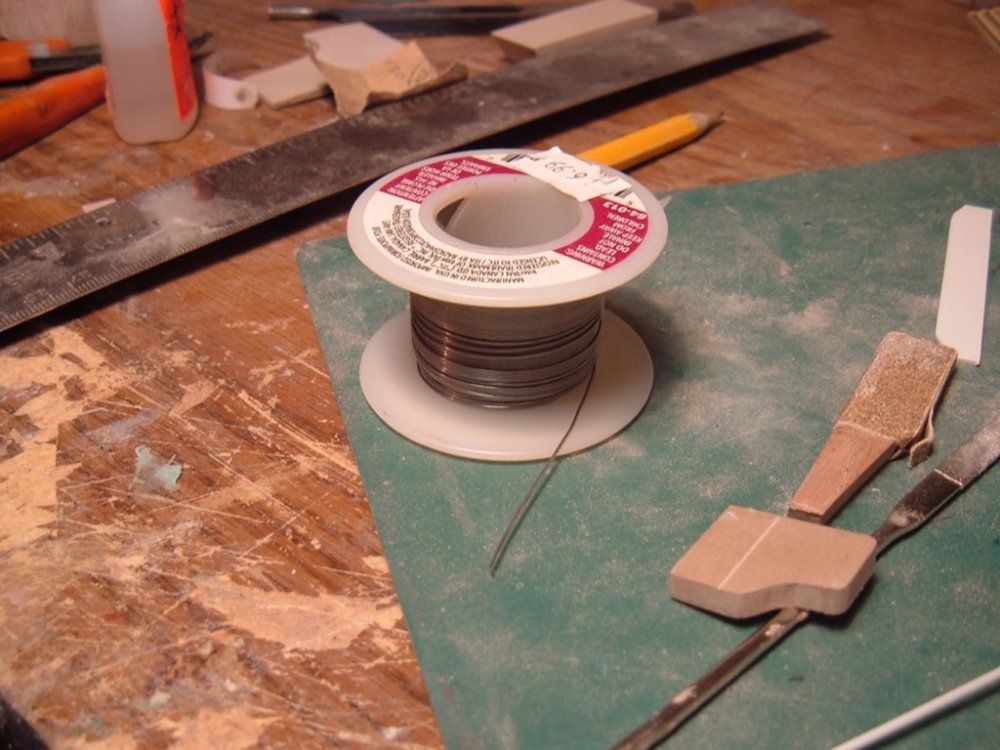
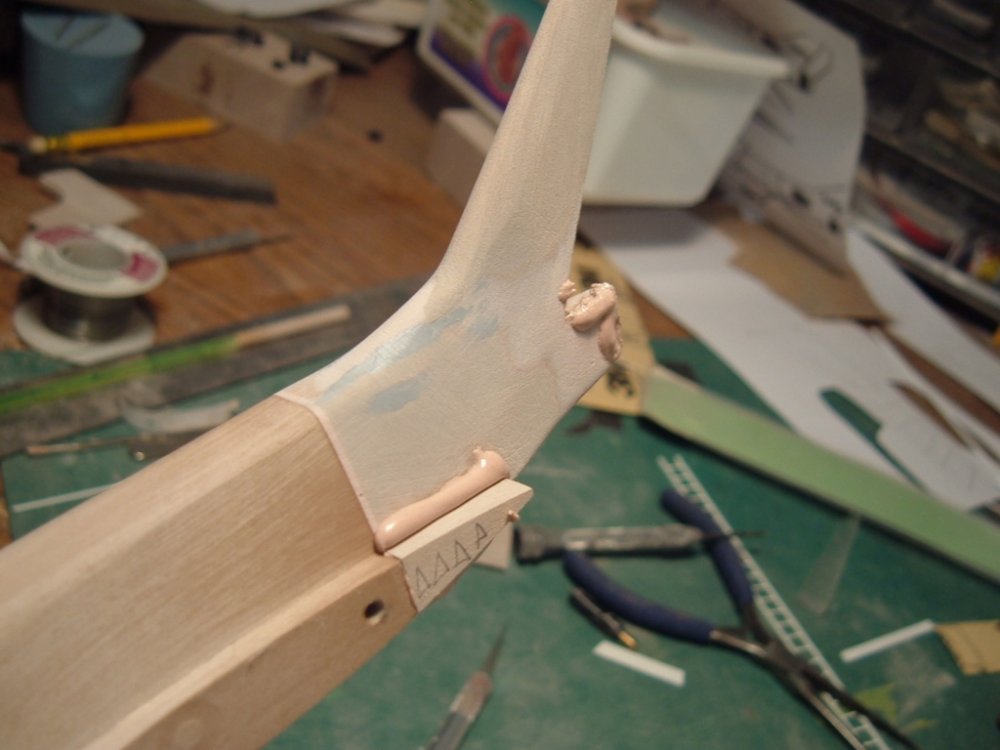
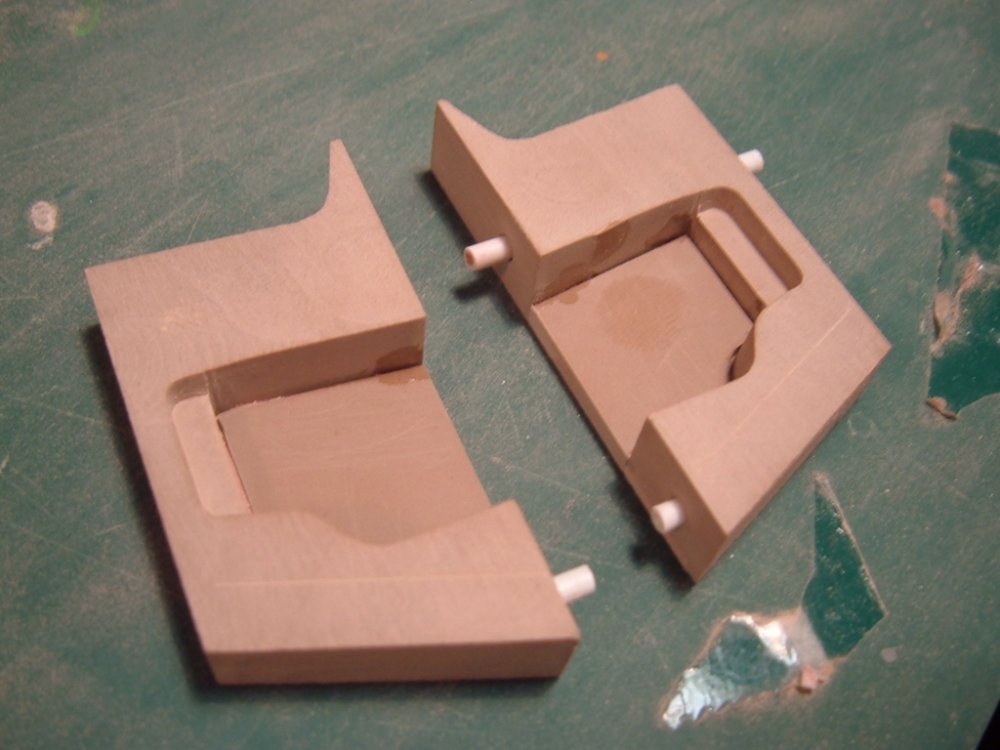
Captain's log, Friday, May 14th. The Enterprise is trapped in a strange energy fi—woops! Sorry, wrong reality! I've had such a long week that I lose track of what dimension I'm in. Wait, where was I? Oh yeah, the Kaa 'Tsai update. Pic 1: solder. It makes soldering possible. It also makes super-detailing possible—and fun! Its easily pliable nature and availability in several different diameters makes this a wonderful tool for adding wires or piping to a model. Pic 2: this is just one example of what solder wire is good for. The main gear bays are now starting to take shape. I don't normally get so busy with detailing so early into a build, but the nature of this project requires a much less conventional procedure. Pic 3: the aircraft's V-tail undergoing some spot putty repair. Due to the complex nature of the shaping of the tail, I couldn't just carve the whole thing out of one solid block, so certain structures are added gradually along the build process to ensure that the kit has a good foundation and good symmetry. Pic 4: the aircraft's sto-wing folding mechanism. The interlocking teeth you see were all added one by one, by hand.
-
Actually, it was a marketing decision to "cheat" with regards to size. Gotta remember that the conceptual stage doesn't exist in a vacuum: ideas are swapped back and forth with sponsors and/or the merchandising arm. Contrary to popular belief, product ideas start off as price-points, and are somewhat "back-engineered" to meet a target price.
-
The Glaug in the pic is actually the ARII kit; IMAI never made the Glaug in 1/72. If you base yourself purely on numerical values, the ARII kit is more accurate, but as was mentioned above, from a functionality and realism standpoint, the plastic Zentradi kits are quite disappointing.
-
Funny Fact #1: I actually used to work at a MUCH faster pace, fueled by substantial amounts of coffee & sugar, but I started to slack off in the last few years so as not to wreck my health. Funny Fact #2: working from scratch is actually a lot easier than most people think; far, FAR harder to fix "problems" on an existing model. In fact, I'm glad you reminded me, I'll try to do a little segment in the next update to cover custom tools.
-
Pic 9: ...And speaking of bogey, this is the unit that will be transformed into the main gear; it's off a 1/144 scale 747-400. It will have to be modified to two bogeys in stead of four, and the retraction mechanism will need to be replaced, but it's nothing I can't handle. Pic 10: Perfect fit! Pic 11: ah, now we're getting somewhere! After lots and lots of hand sanding and shaping, it's finally starting to look like a plane. Pic 12: underside view of the same. I placed the hatches over the wheel well and belly cavity so that the hatches would be a perfect, seamless fit. On a side note, this plane is MASSIVE for a carrier-based bird, not just compared to the VF-1, but also compared to modern birds. In a future installment, I'll show photos of it next to a YF-23 and you'll see what I mean. Stay tuned


-
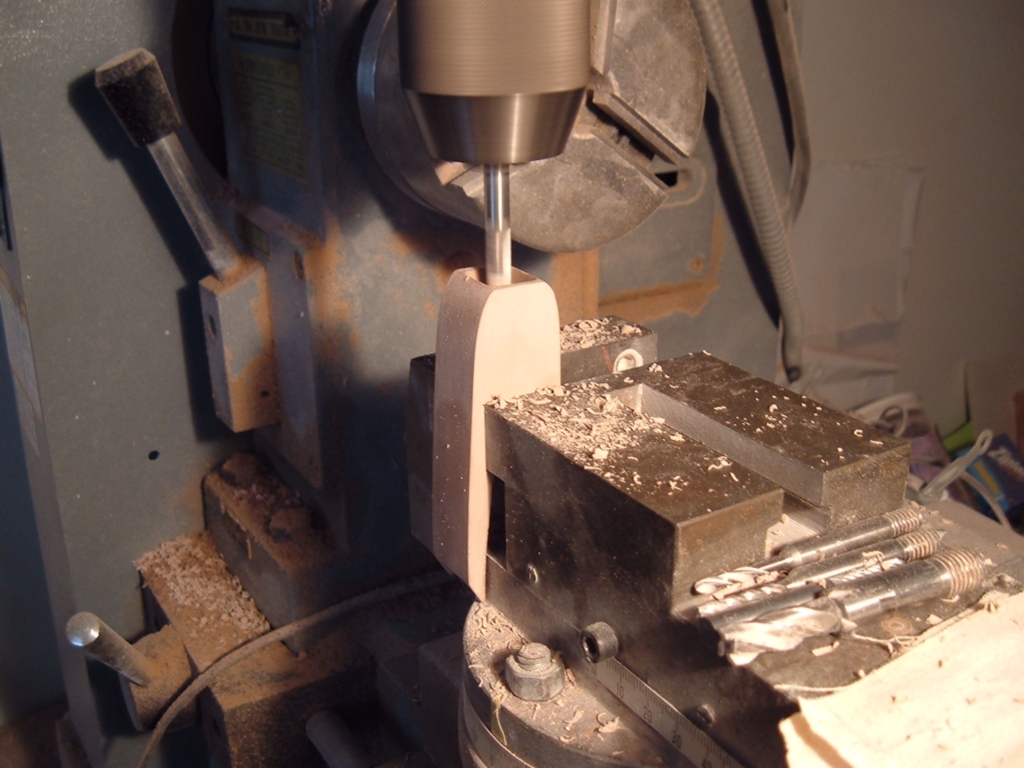
Pic 5: and here I'm milling the vertical sides! This is why I keep many of my shapes square until the last possible moment: once you start shaping those compound curves, you lose those geometric flats and reference points become much harder to calculate, not to mention that it makes it infinitely harder to clamp a rounded part in the mill vise. Pic 6: here's that leading edge engine nacelle again, now starting to have more of the desired, tapered shape. Pic 7: this is the aft view of the engine nacelle; I strategically split the pod in upper-aft and lower-fore sections so that I could hollow them out (precious weight savings!) and also makes it easier to get the tunnels shaped. Pic 8: the main gear bays, a step closer to completion, needing to be checked for bogey-fit.


-
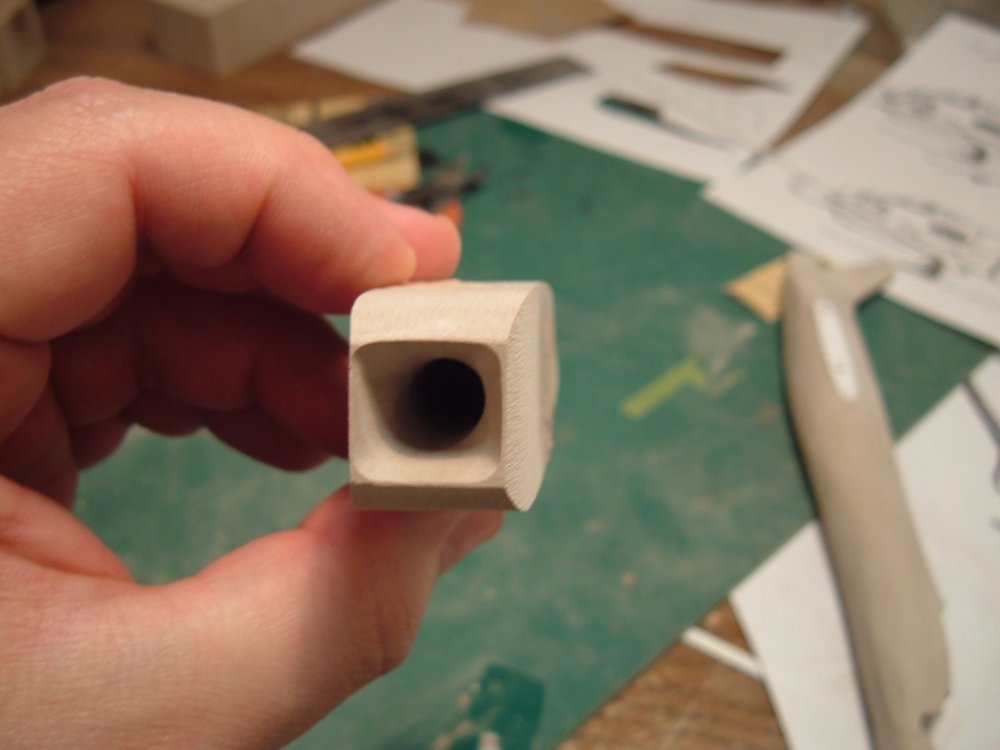
Captain's log, Friday, May 7th. Also referred to as pizza day. While I've been able to progress on the Kaa 'Tsai, the progress has admittedly been a bit slower than I would have liked. Probably because unlike, say, a Destroid, which is mostly a series of blocky, geometric shapes, this project has a lot of subtle, compound curves that require lots of hand-sanding. More fun for me, but also more time-consuming. Pic 1: here is the leading-edge intake of the engine nacelle. This is a particularly tricky area, as the intake tunnel will need to go from a square with rounded corners to a cylindrical/circular shape at the compressor face. I started by boring the channel on the mill, and will follow-up with some homemade sanding tools to get the desired square taper. Pic 2: here is yet another part that has “complex procedures” written all over it: the LEX/wing/main gear bay. I really had to plan-out the sequence of work on these pieces or risk fouling them up. Being the LEX/inner part of the wing, it has a normal air foil cross-section that, just like on any plane, tapers off in width, height, but it also has to be partially hollow to accept the main dual-bogey main gear, and then it has to have a conventional flap/aft control surface (yes, these will be separate and positionable—it's me afterall!) Pic 3: this is the belly of the main fuselage. The smaller opening will become the front gear well, while the larger hole in the aft fuselage was simply milled to reduce weight on the structure and will have an appropriate cover. Pic 4: the same part, as seen from above. I've overlaid yet another paper template so as guide me as I mill the vertical sides.