captain america
-
Posts
3563 -
Joined
-
Last visited
Content Type
Profiles
Forums
Events
Gallery
Everything posted by captain america
-
Not yet, but I should have them any day now. I can't wait too, cos I've got this huge pile of kit boxes in front of my TV and it's driving me bonkers!
-

Quirtra Queramitzuu: Kamikaze Space Cucumber
captain america replied to captain america's topic in Model kits
Oh yes, main gun will be able to be built open or closed. Battle-damage seemed pretty spread-out over the ship, so I'll likely make it un-damaged and allow modelers to make any damage as per their own interpretations. -
Quirtra Queramitzuu: Kamikaze Space Cucumber
captain america replied to captain america's topic in Model kits
Actually, the Kamikaze ship wasn't brown, but purple (it was a Meltran vessel.) The reason it looked brown is because I think the top of the hull rusted from exposure to the elements and such. I know because I just re-watched Ep 36 a few times just recently -
Quirtra Queramitzuu: Kamikaze Space Cucumber
captain america replied to captain america's topic in Model kits
Yup, so roughly 30cm from bow to stern -
Hi Everyone. As per the title, I've decided to set my scratchbuilding sights on the infamous "Kamikaze Space Cucumber" from episode 36 of the series that Quamzin uses to ram the Macross. I happen to really like the shape of the vessel and of course the main gun design is the cat's meow! http://www.macross2.net/m3/sdfmacross/quiltra-quelamitz.htm I'm not yet sure if I want to render her in full battle-damage or not, but I think I'll cross that bridge when I finally get to it, and that's still a ways off. I've settled on 1/5000 scale (the same as the mini-me Salan Scout) in order to keep a level of consistency with existing models. Also, the fact that there's a Macross Storm-Attacker in plastic that's been floating around for 25+ years makes the potential for a diorama too sweet to resist! Alas, this is where it begins: I'll start rendering some diagrams and will probably have a first update by Friday or next Monday. After that, I'm off to pick an adequate-size cucumber to make the hull and some corn nibblets for the sensor thingamabobs
-
All the sourced I've found list the ship's length at 1500m
-
Yes and yes, respectively! It's the gunboat that Quamzin used to ram the Macross in his suicide run of episode 36. I think that 1/5000 would be just perfect in size (about 30cm) and in scale with mot only the tiny Salan Scout, but also the plastic Macross kits.
-
You mean that ol' lullaby? That won't be until close to Christmas if at all. In the meantime, I think we needs another space cucumber: something with a deployable main gun... Like a Quelamitz.
-
Update! Looks like the canopies are done and shipping!! I should have those in the next couple of weeks, and shipping will begin almost immediately after Many thanks to all of you for your patience
-
Clear resin isn't all it's cracked-up to be; pretty much all the brands I've used are tempermental and don't offer sufficient rigidity in cases of extremely thin castings, not to mention the flow problems they exhibit with very thin cavities, even under pressure. Plus, vac-formed lexan provides unsurpassed optical clarity. Only the best option will do.
-
Nothing lately. I'll send Onezero a nmessage tonight.
-
**Boards-up the windows** Closed!
-
The Transformers 3 Thread--A Michael Bay Thread
captain america replied to areaseven's topic in Anime or Science Fiction
Don't forget all the panel lines that disappear too! In time I simply accepted it as part of the whole "camouflage" effect made possible with that pseudo-organic metal of theirs. Purely cosmetic when in vehicle mode. -
+1 what Petar said. Though precision is sought for a more engineering-based model, the artist in me kinda likes the mottled and organic look of the clay. Honestly, neither one is bad, they just appeal to different senses. I say follow your heart!
-
**Waves Kicker773 in** Shoot me a PM and I'll fix you up
-
2 more days before I shut down production...
-
The Transformers 3 Thread--A Michael Bay Thread
captain america replied to areaseven's topic in Anime or Science Fiction
Notice how they have a little blue "cover" over the hood ornament? My money is on it being a Decepticon. -
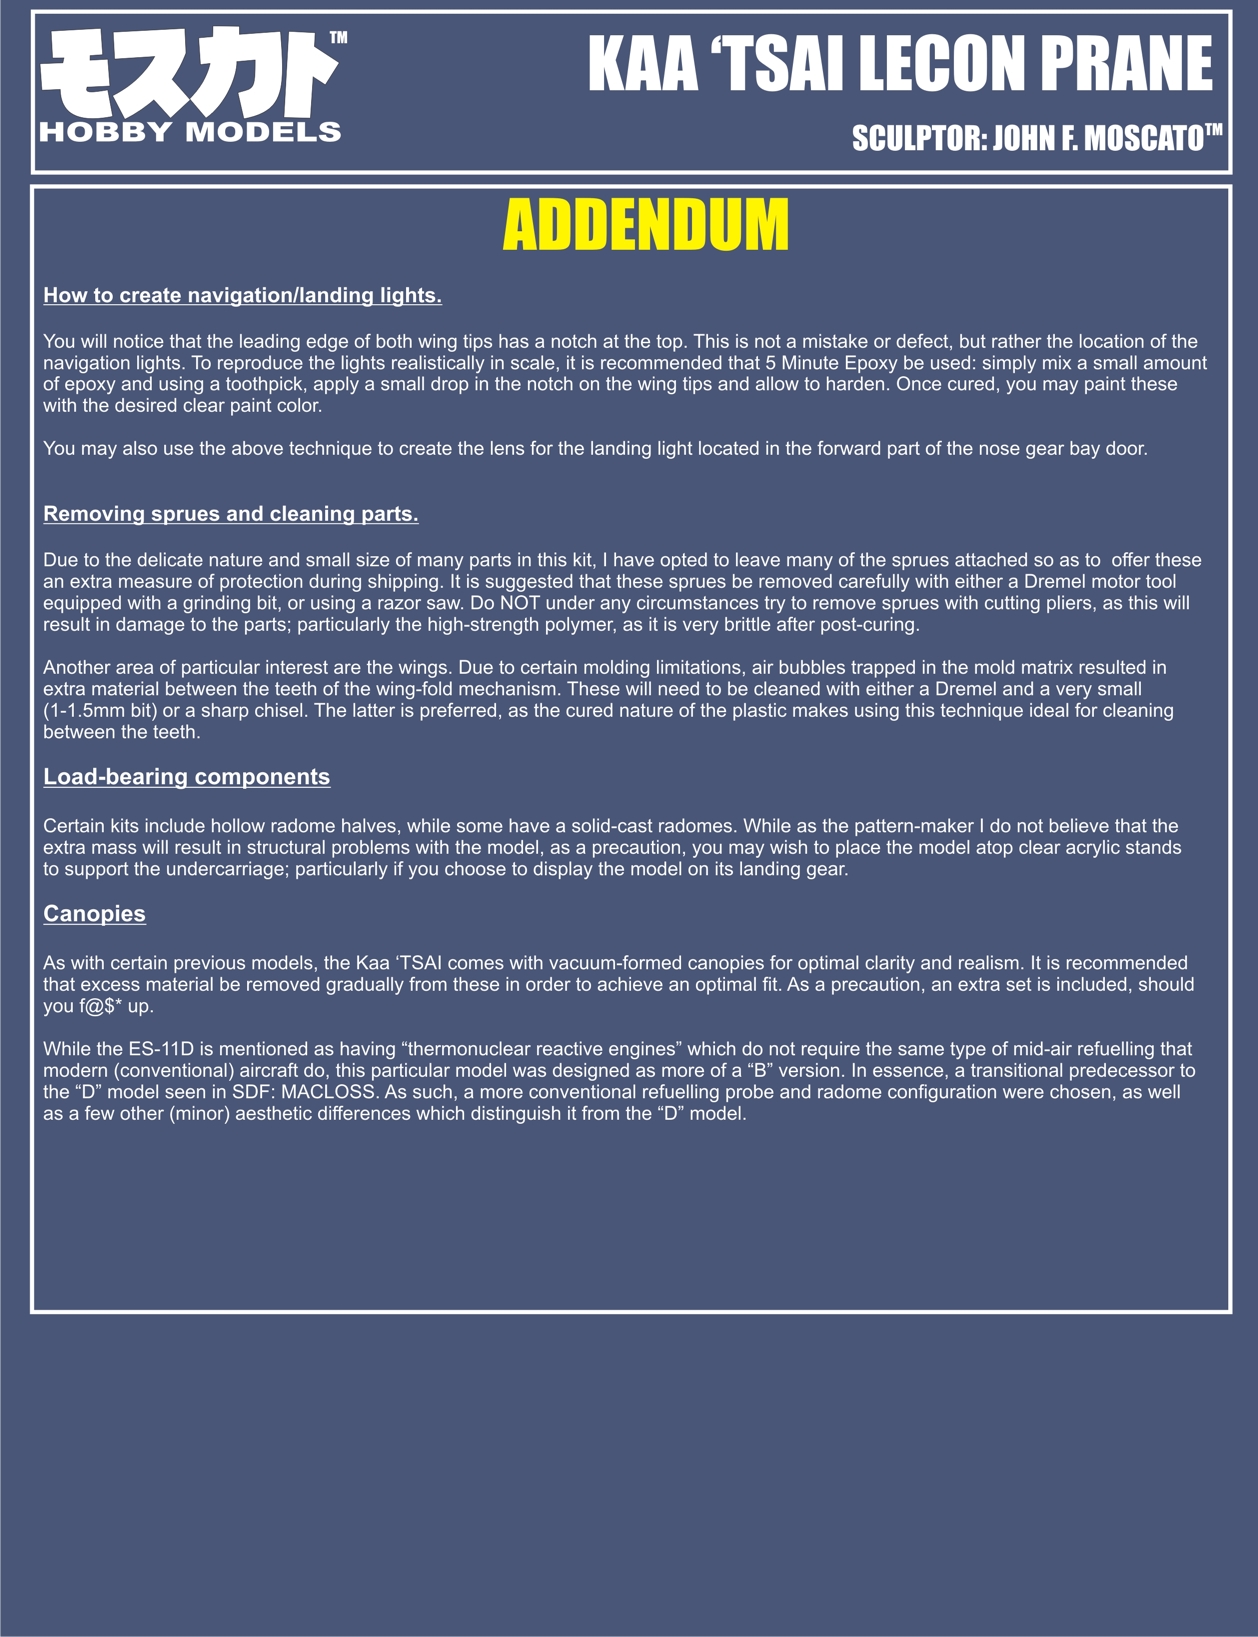
Hi everyone. Quick update (or more precisely NO update.) Still no word on when I'll be getting the canopies, and once again, please accept my sincere apologies for the delay. The second I know when I'll be able to ship your models out I will post. Also, I will keep the order window for the Kaa ,Tsai open until Friday the 13th, at which point I will cease production, so there's still a chance to snag a kit until then. As always, I remain at your disposal if you have any questions.
-
Assuming that I can get sufficient demand to resurrect it, you'd likely be looking at 7 big ones price-wise, including screws, acrylic pieces & decals. My idea was to break it down into 6 modules, with me offering one module every 1-2 months: this makes the price easier to manage, and the work load easier to manage as well. It's hard to convey, but just one arm of the Beast is more complex than one of my 1/72 Destroids. Assuming it even comes to fruition, it would be commencing around late October to mid-November, and I would easily give everyone a 30-day heads-up to prepare... Including myself!
-
Parts of the "Beast" were sent off to a couple of fellow MWers to evaluate, examine & perform tests on. In a way, perhaps it was for the best that it was forgotten for so many years; gave me a chance to do some other interesting projects in the meantime and truly understand that it was for the best. Now, with more experience and clear-headedness under my belt, I have the opportunity to unleash its true potential.
-
Hehe, well in point-of-fact it WAS scattered across North America, but is now happily all under one roof. I mean, it's not a done deal yet by any means, but a few advances in technology and some clever re-thinking could make it possible. Oh, BTW, I edited the destructions in the other thread, so those are ready to download for those who had viewing difficulties with the previous jpegs. Still waiting on the canopies.
-
Ok, Destructions all re-formatted and ready for download. Please forgive my tardiness.
-
Oh, I can pull it off no sweat (if I can make a Glaug, I can make anything!) However, I MAY decide to revisit an old Mospeada project first. Something that's been in storage for years...Know what I mean? If you do, don't post it, I want to keep that hush-hush
-
Little test. Can you guys see/open this file?

-
Hi guys. I'm going to do a little test by week's end and post a RGB-converted sample of the instructions. Hopefully, this will cure the previous issues of the images appearing in negative.