captain america
-
Posts
3563 -
Joined
-
Last visited
Content Type
Profiles
Forums
Events
Gallery
Everything posted by captain america
-

1/72 Nousjadeul Ger Moscato kit?
captain america replied to captain america's topic in The Workshop!
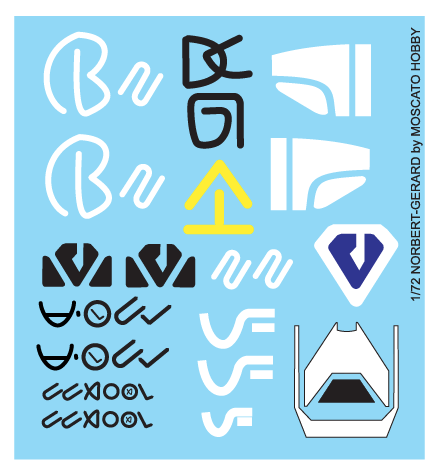
Hi guys. Destructions are underway as kits are beginning to ship. I've also done the artwork for the decals, but since it's an Adobe Illustrator (ai) file I can't seem to upload it. Can someone host the file for download, maybe? I've attached a screen cap as a preview for the art.
-
1/72 Nousjadeul Ger Moscato kit?
captain america replied to captain america's topic in The Workshop!
Pilot figure not included, I'm afraid. So far I have the following interested parties for a secondary run: -shdwfx2000 -Jason C -tdo7623 -
1/72 Nousjadeul Ger Moscato kit?
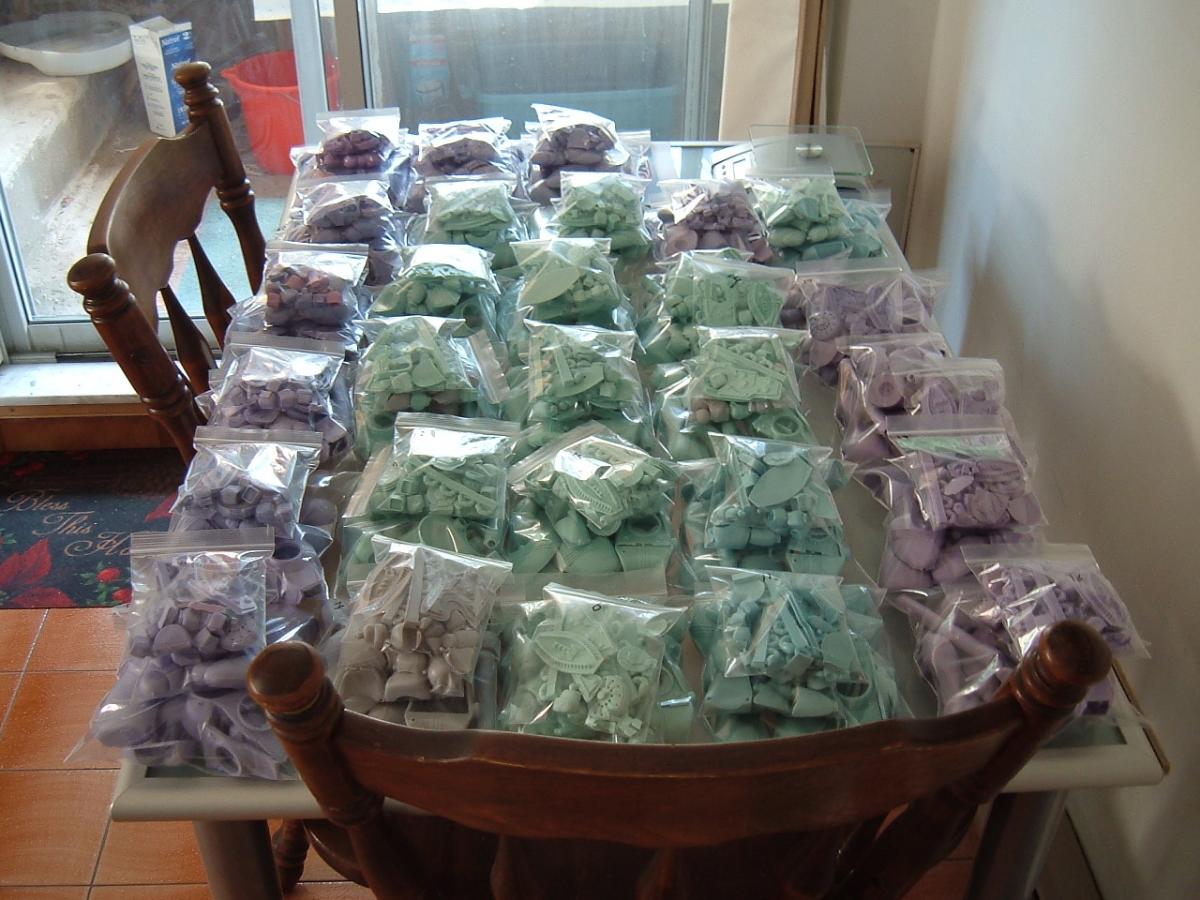
captain america replied to captain america's topic in The Workshop!
Kits are ready and boxed, I start shipping next week. Here's what my kitchen table looked like for a short time.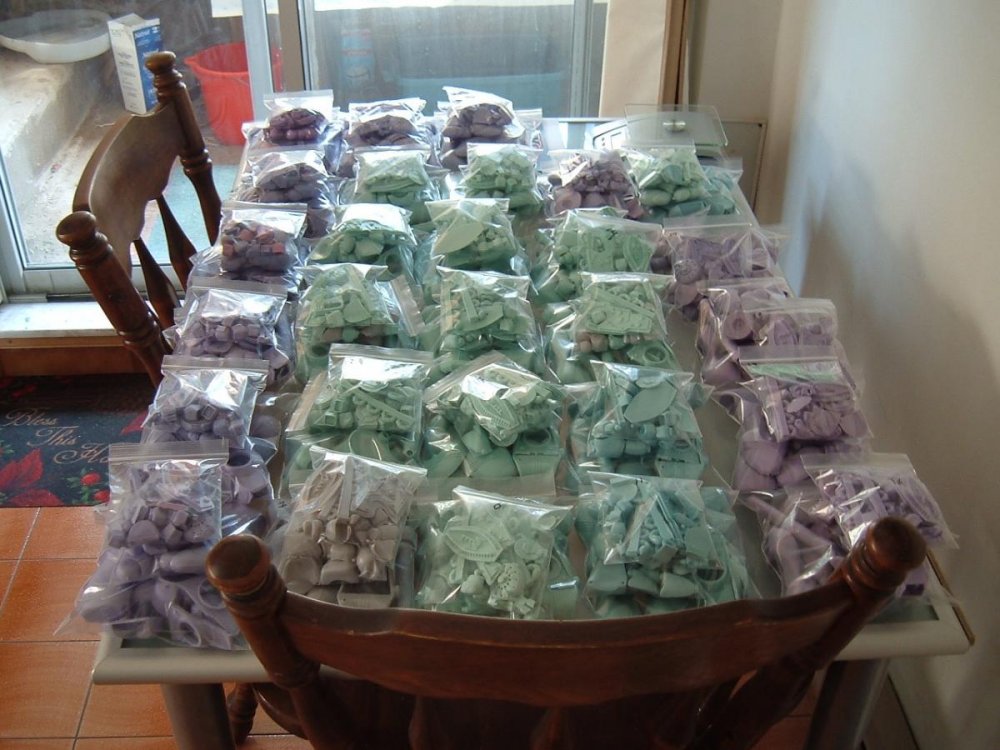
-
1/72 Nousjadeul Ger Moscato kit?
captain america replied to captain america's topic in The Workshop!
Technically, if I can get 6 more orders, I can justify re-tooling the other half of the molds. -
Holy smokes, that's all kinds of awesome, dude!! I wasn't sure about your Gosu colors at first but now that I see it complete I think that you hit a home-run, congratulations on that wonderful collection and thanks for sharing!
-
1/72 Nousjadeul Ger Moscato kit?
captain america replied to captain america's topic in The Workshop!
Hi guys. Just wanted to let you know that damage-control has been implemented and the damaged molds have been re-done; I will resume casting on Monday. I also worked on my own kit and photographed plates for the destructions. Here's a sample of what you'll be getting.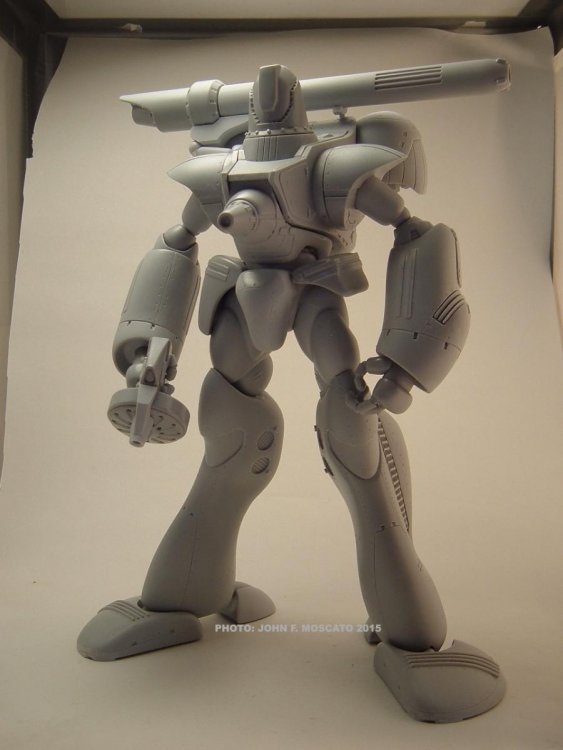
-
I like where this is going! Always a delight to see my kits reaching completion
-
1/72 Nousjadeul Ger Moscato kit?
captain america replied to captain america's topic in The Workshop!
Sooo, quick update: less than 10 kits left to cast and I open up a new liquid resin kit and start pouring as per usual... But it's a bad batch of resin! The good news and the bad news: half my molds were ruined by the defective resin... Going to contact the manufacturer tomorrow. 2/3 of the run is cast and done, but now I have to replace the trashed molds and so the last third will be delayed at least a week. Some days it just doesn't pay to get out of bed. -
1/72 Nousjadeul Ger Moscato kit?
captain america replied to captain america's topic in The Workshop!
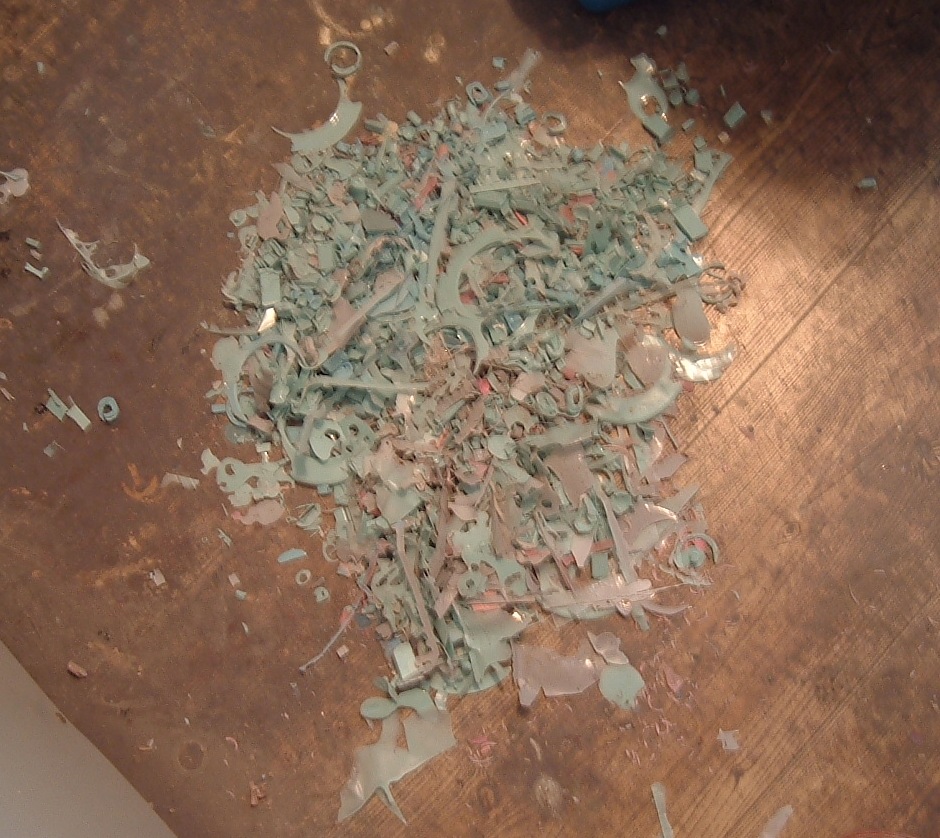
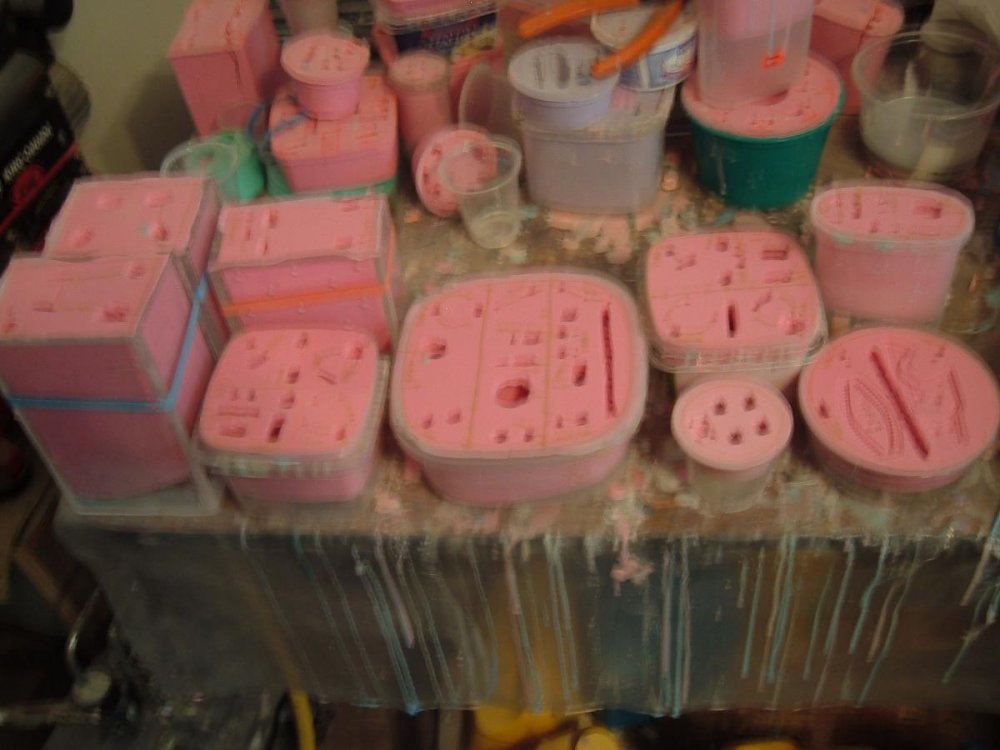
Hi guys. Just wanted to let you all know that casting is going quite well and I'm almost at the half-way point. Did you ever wonder what happens to all the sprues needed to cast resin models? They end up on my floor, and then in the trash.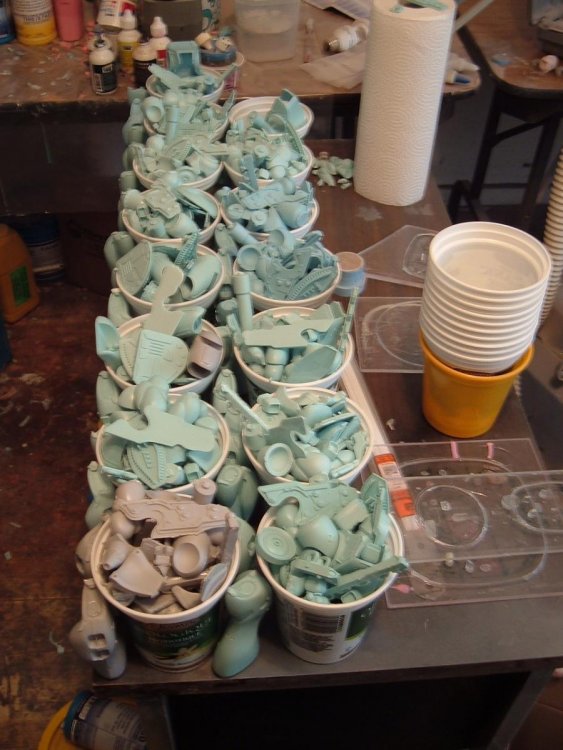

-
1/72 Nousjadeul Ger Moscato kit?
captain america replied to captain america's topic in The Workshop!
Hi guys, casting has begun in earnest and going a little smoother than I thought it would, even though it's a slow process. I probably won't have an update until this time next week due to some scheduling conflicts. Over and out! -
Hi everyone. Someone on the forums is looking to find the instructions to two of my Macross models, namely the 1/72 Pharanx and Regult pod. Might there be a version archived somewhere that I could link to, or must I absolutely go rummaging through my storage drive? Many thanks in advance for your help
-
1/72 Nousjadeul Ger Moscato kit?
captain america replied to captain america's topic in The Workshop!
Hey guys!! Well the molds are done, all 9 of them! I will have to mold one complete model in two shots, as I won't be able to pour the almost 800ml all at once before it will start to cure. That being said, the parts came out excellent as always. Now for the "pay me" part. Based on my calculations, there is the $155 CAD outstanding balance on the kits as well as the shipping fees which are as follows: $30.00 CAD up to 2 kits for USA/Canada $72.00 CAD for international shipping. Also very important: please add an extra 5% to the total to cover transaction fees if there are any. Generally PP will let you know before you send if there are fees and ask you if you will pay or make the recipient pay. I will commence casting on Monday once I test and group the molds for optimum casting. For anything else, my office (PM box) is always open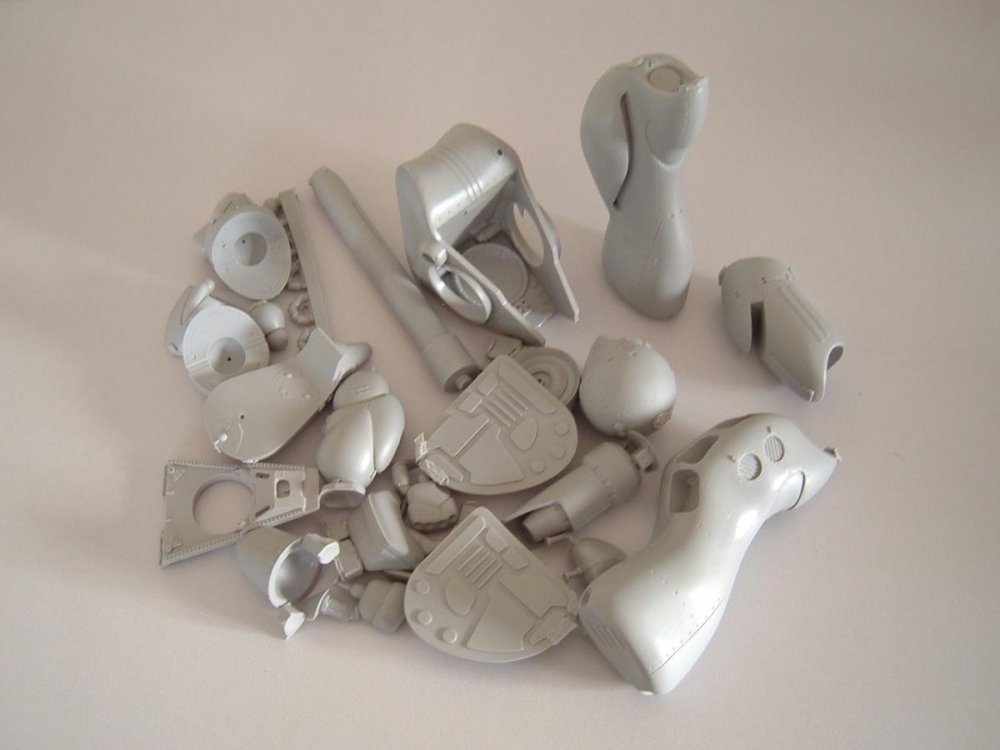
-
Unless you install a blue LED in the head. Regardless, I think it looks fantastic!
-
1/72 Nousjadeul Ger Moscato kit?
captain america replied to captain america's topic in The Workshop!
No pilot figure with the kit, maybe an aftermarket accessory later on. In the meantime, molds are prepped and poured: 5 down, 3 to go.


-
1/72 Nousjadeul Ger Moscato kit?
captain america replied to captain america's topic in The Workshop!
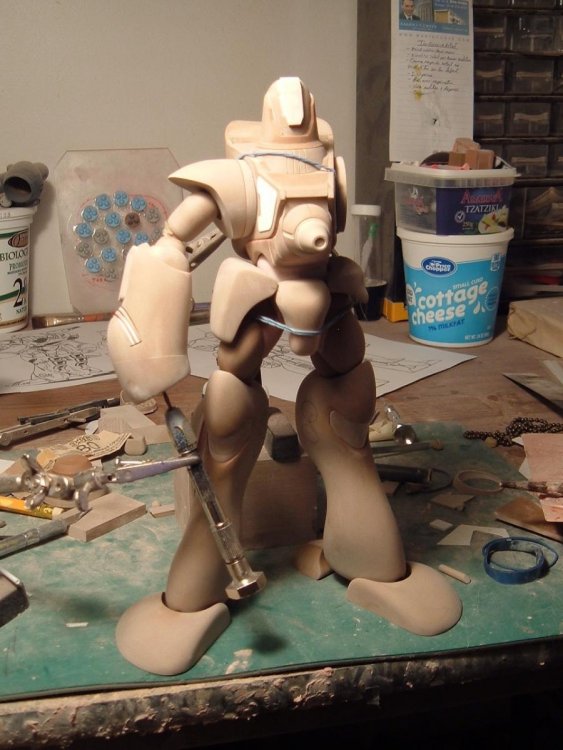
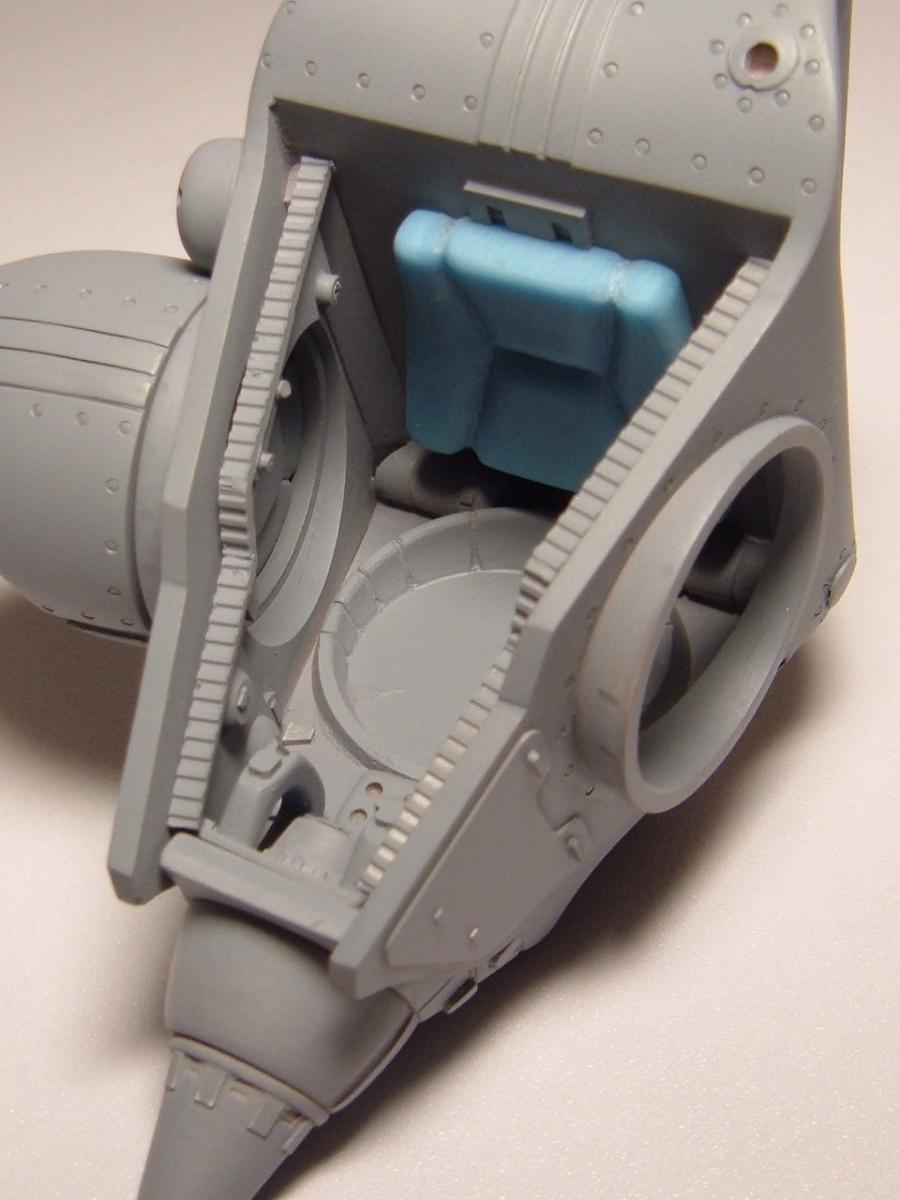
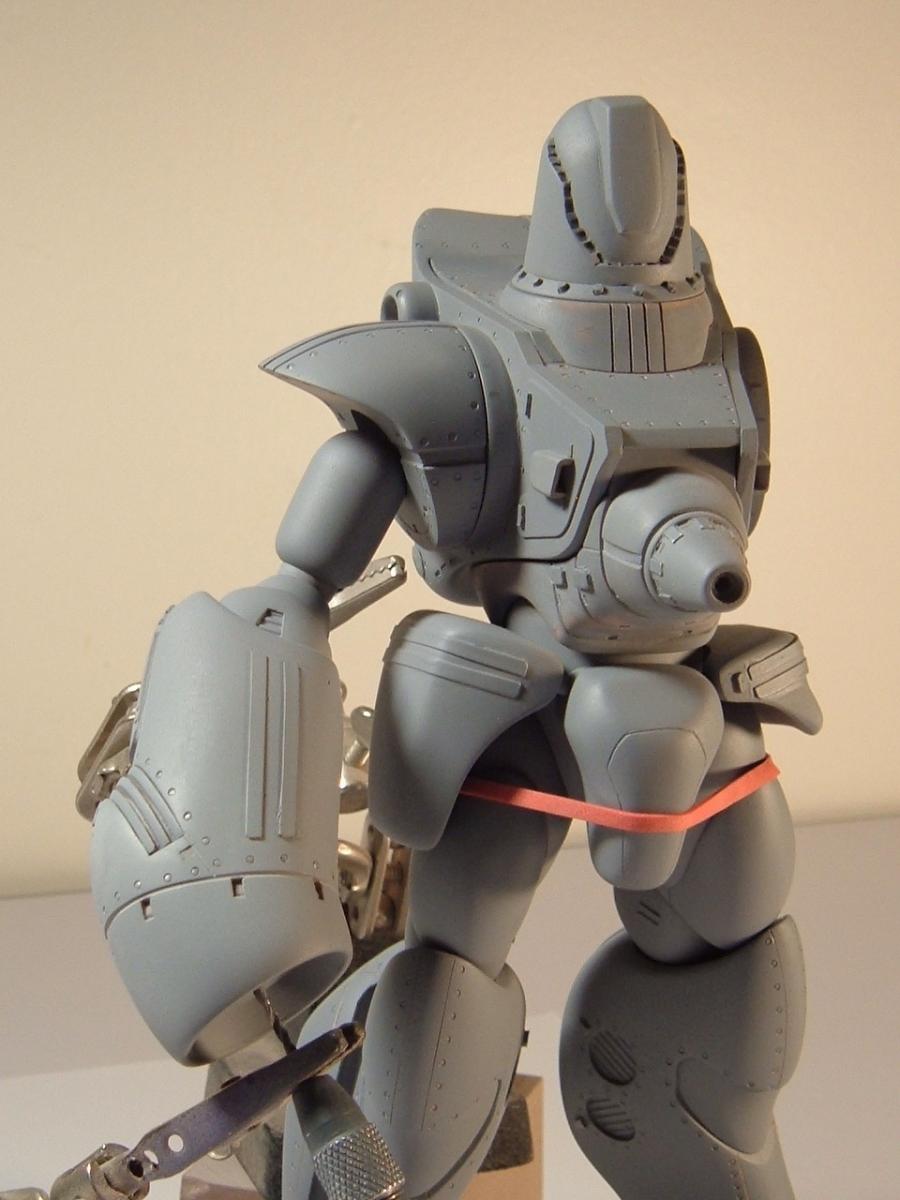
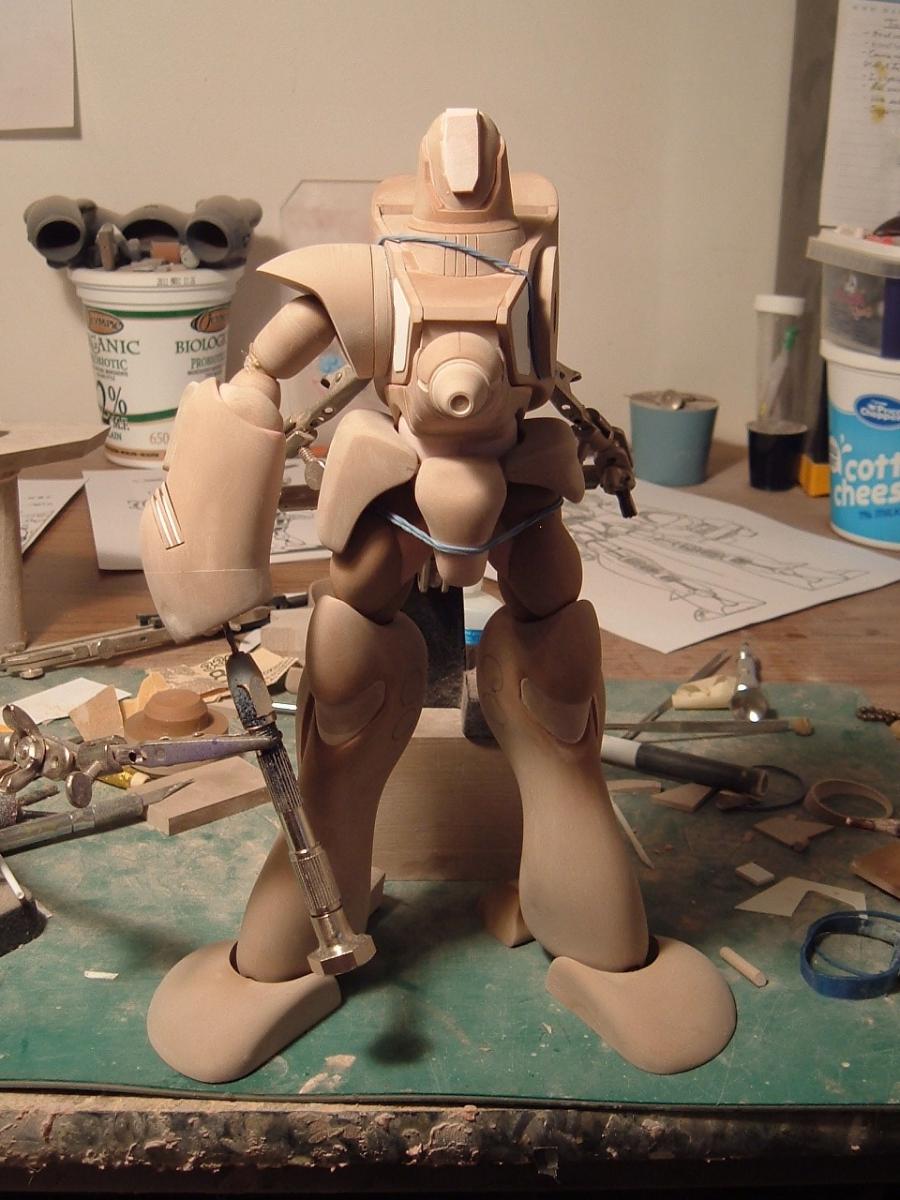
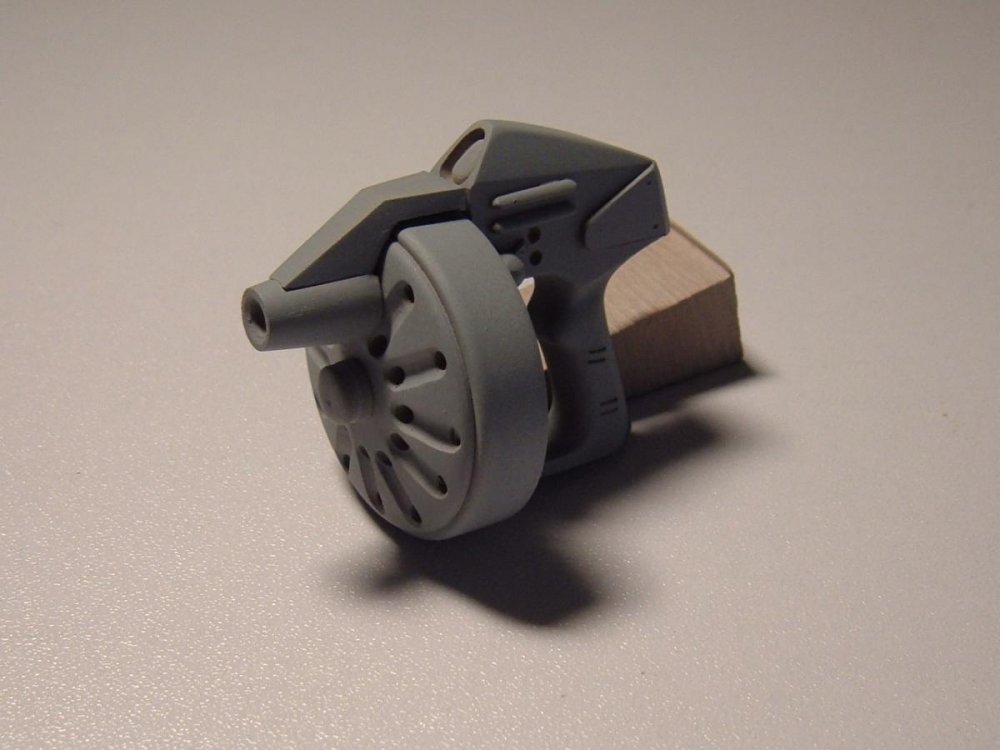
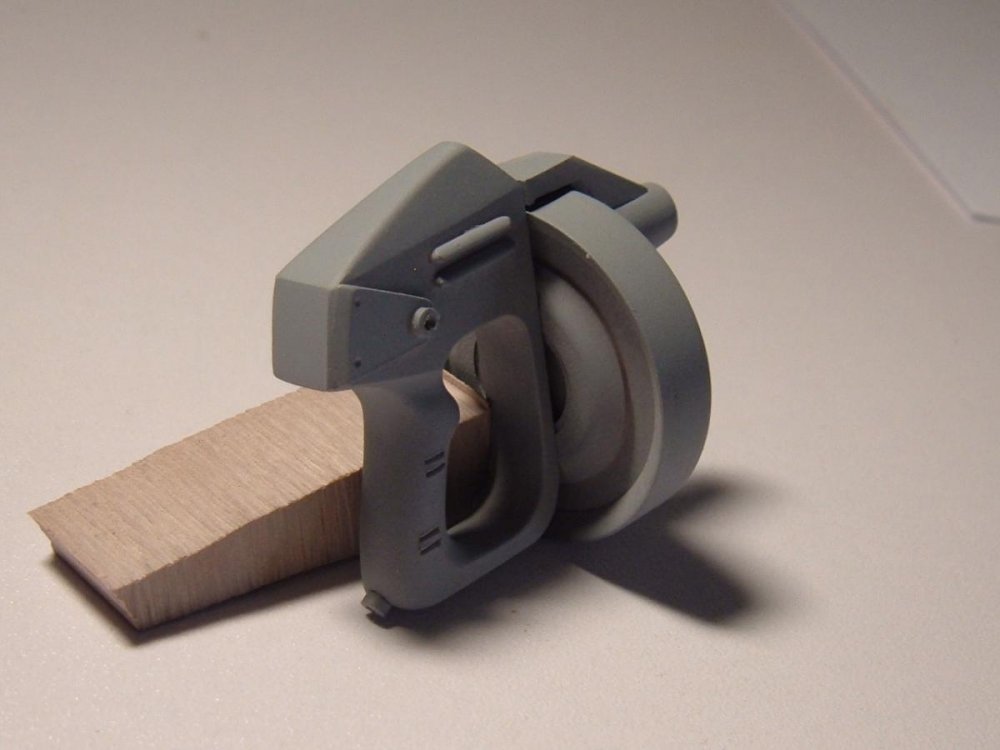
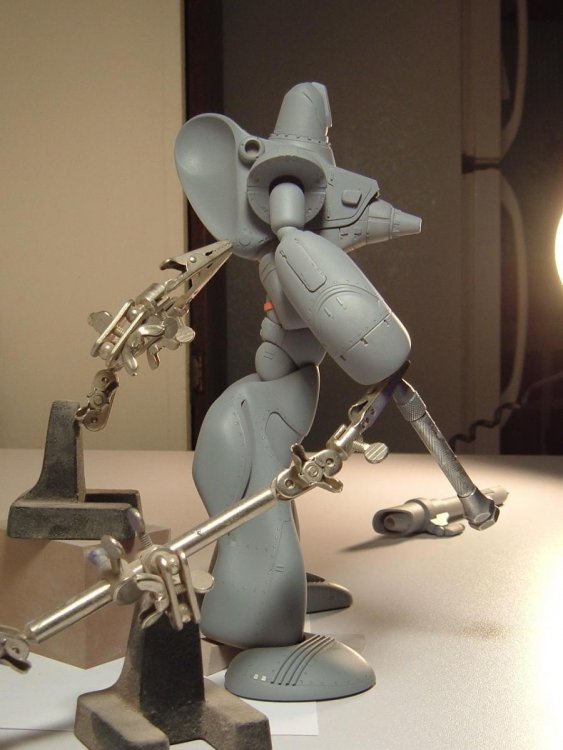
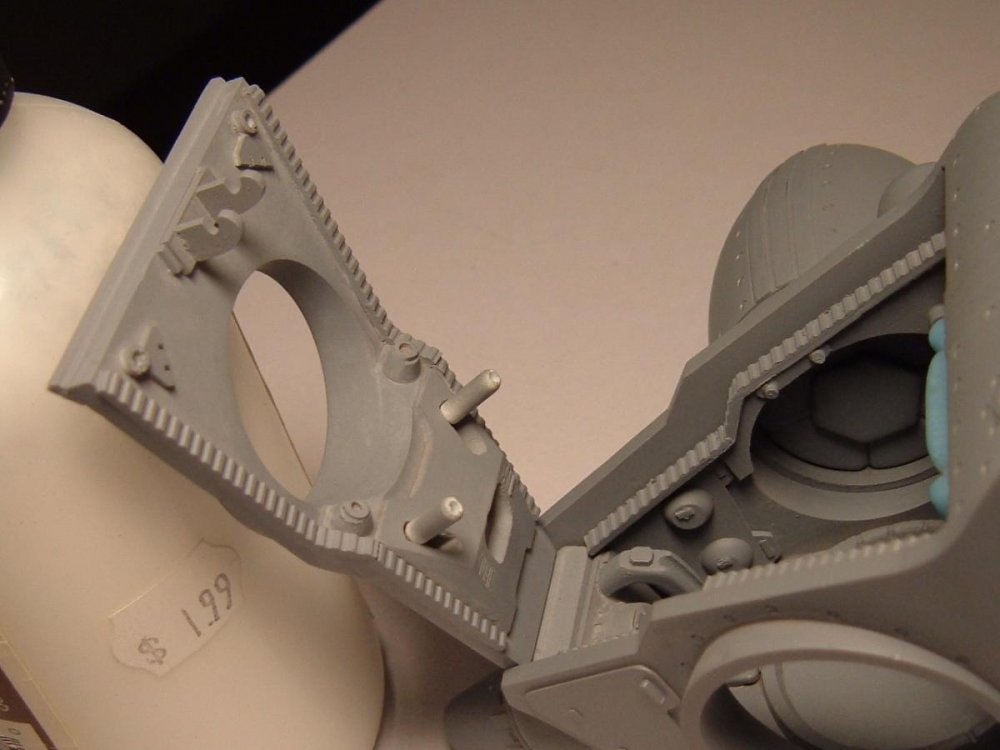
Thanks for the kind words, I really just build my models the way I think that they would look IRL, which hopefully coincides with the expectations of my patrons. That said, a few more pics of the masters: mostly ancillary details that otherwise are taken for granted. I tweaked the main cannon mount so as to allow not only unobstructed egress/ingress of the pilot, but you can also point it forward in attack mode if you wish.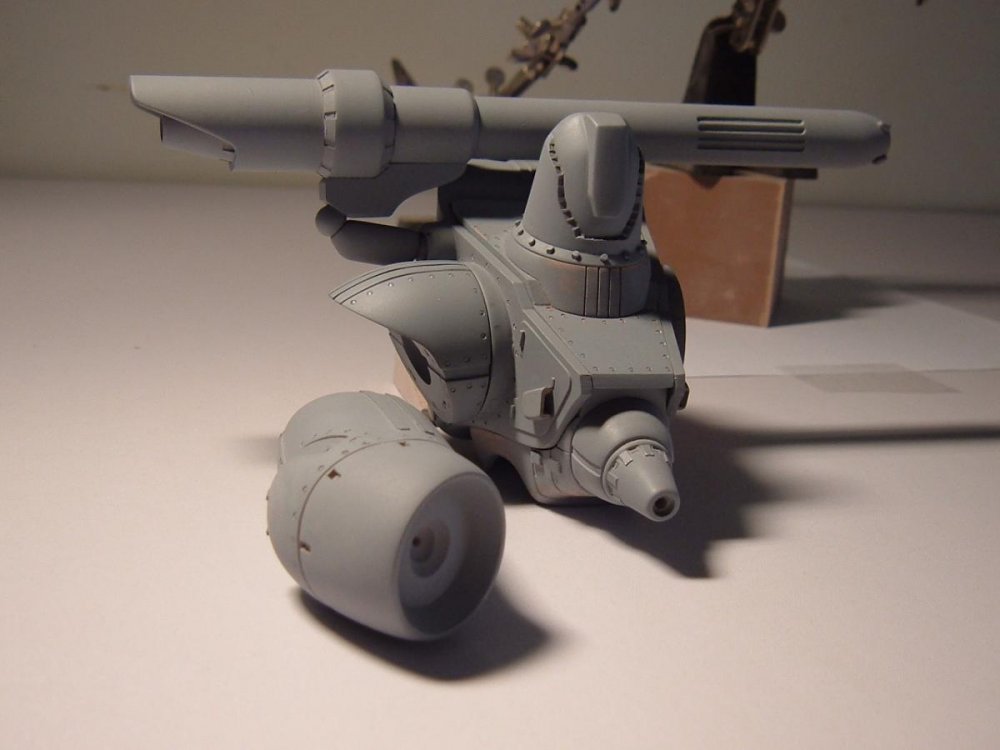


-
1/72 Nousjadeul Ger Moscato kit?
captain america replied to captain america's topic in The Workshop!
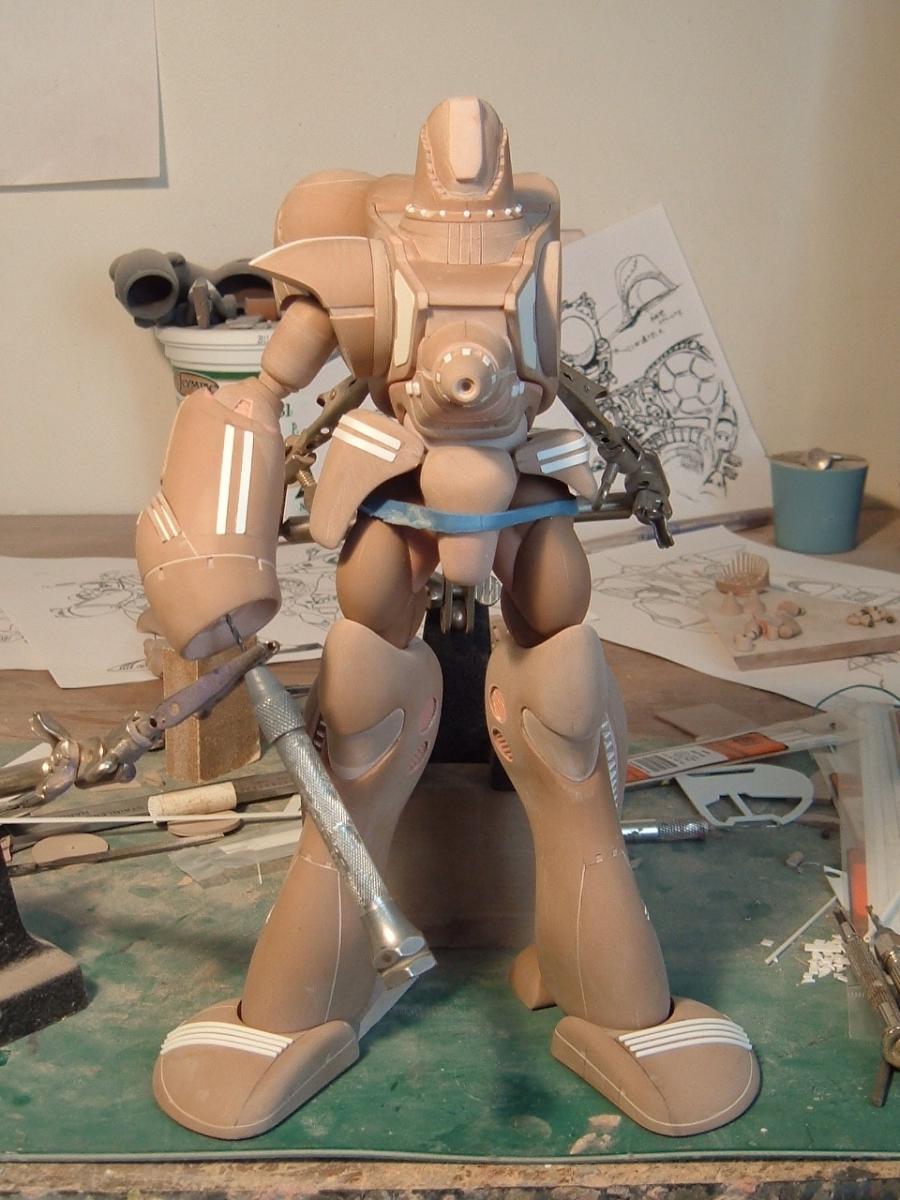
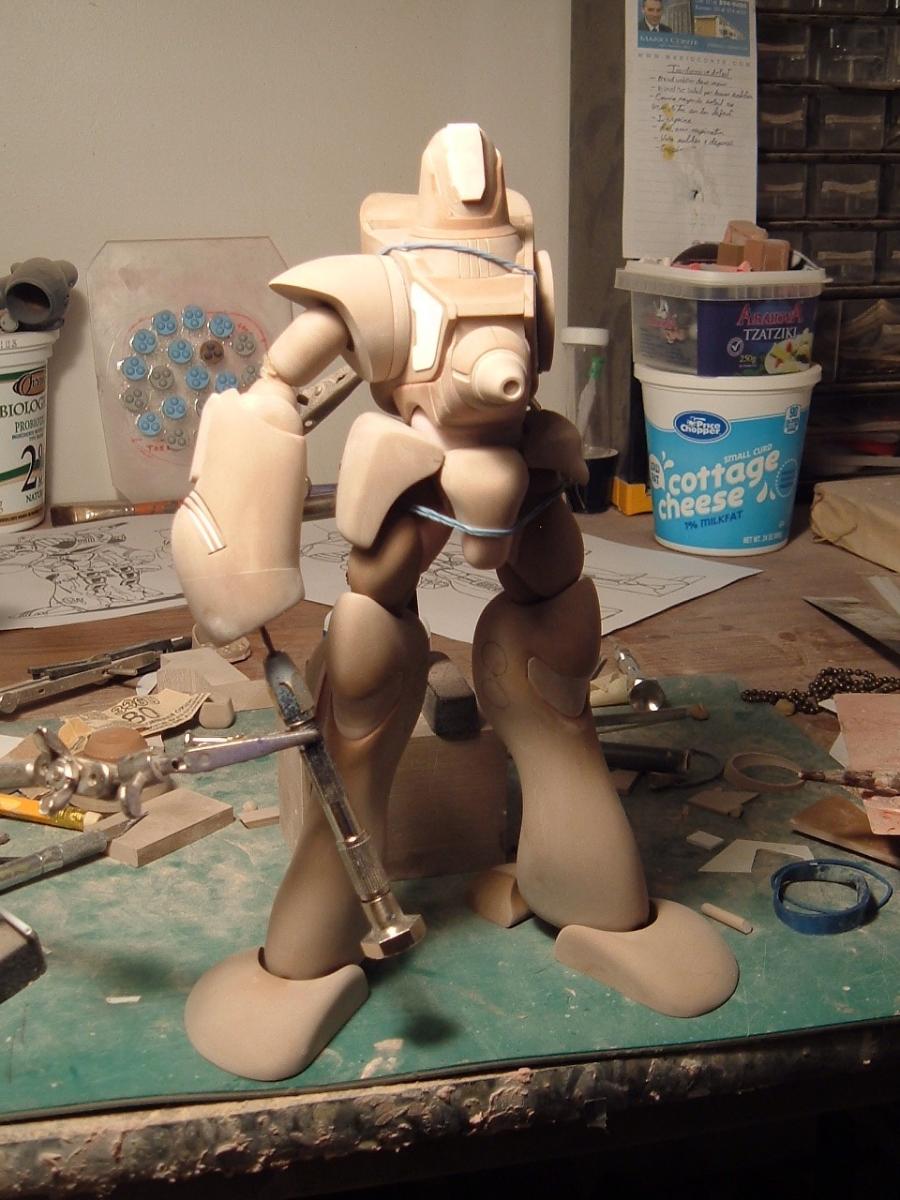
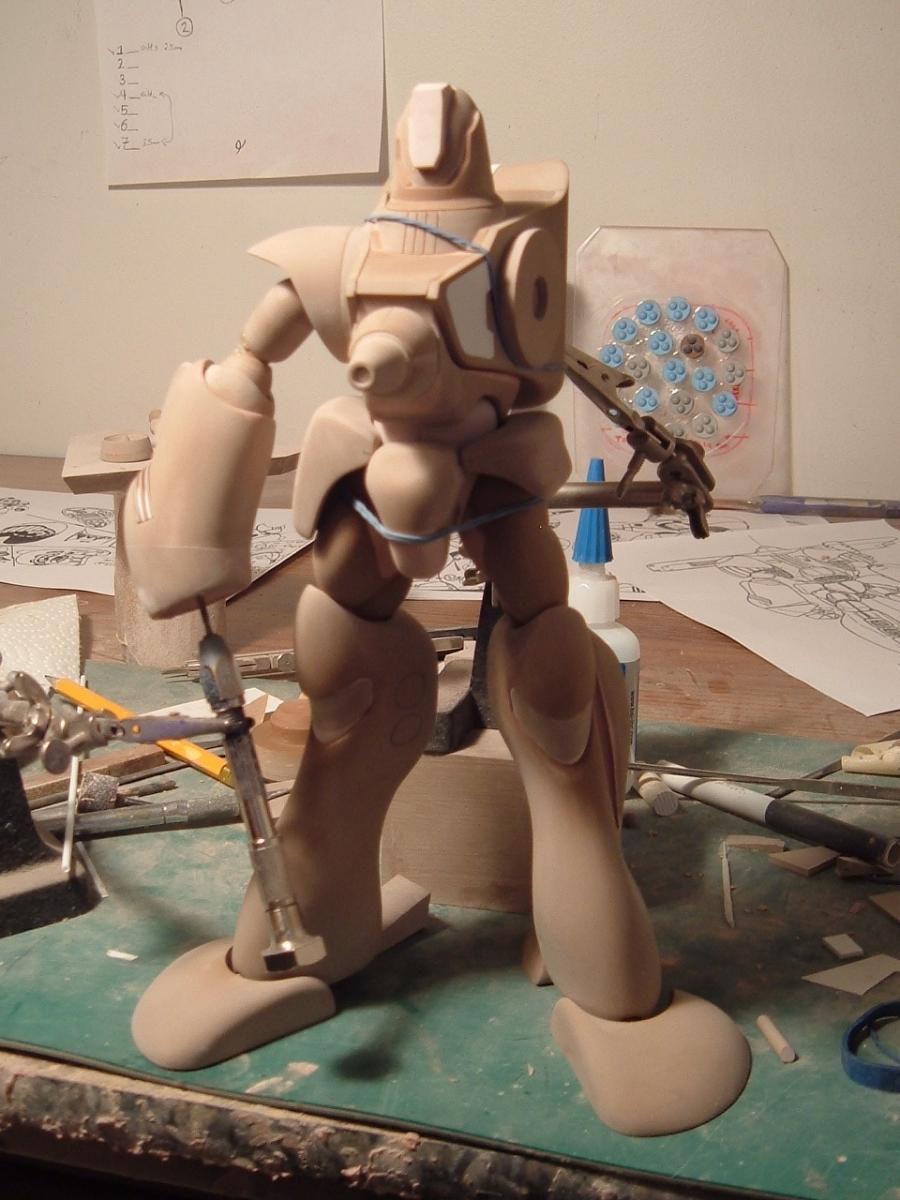
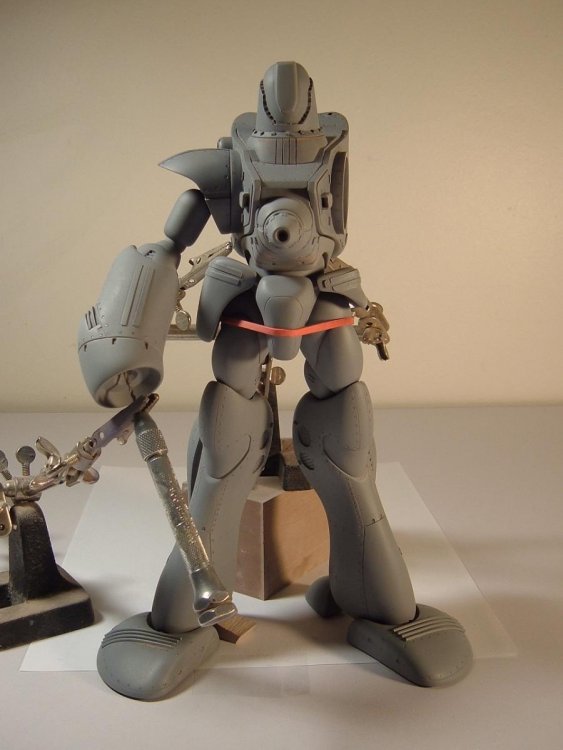
Tomorrow has arrived! I didn't get too crazy with the pose to avoid damaging the masters, but it's all there. Little details being added at the last second in my usual, spontaneous fashion, hope you enjoy! Will have a pic or two of the back and the pistol later tomorrow, er... Today. Will begin mold-prep on Monday and the usual updates will follow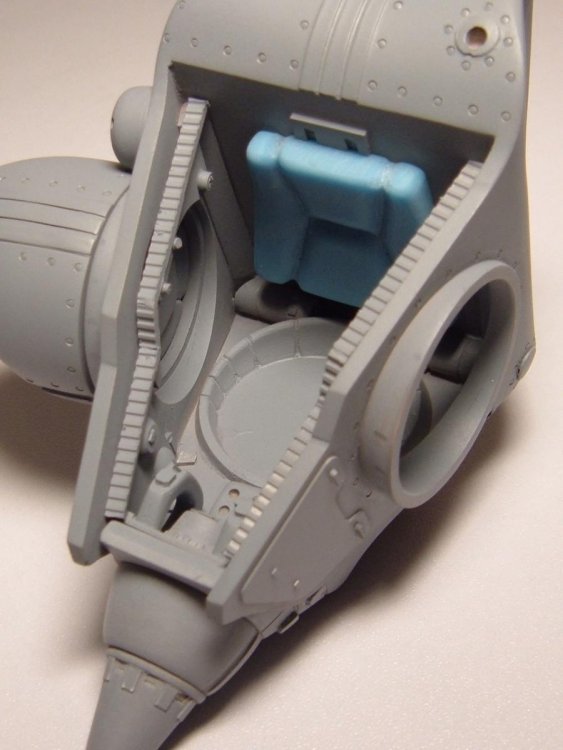


-
1/72 Nousjadeul Ger Moscato kit?
captain america replied to captain america's topic in The Workshop!
A little preview of the completed masters. I completely redesigned the shoulder joint at the last minute to give the pilot a bit more room at the shoulders/arms. I did cheat and carry-over ONE part from the Regult: the back cushion with a few small tweaks.
-
1/72 Nousjadeul Ger Moscato kit?
captain america replied to captain america's topic in The Workshop!
If all goes as planned, balance payments will be due first week of May. -
:D
-
1/72 Nousjadeul Ger Moscato kit?
captain america replied to captain america's topic in The Workshop!
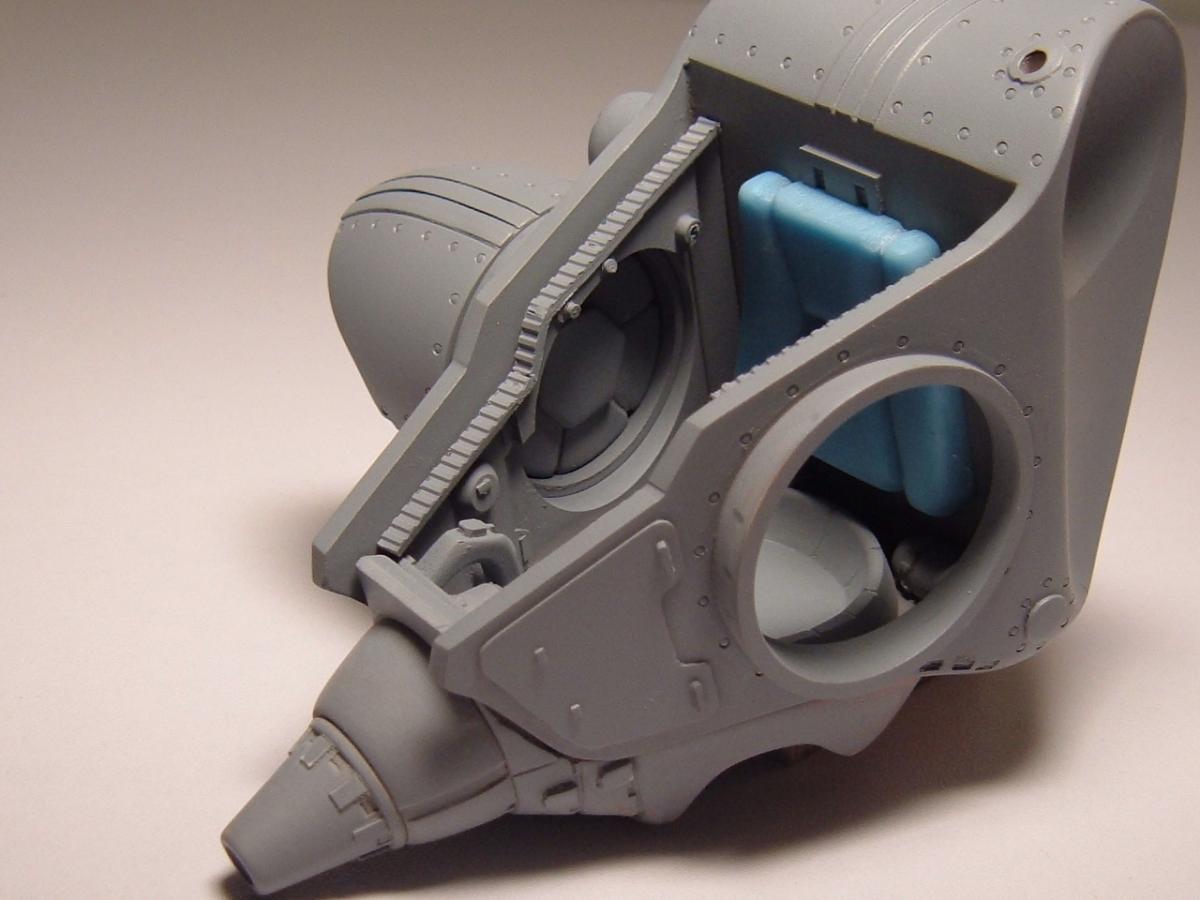
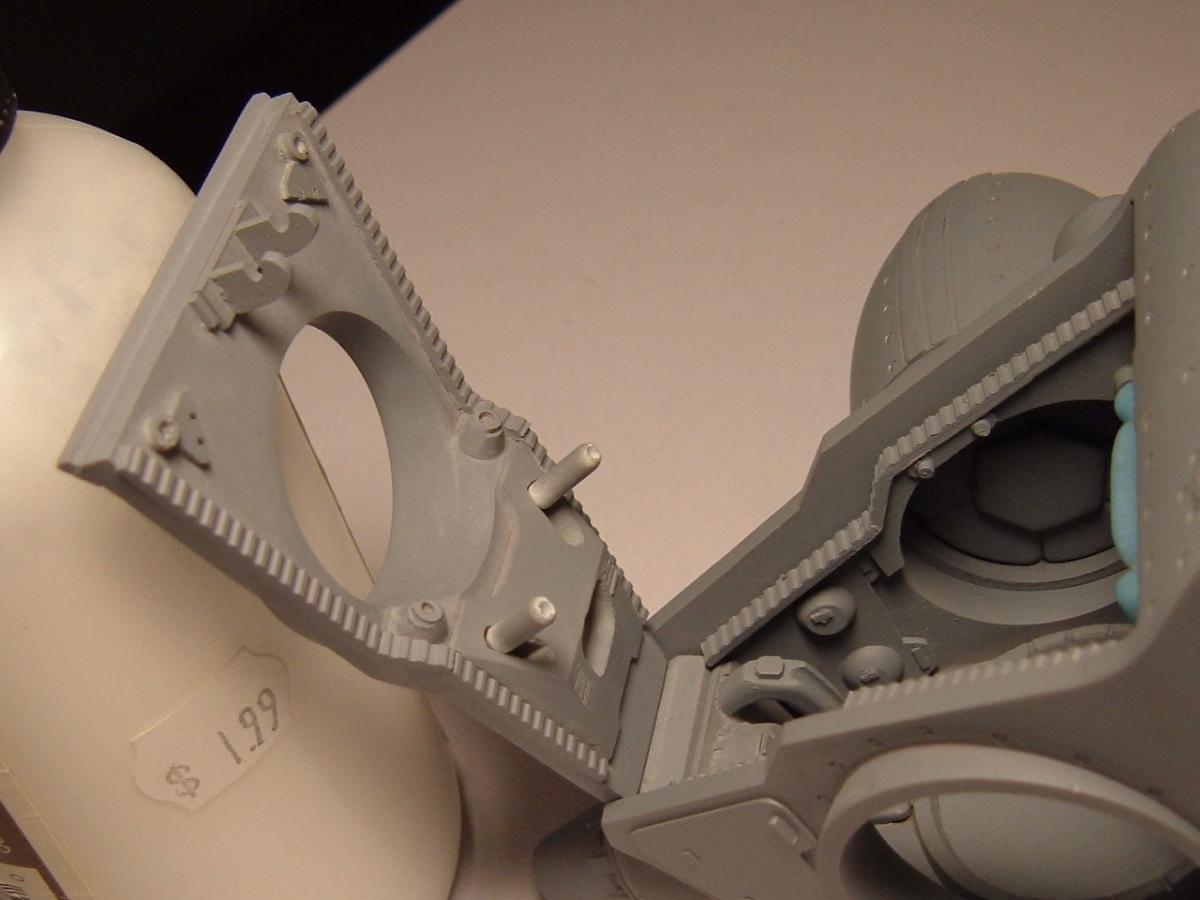
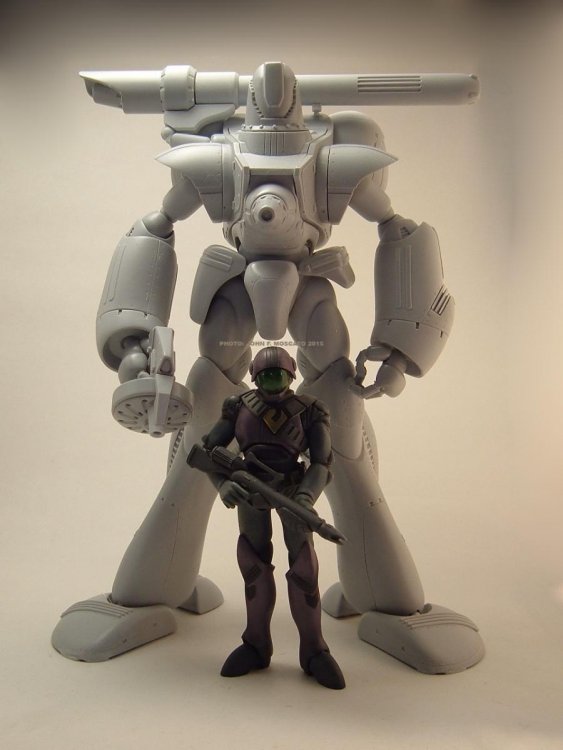
LMAO! Yes, the soldier "theoretically" fits inside the mech. If you examine some of the line-art, the soldier should be 50% bigger and still somehow be able to squeeze into that iron coffin. The cockpit will be VERY tight in the shoulder area since his arms are not in the mech's arms, but inside the rectangular bathtub area of the chest while the pilot's legs barely go below the calf area. Don't look at me man, I didn't design this thing, I'm just trying to make it work! -
Someone's got a serious case of crabs going on. Keep up the great work, can't wait to see more!
-
1/72 Nousjadeul Ger Moscato kit?
captain america replied to captain america's topic in The Workshop!
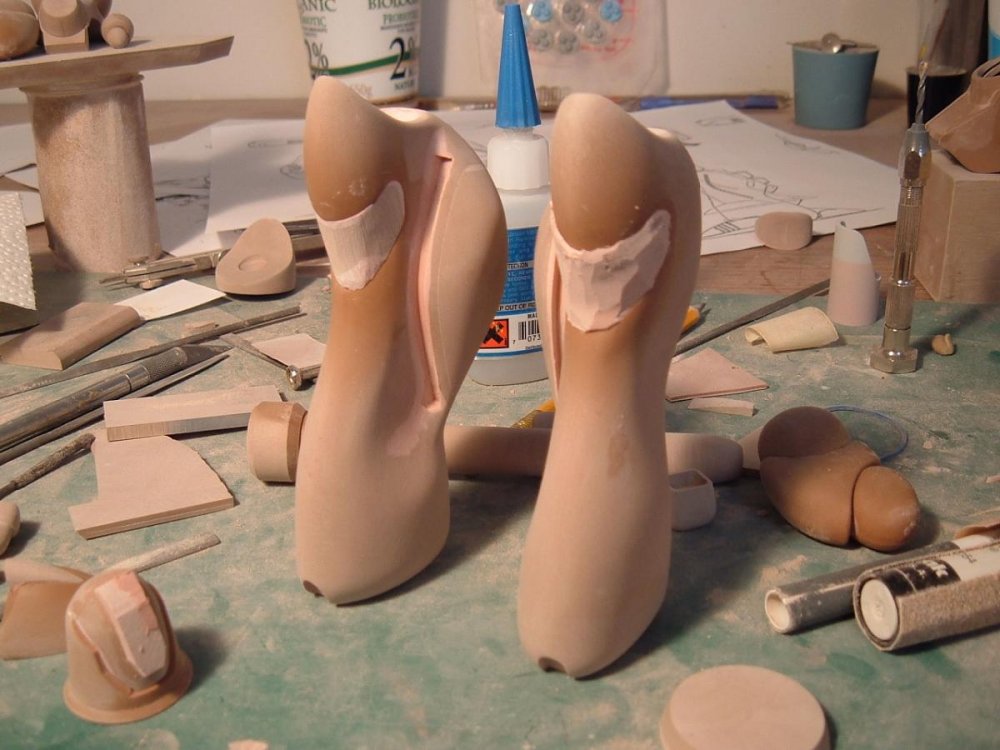
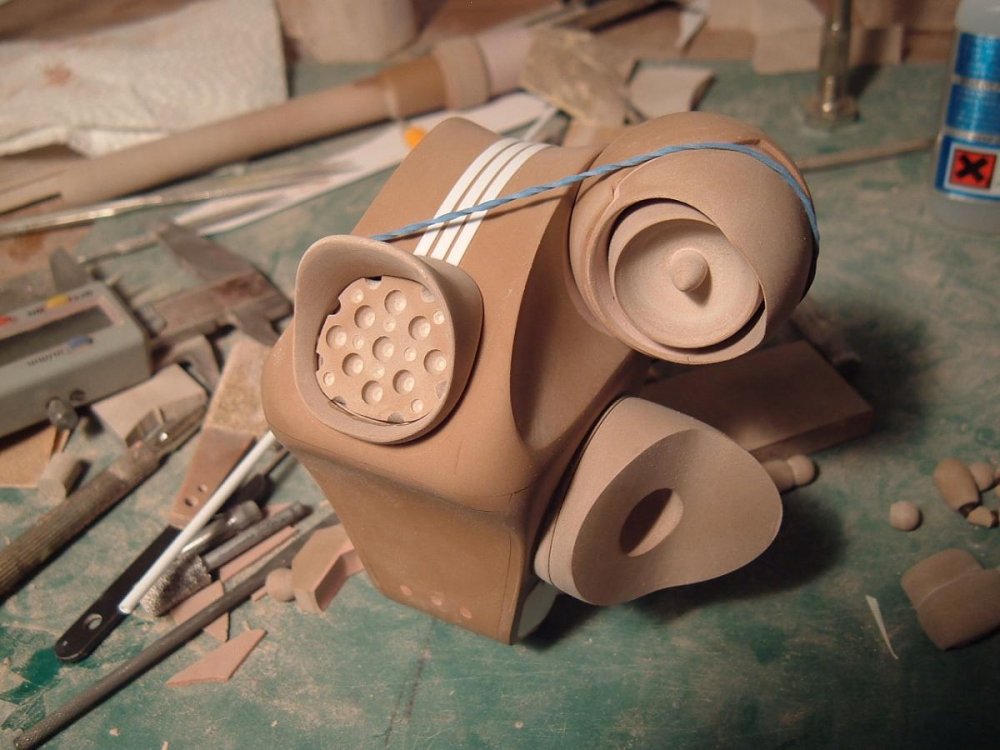
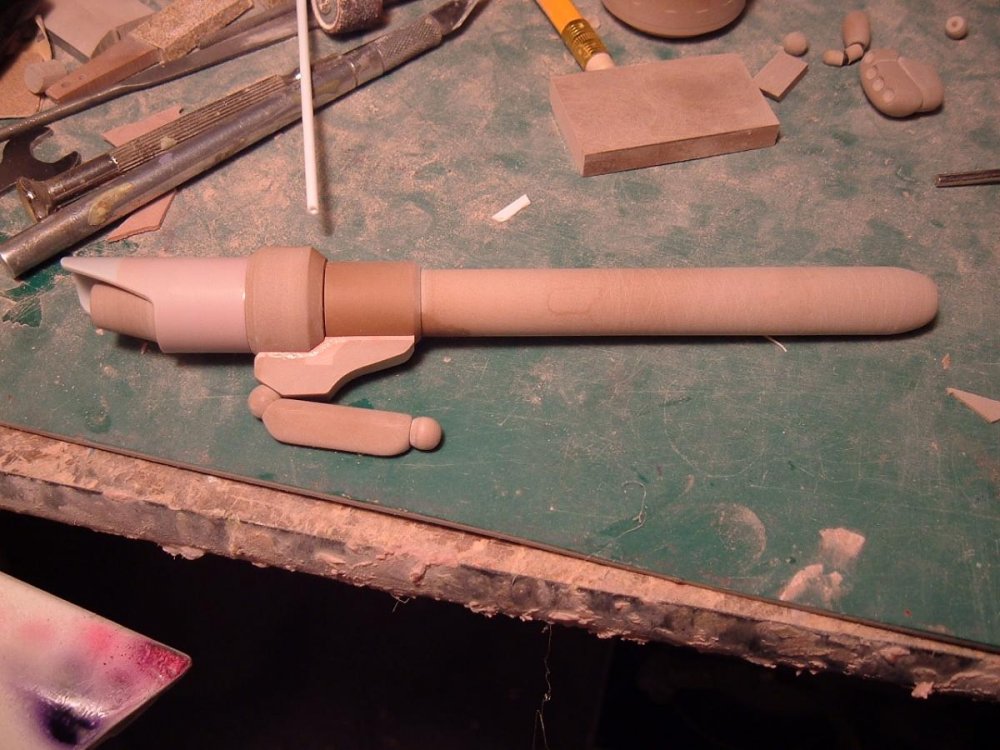
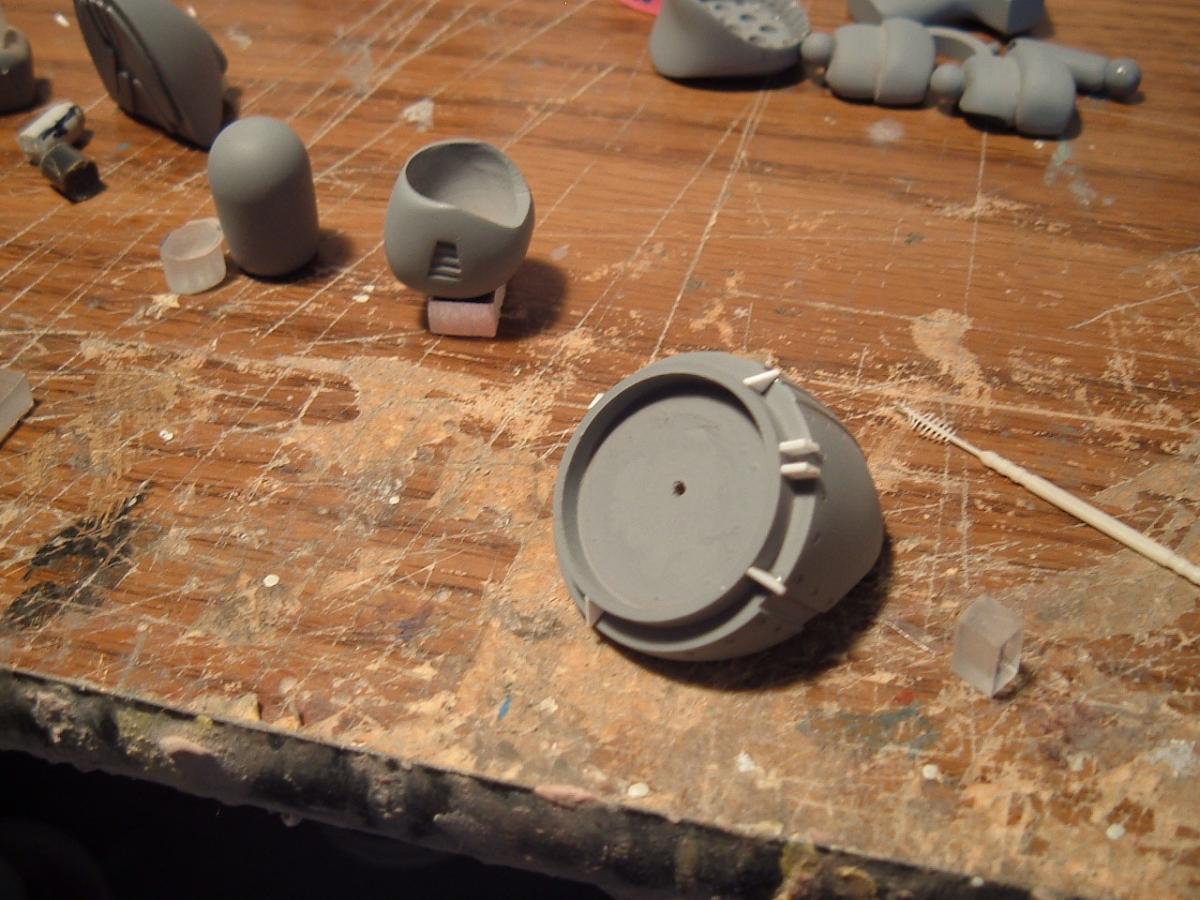
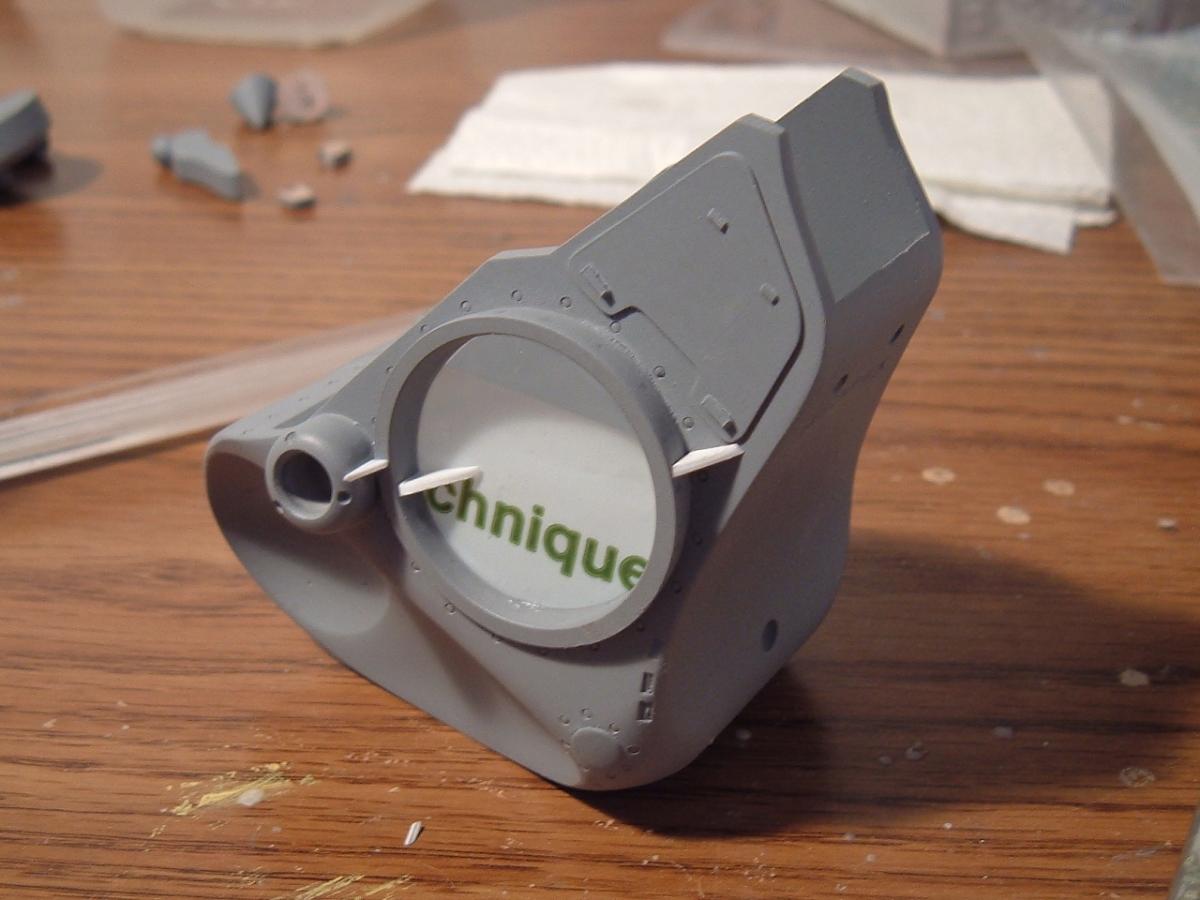
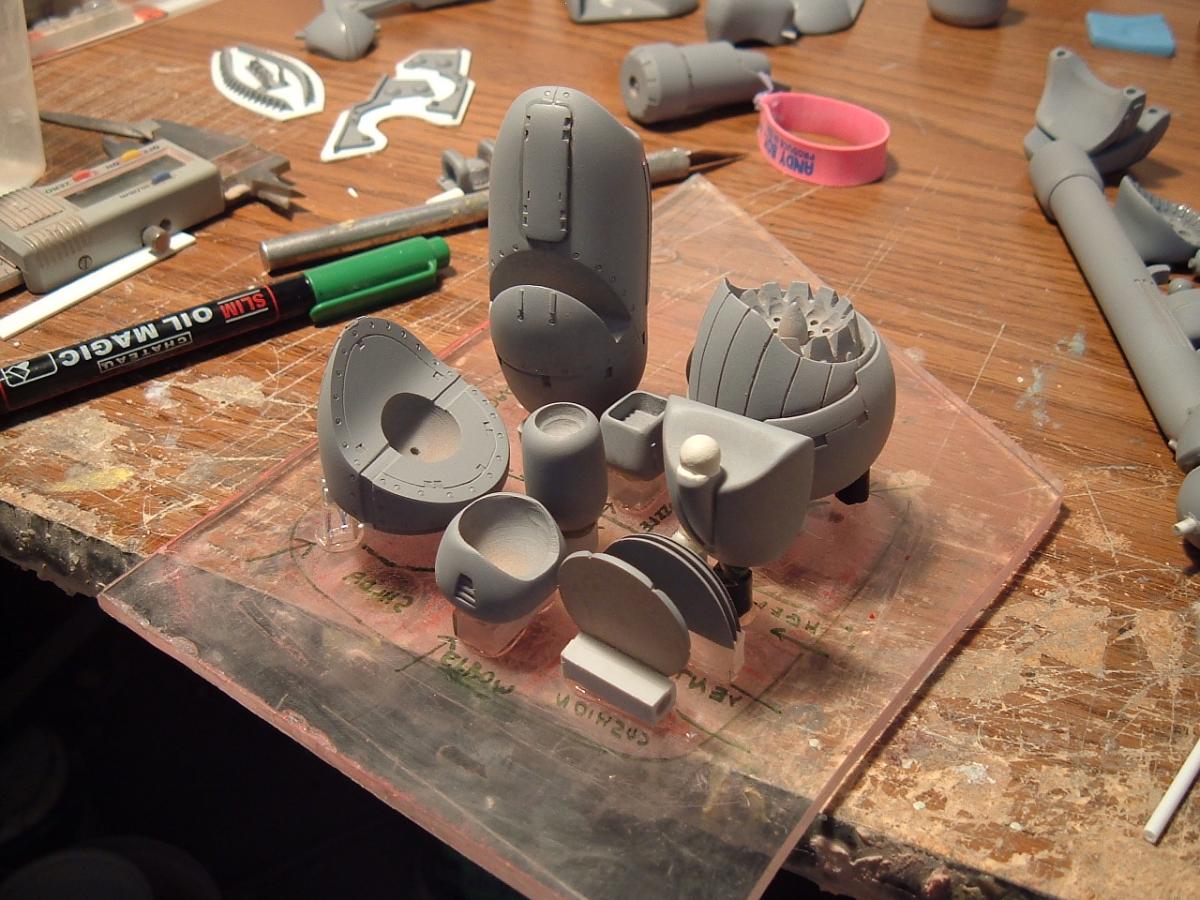
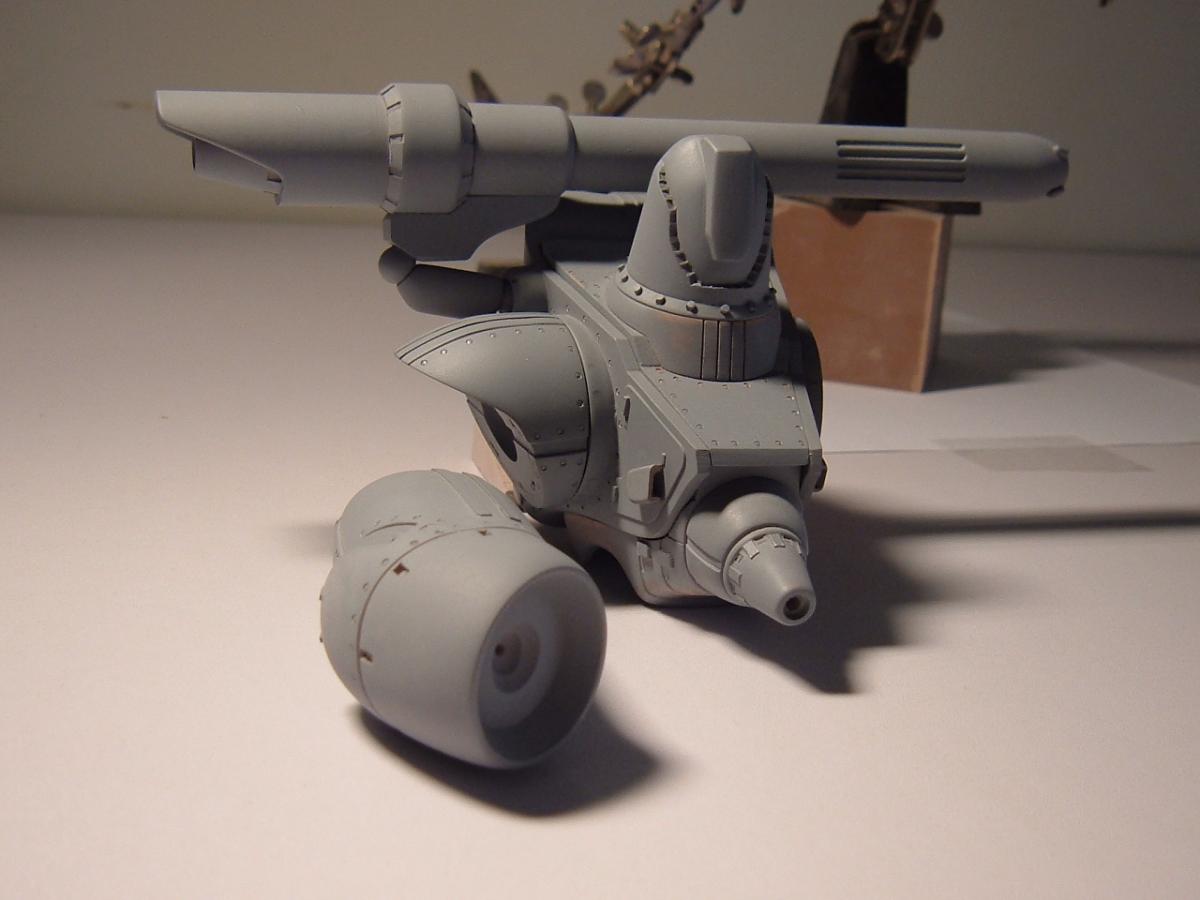
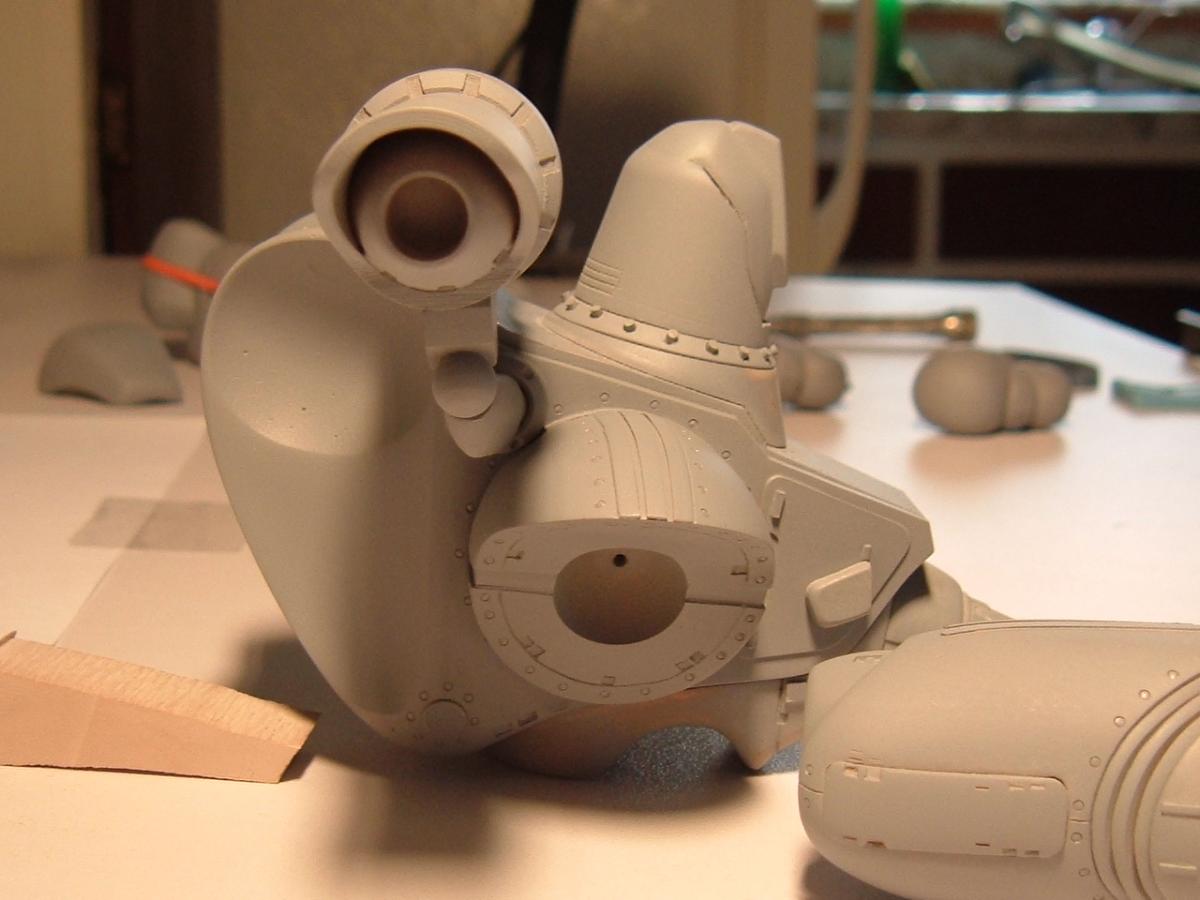
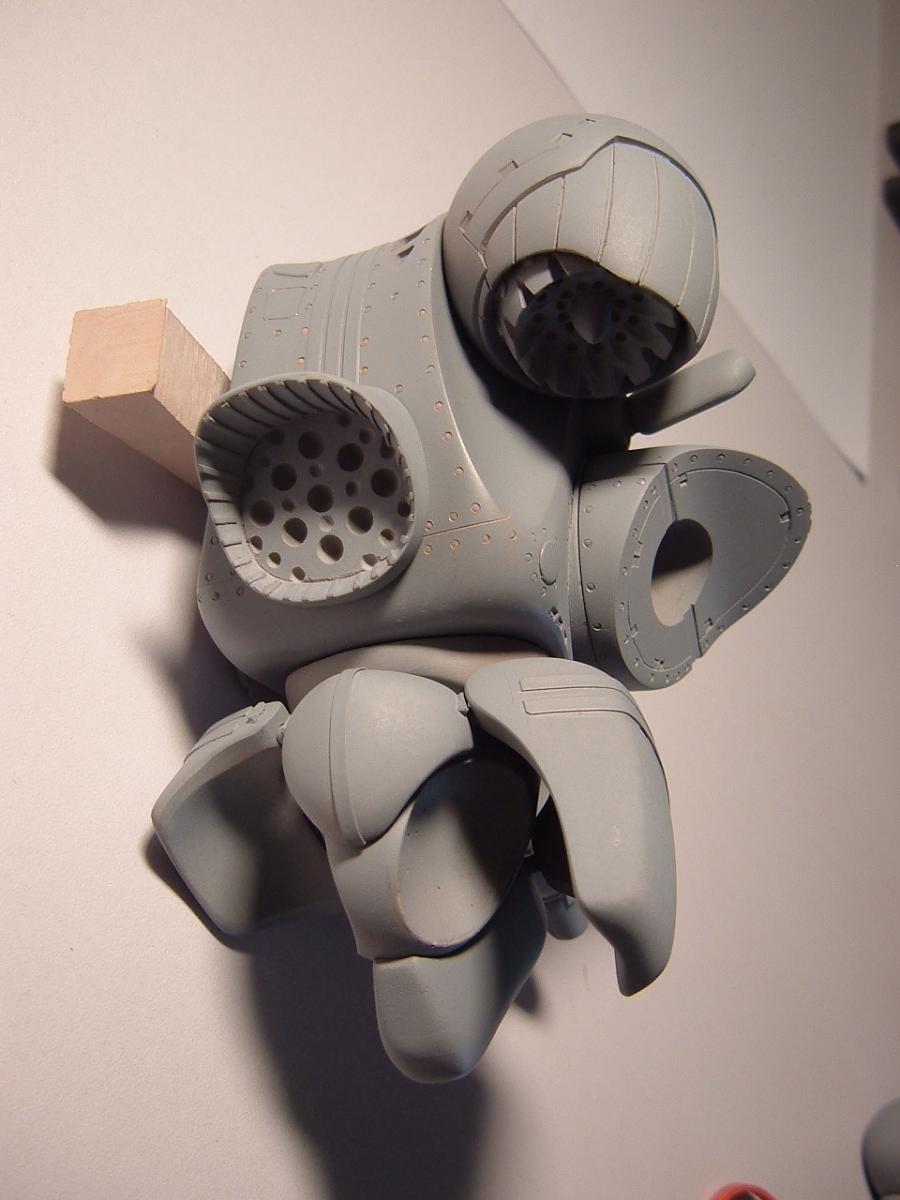
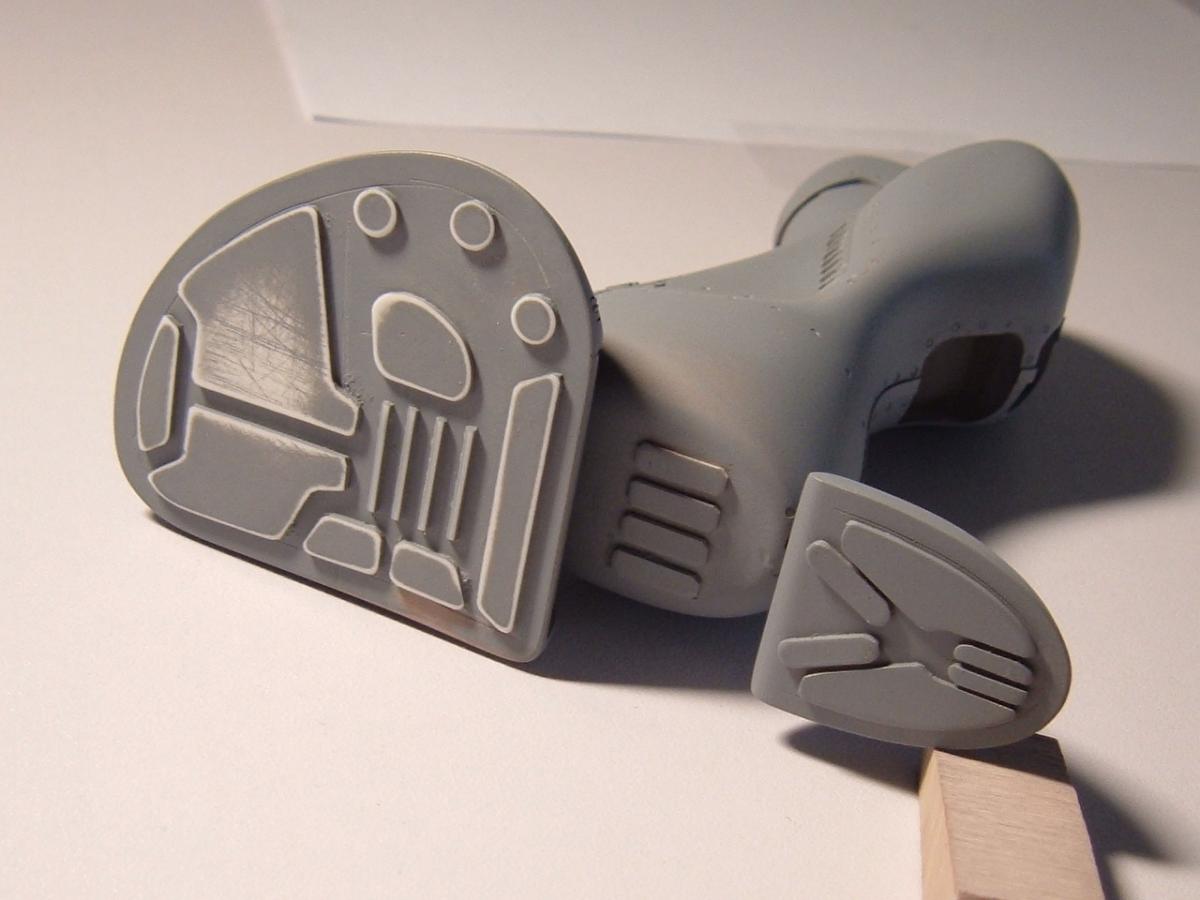
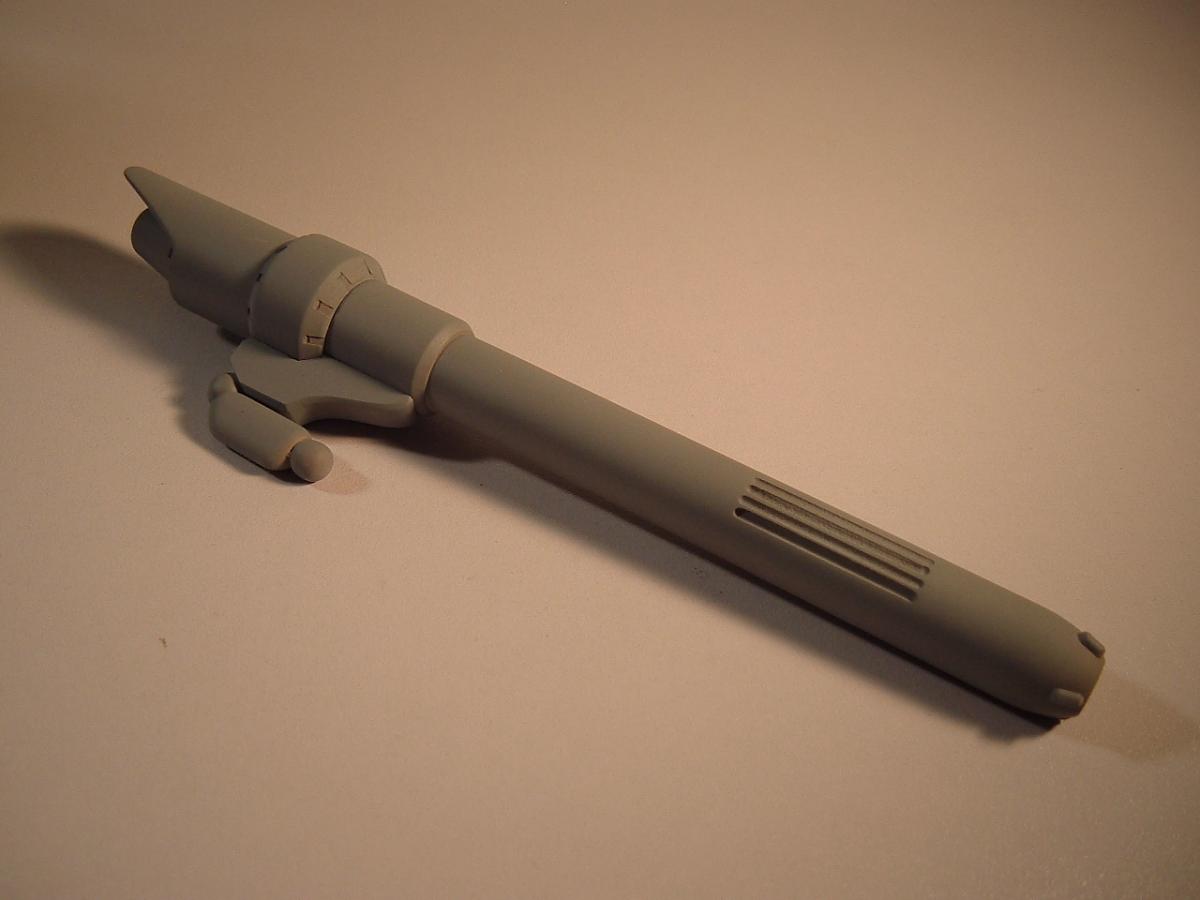
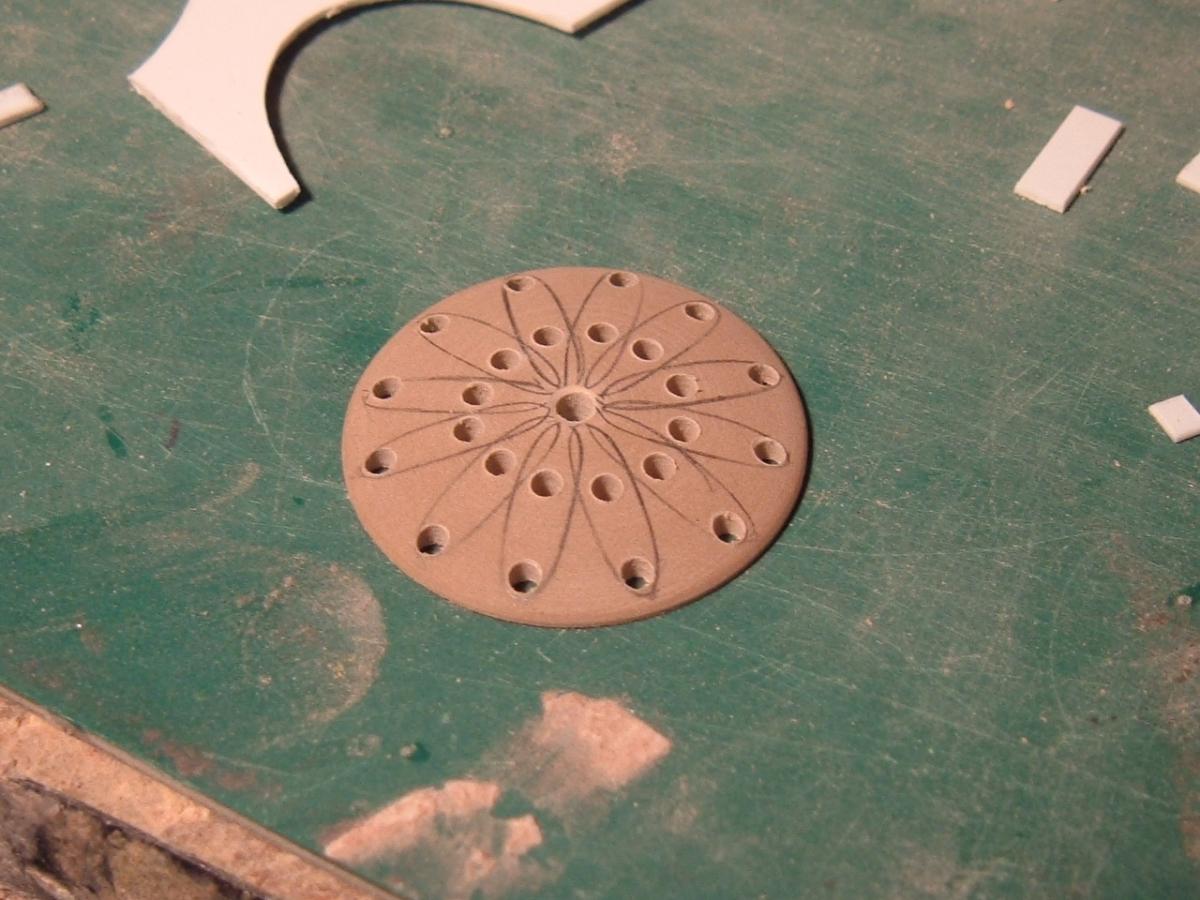
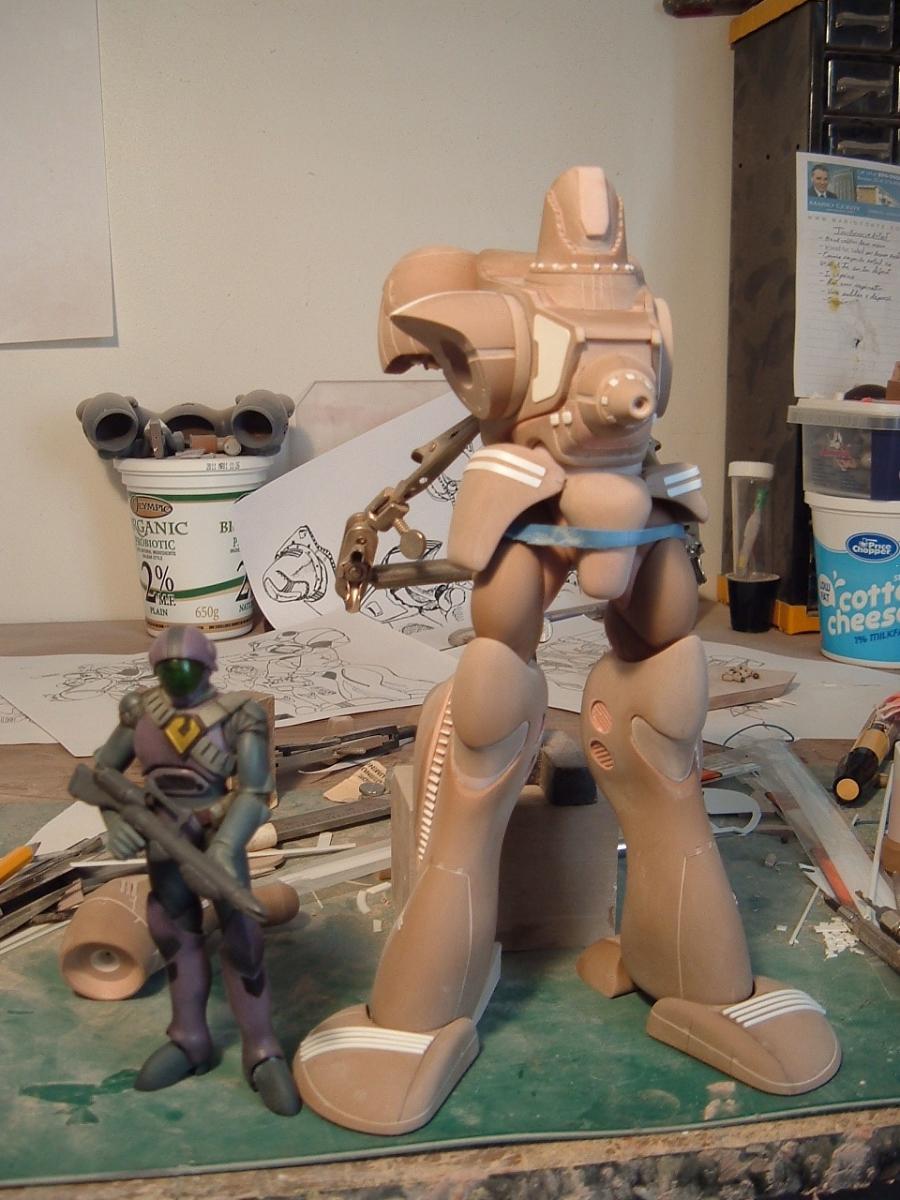
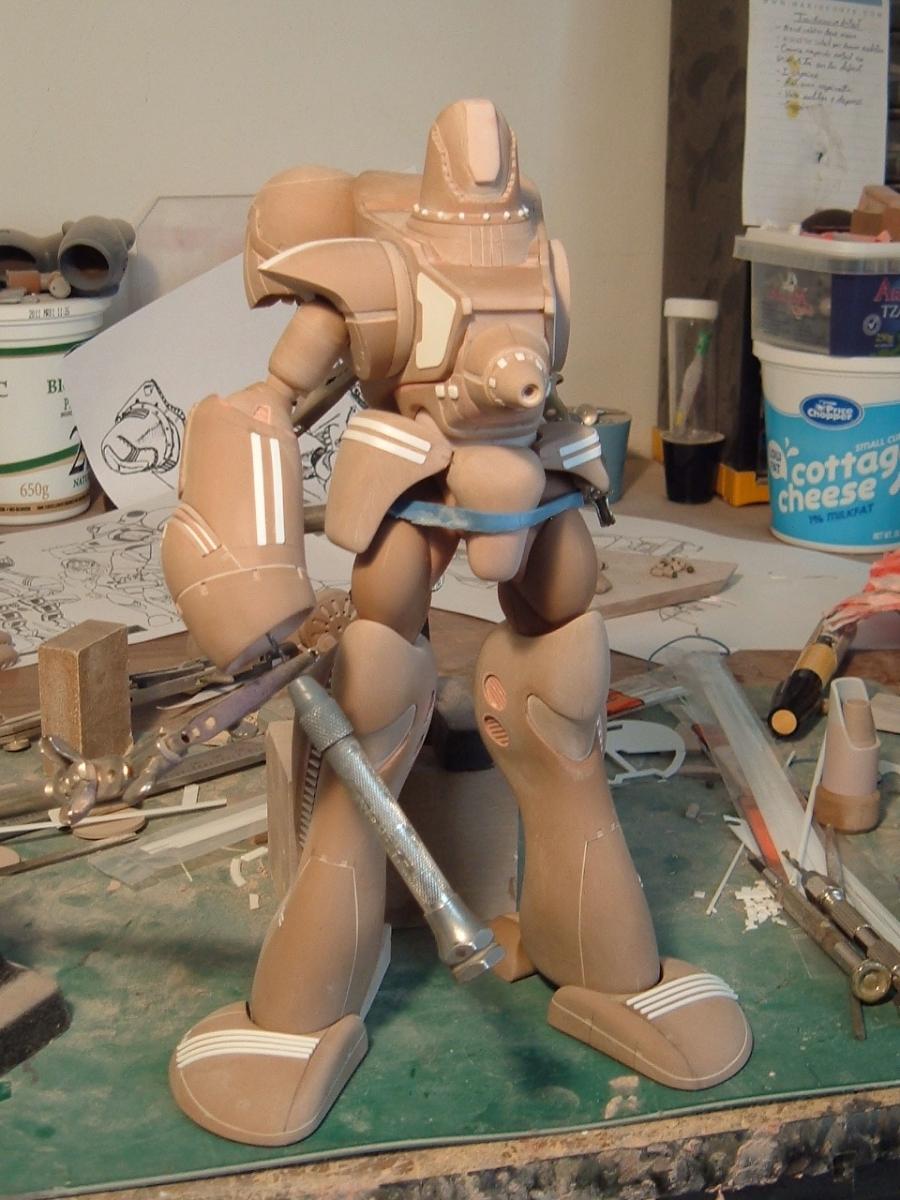
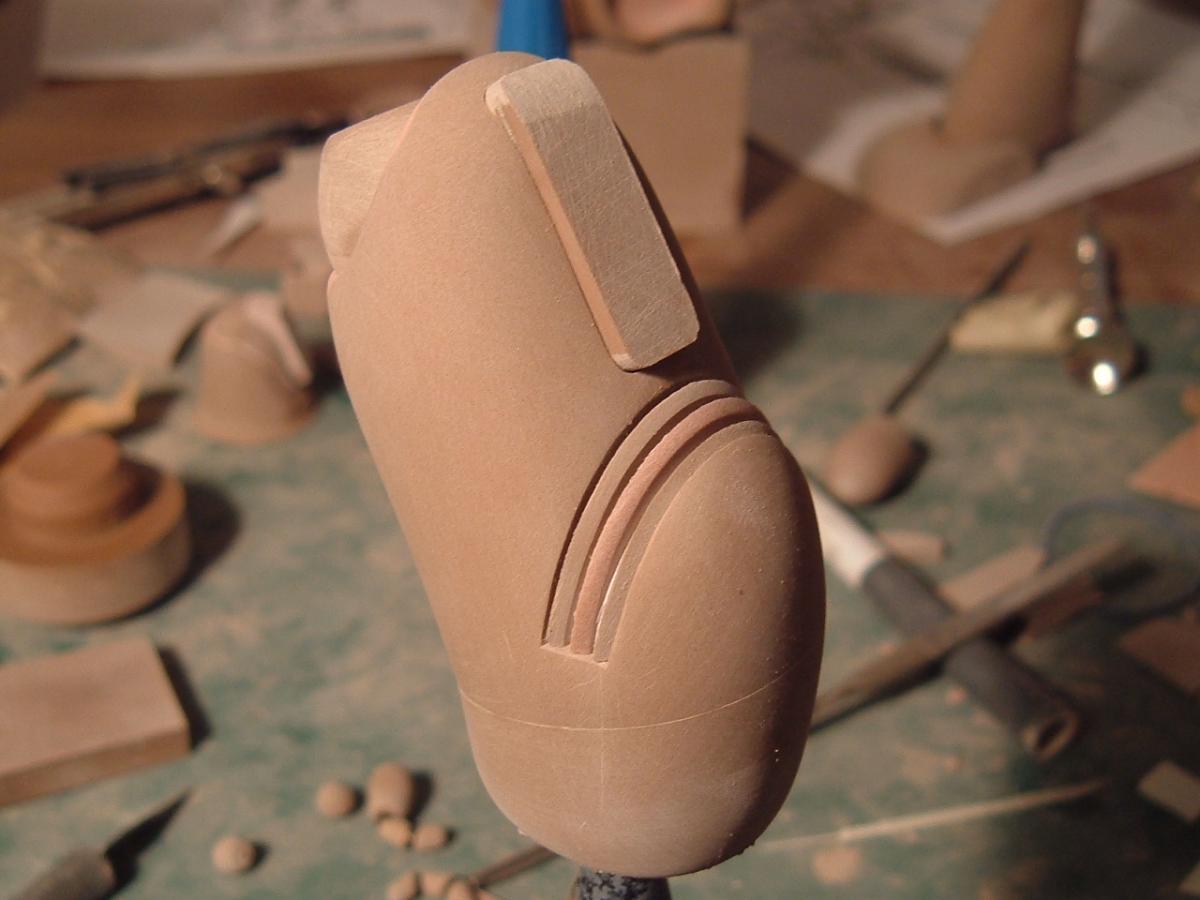
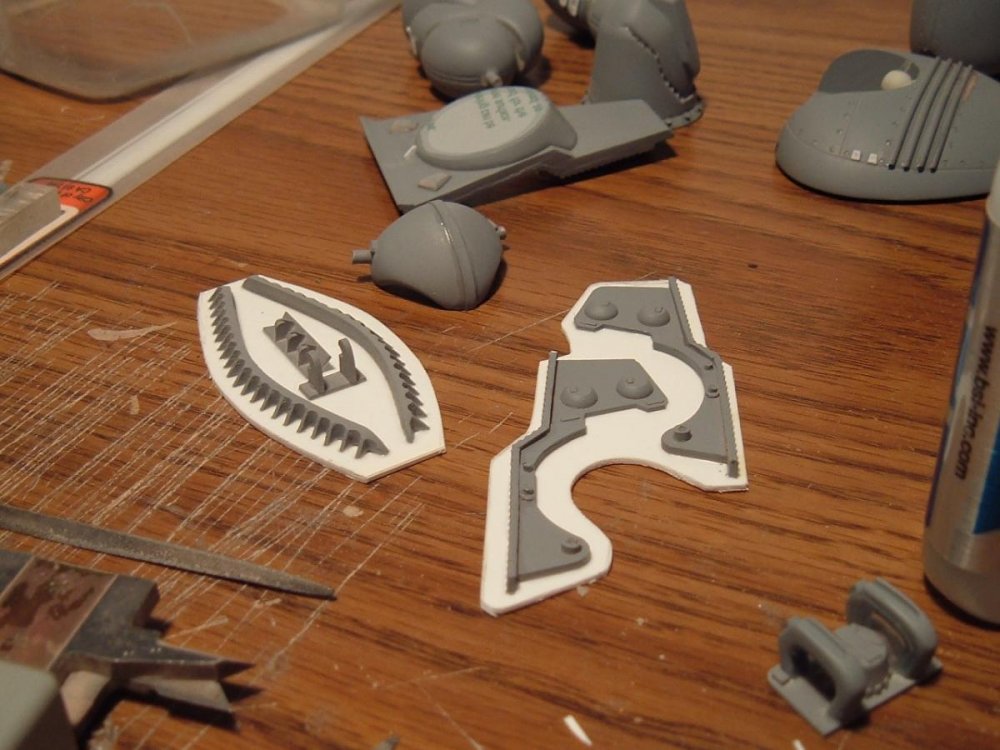
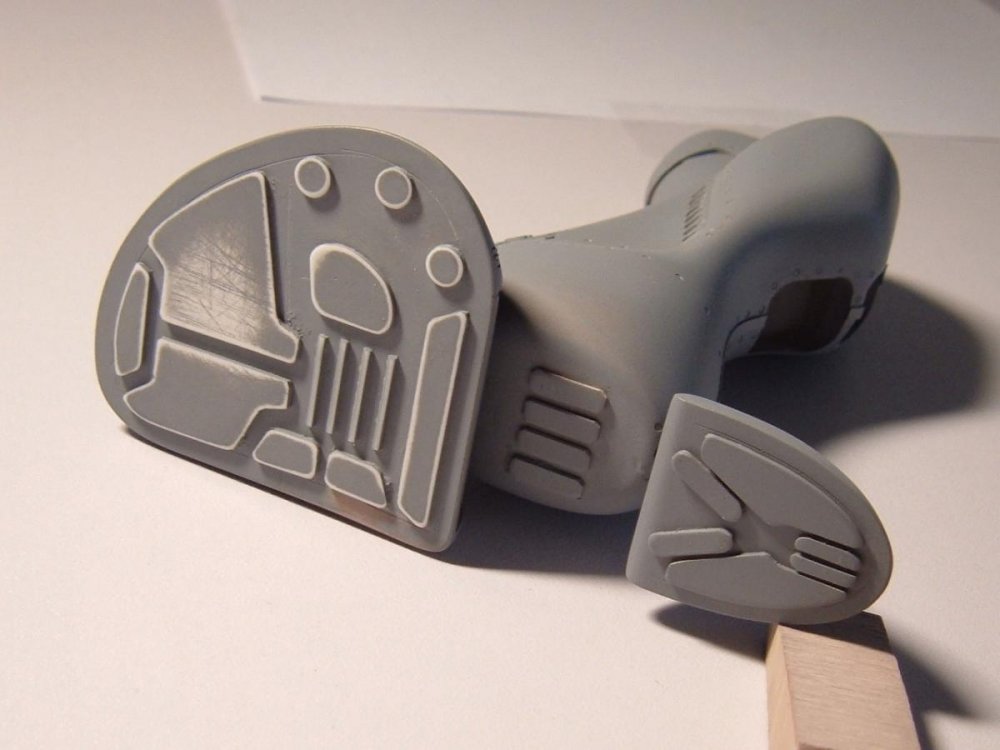
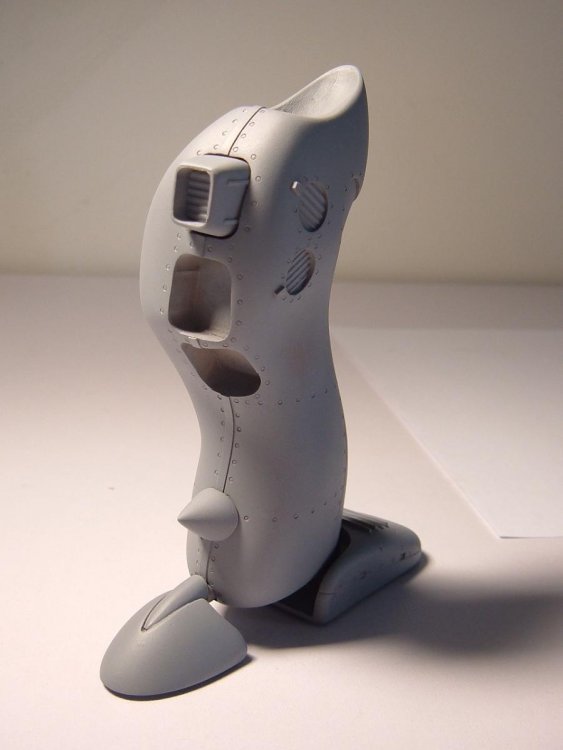
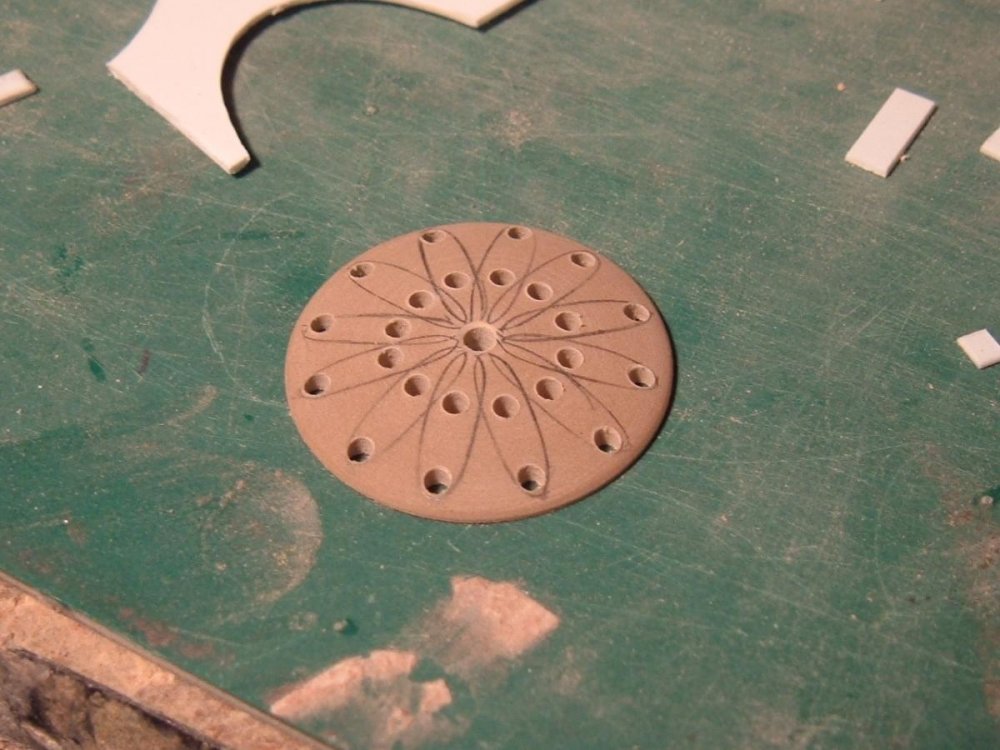
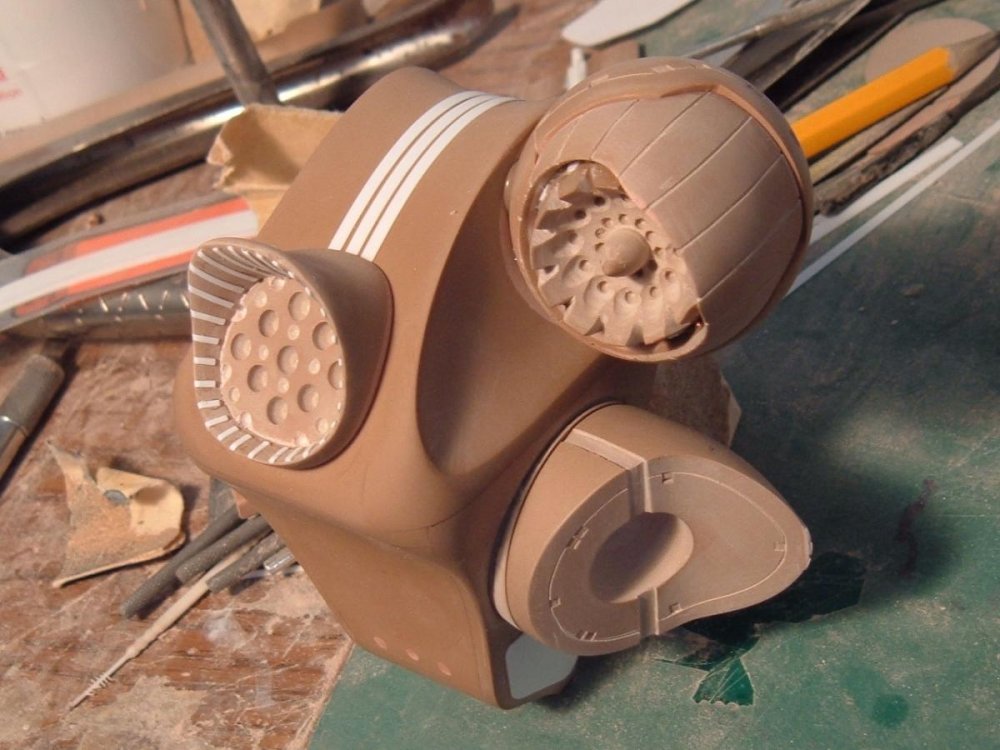
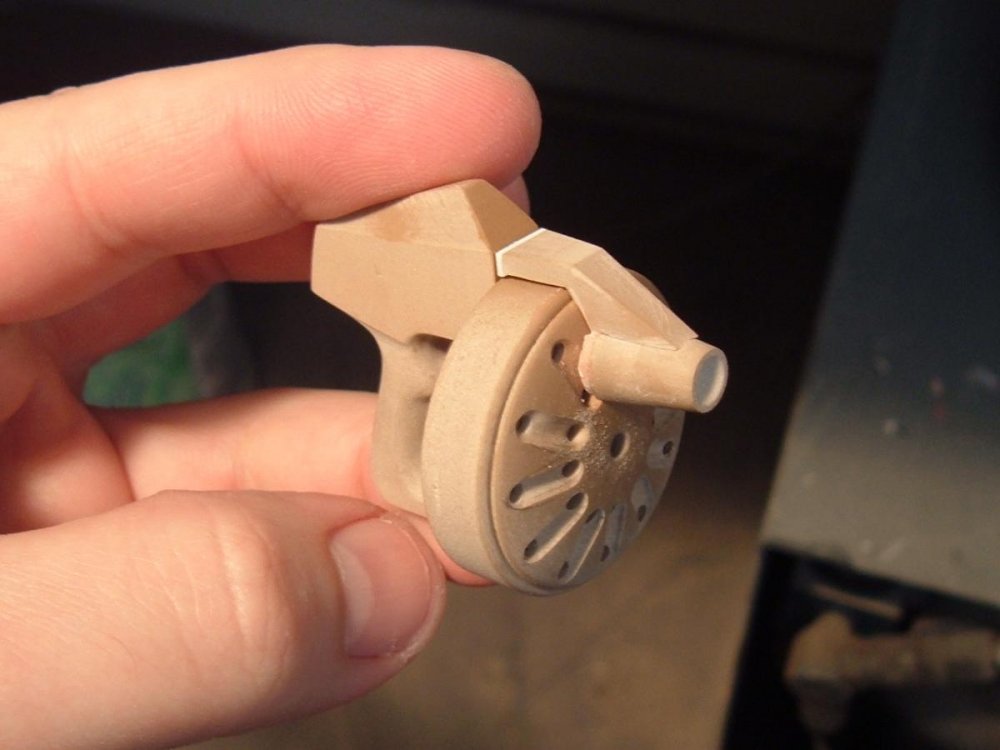
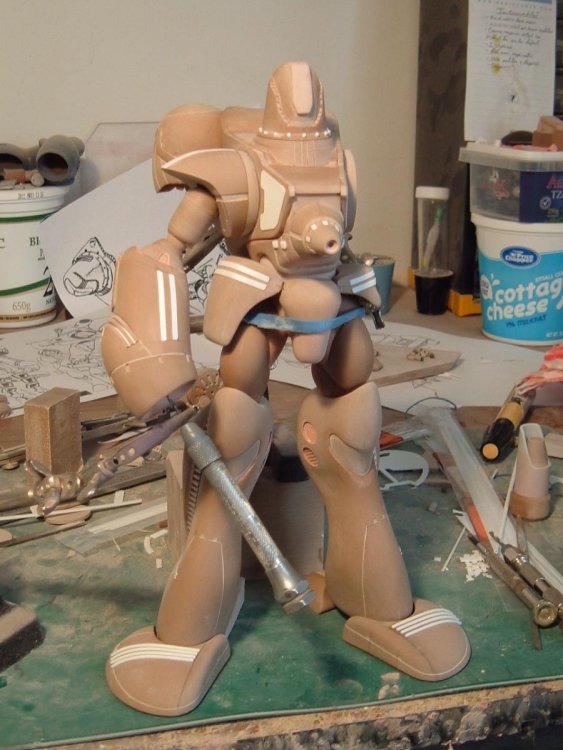
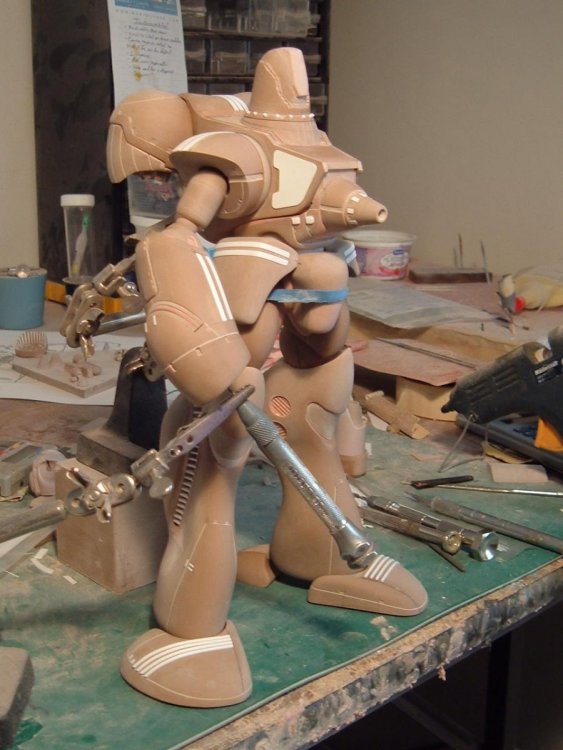
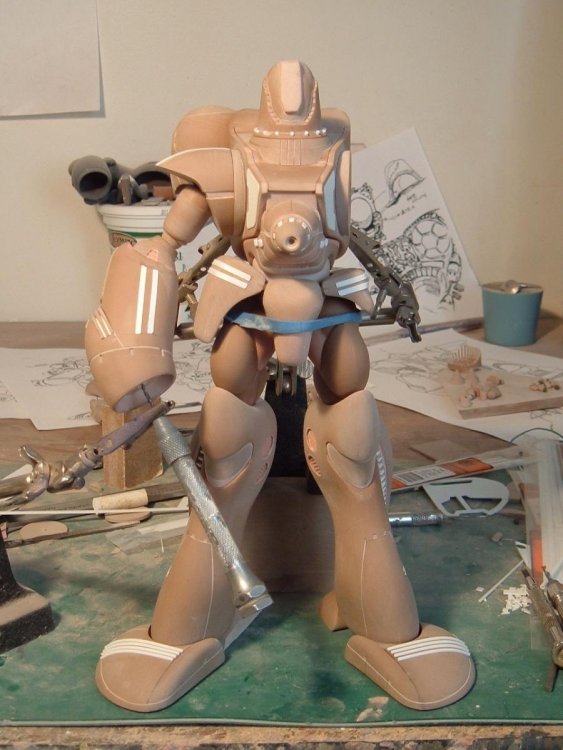
Captain's log: Friday, April 17th. It's in the home stretch now that the big stuff is out of the way. The detailing fun is in full-swing and coming along nicely. DSCF5341: underside foot detailing in its initial stages of plotting. I don't need to draft both sides since I can just cookie-cut once one side is done. DSCF5342: the barrel for the glorified flare gun that is the sidearm of the Ger. DSCF5349: more flare gun action. While this thing is NOT practical from a functional standpoint, I do find it rather nifty. DSCF5348: thrusters now have detail, just a few other nick-knacks to add to the backpack unit for it to be complete. DSCF5350: comparison of the Ger unit with a soldier to give you a better idea of the size. DSCF5351-53: typical beauty shots with some added detailing. Rivets and other details will be added once the parts are primed, though I wanted to take some pics before the primer coat to show how very little putty was employed for these masters. So back to the shop I go to do a bit of cleaning… I'll snap a few pics of just how much modeling board ends up on the shop floor in the next update. Until then, play safe and enjoy the weekend!

-
1/72 Nousjadeul Ger Moscato kit?
captain america replied to captain america's topic in The Workshop!
Hi guys, I'll have a quick update tomorrow. I'm down to detailing with mostly the cockpit left and a few bits here and there. I really don't know what was running through the designer's mind when he drew this thing, there are so many unusual shapes and details that have been so very challenging to get right. Not enough perspective grids and too much wacky tobacky if you ask me. Thankfully I'm almost there! -
1/72 Nousjadeul Ger Moscato kit?
captain america replied to captain america's topic in The Workshop!
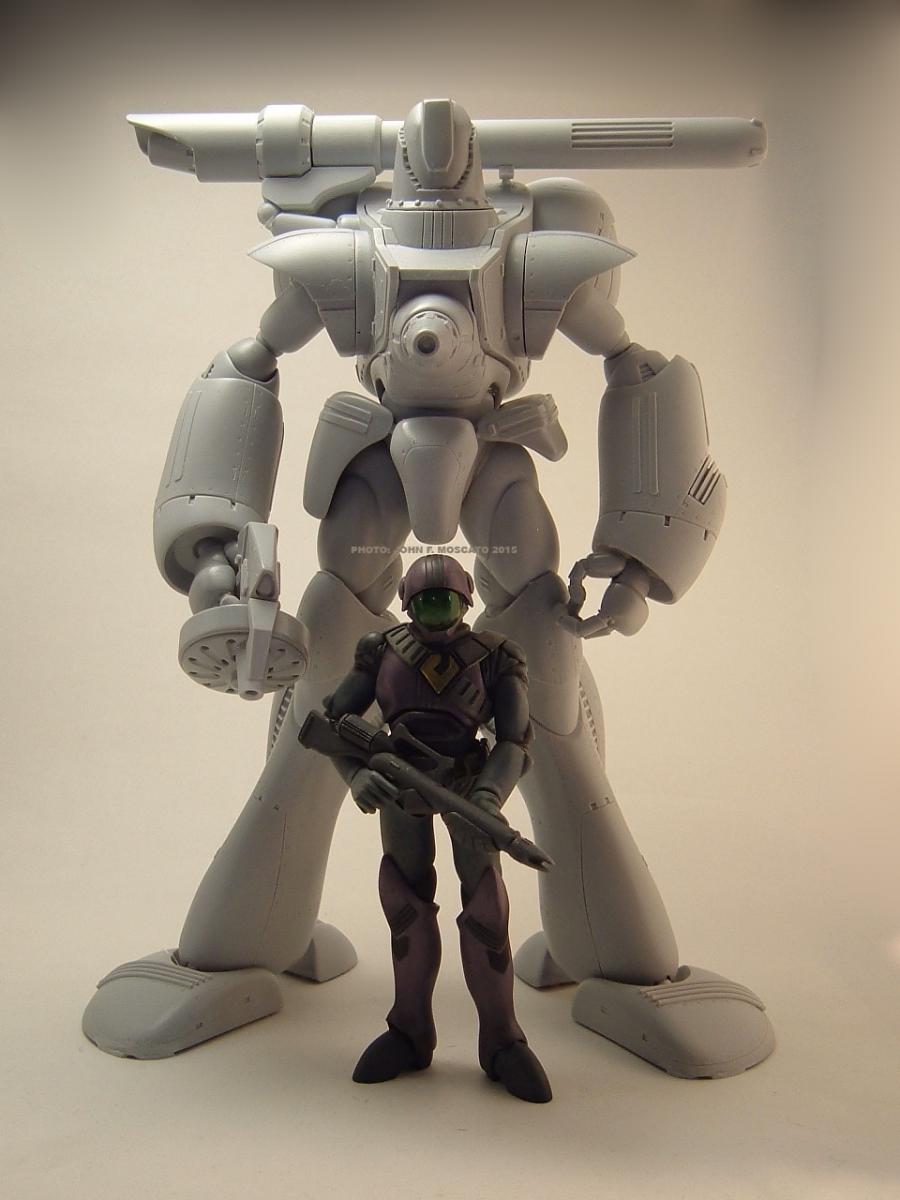
To be fair, I don't think that Imai (later Bandai) ever really made an effort with that kit other than with the box-art. Side-by-side comparison from left to right: the Imai 1/100 (1/144), my customized Imai 1/100, my 1/72 scratchbuild and the line-art.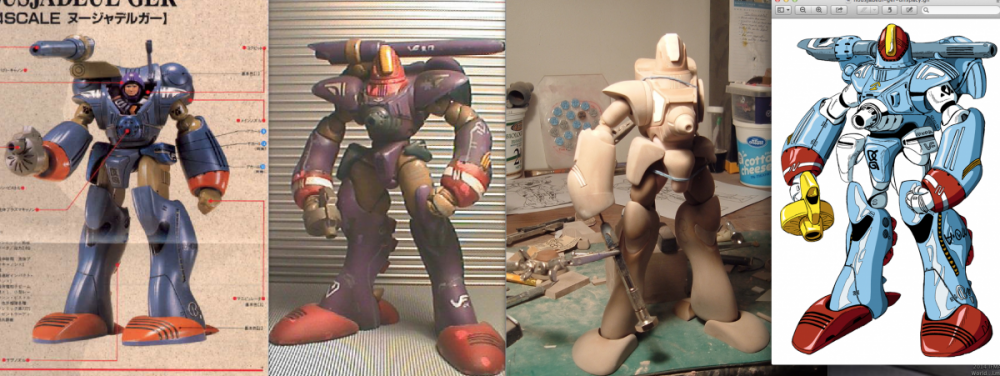
-
1/72 Nousjadeul Ger Moscato kit?
captain america replied to captain america's topic in The Workshop!
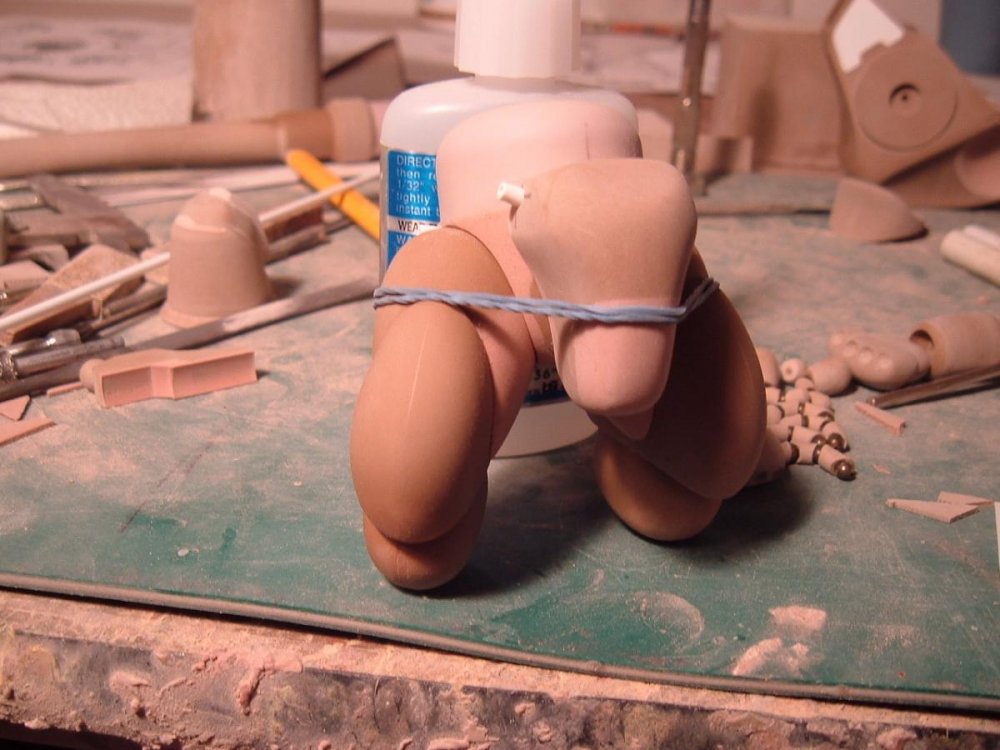
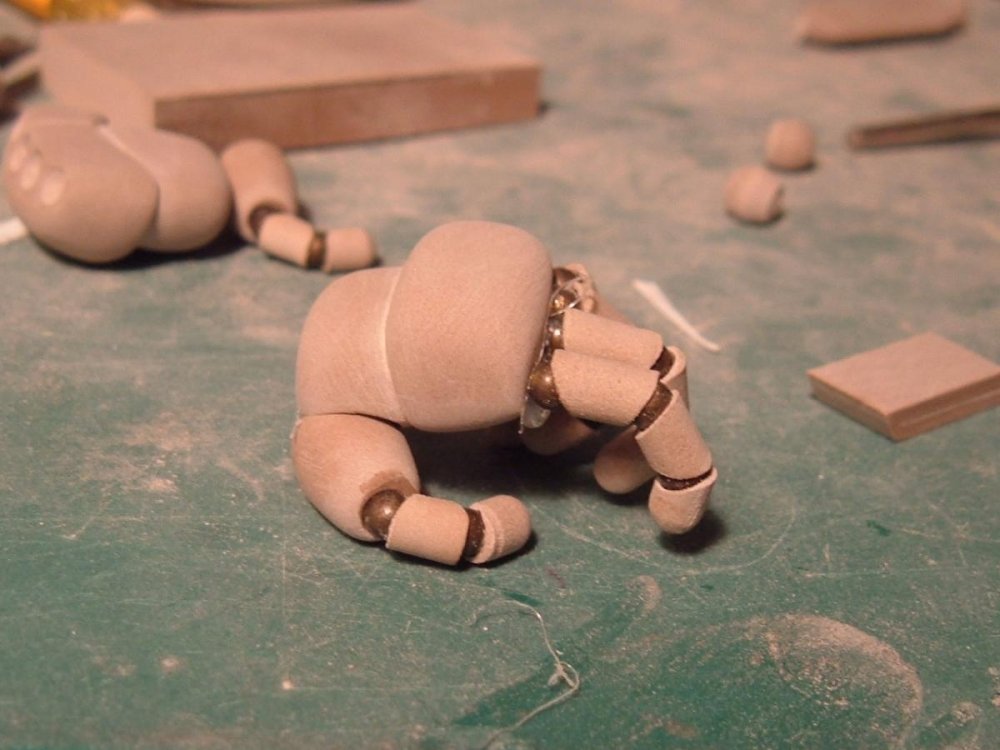
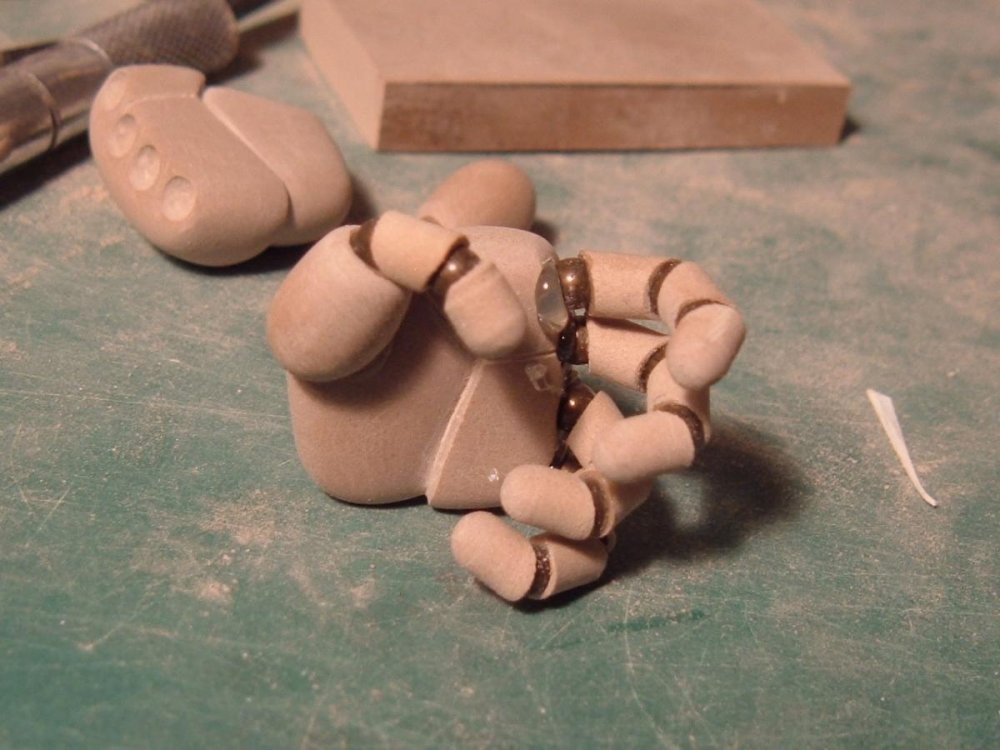
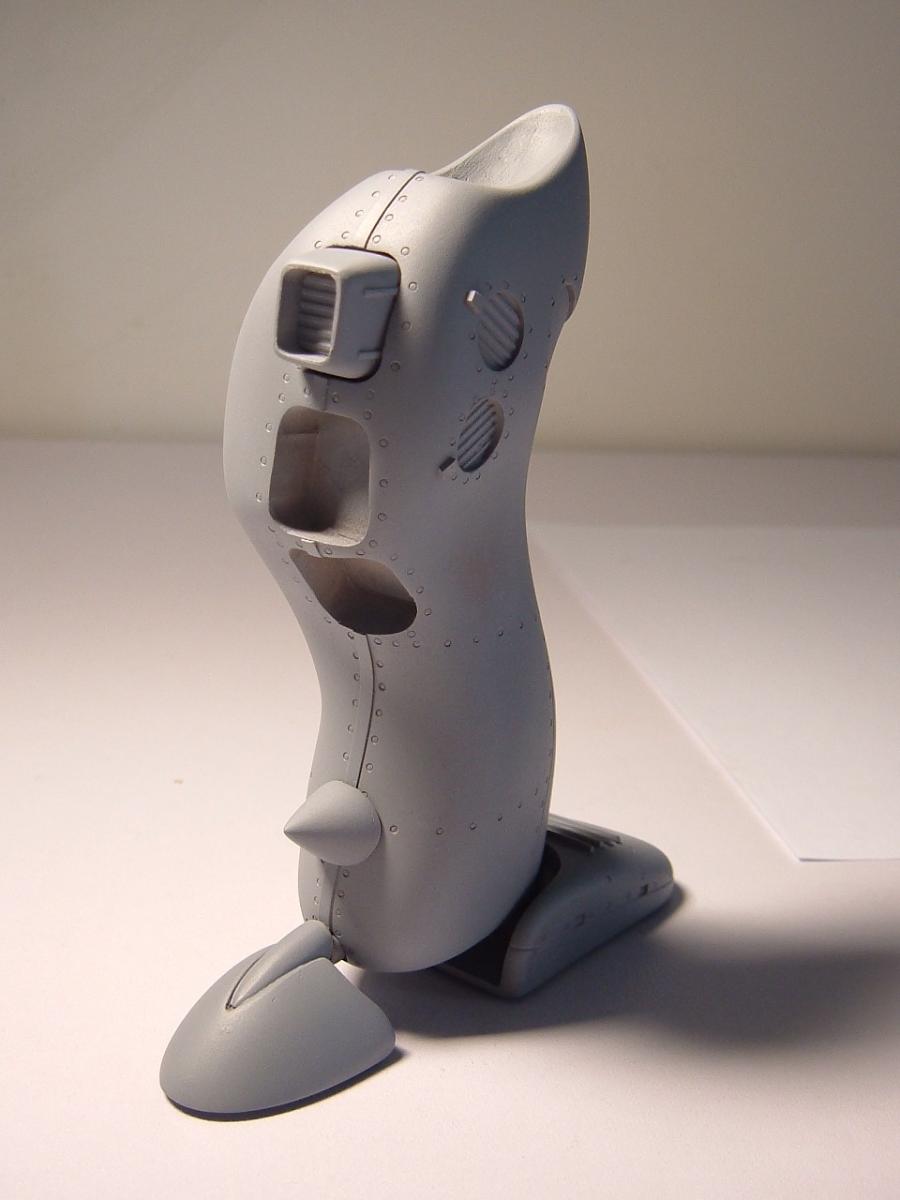
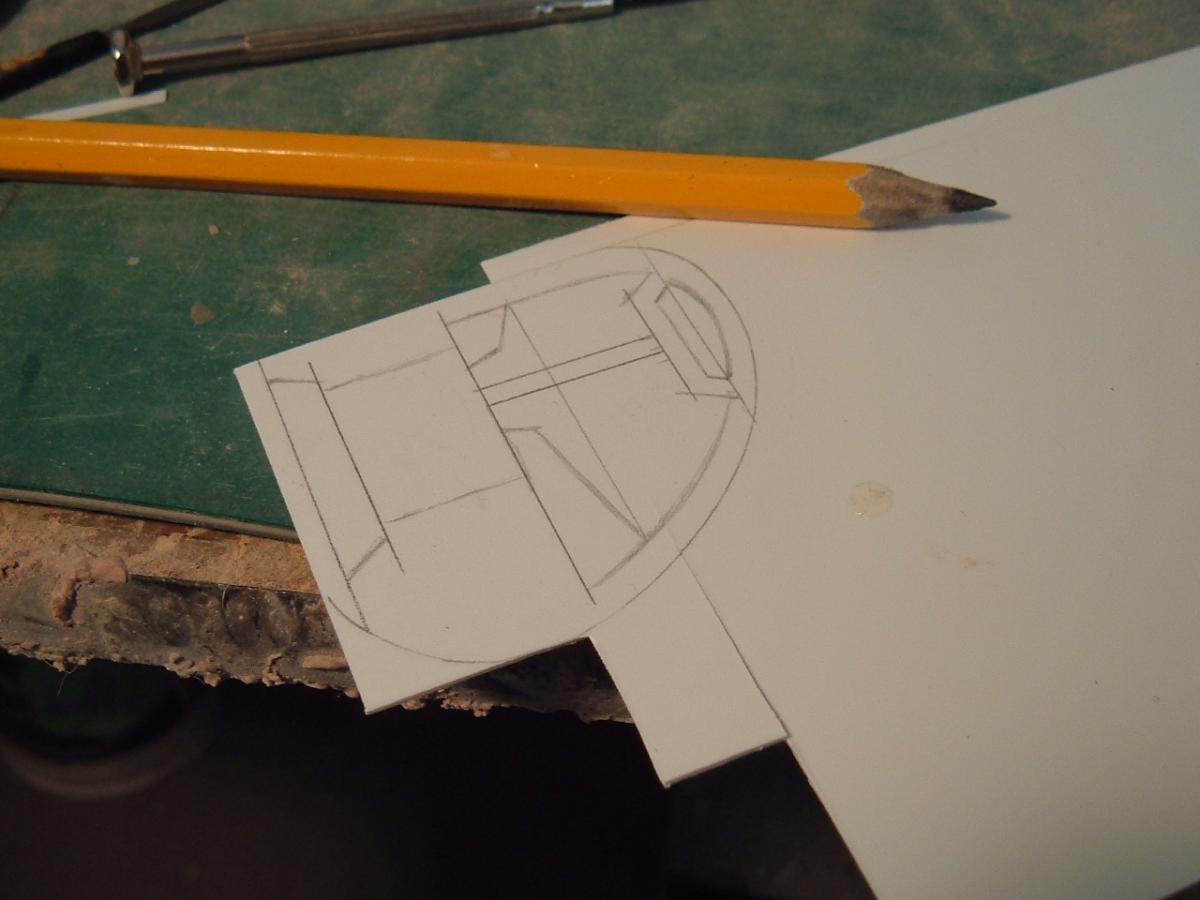
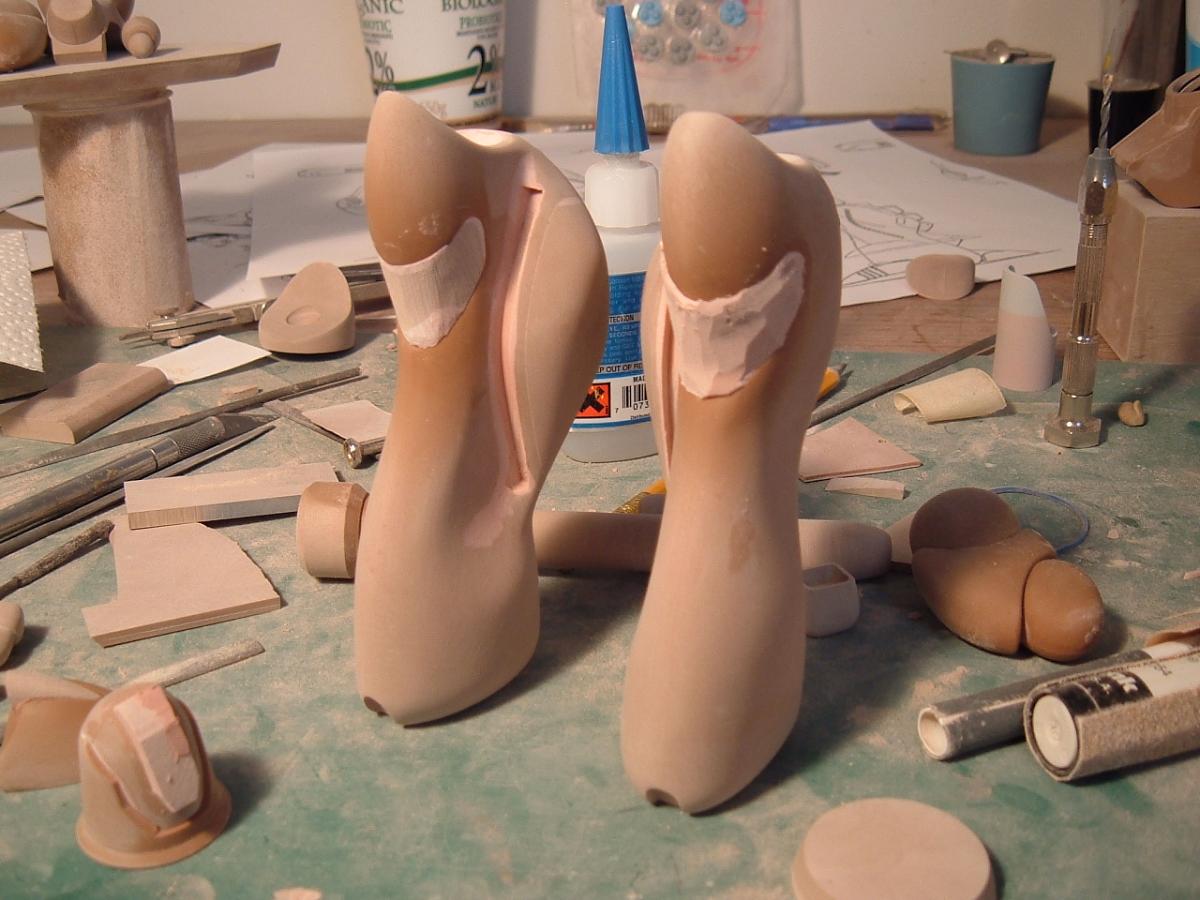
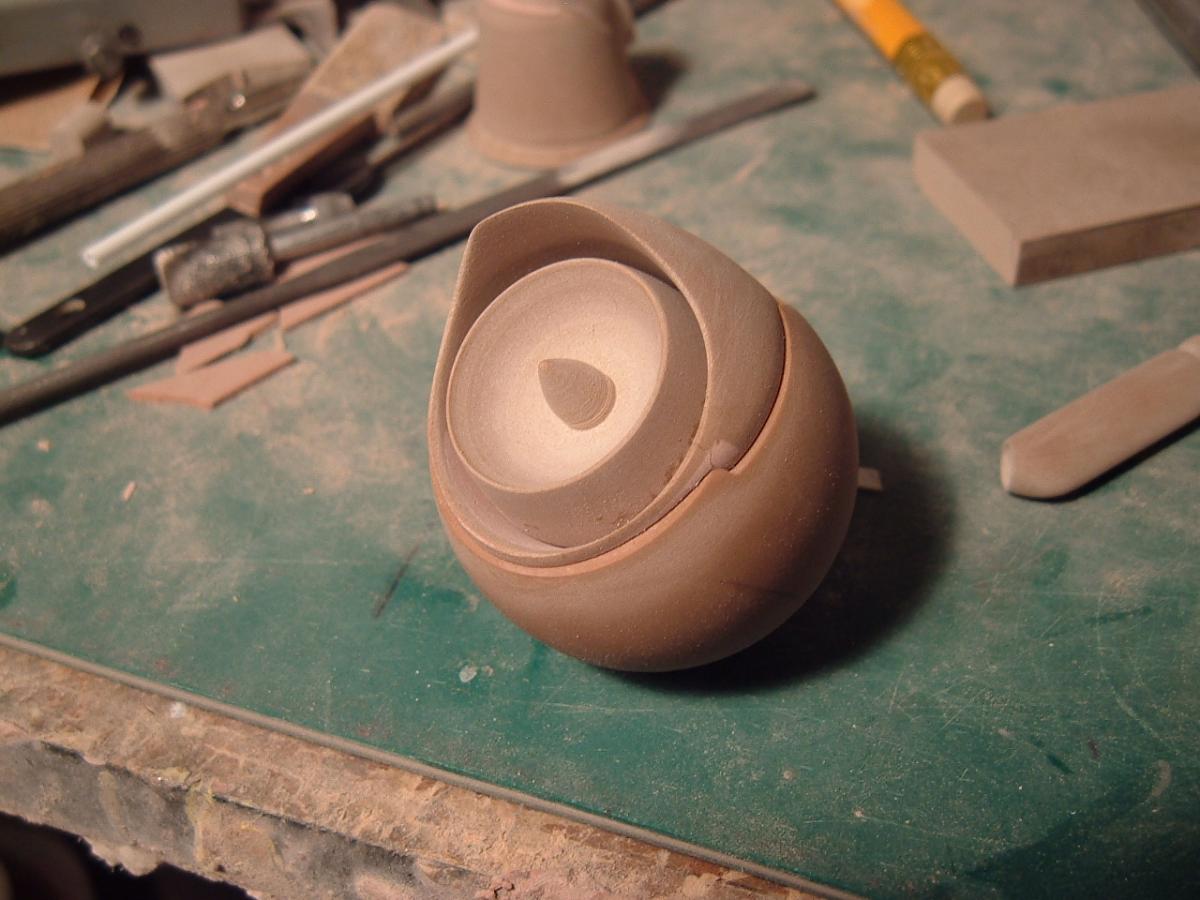
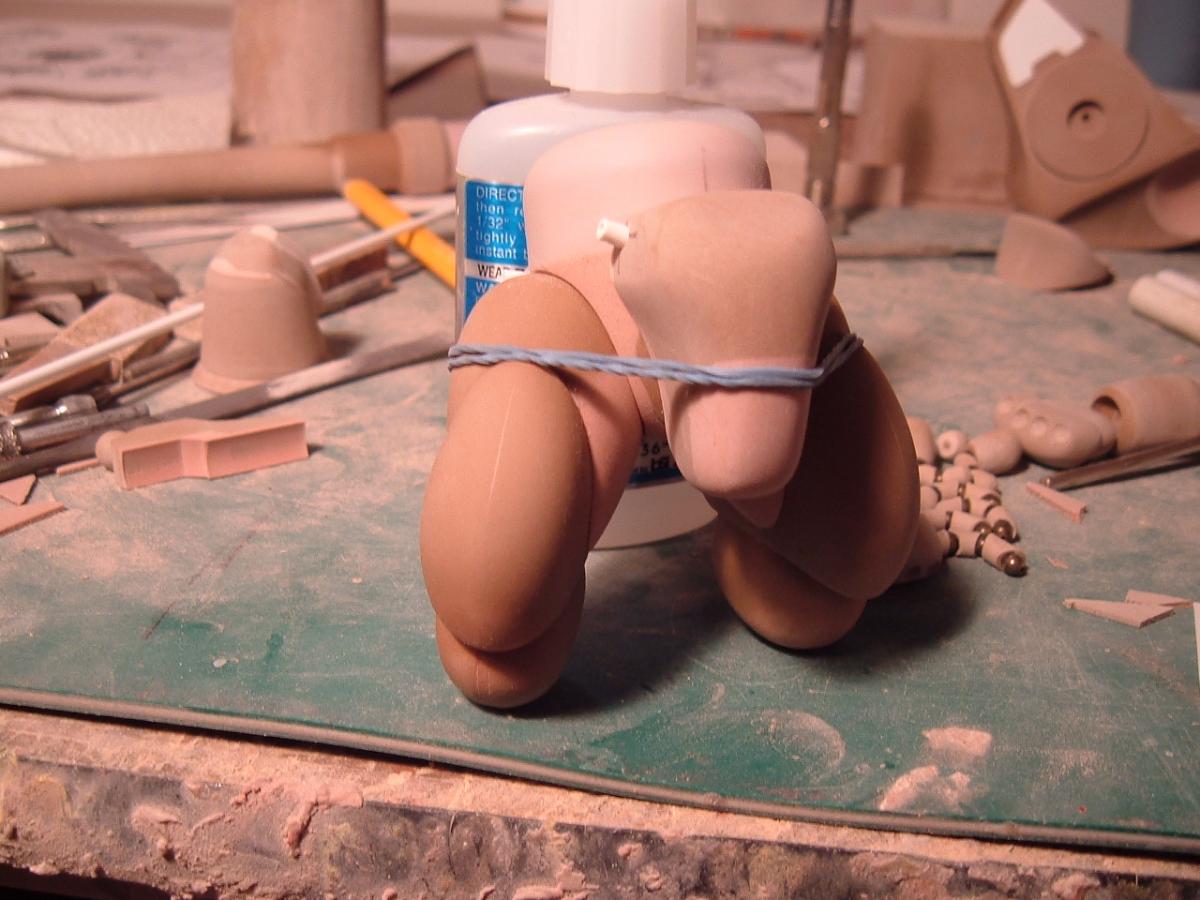
Captain's log: Friday, April 10th. Despite the depressing, rainy weather, I'm happy to say that Norbert-Gerard (N-Ger) is progressing nicely! DSCF5317: a little bit of putty work on the lower legs is the opening attraction for this update. The piece on the left having been sanded-down while the leg on the right is still hardening. One useful trait with polyester putty is that it goes through a rubbery pre-hardening stage whereby you can carve excess putty with a sharp knife to minimize sanding and grinding once it's fully hardened. DSCF5318: one of the thruster balls which is now almost completely shaped and awaiting details. DSCF5319: the hip/thigh/crotch-guard. I took care to try to keep the attachment system for the hip pockets as close to the line-art as possible. DSCF5320: the back-pack with the thruster units temporarily affixed. More detailing and slight changes yet to come. DSCF5321: the forearm unit showing the "bands" that run across the outer portion. I decided to make these vents and spent an inordinate amount of time carefully crafting these to the shape of the arm. I probably could have just scribed them but I felt that the extra touch was worth the effort. DSCF5322-DSCF5323: the hands are another area where I spent significant time and attention. The line-art shows some sort of big knuckle-guard but doesn't elaborate on whether the unit is gloved or not, only that the shapes are rounded. I used the little metal balls that make-up a lamp switch for the knuckles, as I felt that this was a practical knuckle design and they just look cool! Like the 1/32 Legioss, the fingers will be separate. DSCF5324: the main cannon along with the mounting arm. I may shorten the lower arm just a tad to make sure that the cannon sits well centered on the back, but you will have the option to build it with the gun facing forward in attack mode as well. DSCF5325-DSCF5328: this is what it looks like with most pieces hastily-assembled. Most of the big shapes are done and I'm starting to work more on details and the cockpit. I did take a few liverties with the overall dimensions of the body parts. Nothing major, just a little tweek here and there to make it more elegant and less clown-like. I've always felt that this particular mecha was under-appreciated and had loads of potential. I also wanted to achieve a balance of faithfulness to the line-art and the super-elegant, curvy version that I made 22 years ago. So far I think that I've surpassed my own expectations and I hope that you will approve as well. That's it for this week, so until next time… Play safe!!