captain america
-
Posts
3563 -
Joined
-
Last visited
Content Type
Profiles
Forums
Events
Gallery
Everything posted by captain america
-

Hasegawa announces a TV SDF-1 and a Super Messiah!
captain america replied to cool8or's topic in Model kits
I hate to be the one to say this, but I'm disappointed that Hasegawa certain visually-inaccurate DYRL parts for the TV version, it really does compromise the look of the kit: the leg/thruster design and where the bow meets the middle hull are particularly irksome. -
1/48 MOSPEADA LEGIOSS RESIN KIT: FINAL SHOT
captain america replied to captain america's topic in Anime or Science Fiction
Keep the deposits coming, guys. I will only start construction once all the deposits are in, since it's a smaller than average run. -
Hasegawa announces a TV SDF-1 and a Super Messiah!
captain america replied to cool8or's topic in Model kits
This. Hasegawa has done stellar work up to now, so they have the benefit of my doubt. And if it should happen that they would get it not quite right, then that's when I come in -
1/48 MOSPEADA LEGIOSS RESIN KIT: FINAL SHOT
captain america replied to captain america's topic in Anime or Science Fiction
Today... Is Deposit-day! You may now begin sending your deposits of 200 CAD (per kit ordered.) If you don't have my payment info, just PM me. Also, because of new policies implemented by the post office and their updated customs forms, please make sure that your phone number (with area code) is either displayed with your address or the body of the paypal message. On my end, I have started the back-engineering process from my 1/32 kit, which will likely continue into next week. First progress update/pictorial scheduled for Sept. 11. P.S: please insure that any PP fees are covered on your end. I've noticed that there are no fees if you're sending funds to someone and you already have the amount in your PP account. The fees kick-in when you send funds by withdrawing from a credit card or bank account. -
1/48 MOSPEADA LEGIOSS RESIN KIT: FINAL SHOT
captain america replied to captain america's topic in Anime or Science Fiction
Post # 47: the project goes forth at the original price. Prepare your wallets accordingly. -
1/48 MOSPEADA LEGIOSS RESIN KIT: FINAL SHOT
captain america replied to captain america's topic in Anime or Science Fiction
This. -
1/48 MOSPEADA LEGIOSS RESIN KIT: FINAL SHOT
captain america replied to captain america's topic in Anime or Science Fiction
It does, and having re-evaluated the situation, I would much prefer to keep the price-point at what I originally quoted. My gut tells me to green-light the project and things will work-out, even if it doesn't happen on my preferred timetable. It's settled: kit stays at 292 CAD, and I'll start taking deposits of 200 CAD on Friday. *bangs gavel* -
Hasegawa announces a TV SDF-1 and a Super Messiah!
captain america replied to cool8or's topic in Model kits
Yes, exactly that! -
Hasegawa announces a TV SDF-1 and a Super Messiah!
captain america replied to cool8or's topic in Model kits
You know what would go great with that Macross, but that they probably will never make? A same-scale Supervision Army gunboat! -
1/48 MOSPEADA LEGIOSS RESIN KIT: FINAL SHOT
captain america replied to captain america's topic in Anime or Science Fiction
Hey guys. The deadline for the 30 spots will be upon us in 5 days and from the looks of it, interest for the project has stalled. I will ask all those members who want the kit to let me know if you approve or reject the project with a price increase to accomodate the lower production volume. If there's a unanimous yes, I will start on the 30th. If not, I will consider other projects. -
1/48 MOSPEADA LEGIOSS RESIN KIT: FINAL SHOT
captain america replied to captain america's topic in Anime or Science Fiction
Quite right, I corrected it. -
1/48 MOSPEADA LEGIOSS RESIN KIT: FINAL SHOT
captain america replied to captain america's topic in Anime or Science Fiction
If I were to do a run of 22 in stead of 30, it would raise the price from 292 CAD to 390 CAD (290 usd), a rather significant price bump. It would have to be approved unanimously by the 22 already aboard or it all falls apart. -
I'm digging the choice of colors, and thankfully there was no mixing required.
-
1/48 MOSPEADA LEGIOSS RESIN KIT: FINAL SHOT
captain america replied to captain america's topic in Anime or Science Fiction
See first post. I'll take a deposit to secure orders and commence work, say 200 CAD (153 USD) and the balance just prior to shipping. -
1/48 MOSPEADA LEGIOSS RESIN KIT: FINAL SHOT
captain america replied to captain america's topic in Anime or Science Fiction
So far, 20. The problem with leaving it for longer is that after about a month, people become distracted, forget, or commit to other purchases and then comes the chore of tracking down the members that don't visit MW frequently to see if--after all that time--they're still committed. -
1/48 MOSPEADA LEGIOSS RESIN KIT: FINAL SHOT
captain america replied to captain america's topic in Anime or Science Fiction
I'll leave the thread going until the 28th. If by that time it hasn't hit 30 I'll call it a day. -
MOSCATO'S GLAUG COMPLETED RESIN KIT AMAZING!!!!
captain america replied to tdo7623's topic in Model kits
Holy cow, that's awesome... And shocking! That Kamjin would allow his Glaug to fall into such a state of disrepair!! Seriously, that is one impressive model. May it strike fear into the rest of your kits for generations to come!! -
Actually, all the Legioss toys/models, save for the Toynami (1/55?) are undersized for any kind of adult human pilot. Having scrutinized the line-art at length I can tell you that even the original stated dimensions for the craft are stupid small for any pilot bigger than a 10 year-old child. According to the stats, a 1/32 Legioss Armored Soldier should be 27.5cm tall, but mine is almost a full 10cm taller because I designed the whole thing around the pilot. The whole "line-art accuracy" thing is irrelevant: being hand-drawn, the shapes and proportions vary wildly in all modes from one illustration to another, so it comes down to picking what version you happen to like more than another.
-
Personally, I don't think that the DYRL color scheme gets enough love.
-
1/48 MOSPEADA LEGIOSS RESIN KIT: FINAL SHOT
captain america replied to captain america's topic in Anime or Science Fiction
There would be a deposit when I'm ready to start and balance due prior to shipping as with my previous project. There are already 20 down of the 30 needed, so it depends on how quickly I can fill the remaining slots. I reckon that there are still quite a few people on vacation and possibly not checking the site regularly. -
1/48 MOSPEADA LEGIOSS RESIN KIT: FINAL SHOT
captain america replied to captain america's topic in Anime or Science Fiction
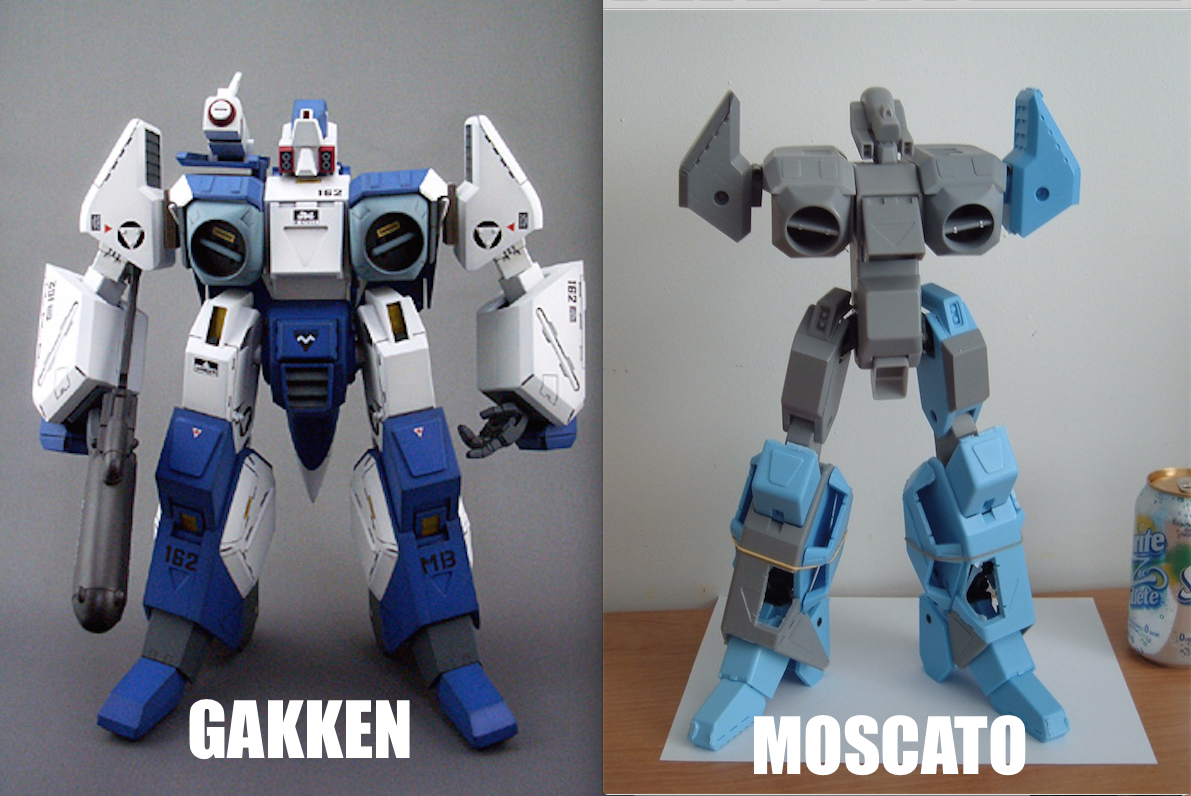
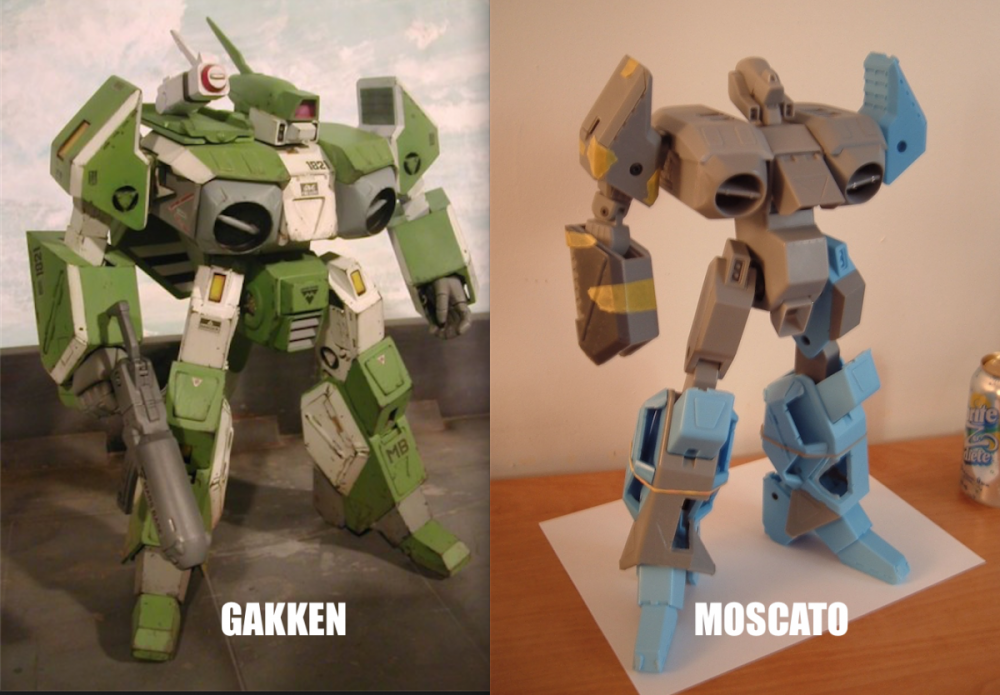
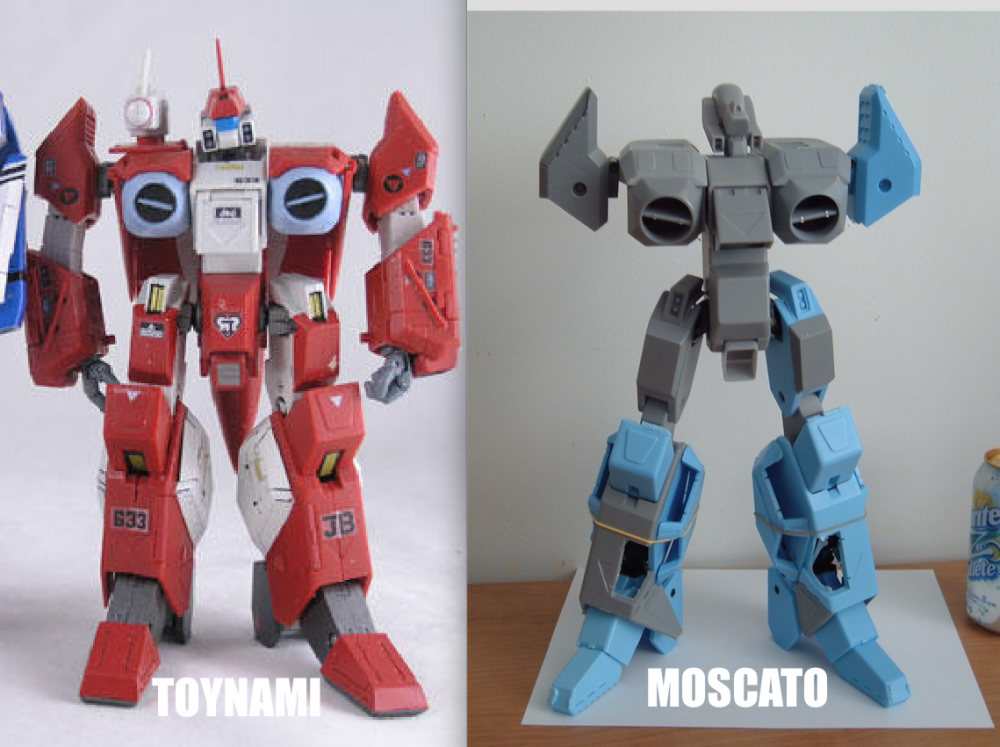
Figured I'd post a couple of pics of the venerable 1/32 compared to some of the more "classic" Legioss offerings. I was asked why I felt that the market needed yet another 1/48 Legioss, as there were already many offerings available from Imai, Aoshima, CM, Gakken, etc. I will just post comparison pics and let you decide for yourself. The Toynami MPC is essentially a revised Imai sculpt with improvements over its predecessor.
-
1/48 MOSPEADA LEGIOSS RESIN KIT: FINAL SHOT
captain america replied to captain america's topic in Anime or Science Fiction
It will very much be an Armored Soldier kit, but based on the overall proportions of the 1/32 model. That being said, the proportions will allow a more astute modeler (with some scratchbuilding skills) to make a fighter if they so desire. It will NOT be transformable. -
1/48 MOSPEADA LEGIOSS RESIN KIT: FINAL SHOT
captain america replied to captain america's topic in Anime or Science Fiction
I am using my 1/32 design, shrinking it down to 1/48 precisely because it works -
That thing could potentially be a thing, but first the other thing has to be a thing... Otherwise that second thing has nothing to link to 1/32 would have been nightmarishly large for a TREAD, but 1/48 is still borderline feasible. I intend to base the Legioss on my 1/32 model proportion-wise and can make it such that, while not actually variable, an astute modeler could build it into fighter mode with a few updated or scratchbuilt parts. Assuming that demand is there, of course.
-
1/48 MOSPEADA LEGIOSS RESIN KIT: FINAL SHOT
captain america replied to captain america's topic in Anime or Science Fiction
Keep the demand coming, guys! If you need to, share the word, send the link with your friends!