

captain america
-
Posts
3555 -
Joined
-
Last visited
Content Type
Profiles
Forums
Events
Gallery
Everything posted by captain america
-

Anyone have a $!@ problem with Canadian Customs?
captain america replied to soze's topic in Anime or Science Fiction
Slow mail is just the tip of the iceberg in this country... Improving on one's stupidity and feeblemindedness seem to be the national passtime now. What do you expect from a country that has the highest taxes in all of North America, where the customs officers are unarmed clerks, and where intruders are allowed to sue the owners of the homes they break-into when the owners try to protect themselves. -
The Robosapien control system was designed by Mark Tilden. He's still under contract to NASA as far as I know, but he seems to have been granted permission to moonlight on toy projects... He also participated in the development of Hasbro's big 14" R2D2 a while back. I used to work for Wow Wee toys years ago. The cheap plastic is a typical Wowwee trademark... Among many other points of lackluster product design. I've offered to help them fix a lot of those shortcomings, as well as offer to help "style" their toys, but alas...
-
You can definitely thin Tamiya or Gunze acrylics with lacquer thinner, but I wonder if that would be wise for painting. Personally, since acrylics are water-soluble, I like to take the less toxic route, and thin them with either rubbing alcohol, or if you need the paint finish to be a tad shinier, or for clears, I use distilled water. I have built-up models painted entirely with acrylics that were done almost 15 years ago, and the finish is still as nice as if it had been applied a few hours ago... All acrylics diluted with alcohol.
-
NEW Official MPC Thread!!!
captain america replied to FRED THE FRENCH's topic in Anime or Science Fiction
I have to say, the toy looks surprisingly good thus far. The color, the molding all look nice. I'm not a die-hard activist for sturdiness, since collector toys should emphasize detail and poseability over sturdiness anyway. I'm still going to wait for a fellow MW member to review it, but overall, it looks like Toynami have done their homework. -
To keep things short, sweet and simple, your enamel paints will always remain tacky on PVC vinyl kits. You'll just have to strip it. How do you strip a painted vinyl kit? Try Easy Off LEMON scented oven cleaner. Before committing that to the actual kit, do yourself a huge favor and test it on a leftover scrap piece. If all goes well, it'll just attack the enamel paint, and you'll be able to wipe off the residue with a cloth ( takes about 4-6 hrs.) For vinyl kits, you should stick to hobby paints like GUNZE SANGYO Aqueous colors, or Tamiya acrylics... Both available from any reputable hobby retailer.
-
NEW Official MPC Thread!!!
captain america replied to FRED THE FRENCH's topic in Anime or Science Fiction
Are you referring to a Valkyrie MPC, or the soon-to-be released Alpha? Your post was confusing to read. -
Official - Weapons Banter Thread
captain america replied to Mechamaniac's topic in Hall Of The Super Topics
You don't need any special compensator to shoot Glocks underwater. What you DO need is the P/N 3073 'Spring Cups, Amphibious'. Graham, (Glock Armorer since 1996). ...Yes, that's it! The little bits that allow the firing pin to maintain sufficient velocity to detonate the primers underwater... Or something along those lines. Personally, i can't think of any instances where any civilian would even WANT to fire their gun underwater (if I want to play with a gun in the bathtub, I just use a waterpistol ) -
Official - Weapons Banter Thread
captain america replied to Mechamaniac's topic in Hall Of The Super Topics
Shooting a glock underwater? Without the special compensator PROPERLY installed, you might as well just chop your hand off with a meat cleaver... Nowhere near as messy as letting the exploding gun do it for ya I've done some research on glocks, and apparently the.40 has a nasty little habit of exploding on you if you should be unfortunate enough to get a bad shell-casing on the round you're firing. This guy seems to echo my sentiments... http://members.cox.net/guntraining/no_glocks.htm This is not to say that I think glocks are bad guns; my biggest beef with them is that they're just horribly unattractive -
Official - Weapons Banter Thread
captain america replied to Mechamaniac's topic in Hall Of The Super Topics
Hi JS Arclight. You'll be happy to know that my 9mm is fundamentally gimmick-free. There would be no use for a decocker, since there is no hammer whatsoever; the firing system is something completely new that I designed from scratch. Idiotically-simple, but rugged and reliable. Though I can't elaborate on details, I can tell you a few things about it: the pistol is COMPLETELY ambidextrous, right out of the box: safety, mag release button and slide release are all designed so that you can use the gun with either hand without any fumbling whatsoever(ALL backup guns should be). Furthermore, I also incorporated a sighting system that is 100% snag-free, and yet makes aiming even easier and quicker than with normal sights. You'll also be happy to know that the grip, which is minimised in thickness AND length(no extra room needed for a sear or main spring) sports finger indentations for maximum controllability. The safety also does double-duty, locking both the firing pin AND the trigger when not in use... Completely drop-safe. Oh... Did I mention that it can do all this with a mere 41 total parts? That includes the sights, screws, and springs. -
Official - Weapons Banter Thread
captain america replied to Mechamaniac's topic in Hall Of The Super Topics
Hi Opus. I was grappling with the issue of mag capacity during the design phase as well. The problem is, when you design a micro-compact, whether you go for single stack, or double-stack to get the 10 rounds, you compromise on compactness and concealability. My own take is that 6+1 rounds is more than adequate for a CC/backup weapon. If you need more rounds than that to take down an assailant or two, it's cos your aim is bad! LOL Seriously though, for certain situations, nothing beats a full-size gun with the full 10 round mag. The good thing about designing something small, is that it's a lot easier to size-up afterwards, than the other way around.. If I play my cards right, hopefully I'll be able to offer both -
Official - Weapons Banter Thread
captain america replied to Mechamaniac's topic in Hall Of The Super Topics
I currently carry a Glock 19 and HK USP Compact in .357 SIG as backups when I am working. One on each side of my vest. off duty, I carry two Glock 33s in .357 SIG. i usually carry these in either a dual shoulder-rig or in two fobus paddle holsters. I am looking into getting the HK P2000 subcompact in .357 SIG when it comes out. Hmm. Those are still fairly bulky pieces to carry. I always had a liking for the PPK, but it's a little bit large for a "modern" .380, and for that size, I'd definitely like something with a bit more stopping-power. Hopefully, what I've got in development will make concealed-carry a little more "concealable"; especially for everyday use. Essentially, I've been working on a compact semi-auto chambered for 9mm. 5.6 inches in total length, 4" high, and 0.95" across grip & slide. Mag capacity:6 rounds... The best part is that it's DAO, but uses a slide-in trigger like a 1911, and a few other features that I can't really elaborate on... Yet. -
Official - Weapons Banter Thread
captain america replied to Mechamaniac's topic in Hall Of The Super Topics
I design guns and I can't believe I haven't noticed this thread until now Anyone here into compact, concealed-carry pieces? -
It just dawned on me that this year will mark the 20th anniversary of Takaya's Bio Boosted Armor Guyver series. I know that they're releasing a new series of poseable figures based on their old vinyl kit series line, but I was wondering if anything else might be planned?
-
Hi Sam. All I can say is wow, Guyver III never looked so good! I took a stroll onto HLJ's website, and did a search for both Max Factory and Guyver, but they don't seem to have the item listed--out of stock, or otherwise. Is the original yen price listed on the box, by chance?
-
The Exorcist: Overrated?
captain america replied to SupremeKaioshin's topic in Anime or Science Fiction
To call the Exorcist "overrated" is truly unfair. It stands as probably the scariest horror movie of all time, not because of its visual effects, but more because of it's chilling mood and psychological impact. Gore does not mean scary, and vice-versa. For what it's worth, it boggles me that films like Scream and its carbon-copy immitations are held in such high regard by the average viewer; they're completely devoid of the fundamental psychological "chill" factor necessary to truly frighten a person to the core. That's why the Exorcist will probably always be toted as the king. -
Trumpeter 1/32 SU-27 Flanker
captain america replied to captain america's topic in Anime or Science Fiction
... I seem to have found the answer to my own question, and the answer is an impressive doosie. Quoted directly from the Hyperscale aircraft forums: "APPROXIMATE ARRIVAL: SEPTEMBER 1, 2004 ___**2224 1/32 SUKHOI SU27 FLANKER-B FIGHTER SRP $149.95 The Su-27 was developed as a long-range air superiority fighter, having improved the quality of the former Soviet fighters. It’s combat abilities compare roughly to the US F-15. Up to 10 air-to-air missiles can be carried and is equipped with a formidable front and rear radar system. This allows the Su-27 to fire at targets in front or behind the aircraft. The Flanker-B variant was placed into service in April, 1981, having been newly equipped with better aerodynamics and an aft radar extension. Kit consists of 350 parts on 9 giant sprues plus upper and lower fuselage halves, canopy, nose radome and 3 rubber tires. Additional features include white metal landing gear & struts, pitot head and flap shaft, photo-etched aileron and flap hinges and a film instrument panel. Markings are for the 582nd Fighter Regiment, 4th Air Army Frontal Aviation, Chojna, Poland, 1992. Operational parts include the flaps and speedbrake, and opening canopy. Completed kit measures 27 ½” long with a wingspan of over 18". Oooooh boy, she's gonna be a BIG BIRD! -
Trumpeter 1/32 SU-27 Flanker
captain america replied to captain america's topic in Anime or Science Fiction
Hi Retracting. I've been hearing feint whispers of this model since about this time last year, but nothing solid whatsoever. As you can see now, sites are starting to show it as To Be Released, and one actually had a price of $148 for the model. I think they SHOULD have released it last year, but seem to have held-back in order to improve the tooling and correct a few little details. It's to the point now, that even one aftermarket decal company is planning to release an upgrade decal sheet to coincide with the kit... Unfortunately, still no official date of release. http://argo.net.au/jbwhole/trumpeter/tr32.htm http://www.discountmodels.com/trumperter_32_planes.htm http://www2.stevenshobby.com:5641/si/produ...supplierid=5270 http://www.udisco.com/hobbies/inv/Trumpe.HTM -
though I wouldn't normally bother with a silly "pie-in-the-sky" rumor of this nature, I've seen this listed on at least 3 sites so far as being slated for 2004 release by Trumpeter. Unfortunately, no pictures or prices. Just wondering if anyone had any solid info of any kind on this (possible) upcoming release?
-
F-14 kits, reviews, comparisons, and Shin's
captain america replied to David Hingtgen's topic in Model kits
Hi David. The Techniks and Cutting Edge update sets are one in the same; just packaged differently. With regards to the "incorrect-ness" of hasegawa's wing-glove fairing, it's too flat when you look at the aircraft from the side. The area where the wing-glove meets the foreward fuselage/nose section should have a bit more of a curve to it. In the end, most people won't notice, and despite all my scratchbuilding skills, I deem it as not worth the hassle to repair. I did a quick write-up on the hasegawa kit here: http://www.aircraftresourcecenter.com/Fea1...cato/fea681.htm One sample picture: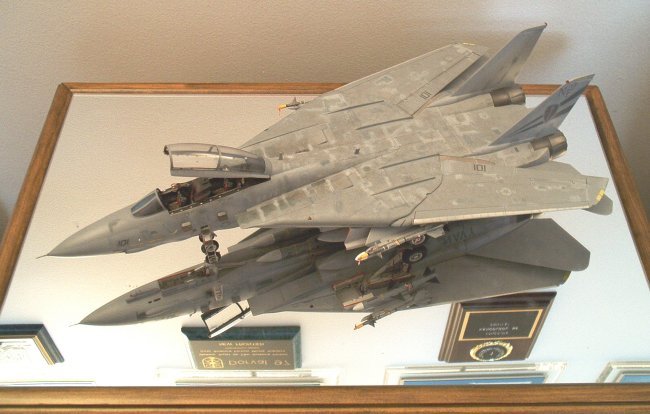
-
F-14 kits, reviews, comparisons, and Shin's
captain america replied to David Hingtgen's topic in Model kits
Hi David. I actually have the 1/32 Tamiya Tomcat ( 1994 re-issue.) All in all, I firmly believe that it has more potential than any other Tomcat kit out there on the market at the moment. The lack of scribed detail on the aft fuselage is a blessing in my eyes: considering tamiya's tendancy to carve very deep trenches in offerings like the 1/32 Eagle and Phantoms, I'll gladly do my own scribing in the proper size. Regarding the Cutting Edge fuselage/engine nozzle update set, I think it falls rather short in my eyes: there's absolutely no need to cut away the aft fuselage to make it correct, you just need some putty to square-off the outer fairing and re-model the adaptor fitting aft of the alligator plates, which is really just a bare carbon-fiber part. Even worse, the update kit completely ignores the fact that you need new burner cans to go with the GE nozzles, so scratchbuilding skills are necessary if you want to do it right. Having said that, it's still my pick as the best F-14 kit out there, with the 1/48 Hasegawa a close second. The latter definitely provides more bang for the buck and gives you more lattitude to build alternate versions, but they did screw-up in the shaping of the upper portion of the LEX/wing glove, which is a tad too flat, and the lower aft fuselage just foreward of the engine nozzles is improperly shaped. -
F-14 kits, reviews, comparisons, and Shin's
captain america replied to David Hingtgen's topic in Model kits
What? No review of Tamiya's 1/32 Tomcat?? -
Hi Jesse White metal (pewter) is intrinsically difficult to cast because of the fact that the metal cools/solidifies very quickly. I've tried doing some home pouring myself, but for anything more detailed than a 1.5 by 1.5 inch cube, it'll result in much of the detail not coming out because of the above problem. As it turns out though, I currently have a supplier that specialises in white metal casting. He uses spin-casting ( centrifuge) to do small stuff, and from firsthand knowledge, his work is quite nice. Just let me know if I can help.
-
Hi Anthony ...I really should've been more careful about posting that; looks like I've opened up another can o' worms. The Vf-1D project sounds like a relatively interesting one. However, if you look at the foreward fuselage of the D conpared to the A/J/S, there's quite a length difference. That, combined with the shortened chest armor and the need for a very long heatshield (to cover the elongated canopy) might result in an engineering "brick wall." Probably the best solution would be a "cheat" technique similar to what Yamato did in 1/60... It's a lot of work though.
-
Yeah why don't cha cast it for us, we'll all buy it? Sure thing. Just line-up 50 or so people who are willing to shell-out $520.00 apiece for the kit, and I'll get right to work.
-
1/32 scale.
