-
Posts
3553 -
Joined
-
Last visited
Content Type
Profiles
Forums
Events
Gallery
Everything posted by captain america
-
Hi Sean. I get my modelling board here http://www.mfcomposites.com/ You can work the Ren Shape with any milling machine or lathe, as well as a dremel for removing large volumes. You can then very easily sand it with regular sandpaper for fine finishing. Just so that you know, the dust put off by the material is toxic, so you'll need a mask to work it. You can get a relatively good finish on the parts, but as it's still technically somewhat porous, you will need to seal it with primer prior to molding.
-
Specialised, yes. Expensive is relative. A 2" by 16" by 50" plank usually runs @ $400 dollars. I'm in Canada though, so we have different pricing. The booster end-bell is actually urethane resin: I poured some into an empty yogurt container and let it harden; makes perfect round stock that you can turn and taper... Just takes way too long to hack Renshape into round bars, so I use it almost exclusively for flats & components that need to be milled.
-
Hi whytwolf. It's high-density modelling-board: CIBA Ren-shape 460 & 480... 2 inch plank.
-
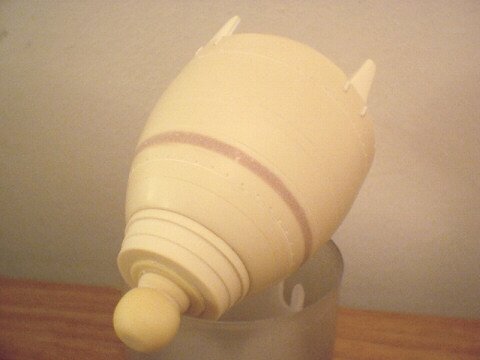
Hi guys. Stamen: the side view Rob posted has the little tabs on the nozzles looking chunkier. However, upon closer inspection of the original lineart, Kawamori has them rendered considerably narrower, so I simply opted to stick with the closest reference; I guess it comes down to personal preference with things like that. WM: the ball-joint will be simply for final positioning/glueing. In reality, you may not have that much positioning leeway as you think, since the nozzle fits quite snugly into the fuselage in the line-art(and probably will in the kit too). The ball-joint will probably end up being just a simple connection point
-
-
-
-
-
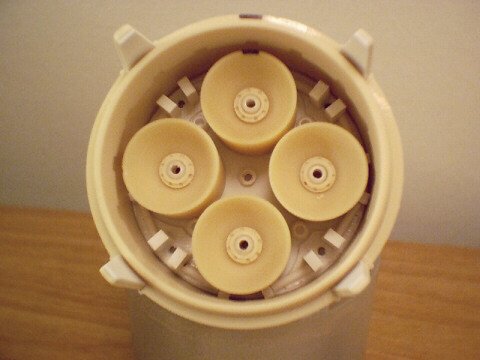
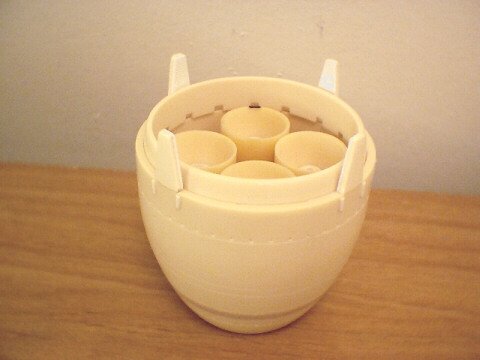
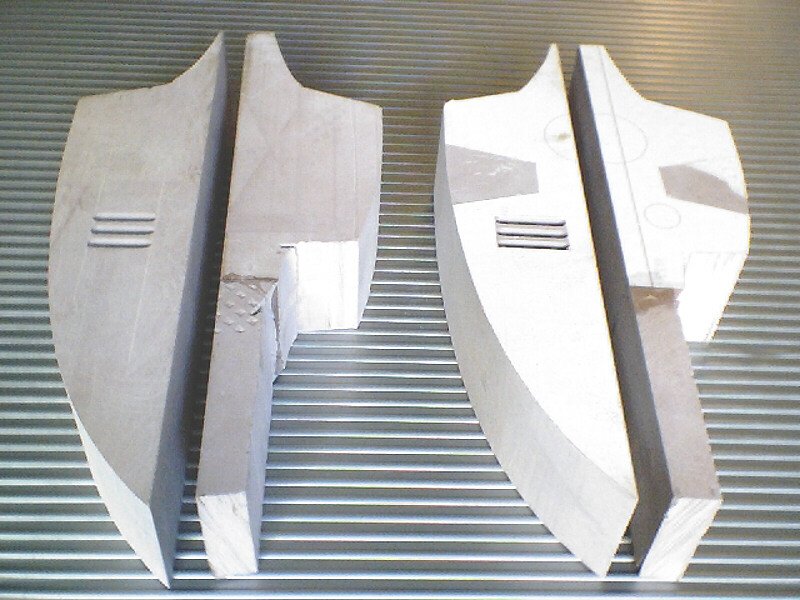
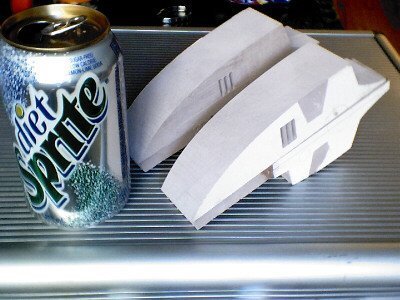
Update July 29th. Here are some preliminary progress pictures of the booster thus far. The first pics are of the main booster fuselage hulls, which are temporarily split into four parts for better dimensional control. The paper templates affixed to these are from the side-view that Rob provided. The next set of pics are of the booster nozzle itself. I spent most of my time doing this piece, and consequently, it's relatively close to finished, with just a few little bits and rivets to add. Since Kawamori's line-art just shows black in the recessed areas between the secondary (smaller) nozzles and the main outer nozzle, I took the opportunity to do some creative modelling in that area; adding lots of little bits & pieces that would normally be hard to see in the overall view, but would then provide some eye-candy for those willing to stick their flashlights & dental mirrors up the tailpipes. The nozzle assembly itself will be two pieces: the main bellhousing(which is hollowed-out from the back for weight savings) and the ball-joint/end cap. Enjoy...
-
Hi Noel. I'm not entirely sure what you're refering to with regards to the "booster frame." I have the Perfect Memory book, as well as the Macross/Robotech RPG book, and both show exactly the same line-art. 3 views, and one black silhouette on the launch vehicle. There are no technical or plan views in existence that I know of, so all data needs to be extrapolated based on these drawings. The fact that the drawings are freehand and vahe clear signs of "cheated" perspective only serves to complicate the task somewhat. If you have any pics or diagrams of your own to illustrate your views, by all means, feel free to share
-
Hi WM. Thanks for the vote of confidence I'm definitely trying to keep the design as sleek and slender as can be, but I still have to allow the design to taper sufficiently at the rear to allow for the mounting of those huge booster nozzles. The fact that there's very little reference to work from, and that Kawamori's drawings tend to contradict each other somewhat just makes things that much trickier. Paneling: oh god yes! If anything, I'm trying to maintain continuity between the Valk and the booster, so it's crucial that the detail flows as seemlessly as possible for apperarance's sake.
-
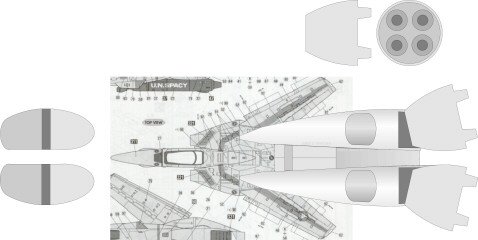
hi guys. Here are some initial tech drawings for the booster unit. I'm trying to keep things as close to the line-art as possible, all while allowing the booster to mate cleanly to the Hasegawa model. Sculpting proces begins tomorrow, and progress pics will be posted regularly to allow prospective buyers to see the evolution of the model.
-

New Polar Lights NCC-1701 Refit
captain america replied to B-52 GUNNER's topic in Anime or Science Fiction
I read Olsen's painting article for the big E. However, I'd seriously consider against using high-build primer on the kit; you'd completely drown & ruin the detail. They used high-build because the original was a fiberglass laminate, which (probably)needed a lot of touch-ups & putty. If anything, I'd recommend an automotive epoxy primer... You can get those in white, and it's extremely thin. You could litterally apply your pearls directly onto the primer after a bit of wet-sanding. -

New Polar Lights NCC-1701 Refit
captain america replied to B-52 GUNNER's topic in Anime or Science Fiction
Hi David. I just got myself a 1/850 Bandai Enterprise refit myself... I was actually expecting it to be much worse than it was; all I'd heard were horror stories about poor fit about those kits. Though I think more of that criticism was aimed at the E model than the others, even the comments on the refit weren't all that great. Perhaps I just got a lucky kit, but I honestly don't think I spent more then 2 and a half hours to put it together. Excellent fit. Pre-painting was cute. Not phenomenal, but acceptable. The only thing that bothers me is the lighting system. I'm almost afraid to turn it on too often for fear of burning out those microscopic bulbs... Anyone know what the life on those bulbs is roughly? -

New Polar Lights NCC-1701 Refit
captain america replied to B-52 GUNNER's topic in Anime or Science Fiction
Ok. Now I feal that I must bring-up a rather unpleasant aspect of this model... painting. More specifically, the complex and intricate mosaic of aztec patterns that cover the ship. Personally, I'm happy that PL have opted to not overscribe, or do with raised lines... Purely for authenticity's sake. However, there's going to be a mind-boggling amout of masking involed to paint it correctly. Any chance that someone will take the initiative and produce an aftermarket stencil set for this monster? I'd gladly produce it myself, but I'm far behind the learning curve on ST models, and I'm not the best poised to get access to the film prop. -

New Polar Lights NCC-1701 Refit
captain america replied to B-52 GUNNER's topic in Anime or Science Fiction
Actually, I think that size bodes well on a kit like this; to paint the complicated mosaic pattern on something smaller would just be an exercise in frustration. For those of you who may not know it, Paramount went all-out for the production of the retrofit NCC-1701 miniature that was used in STAR TREK; The Motion Picture. That model has the distinction of being probably the very best film prop ever made in Hollywood, and I don't think that any prop has been made since with such a mind-boggling attention to detail. Everyone I know who's had the fortune to see it in person simply ghasps in awe at it. -
fighter mode looks beautiful; very sleek and elongated. I'm just wondering if that very feature may end up causing problems for you in transformation; particularly because the bulk of the wing is almost completely aft of the engine nacelle.
-
It's unfortunate to see how much sheer grief Rob had to go through on a project as simple as the Valkyrie booster. I was so sure that there would be a little bit more professionalism in Japan, what with their strong GK industry, but apparently it's just as bad as in my neck of the woods (Montreal.) I pretty much don't subcontract anything out anymore because of incidents just like those... At this point I'd rather just refuse a client alltogether on a project than bite off more than I can chew and have to deal with all these half-assed con men
-
...And some of us professionals charge $40/hr
-

New Polar Lights NCC-1701 Refit
captain america replied to B-52 GUNNER's topic in Anime or Science Fiction
Addendum. More, higher-detail pics here: http://www.thomasmodels.com/refitmockup.html Also be sure to check the link to the index with even newer pics of the model; it may just be the pics, but it actually looks like they've toned-down some of the scribing, and the inner shuttle bay components look amazing!!! -

New Polar Lights NCC-1701 Refit
captain america replied to B-52 GUNNER's topic in Anime or Science Fiction
The size is definitely impressive, but the huge ditches (scribing) on the saucer section leave me rather flat. At 1/350 scale, the only way you'd see any panel-lines would be from a different-colored paint demarcation. In stead of that horrid scribing, they could simply have molded the upper/lower saucer hull with alternating smooth and LIGHTLY-textured patches which could serve as painting demarcations. But alas... -
actually, the finishing is quite decent from what I can see; proper pictures would certainly help though. The price is outrageously cheap, especially for a finish that good. Think about it... Even if a guy only charges $10 per hour for modelling services. Over the 30-40 hours necessary to finish it, that's already $300-400 and you haven't even added suppllies like paint, putty or any pricy photoetch and/or resin tidbits.
-

Anyone have a $!@ problem with Canadian Customs?
captain america replied to soze's topic in Anime or Science Fiction
um its nto that hard to compare when you narrow it to North America. Istn it jsut Canada and the USA? I mean obviously one will be higher than the other its a given. Plus dont forget they have free healthcare for anyone. Only problem is if you want surgery or such you need wait in line. Its not like money talks in Canada. Thats why people in canad come here for stuff like surgery. actually, North America includes Mexico too. Astonishing as it may sound, we have the highest taxes, but the US actually spends MORE per citizen than the canadian government. Basically, the US taxpayer gets more "bang" for every tax "buck" he is charged for. We may have "free" health care, but the US has an absolutely monstrous military machine, which is astronomically-expensive to deploy and maintain. This alone far outweighs our mediocre medicare expenditures. The simple truth is that canadian taxes are nothing more than legalized embezzlement. Do you think Paul Martin or Jean Chretien will ever serve a minute of jail time or pay a dime in restitution for the 1 BILLION+ dollars that magically went "missing" during their tenure in office? Of course not. They are the system, and the system protects itself from the taxpayers, who have grown ever more meek. -

Anyone have a $!@ problem with Canadian Customs?
captain america replied to soze's topic in Anime or Science Fiction
Slow mail is just the tip of the iceberg in this country... Improving on one's stupidity and feeblemindedness seem to be the national passtime now. What do you expect from a country that has the highest taxes in all of North America, where the customs officers are unarmed clerks, and where intruders are allowed to sue the owners of the homes they break-into when the owners try to protect themselves. -
The Robosapien control system was designed by Mark Tilden. He's still under contract to NASA as far as I know, but he seems to have been granted permission to moonlight on toy projects... He also participated in the development of Hasbro's big 14" R2D2 a while back. I used to work for Wow Wee toys years ago. The cheap plastic is a typical Wowwee trademark... Among many other points of lackluster product design. I've offered to help them fix a lot of those shortcomings, as well as offer to help "style" their toys, but alas...

