captain america
-
Posts
3550 -
Joined
-
Last visited
Content Type
Profiles
Forums
Events
Gallery
Everything posted by captain america
-
The only "modification" needed to the Valkyrie kit legs are the deletion of 2 parts, but this is clearly outlined in the instructions. You can always just clean out the foothole with a dremel and file if you insist on keeping all the parts. However, the castings that Jesse is doing seems to have alleviated the issue of the foothole, so for those castings you may not have to modify anything.
-
It would be a bit tough to find 100+ orders for an expensive toy conversion of a subject that isn't cannon. Besides, the silicone molds from which the castings are produce will typically have a life of about 35-50 pulls. Afterwards, you have to re-tool, and that in itself incurs cost. The $250-300 price tag would be for the TH armor only, no fast packs...They could be offered pre-pigmented, with only minor painting required. To take existing FPs, disassemble and mold/cast them would cost more than buying the whole FP kit, so it's easier for consumers to simply procure their own, and paint them.
-
The question that really needs to be asked is : would you still want a Thunder Hammers 1/48 conversion if it were (realistically) priced at $250-300? Though it looks simple when all the panels are closed, the TH armor is actualy quite complex, with thinwall panels & undercuts in the shoulder module, and a skeletal frame for the leg armor comprised of both rods and oddly-cut thin cross-sections, and then there are all the missiles. Long sculpting time, coupled with those thin, hard-to-cast parts = expensive model ( or at least it'll be expensive if you hire competent professionals.) More so if all parties have to turn a buck over a very small production run. Food for thought.
-
Very nicely.
-
Hi Lu. Not bad, not bad. I get the impression that you've been sharpening your painting skills lately, and it's starting to pay off. Just make sure no one ever finds out what you did to those poor FSS models, or they'll lymch you Next time I stop in, maybe I can give you a few painting/weathering pointers. Quick things, that'll make a big difference.
-
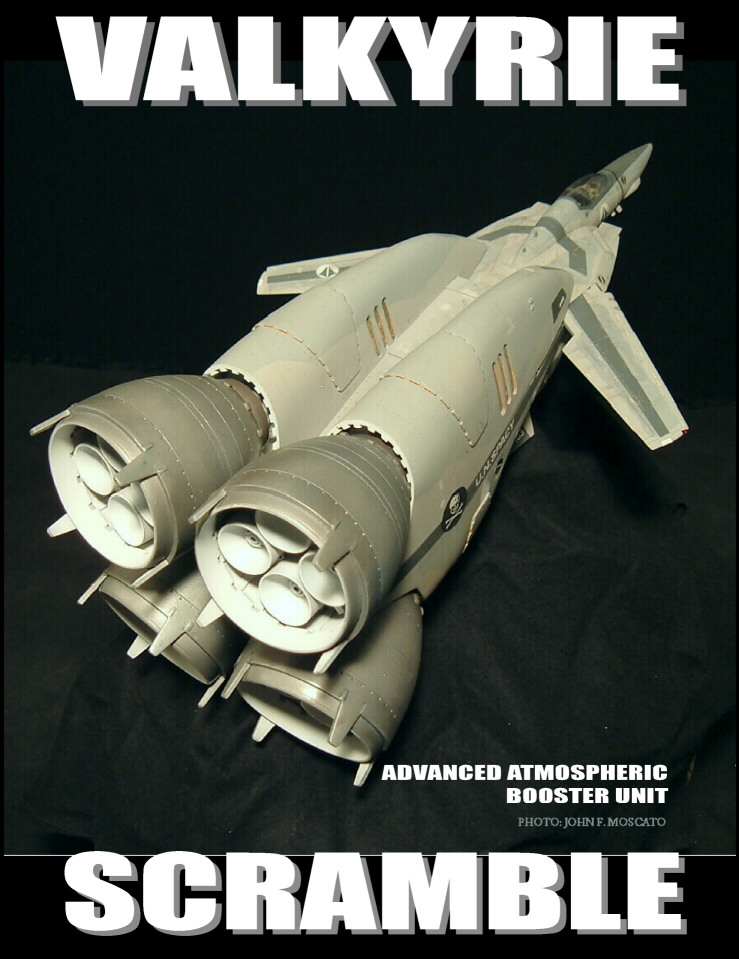
Last one for now. Guys, feel free to post pics of your own buildups! Let's see some of that creative painting and detailing
-
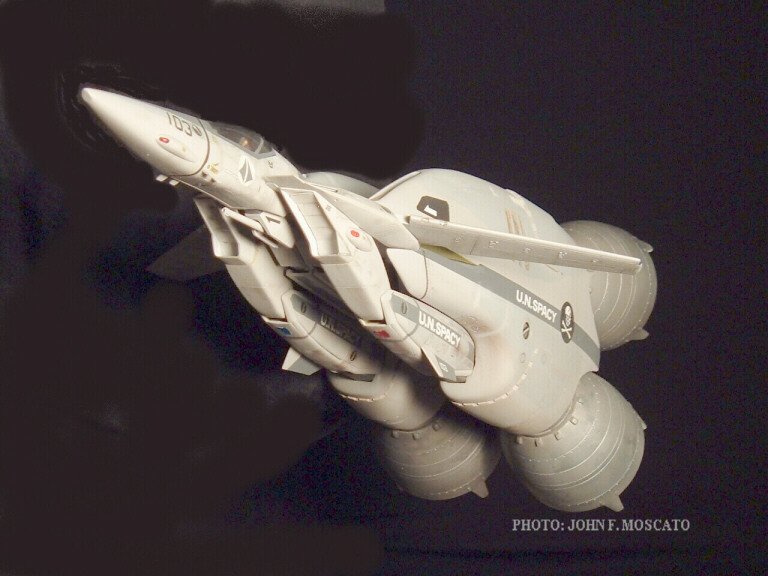
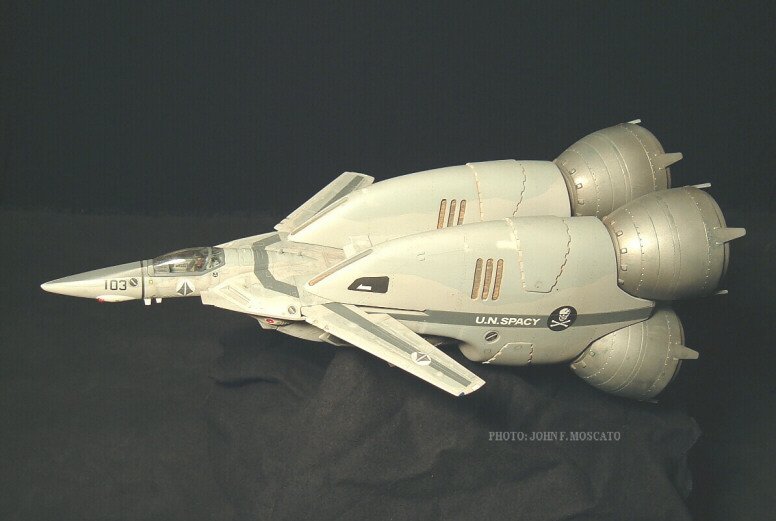
Another pic.
-
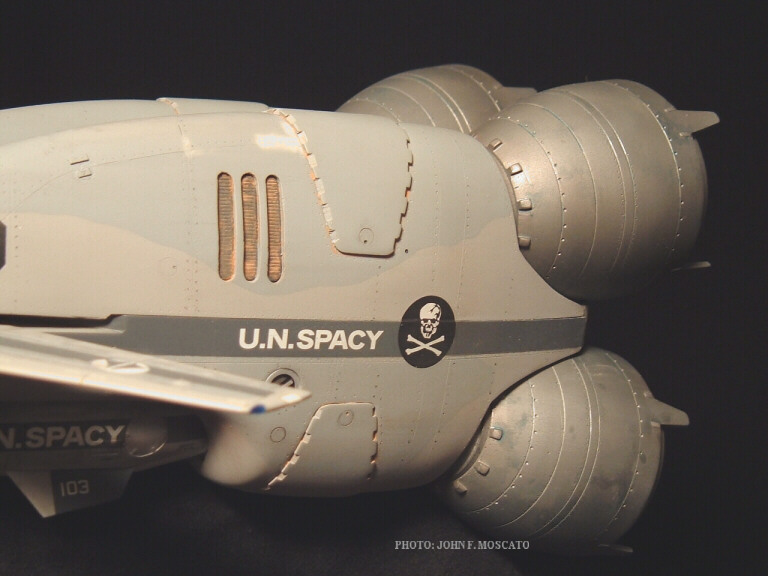
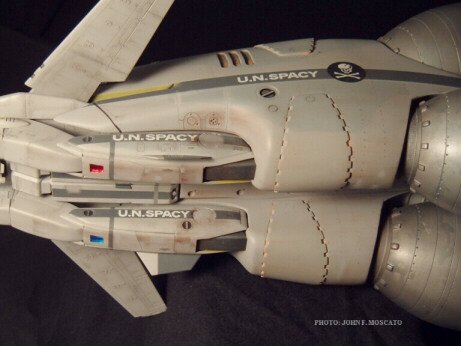
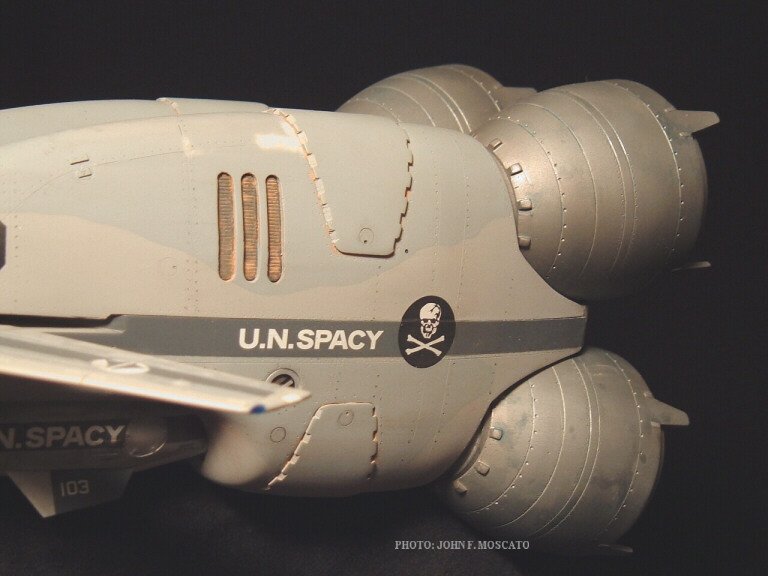
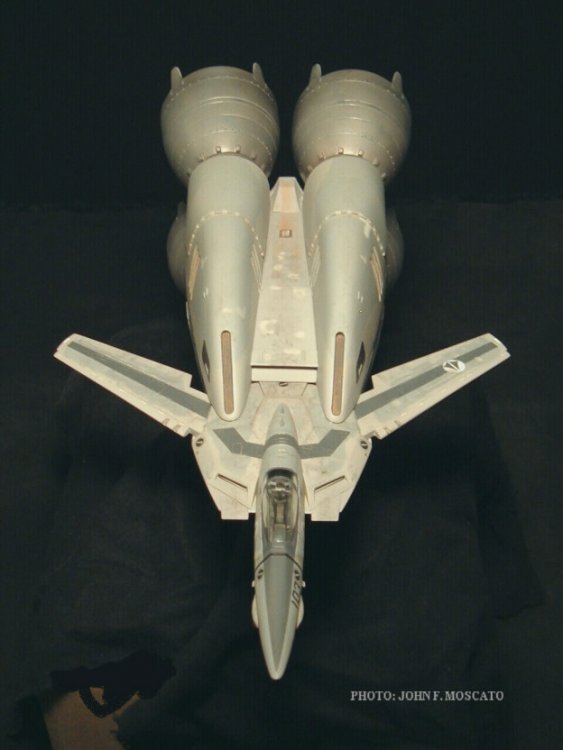
Close-up of the port-side fuselage and vents. Rust detail was added with chalk pastel in order to give the booster a different weathered look from the fighter, since I immagined that both units would have been used and maintained differently.
-
Top view.
-
Hi guys. Just thought I'd start a thread exclusively devoted to promote the VF-1 Booster project. Essentially, this is the grand-prize buildup in its finished form, and hopefully, this will give a good idea of what can be done with the kit. Enjoy.
-
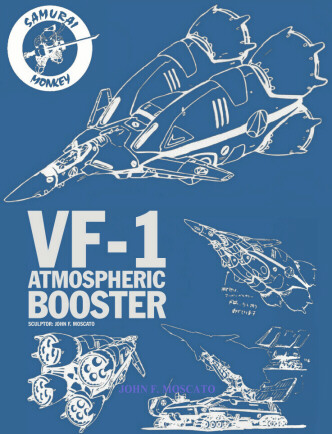
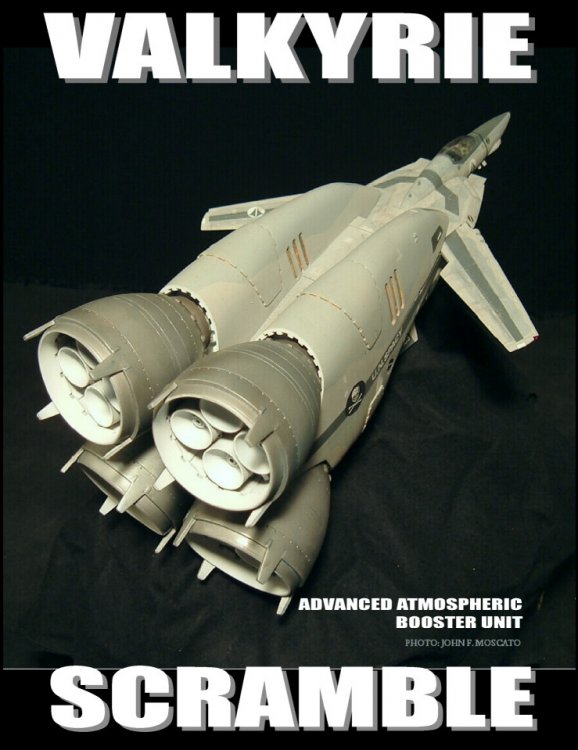
...And here's a little promo poster I whipped-up.
-
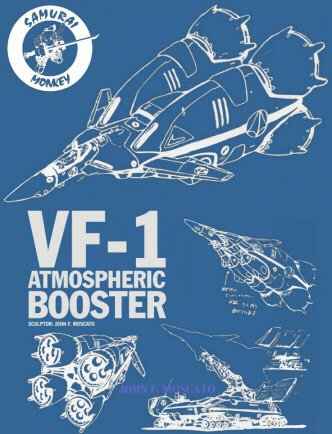
Here's a sample of the box art. Simple, no fuss, no mess.
-
Hi Anthony. Point well taken, actually. I think that 1/48 toy conversion parts would be extra kool. If enough people would want 1/48 Elint and Ostrich conversions, I could certainly do those, and for a fairly reasonnable price too, I think. Just picture it: a super O or Elint 1/48 conversion kit that comes pre-pigmented in the proper plastic color; almost no painting to do. Just unscrew plastic part A, and replace with resin part B.
-
I'm even scarier before I have my morning coffee. I think that regardless of who does the sculpt for the next model, more or less the same issues of cost feasibility-->consumer value will be there. In reality, all the designs are feasible from a construction standpoint, it's just that there needs to be a balance between the amount of effort/time/materials that go into a particular kit, and the outright demand from the consumer base. Something like the Glaug is a perfect example: it wouldn't be that hard to produce the definitive Glaug model in 1/72(basically because the two plastic model versions aren't that great) but it would still be very large and very expensive, and in such, it would probably be just as hard to find 50 or so people willing to shell-out $300 per kit. Basically, that's why we have the poll: to try to figure out what item people would want the most Vac-forming: yes, I'd already contemplated using that for the main body of the booster launch vehicle. Good for some applications, I agree, but more of a headache in others, and definitely not good for load-bearing components, or parts with fine details/complex shapes.
-
Hi Carl. The guy in my avatar is me. I want a 1/32 Legioss too, as well as some 1/32 inbit ...Maybe one day.
-
The Thunder Hammers GBP is a super-excellent design. The thing that bothers me is that if you look at the Model Graphix report on the build, you can tell from the pics that it's really a one-off, as many of the sub-assemblies are too complex and thin to mold/cast in resin properly. My only suggestion to you all is choose your subject carefully. The Thunder Hammers armor may be physically small, but a resin model kit of it may wind up costing as much as a 1/72 Glaug, purely by virtue of the sheer engineering complexity and time it takes to produce it.
-
Actually no, it hasn't. I was wondering about that earlier this week... But then, it all depends on what service was used, and where it came from. And the fact that Canada post are just plain slow.
-
I firmly believe that the GER power suit or Regult, even with cockpit detailing could be achieved for < $200 a pop. Something like the GBP-1 might be closer to $100-$120. The biggest factors are sculpting time(complexity), and the volume of resin necessary per kit.
-
The Bandai Valk II was a mediocre kit at best; too small and ill-proportionned... Built one over a decade ago. They can still be obtained for a cheaper price than it would be to make one in resin, so as far as I'm concerned, it's moot. If anything, I would urge against tackling any sort of variable or semi-variable subjects for the time being, purely for cost reasons: Samurai Monkey models is a small firm that's just starting out, and the sculpting costs of variable models is very high, due to their complexity. That, coupled with the relatively small clientele(for now) wouldn't be all that profitable. Also, whilst the GBP-1 is a terriffic subject, there's still a fair chance that Hasegawa might produce one in plastic for a much more competitive price than can be done in resin... Hence my preference for tackling subjects that don't really stand a prayer of being produced by any major firm.
-
Seems infinitely easier to just build new vehicles from scratch. You'd no longer have to be limited to the one piece opaque block design of the original plastic versions...Assuming you could even scale them properly. New tooling would allow you to add better detail, clear windows, cockpits. This is not to say that the Hydrospan technique wouldn't work; just an observation on my part that producing all new tooling may take about the same amount of time, and yield a better result.
-
Though I don't necessarily have a say in the choice of model, I do tend to fancy the Regult; there's already a slew of good-guy mecha out there to choose from, right down to the Cat's Eye, but pretty much nothing in enemy mecha. I always thought a Regult would look fab standing next to a Valkyrie, purely for size comparison. ...Maybe even design it so that you can have half the pod(pilot's compartment) removeable as a possible cutaway to show the cockpit/inner workings. Just an idea.
-
a 1/72 Jagd would be insanely large; just the mold-making process would be hellish. I'm also concerned about how Hydrospan would affect the dimensions of the kit. On the website, they used it on a Scooby Doo head, which is a very organic part with just a simple, flat bottom. They say that it expands uniformly, but for complex mechanical, interconnecting components I'm quite sure that there would be distortion of parts. This combined with the shrinkage of the mold material and then the resin would most probably lead to parts that fit so poorly as to not be worthwhile to enlarge. It's still an interesting product, but it has its limitations.
-
LoLoL! It's ok Valkyrie, I know him. Guncross is actually a good friend of mine
-

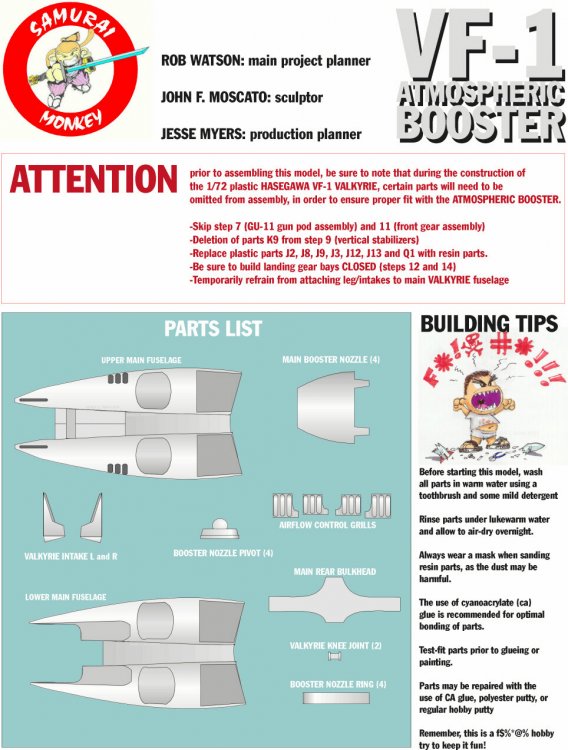
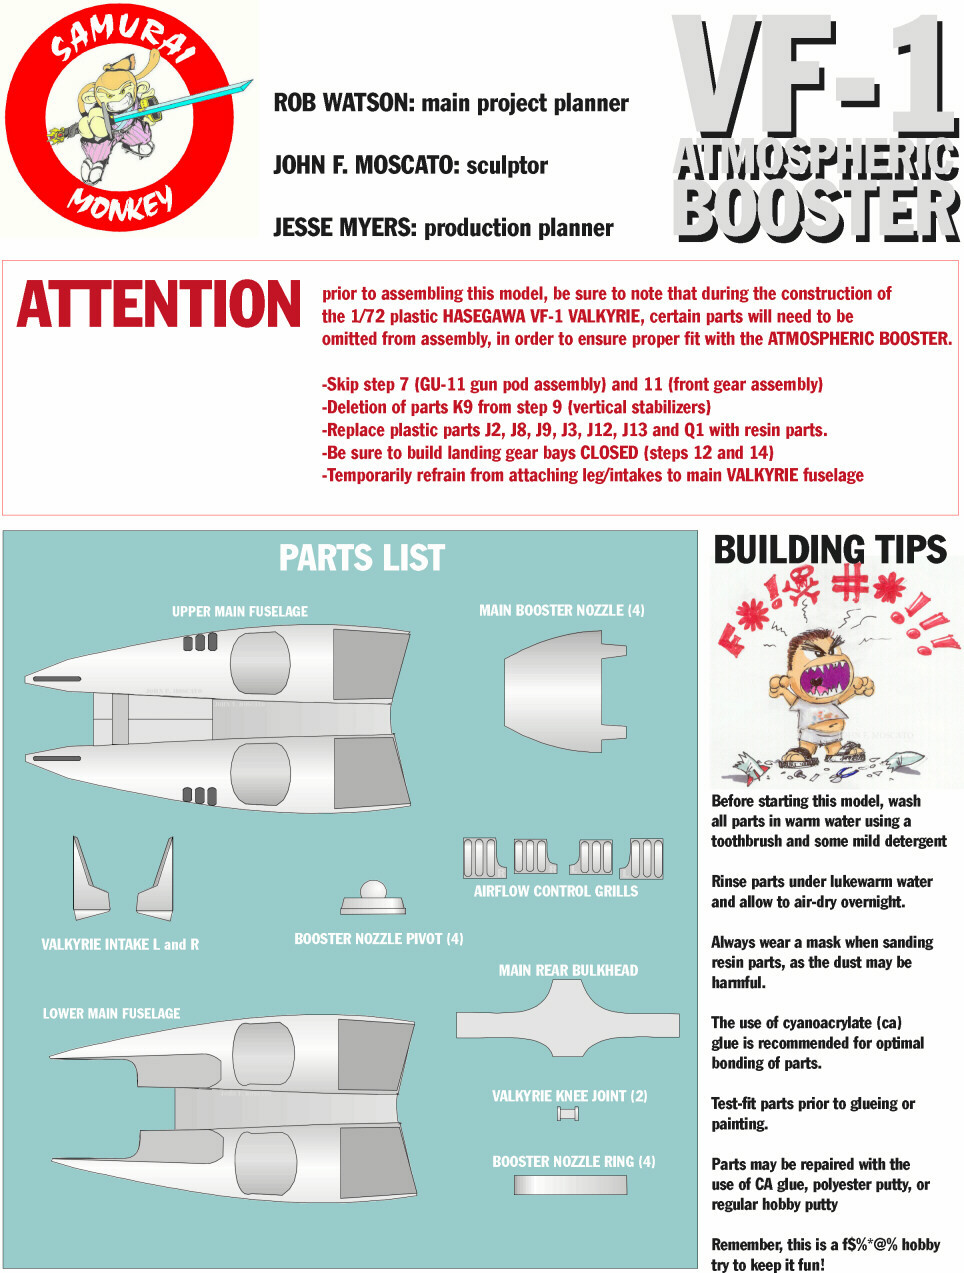
1/72 Valkyrie Booster instruction manual.
captain america replied to captain america's topic in Model kits
Page 2.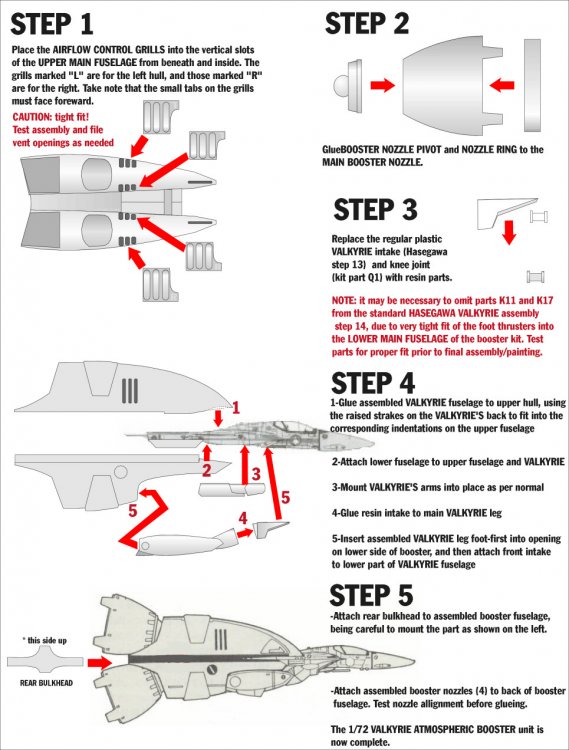
-
Hi guys. I've uploaded the 2-page instruction manual here for the people who purchased the model. I felt that this would be a neater way to provide them rather than including them in the kit. This way, you can simply download & size them as you see fit for building.