-
Posts
3527 -
Joined
-
Last visited
Content Type
Profiles
Forums
Events
Gallery
Everything posted by captain america
-
Define "good money"
-
Hi Guys. I think Nightmare was just being sarcastic; no malicious intentions on his part. On my end, I really don't mind the questions, and I'll try to answer them as straight-forewardly as possible. I would never expect someone to plunk-down money for a product sight-unseen. That's partly why Rob never accepts payment for the models until the masters are done & properly photographed.
-
Actually.. The launch vehicle has tank treads, not wheels/tires. Four sets. The cockpit for the LV is actually a bubble-shaped front windscreen, and yes, it would most certainly be clear. The driver module is a sort of pod located on the right-hand front, and hard to make out since there's only one view of the whole vehicle. Nevertheless, I would produce an adequate and detailed cockpit... You guys should know by now that I don't do things half-assed
-
It's an upgrade kit. You get better detailed hands, the leg-holstered gun, a new casting of the leg holster, one of the funnel drones, and a few other menial little bits. Quality is "better" than the original plastic kit parts, but that's not saying much, because that kit was uper-crappy to begin with. The update kit was $40-ish way back when it came out. Typically B-Club: way overpriced model with so-so quality. If you can put your hands on it for $20 or less, you won't feel TOO violated, but my own suggestion would just be to scratchbuild/kitbash your own.
-
Bird's eye view. I think it's safe for Rob to begin the pre-ordering process... Keep an eye on the FOR SALE section for news from Samurai Monkey Models.
-
-
-
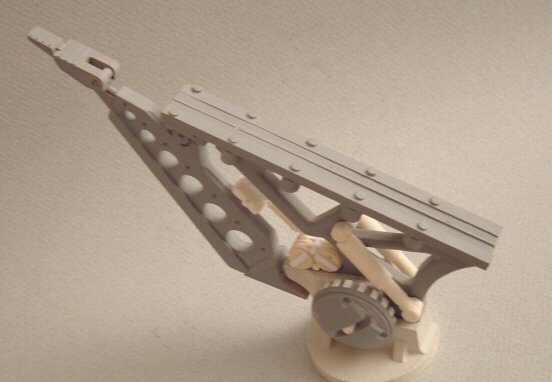
Hi Thor. You actually don't need a roto-casting machine, you can accomplish the same process by "tumbling" the mold manually (for a LOT cheaper, I might add). Problem is, you get uneven wall thickness, which is ok for something purely aesthetic, but definitely not good for something that you're going to plop 2lbs of resin on. Just not a suitable process for this specific model. At any rate, the masters for the launch rail are done--TA-DA!
-
Hi Agass. I've considered loading the resin with some sort of filler, but it wouldn't really work: the cost-effective fillers, like microballoons, will actually compromise the strength of the plastic. Reinforcement fillers like aluminium or carbon fiber millings would cost as much or more than the resin itself. On the other end, I can always make the launch vehicle hulls out of fiberglass, but even with that, whatever I save on pure materials cost I lose out on layup time and longer cure time. Basically, no matter how you look at it, it's going to end up being pricy one way or another. As for being able to get yourself a booster kit, you can simply contact Rob (Monkey-N) via PM to enquire on availability. In addition, you can also visit the Samurai Monkey Website at http://www.samurai-monkey.com/
-
Hi guys. With regards to the launch vehicle, there's pretty much no way to make it at a $100 price point; it's just too big. It'll probably be closer to but still under the $200 mark. Mind you, I haven't started tackling that yet, and I'm quite confident that I'll be able to find a way to keep the price under control.
-
Hi Thor. If you're refering to the treaded launch vehicle itself, it's quite large... About 14" long and about 5.75" wide. The flat-top portion of the vehicle where the launch pylon anchors is about 3.1" off the ground.
-
It suuuure is! Actually, I'm only holding on to your model until I get the pilot figure installed, and I can snap a few pictures with the launch rail. After that, it's going straight to you; sorry for the delay.
-
-
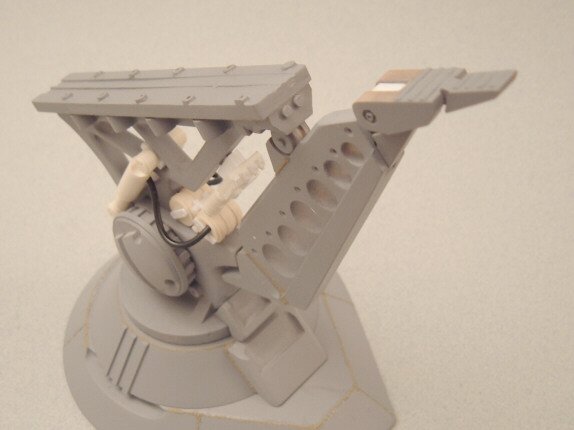
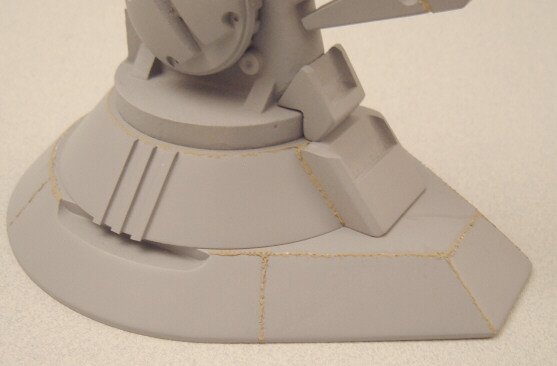
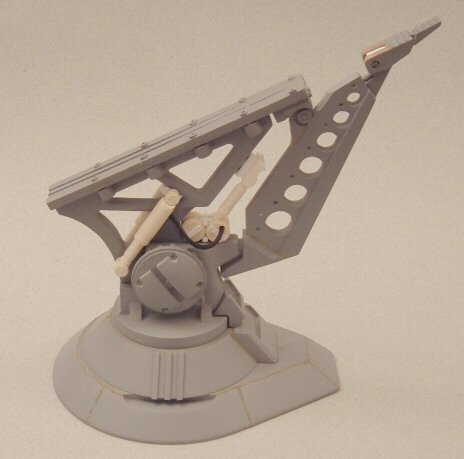
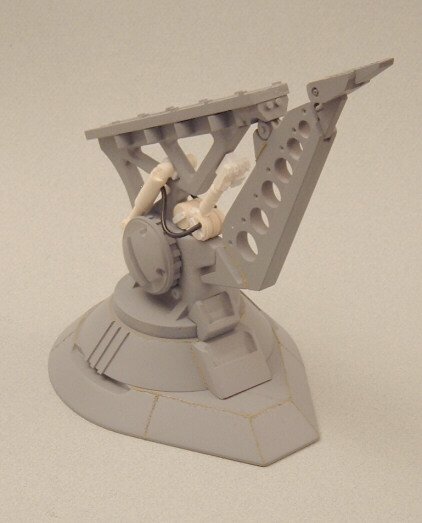
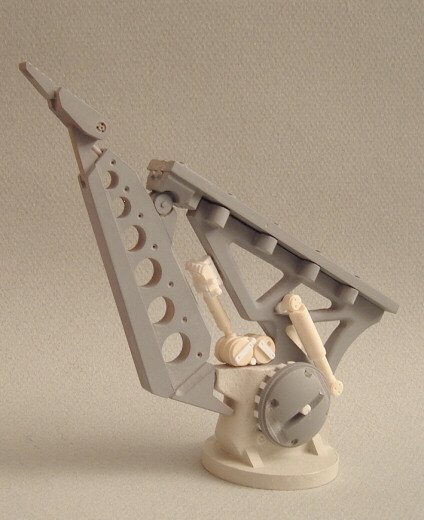
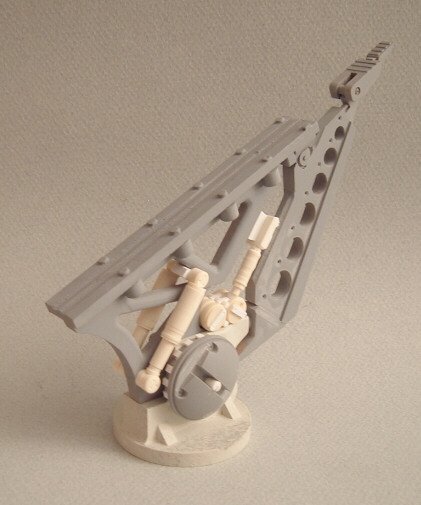
Hi Super O. Actually, the whole point of the launch rail/base is that it MUST be strong enough to support the weight of the finished booster, and it will--> see pics below. Regular resin would've been too brittle and insufficiently strong to do the job, so I switched to a high-impact, high strength polymer in which to cast the base and part of the support pylon. The down side of this is that this material is more expensive than regular resin, but it sands/putties/machines every bit as nicely. The central column part (with the 3 triangular openings) is set to be cast in metal for oprimal strength, but I'm still going to experiment with the new polymer; the stuff is so tough that it might very well be strong enough to cast the main support in as well.
-
Hi Tony. Yes, the podium will definitely be included with the launch rail. I'll post some pics of it later this week.
-
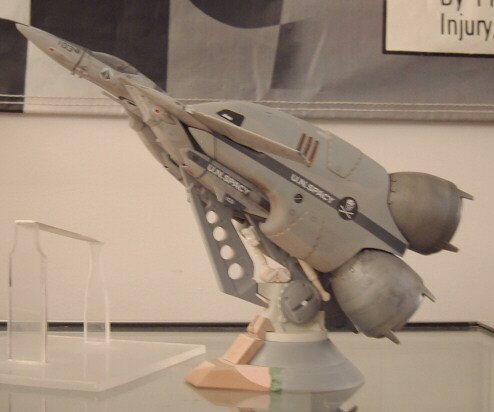
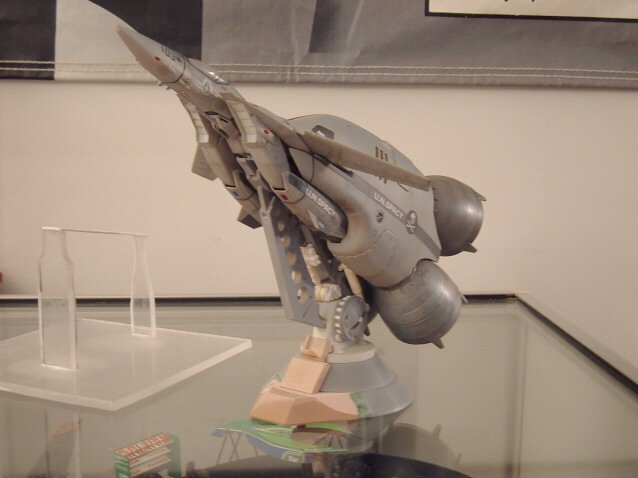
Hi guys. Let's see, where do I start... Firstly, much to my own chagrin, the booster pylon doesn't swivel up or down: because of the relatively heavy weight of the booster unit, and the thin cross-section of the launch rail would have made the model dangerously unstable if I were to allow it to pivot, so I decided to make the launch angle fixed. Also, as the booster unit is VERY back-heavy ( full resin nozzles, versus a VERY light plastic kit at the front) makes the whole booster assembly want to fall on its tailpipes, even in full horizontal. Therefore, I'm designing the whole thing to mount to the launch rail via eight hex-head screws, to hold the booster firmly in place. I suppose that you COULD unscrew the vehicle and remove it once complete, but generally, I'd tend to say that it should be affixed permanently for stability reasons. Price: the launch rail/pylon is seemingly going to be about the same price as the booster; I think it's set at $105, but that will include the paypal fees. The fact that there will be about 14 screws, metal cast parts and wires, not to mention using a slightly more expensive plastic all had to be taken into account financially.
-
Also... It was decided that the launch vehicle, because of its extreme size and cost, would be offered in two components: the first being the launch rail/pylon assembly/podium and then after, the launch vehicle itself. The idea behind this is that firstly, it helps to defray the cost of the whole shebang into much more affordable segments for those who want the whole booster launch system, but also, for those who may not have the means to afford /don't want the whole monty, those customers may simply want the booster and then use the launch rail as an elaborate display base.
-
Last pic. The raised, circular locks are designed to mate with the recesses on the lower fuselage of the booster. As the booster kit itself is rather heavy, new-generation polymers will be used in the launch vehicle castings for extra strength.
-
Pic 2. Though it's not finished, some of the detailing I've opted to enhance are more subtle, like the rough, cast texture of the main pylon; giving it a sturdy, "tank turret" heavy steel cast look.
-
Hi all. At the request of Samurai Monkey Models, I'm posting some preview pictures of the 1/72 Launch Vehicle for the Valkyrie Booster. The core of which is the launch pylon/rail, atop which the Valk and booster sit. The detail herein was extrapolated as best as possible from the singular (and minuscule) sketch of the launch vehicle. I've also obviously improvised to fill-in the gaps in the structure that were not visible, and unlike the Booster unit, the Launch Vehicle will be much more "mixed media", making use of not only resin, but also metal cast parts, steel screws and wiring accessories. Cheers!
-
Primer is useful at providing a nice, matte surface color that allows you to spot flaws more easily. However, primer also has a secondary purpose: helping paint adhere to a given surface or providing a barrier coat between the paint and the surface. If you're using model paint on a plastic model kit, you generally don't need primer. If you're unsure about some seams that you've filled, you can just "spot-apply" primer in those key areas. However, if you want to use automotive paints, or industrial finishes on your plastic model, you have to prime, otherwise the strong solvent in the paint will attack and craze your plastic. Resin kits: generally, I'd recommend at least a quick primer coat, just to help spot any minor flaws, like tiny pinholes you may have otherwise missed. However, unlike plastic, the nature of polyurethane resins allows you to apply pretty much any paint, hobby or industrial, right onto it without problems... Just make sure you washed /lightly sanded the part carefully to remove any residual mold-release.
-
Hi Carl. As a rule of thumb, I try to avoid the use of metal in kits unless it's truly needed as a load-bearing structure, like say the launch rail/pylon for the VF-1 booster. Typically, metal shrinks at a different rate than resin, and for certain parts can be tricky to incorporate these 2 materials together with regards to fit. However, my train of thought is simply to do whatever is necessary and best for the sake of the kit. Somehow, I get the strange impression that Hasegawa might not tackle the GBP1. Though it's still very much a possibility, I think that I could still offer an interesting take on the design. Variable VF-9: it would take about as much time to engineer the transformation process as to sculpt it, and would be VERY expensive as a result. In thus, I'd prefer to start with a few more moderately-priced models. At least up until Samurai Monkey can attain a good reputation with regards to quality/craftsmanship, and gain a broader client base that would make sculpting/selling such complicated models more worthwhile.
-
Please bear in mind that the project mentioned above will follow the VF-1 Booster launch vehicle, and will probably be scheduled for late December at the earliest.
-
Actually, the price quoted was for the GBP-1 (tv/film) armor, not the TH. Looking at the complexity of the TH unit, the same scale kit could cost as much as $50-60 more. Though small, a lot of the parts in the shoulders & legs would be very small, thin, and very tough to cast ( more reject parts, lots of parts, longer production time per kit, etc.) There's always a chance that I can end up doing it for cheaper, but I usually want to prepare clients for a worst-case scenario, and if by some magical twist of fate, it takes less time/effort/material than I planned for, I just re-adjust the price of the kit accordingly.
-

1/72 Valkyrie Booster instruction manual.
captain america replied to captain america's topic in Model kits
*bump* I was wondering if the mods could pin this post, even if only temporarily? Just long enough to allow customers have access to them until the final model are shipped. Thanks,

