

Bobby
-
Posts
538 -
Joined
-
Last visited
Content Type
Profiles
Forums
Events
Gallery
Everything posted by Bobby
-
Thanks for pointing that out! Actually don't mind that it's optional

-
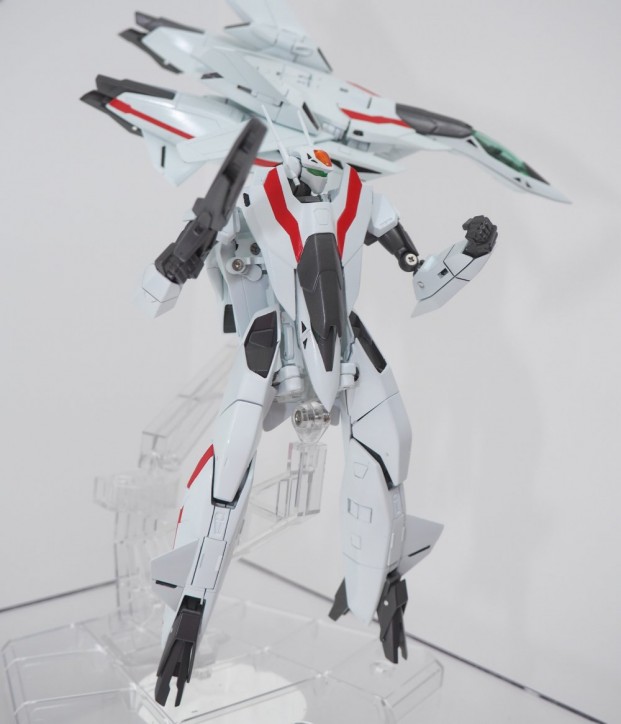
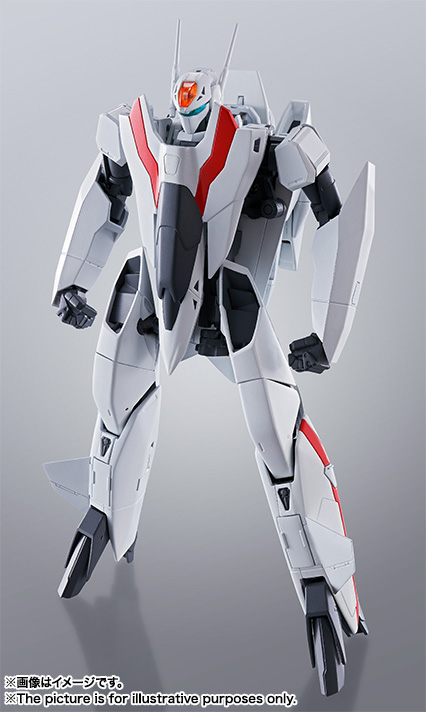
It's just great to see some of the improvements over the prototype images that were released last fall...namely: - getting rid of that split in the front foot thruster - tidying up the closeness of the canopy shield with the nose (while retracted in battroid mode) - blue visor instead of green - improved/sleek tab shape/design located on the inner legs - better concealment of the screws/hardware (mostly notably in the hips, elbows, and wing joints) old prototype images... vs. the latest pics!!! The feet improvement and blackened out hip hardware and under the arms is looking pretty great!

-
You're definitely right that those aspects are very important in assessing a favorite toy. As a matter of fact, if we were to imagine a bar chart that had the design quotient, engineering quotient, playability quotient, cost quotient, etc. rated in columns, the VF-2SS would score very low in these categories. But also in assessing one's favorite toy there's another metric which is any toys "X-Factor". Since this makes it subjective I don't expect this can truly answer the question as to how anyone can claim this VF-2SS as a favorite. But in my case Evolutions attempt was still able to fulfill a two decades+ long desire of putting something into a spot that's been reserved for a VF-2SS toy for a long time. It is probably more of the idea of finally having one than what it actually is in this case to the point where my x-factor rating just gets launched off the charts. And I'm not married to this particular version either because if Bandai does end up producing the hi-metal one we saw at the Tamashiination 2015 booth that will probably become my favorite! As mentioned earlier and in an attempt to be levelheaded, my VF-2SS rating would realistically have its bars for price, design, engineering, playability, etc. very low, like below the baseline in some cases (negative). But still, if I am to be honest with myself and consider my ratings of all my valks side by side, the highest scoring in the X-Factor category would have to be this VF-2SS toy... ...and so high (Battroid mode for display rating would be a decent score too in this case) it's to the point that it outweighs my negatives to end up in this position...at least for now. I know it's sad and I'm sure no one envies any of this like I envy many of you whose favorite valk ended up being a genuinely anime accurate engineering marvel that is highly playable and does Macross some real justice
-
Favorites: 1. VF-2SS by Evolution - Graham said favorite, not best, most well engineered, anime accurate etc. For me, it fills the void of having wanted one as it's my favorite valk. I actually have 3 Silvie's, 2 Faeries, and 2 Nexx's. I really enjoy them regardless of all their MANY faults and am looking forward to having Bandai's someday (hopefully). 2. VF-19 Double Nuts/Bird of Prey - the paint scheme does it all for me plus the white body molds (vs. cream) seals it. Have them both on display in a prime spot, they look great and compliment each other well. And if you flightpose angle them just right to conceal the underbelly disproportions they look so good. 3. Low Visibility City Urban Camo w 1/48 VF-1J - again, the paint scheme and markings is what did it for me. Rare, menacing, clunky yet sophisticated. (Honorable Mention: 1/60 VF-X - I really, really like this valk a lot. Again, the paint scheme, simplicity, plus the rarity but just not quite as unique to me as the above.) Leasts: 1. 1/60 VF-25F (1st release) - Gerwalk legs? Fighter proportions? Battroid proportions? Discoloring plastic? Overall a let down. 2. 1/72 YF-21 (ver 2 w/fast packs) - As much as I wanted to like this as it broke the mold for typical variable fighter toys, I just could never get into it although for its day it was well done. On the other hand I have the Max and Milia 1/60 Sturmvogel II's and think they're great (except for their hips, grrr)! 3. 1/60 VF-1J Super Valkyrie (ver 1) - The partsformation. Right out of the gate still a relatively new company attempting Macross toys, using diecast, new molds, high hopes, making finding old Takatokus not as daunting, yet they couldn't figure out a way to engineer some attached swivel legs? (Honorable Mention: VF-2SS by Evolution - Yes it's weird to like it so much and yet be so simultaneously disappointed in it ...just keepin' it real folks ...jus keepin' it real.
-
Indeed...as a matter of fact, it was just like a boobytrap
-
Yeah, it will actually remain that way for a bit. What I've concluded is that it's just a poor choice of words for a short phrase. If the auction is over and you won (or did a buy it now) then rest assured, you won plain an simple. Zen calls this entire period where they go through all their customers won auctions and make payment for them plus arrange for shipping, etc. "awaiting buying". It should be something more like "awaiting acquisition" or "in the payment process", because it's already been "bought" so to speak. Once it reaches their warehouse you will get a "your items have reached our warehouse" email. It can actually stay in storage for up to 45 days for free. After that it is 50¥ per day. With multiple items (if you had a continuing shopping spree) I usually wait until around day 42 to "make my package". Usually by the next day they provide all the shipping options. Then whichever carrier you choose before you select it you can add that exact amount to your account so you can have a zero balance once the whole thing is complete. Then within the next day or two it will go out.
-
I know, the moment I discovered Japanese buying services it was like opening Pandora's Box!
-
You know, I've never had to do that before so I unfortunately don't have any experience with that. It usually just plays out like this...I use Paypal (2.9% which is cheaper than one single Buyee handling fee <$300) the money then goes into my account. I bid x amount which is usually my max bid (sniper) plus 300¥ and the money is no longer accessible because it is "reserved" for my bid until the auction ends (but you can still cancel your still). If I win, great, if I lose, all of that money plus the 300¥ returns into my Zen account and I usually win something else and have the money already there for another item + shipping. So in addition to the 300¥ service fee and 2.9% to load my account, the only other thing is the shipping costs (ex. of my latest shipments): size: 35 x 35 x 8 (14" x 14" x 3") weight: 2345g (5.2 lbs) fedex: ¥3,783 ($34 USD) -- size: 33 x 24 x 13 (13" x 9.5" x 5") weight: 3430g (7.6 lbs) fedex: ¥5,148 ($47 USD) As you can see, that seems very reasonable for that size and weight. Even though the yen has been getting stronger in the last few weeks, this ended up being much cheaper than Buyee as well because at Buyee they won't take your items out of the packaging they received it in. So if you win multiple items, the box just keeps getting bigger and bigger and heavier and heavier because it has to hold all these other boxes/envelopes and all this wasted space (another thing that bothered me). For the most part, I've seen that Zen unpacks and then packs more efficiently (at no charge) and can even send you pics of your items for inspection (for a small fee). It might depend on the packer or the item though because I do recall having received a few items before that were still in their originally shipped box (from the YJA seller to Zen). If you've ever wanted an item from Amazon Japan but saw they are unable to ship to your stateside address, Zen has a tab (just like Buyee) where you just click the Amazon tab and buy it. And for that matter, technically ANY website in Japan that will not ship to the USA (just click the "Other Shops" tab) can be bought from by simply adding the shops URL to the shopping cart and then buying the items which I've done as well and was very happy. My point being that there are SO MANY ITEMS in Japan that you are bound to find something! At least that's why I've never needed to get my money put back on my card About getting your money back: With all that said, it might just come down to this...if I recall correctly, Buyee doesn't charge unless you win...so that's definitely a great value proposition and eliminates this whole issue and might be the way to go for single items and infrequent overseas shopping vs. if you are a regular overseas Japan shopper and purchase multiple items on a fairly regular basis.
-
You're welcome! Btw, if you lose an auction zen gives you the 300¥ commission back and of course the amount you bid. Also, you get options for which carrier you want after everything is packaged and weighed so you can choose the cheapest and/or the fastest method.
-
I use zenmarket.jp. I purchased lots of items through Buyee in the past and never ever had a problem. But over time, the fees kind of got to me (high service and packing fee in particular). After researching I found zen...they don't charge anything for packaging your items and they have a straight service fee of 300¥ per transaction no matter what you buy. They also have a built in sniper system (but you still do have to honor YJA platform of waiting until all bidding is done for). The main difference is that you have to pay upfront to load your account while buyee just charges as you go along if I remember correctly since it's been awhile. You can buy credits when the yen is weak as well so market behavior can be in your favor/control instead of just when it happens. I have purchased over a hundred items (lots of books mainly) with zen and again, never had any issues and their contact support always gets back to me within 24hrs.
-
Has anyone heard of UV Adhesives/weld products? - seems interesting...
Bobby replied to wm cheng's topic in The Workshop!
I bought some of this awhile back...yeah, it really didn't work that well as a glue/weld. I too was quite hopeful when I saw it. However, it works great as a custom formed support to test-fit and/or glue pieces together after using it. But in the end the bond is as only as strong as the glue you used and maybe it has a little more support as it adheres the resin cast you created to the joint you were repairing. The music and claims being made in that first video reminded me of this parody of another promise to relieve pain...just not broken toy pain! -
I got a message requesting more specifics on this mod. I figured I might as well post the pic I made as a reference in case anyone else was curious. 7-Step Summary i. Remove Rudder A/B w/dremel (leave hinging portion so there is no gap). File/sand everything smooth. ii. Separate B from A w/knife or dremel. File/sand smooth. iii. Remove C and D from wing (separate C parts from each other, D will fall out, use dremel to remove plastic peg that C rotated on and file/sand smooth) iv. Fasten A (plastic weld or super glue) to existing wing (make sure you sanded an angle that matches the existing wing). v. Weld/glue D and B together to form new rudder and weld/glue new rudder right before wing joint towards the rear. vi. Swap E with each other so they are facing the opposite direction or leave it off. vii. Use 91% alcohol to remove F tiger stripes and G yellow/orange line/logo markings As a general rule, always have as smooth/flat surfaces as possible before mating any pieces together for a strong, secure bond. Once complete, it still fits in the foam insert in the box and the wings still extend in and out. The only thing that's fixed are the rudders but a hinge modification could be possible.
-
This. Is. Great. Please. Post. More.
-
oh man...oh man...oh man...hot diggity dog
-
Your most recent Macross or toy purchase! General thread.
Bobby replied to Gakken85's topic in Hall Of The Super Topics
-
I'm going to guess 1/55...it's actually made out of wood. It was carved by emodelairplanes on ebay. This was a looooong time ago when still waiting for something bigger than the old 1/100 Bandai kit!
-
Thanks...it's probably the most anime proportionately accurate of them all. (one on amazon jp)
-
I'm getting more and more excited for these! With all the comments on the similarities of the VF-31a / YF-30 I thought it was worth a quick photochop "test". This series of chops is only moving the rudder location, then removing black, red, and adding the 31a paint scheme. Maybe I'll save some money and just paint my YF-30...not
-
My 29 broke obliterating its resale value...and since I had to fix it, I modded it and one of the first things I did was get rid of the black "tiger" stripes. I really like red valks as well (reminds me of Milia)! The orange, yellow and some other colored lines were not my fancy so much and it's quite easy to remove the stripes (and any other paint you don't prefer as well). You just need some paper towels, 91% isopropyl alcohol, and some patience to rub it off (and blue painters tape to mask off other nearby paint). Of course you wouldn't want to do this if you are concerned about resale value.
-
Here's a YF-29 Durandal that I modded shooting for a new Delta's VF-31 kinda look. Here's a color corrected pic I based it off of: I bought the YF-29 used off of here and the central linking hinge beneath the canopy body was cracked and broke in half after just a few transformations Bummer. It had to be repaired and it had lost it's resale value. I shaped a piece of aluminum and after fitting it with tiny washers it was actually good as new (if not stronger) I got the bug to keep going however so this seemingly negative incident turned into the opportunity to mod it. I know the result isn't going to be everyone's cup of tea, but I really enjoyed doing it. First, I had recalled seeing this in a display online I liked what I saw and adjusted the colors on another display to this From here I thought I would try it. I used all existing parts, so in essence it was just a re-arranging of planes and parts (with some elimination of excess). front back action front gerwalk back What I was impressed by the original design was the consistent use of acute angles being all within 3-5 degrees of each other all throughout the airfoil pieces. The wings, rudders, canards, etc. all partake in a healthy share of similar acute and obtuse angles to create all corner edges of the various surfaces. This consistency of angles made transitioning them to other parts of the plane a much easier task. What I particularly like is that the wings still retract in and out like on the original (but without the engines) and has some VF-19 sweeping movement So there you have it, when your valk breaks and you venture out to fix it knowing it's value's been compromised, being optimistic and doing something about it can help cuz I went from not liking it (when broken) to really enjoying it (when fixed).
-
« CAUTION » ARM TAB HINGES « CAUTION » I disassembled the arm in prep to modify and came across something you definitely should be aware of if when transforming into fighter mode. Even more so if you plan on or have used superglue/nail polish/future, etc. to make it more sturdy. Quick Overview: In fighter mode ET's uses 4 contact points that hold it together: 2 for the legs and 2 for the arms. I am referring only the ones for holding the arms. Description: The tabs that extend out of the forearms to connect the arms to the lower legs have an INCREDIBLY under engineered hinge. There is a substantial risk of breaking this hinge if you thicken either the tabs and/or the holes and are not careful when pushing the forearm tabs into the legs because of the need to apply more pressure. Explanation: This diagram represents the hinge internals. The large folding forearm panel and the tiny connecting tab have a metal rod running through them which is very sturdy. However, supporting this entire assembly are tiny, molded pin-sized pegs. Below is the metal hinge for the tab and the forearm coverplate. You can see the tiny hinge pegs are on the actual arm itself. To contrast, Transformers usually use a dimple for the hinge so if too much force is applied it snaps out. This peg being longer has the potential to bend, stress, or break. When inserting the tab into the leg for fighter mode, almost all support gets placed on the bottom peg-hinge. Conclusion: Whether you thicken the tabs/holes or not, while inserting the forearm tabs into the legs to convert to fighter mode, always be careful and not press too hard or you will eventually snap one of these tiny pegs because all the force is focused on these 2 points...they are only 1mm thick. An EDIT to Post #1754, consider not even applying any thickening agent on the arm tabs. You may find that you are quite satisfied with just improving the leg tabs (which are waaaay more sturdy). I will go so far as to suggest that if you want to preserve these hinges in the forearm tabs from ever stressing or breaking, just forego even using the tabs while in fighter mode as it still holds together extremely well imo by just improving the leg/hip tab.
-
Yes, this is what I used and did it to both the slots for the arms and the hips. Your brain will go from thinking, "Man, I don't wanna even touch that thing!" to "Man I can't wait to pick it up n' hold it!" BTW...on another note, is everyone aware that the feet do retract in and out from the legs (if so I didn't see any comment about it sorry)? Makes it even TALLER in battroid mode
-
For me personally, you wanna do something like this as few times as possible and you want to be able to make sure you have good control when applying whatever it is. So I always have a couple bottles of this lying around because it can actually be applied just like nail polish It's not gonna be at every store...I usually see it at office supply stores or Walmart more often than I do something like a Home Depot. But like others have said, once you apply it, it is night-and-day difference! I only did the 2 long edges of the openings on mine.
-
It's actually not that difficult to explain. In general, you will only want to apply it to the edges of the respective holes/openings and not to the tabs and I'll explain the logic behind my opinion. To Secure Arms To keep the arms more secure, apply your preferred thickening agent onto the edges of the holes in the legs (inside of the calves area). If you apply it to the tabs on the arms, you will make it more difficult to open/extract them since they already have a tight fit (at least on mine) and you don't want it to be any more difficult to pull them out from the forearms for fighter mode. Please See Post 1766 for further info regarding the arms. To Secure Legs To keep the legs (referencing the top of the intake) more secure, only apply your preferred thickener onto the edges of the holes in the top of the intake. If you apply it to the tabs coming from the chest area, you will thicken them up making inserting the arms into them (for battroid mode) unnecessarily more difficult since it is already pretty solid and secure as is (again, at least on mine it was). Summary Only the legs end up getting any thickening agent. Another tip: Since thickening agents vary in their "thickening" effectiveness you can consider applying in stages. Since each hole opening has 4 sides that you can each individually thicken, you don't have to do them all at once. Doing just 2 sides might be enough to satisfy how secure you want it. Now on the contrary, if anyones tabs are not thick enough and needing to be built up, then apply it to the tabs, but it would be better to start with the openings in my opinion. Also, if you do need to build up the tabs that come out of the forearms, if they ever become tight/harder to pull out you can always just open the forearms and push them out.

