Jasonc
-
Posts
6295 -
Joined
-
Last visited
Content Type
Profiles
Forums
Events
Gallery
Everything posted by Jasonc
-
Thanks. I'm hoping to get started on it sometime soon. I've been looking at place to add LED function to it, as well as a small switch. I may end up going with a darker red for the body, and doing a yellow clear for the front, but I'm not sure yet. I like the blue as well. Green would also be good, too. Man, decisions decisions.
-
Not really anything I'm missing toy wise. As far as kits though, I'm looking for the Sivil resin kit. That's all.
-
Is that lense blue in the anime?
-
I should have enough. I'll send you a pm with the info. Also, for info on this for everyone, I did try to color cast it, and in using the orange dye in each cast, it seems to work just fine. It's not as strong of an orange as the regular resin, but as most are being painted anyway, it's negligible. It will help with blending in, in case of a scratch, but other than that, I'll send out orange ones to those that aren't getting them painted.
-
I have 7 at this point. Let me see what I have left after that, and then if there's any left, I'll send you a pm. I don't want to get too far ahead of myself.
-

Macross World Podcast - feedback & comments
Jasonc replied to Tochiro's topic in Movies and TV Series
I'll listen in tomorrow. gonna load up the episode and watch first. Thanks for putting these out regularly. They've been interesting conversations throughout. -
Ugh, I forgot to put this out there. If anyone wants one of the wings in the Task resin, I can make it in that for an extra $6. I have to charge that because this stuff is extremely pricey, significantly more than what I use. However, the stuff is really good. I can't do all of them in that, but I may be able to only get 7 or 8 done. If anyone is interested, send me a pm. I'm only doing the wing with that, as it's the only part that would really benefit from it. As a side note, the regular resin is not bad, so don't think that. The only reason I'm putting this out there, is that if you want to put on the HMMs and all that on this kit, while the regular resin will last and hold it up, this stuff most definitely will, and if you have any concerns about the properties over a long period of time, I know first hand, that this stuff will hold its shape for years and years. I have one trial size of it, and I don't have any plans of using the rest for a long time, so I do need to use it up. I'd like to recoup that cost, and provide a higher quality part. No worries if nobody wants to pay extra. At least I can use it on a tiny project I'm working on, and just "experiment".
-
I still need to get the Sharon Apple. I've got some plans for the Ghost X-9. For this kit, I have the lower parts up to 19 done now, and I've been able to do them all off of the same mold, so it's worked great. I'm gonna start cleaning those parts soon, and begin on whatever patch work I need, and get those done. I do need to order the paint (just remembered. I'll be using an airbrush, as I have better control over that, as compared to a paint can, but I'll get one of those as well, just in case the difference is insignificant. I need to deepen the panel lines though, so those will go along with clean up. Man, I can't wait for this to be done either.
-
Very nice. I'd like to see this as well. It may be better to design it upscaled already. I tried that, and when I upscaled parts, the dimensions for panel lines were a bit off, and it didn't have the best outcome in that way. Nevertheless, I can't wait to see more. It's one of the ones I really want as well. I chose the VA-3 simply because it's just an oddity. This makes me want to get right back in now. I do have to wait though, for a current project to finish. Good luck.
-
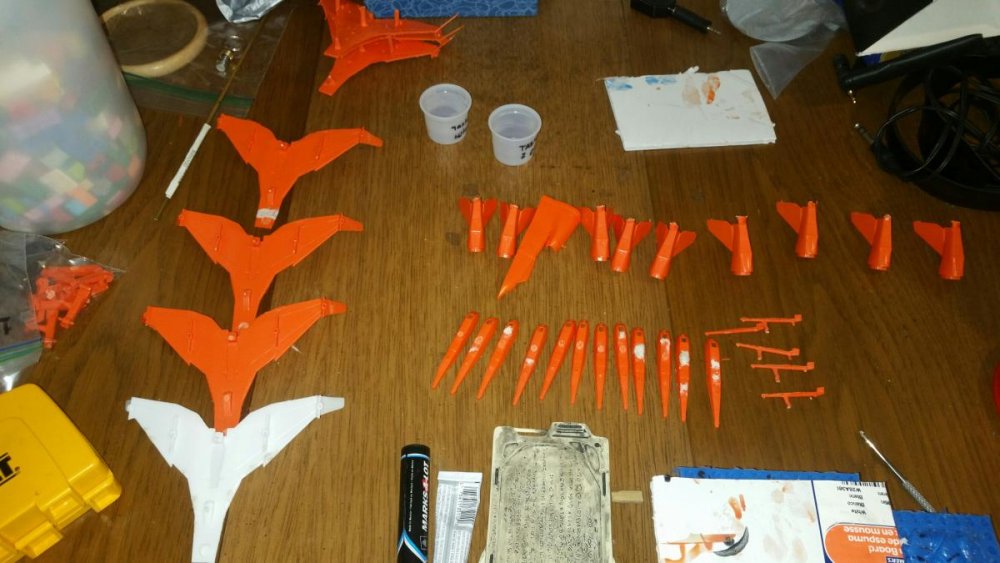
OK, I don't have a big update. I did a few of the wings, but I'm going to hold off doing these until the rest of the parts I'm working on are complete. The white version is of the Task 2 resin, which from feeling it out, feels just like a good quality plastic. I'll be using this for a different project, but I wanted to see how it worked. In any case, here you go. Clean up of some of the parts has also started.
-
Got mine yesterday, and everything looks great. I haven't done a parts check, but so far so good.
-
I'm still working on parts. Nothing really to show. There's just more of what I showed. However, I did finish all molds and the wing, as much trouble as it's been with the 1/72, is very good. Very minimal work needed for them, so that'll help me with the finish work. Now, as for the tail fins, I haven't been happy with how they've been coming out. It isn't the mold, it's the actual prototype part. I'm getting a new one, so once that's in, I'll be redoing those. Until then, I'm not doing those. I'll try to take pics tomorrow, so you can see the other recast parts.
-
It's going to need a high performance resin to use for transformations, which will factor in the cost a little, but mostly it's in the needing to order parts and needing to reorder them as I continually tweak them. Not fun, but if I can get these parts down with little refinement (AKA, they're done right early) then the cost can be lower.
-
1/55 Swivel Thigh Mod - BIC Pen Method (Streamlined)
Jasonc replied to Skull-1's topic in The Workshop!
Looks like it came out quite well. Congrats on a well done job. -
I've already made bomb clusters designed to fit on the VF-1 pylons, so the wings of this one would have those connectors as well. I have made several different weapon sets, but I really want to make them much more detailed, so those will be updated eventually as well. The bomb clusters were first, but I've also made Paveway bombs as well. I don't think it's ugly at all. It's got a much more curvy look to it, but it has a vintage look to it based on the Intruder, which I've always been a fan of that jet. It just has a tough look to it. I've been looking for the Experten model, but to no avail. I do have the Studio Half Eye version, which this is somewhat based on. The idea though, is that since this would be larger, I can incorporate ratchets and hinges. I guess right now, I'm just designing as a larger scale Half Eye model, but as I engineer better parts for locking and movement, those pieces will be redesigned to incorporate those outside parts. I have one VF-1 unassembled kit that is in pieces, so I will see what some of those hinges and bars in that can add to it. I'm sure I'll be incorporating some metal parts. I've also been thinking of the recast process. this will have to be done in TASC resin. there's one with similar properties to ABS plastic, and for the most part, it's got the integrity of it. Color casting it might change the integrity a little, but should be negligible. All in due time (fingers crossed). In working on the gun, I may find some gimmicks to make this work very nicely in all modes and do what it needs to do. It's a good warm up. It's a slow restart, since I have another project I'm already doing, but in between that, Delta, and my regular duties, it's alive.
-
Yes, these are all 1/60 parts.
-
Yep. I really have my work cut out for me. In other news, here's just a small picture of the assembly process I am doing while recasting the parts. As you can see it takes a while, and with only a two and a half gallon pressure tank, it does take awhile to get them all done. I will need another gallon of the rubber mold, and that should be all that I need for this. Anyways, without further Ado, here is a pic of what I described. Sorry for the picture size and for the rest of the mess you see in the picture. I am using my cell phone.

-
Macross World Podcast - feedback & comments
Jasonc replied to Tochiro's topic in Movies and TV Series
Listening now. Good show guys. Best place (really only place as well) to go for Macross information and event stuff. -
I know it's a zombie, but I'm going to start work on this project again, and soon. I'm ordering the left and right leg parts I've made so far, and going to see what size pins and screws would work best for it. I'm also looking at some ratchet systems to put into it. Working on the gun as a warm up again, and I found a great book to get a bit faster at doing this.
-
It is. I like the Figuarts sculpts, just not the size. I have the Black Bunny Sheryl of theirs, and that looked great. I just wish it was larger. Other than that, I'm really looking forward to getting this figure. The dynamic pose and the expression really bring it to life.
-
I transformed mine several times, and never had a single issue with any of the things people have with theirs. Maybe I'm just more careful? I don't know, but no issues with mine, and the head was straight.
-
Definitely welcome. I forgot to add that for those (I think 2) that ordered these unpainted, your's will probably go out within the next few weeks, as I have no reason to hold onto them like the painted versions. I'll recast a few more parts tonight, and tomorrow, hopefully will have the new molds ready to make. Those take about 7 hours (45 mins. pot life + 6 hours to fully cure) each, so I hope to have those done this weekend, unless I need more of the mold rubber. Man, this'll be 3 gallons already. Anyways, I'll try to set up pics either tonight or sometime during my work over the weekend.
-
1/55 Swivel Thigh Mod - BIC Pen Method (Streamlined)
Jasonc replied to Skull-1's topic in The Workshop!
To answer both of your questions. The last I had one was about 2 years ago. the modification still held up as if I just put it in. The key is finding a pen to cut up with a really tight socket for the pen, and sturdy plastic that is still soft enough to not crack or break. As for the construction method, the upper thigh part has virtually nothing in the middle of it, so the top and bottom halves still keep their integrity to the toy itself. It will still ratchet and move the part attatched to the lower leg and the part that connects to the cockpit. I miss them to some extent, but for an easy mod, this is a very good way to jazz up the chunky monkeys. In re-reading this thread, I never did post up pics of the modified feet, which were able to swivel with a bit of vector thrust. -
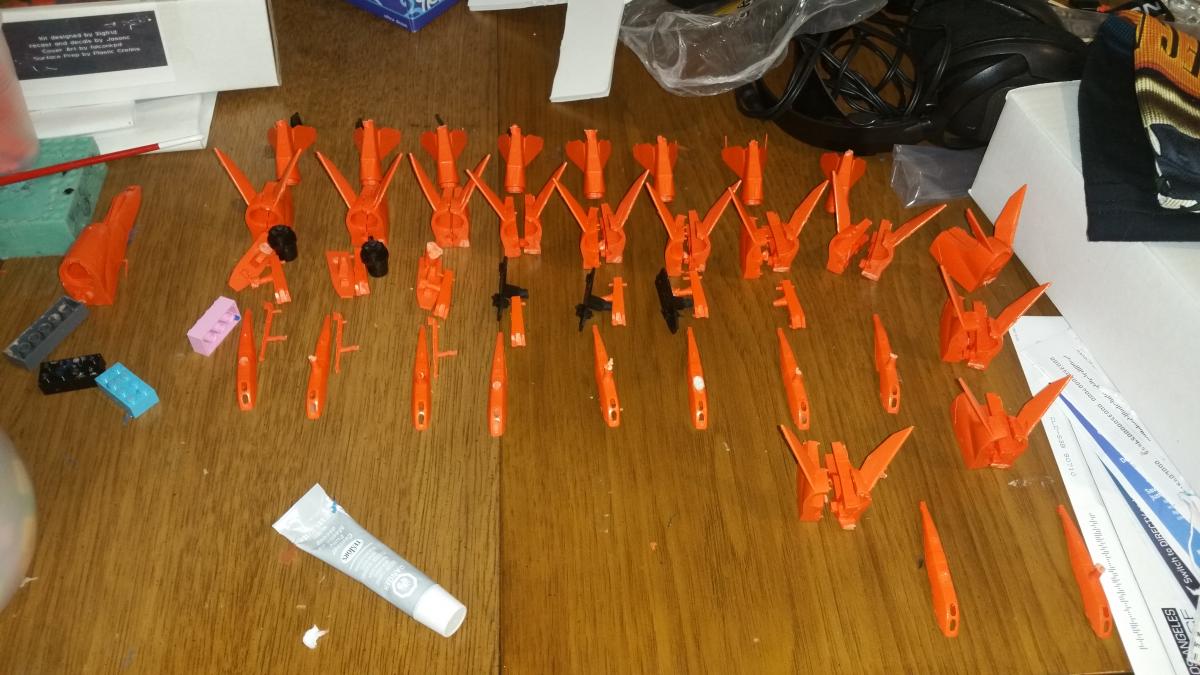
I have roughtly 12 sets of the rear assemblies recasted, which is the tail fin piece, the rear black part of that, the engine harness pieces, engine parts, wing hook, and starting to catch up on the camera harness in black, and the camera cover (cockpit). While doing those, I do need to make a new mold of the main body that the camera and wing are mounted on, as well as the wing. Those parts have already began taking shape to be recasted. I also just finished casting the barrel for the gun. I have a total of 25 to make, I believe, so it's going well so far. Still trying to do this in sections while prepping the rest so that I can just transition into doing other pieces as the ones I'm recasting now are getting done. I'm also trying to find a good orange to use on this for paint. Too warm of an orange, and it stands out too much. A cooler orange makes it look pale. Aside from all that, I'm really happy with the way the recasts are coming. for those that I'm painting, I shouldn't need too much work on them to prep them for painting. I will need to deepen the panels a bit, as the prep work for recasting (which I didn't do) was real heavy on the paint, and took a lot of detail out of some parts. Sorry for the delay in updates. I haven't been on here as much, but I am keeping up with the project in the garage. I have a staycation coming up for 1 1/2 weeks starting next Wednesday, so I'll be working on getting a lot done then.
-
I'm gonna begin work soon on the VF-4 head, as well as the MtF head. I've been able to finally locate the other Frameout head, so I'll try to get some pics done today when I get home. Kurisama, is there anything you're working on now that we can look forward to?