Tage
-
Posts
194 -
Joined
-
Last visited
Content Type
Profiles
Forums
Events
Gallery
Everything posted by Tage
-
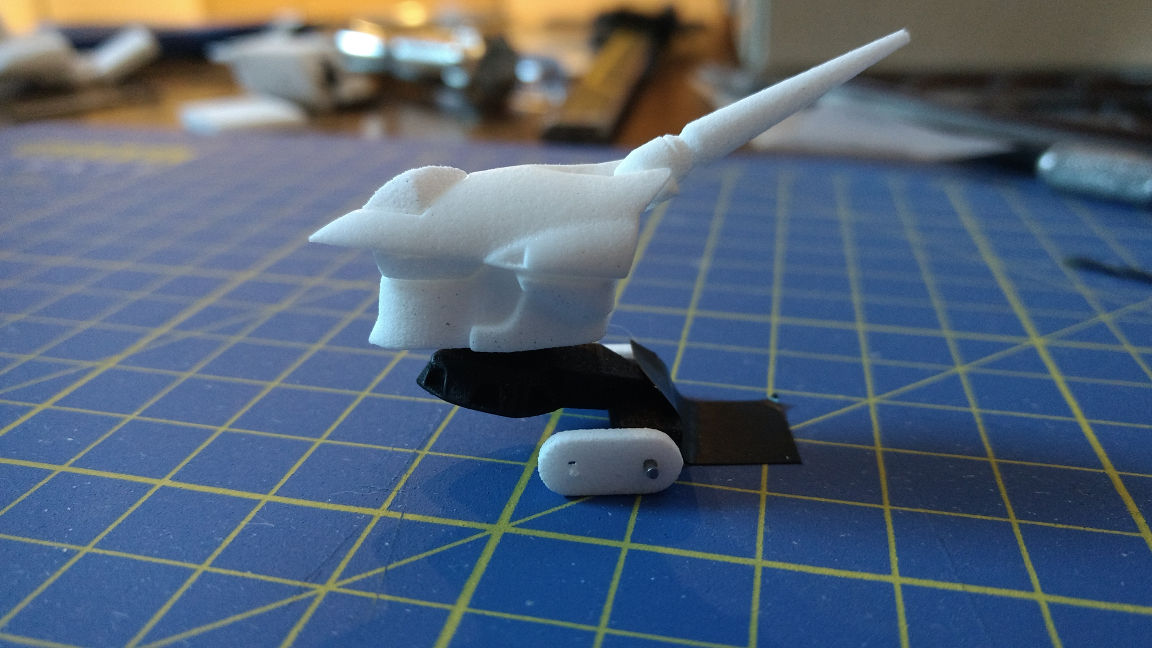
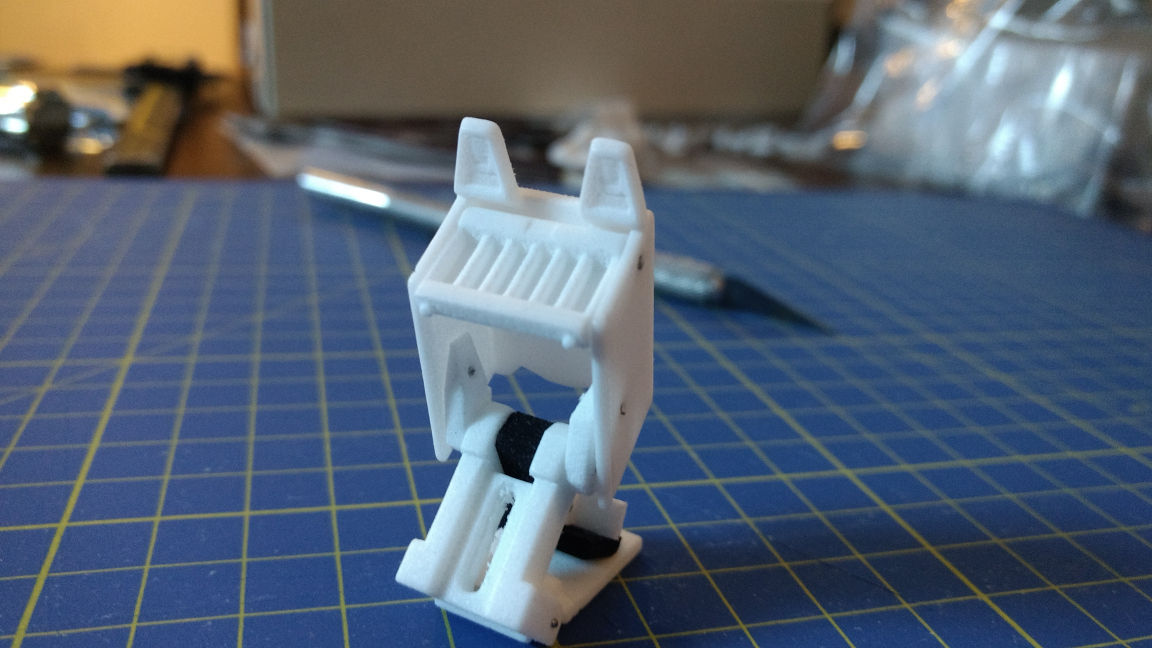
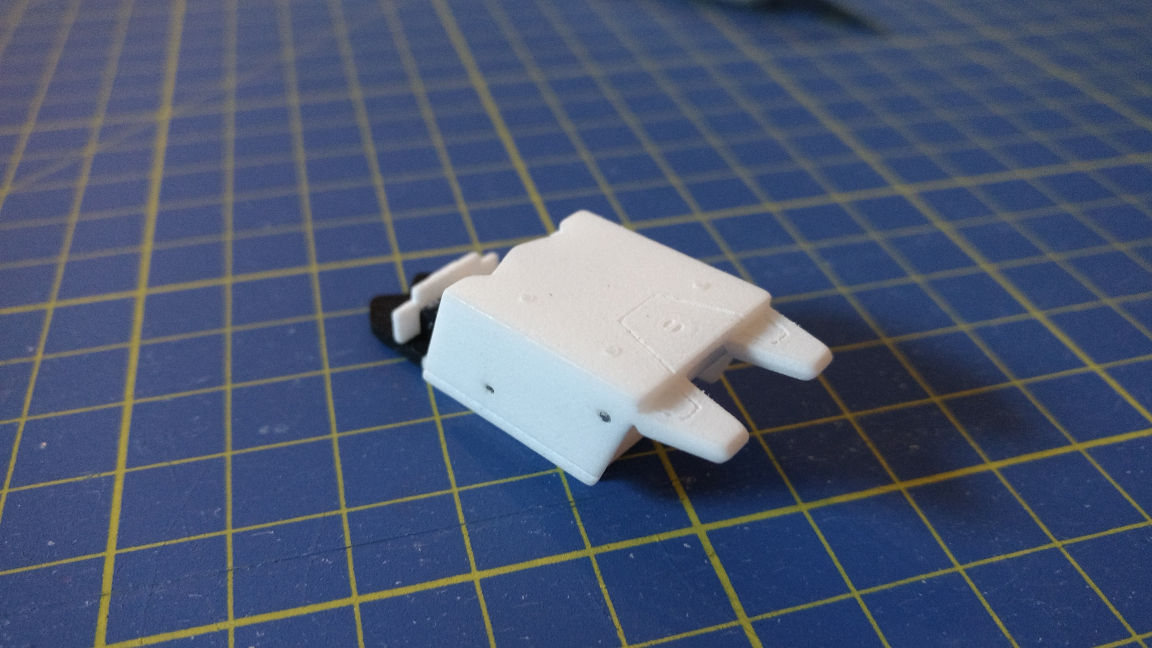
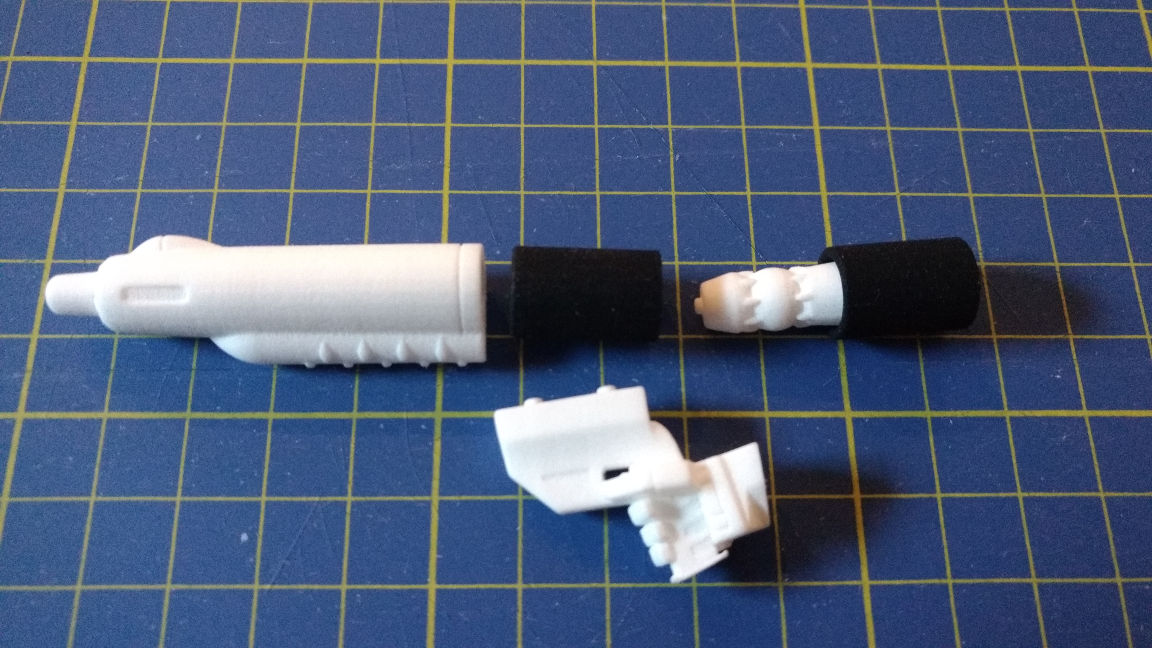
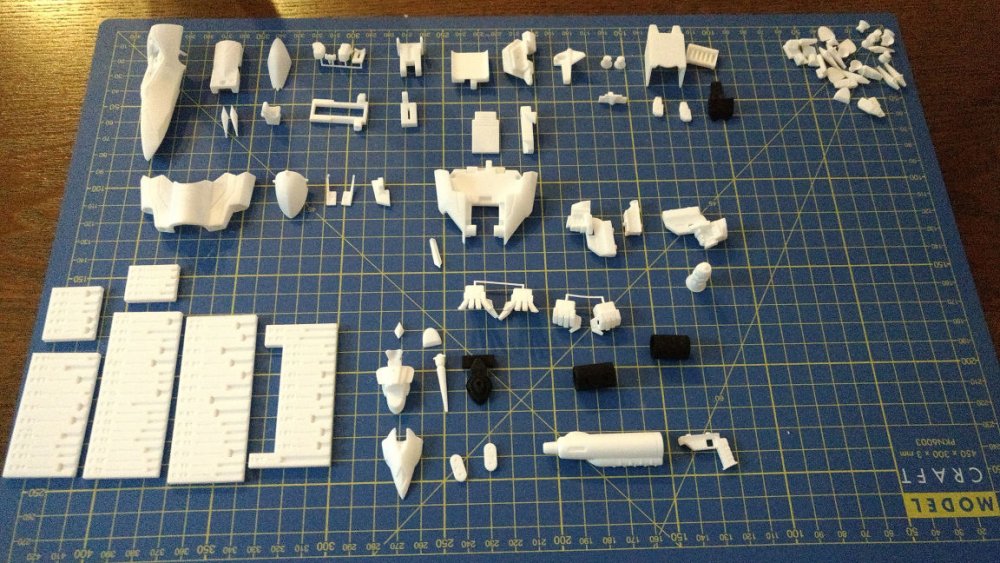
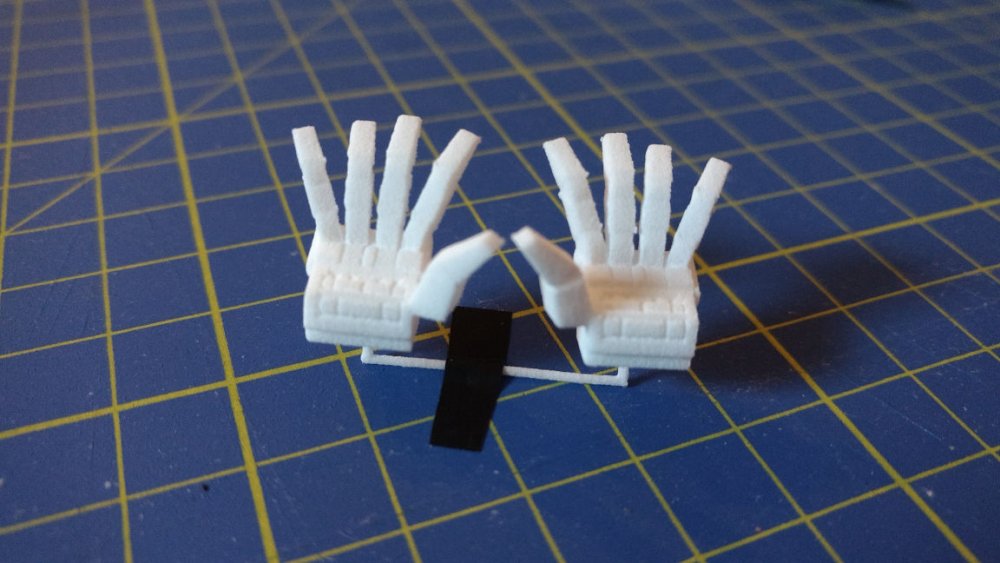
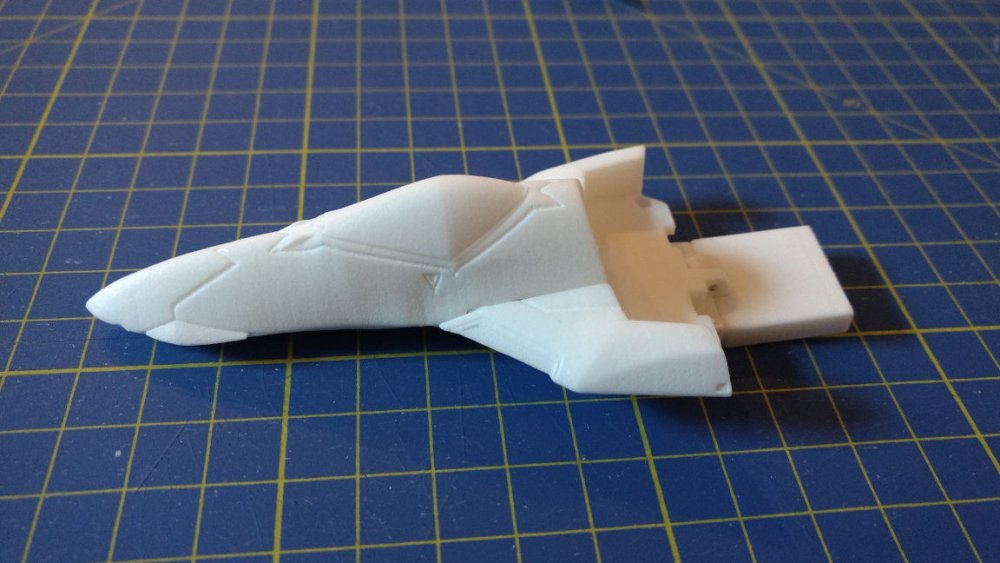
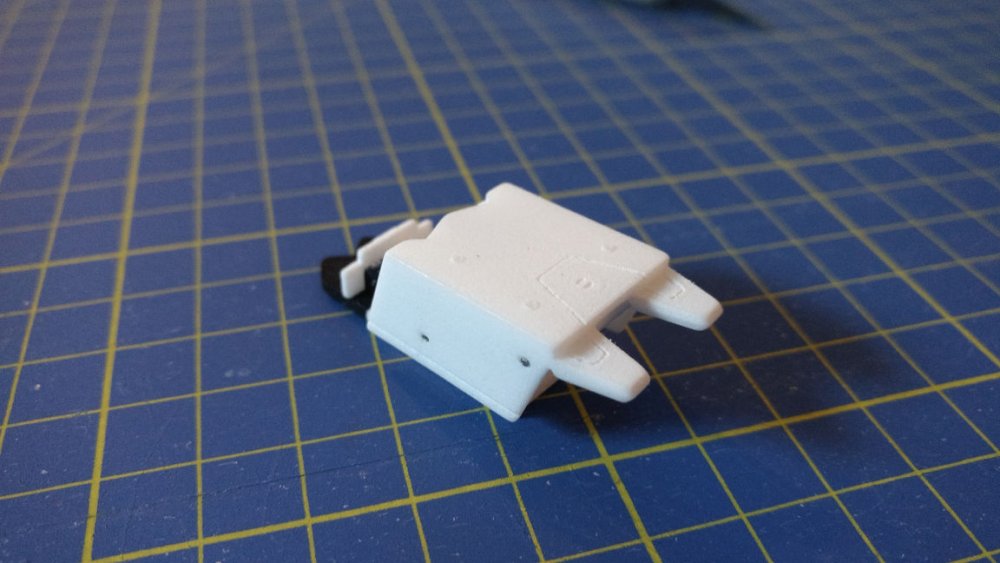
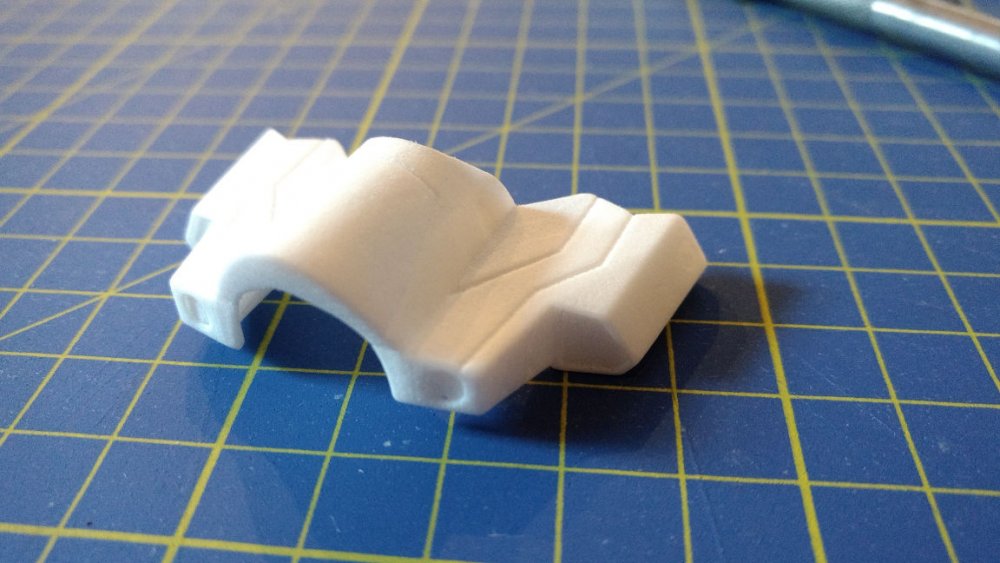
Hey Team! So i had a lot of stuff delivered and it looks great! Oddly they gave me a bunch of duplicates of the small things (piled in the top right of the large photo) but misplaced the shoulder stock of the gunpod. doh! The material is crazy strong, and i'm really surprised with just how thin it can be. Attached a few pics of what a few of the bits looked like all put together. I think it's great. Also I've really only technically messed up 5 fairly minor things. 1 just being i ordered what i thought were the correct size square nuts, but they were wrong size, and the only ones i can find that are the correct size are more of a hex shape – when i had already designed for square nuts to sit in the model. I've already corrected that in 3D so the new nuts can be slotted where the old square ones were going to go. Just means i've had to cut away some of the plastic on these print outs for things to work. 2 - The gunpod sliding mechanism just isn't sturdy enough - that white small bit basically acts like a plug with a stopper on it to keep it from falling out of the black part, but it's way too loose, so i'd have a floppy gunpod, and no-one want's a floppy gunpod! I've already thought up a couple of ways to fix it so no biggie there. 3 - Not really a mess up just something to fix for the next round of prints - are the pegs and holes. Like on the trigger of the gunpod and backpack parts - i'll just have to extend their pegs to give them enough friction to hold in place with the weight they'll be carrying. Again, not a biggie. 4 - Sort of the most annoying one, is the heat shield that comes over the cockpit. It's just way, way too loose and keeps falling out - similar to the original model actually. I'll just have to tighten up the space it has to move and around in and then it should be good! 5 - My Cutting guides - I gave the slots a bit too much breathing room, so when i go to cut my bolts and rods, they aren't super secure, so take a little longer to cut. Again an easy fix, just annoying. Plus I thought my dremel had some good metal cutting discs and it doesn't! So all in all i'm pretty happy with how my first test went. And it's going to be pretty easy to put what i've learnt into the next test (and hopefully final, as long as things go to plan) print. I'm particularly happy with the hands actually, the detail really came out nice. And seeing the head really makes him real – as odd as that sounds. Slightly great yet annoying news – i'm going to have to put that next test print on hold. Reason is i'm currently towards the end of the process of buying a house, and not too sure me slamming down some cold hard cash on a 3D printed robot is the best thing to do right now. Especially as the place may need a full re-wire of its electrics! So i may have to hold of for a month or 2. I will keep working on it in the background with what i can in 3D to fix the above plus on the rest of the shapes. But yeah sorry, will be another while before i can hit the print button again. Enjoy the pics for now! It's so close though, it'll really really happen. cheers.


-
Yeah I really should try for standard lengths... I think it's part of my over obsession with wanting to keep this as clean and accurate as possible. Plus I was thinking that these cutting guides will double as holders for all the rods and bolts if I put a bit of electrical tape or something over the top of them, keeping them in place until I need them as i'll probably be cutting these all in one go. Rather than cutting them one by one, as and when I need them. In other news, I'm playing the waiting game. Waiting for rods and bolts to arrive, waiting for 3D print to, well, print... I have designed the red markings for the wing and nose that i'll scale to the correct size and print on some clear decal paper, then print on at home. Going to get some white decal paper too and create a circular backing for the middle part of the red marking. I sort of want to design more decals - but I haven't really put on too many stickers and things on any of my other 1/60 bots. So this one being all decaled up with things like 'no step' all across the wings would look a bit out of place. I've also tried designing the pilot, but i'm seriously so bad at making organic shapes in sketchup, it's embarrassing. So i've made a very blocky pilot that i'll then use a bit of Warhammer green and blue stuff on her to bulk and smooth out a few parts once printed. Oh, also i'm down to 2 colours I want to use for the main body colour. It's either a light turquoise or just plain old turquoise from Vallejo paints, so i'll get both and test. Don't really want to be mixing things to get the right colour as that's just painful. The rest of the bot is easy being an off white and a straight yellow. That's pretty much me for now though. Will report back once i've got some 3D prints to share. Cheers :-)

-
Hey guys, So i've ordered all the bolts and rods (at generic lengths) I need and I've made a few cutting guide pieces that I can use to cut those bolts and rods to size! Also i've just sent off the whole nose section and Gunpod to be printed, so should get those pieces back in the next week or so as a bit of a test and hopefully print the rest from there. While i'm waiting for those things (especially the nuts and bolts as they're coming from China to the UK – i really should have ordered them ages ago) i'll get the detail on the body parts done, as i think i've missed just one section that gets revealed in robot mode after transforming. And then I'll also do a little model pilot, someone has to fly it after all. So, the light is really at the end of the tunnel. Hoping the next photos I attach here are actually real photos, not just screen shots. :-) cheers
-
Hah nice! I've been thinking about putting some glow in the dark paint underneath some clear parts of models to help them glow.
-
Locally – and in SLS. For the prototype at least.
-
Oh, that's a great idea! I was just thinking of sticking with the covered intakes to make it less fiddly, but i'll see what i can do... Just realised I still need to make the pilot haha. And yeah that image is just half sorry. For my other pics i've copied and mirrored half of the model to show how he looks fully, I just forgot to do it late last night. Speaking of interchangeable parts, i'm also going to experiment with magnets for the fast packs. I think it'll work with the leg ones, but the backpack may have to be large pegs that insert into his back... I'm worried that the magnets i'm looking at won't actually be strong enough to keep the rather large top fastpack up in bot mode, as well as they'll make him extremely top heavy.... I'm sure just using 1mm metal rods will be fine – as you'll be able to take it off, but it'll still be secure enough to stay on. :-)
-
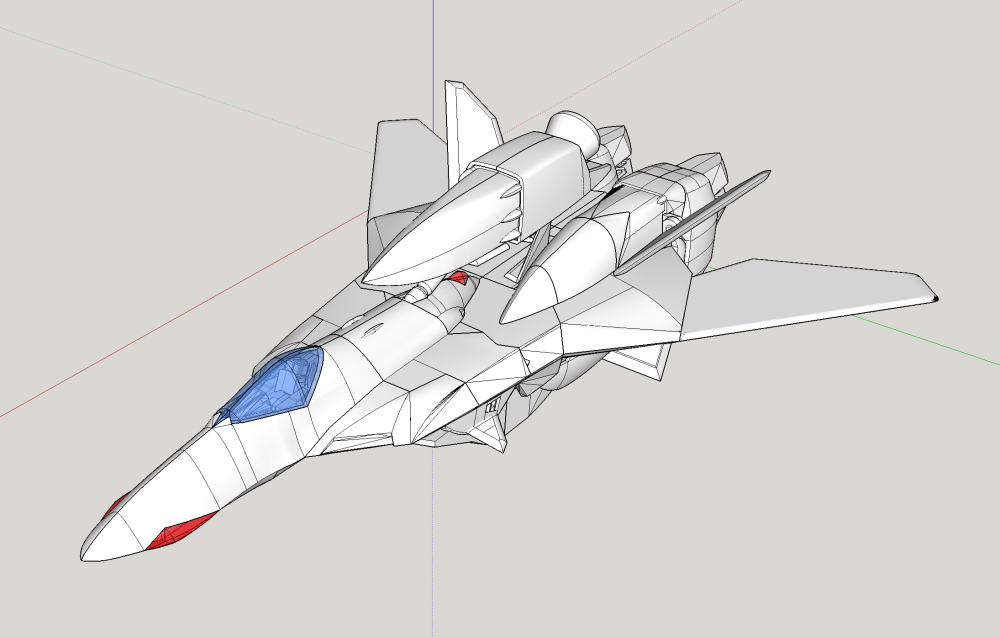
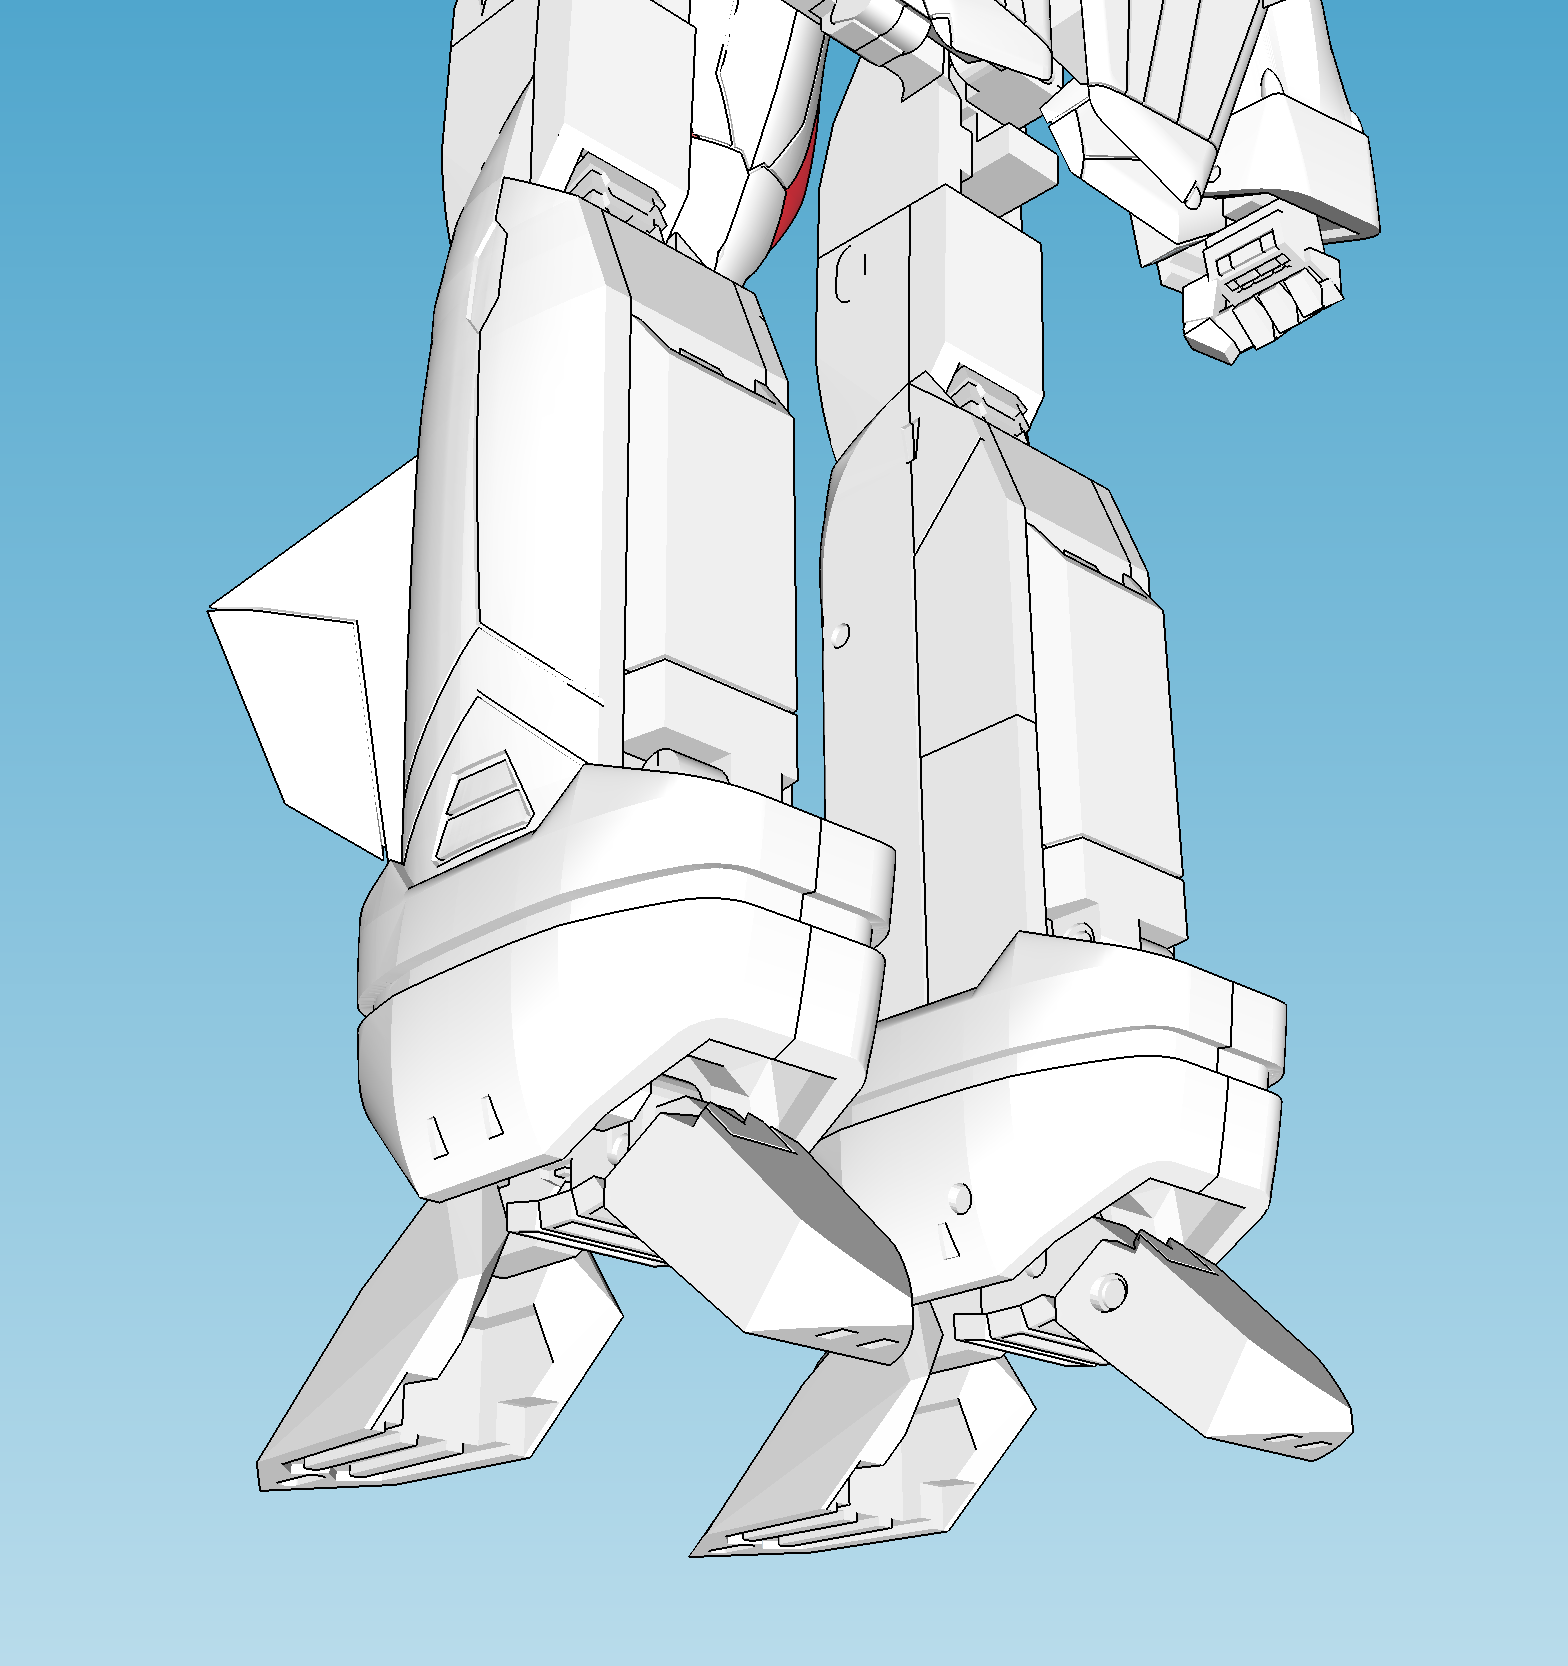
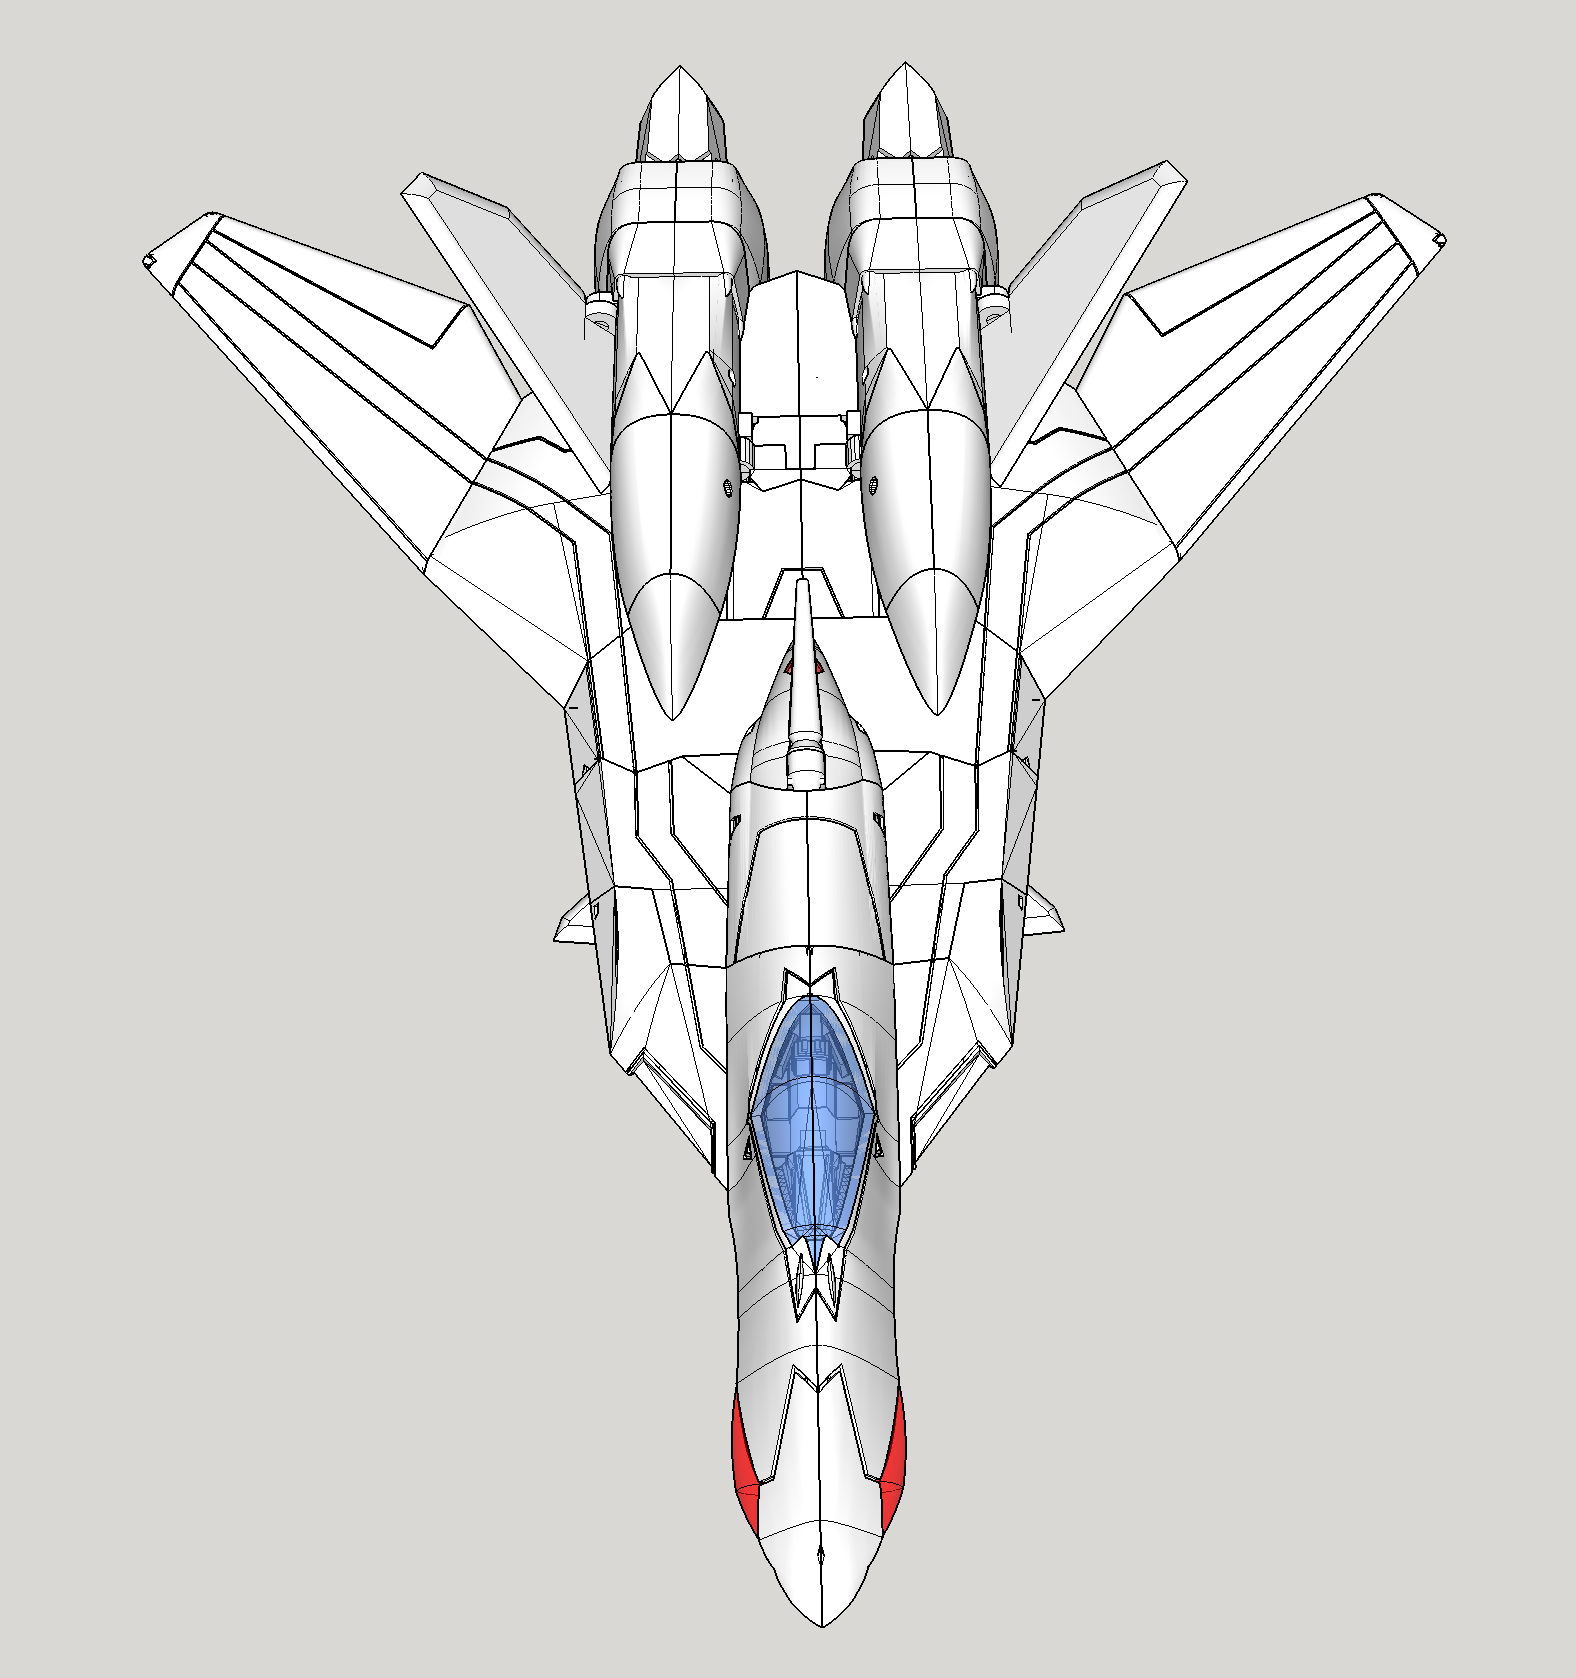
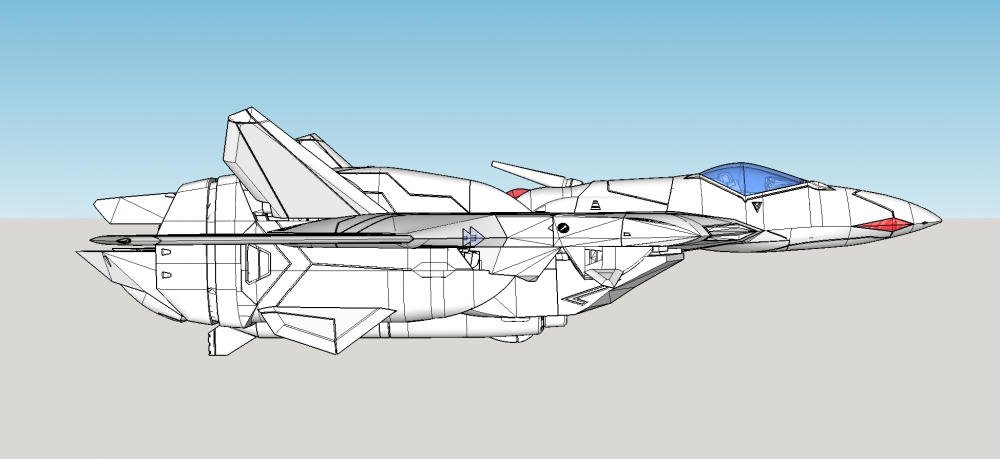
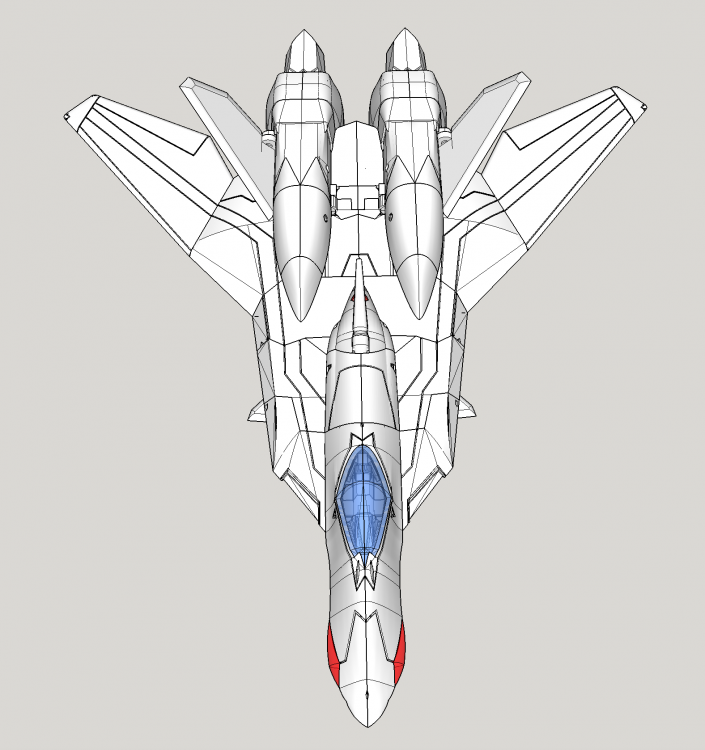
Hey guys, just a small update. All the detail work is done! I'm now measuring the length of metal rods and screws i'll need to cut for all the joints, and also just checking a few last things. It's taking a bit longer than I thought but i'll get there. Here's a picture for now though. Hopefully it shows the intakes and fastpacks enough. :-)
-
So good Xigfrid, as always. Good luck with figuring out the transformation. Getting from that submarine shape into 4 legs looks crazy hard.
-
I have a VF-11B, but i'm a bit worried to take him apart to measure those parts to 3D model. But if you guys can measure (preferably with a digital caliper is you can?) and also take some photos of those parts i'll be glad to help :-)
-
Nice! Looking forward to seeing more.
-
I have been meaning to do a bit of a spreadsheet too actually – even for insurance purposes. Do you guys have your collections insured? Unless it falls under the general 'House contents' insurance if you have it... I've also been trying to be good and stick to a 'Things I want' shopping list, that's I promised my girlfriend i'd stick to... there has been a few sneaky impulse purchases though! hah. But i'm not far off it really. I also collect Transformers, with just the autobots from the first few episodes, and the original movie. Used to collect a bit of gundam stuff too (mainly anything Gundam Crossbone related I could get my filthy hands on) but i feel like i'm quite happy just displaying that stuff now. As for Macross, it's mostly been the 1/60s with a few 1/72 kits thrown in. On the original question... I guess I've gone and come back, gone and come back again over the years. I've slowed recently as I am purchasing a house, but last year I did possibly over do it a bit. So keeping an eye to collect cool stuff without over doing it is mega important. But yeah I feel like i'll keep on collecting once there is another new series of Macross out. Overall though, i'm just trying to stick to my shopping list that Macross wise i really only have the 1/60 Draken fast packs to get (already preordered) and maybe a 1/60 VF-30A if that ever comes out left to collect. Thinking about getting a couple 1/72 VF-30A... one to paint normally and another to do a YF-30 paint job on... We'll see... This of course depends on how much DIY my girlfriend wants on the house when we move in, haha!
-

UPDATED! 3D Printing replacement Takatoku 1/100 VF-1 parts?
Tage replied to lungbarrow's topic in The Workshop!
I love it! At a glance, I wouldn't have known it's a replacement part that's for sure. -
Very nice! i'll have to keep in mind what you used for the canopy for my project! Lovely work.
-
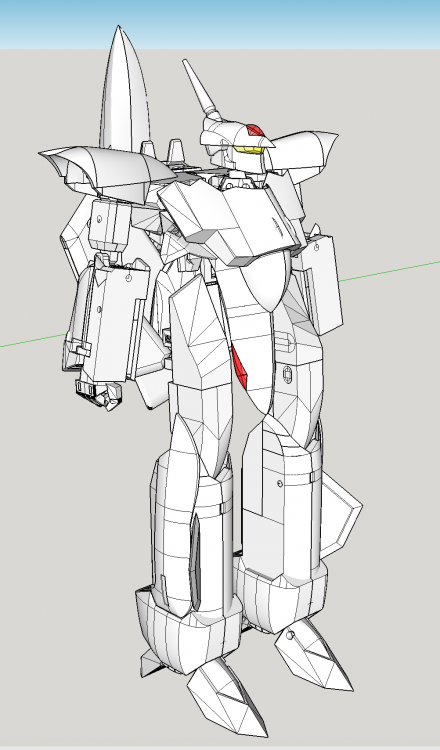
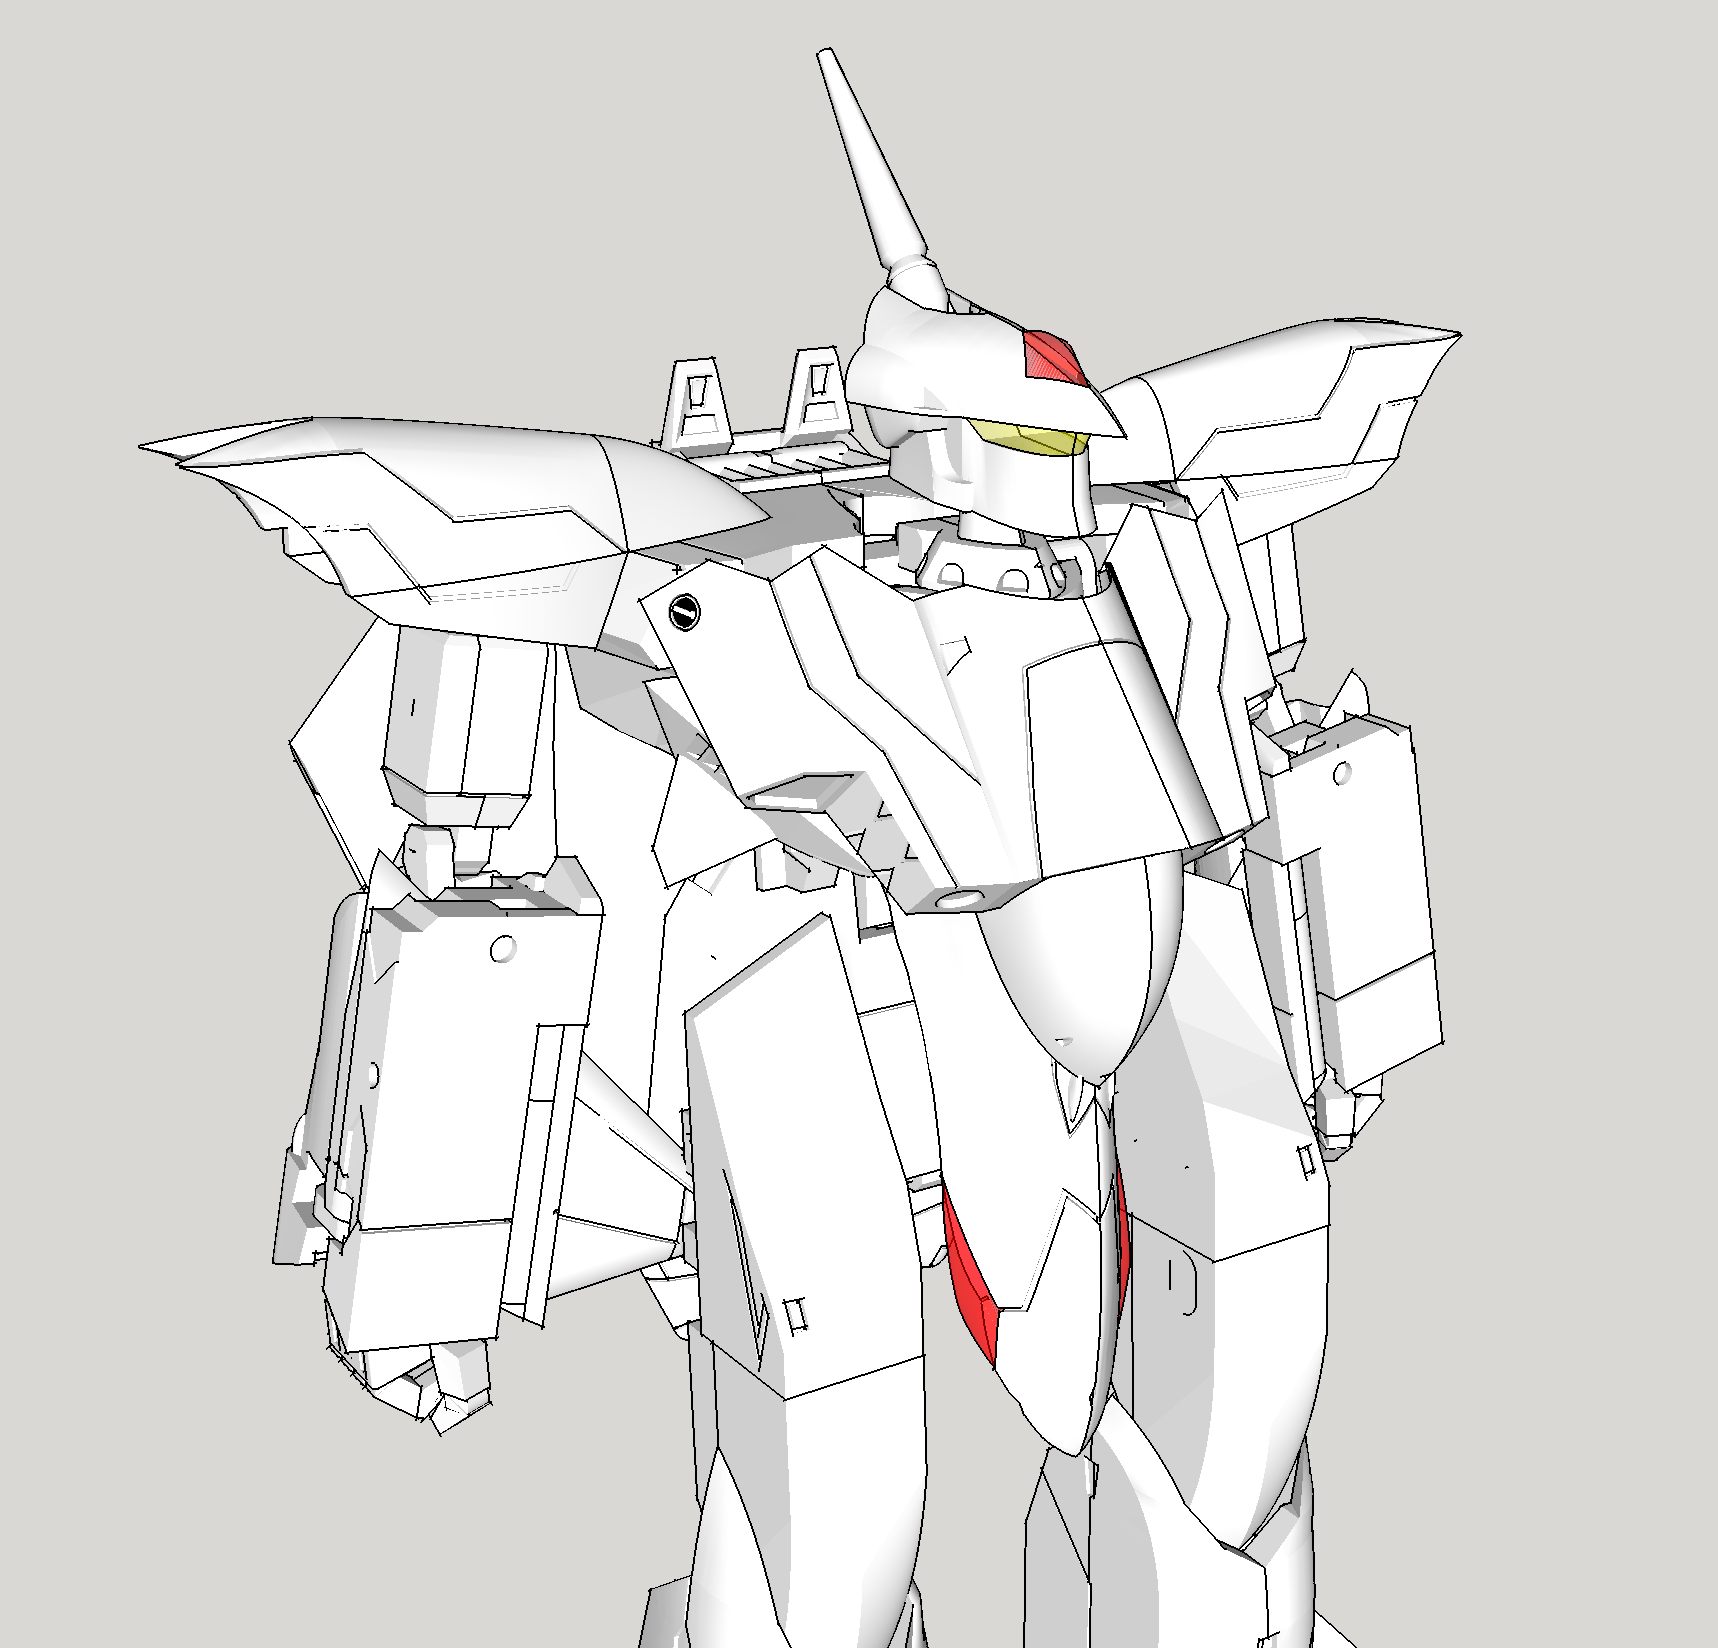
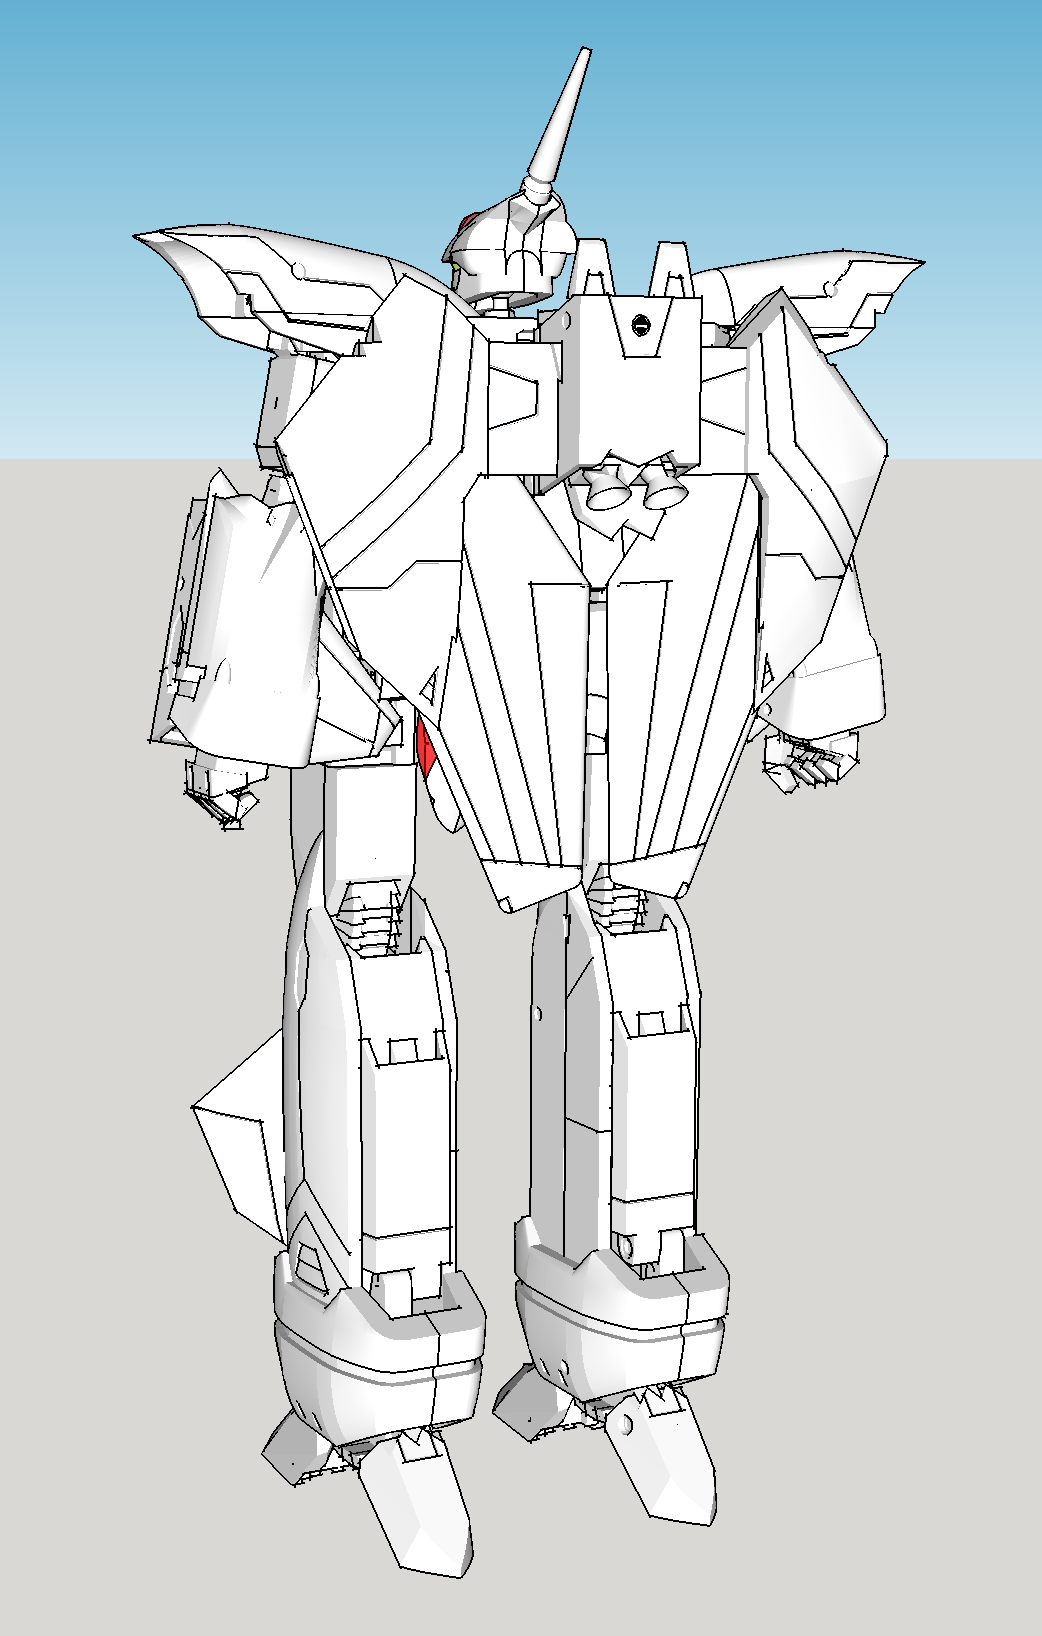
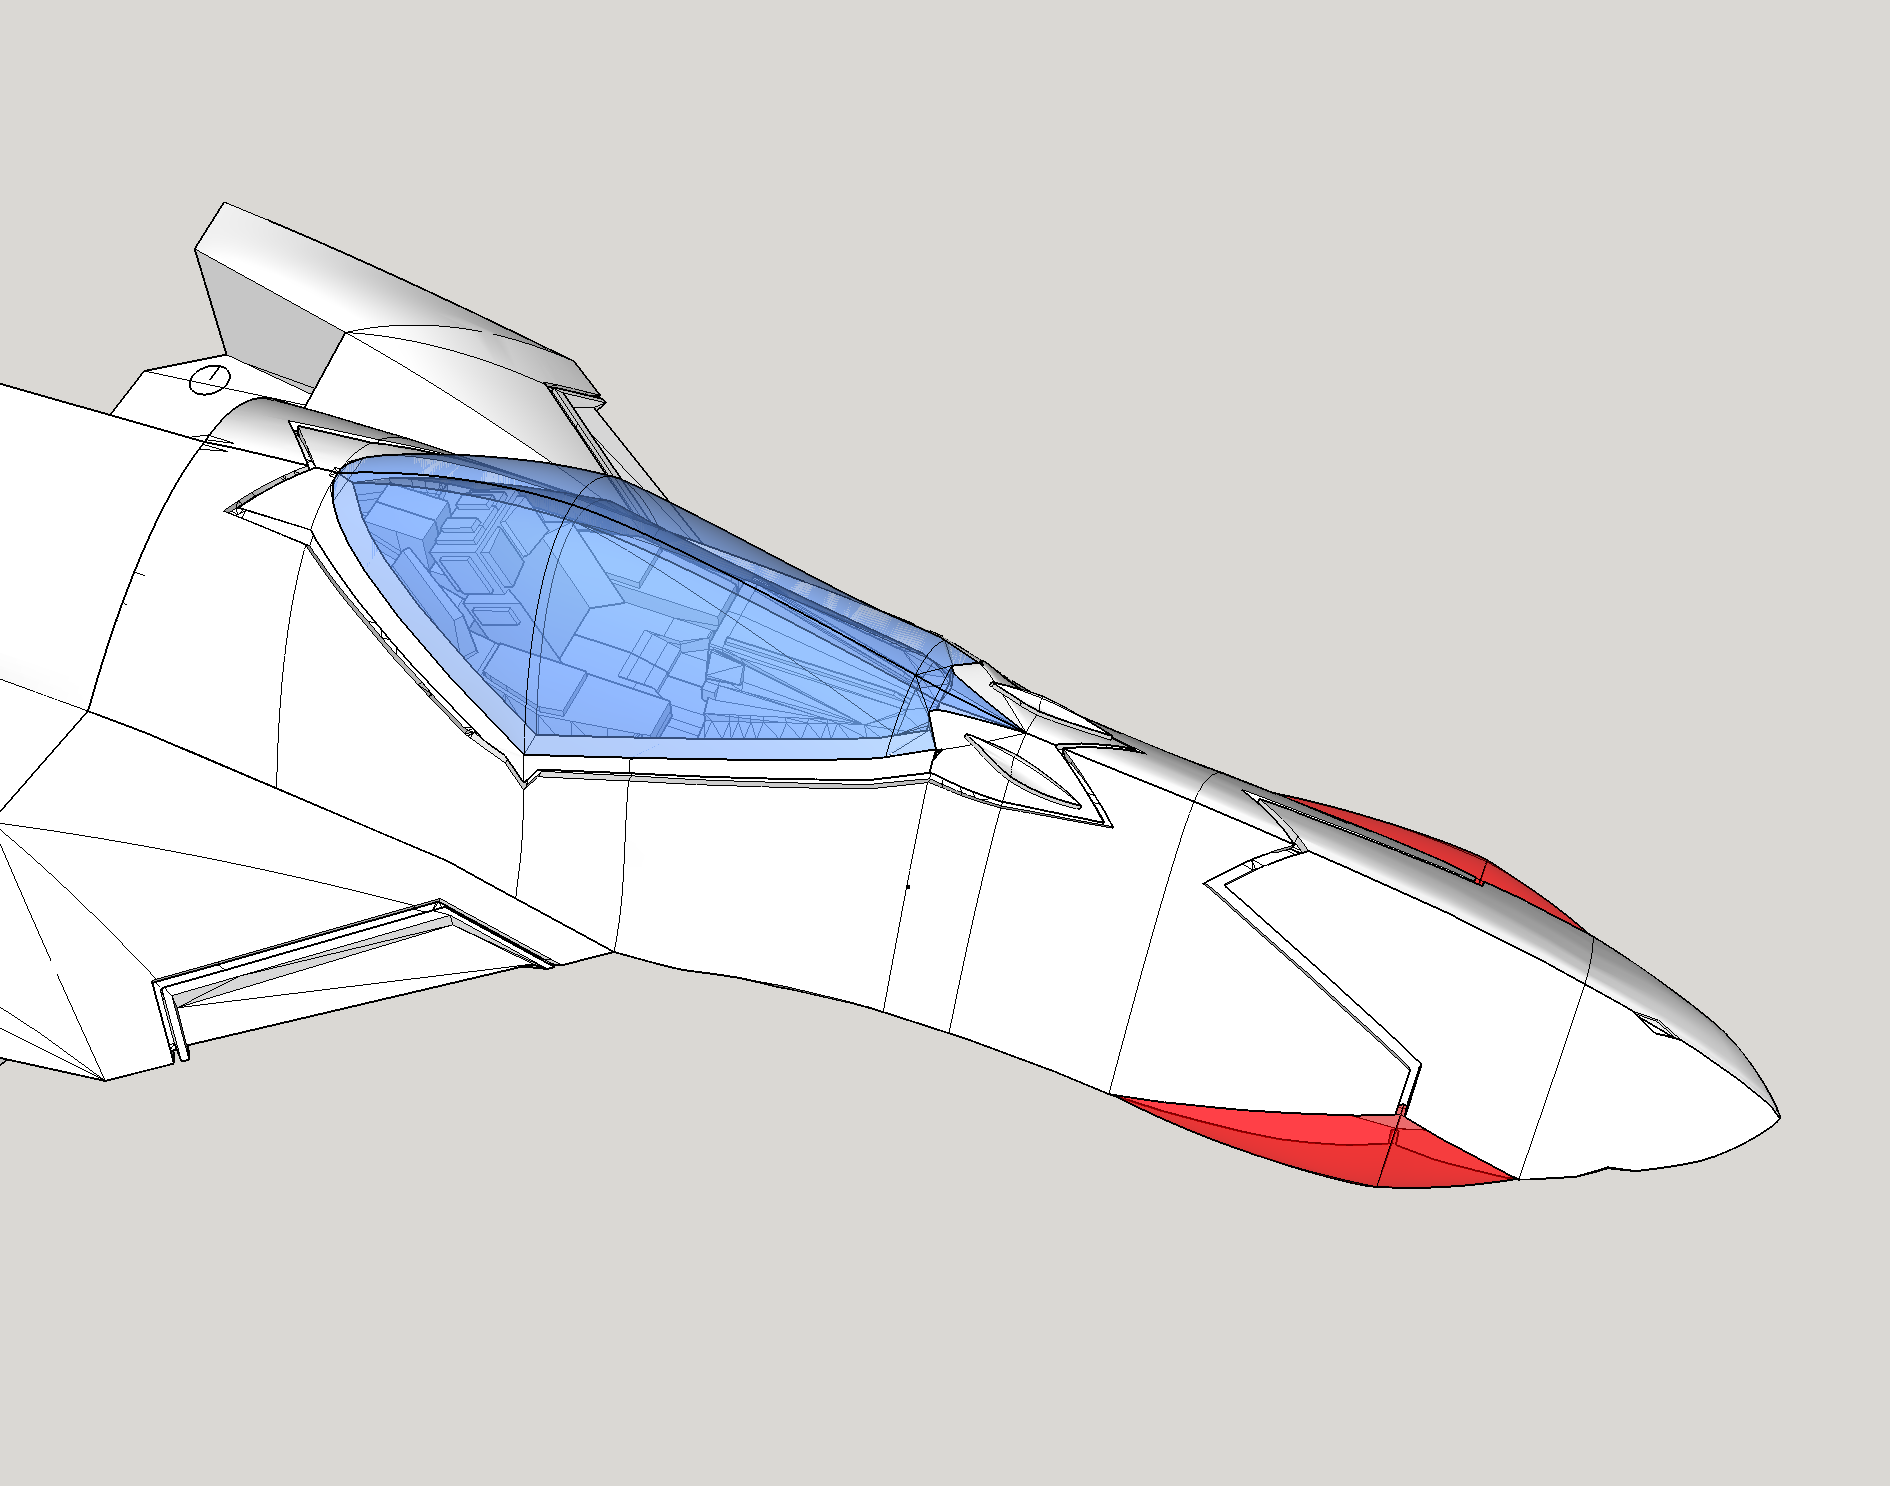
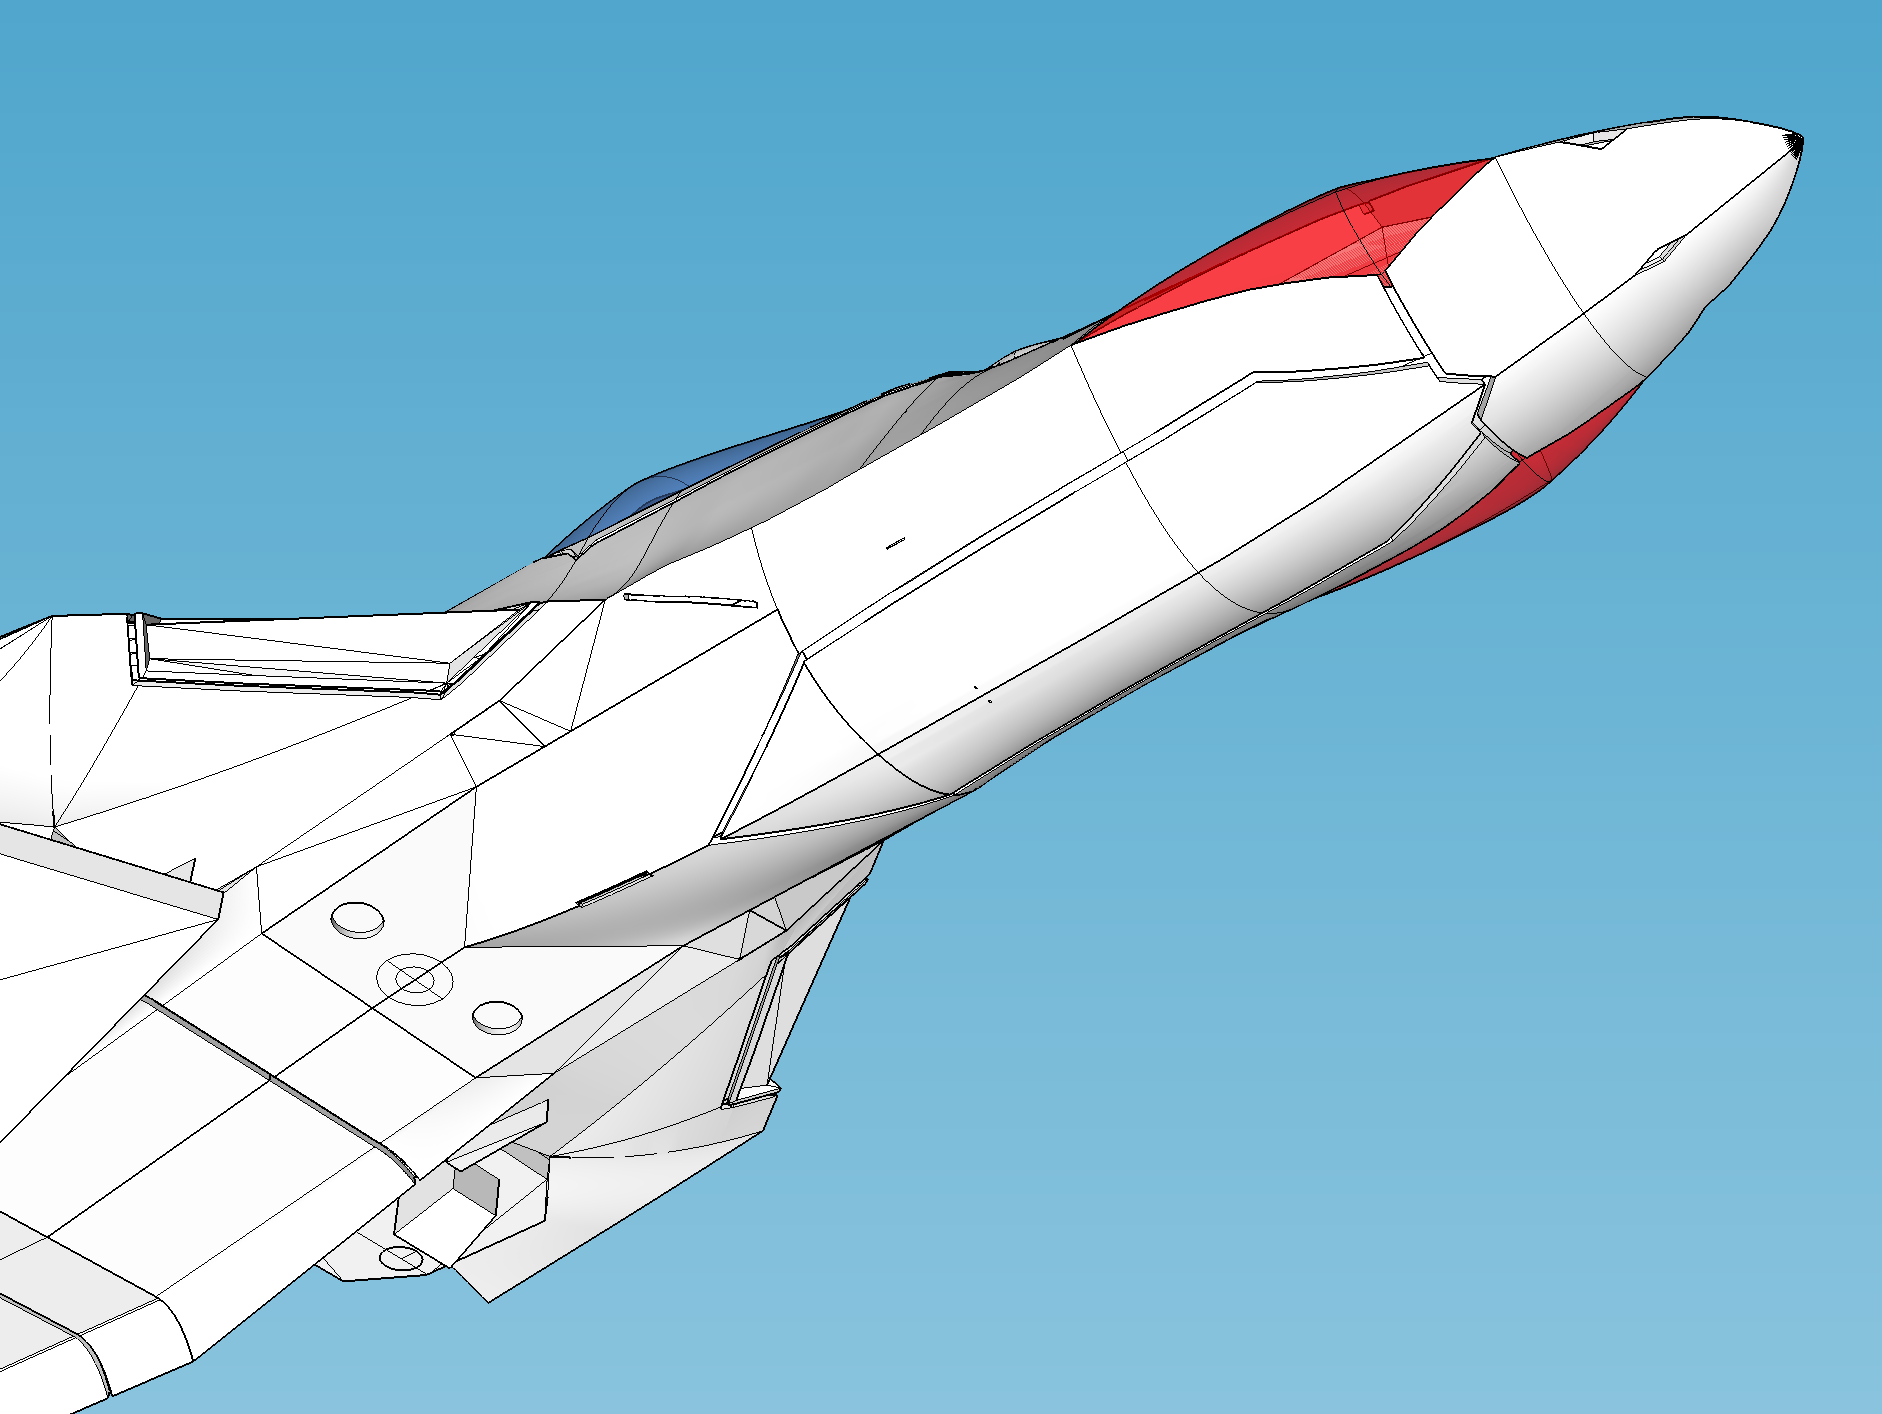
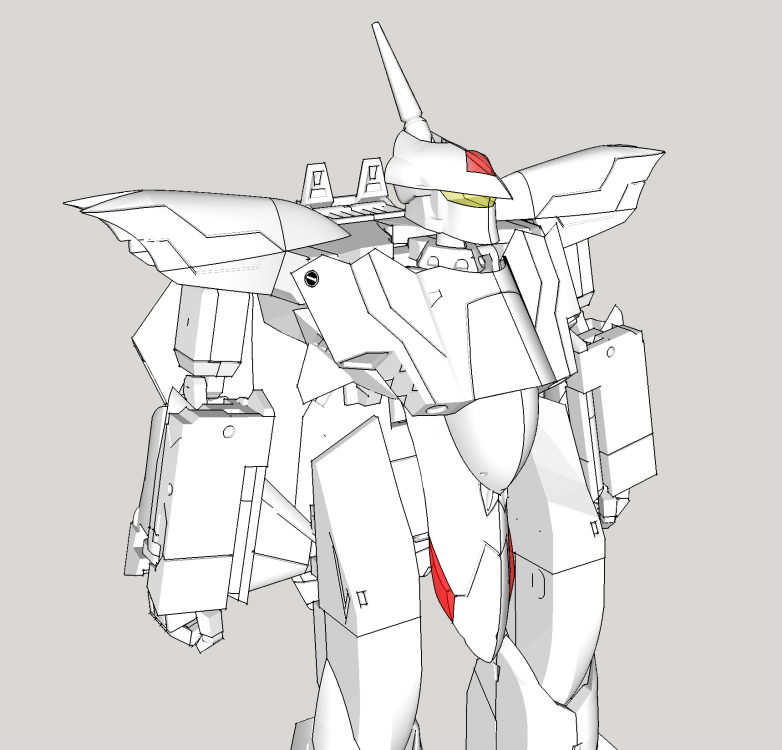
Hey guys! Added way more detail this week. His 'personality' is really coming through now :-) Particularly in the arms and legs. Just need to do the engine intakes and all the detail work on the body parts are done. I have done the leg fast pack too actually. Just the back fast pack needs a lot of work detail wise, as well as i have to work out where is best to split it in 2 and create a hollow. As technically it's the biggest lump of one piece plastic at the moment. Making the parts 'print ready' and correcting the mesh mistakes is becoming a lot quicker as i'm getting used to doing that stuff. But yeah... Not far to go at all now though!


-
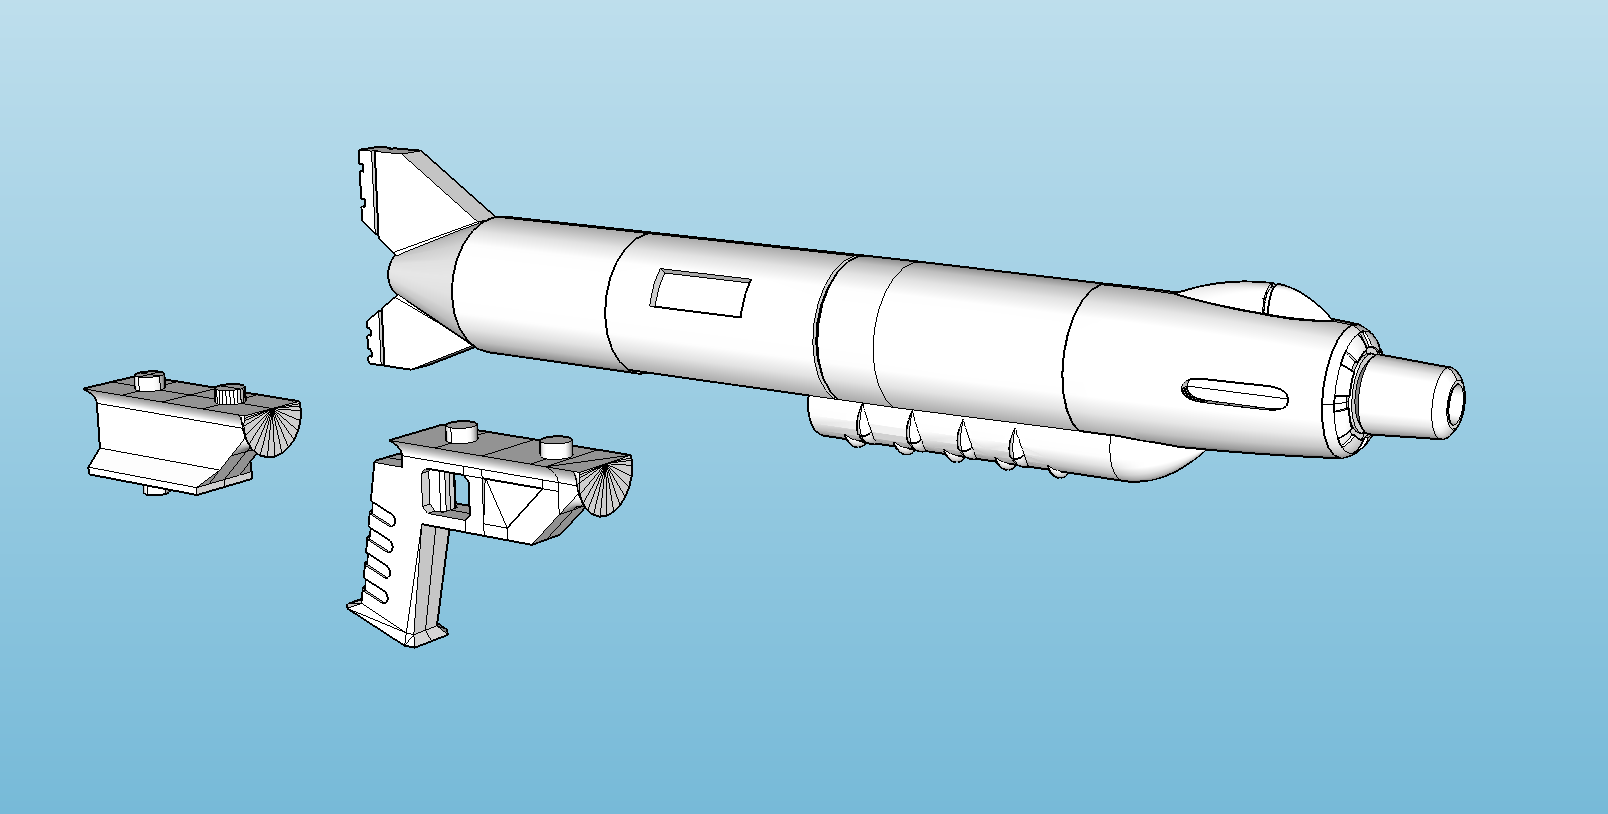
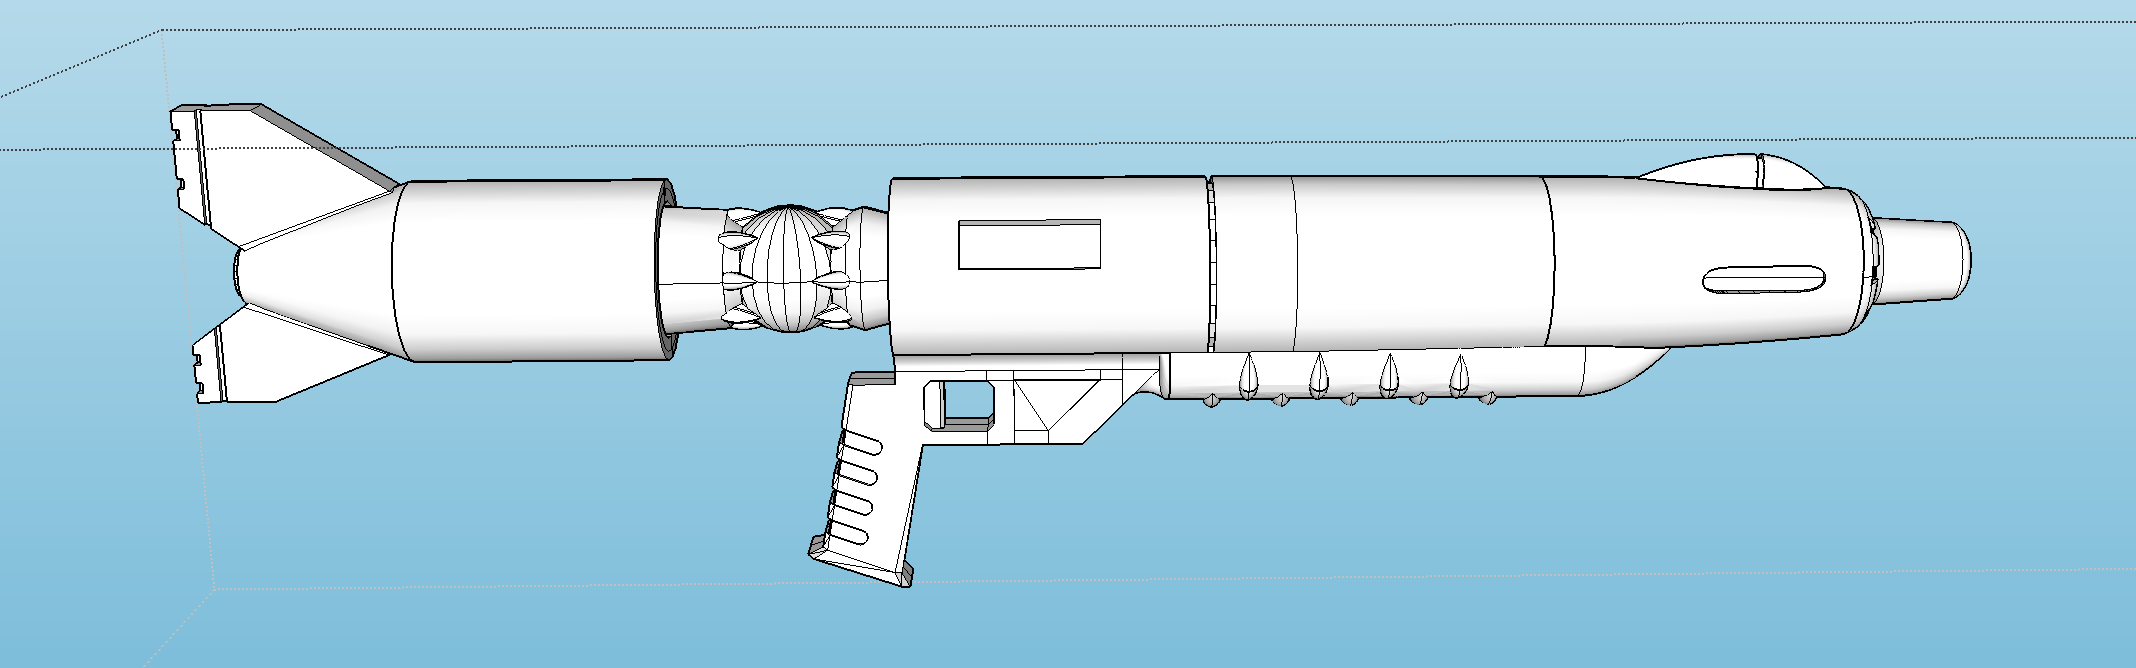
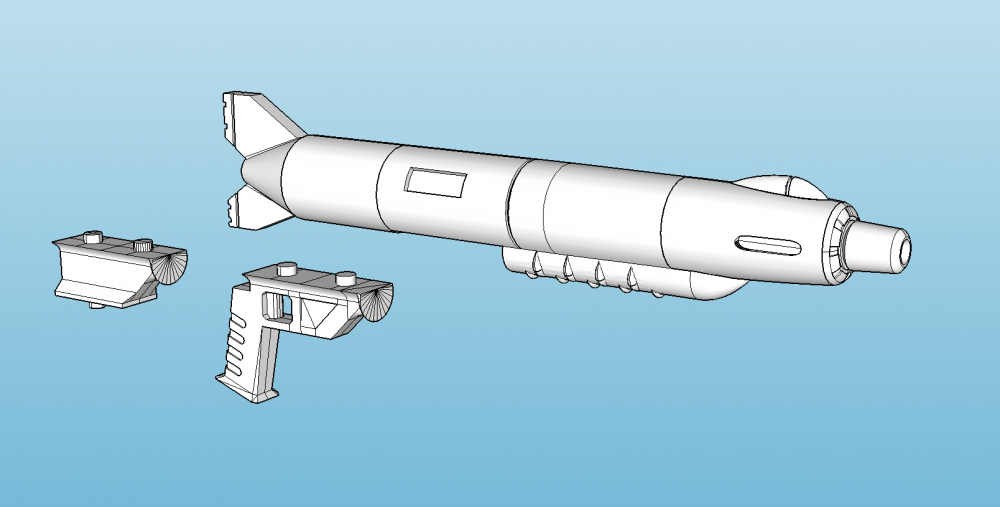
Ah yup I get ya. Thanks for the info guys. I'll bare that in mind come print time. Not too much more to report this week. The gunpod is now good to go. I noticed when i originally made it, i did the little bumps on the under barrel wrong and they had tiny tiny gaps between themselves and the barrel, so i had to go back and fix those which took a bit longer than i thought. But yeah, we're getting there! Also added tiny little holes and pegs that'll help keep each part of the gunpod together and aligned when I glue it together. No screws needed on this bit! Thanks again, and see you next time. :-)

-
Oh so do you mean like... for the main wings for instance... that their orientation should be vertical rather than horizontal (Like they currently are in fighter mode)? And thanks for comments dudes :-)
-
Happy Sunday everyone! Not too much new to report. Just still going on details. Repairing the top tail fin after recessing the panel lines took the longest this week as there were just so many errors! Main exciting detail part i added was the little black circles that are on a lot of valks. Xigfrid - once it comes to printing SLS, the orientation of things don't really matter does it? Or will i still get a bit of stepping? Thanks dudes.
-
Wow yeah I really like it. Has a really nice minimal look to it compared to the standard stands that come with those toys. Nice work.
-
Cheers dudes. Chronocidal - Yeah so the resin kit is the Studio Half Eye kit of the VF-5000 I've been trying to copy and make into a 1/60 to match the rest of my Macross collection essentially. And yeah i'm hoping if i do need to redo any parts it's going to be a minimal amount.
-
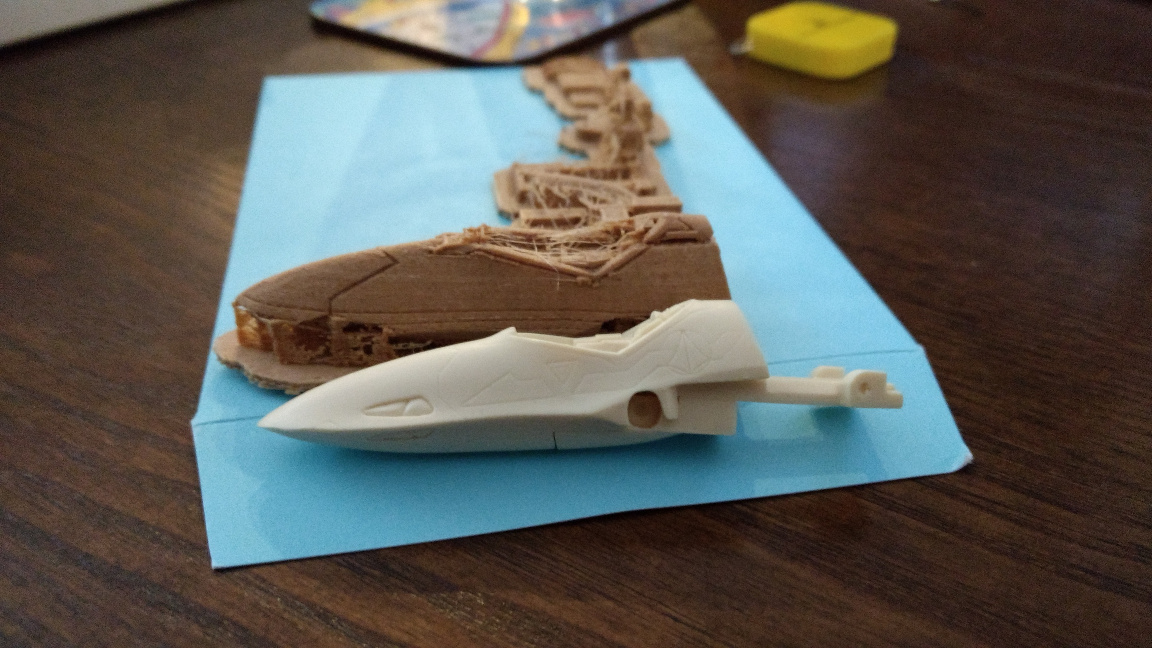
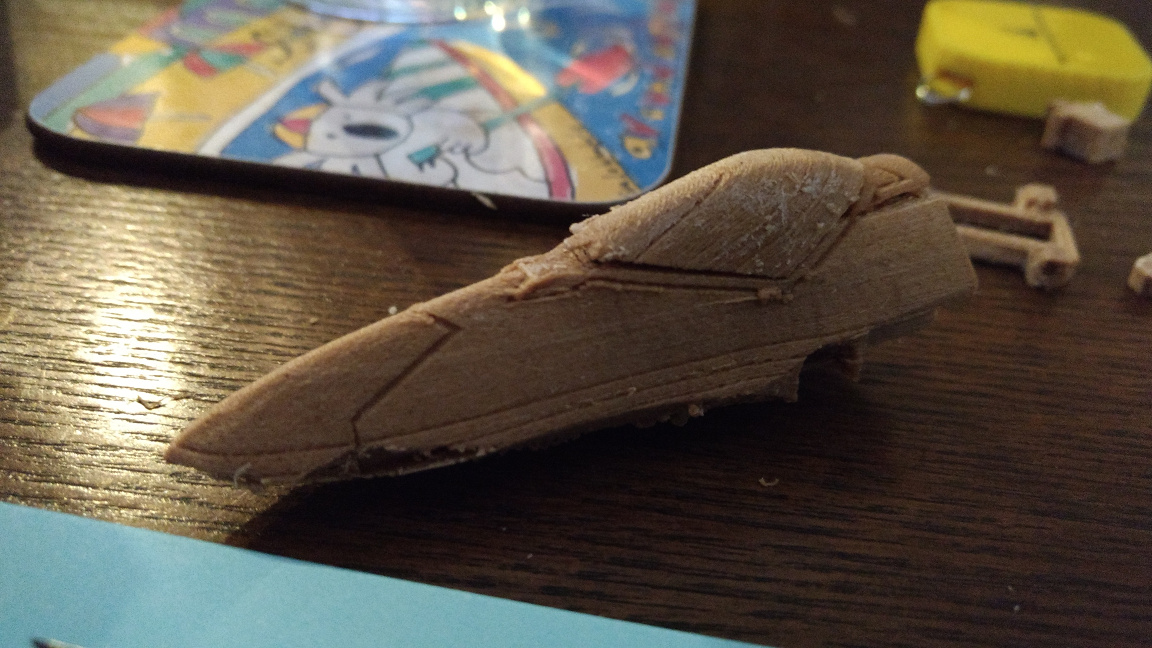
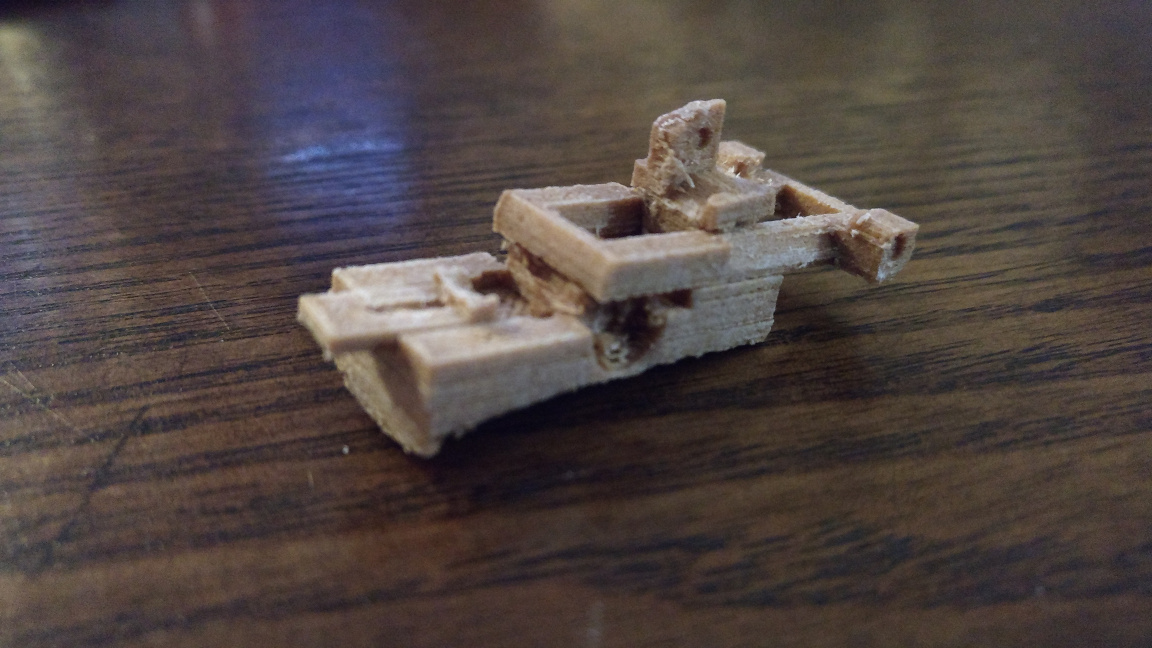
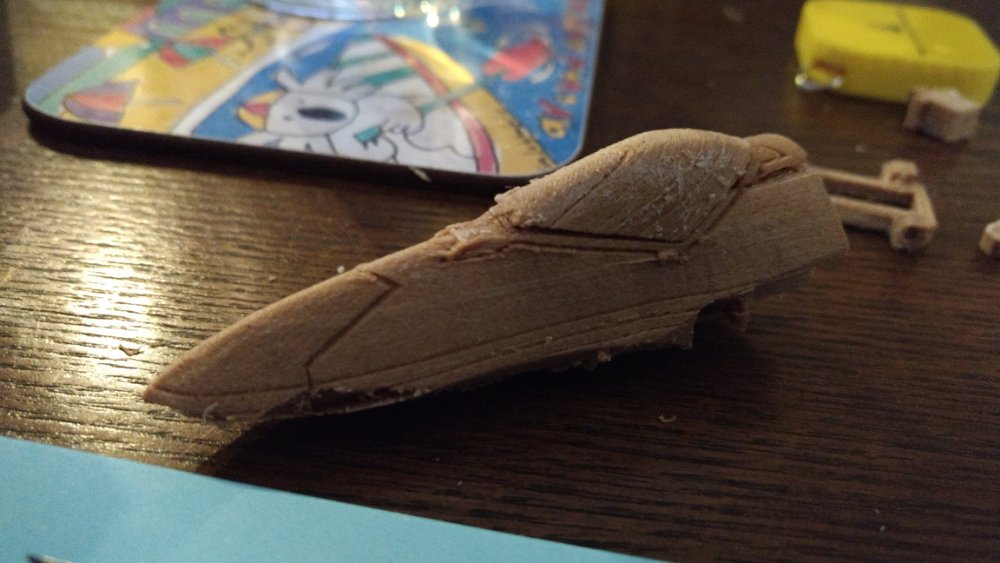
Hey guys, update time! Just been doing more panel lining this week. Overall it's going well, the main time spent is actually repairing the mesh of the model the panel lines cut into, as some overlapping errors occur sometimes. But really liking how its is really coming to life. Also did a quick test print on my friend's 3D printer.... I think a few more tests are required as i don't think any of the pieces came out as good as i'd like. As you can see, I tried the nose and some internal parts for this test. My friend has a Makerbot Replicator 2 for those who know what that is. Used this wooden material he actually recommended as it's meant to be easier to clean up and sand. It also makes the whole thing look like a wafer once printed! It was easy to clean, but I think i'm going to have to do a few tricks like splitting sections in half.... This is because the support structures the printer builds up to support high objects (like you can sort of see for the nose) really eats into the detail i've worked so hard on, and is hard to clean off lol. Also, this material is weak as hell, which doesn't matter too much as i'm hoping to then cast these pieces in a stronger material, but it would be nice to make sure all the joints and every piece comes together before i do cast him. Plus i think i'd need to print each part at a time rather than his big chunk at a time like i did. But really, I'm looking into just going with Shapeways and using their stuff and go from there. But hey, it was a fun test anyway. Nice to start to see the size difference and how it's going to come together. Hope you like!


-
Hahaha, if it is even half of that, I certainly wouldn't want one haha.
-
Oh! Forgot to mention... How many of you guys would actually be interested in this is a kit? Just starting to research reproduction options, and basically depending on how many people are interested, I'd want to get you the best quality for the cost basically. If it is 3D printed it'll be fine, but if i can get it casted in some good resin, even better! So yeah - just a quick PM to me will do - don't worry, it's not a commitment or anything, just keen to know vague numbers. Cheers
-
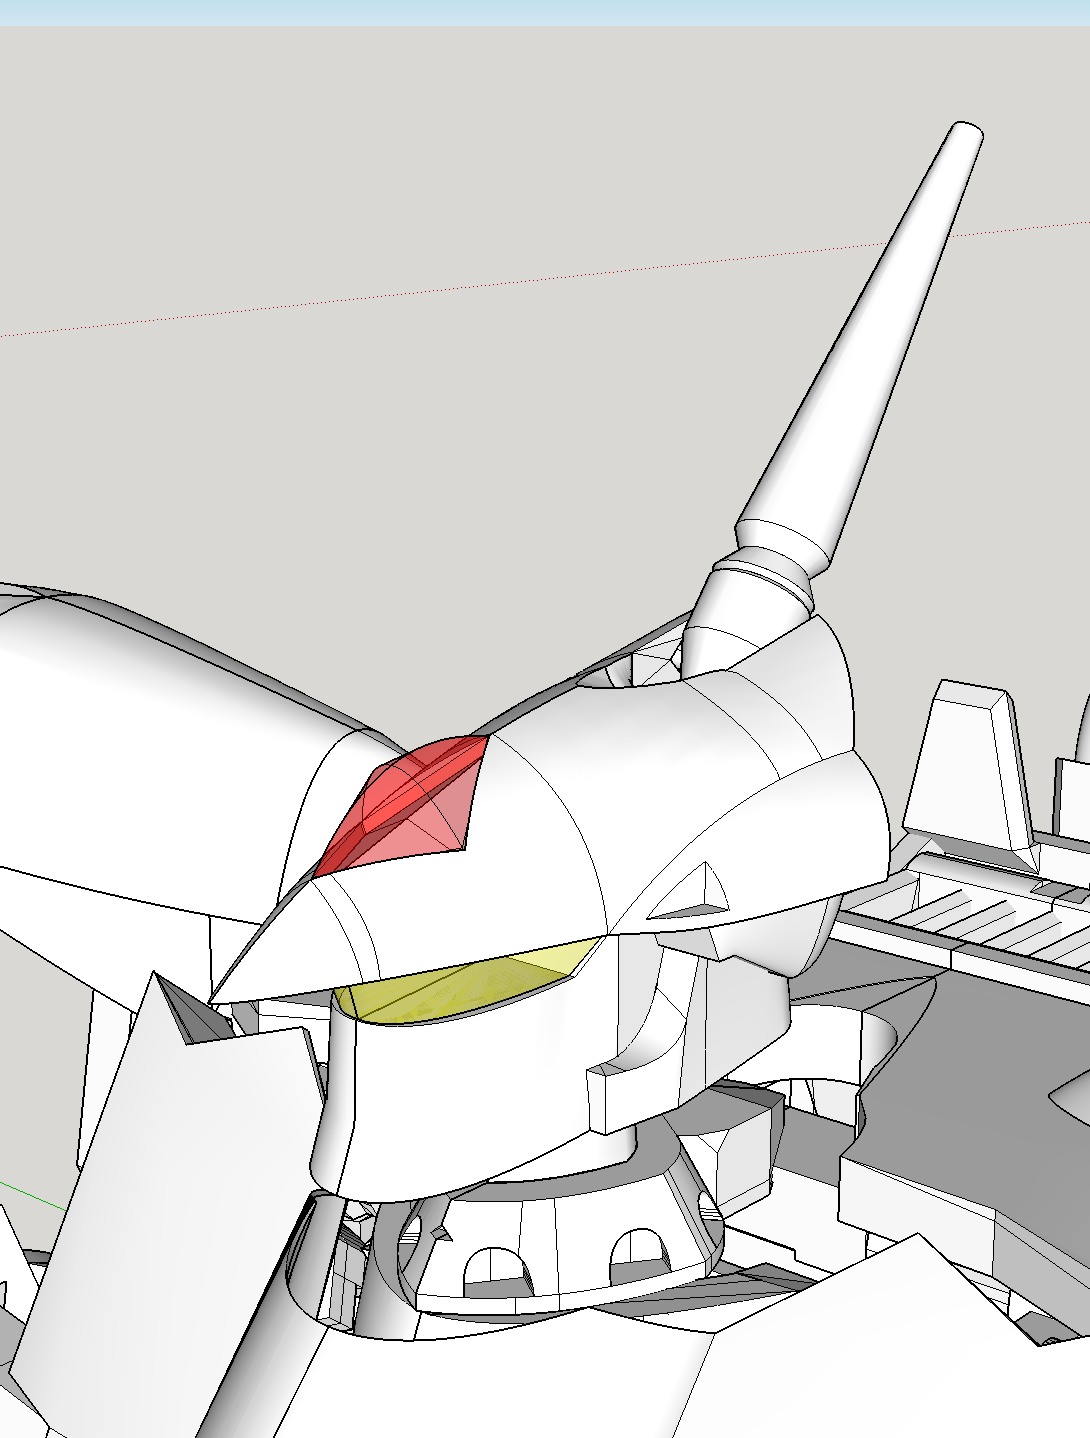
Hello again! Back at it again - and hoping to keep up with weekly updates. This week I've been adding panel lines! I started on the hardest part, which was the nose and around the cockpit. Mainly to learn a few lessons which is now making doing the rest of the panel lines pretty quick and easy. I've printed off some of the line art and highlighting that as I go as a bit of a checklist so no panel lines get missed :-) The panel lines look deep and big at the moment in 3D, but i'm pretty sure they'll be fine once printed. Big shout out to Xigfrid for explaining the tech side of these panel lines in an old PM many moons ago haha. Cheers.


-
Woooaaaahhhh! Too good. Amazing job!
-
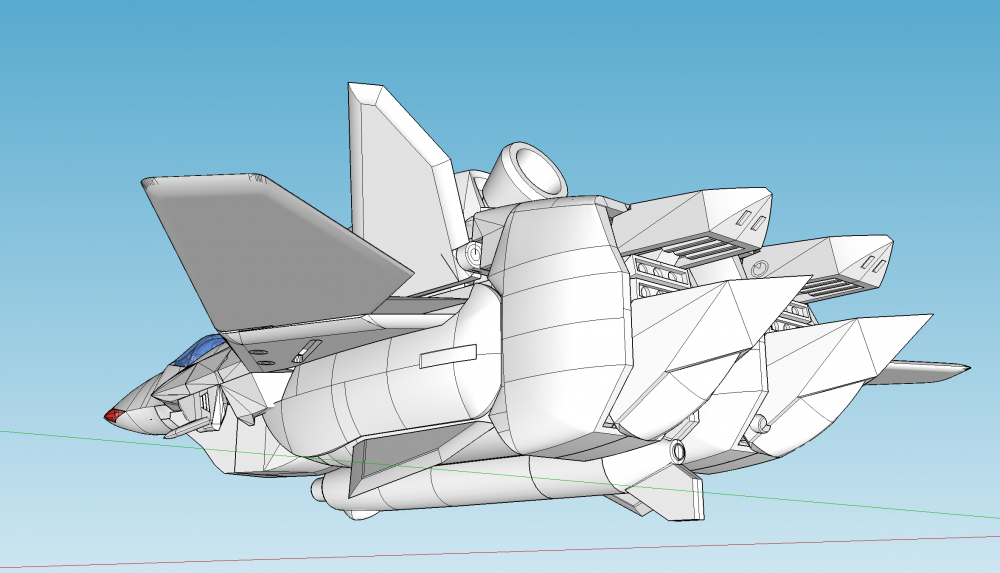
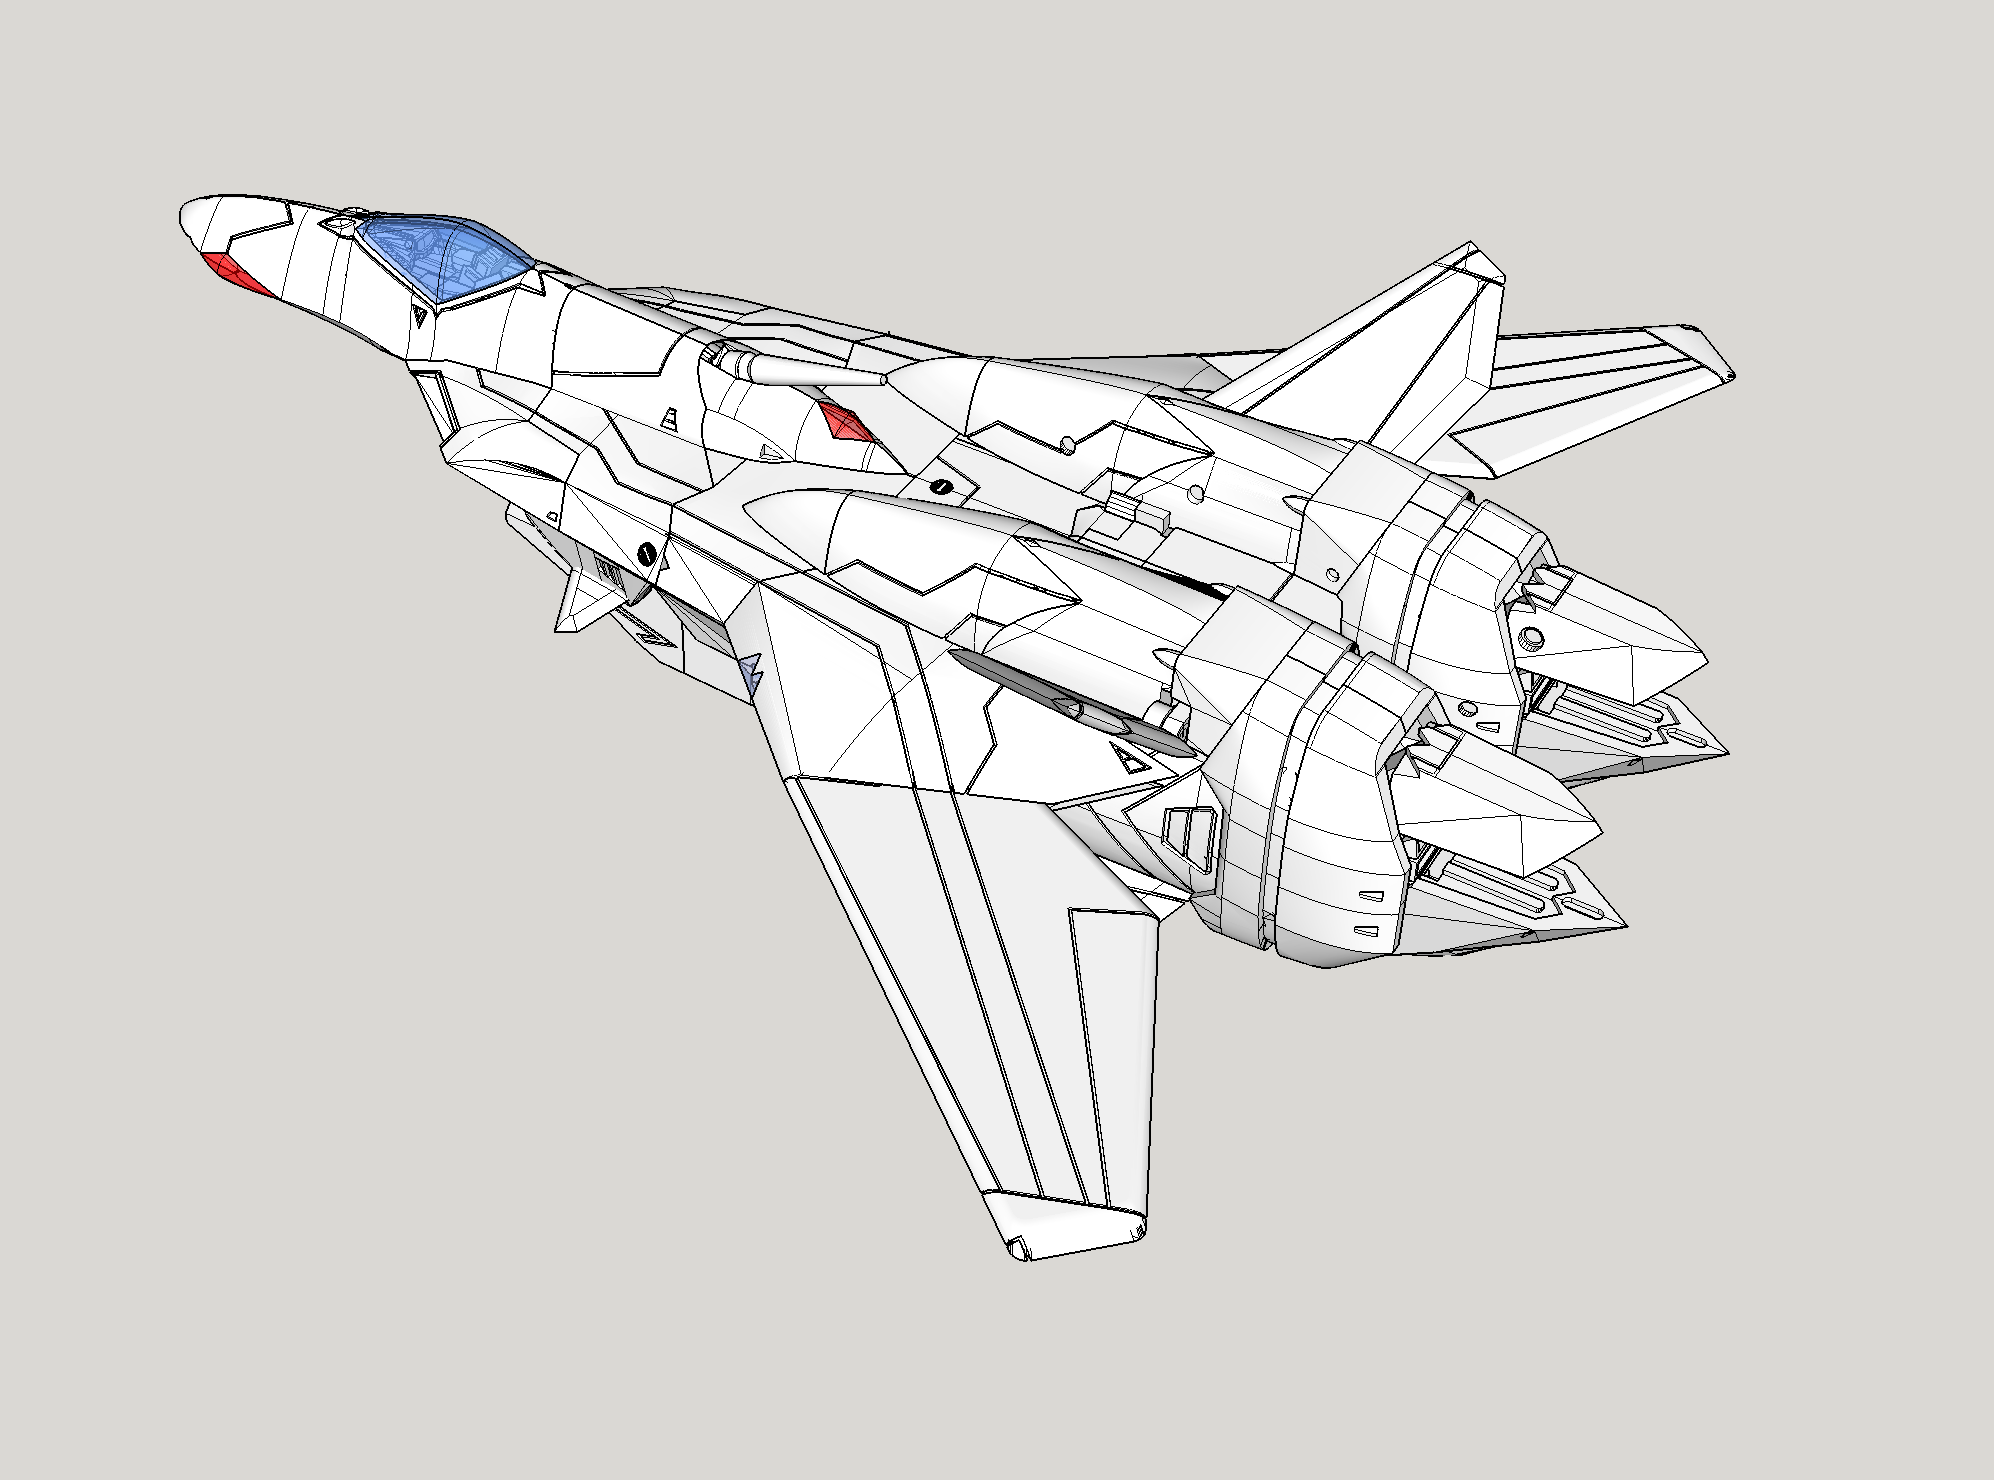
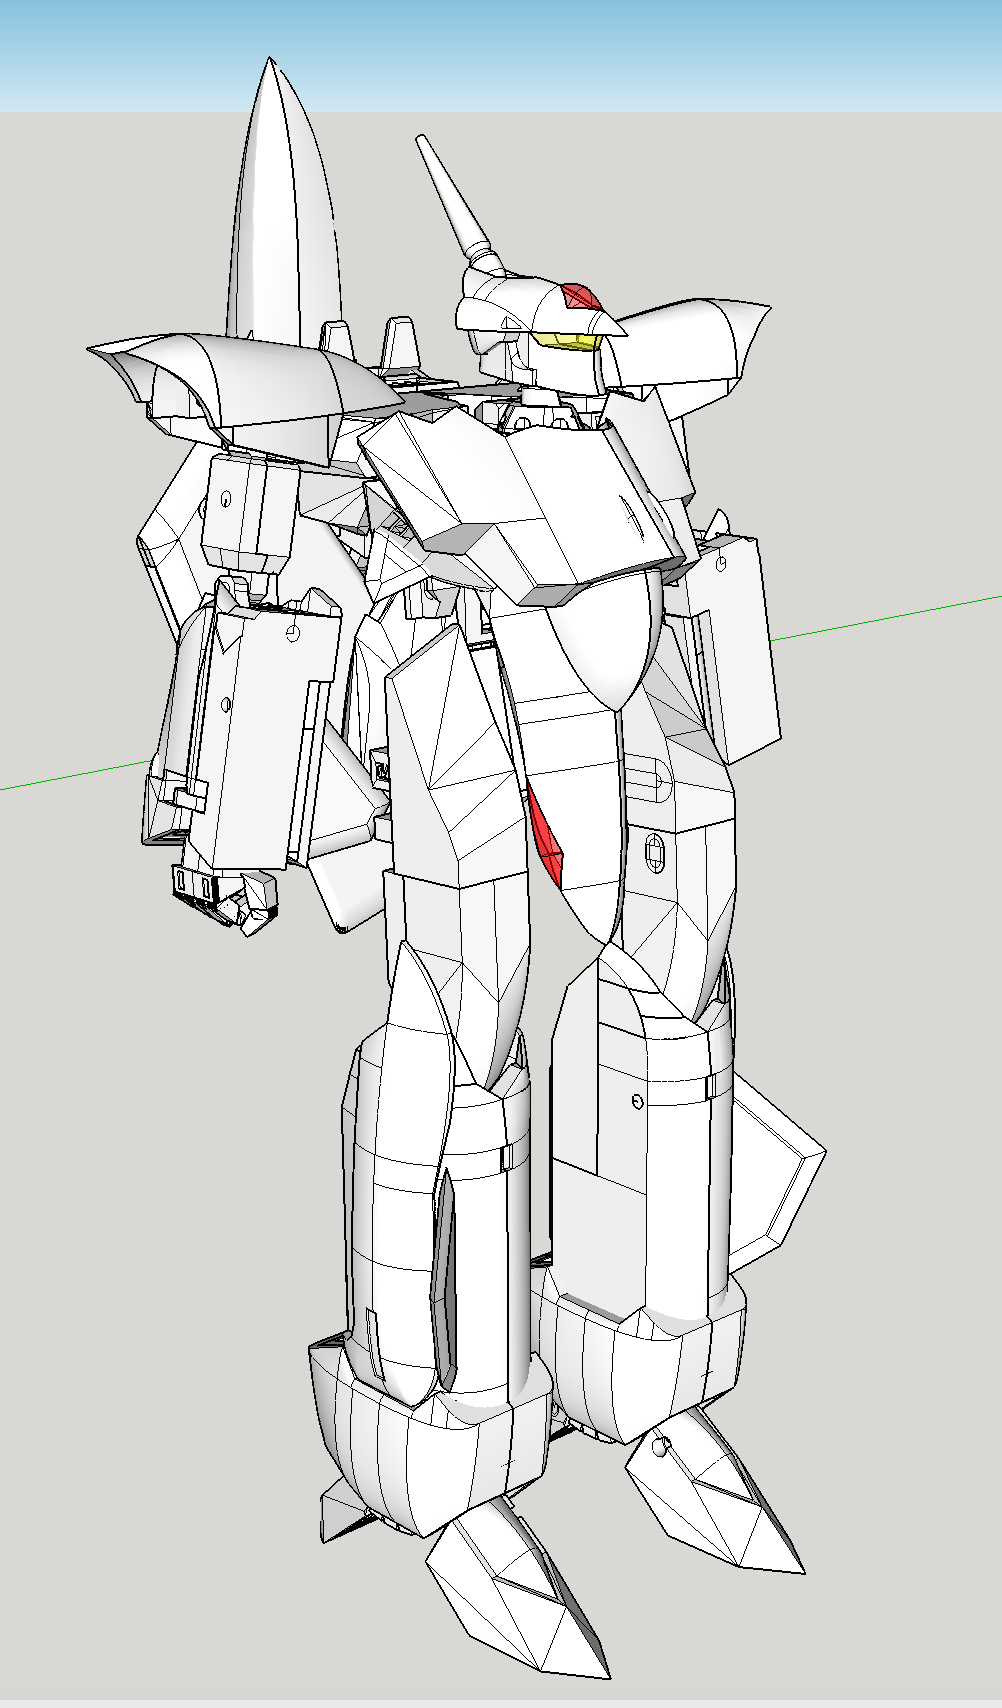
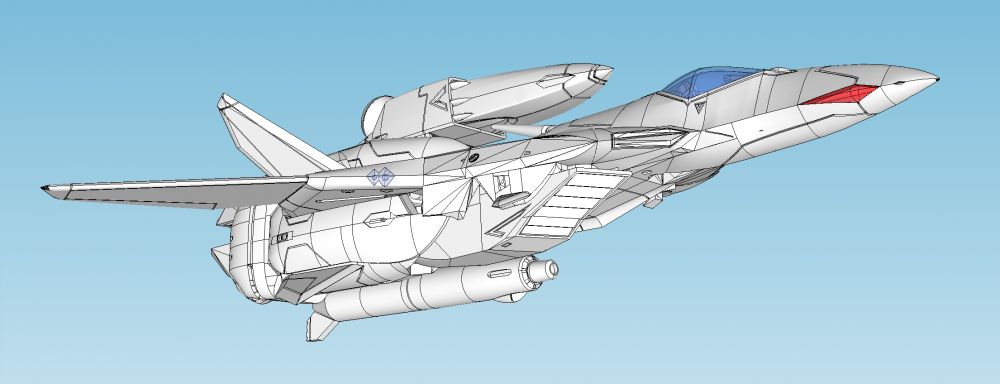
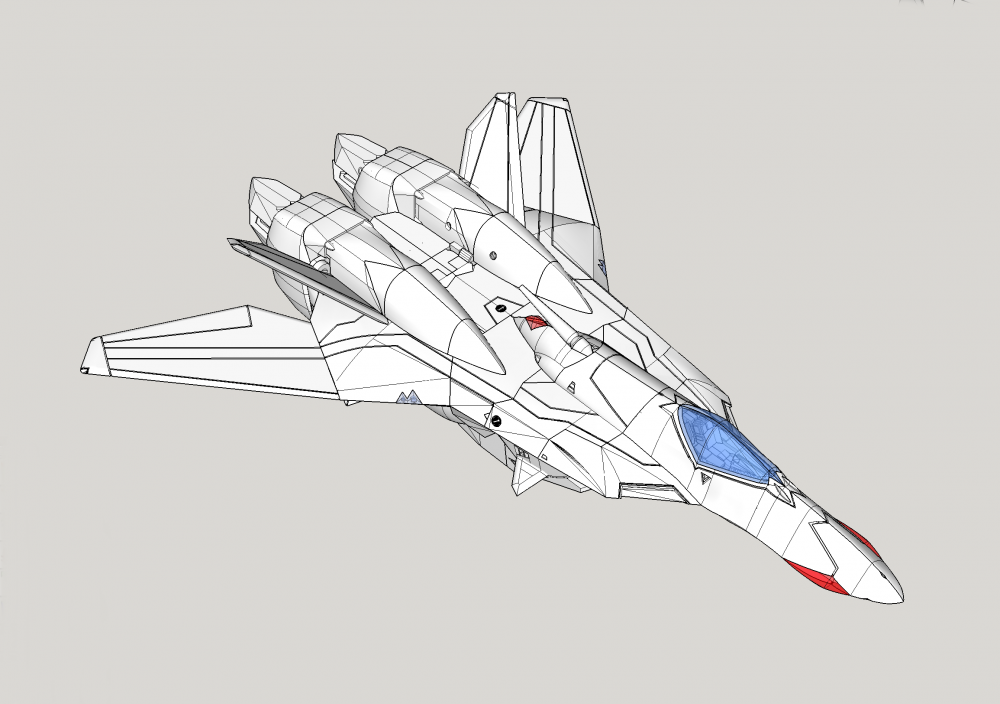
Hey guys! Right! Update time! Sorry it's been a while. I've finally finished the leg fast pack! Had to cut away a bit of the top of it to allow room for the wing in fighter mode, but overall, i'm happy with the result. So next is detailing this thing with panel lines. I've had a look at comparing this model with the line art to make sure i'm as close as i can be, and look i'll be honest, it's not THE best rendition of a VF-5000. My guy has some chunky legs and arms compared to the line art. And a few squashed proportions here and there. But i'm actually pretty happy with my work on this, as i need to keep reminding myself that this is my first ever proper 3D project, and somethings aren't going to be 'perfect'. And really - to get me up to speed with using Sketch Up, and make this transforming valk thing possible, I have been just copying the SHE kit and essentially upscaling it, with a few little improvements here and there. So even looking at the SHE kit, it's not really accurate to the line art, but it's close enough I reckon. And at the end of the day, i still think it looks cool. And should look even cooler once printed. One thing i'd love your guys' advice on though is the head... is it there yet? Thanks for your continued interest in this rather epic project. cheers.