winterdyne
-
Posts
189 -
Joined
-
Last visited
Content Type
Profiles
Forums
Events
Gallery
Everything posted by winterdyne
-
Planning customising/weathering 1/48 VF-1J and GBP
winterdyne replied to winterdyne's topic in The Workshop!
Thanks. Next time I get a chance to do some painting I'll do them. -
Planning customising/weathering 1/48 VF-1J and GBP
winterdyne replied to winterdyne's topic in The Workshop!
Thanks! I do have a question though, for anyone who's done this before: You know those little semi-circles in the screw-caps etc (don't know what you'd actually call them)? Should I paint those in prior to wash or just let the wash darken them? -
Planning customising/weathering 1/48 VF-1J and GBP
winterdyne replied to winterdyne's topic in The Workshop!
Ok, here's where I'm up to. Not a great pic: I primed the valk with citadel skull white primer (quite a good 'dusty finish') primer. Preshade with tamiya sky grey, and cover with many light coats of very thin flat white. Stripes are tamiya flat red and nato black. You may notice the heatshield looks a little different. I've sculpted a raised upper section onto it, (actually by filing/sanding down the lower section). Should look nice with a wash. Next step will be a thin coat of future, then decals, the seal those in with a thin coat of future, then oil wash, future, then matt. Then assemble. Hopefully everything should still move! -
There are a couple of tricks that might work for the opening: 1) Build a deeper recess. This means you'll have a fairly large block on your wall and presents the problem of having sides that need detailing. 2) In the recess use a reduced apparent scale to fool the eye for depth - you need to build the back part of the recess larger than the front, and put detail on the back wall in a smaller scale. Looks very good for static camera shots but doesn't work so well when the viewing angle changes. Both of these can be helped with good lighting (drawing the eye to the back wall rather than the 'warped' sides of the recess - internal LED's ftw) and paintwork (again use highlighting tricks to draw the eye back or to the launch boom). At the end of the day though, if you look at it with 2 eyes your depth perception will make the warping apparent. This is probably why the shallow recess / closed bay door was used.
-
To my knowledge there are no 1/48 carrier trucks (as in the Yamato display) available currently. Best bet is to use italeri's set for the ammo loader and flatbed trailer, hasegawa for the generators and a few extra ground crew (though the sculpt is poor) and try to find verlinden's tractor set (which can be built up in several variants). If you're really set on quality verlinden's carrier crew are also very good, but expensive!
-
The tractor is a 1/48 Verlinden US Navy Carrier Tow Tractor (V0268). And it's OOP and VERY hard to get hold of. If anyone fancies doing recasts and can get hold of one, I'd reeeeally like one. For positioning on a 'rough diorama' I tend to use either a very small dab of CA or blu-tak on surfaces that can't cope with a knife or be resanded easily. Final fit is always CA.
-
1/72 Hasegawa VF-1 + Booster step-by-step...
winterdyne replied to wm cheng's topic in The Workshop!
Car body / paint shops should have it. It's used with lacquers, and it's nasty stuff. Should be similar chemically to the metalizer thinner (as those are lacquer based), so if that didn't work, chances are the cellulose thinner won't work well either. Worth a shot though. -
1/72 Hasegawa VF-1 + Booster step-by-step...
winterdyne replied to wm cheng's topic in The Workshop!
You could try very sparingly applying some cellulose thinner with a very fine brush (expect it to die), and then try to pick up the dissolving mask with the same brush. Should soften or cause the mask to start flaking off the mesh. Of course, this relies on the mesh being metal as plastic / fibre mesh would be ruined by the cellulose thinner. I've used this technique for part-stripping metal miniatures that I don't want to ruin most of the paintjob on. -
I repainted my TV hik pilot just over the top of the existing paint, no stripping. I did wash and degrease it carefully though. Using a flexible acrylic (citadel is king here) works very well on the soft plastic. Since you do want good adhesion, I'd recommend priming (citadel skull white) before undercoating (I used citadel fortress grey) and then highlighting up. You need a 'thick' painting style for these, or your paint will split visibly when the figure flexes. I'd probably advise against enamels or tamiya / humbrol ('dusty') finish acrylics, as these form a surface that's too brittle, and the paint will flake off easily. You may also want to omit a varnish / topcoat unless you can find one with similar flexible properties.
-
Trying to fix the problem of yellowed parts
winterdyne replied to robodragon's topic in The Workshop!
White is actually a pretty hard colour to match. If you've got a toy that's yellowed (or a mostly white model that's scuffed / chipped), and you don't want that part to stand out, you really need to repaint ALL of the white surfaces (of the same 'type'). Markers are terrible for touching up paintwork. You have no control over the consistency of the paint so you can end up with it looking 'lumpy' and/or needing to sand down the touchup work. This almost always looks worse than slight yellowing. Generally markers come with fairly thick paint in them. A good, soft, flat hand brush (or decent airbrush) and good masking tape are the tools of choice here. And thin, high pigment paint and patience. Mismatched colour (applied without sharp masking) also looks terrible. If you can't match the colour you need *exactly* your work WILL stand out. Masking off just a single panel neatly can allow you to justify the mismatch (that panel / part has been replaced), but this works better if you repaint other panels too. Finally you'll need to match the finish. Again, this is easiest done by clearcoating the entire model (non-retouched areas and all, this also protects your repair work against handling a bit). Otherwise you're left with trying to match the finish that the manufacturer's paint or plastic is. Not easy! If you post a photo of what's yellowed where I could probably come up with a suggestion for dealing with it. Markers are not a great idea, though, unless you're really not fussed by the quality of the result. -
Sorry, but I'm a believer that toys should be played with. 'Course with toys like the 1/48's they're not the sort of thing you give an 8 year old, so it's generally 'grown up' play in that they're mostly displayed and transformed infrequently. And whooshed around the room when the kids are in bed and the girlfriend's not looking. Ahem.
-
That'll be because in the anime it was only used on a VF-1J. In Macross on Hikaru / Rick's, and in DYRL on a VF-1J with an alarming resemblance, but Hikaru is in a VF-1S at that point IIRC.
-
Regarding the vinyl figures, this http://www.starshipmodeler.com/basics/lj_vinyl.htm is a pretty good guide.
-
Vinyl kits are often attacked by oil based paints and solvents. If you're planning a strip / repaint be very very careful what solvents you use. Ideally use a water based acrylic on bare vinyl as a pre-primer. Actually I'd reccommend water based paint throughout (as some enamels are based on solvents that will dissolve the vinyl). Once you've got the vinyl pre-primed, you can then go for an enamel primer over the top which will help if the kit is going to be handled at all, but it'll never be as tough as a styrene kit. I strongly recommend using a soft cloth to handle dried paintwork in conjunction with a painting block. You don't want your nails or fingertips ripping the paint off before you seal it on. If you're going for oil-wash weathering make damn certain the vinyl's not exposed. It's horrible to see paintwork peel off around a nick or scratch as the solvent works its way under. It's probably a good idea to paint the model matt, and apply the satin finish to the unweathered article with a thin varnish, rather than attempt to use a satin paint - this will give you much more control over shading. How big's the kit? Different techniques work better on different sizes. I've worked on 120 and 200mm figures professionally, in addition to lots of other scales in general hobby projects. On large kits, a good trick for 'spatter weathering' I've used on uniformed WWII troops is this: Very lightly drybrush the weathering colour (usually a dusty light brown / buff) onto the top surfaces of boots, and flatish surfaces (like the sides of boots). Once this is done, thin the weathing colour to nearly wash consistency and dip the tips of the bristles of an old toothbrush into it. Wipe the brush on a piece of tissue so you don't have big droplets on the brush. DO NOT HANDLE the area you're weathering from now on! Use a soft cloth hold the model, and fold it over so spatter doesn't go where you don't want it. Now use your thumb on the bristles of the brush to flick them so the spatter paint in the direction you'd expect a splash to come from. Very small droplets will flick off producing a nice spatter effect. If you're very brave, you can also do this by trimming an old household paint brush with a pair of scissors and stipple, but I find stippling produces very 'stand out' drops and needs a very gentle touch and thicker paint or the shape of the stipples comes out wrong. Because you're going for a glossy surface under the matt weathering, you won't be able to seal the weathering in, and those spatter drops will rub off with very slight touches. It'll look ace though.
-
1/48 scale is the ONLY reason I bought a yamato valk. 1/60 just isn't a good scale to model with (and I like modelling with toys and bits thereof). 1/72 is a little dinky (and doesn't generally have perfect transformation without some major headaches). 1/48 is easy to work in (especially seeing as there's a wealth of 1/43 - 1/50 toys to cannibalise). I've been planning on putting together a tomahawk and factory diorama in that scale as I had the old 1/100 'Robotech' factory double set (GBP VF-1J, Tomahawk) as a kid and have nostalgia pangs. I won't say what happened to it in my hands as a 9 year old, as I'd probably be (perhaps justifiably) lynched. I still shudder when I think about what I saw the exact same kit go for on ebay. It's not actually got much further than a few sketches and lightwave models so far. I've been following Mike's factory with some interest!
-
Wow... 1/48 destroids would be seriously cool. Weight is the primary issue here, especially if going for posable forms (without a feckin' great metal armature). One trick I've seen done is to vac form approximate shapes from a rough sculpt, and use those as a base for sculpting actual detail (fiberglass/filler and epoxy putties over the vacform), then recast the detailed components. Dunno if you actually work that way already, but thought I'd throw the idea out (seen it used on ergonomic keyboard cases of all things).
-
Can you not remove the pilot and repaint? If not you can probably apply a couple of thin washes with it in place - a blue on the flightsuit and grey on the helmet.
-
Valkyrie addict, what scale is that?
-
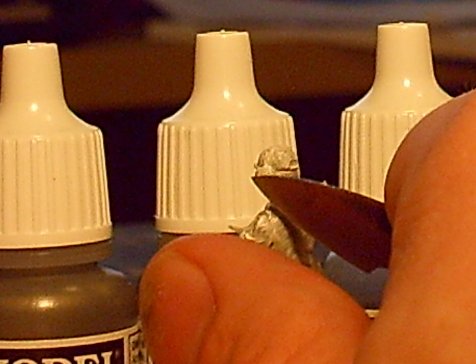
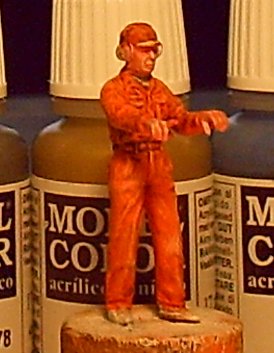
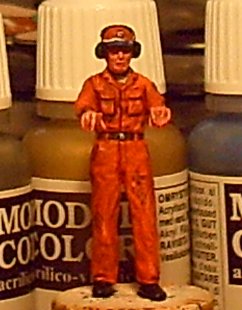
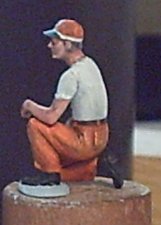
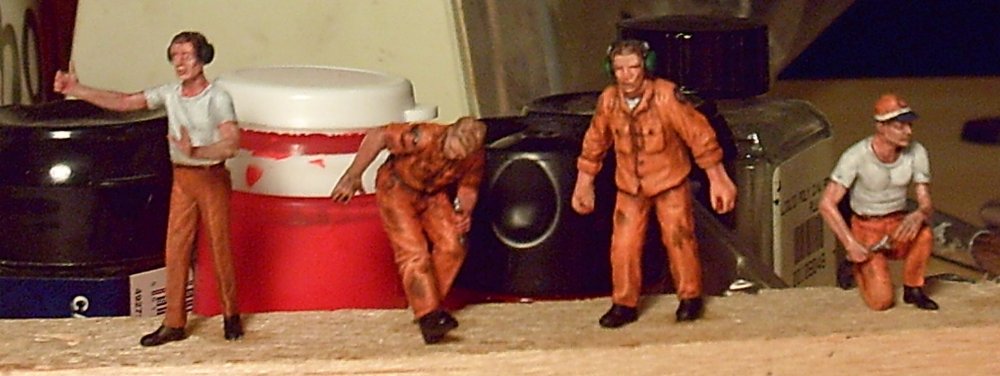
People asked about how I paint the figures. Here's a step by step thread. All these techniques will work just as well on 1/72 figures, although eyes may not work so well. This is a hasegawa figure (crewman using a generator, hence the odd pose - generator to come soon). The facial sculpt's rubbish, so I'd expect a similar overall result on a good 1/72 figure too. STEP ONE - Cleanup and Assembly First, clean up the figure parts. I use a ground down high-speed steel hacksaw. A good knife is essential. Cheap shoddy knives lose their edge when you scrape off flash, and bend their points when you use them to carve out flash from recesses (like belt edges). Note- I assume you've already degreased using warm soapy water! Assemble using a thick glue and push arms up through the glue to produce a bead on the visible (top) edge. This can be scraped away with your trusty knife when dry to hide the join. Don't worry about it if there are some small visible gaps, paintwork can hide a multitude of sins. Once assembled. CA the figure onto a block. Just a dab on one foot will do, you want to be able to snap it off when building your diorama. With the figure mounted, do any final cleanup. Use a large, stiff brush to dust off any particles of plastic. Your figure should now look something like: STEP TWO - Prime, Cleanup, Prime. First, get a big stiff brush. I use an old Citadel 'Tank Brush'. I use Citadel Skull White here. Thin your primer to roughly the consistency of milk, and with *very little* paint on your big fat brush, very gently (almost drybrushing) coat the figure. The paint will be splotchy, uneven, and will run into the recesses. If it beads up into puddles, either your figure is still greasy or you have too much paint on your brush. Don't put too much paint on at this point, the goal here is to highlight flash you've missed previously. You should end up with something like: Now, let that dry for a bit. As you were painting, you'll probably have noticed flash you didn't see before. Get your knife and scrape away: The paint also acts as a depth guide for gaps at part joins. Scraping at the join till the paint disappears will indicate a flush surface, which you may or may not want. Once you're done scraping, remove the scrapings with your big dusting brush. Finally, repeat the undercoat to cover plastic you've exposed by scraping and even up the coverage a bit. Since in this case our subject matter will be grimy and filthy, an uneven surface tone isn't that much of a disadvantage. You should end up with a 'fairly white' figure: STEP THREE - Base Colours. You'll need a couple of brushes here. Both need to have reasonable points. I use a Citadel 'Standard Brush' (Equivalent to a 0 or 1) and a Citadel 'Fine Detail Brush' (Equivalent to a 0 or 00). Both are sable. Sable brushes are flexible, fine-bristled and keep a point well. Cheaper brushes get stiff (which tears paint surfaces creating a horrible streaky finish) or flare (which stop you making clean borders). I have yet to find an acrylic brush I can get on well with. I use Citadel acrylic paints (although I'm thinking about shifting to Vallejo). They're very high pigment, water based paints. So no stink, and good coverage. They have a slightly rubbery consistency when dry, and are pretty durable to handling. Start with the smallest and 'deepest' visible colour area. In this case it's the techie's white t-shirt. This gets thin glaze/wash of Citadel 'Fortress Grey' - a very light 'cement dust' grey - just to provide some shading. Then the flesh - a solid covering of thinned Citadel 'Dwarf Flesh'. This is the 'pinker' kind of flesh tone you can buy (as opposed to the very pale skin tone). Ignore detail areas like hair, mufflers, and solid black areas that can best be done later like boots. Finally, the overalls. I use Citadel 'Fiery Orange'. A fairly solid colour is the objective here, but as mentioned since the overalls will be stained heavily, a bit of splotchiness doesn't matter. You should now have something like: STEP FOUR - First Washes. Two washes to do. On the overalls I use a mix of around 25% Flaming Orange 75% Scorched Brown. This is about the same colour as melted milk chocolate. Thin this mix to the consistency of milk and apply smoothly over the overalls. The wash will settle into the recesses. If it puddles too much just wipe your brush on the back of your thumb to drop some paint, and pick up paint from the puddle. On the face and hands I use a thinned 'Scab Red'. A mix of about 90% pure red and 10% black should be similar. Doesn't really matter, the tone you're looking for on the figure is 'skinless flesh', or a bad sunburn. Once done it should look like this: STEP FIVE - First Highlights. Start with the overalls. This is a run of drybrushing, so sort out your oldest, nastiest brush. THIS DESTROYS BRUSHES - NEVER USE YOUR BEST DETAIL BRUSH TO DRYBRUSH. I used Vallejo Flat Yellow, and Citadel 'Skull White' and 'Fiery Orange', for four passes. First I drybrushed pure Fiery Orange to pick up the highlights. On large areas I moistened the brush slightly to turn the drybrush into a glaze to help smooth out the wash. Then I mixed in a little yellow, then a little more, then finally a little white into the mix (ending up with a 'peach' colour). The face is highlighted using the fine detail brush and slightly thinned 'Dwarf Flesh', picking out cheekbones, brows, nose, upper and lower lip, and finally chin and jawbone. The fingers on the hands are picked out, as are 'pads' on the palms, and the outer edge of the back of the hand, leaving a pinkish area in the middle by the wrist. Several passes are done with thinner paint to build up a smoother highlight on larger figures. At this scale (1/48) a single pass will usually do. The second run of highlighting on the face is done with Citadel 'Elf Flesh'. This is the pale, pasty fleshtone. Thinned slightly and applied in layers, the 'two skin tones' / Verlinden technique works very well. At this scale a single blended pass will do. The result should look like: STEP SIX - Glazes and 'fine washes'. To blend together the previous stages, we now prepare a glaze of around 75% Fiery Orange and 25% Scorched Brown. It's a definate browny-orange colour. This is thinned slightly (not to make it a wash) and applied smoothly over the overalls. It's purpose is to tone down the yellowness of the highlights and brighten the recesses, basically unifying the colours. Pure scorched brown is used whilst the glaze is wet to line around the ends of the sleeves and legs. Doing this while the glaze is wet allows us to work toward the overalls, and blend in any overpaint. Scorched brown is also used to pick out the belt, and as very localised washes on the pockets, around the collar and under the rim of the hat. It should now look something like: STEP SEVEN - Details. The rim of the hat is painted with... um, actually the pot's not marked. I believe it's a very old Citadel 'Midnight Blue'. But it's basically Prussian Blue. Anyway, the rim of the hat is painted blue and highlighted with just a touch of white in the blue. Discs are painted above the rim (leaving room for the white stripe) and on the left shoulder. The eyes are picked out with slightly thinned Scorched Brown, and a very delicate wash is added between the fingers. Hair is painted with Scorched Brown. The feet are painted black. A black chevron is added to the right arm, and a thin black wash is applied to the hair. The blue should now be dry. White discs are painted inside the blue (for the UN Spacy kite badge). White is painted inside the black chevron. A white band is added to the cap. A red triangle is added to represent the kite in the badge on the hat, and a red arrowhead is used to make the kite on the larger shoulder badge. A few streaks of thinned black are added to the overalls and hat to represent oil stains - including over the badge. It's important to weather badges as this blends them into the overall figure. The ear mufflers are painted black. The band is painted Vallejo 'Natural Steel' (although any generic Silver is just fine). The mufflers themselves are painted Citadel 'Dark Angels Green' and highlighted with a little 'Goblin Green'. A non-drab dark green is the result. It should now look like: Ok, we're done. Snap the figure off the painting block (use a knife to pry it away if you have to - don't snap him off at the ankle!) and CA it to a 'storage block' - this stops figures rubbing against each other in a bits box before you use them, and makes them much easier to handle and check for consistency against each other: I hope this was useful to someone. Now - if someone could post a 'how to use an airbrush properly if you don't know the first thing about them' article, that'd be nice. Edited: Just to put pictures back in sequence


-
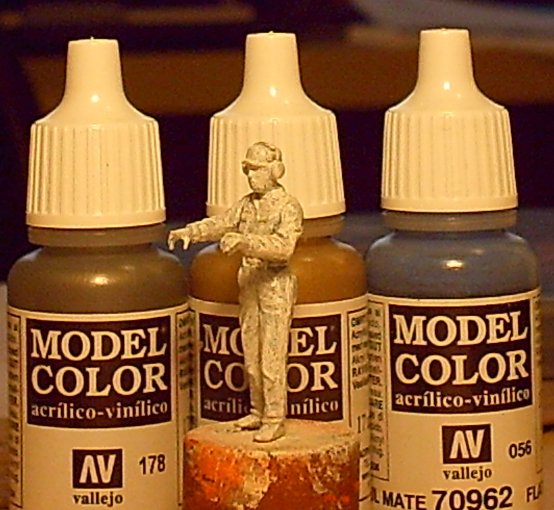
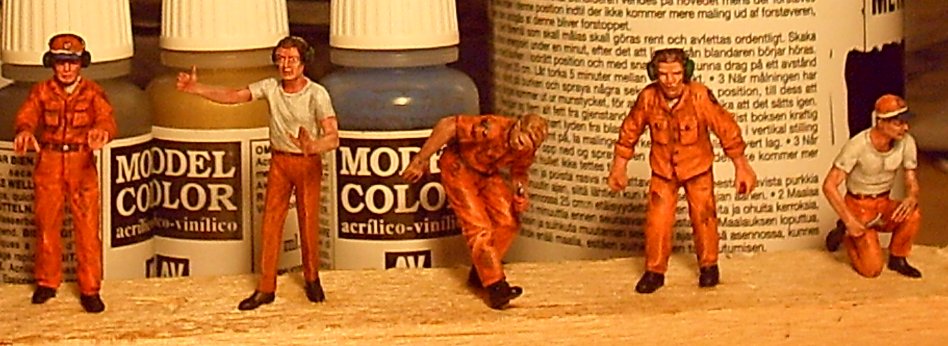
They're 1/48. Hasegawa US Ground Crew Set A (inner two) and Italeri combat aircraft support group (outer) sets. The paint pots behind the figures are citadel pots...
-
I've been painting ground crew. :-) [attachmentid=41384] A mix of Hasegawa (inner) and Italeri (white t-shirts).
-
Planning customising/weathering 1/48 VF-1J and GBP
winterdyne replied to winterdyne's topic in The Workshop!
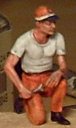
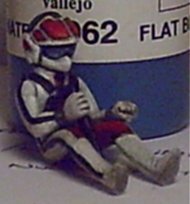
I've been figure painting (properly) for around 20 years. I'd say I got to 'pro' standard (as in I did commission pieces for quite a lot of money) around 10 years ago. These aren't up to that standard though. I've just finished my 4th techie (done 2 Hasegawa, 2 Italeri). Damn. I do not like the Hasegawa figures. They really don't paint up very well. Much more 'Macrossy' in style (big overalls) but the faces are like bad Dr. Who monsters. The Italeri ones, although being rather 'Korean' in style (very sharp trouser creases) lend themselves to painting much better. Even holding up to Verlinden flesh work (which on anything under 1/32 is in my opinion good). Much skinnier than the Hasegawa figures, but with very nice hands. Hands are important - they're a focal point on any humanoid figure. [attachmentid=41383] From left to right: Italeri 'slightly camp chap'. Fourth painted. Left eye doesn't stare like in the photo - there is actually an eyelid over it on the model which the camera didn't pick up. Hasegawa 'spanner bloke'. Third painted. Spanner's cute, and the hand's aren't *too* bad, but the face is godawful. Thank god he's looking down. Hasegawa 'Lurch'. Second painted. Oh jesus he's ugly. Nuff said. Italeria 'spanner chap'. Nice. (and I copied the hat from MechTech's avatar, thanks MT). All are painted the same way; if you want I can post a stage-by-stage for the next one I do, it's pretty easy stuff if you've got a half decent brush and a table to lean on. The valk I'm quite scared about. I really have very little airbrush experience. Getting the compressor on Sunday. :-)
-
Planning customising/weathering 1/48 VF-1J and GBP
winterdyne replied to winterdyne's topic in The Workshop!
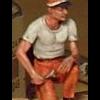
Thanks dude. Filthy orange is actually quite a challenge to paint and highlight properly. Was fun. Here's the result. Would have put it up last night, but I got migraines at the mo. :-( [attachmentid=41336][attachmentid=41337] That diorama... there's a couple of the Hasegawa ground crew sets in there, and what looks like a verlinden US Navy carrier tractor (anyone know any other firms that make these?)- but what are the trailers made from?
-
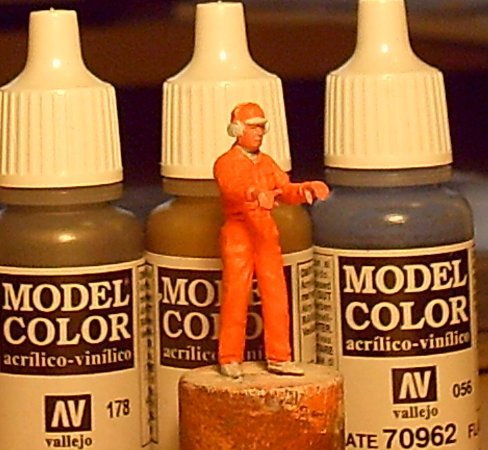
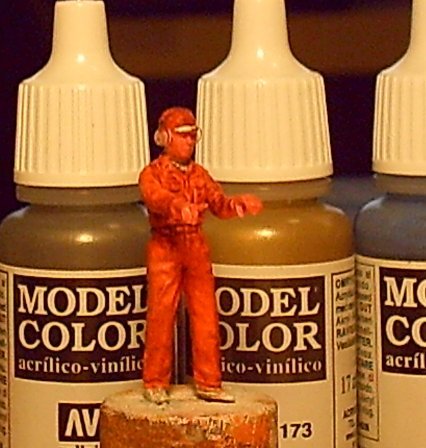
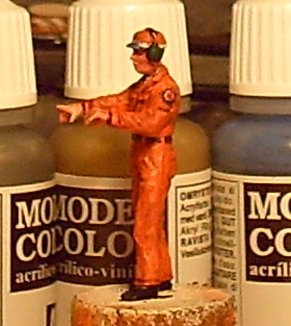
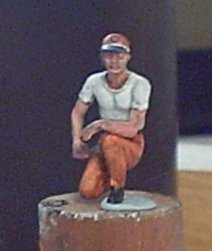
Planning customising/weathering 1/48 VF-1J and GBP
winterdyne replied to winterdyne's topic in The Workshop!
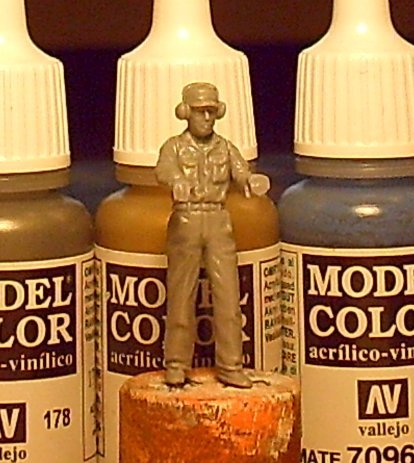
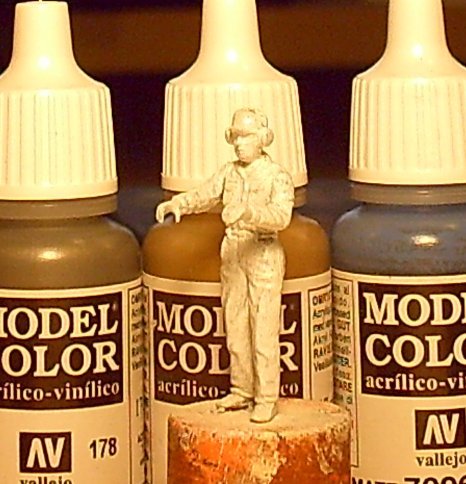
Hey all... well, I've actually started! It'll be another couple of weeks till I can go an borrow my brother's compressor and airbrush to work on the valk and gbp itself, so I've started with brush work on the pilot. [attachmentid=41302][attachmentid=41303] This is also the first time I've used Vallejo paints, having been using Citadel almost religiously (and Tamiya for airbrush work in the past). I have to say, I'm very impressed. I bought myself some 1/48 ground crew (the hasegawa set A and the Italeri Combat Aircraft Support Group). Jesus. The mould quality on the Hasegawa figures is disappointing. I don't think any of them will look reasonable at all. The equipment seems ok though. Italeri's figures are sharp and precise and will paint up nicely though. Next update will be 'bloke with spanner'. If anyone has reference links for UN Spacy ground support crew (or can remember any SDF episode with such chaps in) that'd be a great help.
-
Ugh, I won't be buying that. I really don't like the green on it. 3 shades of grey would have looked a lot better IMO.