

mslz22
-
Posts
1144 -
Joined
-
Last visited
Content Type
Profiles
Forums
Events
Gallery
Everything posted by mslz22
-
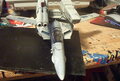
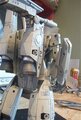
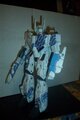
From the album: VF-1J 'Enigma' custom by mslz22
-
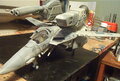
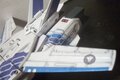
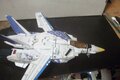
From the album: VF-1J 'Enigma' custom by mslz22
-
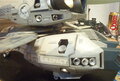
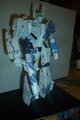
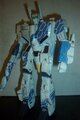
From the album: VF-1J 'Enigma' custom by mslz22
-
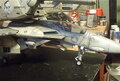
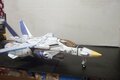
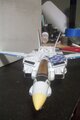
From the album: VF-1J 'Enigma' custom by mslz22
-
From the album: VF-1J 'Enigma' custom by mslz22
-
-
-
From the album: VF-1S 'Minmay Guard' custom
-
From the album: VF-1S 'Minmay Guard' custom
-
From the album: VF-1S 'Minmay Guard' custom
-
From the album: VF-1S 'Minmay Guard' custom
-
From the album: VF-1S 'Minmay Guard' custom
-
From the album: VF-1S 'Minmay Guard' custom
-
From the album: VF-1S 'Minmay Guard' custom
-
From the album: VF-1S 'Minmay Guard' custom
-
It will come with decals, in fact the run may be limited to the amount of decal sheets i have on hand, i think 11 or 12 sheets.... thanks mike
-
Hey Guys sorry for the long delay without an update, i am still swampped with other projects and do not get here anywhere near as much as i would like to....I am still planning on a 2nd small run of the monster but it may not be until fall at this point, all of my time is accounted for over the summer....sorry guys.... mike
-
At least until the end of the summer... mike
-
Hey Guys, sorry i have not been around in a couple of weeks, kids school vacation and my wife kept me busy every minute of it...anyway first off the last remaining orders are shipping between today and Wed. To answer a couple of the ?'s 1. These will still be available for a while, the molds are holding up fine.... 2. As for the choice of where to put the rotating ramp, it was put there for a couple of reasons.....it was not meant to be an exclusive detail to gantry, in fact on mine i have a valk sitting on it in fighter mode and another valk standing behind it under the gantry. If you had a sidewall you can prop up the gantry on the sidewall and put a valk or mech under it on the ramp. Also keep in mind that this whole thing was built trying to keep in as nonspecific and versitile as possible, part of my reasoning was the people would want to display as many things on it as possible, getting the best "bang for your buck" i.e fitting mech whereever you can on the floor.... thanks mike
-
Just wanted to be sure you got my response, your email seems to have bounced back to me, pm me here if you need more info.... thanks mike
-
Gap filling superglue should be fine, the way i did it was to hold the back panel, sidepanel, and floor together with the help of a square. I then put a large drop of the medium gap filling superglue in the back (so it did not get on the paint) joint where the 3 meet. The capliary action of the glue carries it down the joint for a strong joint, you can then sneak a little where the floor and the back wall meet. If you are doing more than 1 set, use the technique above and build on once that has set up strong. For the wall extension glue the wall support part to the wall extension first, check the length as trimming may be needed, then glue the wall extension to the back and side wall. thanks mike
-
It's a recast of the Yellow Sub kit, the metal tubes are a nice touch but are most likely just 4 K and S alluminum tubes....
-
I do not use any mold release, only a bit of baby powder, I still reccomend washing the parts but you do not need to go crazy, light soap and make sure the parts are dry before painting. A good auto primer applied in light coats should give you a great surface to paint on..... mike
-
Just a note to let everyone know these are starting to ship, i do not think i need to make any instructions but here are a few pointers.... 1.Make sure that you have a square on hand to make sure the back and side walls are glued up at 90 degrees/ 2. I suggest painting the panels seperately before assembly 3. When assembling the gantry be sure that the 2 parts glue up to 90 degrees, they should but if there is any stray due to casting you can make small adjustments by sanding the joint before gluing. 4.If making more than 1 bay you can use some strip styrene to cover any joints if you do not want to fill the seam with putty, it's easier to use the stryrene and you can paint the strip then glue everything together. 5.If you want to use your wall panel extentions flat instead of angled you may want to sand the angled edge flat, you can also run the part thru on a table saw if you would like. 6.Have fun with it....... Colors i used on mine, the base color is Walmart equipment grey primer, just about a buck at Walmart, Tamiya Dark Yellow, and Tamiya Haze Grey for the floor accents, both rattle cans. Let me know if you need any help with the assembly... thanks mike
-
They are resin,but i don't know if i would call it heavy, a single set is about 5lbs, but it's split up over the 4 main panels so no single part is bearing down heavy on another, it's pretty balanced....
-
I am not limiting these unless there is not enough interest to justify making a second set of molds, in which case i will only produce what the current molds will produce. No deadline other than the above condition. I am casting orders that i have received already, and will be shipping this in the order paid. thanks again mike