
SteveTheFish
-
Posts
289 -
Joined
-
Last visited
Content Type
Profiles
Forums
Events
Gallery
Everything posted by SteveTheFish
-
I do not know. It can be made to just hold and mess around with, but in order to get her to stand up straight on a shelf, I'll use a brass road going through one leg to ensure that she won't fall over. I've employed magnets to help make the heads swappable. You can see this in action in this video (set to start at the specific timecode):
-
I'm nearly done with my Priss sofubi figure. I just finished painting her eyes. She has red eyes. I added a bit of white to one side to give her irises two tones, then painted the pupils, and finally the light spots. Here is the back of her head. I guess now I'm ready for final assembly. I'll have to cut out her arm hole sockets to pop her arms in. She also has both a gloved right arm and a cannon right arm that can be swapped. I haven't really done anything with those yet, other than paint them.


-
It's all mixed together. I followed the instructions from Aoshima's Priss + Motoslave plamo kit that I have. It's not a very good kit, but it's OOP and expensive these days. The R&D project manager responsible for that kit told me that he wasn't satisfied with how it ended up. It is what it is. I'll build it someday. The instructions for painting Priss's figure calls for a mixture of something like 50% silver, 30% clear blue and 20% indigo blue with Mr. Color paints. What you see is roughly the same, but with V-Color vinyl paints. I picked up a package of pearlescent blue powder at the Winter Wonder Festival with the intention of mixing it with gloss clear V-Color paint, but actually I think it looks fine the way it is. I took a half day off yesterday to enjoy the cherry blossoms with my daughter and have a picnic with her. At night I was planning to do the touch-up brushwork for Priss, but I ended up connecting my Tenacontrols lighting kit for my AMT Enterprise E model kit to a breadboard and figuring out how it works. I'll see if I can get back to Priss tonight instead.
-
Here's a test fit of my Bubblegum Crisis 1:6 scale Priss sofubi figure. I'll have to do a little bit of touch-ups with a brush. I've painted her entirely with sofubi paints. mostly V-Color but also I've used Mr. Hobby Sofubi Color for the metallic black parts. The metallic blue color of her hardsuit is a mixture of silver, clear blue, and a bit of regular blue. It looks so beautiful! So I took a picture of this dry fit, then remembered to add that V crest on her chest. There's another head with her without a helmet, and I have yet to paint her eyes. I've employed strong magnets to make the heads swappable. This is one of those sofubi figures that will feature somewhat movable limbs.


-
The Japanese word "seifuku" means "uniform." Apparently Google Translate just assumes it means "school uniform." Also, I didn't notice this before, but she'll be a 3D printed figure, not a traditional resin figure like up until now.
-
Hasegawa posted this on their website just an hour ago when it turned noon. TV version 1:24 Misa with Super Valk Eggplane. http://www.hasegawa-model.co.jp/product/65899/

-
A vivisection on a plushie shouldn't be necessary. It's been forever since I lived in America, but I believe you could use a Bounce dryer sheet. Dad and I used to call those "Mom Bombs" when I was growing up because sometimes putting on clothes one might fly out of a sleeve or something. I use a vent filter to get that sort of effect. In fact I used that on the Valkyrie I posted pictures of a week or so ago. Just make sure there isn't a pattern going in one direction and that it's an even pattern. In any case, give your kid a hug for lending you that stuffing. With all the kits you're building one after another, make sure you get plenty of "dad time" clocked in. There's an ebb and flow to parenting, it seems. A few years ago, I used to get a lot more hobby time as my daughter was off in her own world most of the time and I had to give her space. Now that she's nearly 18, she's become a magnet girl again. Sometimes she'll walk into my hobby room and demand I come and flop on the pile of pillows on the floor with her. Hobby time is sacrificed, but by tomorrow she'll be a day older. This is my hobby room/nerd cave. The pile of game pillows has increased since then. https://stevethefish.net/stuff/index.php/2024/08/31/my-nerd-cave-late-at-night-updated-august-2024/ She says my hobby room is relaxing. Did you get the memo about the TPS reports? We need to talk about your TPS reports.
-
Oh wow, that was quite a masking endeavor! Did you build that figure? It looks fantastic! So just mixing flat white with the flesh color, huh? I'm thinking... Perhaps I'm wrong, but I kinda like Rei being pinkish and Asuka being orangeish like in that photo, but I'm the last person to make a solid judgment on colors. So Papa Rat, fleshtones can be obtained with either fluorescent orange or fluorescent pink. It sounds weird, but that's what does it. Add in flat white with a bit of tan color to the shade you want. Different variations can be obtained too. In the picture below of the Eggplane Girl, to obtain that Chinese skintone with Mr. Color paints, I added Fluorescent Orange and Flat White to a base of Sandy Yellow. For the Nadia I'm working on that Tekering printed for me, I'm using Tamiya colors; Light Brown, Flat White, and Orange.

-
Mr. Color 111 and 112 are the easiest fleshtones to go with. Use 112 as the base and 111 on top. Tamiya's flesh color is not good for anime figures at all, so stay away from that. Mr. Color makes other fleshtone paints as well as Gaia Notes. I suppose Vallejo does too, but I am not familiar with that brand of paint. I have that same kit as well, but I haven't really looked at it yet. Go with a dark green first and then highlight it with the lighter green. I'm colorblind, so you'd be better following your own instincts with that. Or you can use dark green artist chalk to go over the recesses in the hair sculpt.
-
Thank you for catching my mistake! The wings already have the 012 decals on them as they should. I made a mistake without looking at the instructions when I put the 013 decals down on the other parts. I used Mr. Mark Softer, then scraped them off carefully with my hobby blade. Yesterday I put the proper 012 decals where they need to be. Thanks! @Papa Rat Make sure you scrub Millia with detergent an pumice powder with warm water, but be careful with the hair. The frustrating thing with resin figures is when you lift masking tape off and it yanks the paint down to the bare resin. Soak the parts in hobby-grade lacquer thinner for a bit too if you can. The parts of plastic model kits by Japanese makers don't need to be washed, but resin kits certainly do. I wash the parts, then wash them again. After doing all the sanding, wash them again!
-
If I may ask again, where did you buy these? Is "Admiralty Model Works" another one of those "We only sell on Facebook" entities? I did a search on Google and DuckDuckGo but only saw links to Scalemates.com.
-
Nice! Are those scaled to fit the Moebius Galactica model? Where did you buy those?
-
Yes, it's the same kit. I sort of lost track of this build last year and I hadn't posted an update on it for a while. I was documenting the build here and there, and I'll probably have another video done soon.
-
This is my first Hasegawa Valkyrie. I'm building it as Kakizaki's VF-1A. I chose to paint the green stripes, especially after the decals went bad and the replacements I got didn't come with green since Hasegawa no longer makes the VF-1A kit which was their very first kit they released. The decals are still in the process of relaxing. I sprayed the paint job through oven filter sheets to give it a dirty look. I also did the surgery to put the engine nacelles in a straight position.


-
Oh wow, you must've procured those designs elsewhere. I think I saw those on Thingiverse. All I did was send you the cockpit interior STL files. I can send you the rest if you'd like. As for myself, I think I'll finally get started laying down decals on my Kakizaki green VF-1A from DYRL by Hasegawa. It has a gloss coat now and is ready to go. I've been slowly working on this for a couple of years now, always getting distracted. I can post pictures of it tonight. It would otherwise be a slow evening after work and the perfect opportunity for hobby time tonight, but today is the commemoration of the female spousal unit's manufacture date. She turned 49 today. Which is fine, but I turn 50 on Sunday. Crap.

-
 I assume that Irem made the R-Type license open to everyone and for a good price. I now have the gachapon R-Type set by Toys Cabin. They are rather nice, with good metallic colors on the engine bells.
 -
I'm with you. TOS Galactica is dear to my heart, and as a little boy I wanted a brown suede jacket with all the buckles so badly, way more than Han Solo's vest. Corny as it may be, I appreciate it for its campiness. I tried giving nuGalactica a try, but it didn't sit well with me. They turned Starbucks into a sexy chick, they turned Boomer into a sexy Korean chick, the chrome Cylons were turned into Replicants, and all of Ralph McQuarrie's designs were trashed. The Cylon ships look like hood ornaments. "Oh but Steve, I mean Greg, the original TOS Cylons show up in the 4th season in one episode..." I DON'T CARE. I was hoping that the remake show would capture the look and feel of TOS, and they sort of revive the Viper as an "older model" that remains faithful to the original design, but pretty much everything about it was a disappointment. I have to say that the best design from the reboot show is the Pegasus, as Ted mentioned. Fantastic. I started my TOS Galactica model kit several years ago, but as I was trying to figure out the timer chips to create the runway chase lights for the hangars, I couldn't get them to work right and I shelved it years ago. I really need to get back into doing electronics...
-
As I posted in the "What will Hasegawa do next" thread, I visited the Winter WonFes event this past weekend. Here are videos and photos of the event. YouTube: The video is mirrored on Odysee: https://odysee.com/@stevethefishdotnet:2/Wonder-Festival-Winter-2026:e And a photo gallery on my website here: https://stevethefish.net/life/life152.htm
-
Those Macross F ships are GKs. This was the table immediately to the left of Hasegawa's table, so coincidentally it was just the next segment in the sequence. When I was compiling this for the video, I thought that maybe it might confuse people, thinking that these were Hasegawa kits. I just decided to roll with it. The other ships I could't recognize what they were from.
-
You're welcome! Of course, this was just my bias, focusing on older anime and video game items. I saw some GKs where people were crowding around, taking photos. I couldn't recognize the characters, so I just passed by. Then after hours of walking around, I met up with friends and their friends. They showed me the stuff they bought and it was all sorts of cool stuff I'd passed over without noticing. There was an animation mistake in one episode of Macross where an animator really messed up with Kakizaki's VF-1A head, adding additional cannons on the sides of the head. my friend Adrian found a resin head of that mistake, which can be added to a Hasegawa (or maybe a Plamax) Valkyrie kit. Oh yes, and someone had 3D printed a pilot figure for the Hasegawa Glaug kit, but I was too late and it was sold out by the time I found it. Drat! Although for a 3D printed figure, I think the seller was asking for too much. I'd like to see someone design one for Cults3D or Thingyverse to go with the Hasegawa kit. I took pictures of the event too. I'll make a gallery and put it on my website. Hopefully later this week. There is ONE Windows program I miss in Linux, and it is Photoscape. I really wish there was a Linux version of this program. It can run photos through batches. It can auto enhance, auto contrast, resize, and rename photos in batch processes. Very easy to use. I still have yet to find a program like that for Linux.
-
He does fine work. I had Ted do that Nadia figure I posted earlier. I also had him redo the K'Tinga parts that another friend of mine did for me that ended up warped because he didn't support the parts properly.
-
I was at Wonder Festival and saw the N-Ger in-person. I still haven't gone through the photos yet, but last night I uploaded a video.
-
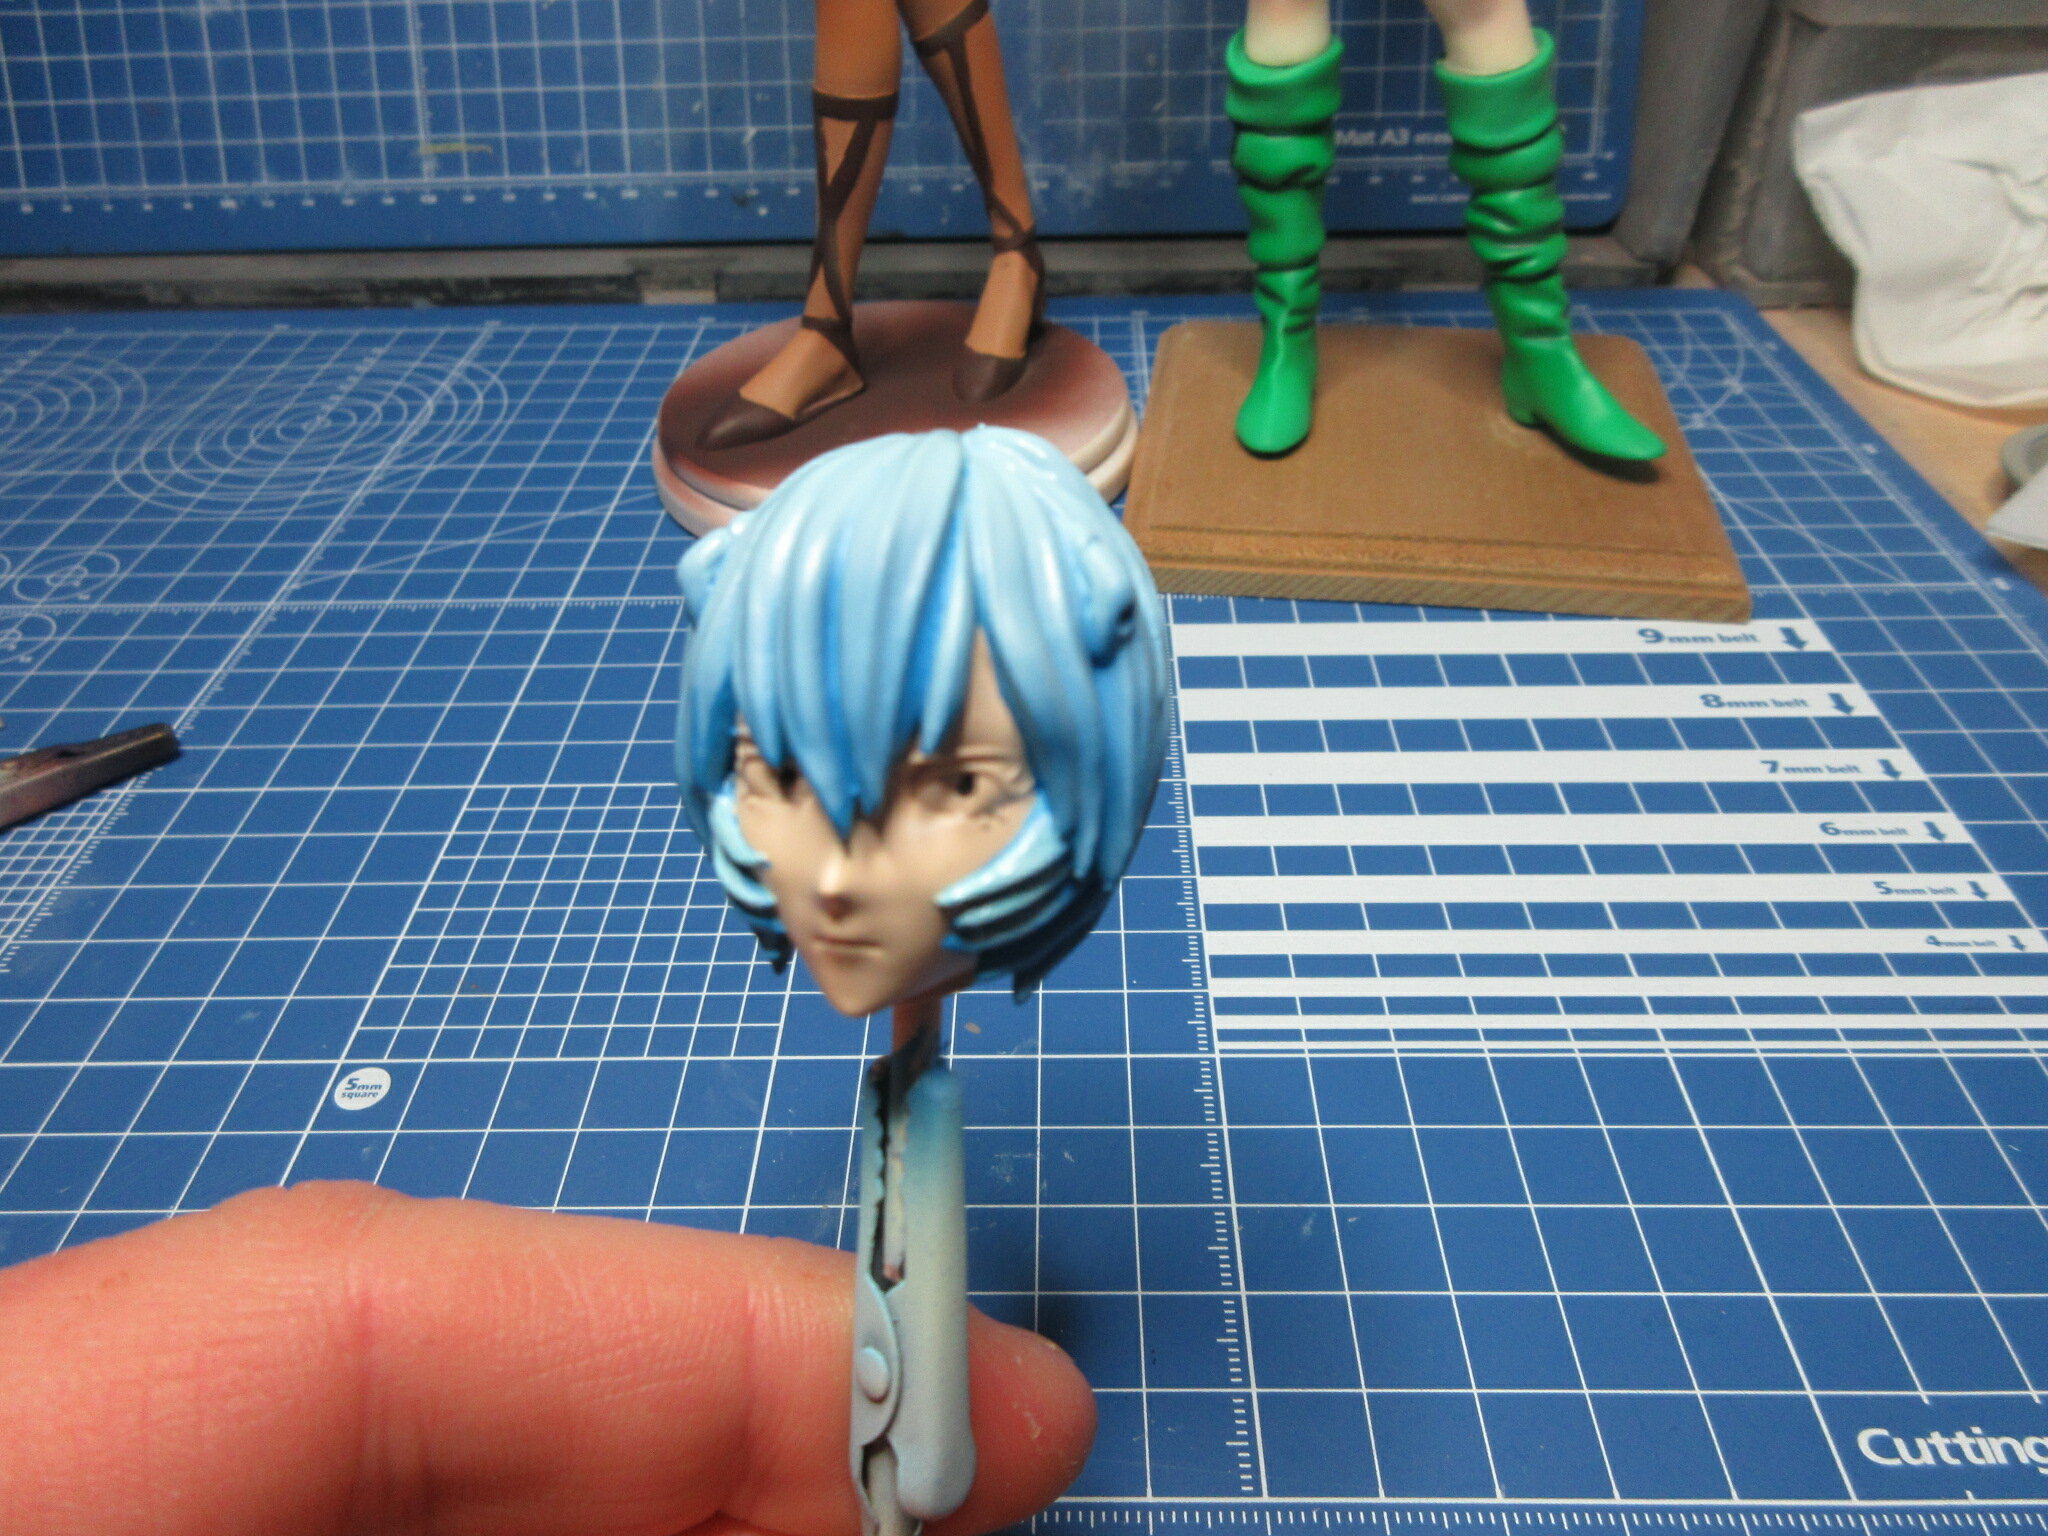
Thanks, guys! Thom, you've gotta watch Record of Lodoss War. The original OVA by Madhouse is legendary, with incredible vocal opening and ending themes. I normally don't care about anime vocal music, unless it's Macross, Lodoss, and BGC. The OVA was done before the novels were completely written, so its ending is considerably different from how it was meant to be. Later there was a Lodoss TV series that mostly glossed over the events of the first story arch, then it covered the Leylia redemption arc. The second half revolves around Neece's capture, who is the daughter of Leylia and the wizard Slayn from the first story arch, now a teenager. The sorcerer Wagnard captures Neece to sacrifice in an attempt to resurrect the Goddess of Destruction, Kardis. In the OVA version, Wagnard captures Deedlit to sacrifice to Kardis and Parn must rescue her. Unfortunately, there is no clear-cut way to just sit down and take in the entirety of Lodoss and have it make sense. The OVA is all about Parn's hero's journey. But only the TV show features the "next generation" characters. Chas, I'm pretty happy with how Deedlit's hair turned out. I've only temporarily attached her head because her cape needs to go on first, and then her head/hair. I also need to attach her side locks that go on in front of her ears. I'm also working on a 3D-printed Rei figure. I first airbrushed her skintone, then masked it off and airbrushed her hair Mr. Color 34, sky blue. I managed to find the official Rei hair color by Gaia Notes. It's too light, I think, so I just sprayed it from a top-down direction to provide a gradation.
-
I'm glad to see this finally happening. For a while, Aoshima was going to release this Silent Moebius police spinner. There was one on display at their boot at a hobby show several years back. I asked and this is a completely differently-tooled venture. As for me, here are the two figures I've been working on. The Nadia is a 3D print that Tekering made for me. Deedlit is a sofubi I started on almost 2 years ago and I'm nearly done. I need to heat up her cape so that I can wrap it around her. As it is, it's too stiff.

-
@Chas The Bronco looks great!
