cool8or
-
Posts
1287 -
Joined
-
Last visited
Content Type
Profiles
Forums
Events
Gallery
Everything posted by cool8or
-
This is great! You are getting the right looking!
-
Minmay love here! GREAT! I'll be watching this build!!
-
But Glaug Booster was in 1/100... it was a Samurai Monkey kit.
-
XVI - Glaug XVII - Cat's Eye And don't forget the non 1/72 Macross Models: - Picket Patrol Ship - Quiltra-Quelamitz And the Garfish of Mospeada
-
Nice Defender! I have to build mine! Anyway, here is my Gnerl:
-
This is great, ahiachris!! If you decide to produce it as a kit, count on me!!
-
I also have the problem with the clear tips, but it seem like only happen with model kits painted with enamels. See, actually I have 4 model kits displayed with Flightpose stands: 3 of them (VF-4, SDF-1 Cruiser and a Legioss+Tread) were painted with enamels, and in all these cases, the rubber tips stuck of them. Even more, It's like the paint is "melted" by the rubber tips. My lastest model, the Gnerl, was painted with automotive acrylic paints, and don't have this problem in absolute. I finished the Gnerl in December, but just this weekend I took it off the stand, so I verify this theory before to know about this thread. Also, you have to consider that the Gnerl is too much heavier than all the other model kits together. I'll take some pictures of the models affected, that way you'll can see the marks on the paint. Ah! And I have a base cracked, too. PD: Even with these problems, Flightpose is my favorite stand!
-
Yes gigawatt, I have been uploaded the final pictures, you can find it here: http://www.macrosswo...showtopic=34703 Thank you for following this step by step!!
-
In that case, I want my fee!!
-
Wohooo!!
-
Thank you for your coments! These are the last pictures.
-
At least! Here are the final pictures of my Gnerl, I hope do you like it!! If you lost my step by step of this model, you can found it here: http://www.macrosswo...showtopic=33224 I have a couple more pics, so I'll wait your comments to can post them.
-
Thank you Petar for your advices. Guys, I have been uploaded the final pictures, you can find it here: http://www.macrossworld.com/mwf/index.php?showtopic=34703 Thank you for following this step by step!!
-
So, here we go Sketchley! I feel disappointed with the result of this step. The idea was to give more depth to the chips, but doesn't look integrated with the original chips. Next time I'll try to making them with brush, or another "salt" step. However, this technique is used in "normal" 1/72 model kits, and I used it before, you can appreciate it specially in my Destroids. You have to wet the sponge with a little amount of paint (in this case, I used water based paint), and clean the excess with tissue paper. The secret is to make very little spots, wich have the aspect of a chip. I use a metallic paint, to simulate a deeper chip, until the chassis of the ship. Once fishished our wheathering, we assemble the final parts and we put it in its flightpose... this is the perfect stand for this baby!! And this is it. Tank you for your patience, I hope that you enjoy this step by step. Tomorrow I'll open a new thread with the final pics... any comment is well received!
-
Yeah, I can't post more to 9 pics at the same time, is the limit of this forum... Do you remember the monitor? Well, I put a couple piano wires in the back, it supouse that they comes from the camera in the nose (please don't ask me how the zentadis look from the sides! Camera from the nose: Final assembly, I apply a flat coat. This is important to the adherence of pigments. And the pigments. I use Tamiya's Red Rust, yellow and soot. MIG's "Industrial City Dirt" is used for general dirt. Application is too easy, just as you see in the picture! Brush is used to spread and smooth pigments, getting a natural effect. There is only 1 post left to finish this step by step! Thank you for posting!
-
As you command, sketchley!! I made panel lines with water-based paint. Excess is easily removed, because the color base is laquer: I cut some black decals to make this detail below the knees: A flat coat and we are ready Some cockpit details. For lights, I apply a coat of silver paint, and after that, transparent red or blue. And there are more to come!!
-
Thank you Lobizon! It's my fault because I think that I already posted these advances, two months ago... Anyway, we are closer to the end!! When it's ready, I painted with transparent green. I used Alclad paint. Glue it with some cement like this. If you use CA glue, you'll have an ugly white spot, so listen to me!: Some masking: And remember, there are more pictures!
-
Thank you for your comments!! Now it's time to work in the pilot. I mix red, white and blue to get the armor's violet Some masking: For internal parts, I used water-based paints: So, here we are. I paint some details of the face with enamels, this way I can fix any mistake no affecting the base color. I used the smaller brush that I found. I cut the visor of the hermet very carefully. At the end, you can use some sand paper I have more pictures to share, so please post! I can't post more pictures if I don't have a post from you.
-
Thank you Jardann!! To enforce the aileron support, I add plastruct strip Missiles bays Missiles and their thursters: Gnerl's back: Panel details: I have more pictures to share, so please post! I can't post more pictures if I don't have a post from you.
-
Wow! How do I missed this thread? Amazing work! Inspiring!!
-
In some cases you need to put a white decal before, to achieve the original colors of the decal, without a white border: Here we have a little mistake: I have to put some decals above a chip. I'll have to try to hide it with pigments. However, I apply a gloss coat between the white decal and the clear one. Other decals: I have more pictures to share, so please post! I can't post more pictures if I don't have a post from you.
-
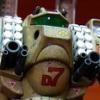
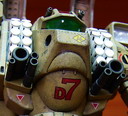
S**t!! Finally I got the time to post the last steps (I finished the model on december), but I see that I never post the previous one! So what the hell, here we go: The cockpit monitor is made of clear resin, so I take advantage of this to give it some depth. I used compound to polish the front: Behind, I made 2 holes to put some wires: I painted white as color base, and after light blue with some gray. I add 2 lenses to improve the look: I choose a image from the first episode, to be used in the monitor: I print the picture in clear decal paper: To finish the monitor, I add a piece of transparent plastic that I got from scratch. A curved monitor certainly give it a 80's look: Now the decals. To make them, I download the zentran fonts from here: : http://www.searchfre...e/zentraedi.htm I just write things like "no step", "beware of blast", "danger: Missile discharge", etc. I printed in Testor's decal paper, apply a decal bonder and cut, you have to left a little margin, to avoid that the tint "scapes" in the water Please remember to comment, only that way I can post more pictures!
-
The etching parts of your second post are from Jasmin Models, not Hasegawa: http://www.jasmodel.com/Top_E.htm Anyway, colored PE parts look great!
-
Great work! This will be my new wallpaper!! Thank you for sharing!!
-
Haha, I's the same kit that I wanted to start right now... but now I don't know!! Yours look fantastic... I wanted the same perfection!