

Palantirion
-
Posts
98 -
Joined
-
Last visited
Content Type
Profiles
Forums
Events
Gallery
Everything posted by Palantirion
-
- Thanks! Your take on it is pretty much as I intended it to feel.
-
As an attempt to reduce the introduction of this painting to the bare essentials I will say that it started as a blind amalgam of three things I love: Vintage pin ups, kimonos, and anime. It is acrylic on canvas and 24"x36". It is the first of 4 pieces, representing summer. I thought that Minmay has an appropriate personality for that season so I chose her as the subject. I am currently working on Winter, represented by Lucy from Elfen Lied, and plan to use Fujiko for fall and Chidori from FMP for spring. But back to Minmay...I tried to adhere to her representational style from the original series, but with my own original pose. The kimono patterns took the most time, mainly because of the research involved to keep them respectfully plausible. The background uses geometric patterns for fireworks, streams, mountains and waves. Her kimono is painted as if hung behind her and we are seeing it through her body. The kamon is the SDF logo, and there are various plants and butterflies from early summer. Her kanzashi is pampas grass and morning glory. Her obi is embroidered with roses. And of course all the colors are season-specific. I would encourage a wide range of discussion, as I am quite interested in all your respective feedback. Including criticism. Please know two things: 1) This picture is not a great photograph of the piece, and I will update it if I can take a better one. 2) There are metallic colors used for all the linework, and the obi, obi jime and obi-age. Their effect doesn't really show up in a still shot,
_72.jpg.ac43dd1f18547614d0a5dba3f63b51f9.jpg)
-
A most excellent project!
-
What are the rules for posting what would technically be a NSFW painting? In this case it's roughly on par the shower scene in Macross - naked, not sexual.
-

[not] Macross mini model build, but genre related
Palantirion replied to Palantirion's topic in Model kits
-Rex runs a great channel, I've watched him a lot but must have missed that vid. It wouldn't surprise me if his fingernail test scratched it off if he sprayed it without a primer (which is his usual spoon test process). I'll see how things go with a test on my end, I'm curious as well. -
[not] Macross mini model build, but genre related
Palantirion replied to Palantirion's topic in Model kits
-Interesting, and good to know. I didn't notice it being fragile at all, and I touched the cured black base edge a lot. Your suggestion makes me think I should do a durability swatch with and without clearcoat and also layered with clearcoat between. -
Outstanding upcycling! Have you considered brush seal to keep dust out? I use this size most often on my aluminum cases, but there are other sizes that might be more appropriate for the smaller gaps in your white ones. https://www.amazon.com/gp/product/B084TZWFQV/ref=ppx_yo_dt_b_search_asin_title?ie=UTF8&th=1
-
Hello again, it's been a while since I last posted. Been getting more into toy repair and model building. Just finished this little guy and while it's not Macross, I've always conflated Dougram and Macross because of the Robotech and Battletech appropriation that I grew up with. So I hope that's understandable. The kit is by Max Factory, PLAMAX MF-57, depicting Dougram after its (spoiler alert) heroic scuttling the end of the series. Most often this scene is portrayed years later with Dougram completely oxidized and sand colored. I wanted to put Dougram in a more immediate context, shortly after the fires would have died. As you can tell from the kit (and the series), Dougram was not actually "blown up" but self-destructed more internally and remained visually intact. To that end my primary focus would be on the effects of flames on his paint and the terrain. Test fitting, with an old die cast 1/144 Dougram to compare scale. The kit was beautifully molded, but for some reason the backpack cannon had a flat tip! So I drilled that out. I also (not pictured) cleaned up and scribed lines to properly separate the right forearm from the right leg where they cross. Then my first attempt at zenithal priming. It was tricking to get the model assembled without fully gluing it, as would need access to inner details later. Not the best zenithal, but it was useful as a road map for shading later. Then thin washes to lay out the colors. Note most of Dougram's signature purple paint was painted in a dark silver. Washes will come later to add some purple over these areas as I wanted to show how the heat from the fire had burned most of it away. The base painting more-or-less complete, really more of a block-in. I would go one to refine the highlights and shadows to exaggerate contrast because of the small size of the model. I was not happy with the slightly sculpted but smooth base. Sure, at this tiny scale we shouldn't see grains of sand because in scale they would by big rocks. And where Dougram was scuttled it was open desert, no rocks or distinctive terrain. But the base needed some sense of texture. So I experimented a little and ended up going with a mix of PVA and baking soda (with a little water) and that gave me a nice faint read of texture that I then enhanced with a couple different tan washes. The blast and fire soot was drybrushed using Muso Black. I haven't heard of people using Muso as an alternative to typical flat blacks, but I find its extra darkness reads really well as soot. You can also thin it to do washes. I used water soluble oils to add oil staining and hydraulic fluid runoff. Then more refining of the paint tones, chipping, subtle heat-staining around the right side of the torso (exit of the self-destruct fire) with red and yellow inks followed by Muso drybrushing. Then weathering with Tamiya powders and more refining and touchup. A pic with Dougram finished, posing with the paints used: Finished pics:
-
So good news...I fixed it! After some careful measuring and testing with my 3mm jack extension cable I concluded that the male end was appropriately fixed but the female inside the SDF-1's body was either recessed slightly too far and/or not secure enough to make a positive connection. So I took a large flat file to the indexing stud the male jack sticks out of, shaving off around a mm. In doing so I noticed that the deck of that stud was far from level. The attached pic is at about the halfway point of the filing, when I was done there was still a small bit of the original paint visible. After shaving it the male jack was able to go into the female far enough that the lights turned on!
_72.thumb.jpg.65c721da291164724d616296ca35e155.jpg)
_72.thumb.jpg.eeffd59c9b7414597eec931a41a0924a.jpg)
-
Thanks for the replies guys. My thought about adding solder to the male end stemmed from noticing that it's only a 2-part jack and that the barrel is very long compared to the tip. So if I added a mm or so of solder to the tip, the rear barrel portion could still make contact anywhere along its (appx.) 4mm length.
-
Hello all, it's been a while since I've posted. Over a year ago I got KidsLogic's 1/6 scale VF-1 cockpit, and aside from the enormous weight it was easy to put together and everything worked...for a little while. This year I received my 1/1200 SDF-1 statue/speaker system (do note that the speaker base was radically reduced after the preorder phase ended). I have technical issues with both products and I have exhausted every avenue of communication with Kidslogic that I could think of: Direct email, FB messenger, FB posting (which was deleted), I even contacted BigBadToyStore to see if they, as a vendor, had a way to contact them unavailable to the general public. There was not, and their request was ghosted too. So it appears that I must fix these problems myself, and thus I thought it might be useful to brainstorm solutions with this fine forum. Issue 1: The VF-1 cockpit's primary LCD panel no longer activates when I power on the unit. All the other LEDs illuminate and cycle as they have before. The LCD panel did work when I got it, and worked after I moved it to the unit's current location on my desk. I do not know how to test to see if the display is bad or if it is simple a bad connection. I cannot tell how to access the internals of that part of the statue. Issue 2: The SDF-1's right side giant shoulder cannon barrel does not light up. From my tested I know that the barrel's male 3mm jack does receive power correctly and the LEDs do light up when I use an extension wire. And I know that the main body's female 3mm jack is outputting power correctly. So it would seem that there was an issue with the fitment or molding such that it is not possible to push the cannon far enough into the main body so that the tip of the 3mm male jack properly contacts its target on the female end. I was wondering if there was a way to simply extend the tip slightly - maybe simply by adding a dot of solder? These issues, and the poor fitment quality of my 1/2 scale Mospeada Ride Armor from them, and the complete lack of support for their products make me seriously question if I would ever buy a Kidslogic product again.
-
That is possibly the least aerodynamic subject I could think of to make glide. Very impressive project so far!
-
*subscribed* for purchasing. Great work!
-
-Yeah, I think you are right. Good find, thanks!
-
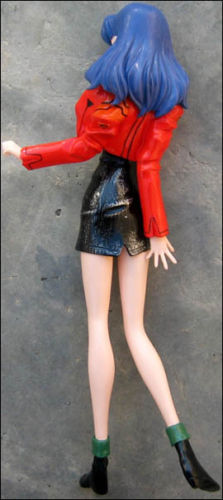
- I appreciate the help, and the direction. Hopefully a mod can move the thread to the right place. Apologies. That kit does look VERY much like my figure. Although in the instructions pic the sleaves are shown rolled up. But in the pics is looks right. Thank you VERY much for this link!
-
1/72 (really 1/100 IMO) arii glaug build w/mods
Palantirion replied to mslz22's topic in The Workshop!
*Subscribed* Looking forward to see your work... -
Very nicely done!
-
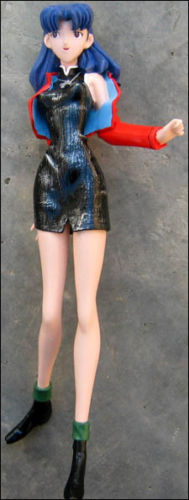
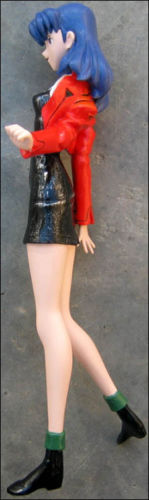
I thought there was a forum section here for Evangelion, but perhaps I was mistaken. But I know many of us on MacrossWorld are also knowledgeable about Evangelion. As this concerns a toy I am placing the thread here. No offense meant. I need help identifying this figure of Misato. The seller on eBay didn't know jack about it, and I didn't pay much. It was listed as "Misato S3 Resin Statue”. It is somewhat heavy, cold to the touch and appx. 1/7 scale. It bugs me to not know where it came from, as I keep good records of my collections. If anyone can help I would appreciate it.
-
Hello, I searched through threads but did not discern if there was a concensus on a current fair price for the Hi-Metal Regult Missle two-pack. I'm not sure if the missed the buying window. It's hard to find many to comp right now.
-
Oops, well thanks for the re-direct.
-
So i didn't already see a thread about it. What can we expect? It's an unusual scale for a toy, unually 1/72 are model kits. I am not familiar with the company's history. https://hlj.com/product/kzc10028 Might go great with my Yamato destroids!
-
Well, AAA is completely useless. Was bounced around to a few different departments until I got a local office that basically told me to pound sand. Every item would need to be appraised, as opposed to only higher value items. So that's a deal breaker. Was also told that my homeowners personal property coverage is not a blanket amount but subdivided into categories and each has limits - very low limits. And collectibles as a category are more covered at all, despite obivously being personal property. Americancollectors answered their phone, and was easy to deal with. Their quote seems a bit high, but I need to get others. Collectinsure didn't pick up their phone, presuably it was after hours but their message didn't say what time zone they are in or what their hours are. I'll try them tomorrow.
-
-Thanks, I'll give them a call. Any tips? Things I should ask/avoid? And have you had to file any claims with them? How did they perform?
-
Hey guys. My collection has increased to the point where I believe it prudent to aquire insurance beyond my homeowner's personal property coverage (AAA). What insurance options are there for collections? My concerns revolve mostly around protecting the replacement value of the items, which means not depreciating them out of step with the market but indexing reasonable appreciation. What companies best understand this?
-
Awesome!!!

_72.jpg.8f483ef1d7c061312062c6a00149286e.jpg)
_72.jpg.bc6492138a48e1f3f3fdc1b9b07991a5.jpg)