
honneamise
-
Posts
483 -
Joined
-
Last visited
Content Type
Profiles
Forums
Events
Gallery
Everything posted by honneamise
-

What is lying on your workbench?
honneamise replied to Tuffskull's topic in Hall Of The Super Topics
I´ve seen this kit at a dealer and I noticed the openings for the flight pods are too big height-wise, but other than that the kit looks great, especially the way you built it. The colour scheme is very subtle yet brings out the best of the detail! Deployed guns? That would be cool... looking forward to more pics! -
What is lying on your workbench?
honneamise replied to Tuffskull's topic in Hall Of The Super Topics
Here is the finished product so far. The building is giving me some headaches. 407100[/snapback] Wow great work, VERY well done!!! Adds some real "life" to the model -far better than the usual "standing around" or "holding gun"-pose!- and brings back memories of my 1st time watching Macross. Can´t wait to see a full diorama with a VF-1D! -
Wow Battletech miniatures, I still have most of the old ones. Back then friends kept asking me why I was painting them in those funny colours like white with black stripes! Need to check some boxes in the basement, I should still have the equivalents for the 4 destroids, Glaug and some Valks. Seems soo long ago....
-
What is lying on your workbench?
honneamise replied to Tuffskull's topic in Hall Of The Super Topics
Their ships look better, but I think issues like wrong cross sections are even more easily overlooked in the "naval department". People tend to praise this exquisitely detailed bofors quads but don´t see a wrong bow section that easily (as in the Hornet kit). Another example is their "Pittsburgh" cruiser family (1/700) which has the whole armour belt/bulge assembly upside down(!) Modern processing techniques mean nothing when there is no devotion to the subject involved. Trumpeter are just copying the "look" of a well researched and executed japanese kit but they don´t actually pay anyone for an in-depth-research. Even with the ships, I rather stick to the old brands. IMO there is no better Battleship kit than the old 1/400 RICHELIEU from Heller (does anyone even know that ship? ) -
What is lying on your workbench?
honneamise replied to Tuffskull's topic in Hall Of The Super Topics
Chad you should look at it from above, my GF said with that nose it looks like what most men dream of... what were the Russians thinking? The kit was brand new BTW. It seems they use a strange kind of plastic. Bends easily and you could scribe it with a pencil I guess. If you have a kit molded in silver you often see streaks with darker/differently pigmented plastic in it, seems to have something to do with the pouring process. You usually paint it over and that´s it, just a pain for those who don´t want to paint their kits. Now Trumpeter seems to have the same problem but with grey plastic. No coloured streaks here but there areas with a totally smooth surface next to one with a rough, grainy surface. Even with the soft plastic this is hard to even out with sandpaper. The effect is not that noticeable, if you have a camouflaged jet you might not even notice it, but with my silver finish I had a real problem. I don´t know if I have a "typical" Trumpeter kit here or if this particular one is was just made on a bad day.... same with the decals, no reviews on Trumpeter kits state any of these issues, neither with the plastic nor the decals. Just bad luck I guess. But still, I even forgot to state that the wings had the wrong angle, the plane looks like a Harrier if you don´t correct this, and the angle of the tail fins is "F-4 Phantom" if you don´t remodel the mating surfaces and install some plugs to hold them in place. Trumpeter tried hard to get all the rivets right but some of the more important parts were not well thought out. A friend bought their Savoia-Marchetti SM-79 and a FW-200 Condor recently (both 1/48). He said they look great at first sight but they are so full of errors in dimensions, shapes and details that there is no chance to fix them. I´m not sure if this applies to all of their kits (I mean they SHOULD be able to get their domestic MIG versions right) but I´m warned now - recessed panel lines are less important than an authentic shape in my book. And Chad, I hope you won´t change your name to Grayson32 one day?! -
What is lying on your workbench?
honneamise replied to Tuffskull's topic in Hall Of The Super Topics
I should be busy casting Ghost kits, but this week I needed to get rid of this Trumpeter SU-15, a commission that had been gathering dust on my bench for months. The kit looked like Tamiya in the beginning but turned out to be a dog after some time. Wrong nose angle, inconsistent plastic surface: rough and smooth mixed up on all the big parts, just what you need for a silver finish , some parts super thin, others totally clumsy, many decals went to pieces when I tried to apply them. One of the red stars broke in 12 pieces, took me about an hour to fix this one alone. If I really count the hours against what I get for this kit I´m going to cry.... This was my first build of a Trumpeter kit and I must say they need to evolve a long way until they are on par with Hasegawa or Tamiya. Still, the plane is quite beautiful.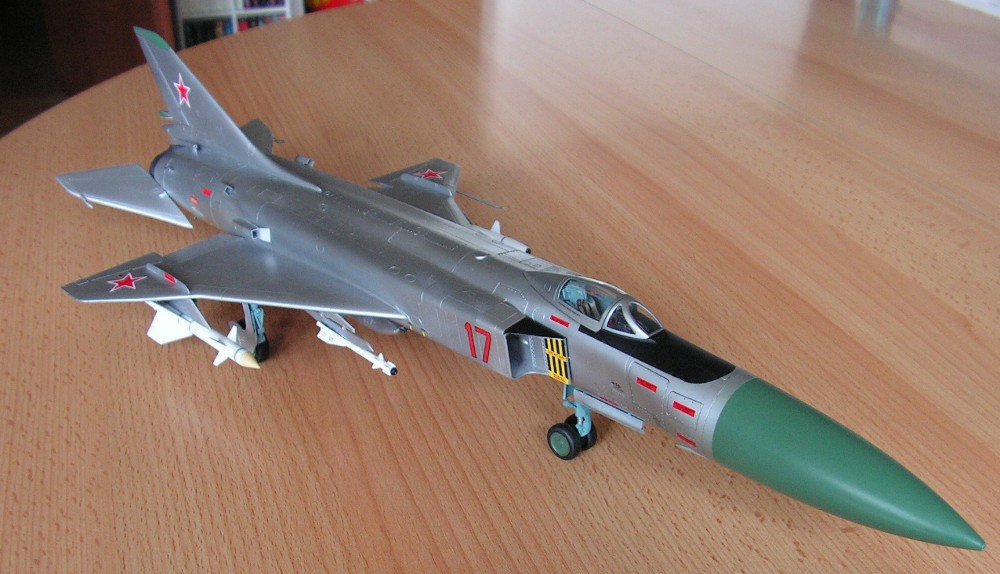
-
As for the Ghost kits, I´ll have to fix some molds next week and I hope to have the last 20something ready in about 2-3 weeks. Before I start something new (still fiddling around with the figure set idea....), if there´s enough interest I could make a new run of Oberths as well, shouldn´t take too long.
-
Someone's building the Oberth! Build thread! Build thread, please!! 402473[/snapback] I´m glad my own Oberth will not be the only built one in the world ! BTW the only"tricky" part is attaching the nose part straight. I had planned keyed pins and stuff but I was not able to cast it properly so it ended up with two flat mating surfaces. Otherwise, it should be a 2-3 days build, apart from the fact that I don´t know a single person who can actually spare all this time at once without real life interfering.... I´d love to see what you guys make of it... or the Ghost - don´t know when I get some time to build one for myself - hell I don´t even have proper parts, they´re all shipped or at least reserved!
-
It came out very well so far, I like the way you are finishing it, the toned-down red, be it canon or not, helps avoiding any toy-like look to it. From what I see in the pics I´d say the way you build the kit makes it look proportionally correct. The weights are a good idea unless you want to put them up in fighter mode - it won´t tip over that way. Considering the booster (the whole set of additional grey parts are the FAST packs but they are in fact a combination of boosters and additional weaponry), I find the colours used perfectly fitting, german grey is correct to me. Don´t know if there are any "canon" colour prescriptions but you usually see those parts painted in a darker grey, sometimes a little blueish, sometimes even greenish and on the old box arts by Y.Takani they sometimes appear more brownish - I like all those colours as long as they make a fitting contrast to the colour of the Valk. I´d really like to see it with the legs attached- and don´t worry about slow progress - I still haven´t managed to finish a single kit in 2006 and I haven´t even got a child! Aajin the model is 1/100 scale and it should be a little under half the size of a Yamato, about a good handful of plastic.
-
It is not Hasgawa quality in terms of engravings but it is still miles above the old Macross 1/100 kits from the 80s. Since I have lots of these old ones in my basement I´ll buy this one as well. Maybe I´ll be using the tritool templates to enhance the detailing but it looks cool out of the box. Any idea of the release date? Nothing on HLJ so far....
-
Second run almost complete, PMs will follow in the next few days. I´ve been planning it for quite some time now, but the Ghost box art is now available as colour print at last. For those who haven´t got a kit yet , it is the same image that you can can see featured on the main page this month - I´ve managed to win the "fan art of the month contest" with the painting - thank you all for voting!!! The print is the same size as the original painting, 50X40cm, printed on water-resistant(? I still wouldn´t try but that´s what the printing company says), UV-proof, heavy-stock 160gr/m² paper, extra matt finish, no white border. The price is EURO 26,- each and shipping is 8,- international or 4,50 within Europe. I have got only three at the time but I can order more if there is demand. Just post here or PM me if you want one. I´ll post this in the for sale section as well in case a "non-modeler" is interested as well.
-
Hi honneamise. "Big" is not necessarily linked to difficult... Depending on the subject and medium of course. I tell myself that if the part can fit in my studio, I can generally find a way to work with it Actually, I must commend you on the Ghost as well: I think it came out quite fabulous and you've managed to give that obscure old design new wings 397004[/snapback] Thanks for the kudos Captain! I´m still stuck to the size of my rather limited pressure pot ! And, as I´m still learning the art of proper casting - I´d still be afraid to tackle molds as big as those main body parts of your launch vehicle - wrong mold breakdown and both the mold and a lot of resin will be wasted! But from what I know of your Regult you´re perfectly in control of those issues. Can´t wait to see your launch vehicle finished, but I´m kinda afraid of the day it comes out as a kit - will I have the money for this and, if not, can I live without it?
-
1. There are or have been at least 3 brands in Japan: Iwata, Rich and Olympos - as I am in Germany I can tell that all three of them are available with different brand names side by side over here. About 15 years ago I bought a Rich, the guy in the shop said it was it was some kind of "copy" of an Iwata just cheaper but probably even made by the same company - I had an Iwata as well and it had almost the same parts plus I could not spot any quality differences. Just 2 weeks ago I bought an Olympos, and the shopowner (different shop) said it was somehow related to Iwata and Rich as well. I still don´t know for sure but all three brands are excellent and have only minor differences. 2. You are right about this but with a little experience you can handle it. I mostly use the paint control lever, if you can adjust the pressure on your compressor you won´t need much of the air control anyway. 3. If you don´t want to fully paint the kit you should still use a clear base coat (e.g. Citadel clear varnish from a spray can) - otherwise the plastic will yellow after some time - don´t know if that can be avoided at all! And your cement will change its colour as well plus the decals will yellow...... frankly, I´d say better fully paint your kits, they will look better, especially long-term. 4. I have had airbrushes with 0.2 and 0.3mm nozzles and you can use both for any job as long as the airbrush is not a crap polish Iwata copy (Don´t buy Sogolee). As long as the thing is clean, paint is correctly diluted and all the airbrush parts are maintained well you can even paint mottle camouflage on 1/144 WWII fighter planes with a 0.3mm. 5. I had one of these things that make a lot of noise and deliver a standard pressure with no means of regulation - didn´t work well! If it is possible get a regulator as the other guys have said or get a compressor with a 20-30 ltr air tank and a regulator for the air pressure - expensive but worth it. I usually adjust the pressure to what I want (lower for detail/shading etc., higher for bigger surfaces or clear finish etc.) and then go with it - plus it is so quiet I don´t bother anyone even if I work at night. Hope this is of help shiyao. I think the most important thing is that you´ve got the right airbrush to start with, everything else is experience (except that pressure adjusting ability on the compressor).
-
You´re not afraid of BIG kits aren´t you Captain America? I´m longing for words... fantastic doesn´t describe it but is all I can type now!
-
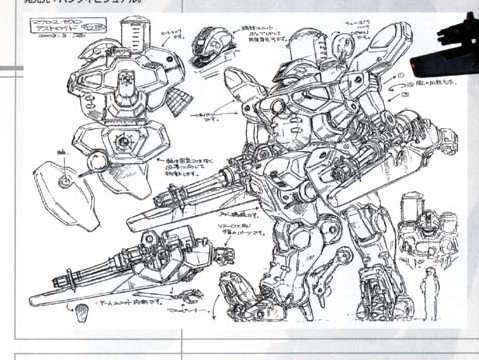
The Cheyenne is actually quite well covered. There is a sketch of the main body, some more lineart and full colour renderings of the whole machine from 2 angles. The only thing I´d still like to know is how the retracting wheels in the back of the legs are supposed to work. Looks complicated. All the art can be found in the magazine section IIRC. By the way judging from the figure the Cheyenne is standard Destroid size like the Tomahawk, not the bigger size we´ve come to know from the VF-0 in comparison to the VF-1.
-
Cool to see a member tackle this thing. I´d love to make a model of the Octos (so I didn´t mind that you had first posted this in the kit forum! <9, but I gave up due to too little screen time of that thing, most of the time in/under water. I thought there would be some lineart in the recent Kawamori books, but....nothing. The people seem to have no heart for Destroids and other non-VF- machines! All I can say is that your rendering looks the point so far, I´d love to see it finished - and how it transforms! As far as I remember the Octos was NOT a CG model in the OAV but more or less handdrawn - could easily be that there is some anime magic involved in the transformation, after all it depends on how much the design was actually "fleshed out" - you cannot tell that from the few seconds it was actually visible.
-
I prefer Tamiya's "Insignia White" aircraft spray for the VF-0S. It's what I used for the fighter, and what I'll be using for the battroid. It just has a hint of grey, which I think looks better than stark white. 394580[/snapback] That sounds reasonable to me Penguin. I dug out my half-built VF-1J Hikaru Fighter and I did use H-311 on it as per the instructions - too grey I think though after the red stripes and darker parts are applied it will look quite light I assume. Still, I don´t want grey on a Focker plane! With panel shading, streaks and weathering done, the thing will look darker anyway.
-
Got mine today. They moved the customs office from 5km away to over 25km away, plus they upgraded their sytems from Computers to handwritten receipts so that the whole procedure of getting the parcel and paying the customs fee took 35 minutes intead of the former 2! Poor Germany Guess in a few years I´ll better take a flight to Japan to get my stuff - might be quicker. But it was worth it, that Battroid looks so awesome!!! Strangely, with all the parts laid out on the table, they look kinda very sturdy and heavy for a Hasegawa kit, I dare say more like a MG Gundam kit. And my "nose" part has lots of sinkholes on the outer surface due to the fat connector pins on the inside - again very Bandai-ish! I´m not saying there are major issues with this kit but it seems like a departure from what I have come to expect from Hasegawa. Anyway, I MUST build this thing.... BTW, are you guys who build the O-S going to use that -311 light grey for the base finish? That´s what the instructions say but to me the thing has always been kinda white....
-
The most important thing is a good primer, it has to "bite" into the plastic, just spraying on some grey won´t help. Paints from spray cans like the ones from Tamiya will adhere better than heavily diluted airbrushed paint. A good clear finish will make it even more durable. Downside: the thicker the paint coat gets the more likely it will chip off.... These things are more important than the acrylics/enamel discussion IMO. Still, if you have some kind of friction between parts, be prepared to retouch the paint job every once in a while. That´s why toys are usually made with pre-colored plastic - which will yellow after a time - I really think there is no perfect solution to this. I´d say you can paint any Valk, model or toy, use your favorite brand, then try to be as careful as you can while transforming it and never give it to anyone else to try!
-
Some companies go with cheap stuff, see Warp from England. Those models are made from good masters but the material used renders them unbuildable, and they are STILL expensive. There is no such thing as a shortcut to good quality resin - the kit´s price is justified! It has grown on me every time I had a look at it - now if I only had the money to spare....
-
A sprayed-on clear coat over a brushed-on colour finish is the way to go, as has been said - but you should quickly forget the suggestion of using different colour types together! From my experiences you CAN spray/paint acrylics on enamels but NEVER try it vice versa. It looks great at first but after some time it CAN happen that the enamel upper coat is slowly dissolving the acrylic coat underneath, no matter how much time it had to dry. I have ruined several kits with this method. They looked great for about 2-3 years, then I wondered why I wasn´t able to remove the dust they had gathered any more. They became progressively stickier with every month and in the end I had to discard them completely. At the time I used Gunze aqueous color with a Humbrol clear cote. I´m not sure how other combinations will react, but given the long time until the effect ocurred; I´d say you better entirely stay away from mixing different paint systems. Over the last few years I´ve been using Citadel satin varnish as clear coat and it works well - despite the term "satin" it is actually smooth/glossy enough to prevent silvering.
-
Hasegawa Valkyries are incredibly out of proportion. Their fighter mode kits are too thin and DO NOT match the lineart. Their Battroid kits are even worse with their out of proportion intake sections that were made to be large because of the joint system. What they did was adapt the lineart of a VF-1 in fighter mode to fit a more realistic modern day fighter design, which was really stupid because it radically changed the basic look of the machine. Now, because they're Hasegawa people automatically believed that their design was true to the lineart. You can ask David Hinginten about how accurate their F-14s are... I submit to you all a kitbashed VF-1 fighter that actually looks like the machine was depicted in the lineart and in the show. Here is the kit. Notice how it has the proper VF-1 look AND propotions. Also note that the arms are FREAKING TINY like they are on the Hasegawa kit. Hasegawa is so totally wrong its not even funny. 394236[/snapback] Different lineart views have different proportions - all models are just interpretations and Hasegawa´s version is just on the "slim" end but not "totally wrong". Take a look at the TV seriesand watch how a slim fighter suddenly gets thick legs while transforming into Battroid. In one scene (ep.2) you can see a Gerwalk hovering - it has EXACTLY the pointed-down "raven"-nose that all the IMAI 1/72 Gerwalk kits have - I don´t like it but you cannot call this wrong. I partially agree with you on the too massive intakes in Battroid mode, but overall the Hasegawa Battroid doesn´t look wrong - but I like the chunky IMAI Battroid as well because it looked like this in the anime (although this thing could never transform into Fighter without a lot of magic). By the way the kitbashed VF-1 Fighter looks great to me, it is just on the "chunkier" side - I have no problem imagining it as a Battroid. All in all I think it is a question of taste after all but I wouldn´t go as far as bashing the Hasegawa kits. They definitely look like VF-1s to me!
-
I Think The Vf-1's Design Was Suspicously
honneamise replied to Phalanx's topic in Movies and TV Series
Absolutely!!! -
A transformable Hasegawa kit is unthinkable, it has been stated before - this is a model company not a toy maker. I also love the IDEA that the model on my shelf COULD transform if I wanted it, but I don´t want skinny legs on a Battroid or fat ones on a fighter (and NO, there is NOOOO way to get perfect proportions in all 3 modes - and that has nothing to do with a model being "handmade" - it is just the fact that Macross is anime and the VF-1 design has the anime-magic "built in"!!). I´ve built the IMAIs in the past, transformed them, broke them and ruined the paint jobs as well. If I ever build another one it will be static. What I want from Hasegawa is a dedicated Gerwalk kit because it is too expensive to buy two kits and it is a waste to throw away all the non-needed parts. A "choose one out of three modes"-kit is not a good idea - either you will have the proportions issue coming up again or there will be multiple leg/arm/nose parts, resulting in an expensive kit with lots of unneeded spares.
-
I Think The Vf-1's Design Was Suspicously
honneamise replied to Phalanx's topic in Movies and TV Series
Based on viewing it from all angles, I can see no resemblance between VF-1 and F-18 noses. Some earlier model kits have a slightly more F-18-like shaped nose but again only from the side, if you take the Hasegawa nose as a reference, the upper side is perfectly straight (unlike the F-18) and the lower profile is too bulged/ S-shaped, as has been said similar to the F-111 but not the F-18. If you take a cross section of the nose, all similarities end - it is almost triangular and flattened at the top (again: based on Hasegawa/ H.Tenjin art but this seems to be canon)! As for the narrow base and more forward mounted position of the tailfins, I don´t think Kawamori was inspired by the F-18 here, these features are simply determined by the shape and position of the "backpack rucksack" that supports them. The backpack has to fit between the legs in fighter mode so it has to be kinda narrow plus if the fins were located further aft they´d sit too high in Battroid mode, sticking out higher than the head and obscuring rearward view. That´s why it looks that way IMO. Had Kawamori designed leg-mounted tail fins, the VF-1 would look even more similar to a F-14. But remember the F-14 has horizontal elevators and the VF-1 is lacking them, so the more angled vertical fins, combined with the rather big (and angled) stabilizer fins on the legs, sort of makes up for the lack of "proper" horizontal fins, at least from a "cosmetical" point of view.

