honneamise
-
Posts
483 -
Joined
-
Last visited
Content Type
Profiles
Forums
Events
Gallery
Everything posted by honneamise
-
Yeah it is like waiting for Christmas when I was 12 years old. Pure Excitement! Too bad I´m in Germany so I won´t be among the first to get it. My last h Hey I wasn´t finished, somehow pressed the wrong key. What I was was trying to tell was my last HLJ small packet arrived in Frankfurt (where all international parcels arrive) and the customs kept it there for 3months for NO obvious reasons - they didn´t even charge a customs fee! Well the average shipping time should be about two weeks so I it will take about another week from now before I go nuts every time I hear the Postal Service car pass by.
-
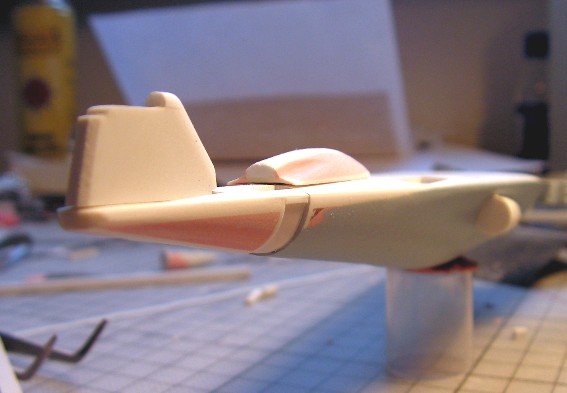
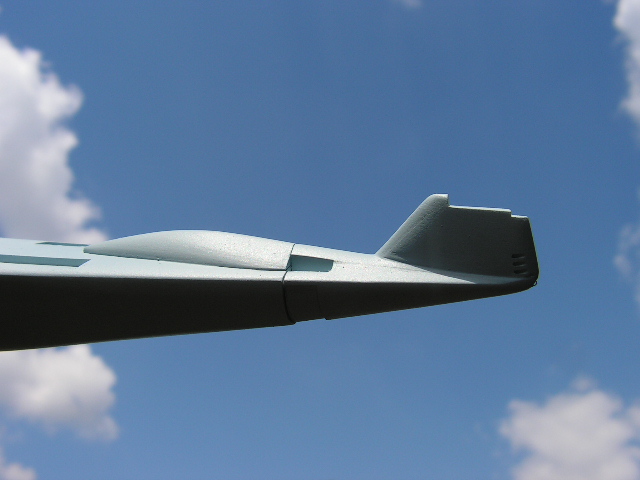
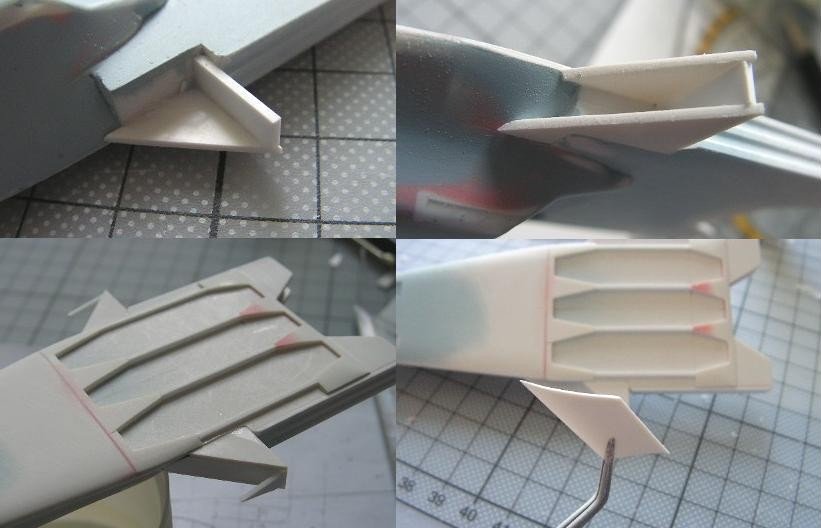
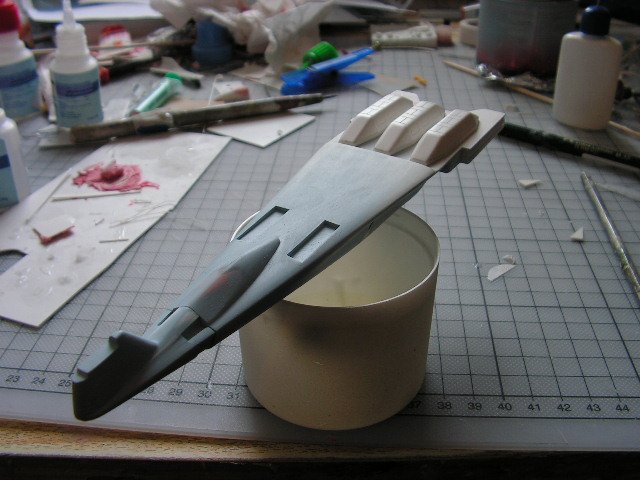
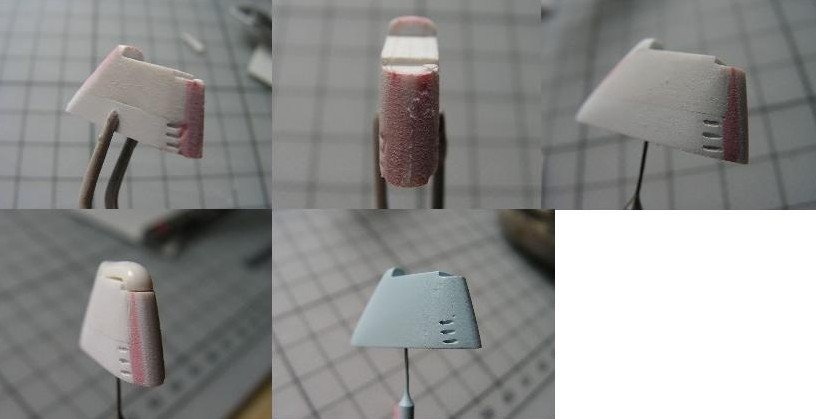
After plenty of fun and games the parts finally conformed to the contour of the hull and all the angles matched! The wing actually looks like the lineart now though it still needs to be "beefed up" on the upper side to get a flush fit to the upper deck. After glueing the parts together I literally "flooded" the inside of the wing by applying Bondo (I mean the Bondo-like stuff I use) with a syringe - works well and prevents warping or breaking I hope. The only thing that bugs me now is that I have built ONE wing but this damned thing needs TWO!!!

-
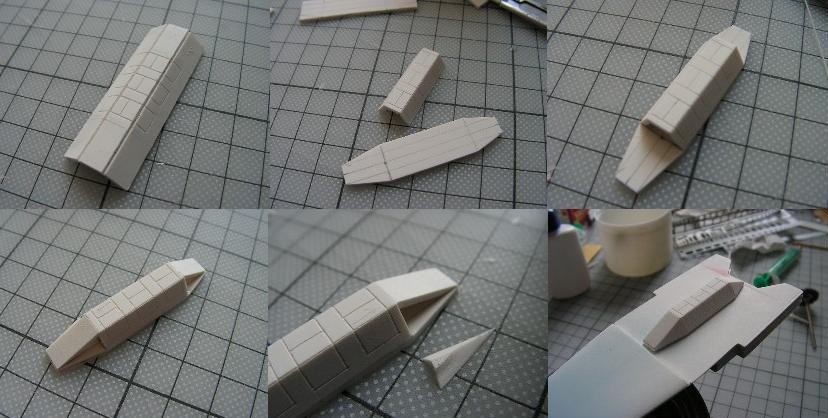
The day is still young so I guess it is time to build the wings. This is no part I was particularly looking forward to tackle - the wings cannot be just glued to each side, they must fit to the hull and this has quite an angle to take care of! First step:easy just a spar with a flat triangle on it. The corresponding triangle on the undersides must be deeper to fit the hull angle- less easy, had some trial and error here The "leading edge" section comes next. I decided to make upper and lower part out of 1mm styrene for stability - as a result I had to sand the insides down to nothingness at the front edge. Gave me a pain in the..err...hand.
-
whole thing looks like this:
-
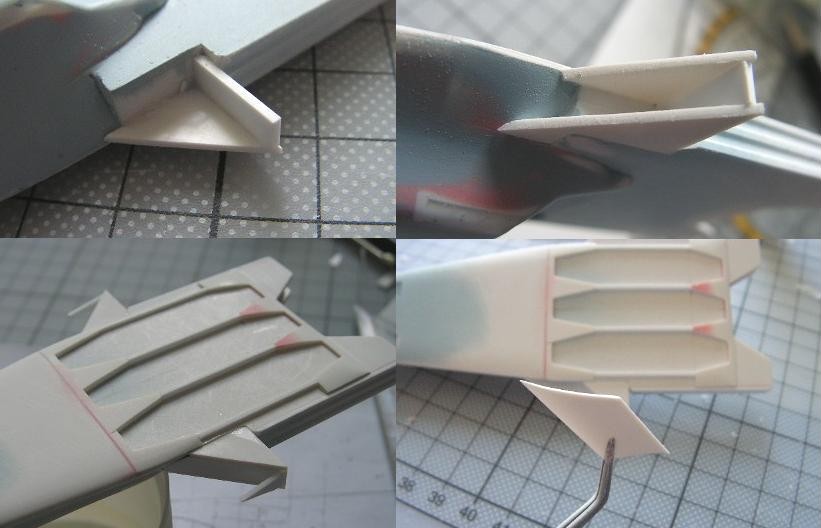
Update: The missile banks get "embedded" into an extension of the upper deck. Here you can see the parts that go around them. When the whole assembly was glued onto the aft part of the ship (missile banks in place for proper positioning) I sanded everything smooth to match the curvature of the forward part of the deck. Missile banks are still removable to get them out of way when I start working on the wings.

-

What is lying on your workbench?
honneamise replied to Tuffskull's topic in Hall Of The Super Topics
OK then my complaining was not justified but as I can tell from your pics the ARC-170 looks much more complete with the R2 attached. You did an awesome job HWR MKII, the weathering turns the kit from a toy to a convincing replica. Although I cannot clearly spot the additional cockpit details on the photos the darker interior colour already enhances the appearance. The opened up side windows are great and I guess this really needs to be done since they are too big to leave them just painted on. Great work!!! -
close up
-
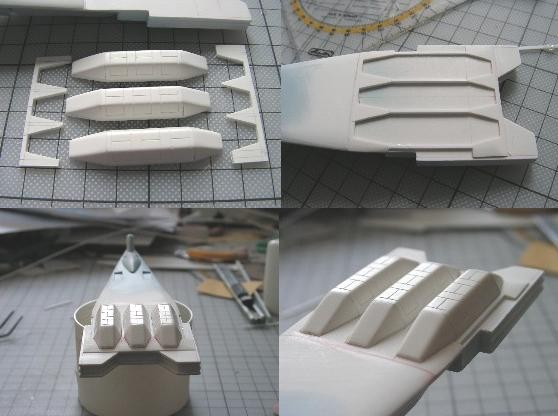
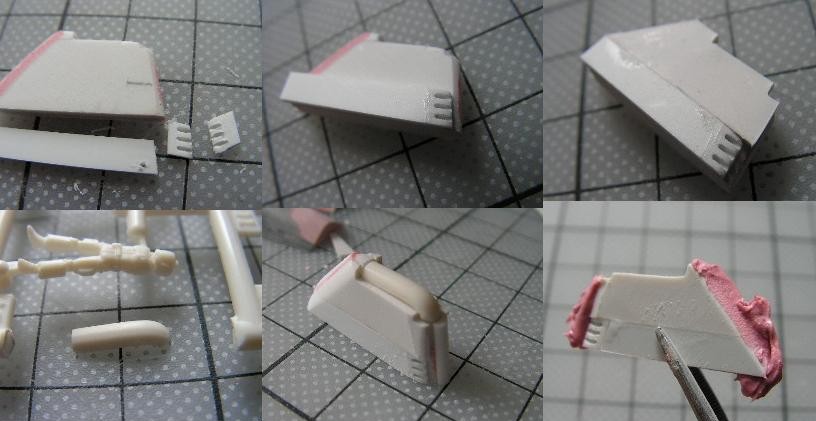
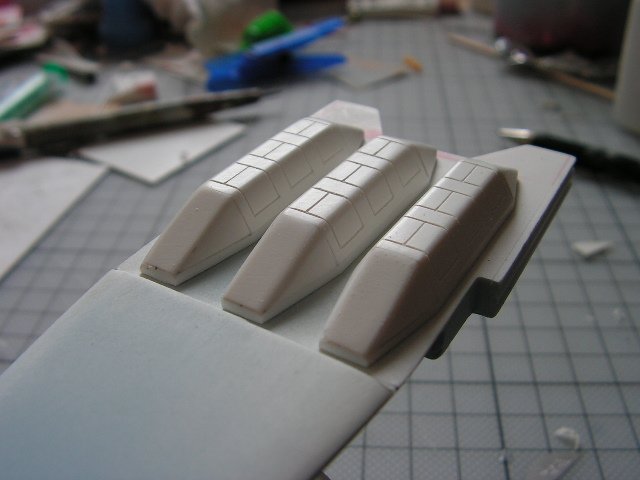
Finally all three missile banks are built and all the edges smoothed. Now I need an aft extension to the curved upper deck that goes between/around them.
-
What is lying on your workbench?
honneamise replied to Tuffskull's topic in Hall Of The Super Topics
I really don´t want to sound like a nerdy nitpicker - Again: I like the Revell SW EP.III kits! - but: Where is the R2? Behind the 2nd cockpit there is a black indentation where the R2 head should be! They even removed the R2 from the CG box art! Poor clone guys have to fly their machine manually - no wonder they got shot down that easily in the movie but wait - in the movie the R2s were fitted! So Revell cut costs on their kit by omitting a vital piece of hardware!!! And you can´t even use the spare head from the FM X-wing because the Revell guys chose 1/67 scale. ...OK maybe the old AMT Snap X-Wing is of some use here.. Ahm, well, I should still point out that I actually really like the Revell kits.
-
What is lying on your workbench?
honneamise replied to Tuffskull's topic in Hall Of The Super Topics
I bought an ARC-170 yesterday, couldn´t resist after seeing the movie. I just put it together and was quite pleased with the result, but you´re absolutely right about the hinges. Moreover, I don´t like the inside of the intakes, they are not really round where they meet the fan and due to colour and size this is very visible. Will be a hell to sand this especially If I want the little ribs to stay intact. On the Revell Remany website all the actual lengths of the "real" ships are stated. What a disappointment! According to these figures the ARC-170 is 1/67 scale, the Jedi Fighters are 1/29 and the droid Trifighter is something about 1/27. Even if these kits are supposed to be playable toys they are STILL made by a scale model company, so why don´t they give a damn about scale consistency? Box scale kits were OK in the 50s but why are they bothering us with this today?? (us= ONLY sci-fi modelers since no one manufacturer would dare to release a new 1/83 kit of an F-14) -
One is basically ready but I will smooth all the edges considerably or it will certainly NOT match the elegance of the bow! But I´ll wait until I´ve got all three missile banks ready, I guess it will beeasier to sand them down all at once. Yeah Zentrandude and there are no strings attached (just a hand but you can´t see it) I like blue skies since I don´t see them that often.
-
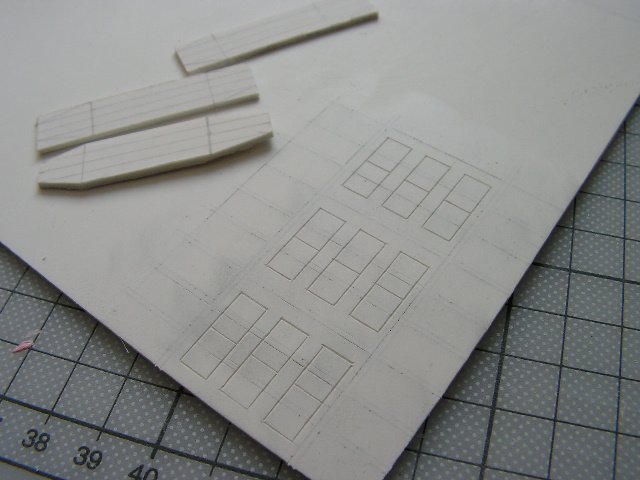
The parts are built up similar to a cardboard model, but with the thick material it is much more work.

-
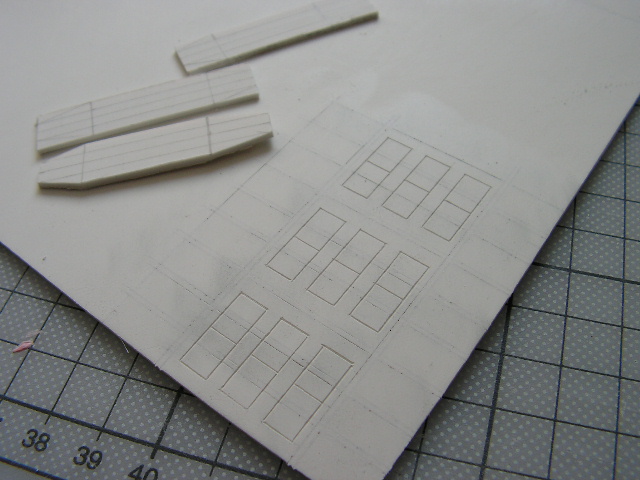
Started to make the missile banks today. I drew the parts on a piece of 1.5mm styrene and engraved the covers - it´s easiest to do this while everything is still flat.
-
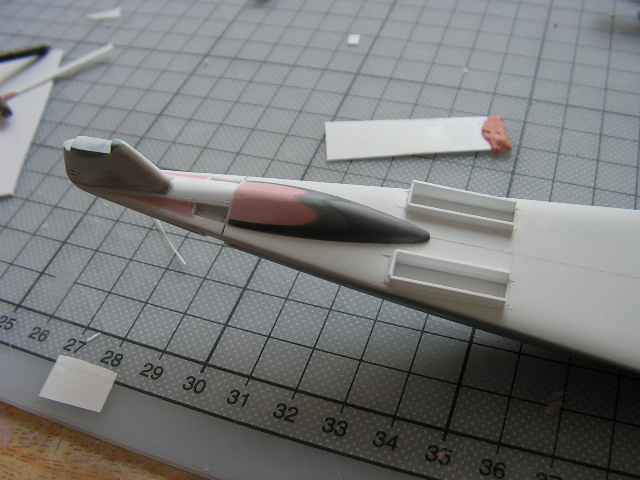
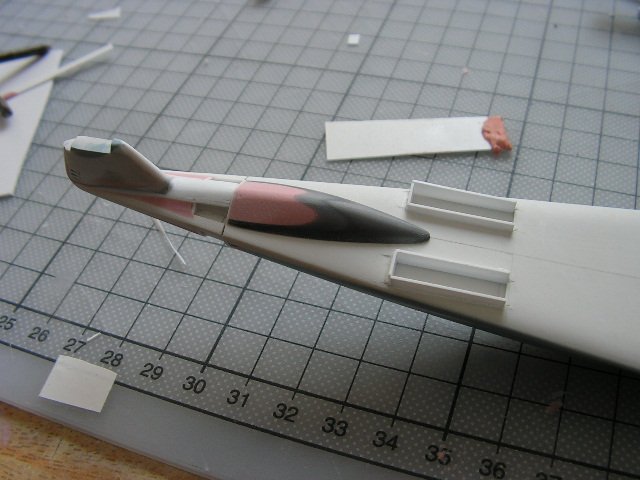
The front end after a coat of primer..... still some sanding to do but the shape seems right I think!

-
After some more sanding the whole thing takes shape. Prior to glueing the hump in place I first had to "box in" the recesses for the upper guns to get their final size right.
-
More front end.... I added styrene strips to get the rough shape of the "bridge-hump-joint", then added very liberal amounts of putty, then sanded again. I had to choose the final shape of the hump. Although I had made a fitting part out of styrene and "bondo"-like putty, I went with another drop tank. You can see both parts in one of the pics. The tank had a better fit to the front end and the overall look is more aerodynamic-not that it matters in space...
-
Thanks, Grayson72, mir geht´s gut! Und selbst? (meaning: and (how are) you?). Well I´m really fine cause I got tickets for the Ep.III premiere tonight ! Hi electric indigo, good to see that Germany is not nearly as devoid of Macross fans as I thought . And I even know the store in Venlo, too! Though when I found it the brief days of Macross kits were long over.
-
What is lying on your workbench?
honneamise replied to Tuffskull's topic in Hall Of The Super Topics
Looking great HWR MKII ! I guess repainting and weathering is the only way to go with these models. The weathered AT/RT is so cool. When I first heard Revell Germany will be releasing them as snap-kits (or "easy kits") I was pretty sure they´d come out with crappy, non-detailed toys (look at their planes within this range). I was able to have a look at them because a friend dared to buy them all at once and I must say Revell did a good job! Sharp details, good proportions (I bet they got the CGmodels from ILM so they couldn´t go wrong here), and no obvious shortcuts in details to simplify assembly. Not Fine Molds but definitely better than many MPC´s. Obviously good value for the price! Have you seen the new Fine Molds Falcon? This will be even better but I bet this thing will be so expensive you will probably get 15 Revell kits for this... -
Ha ha , Gundamhead, I guess no matter where we live we all ask ourselves the same questions.. ARMD... have been thinking about it and I really want to build it. But this will be quite a beast. Won´t fit into my pressure pot either or I will have to break it down into many smaller parts.. but the Oberth will look kinda alone on the shelf once it´s finished. Zentrandude, I was just trying to save bandwidth by compressing useless info. Cobywan that´s EXACTLY what I did back then. Don´t know if it was 45 minutes or 2 hours, but I picked three as well and gone was my money. My first ones were (they only sold IMAI kits at the store): -VF-1 J Armored 1/100 -Destroid Monster 1/200 -Megaro Zamac Jha-Giga 1/144 (had no idea that Zamac had nothing to do with Macross at the time. The purple paint scheme grabbed me I think)
-
Well, cobywan, "here" is Germany, also known as the most underdeveloped country in the world when it comes to Macross! NO Macross show has ever been on TV here - the people do not even know the Robothing. Now we have LOTS of anime fans but the younger ones are into dragopokedigi-moon, the older ones like newer stuff like Hellsing, Evangelion or Cowboy-Bebop. I´m into it since 1983 when a hobby shop here in Cologne had "accidentally" ordered some IMAI kits. Without a TV series to back up any interest they soon vanished from the shelves, but I was immediately hooked by the great boxart. Long story short, I am a Macross fan DESPITE living in Germany. So my filler seems to be the german equivalent to Bondo, guess I am lucky because my paint sticks quite well to it!
-
Without too much thinking I just glued the bridge to the upper deck with a slight overhang to the front. Then I glued a piece of tube to the front end-this will be puttied over and sanded smooth to make a big intake as seen in the lineart.
-
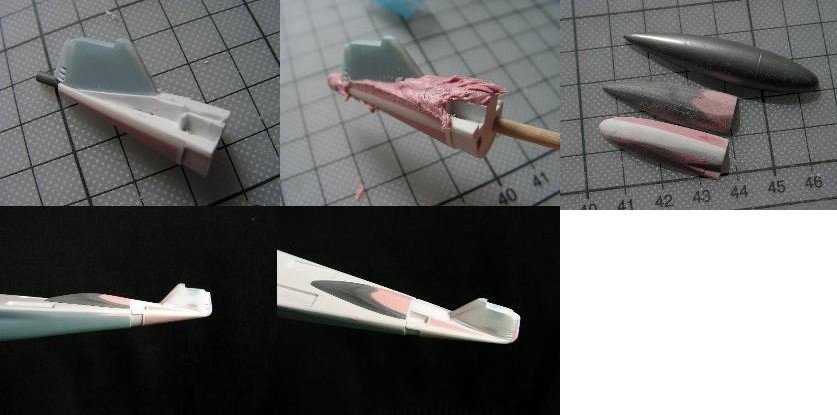
Ah, I forgot as you can see I made a "canopy" by cutting out a length of sprue, filing it to a half-round diameter, then bending it to match the required front curve. While the base of the bridge is almost OK, it has to be sanded to a conical shape towards the top where it should be almost the same width as the canopy. More sanding, then I added primer and sanded again. Almost there...
-
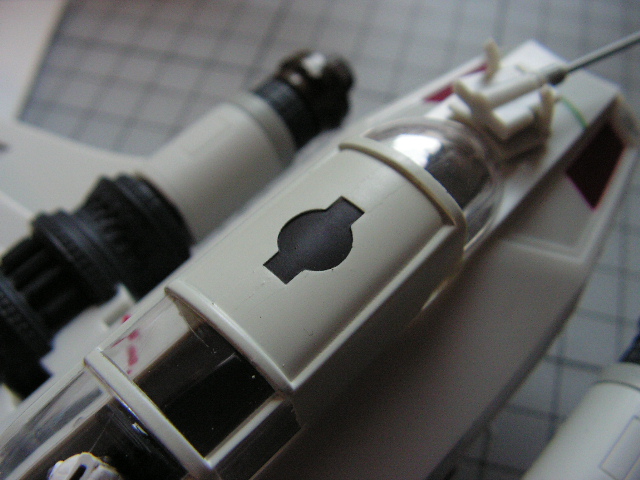
Have been working on the bridge. I have abandoned the syringe needles for the intakes and have just drilled three holes into a styrene strip on each side. Much easier to work with. Then I beefed up the bridge by 1mm each side to get the right thickness at the base. Then a lot of putty followed by a rough sanding. Here is a sequence of it.

-
Well the stuff I´m using is not called Bondo - that stuff is not available over here so I cannot comment on it. What I am using is just called "Polyester Filler Putty" and, after it is dry, you can file, drill and paint it as you like . It does not shrink (not even after some years - I found out most of the one-component-fillers like Revell or Green Putty do and ruin your stuff after some time) and you don´t really need any primer prior to painting. I use lots of primer at this stage though, because it is the only way to show any defects in shape or bigger scratches or seams that still need some fixing. I use Citadel space wolves grey(actually a light blue-grey), best primer ever - sticks to anything, dries fast and leaves all details intact. Only bad thing- those §%&@*%§ don´t make it anymore so this is my last can of it! The other Citadel primers work well too but, being white or black, they will hide imperfections rather than highlighting them. The hump is a thin styrene base plate for the right shape in plan view, a thick piece of styrene (5x5mm) glued along the length then sanded to shape and the rest is filled with the putty. The putty sands easier than the styrene so before you sand past your desired shape you will notice the difference. I still don´t know if the hump looks ok, I have tried with another drop tank filled with putty from the inside, then filed to shape. Looks ok as well but much different with a more aerodynamic shape. The plan view of the hump is not defined in any line art I know so I guess I just have to go with one of them. Pretty hard though, since I consider the whole bridge/hump-assembly will later make up the "face" of the ship and define if it will look cool or just so-so.
-
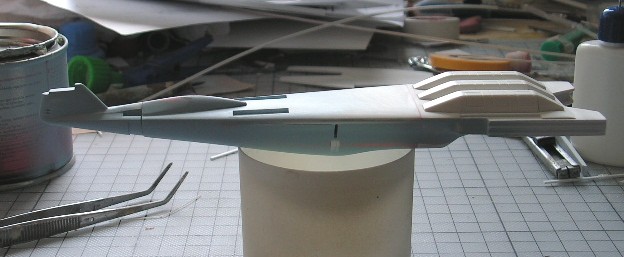
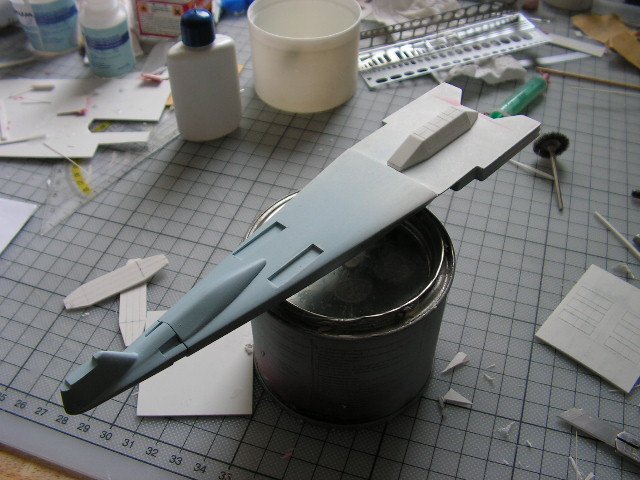
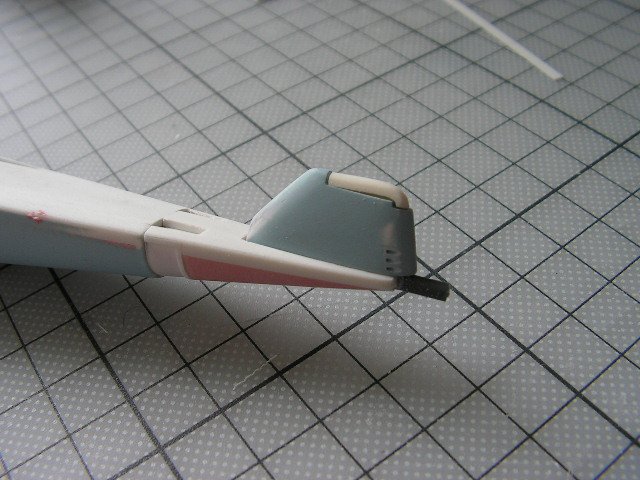
Shaping/sanding of the hull is nearly done and I have added the bulged "upper deck" to the front section. The bridge and the aft portion of the hump that goes behind it take shape. Still very rough and I think I´ll have to reduce the hump a bit. I will not go with the very short hump as seen in the side view of the lineart, though. It is much longer in the perspective view and it looks the same in the anime (that scene where the Oberth blows up, 3rd ep.).