DatterBoy
-
Posts
900 -
Joined
-
Last visited
Content Type
Profiles
Forums
Events
Gallery
Everything posted by DatterBoy
-
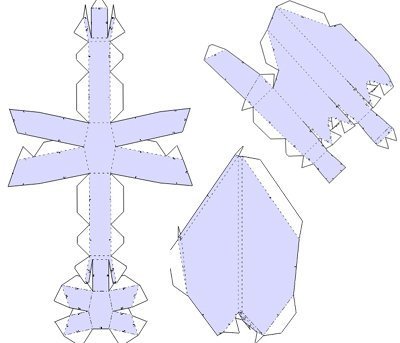
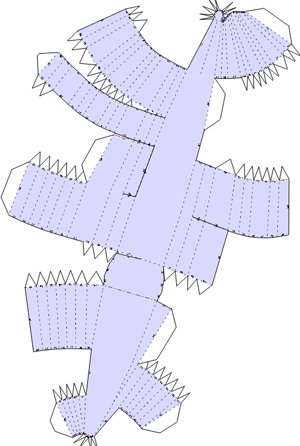
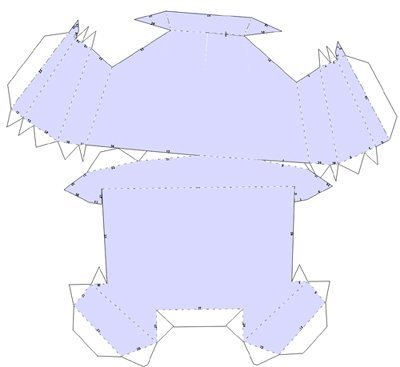
thrusters, tail wing, and intake
-
Backplate:

-
Nosecone piece:
-
Here's a shot of the paper Chestpiece:
-
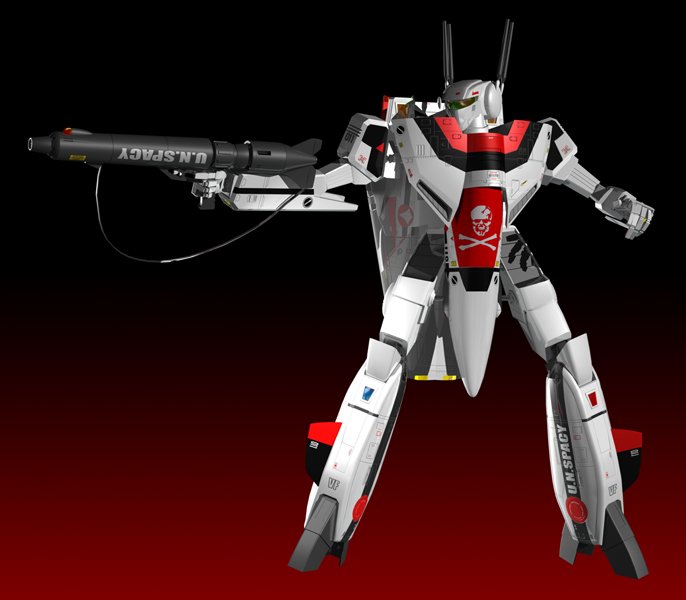
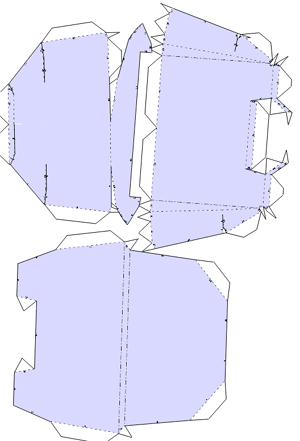
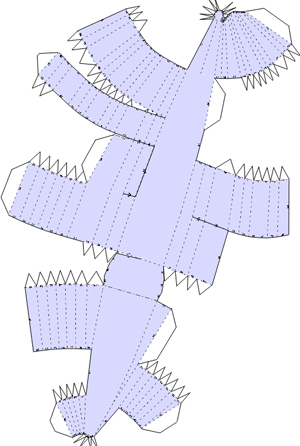
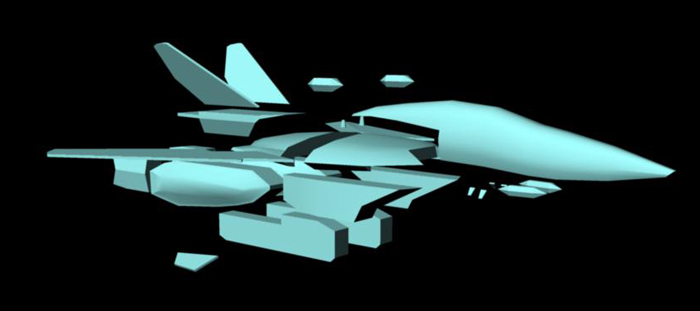
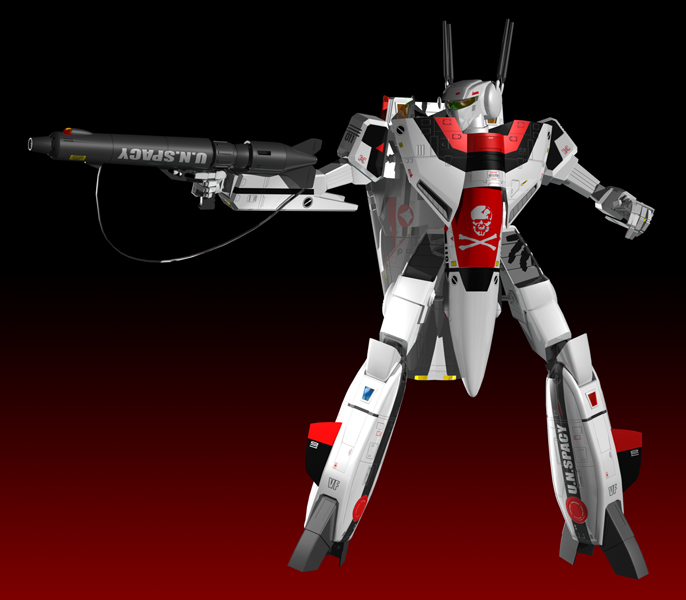
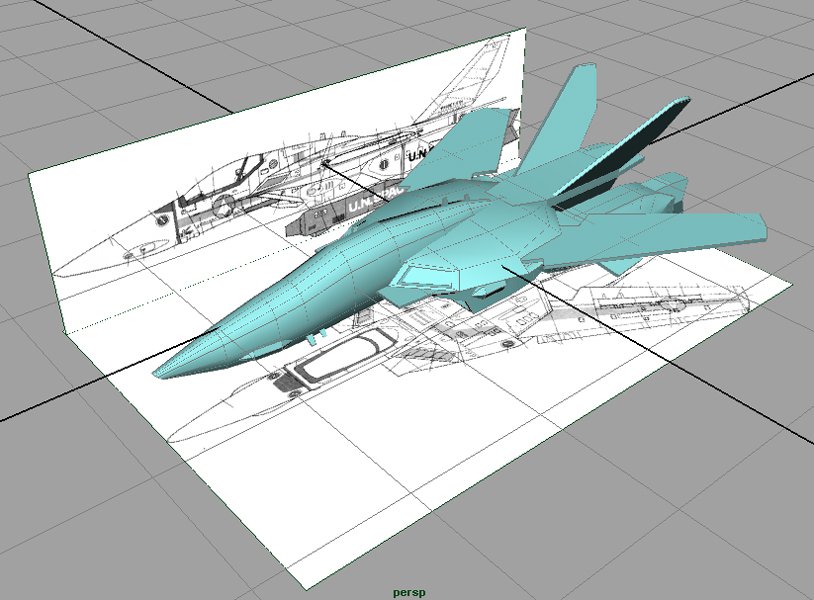
Thought I'd give this a try. Thaks to Akura2 for posting the suggestion in the Mass CG thread. Figure I'd try and make a paper valk and see how it turned out. Seen some really nice stuff out there, thought I'd try too. First, here's the lowpoly CG valk I made as the template for the paper cutouts: Then, broke up the valk into pieces so that they could be built from paper and then reassembled in some kind of a logical fashion. By my count, there should be about 21 peces to build. Then, the polys are taken to a poly ot paper program and laid out like a box.

-
Awesome! I'm gonna try it out and see how it goes. Built me another valk in low poly too just so I can see how this will go!
-
I hear ya. Balance. I should have started with a Hasegawa model, I think my fighter would have looked much better. trying to get a physically possible underside for the arm swings and transformation is hard. I'm hoping at some point, I can turn IK and collision on and everything will still work... And let's not even talk about the mechanism for the leg transformation from the chestpkate underside... not sure how those pistons fit in that space, though ther is a bit of room in the chest cavity... And how the hell would you rig and animate that action? ANIME MAGIC! :Dat
-
Checking out the model on the link. It appears to me that the transformation as indicated there fucntions on 2 slide tracks. One to go up and down on the backplate underside and the other to bring the arm mount plate in and out from center to side. Only real problem with that is that given the thickness of the the arm mount plate (armpit), it would hang a bit low in fighter mode. Could be easily fixed in CG For sure, but I have also found that the arm plate mount interferes tremendously with the backplate underside trim. Even the Yamato 1/48 had to cut some away to accomodate. :Dat
-
Update: 1/60: 1X - Max 1J 1X - Miriya 1J 1X - CF 1A 2X - Hikaru 1A 1X - Super Rick 1J 1X - Roy 1S Strike 1X - Max 1A 1X - 1D 1X - Super O (see anything missing... no elint) 1/48: 1X - Max 1J 1X - Millia 1J 1X - Rick 1J 1X - Super Rick 1J 2X - Max 1A 1X - Roy 1S 1X - Hikaru 1A Bandai 1/55: 1X - 1S Roy 1X - 1A Hikaru 1X - CF 1A Models: 1X - Bandai Max 1J 1X - Bandia Miriya 1J Other: 2X - Banpresto 2X - Rohby Recast JM Total: 27 (holy crap... I can't believe I have that many when I had only 3 as a kid...)
-
Looking Sweet, Rod. I was gonna do the same kind of thing with pods and valks in a city battle. Still need to do some rework on the model and detailing, but want to try and do this as a NURBS model now since it's overall very round, it may serve it better, like yours. :Dat
-
I have a few parts that hang in the air. Working on changing that now. Lotsof people with good advice here. You're in theright place. :Dat
-
If it was a contest of some sort, probably ended up in the hands of someone who could care less for it. :Dat
-
HEAD! MOVE!!!
-
That was pretty damn witty...
-
Hmmm... looks like I'm going to have to do some more modelling... I guess it makes sense over all, but given that the legs tend to flush with the underside of the chest and backplate, I don't see how it all can fit under there without some serious insetting that would impact the wings folding in... Oh well, I guess this is why it's so fun... :Dat
-
DYRL Spreads for Hikaru:
-
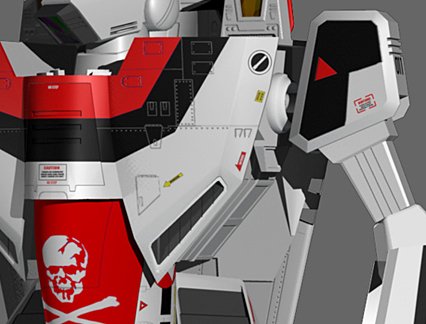
I'm not altogether sure what I'm looking at in that picture... is that the flaps for the side armor with vents underneath them..? As far as folding away, right now, I simply hide them in the other modes. The side armor is one big piece right now since it's modelled for meto see if it looks right. But since I am trying to work this thing towards realism and real world physics and spacing, I'll eventually break it apart and make it stow in for the other modes. The armpit piece where the arm is attached is you standard plate so stores away nicely in fighter mode like it does for a BANDAI type transformation: I've always preferred that over the YAMATO style since I believe it is more cannon (sp?). Biggest problem I have with the armpit itself is the clipping it does with that leg piece on the intake in gerwalk mode. Probably going to have to slide that leg piece around in gerwalk mode to avoid collision, but not sure how else I can address that without compromsing something. I think I could cut some of the pit away to bring it closer to the peg setting, but I like how that part covers up an unsightly gapin batt mode. As it stands I already need to make it so that the height of the shoulder piece on the shoulder peg off the armpit is variable as this varies between the modes. The peg is low on the shoulder piece for battroid mode, and high on the shoulder piece in gerwalk mode to avoid wing collision. Butit looks good at different angles in gerwalk as it is now. Ah well... I ramble on...
-
AZTEK, That site is awesome. From looking at it, I'd say most paint schemes are pretty flat, and I really do prefer the flat look. I really dig the Tenjin paintings on Hasegawa model kit boxes and am wanting to go in that direction for the final look so I think I will knock down the reflection a whole lot. Still modelling the valk though. Want to add a koint system that allows for greater posibility without comprmising the look and would like to incorporate a joint system like the PG Gundam Strike, but i think that may be a bit much. For now, added side armor and arm/shoulder joint detail cuz it looked generic before. :Dat
-
Hi Mechmaster, I can't speak for ROD, but I could use those scans. I don't have a clue what the decals should look like so whatever detail you can provide in the best clarity possible would be great. :Dat
-
AZ! Good to see you back man! Thanks for the kind words. To be honest, I prefer a flat looking myself. I haveno real interest in aircraft outside of the valk itself so I do whatever people yell at me to do. In this case, people kept telling me to make is have some reflection, but I don't know how much to give it but I agree the mirror look probably is not appropriate and should be lessened. Just so I know, if it were to have some glass, which parts would it be and what color paints reflect the most? As for who's valk would kicks who's ass, far as I see it, each of us has our own interpretation. Right now, though, I think ROD's weapons would kill us both. I'm still awaiting the return of BRIAN and DOK... :Dat
-
I think ROD is referring to a decal ref for the pod. :dat
-
Athlon T Bird 1.2 Geforce 2 64MB RAM vid 512M DDR RAM So basically, not a real pump system, but itdoes the job. Looking to move into the P4 arena soon and possibly aPCI Bus vid card. Would be nice. This render in general was 3000 x 2000 so it took a long time. Was trying to get it to squeeze as mcuh detail out of the render as possible. The one posted here is a reduced copy. Using Mental Ray with Caustics and GI, Ray Tracing and well.. basically,every feature pumped to the MAX. Wish it had HDRI. :Dat
-
Holy crap, 14 hour render...