
Chas
-
Posts
953 -
Joined
-
Last visited
Content Type
Profiles
Forums
Events
Gallery
Everything posted by Chas
-
Is There a Megazone 23 Expert in the House?
Chas replied to Chas's topic in Anime or Science Fiction
You're not the only one. I wonder, do you think it would work to have CG backgrounds and Mecha with hand-drawn characters? I'm thinking here of Manga with photo-realistic backgrounds but Manga styled characters along the lines of the work Ryoichi Ikegami did in Mai. -
Is There a Megazone 23 Expert in the House?
Chas replied to Chas's topic in Anime or Science Fiction
, Wow! you're telling me! I would have sworn (in fact I pretty much did in my first post) that Mikimoto also did the others. Now that you mention it I can definitely see that. What else has Hirano worked on? I'd be interested to see more of his stuff as these are some of my favourite designs. Oh and thanks for the quick response! But for anyone else out there I'd still love to see some character art - Iknow, I know I'm begging now but I never said I was above begging -
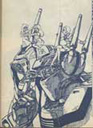
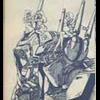
O.K. I know (simply from his style) that Mikimoto, Haruhiko did the character designs for this but what is up with the crediting of such. At animenfo.com they show Sonoda Hideki as the character designer (for which part is vague) and over at IMDB they list Toshihiro Hirano as the character designer and Mikimoto, Haruhiko as .... special character designs .... whatever that means. So, again I ask, what gives here? Did Mikimoto, Haruhiko simply design the main characters in part one? but then who's left for the other guy to design? No, really. I mean obviously Mikimoto, Haruhiko designed Shôgo, Yui, Tomomi, Mai and B.D., but to my eye Coco, Eigen, Môrii, Chonbo and the Slimeball -I mean Producer- also look like his work. So what gives here? Could anyone who has a copy of the OVA please check the credits - if you can understand them- and let me know what they say? And of course If you just happened to have been working on the series at the time (before the funding was pulled) and can explain from first hand knowledge by all means do so. Also if there is anyone with Character line art from part I I'd love to see it as I long ago lost any that I once had thanks! (edit it doesn't have to be just line art - paintings and/or other colour illustrations are more than welcome too. )
-
I use 'em both desktop Pc and G4 Powerbook. Prefer the Mac. I just find it all around a more elegant machine from it's physical design to it's operation. Plus I've had the power book since about 2004 and it has only crashed once. That was this past fall It had 41 days of applecare left on it so we took it in to the shop and they replaced the hard drive, logic board and fan ($1500.00of work) without so much as a blink. What's not to love about that! and don't even get me started on the whole adware/malware/ virus stuff. Sure you pay more upfront but my experience tells me it is totally worth it. 2004 to 2007 without a crashing or freezing once! can anyone with a PC based laptop match that? You pay more for a Mac but you get peace of mind (note: Always get the applecare! particularly with a Macbook or Macbook Pro). That's how I see things anyway. Ciao.
-
So I’ve heard a lot of rumor that SC Johnson, the company that produces “Future Floor Finish”, has decided to change the name of their product from "Future Floor Finish ®" to "Pledge ® with Future Shine". Word is the formula hasn't changed at all, so no real cause for concern. This change is only supposed to affect the US market, and I don’t know if by U.S. market they mean North America or if Canada is considered part of the U.S. market, But I see no evidence of this on SC Johnson’s U.S. or Canadian web sites. So can anyone actually confirm this rumor?
-
All in all it's not too bad. Difficult bugger to paint though. A fair bit of tricky masking. I'm not a big fan of transforming model kits however, so I'm pretty sure that I'll pick up another one and build them in static modes. I didn't have any real fit issues with mine, just a few seam lines. I'm away from my work bench during the week so I won't be able to post any thing 'till the week end.
-
I've got this kit, well actually I've got the autonomous Army version of the Garland since that one comes with the Eve Tokimatsuri figure , and I'm in the middle of building it right now. I know exactly which parts you're talking about as I've had some of the same problems. I solved my problems with a little scratch building and a couple of small screws. While not impossible to salvage it was a little frustrating. I can't post details right now, but this coming week end I could post the instruction page with the problem areas and how I solved them if you wish. Plus I'll take some progress pics.
-
Bandai 1/72 Scale Macross Frontier Plastic Models
Chas replied to Graham's topic in Hall Of The Super Topics
From the looks of it I'd say these prototypes were 'grown' a-la SLS or SLR rather than milled on a CNC Petar. But regardless I think the Cap'n's right - they look to be single mode to me (which IMO is a good thing). My main concern is how thick the styrene they use for the final product will be.That's my main problem with Bandai the thickness of the parts always kills the sense of scale and has a lot to do with the 'Toyness' factor of their model kits. Well that plus the lack of realistic detail and the re-god-damned-diculous depth of the few pannel lines that they do put in. We'll just have to wait and see I guess. I am liking the look of that sculpt so far mind you - That fighter mode is truly a thing of beauty! These may be the first non SDF/DYRL? Macross models I pick up. Edit: After Graham's last post - Well let's all prey that they use the Anime CAD files for the entire process and go with single mode builds - 'cus those look just fabulous! -
WOW! Just wow. That was very good. I thoroughly enjoyed the read. Thank-you for posting this.
-
Are all of our resident Japanese members O.K. ?
Chas replied to Chas's topic in Anime or Science Fiction
I sure hope not. I haven't been to Tokyo yet. -
Just checking in to see if any of our members in Japan live in or near the Nigata area? I hear the earthquake was felt as far away as Tokyo. Hope everyone is O.K.
-
Both Arii and Imai went bankrupt in the early 80's. Bankruptcy court forced Arii to sell off all their tooling to Bandai for any Macross model kits that cost more than 300 yen. All their later re-issued kits are the ones they were able to keep! Whereas Imai were for forced to sell off all their tooling to Bandai for any Macross model kits they had made. (info taken from the models section of the main site - Very handy and informmative ) I think the only 1/72nd scale stuff Arii released were an armoured Battroid, a Glaug, and some Destroids.
-
Wow! you mean Bandai actually included some Anime Magic in their kits. That's pretty cool!
-
Excellent, clean finish to these. Really captures that Anime look. I noticed that your Millia doesn't have the knee-cap piece, was this in order to capture the pose you wanted, or did the kit not have it?
-
Not to mention having quick access to MW and the other Sci.-Fi. modelling sites I frequent for the wealth of tips and tricks that they contain. Edit= And all those online videos of different techniques for everything from putting together your workbench/space to building, painting, decaling and finishing. Lots of reason to have a comp. in your workspace. Although, personally I opted for a Mac powerbook instead of a desktop, so it pretty much goes wherever I go.
-
Here's a link I found while searching for info on a DIY booth Lots of info. LINK Hope it helps.
-
Although they were a little on the expensive side I love my set of Copic Multiliners. Link I've got the whole set and Although the ink is water based I've used them with no problems on some of my kits (base coated of course - never on bare plastic). I particularly like the variety of line widths; the .03 is AMAZING!. But, unfortunately I think there is only black ink available, but I think it might be worth contacting Copic to find out for sure ' cus they are amazing!
-
I found the post I made about this when I ordered the parts trees here's a link: http://www.macrossworld.com/mwf/index.php?...st&p=304127
-
A word to the wise, I've ordered replacement parts from HLJ before too. everything went well, but I wished I'd been able to combine the shipping with other items/kits 'cus, in the end, it was a bit steep for two VF-1 canopy trees. Oh yeah you have to order the tree that the part was on you cannot just order the part. good luck but, trust me, try to combine it with another order. Oh, and don't hold your breath it took a couple of months for my parts order to ship. I think there is a thread hrer on the boards somewhere about it. I know I've written about it here before, I think it was Bertt that wanted me to keep him updated on the cost and how long it took. I'll see if I can find it and get the details for you.
-
Wow! it's hard to believe I'm looking at an Imai kit in those pics. Nice Job! A word to the wise though, the pose in that line art pic is unatainable, or it has been for me anyway. I have managed to achieve a close approximation though. What I ended up having to do was adding weight (in the form of the little lead balls that make up the contents of buck-shot shells) into the nose, feet, and front portion of the super packs. So before you start to glue the sub-assemblies together you may want think about where you want to add weight. I was working with two Hase. kits, I don't know if the Imai will have the same issue but measure twice cut once! as they say. Once again it looks GREAT!
-
Yeah, I've used Windex to remove Acylic paint, works pretty well, so Iguess it'd work as a thinner. For enamel paints I've had success thinning with using lighter fluid in a pinch, as for Lacquer Paints I've heard of folks using brake-fluid to strip Lacquer based paints off of kits - but that stuff is pretty toxic so I wouldn't suggest trying to use it as a thinner. Hope that helps some.
-
Epson also has a non fading (archival) ink for their ink-jet printers. It's called DURABRITE. It's the oly kind we use for printing photos. Our printer is not being made anymore (got it in 2004) it's the Epson CX5400 (all-in-one) and a full set of cartridges runs $88.00 (Can).
-
Did you scribe the rivet marks on the leg piece? If so, what did you use?
-
Wow nice work with the mods there. You should start another thread for the build-up/mods you are doing. I for one would like to see more.
-
Holly Crap! Watching that just makes me tingly all over. Just incredible! Wow!