
MechTech
-
Posts
4702 -
Joined
-
Last visited
Content Type
Profiles
Forums
Events
Gallery
Everything posted by MechTech
-
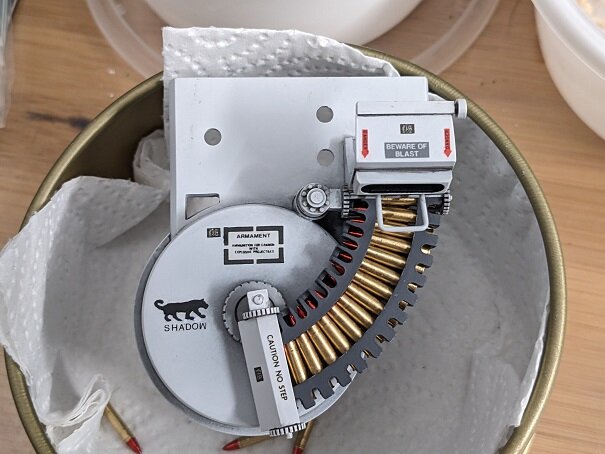
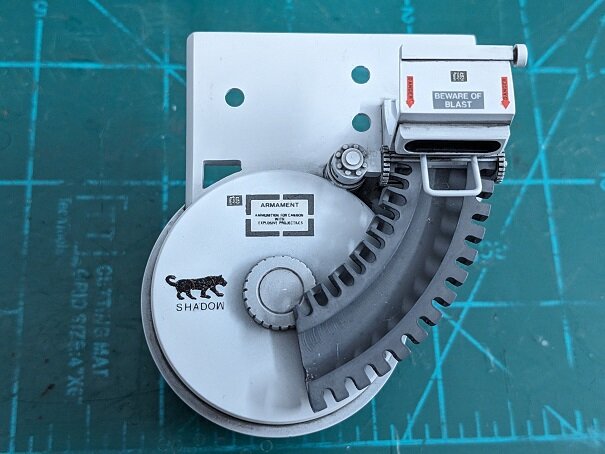
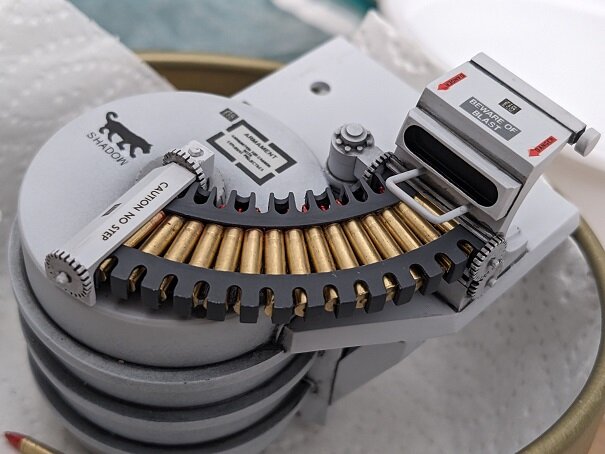
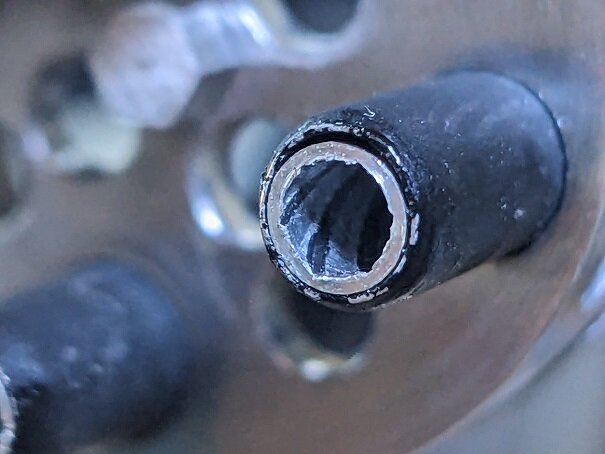
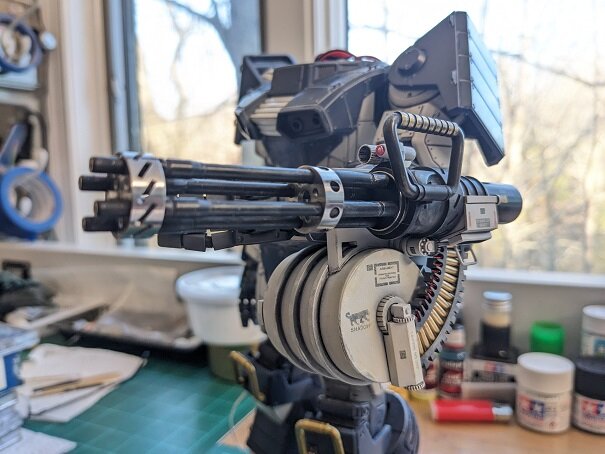
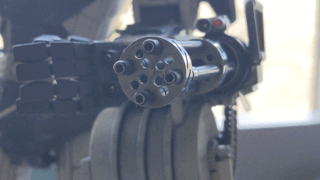
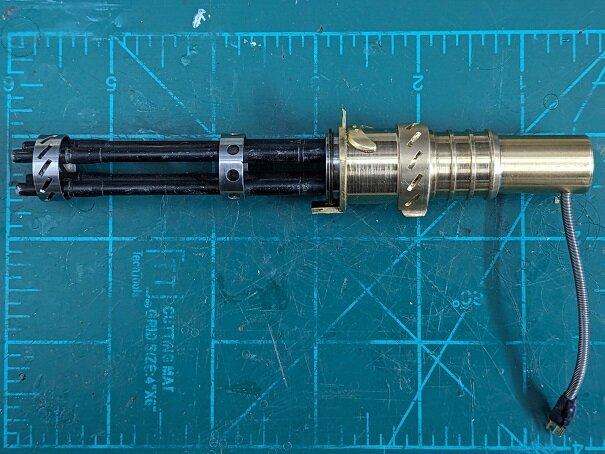
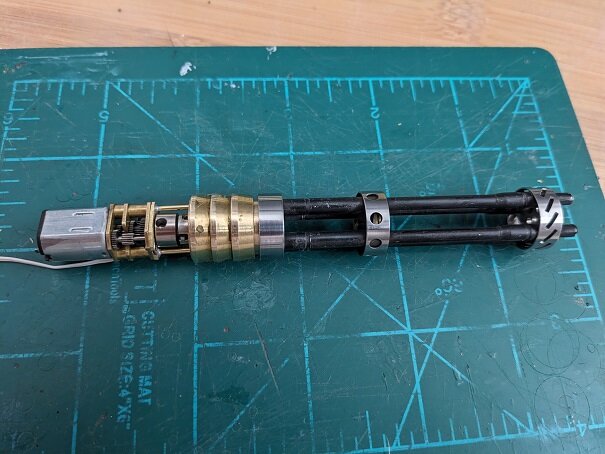
Sorry guys, it's been a while! Too long! I literally ran out of "likes" for all the cool builds you guys are doing! Sorry, I'm also short on time to post comments, so I'm squeezing this in on a break. You guys have been building some AWESOME stuff!!! In trying to spend more time with my wife (so she's not a "hobby widow"), I'm working on Gundam kits in the living room while sitting with her. They take no special tools or stinky glue work just to knock out for fun. The serious scratch building work is taking longer - like weekends only now, so progress has been slow on this build. Speaking of my wife, while at Homegoods with her, I found these cool looking, swirl-blue, water-looking plates. They'll be AWESOME to make under water or over-head water back-drops for your Z-goks or other aquatic mecha and subs. They are styrene so are easily cut, glued or heated up to shape. Just sharing! The Dougram rotary cannon is FINALLY done!!! 1. I took the re-milled Tamiya 1/35 Sherman shells and clear coated them with clear nail polish, then painted the tips red with a fine Sharpie marker. The red isn't canon (ha ha, get it), but stands out in this sci-fi build. The day of and after our cat Shadow was diagnosed with cancer, I was building and painting this cannon. So I decided to dedicate it to his memory with a decal and combining all those tiny identifier letters at the bottom of decal sheets to make his name. Plus, "the Shadow Cannon" sounds kinda cool! The cat decal splintered like crazy! But I fixed it and painted parts. Then in went the ammo with Evergreen clear canopy glue (white glue) to lock them all in snug. The cannon body and site parts got painted and decals as well too. To go that extra mile, I lathed some short 1cm tubes to fit snug into the cannon barrels and rammed a Dremmel cutter down the center with the lathe to "rifle" them. I added a black wash to help the grooves stand out. This photo is with an old binocular lens to magnify one of the barrels. It took SEVERAL photos to get this visible, mostly in-focus one. Then all assembled and weathered with Tamiya Panel Liner, paints, Tamiya dusts and a regular Prismacolor "Silver" colored pencil to "chip" it. And cycling through a couple of times (slowed down for the GIF creation)... It does rotate clockwise from our view. Again, the GIF goofs some videos up! Thanks for your support and checking in everyone! - MT


-
@Shawn Consider this a "LIKE"! Aha! So those (now defunct) LS brand model kits/molds (which I have never seen before - THANK YOU!) must have been bought by Imai who sold them as 1/72nd scale. I knew they were 1/100th, the pilot is way too small! I only recently heard of LS as I bought a TINY model of the BD-5 by them at a hobby convention. It's all starting to come together now! Thank you again! - MT
-
@derex3592 @Papa Rat @Big s @Thom @nightmareB4macross @pengbuzz @Radioguy @Urashiman @arbit THANK YOU ALL for your condolences, thoughts and prayers! They're much appreciated! The long list above is one reason I posted Shadow's death. You guys are an awesome support group of sorts. I also know most of you have "building buddies". It's cool when someone gives you nice feedback on your model build, it's another when they support you in your time of loss. This is the closest thing to me for social media. No time for that AND building - so model building it is! Besides, nobody wants to see the burrito I had for dinner last night on my social media account! Funny thing, we needed a new cat tree, so we decided to buy a new one. We went to PetCo and they had a kitten adoption day! My wife couldn't even look at them! They had tiny trees, so we went to PetSmart. They ALSO had a kitten adoption day! My wife laughed not being able to run from the inevitable! I actually ran out of likes for all the COOL stuff you guys are building! I'll try to make updates in the week. I gotta run now, but THANK YOU ALL AGAIN! - MT
-
Why isn't that in a frame or at least a bag! It's looking pretty worse for wear too. It's IS COOL though! - MT
-
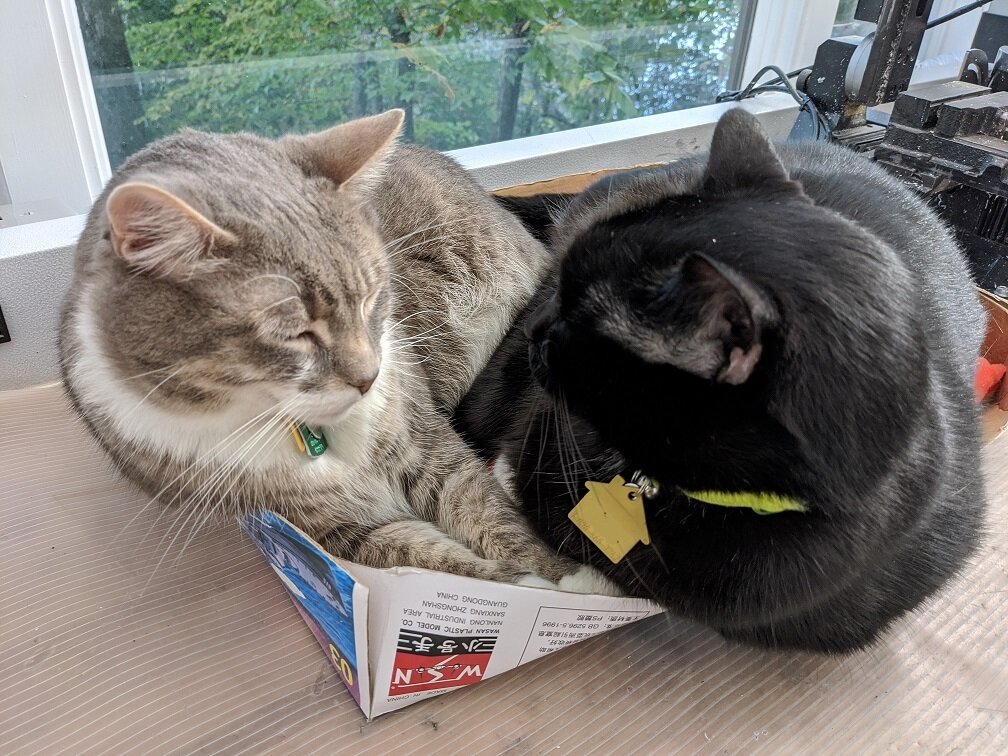
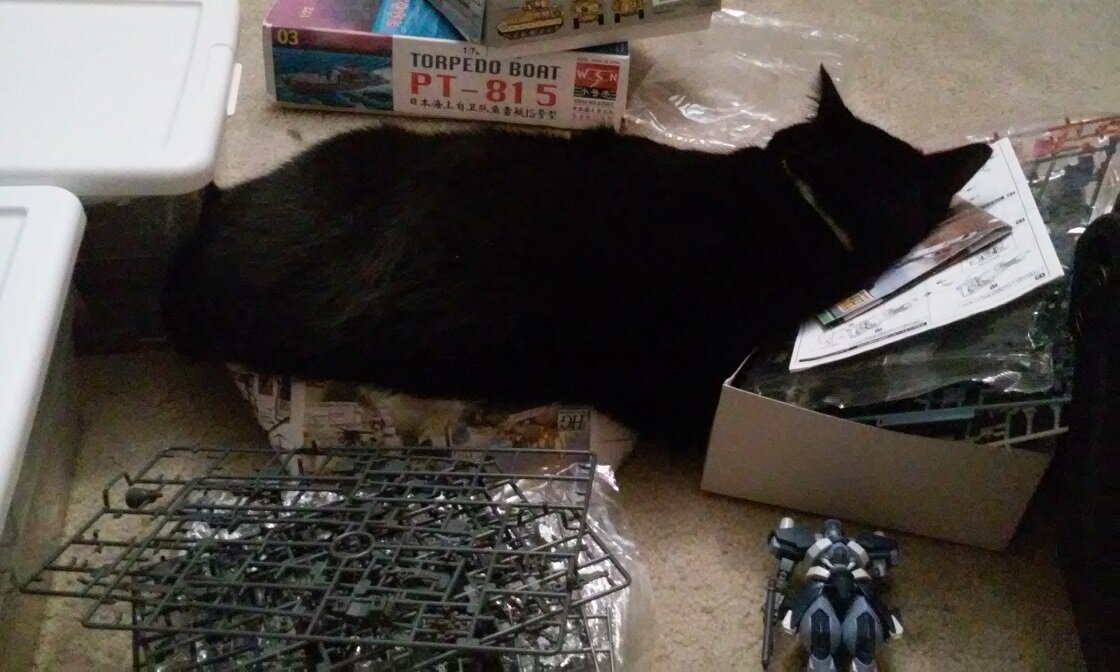
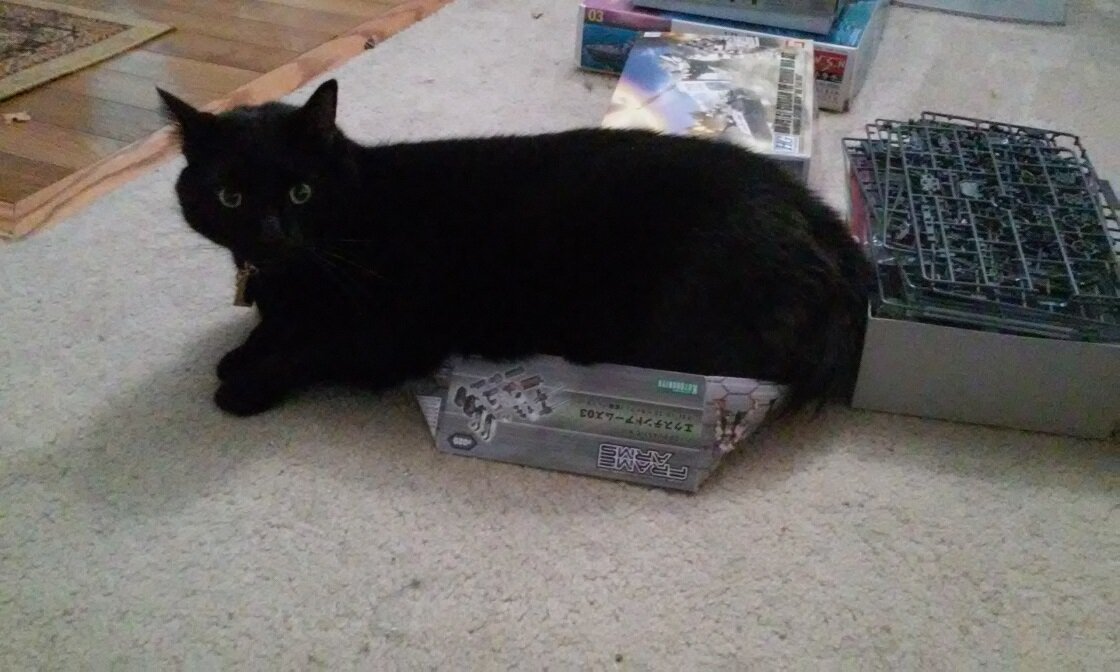
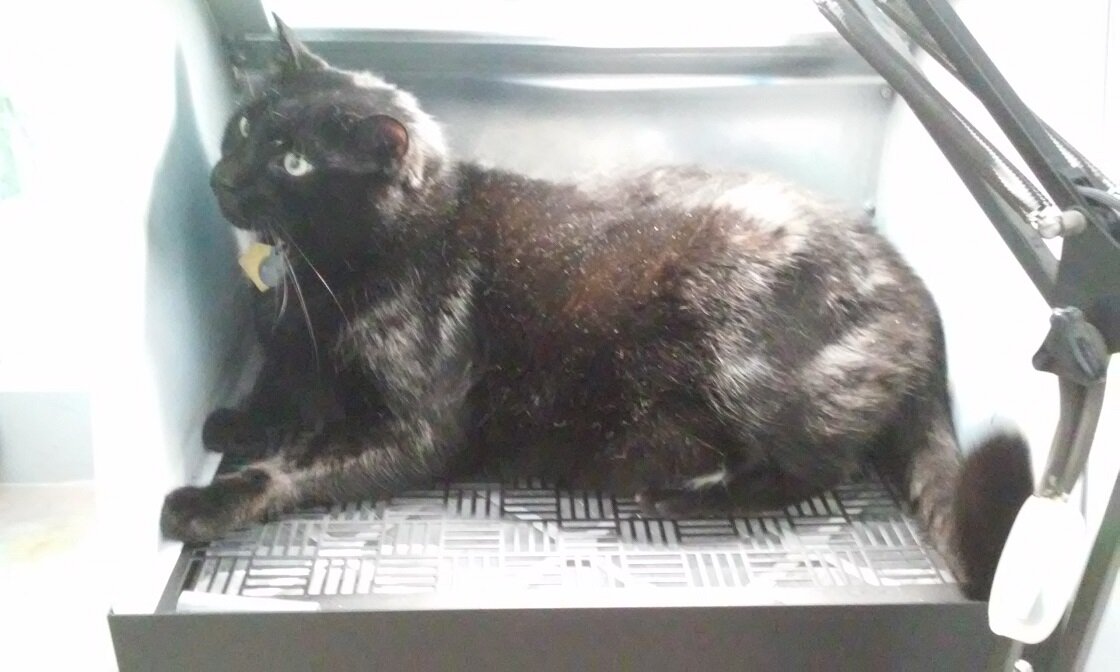
Hey guys, I've had two modelling buddies, "Butters" on the left and "Shadow" on the right. Here they're demonstrating just how much you can really squeeze into a model box! Here, they're on my workbench and "help" me build, so the photos are relevant.😉 Butters got his name from the shelter we got him from, and Shadow got a new name of Shadow because he shadowed us all over the house - not because of his color. In fact, we stepped on him several times the first week because he is the definition of stealth and got under foot. He was a great modelling buddy! Sadly, it's with a heavy heart that I announce the loss of Shadow. He got cancer in several organs and was not eating or drinking. Over the past week and a half he was X-rayed, ultra-sounded and given anti-biotics in addition to a drug that makes you hungry and eat. Nothing worked except the ultra-sound showing the cancerous growths. Shadow went from being a hefty 20 lb cat, to losing about six pounds - a LOT for a cat of any size. We don't know how long he'd been losing weight. Finally, he had to be put to sleep. He couldn't eat or drink, he was drooling, his nose was running, and all his organs were failing. The poor guy was a fraction of his original self. It all happened quickly and surprised us and the vets. He was well treated and loved right up to the end! Last night we brought him in for his final vet appointment and sat with him on the floor as he was laying on a big dog pillow. I'll spare you the details, but it was like Jesus took him before the poison did. He didn't move or blink beforehand at all, like he was already gone. He knew what was going on and had a peace about him the whole time. But to leave this thread on a positive note, he was a hilarious buddy, especially working on projects laid out on the living room floor. He literally made himself at home! How anyone could sleep like that in the photo below is beyond me! He helped keep my instructions flat and make it "fun" to find parts on trees he was sleeping on. Shadow was recycling minded, always helping us crush boxes for the recycling center. I also think he had a small cat mindset in a large cat's body! You don't have to fit entirely inside a box to curl up in it - do you? He loved the little spray booth someone gave me when they moved. Maybe because he actually fit in it! Shadow will REALLY be missed! This is not meant to be a depressing story, but some good model building memories with my buddy. Make sure you all appreciate your buddies. Time evaporates about as fast as model cement! - MT
-
@Thom Thanks. Thom! @Papa Rat The paint is looking smooth on that head. @F18LEGIOSS2 I haven't tried pastels or charcoal, but that sounds like a great idea! As @nightmareB4macross mentioned, with water and soap (similar to Flory's, but they use clay too) would probably work. I have a model I may do where solvents can't be used in the final wash. This might work! @Urashiman The theme to "Magnum PI" plays in my head when I see those photos.😎 That's the original "Loach" kit of a Vietnam era version. Loach as in the speedy and slick fish that's hard to catch. It probably has the aerodynamic pod and mini-gun (gatling gun) in it, unless they cut it off the sprues. I built that kit decades ago! The fit frustrated me too, but I always loved that sleek design. In my childhood home, my neighbor had one and we didn't know it! He invited us on a flight one Easter Sunday. He had it to work his silver mine down in Mexico. It had to be flown and ran up every week or two to keep the turbine seals moist with fuel and oil. So, he invited us out for a flight! It was cool! He was like, "Hang on to the doors, don't let them open in the opposite direction, those hinges cost $1000.00 each (that was back in the 80's). I met a guy who was shot down TWICE in those things back in Vietnam! One time the pilot just got the bird down safely before dying. He got struck with a cannon round! He had some crazy stories! - MT
-
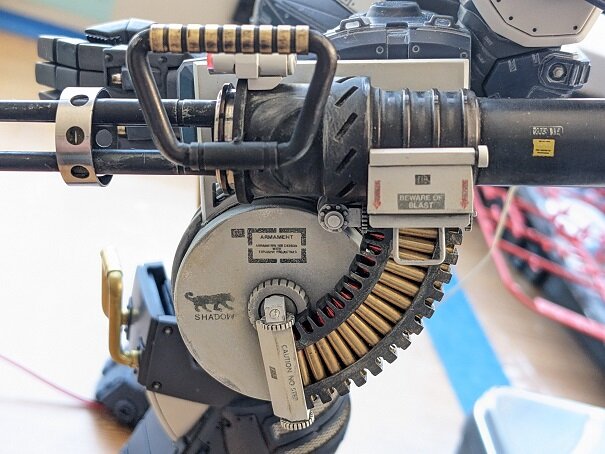
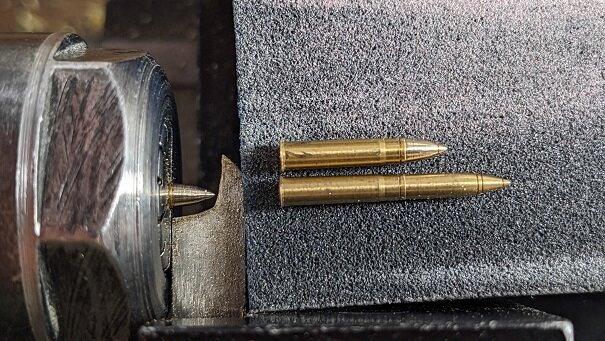
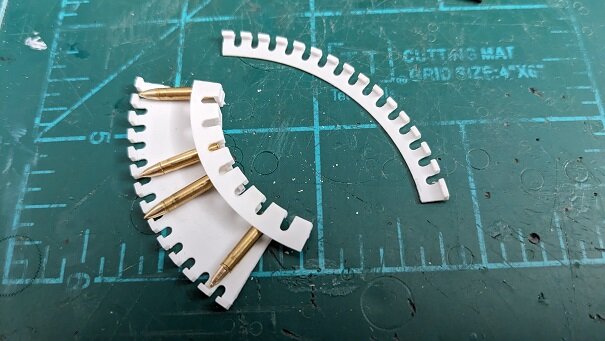
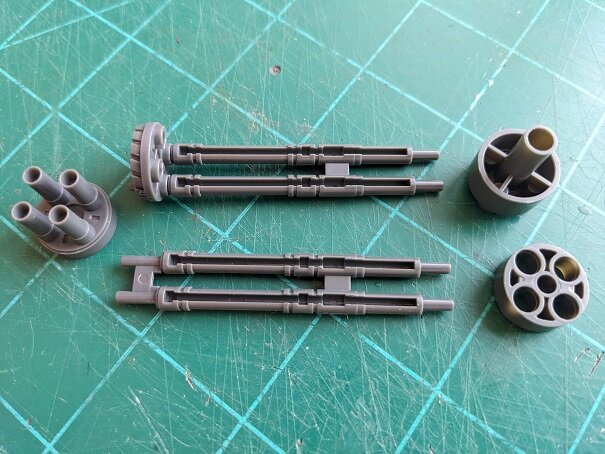
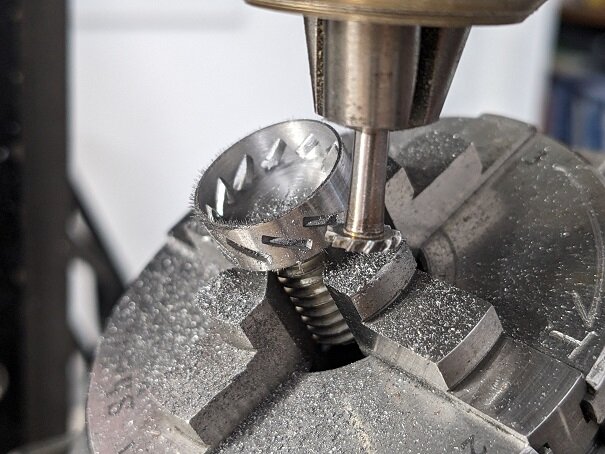
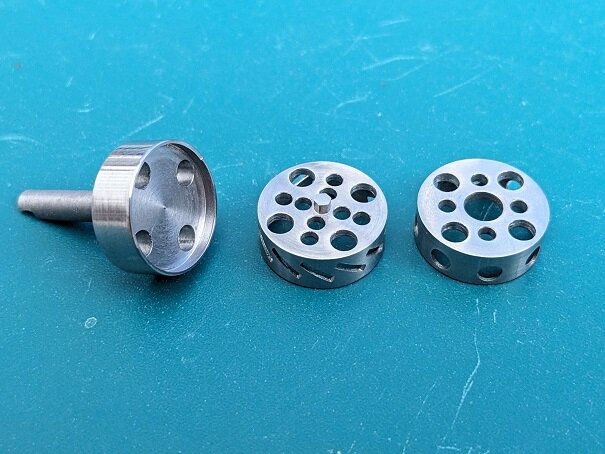
@SteveTheFish If you're going to strip the paint off that, "LA's Totally Awesome" (at the Dollar Store) is one of the best and safest agents to clean all that off. You just need to wash the residue off with soap and water. It won't attack glue or the joints either. Have fun with it! @electric indigo Cool Photoshop of your SLUF and paint of your Luftwaffe "What If"! @Wewyllenium Sweet metalics and colors on your paint job. @nightmareB4macross It may not be for a couple more years at this rate, but you're gonna have to have a party when you finish that! Cool intake covers! Years ago some hobby shop was trying to get rid of their Tamiya brass ammo for various models. So I bought a bunch of it on sale KNOWING I would use it some day. So maybe its been about 25 years now, but I found a use for it! The diameter of the barrels and the size of the cannon body dictated what size the ammo would have to be. So I took Sherman 75mm brass and had to machine it down to a shorter length. They make this brass on computerized lathes that cost thousands of dollars. I had to do with a couple of dollars worth of ground tool steel. Thankfully my idea worked! Next came the ammo chute to feed the cannon. This is where photo etch would be king! But I don't have the stuff to do it, so styrene was CAREFULLY used. The parts are THIN and clean-up after milling them by hand took hours. Here's the parts (one side glued together) and all the pieces glued together along with the cannon body treated with "Brass Black" which is an acid. It beats painting and is much more durable. The ammo chute still needs more work on it along with the drum magazine. That's it for now, thanks for checking in! - MT
-
@nightmareB4macross That is BEAUTIFUL engineering and work on those pieces! @F18LEGIOSS2 If you have Acetone, that is one of the BEST cements for ABS. It is super thin and dries FAST, so watch how you use it if so. - MT
-
@pengbuzz Thank you! WOW! Talk about brain surgery!!! That's some serious sculpting. Looking awesome! I can't sculpt people. Maybe I should try a glue gun to add "hair" to my balding head. I bet I won't need much hair gel.🤣 @electric indigo I don't know about that, but thank you! Yeah, SLUF really isn't accurate; but yours is (see what I did there)😁. It was one of a few planes to actually fly properly and be on production schedule as planned. It had a good all around record. I guess that's why the AF purchased them too. @nightmareB4macross You're right, they no longer are the legs of a '55! They look younger! You ARE a plastic surgeon!😉 @Cheese3 Those are definitely the girls my mom told me to stay away from! Great looking paint and details on them! - MT
-
Cool! Must be fairly tiny. - MT
-
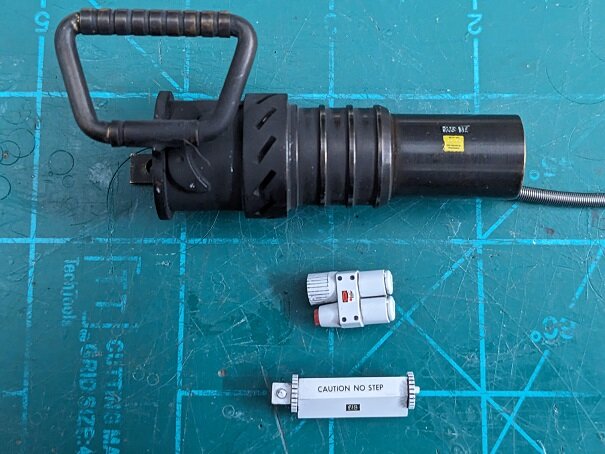
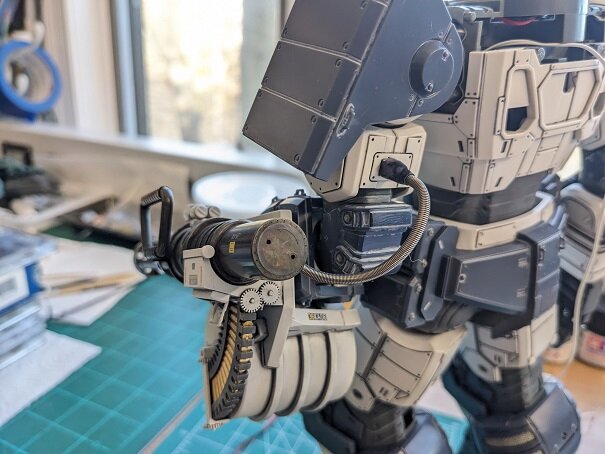
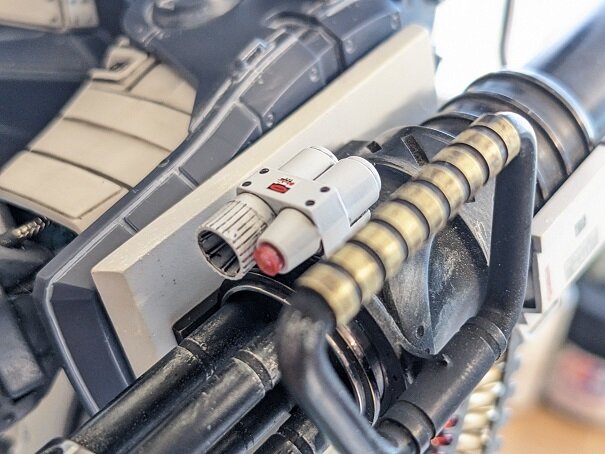
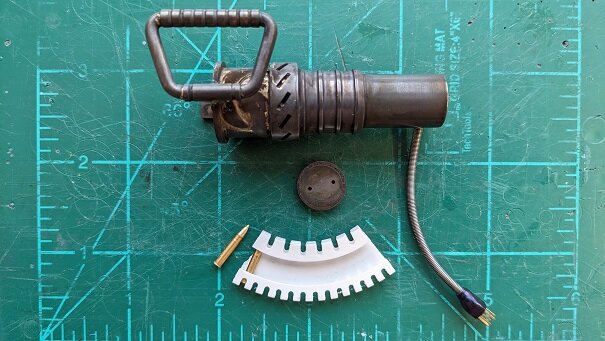
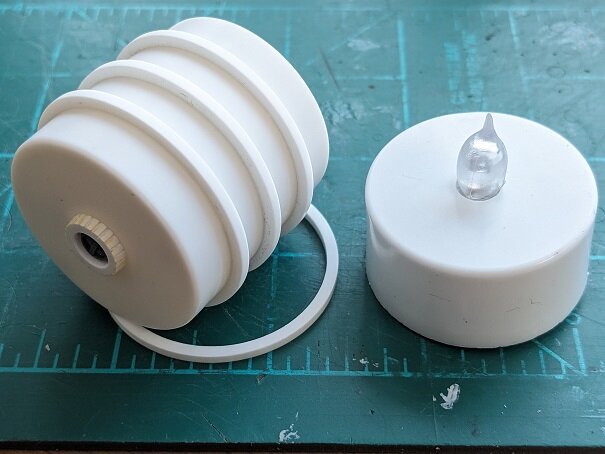
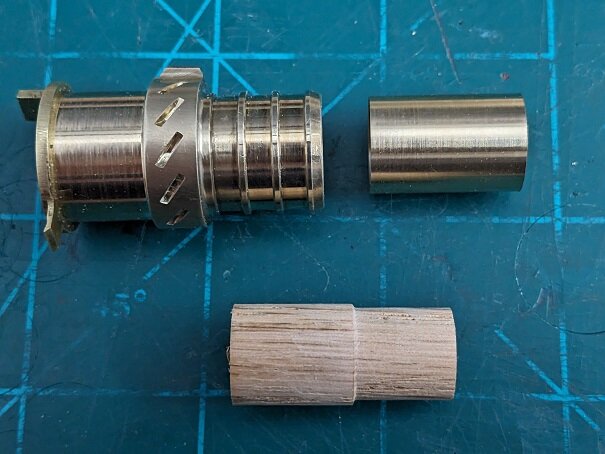
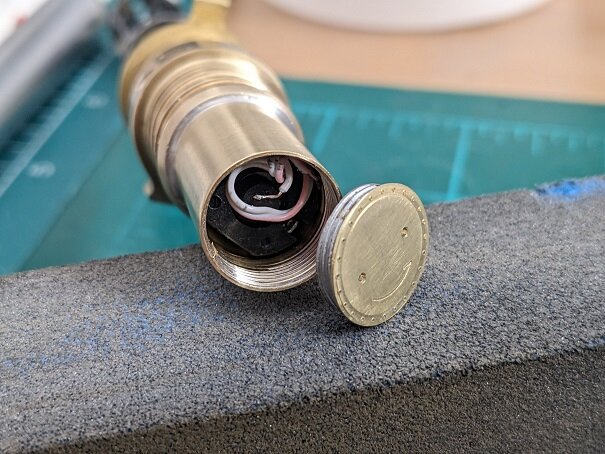
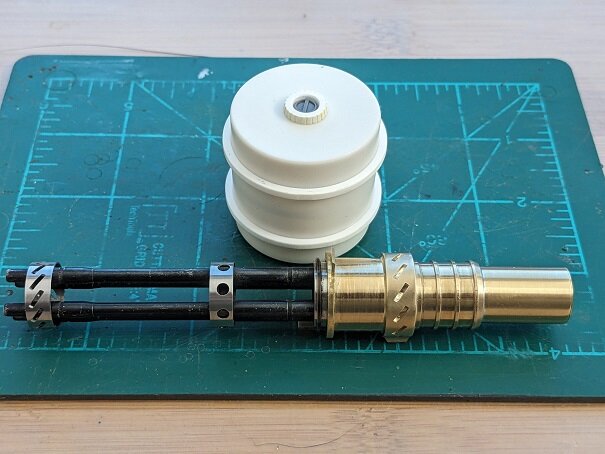
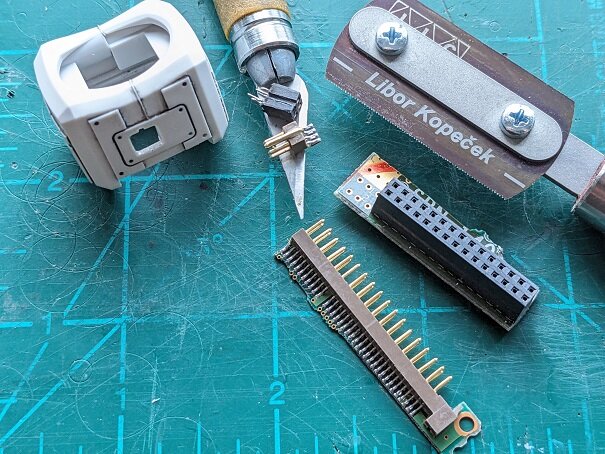
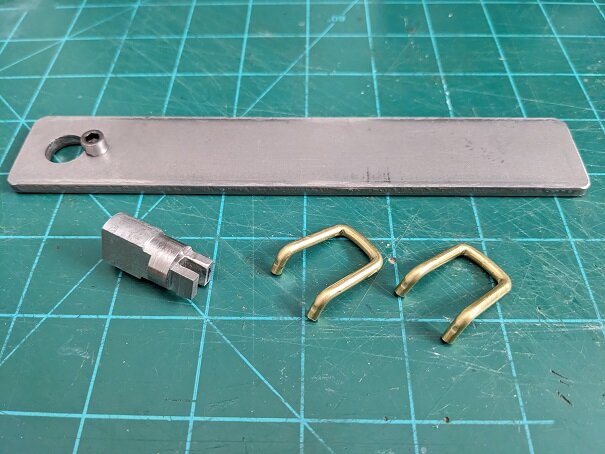
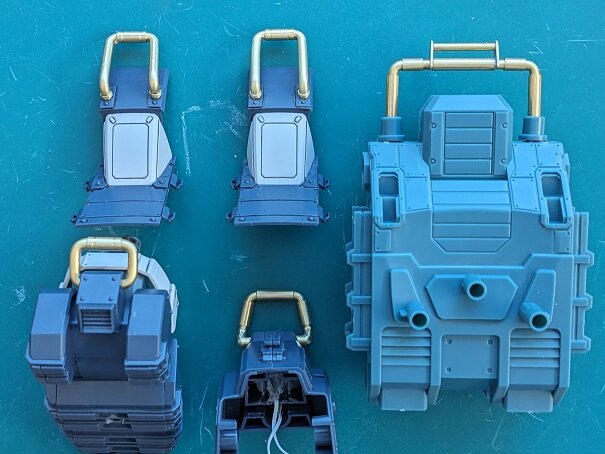
@nightmareB4macross AWESOME improvements to that '55! We can't call it a "Chunky Monkey" anymore.😁 All of those details and added "gimicks" look MUCH better than outa the box! @Cheese3 That Falcon came out great! Your cat on the other hand has that look of "Not another photo! Leave me outa this!" 🤣 Yes, it's cool having everything in the same scale. @Urashiman Cool start on that Valk! @electric indigo Your Corsair came our BEAUTIFUL! Congrats! No bias here😎, but I'm glad to see one in the Air Force livery. They're lesser known, but heavily used. For the 1/35th Dougram... Things are coming out WAAAaaaaay slower than expected with finishing the Dougram. I'm behind schedule for the model show near the end of Feb, and I haven't even started the backpack weapons yet! Oh well! Most "portable" Gatling guns have a handle on top as did the stock one. So I did one, but the handle stuck out A LOT. So I scrapped it. The ammo drum was made of two LED tealight candles cemented together. I milled out rings to go around it for strength and to attach it to the shield. An old brass flashlight was cut-up and turned into the cover for the gear case. It had threaded ends making things easier to complete. The problem was soldering it to the main body (that old piece of hose nozzle). So a wooden guide had to be lathed to keep the parts aligned and concentric. Thankfully it worked! Then I added "bolts" cut around the edge for detail. This can come apart for maintenance, so the end cap screws off. I etched in an arrow to show the direction to open it. Then I realized if it gets stuck, there's absolutely NOTHING to grip it with. So I drilled two holes in it to get tweezers into. The problem, I made a "smiley face". Oh well. It's a happy cannon now! The gun and ammo drum together. Since this was all an afterthought, I didn't build the wires into the model. So they had to be added in afterward. The gun also needed to be detachable as the original is. So old PC board IDE connectors were cut with a razor saw. They work great for this. It's the only way I know to find connectors this small. So one was made with a "fifth pin" glued to the outside to ensure it's keyed for the battery poles to align correctly. The female fits flush in the arm and the male is on the cannon. Add a glue gun and old detailing spring and everything came together while being fairly rugged. Other details are being added to the cannon case for realism. That's it for now, thanks for checking in! - MT

-
@nightmareB4macross The landing gears look cool! If you want to go slimmer, you can use K&S Metals. Their brass or aluminum is easy to work with and is more durable and will last longer. - MT
-
@nightmareB4macross That '55 just keeps getting better and better!!! @pengbuzz YOU are an AWESOME sculpter! I cannot sculpt people to save my life! But your figures look AWESOME! Especially considering what they used to be! Congrats on expanding your ship's crew. - MT
-
@wm cheng I'm REALLY sorry to hear about your water heater and then the mess on your bench! I've seen the Mythbusters blow up some water heaters (and "houses"), so thankfully your wasn't worse! It also sounds like the water heater techs were not very professional. They should've covered everything up. Thank you very much for the compliment! No, I have not seen that Cobra. That is really AWESOME, especially the other stuff that guy did. @Mog Those mods really added a lot more character! The only thing I'd recommend would be to panel line it. There's so much surface detail on it showcase. Overall, it looks great! @cobywan That's cool! I'm just usually around the model building section due to a lack of time. - MT
-
@pengbuzz AWESOME job modifying that Bird of Prey! I was thinking of using good ole' K&S brass tubes, but @Chronocidal has a great idea for Lego hinges! BrickLink or similar may have them individually for cheap. If you do go that way, you'll need Acetone to melt the Lego ABS to the styrene, but it will work. @derex3592 That's a GREAT looking A-10! Sorry about the over under-spray on the canopy; that sucks! All the same, it looks great in "Beast Mode" with all the armaments! @Thom Thank you, Thom, I appreciate it! @Cheese3 Wow! You are mixing different genre - and with alcohol! That's asking for trouble🤣 Congrats on getting some great looking builds done before the end of the year! @The Original Cobywan Wow! you're still alive! I haven't seen a post from you in years! That's cool you created that conversion kit! @Big s Thank you, Big s, I appreciate it! @Nyankodevice That's a BEAUTIFUL sculpt and drawing! It's good to see you back on the boards too! - MT
-
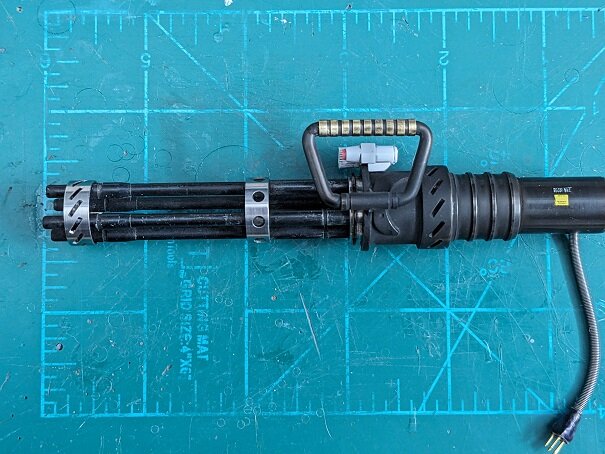
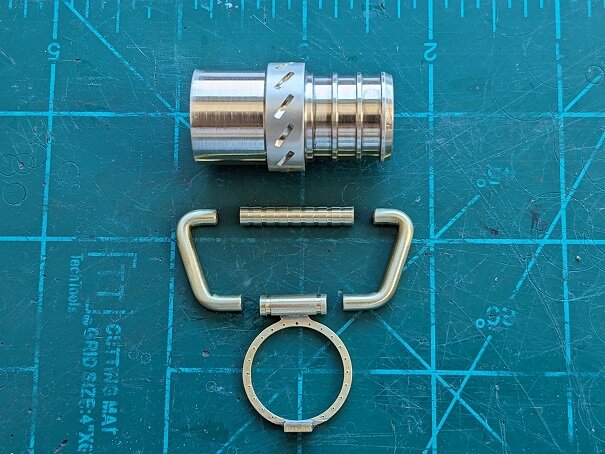
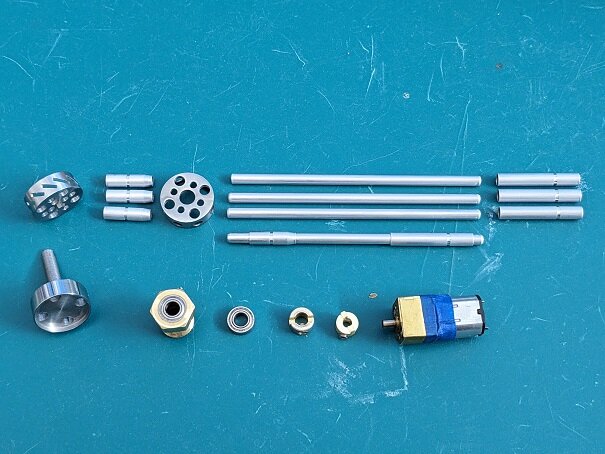
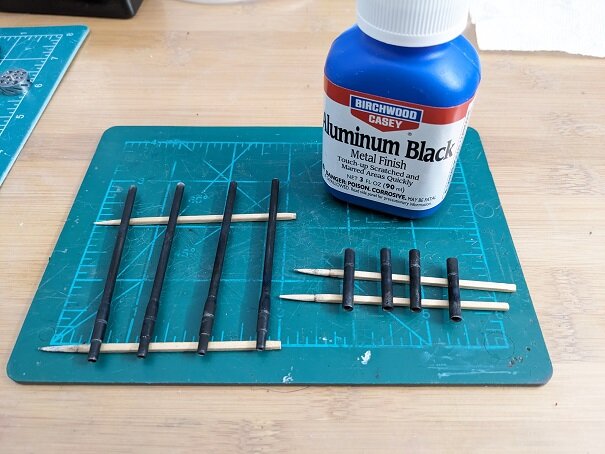
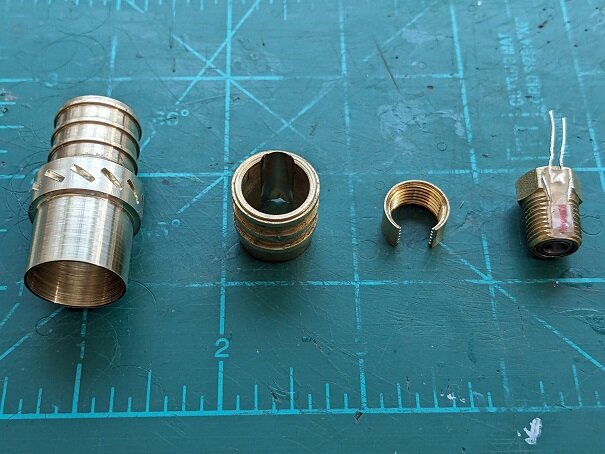
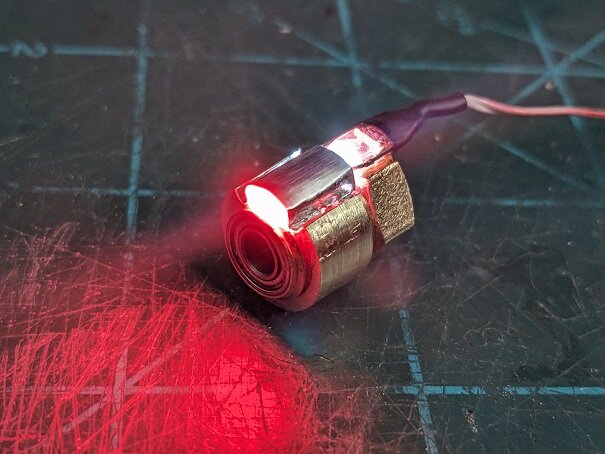
@derex3592 I LOVED building that kit with my son! The cannon are awesome how they progressively elevate. @electric indigo That Corsair is looking GREAT! There are some awesome molds from even 60 years ago! I guess its all in how much effort or skill was put into the mold. A lot of panel lines are too wide in scale, but current tech is limited to what can be done. @SteveTheFish I love the recon reconfig! It's cool that they made those conversion kits. @nightmareB4macross Those mods are looking GREAT! That is DEFINITELY going to be an improvement over the stock version - and then some! @pengbuzz GREAT change of paint on the kit! It does look like the scene you posted. I hope everyone had a Merry Christmas (and Hannakuh since it's still going on). I finally got some free time on the workbench and got somewhere on the Dougram kit. The first photo is from the stock Gatling gun barrels. You can see how all the voids molded into the parts REALLY detract from it! So I decided to rebuild it. Filling them neatly would take about as much work! The first step was to create the clamps and muzzle to hold the barrels together. Here's the muzzle getting hand machined - with a Dremel bit! Can you see how this was made from an old bolt head? See the threads? All three were to keep the colors the same. And all the pieces together including a center "nut" machined for the muzzle clamp. Then all the barrels were cut from simple K&S Metals aluminum tubing in two thicknesses. Old air line fittings were machined for various pieces including the bearing holder. A nice gear motor is what drives everything. It's quiet and has some torque. Then the barrels were blacked with acid. Which had to be redone since the first coat literally came right off!? Do you see the part on the left? It was an old garden hose fitting - now HEAVILY machined! The back part still has its barbs for the hose. All the parts fit inside of each other like those Russian dolls to keep the parts centered. Note the two LEDs in tandem for double the light output. And then covered to reduce the light. And everything connected together that slides into the "garden hose housing." The motor couplers were made as well because of the small size. The bench test (which actually rotates clockwise, but the GIF looks opposite). And with the light shining through the barrels... I can't emphasize enough how God was a HUGE help to me on this project! He even pointed out where I messed up with the main shaft. I couldn't figure out where I went wrong since it wobbled more than what you see. So many pieces just came together as I looked through my spare parts - it was no coincidence! I screwed something up, and it ended up working for the good! Especially with the brass pieces. There's still more to go on this. The handles and base with ammo cans are in the works. Thanks for checking in! - MT


-
@sketchley Those Death Star details are a vast improvement over the stock version. The red looks weird at first in assembly, but complete really pops for the right reasons. @Urashiman Great clean-up on the canopy and paint on the pilot! That's going to be a beautiful build! - MT
-
@pengbuzz WOW! That's a LOT of detail you put into the starship! It looks REALLY good and especially cool since it's a rare subject. - MT
-
Thanks guys! Yeah, the voids molded into the parts class as grand canyon gaps. I filled it way over the void to sand and it STILL had major shrinkage. The water evaporates and nothing is there to take its place in the formula. It's probably good for thin seam fills, but as Big s said, I just use CA myself. CA and Baking Soda for thicker expanses. Oh well, the voids are gone now😁 @electric indigo That is a BEAUTIFUL kit! Someone brought it in to our club meeting a little further along than yours and the cockpit details look awesome (out of the box). - MT
-
@Big s @Chas Thank you guys! I'm glad it's just not me! Whoever formulated that putty was on crack - or crack was part of the formula🤣 How are you supposed to sand rubber? That stuff would have been fine for calking tiny bathrooms, but not model building, that's for sure. - MT
-
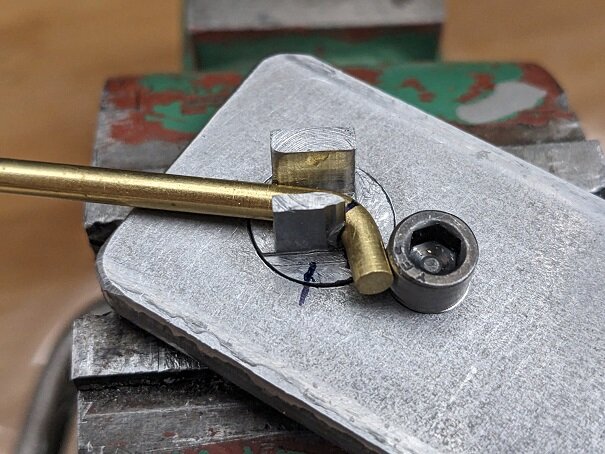
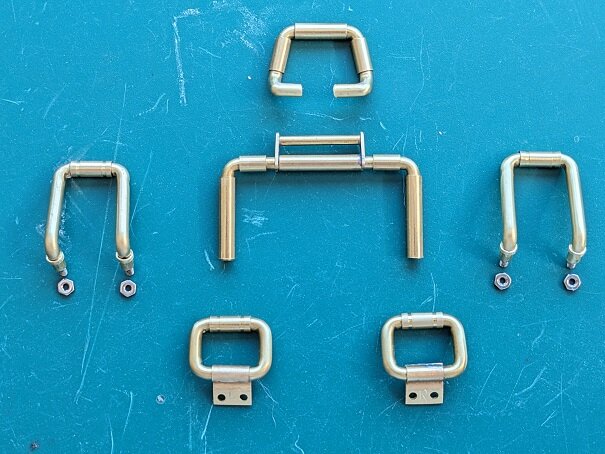
@pengbuzz That's cool! You continue to show that you are THE MASTER with a roll of tape! @electric indigo Beautiful looking paint and weathering on that SLUF! @Cheese3 For a second I thought you were building the Minerva and the related tank for Crusher Joe😁 You've also reminded me why I wouldn't let my children drink beer, play with guns, and ride German armor - all at the same time🤣 @derex3592 Great paint and panel lining! If you guys recall, I told you how the 1/35th Dougram kit has voids molded into a lot of parts. Roll bars or whatever you want to call them ALL were like that. What a pain. I tried filling them with the Vallejo filler and it SUCKS! I tossed it out since it dried like rubber and had MAJOR sinkage as it dried. So I've been trying to rebuild these dumb bars! I tried styrene. Its impossible to get the same temperature and bending radius. I litterally wasted several feet of styrene rod and sprue. I tried heavy electrical wire, but it wouldn't hold the paint with its flexible insulation. The only option was to bend 1/8" (3mm) thick brass rod. I encountered the same problems with it too. I finally realized I needed a wire bender. Sometimes you need a special tool for a special job. I watched some videos online and figured out the simplest version. Just three pieces for the whole thing! The base is a solid bolt body that the bottom half had filed away two sides so it would lock into a bech-top vice. Then that has a channel cut through it for the wire to go through. And finally, a socket head screw was threaded into it. Here's the parts with a couple of tests. And a close-up to see how simple it really is. You can see I filed away some of one side to work out the radius angles. Four weeks later, I FINALLY got a full set of roll bars! Thank God they came out OK and are done! This is where each roll bar goes... I think its on to the weapons back-pack next. Thanks for checking in guys! - MT
-
@derex3592 Paint looks smooth! Just watched one of those flying over and hitting targets in Syria. There's no replacement for that plane! - MT
-
@F18LEGIOSS2 Everything will scratch - sadly! However, Big s is absolutely right. In fact, sanding will give the paint more bite into the surface. I build a lot of parts like that and always try to get the correct color plastic so scratches won't show easily. But that's obviously not gonna work in your case. Like Big s said, try the lacquer paints. Maybe even an automotive rattle can if you can find them. Best wished with your paint! @pengbuzz Is that another masking masterpiece!? That looks cool and the detailing on the surface really adds to the depth of it! - MT
-
@derex3592 I loved that kit! My son and I built it years ago. I love how they engineered the guns to raise and lower sequentially. @electric indigo COOL! An Air Force Corsair! That cockpit looks great too! An Air Force livery Corsair is a rare bird. - MT
-
@pengbuzz@Thom @arbit Thank you guys! I hope to get more work done this weekend and post photos, but we'll see! - MT
