
MechTech
-
Posts
4701 -
Joined
-
Last visited
Content Type
Profiles
Forums
Events
Gallery
Everything posted by MechTech
-
Welcome, Klee! The coating has different names in different countries. In America, Pledge is a spray can furniture polish (SC Johnson company). I assume you're talking about the version that is a clear acrylic coating for floors - just making sure. It should dry crystal clear. How are you applying it? Via airbrush? Brushing? Dipping? I've heard that it can yellow if the coat is much too thick. The orange peeling is also usually a sign that it is reacting to something else. Is the undercoating thoroughly dry? If using a brush, brushes never really come clean. There may be something still in the brush causing you problems. Just throwing some ideas out there... - MT
-
We're going from "art imitates life" to "life imitating art"! I don't know if that's a good or bad thing! @pengbuzz Your Catseye is looking good! Are you going to use wood or something like that for the engine nacelle ends? - MT
-
@GMK I didn't know the CCP watched Macross or played Yukikaze!😄 I DEFINITELY see the resemblance. @pengbuzz English accent: "And so our Maskingtape Master embarks on another adventure into the unknown." It's taking shape! - MT
-
Don't forget "anime magic!" Anyone here who has tried to scratch build something in Macross will be scratching their head as soon as they start comparing drawings. The only exception are the newer anime with actual 3D models taken from the animation. I wish you all the best! - MT
-
@arbit Your figure is looking good! @pengbuzz I look forward to your scratch-build. That is going to be a fun subject to tackle! @Rock Your finish is looking good! - MT
-
It DOES look much better! The colors and markings look great! - MT
-
With all the evil crap going on in the world, this is some cool news! Is it just me, or is this like a couple of decades late? Better late than never I guess. - MT
-

The 'Hey look at this really cool model build I saw' post
MechTech replied to Shawn's topic in Model kits
That's funny! When my sister and I were kids, we used to yell out over his voice, "I need a shower!" 😅- MT -
@ChristopherB Great RARE model and fast packs! Thanks for sharing. - MT
-
I TOTALLY recommend doing vacu-form or Pengbuzz's "heat and smash" technique. It is fun to learn and you'll use it again - I'd almost guarantee it. Just make sure your "buck" is smooth so the canopy is smooth. Want colored glass? Some soda bottles will work too when you cut them open to make a sheet. - MT
-
Thanks for sharing! I didn't know a lot of these existed! - MT
-
Looking good! - MT
-
@derex3592 Tanks that are filled with conditioned industrial gasses are kept "empty" at a low pressure to keep water out. Home air compressors using atmospheric compressed air are best kept empty. As 007 said, water is your enemy in a tank because of corrosion and possible explosions. A friend of mine had a small air compressor like yours that powered his professional engraving shop (engraving equipment and framing equipment). It got a lot of use each day. One day he called me up and asked me to check it out. I got there and we turned on the compressor. It ran and ran and the tank never filled. When I looked at the compressor tank, there was a huge bulge in it from rust under the paint pushing it out. And of course - a pinhole in all that corrosion. Thank God it never exploded on him! Weakened tanks can be like bombs. So I told him about emptying his tank daily. And yes, he had a moisture trap on the tank. Moisture still gets through them, just not as much as straight air. Every time I use my compressor, I empty it and then open the bleed valve at the bottom. I remember how humid it got in Texas too. I also agree, I wish Bandai would show Macross the same love they have as Star Wars and Gundam. @007-vf1 Thanks! EXO has done some great model prints! That's cool the Shapeways guy re-scaled it for you. - MT
-
Thank you guys, I appreciate it! @derex3592 That sucks about your compressor! I have a similar one (one gallon) general use one for tires and air tools. I stick it in my shop, turn it on, and close the door! Then I let it charge up. That's how I deal with the sound! They can be loud. I HIGHLY recommend the smaller diaphragm ones. They are quiet and about 1/6th the size of yours in the photo. @pengbuzz Definitely doing footprints and tread marks. They really aren't in place yet, so I have to wait on that part. @Rock Going over your decals with a light coat is a great idea. I've done the same, but heavier with my models here (and still adjusting the depth). Your finish is looking good! @007-vf1 It's great to see the Cyclops up here! We haven't seen one in a while. All of your 1/700 kits look cool. How did you come by them? - MT
-
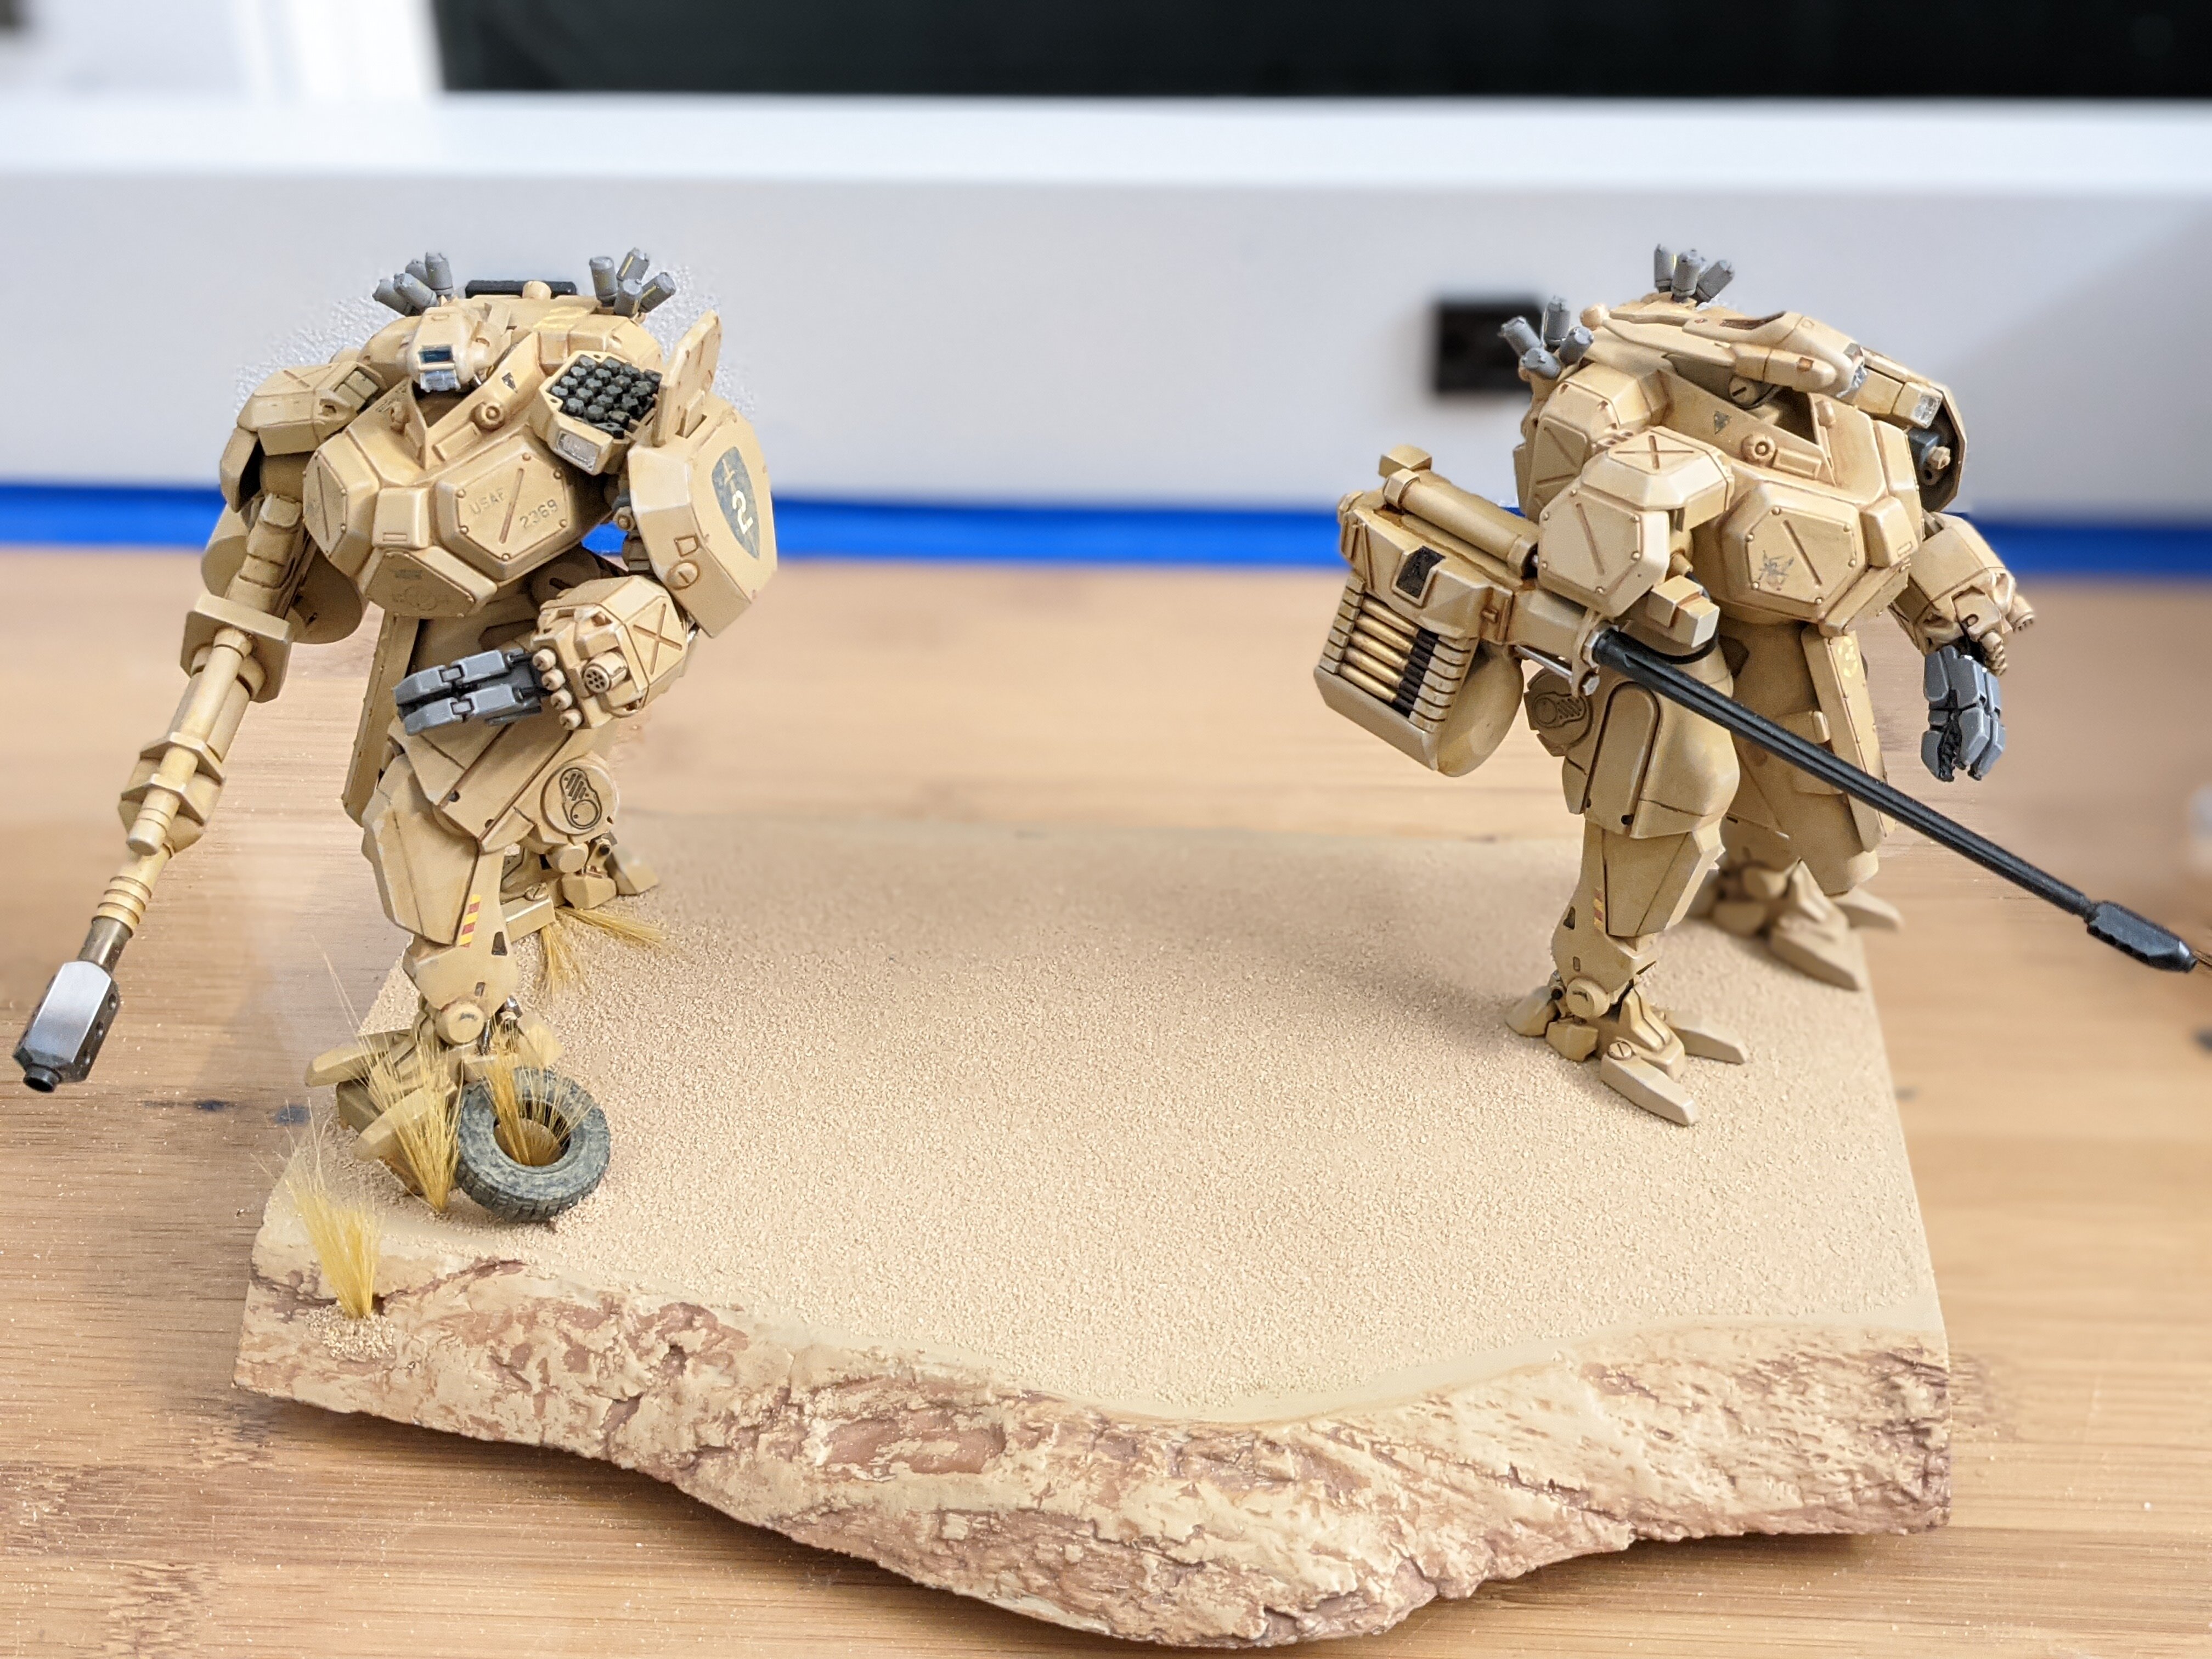
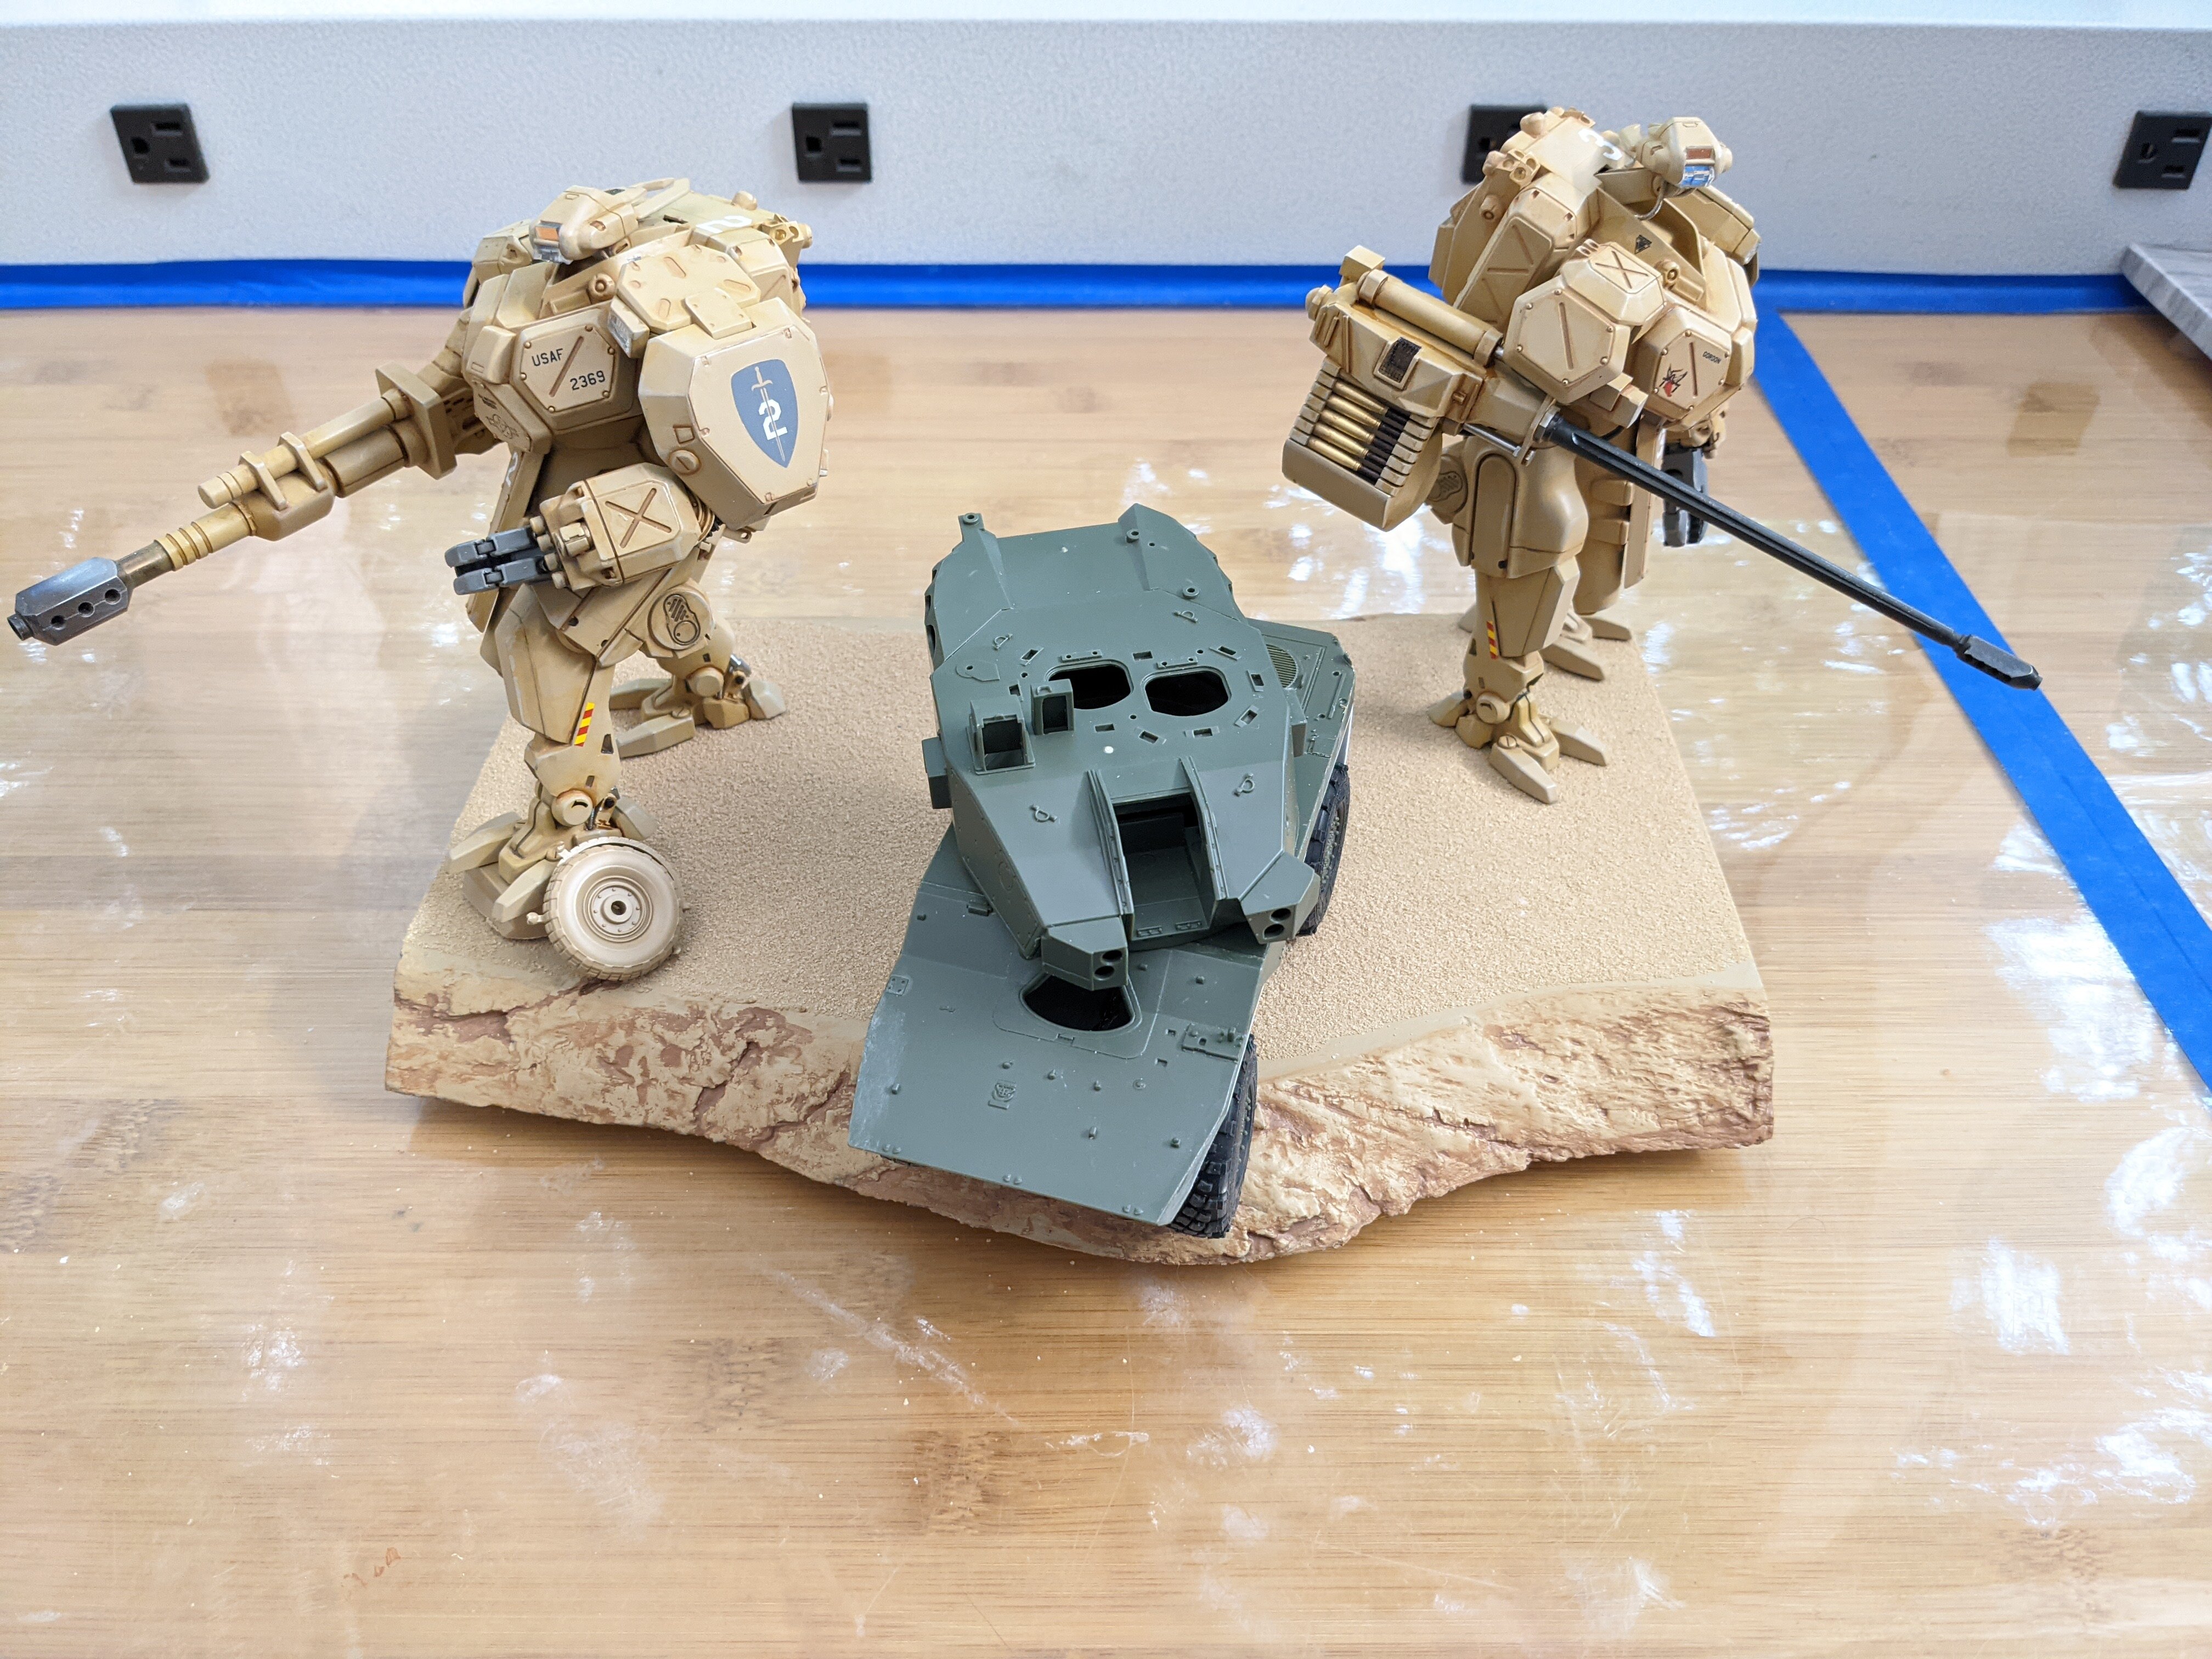
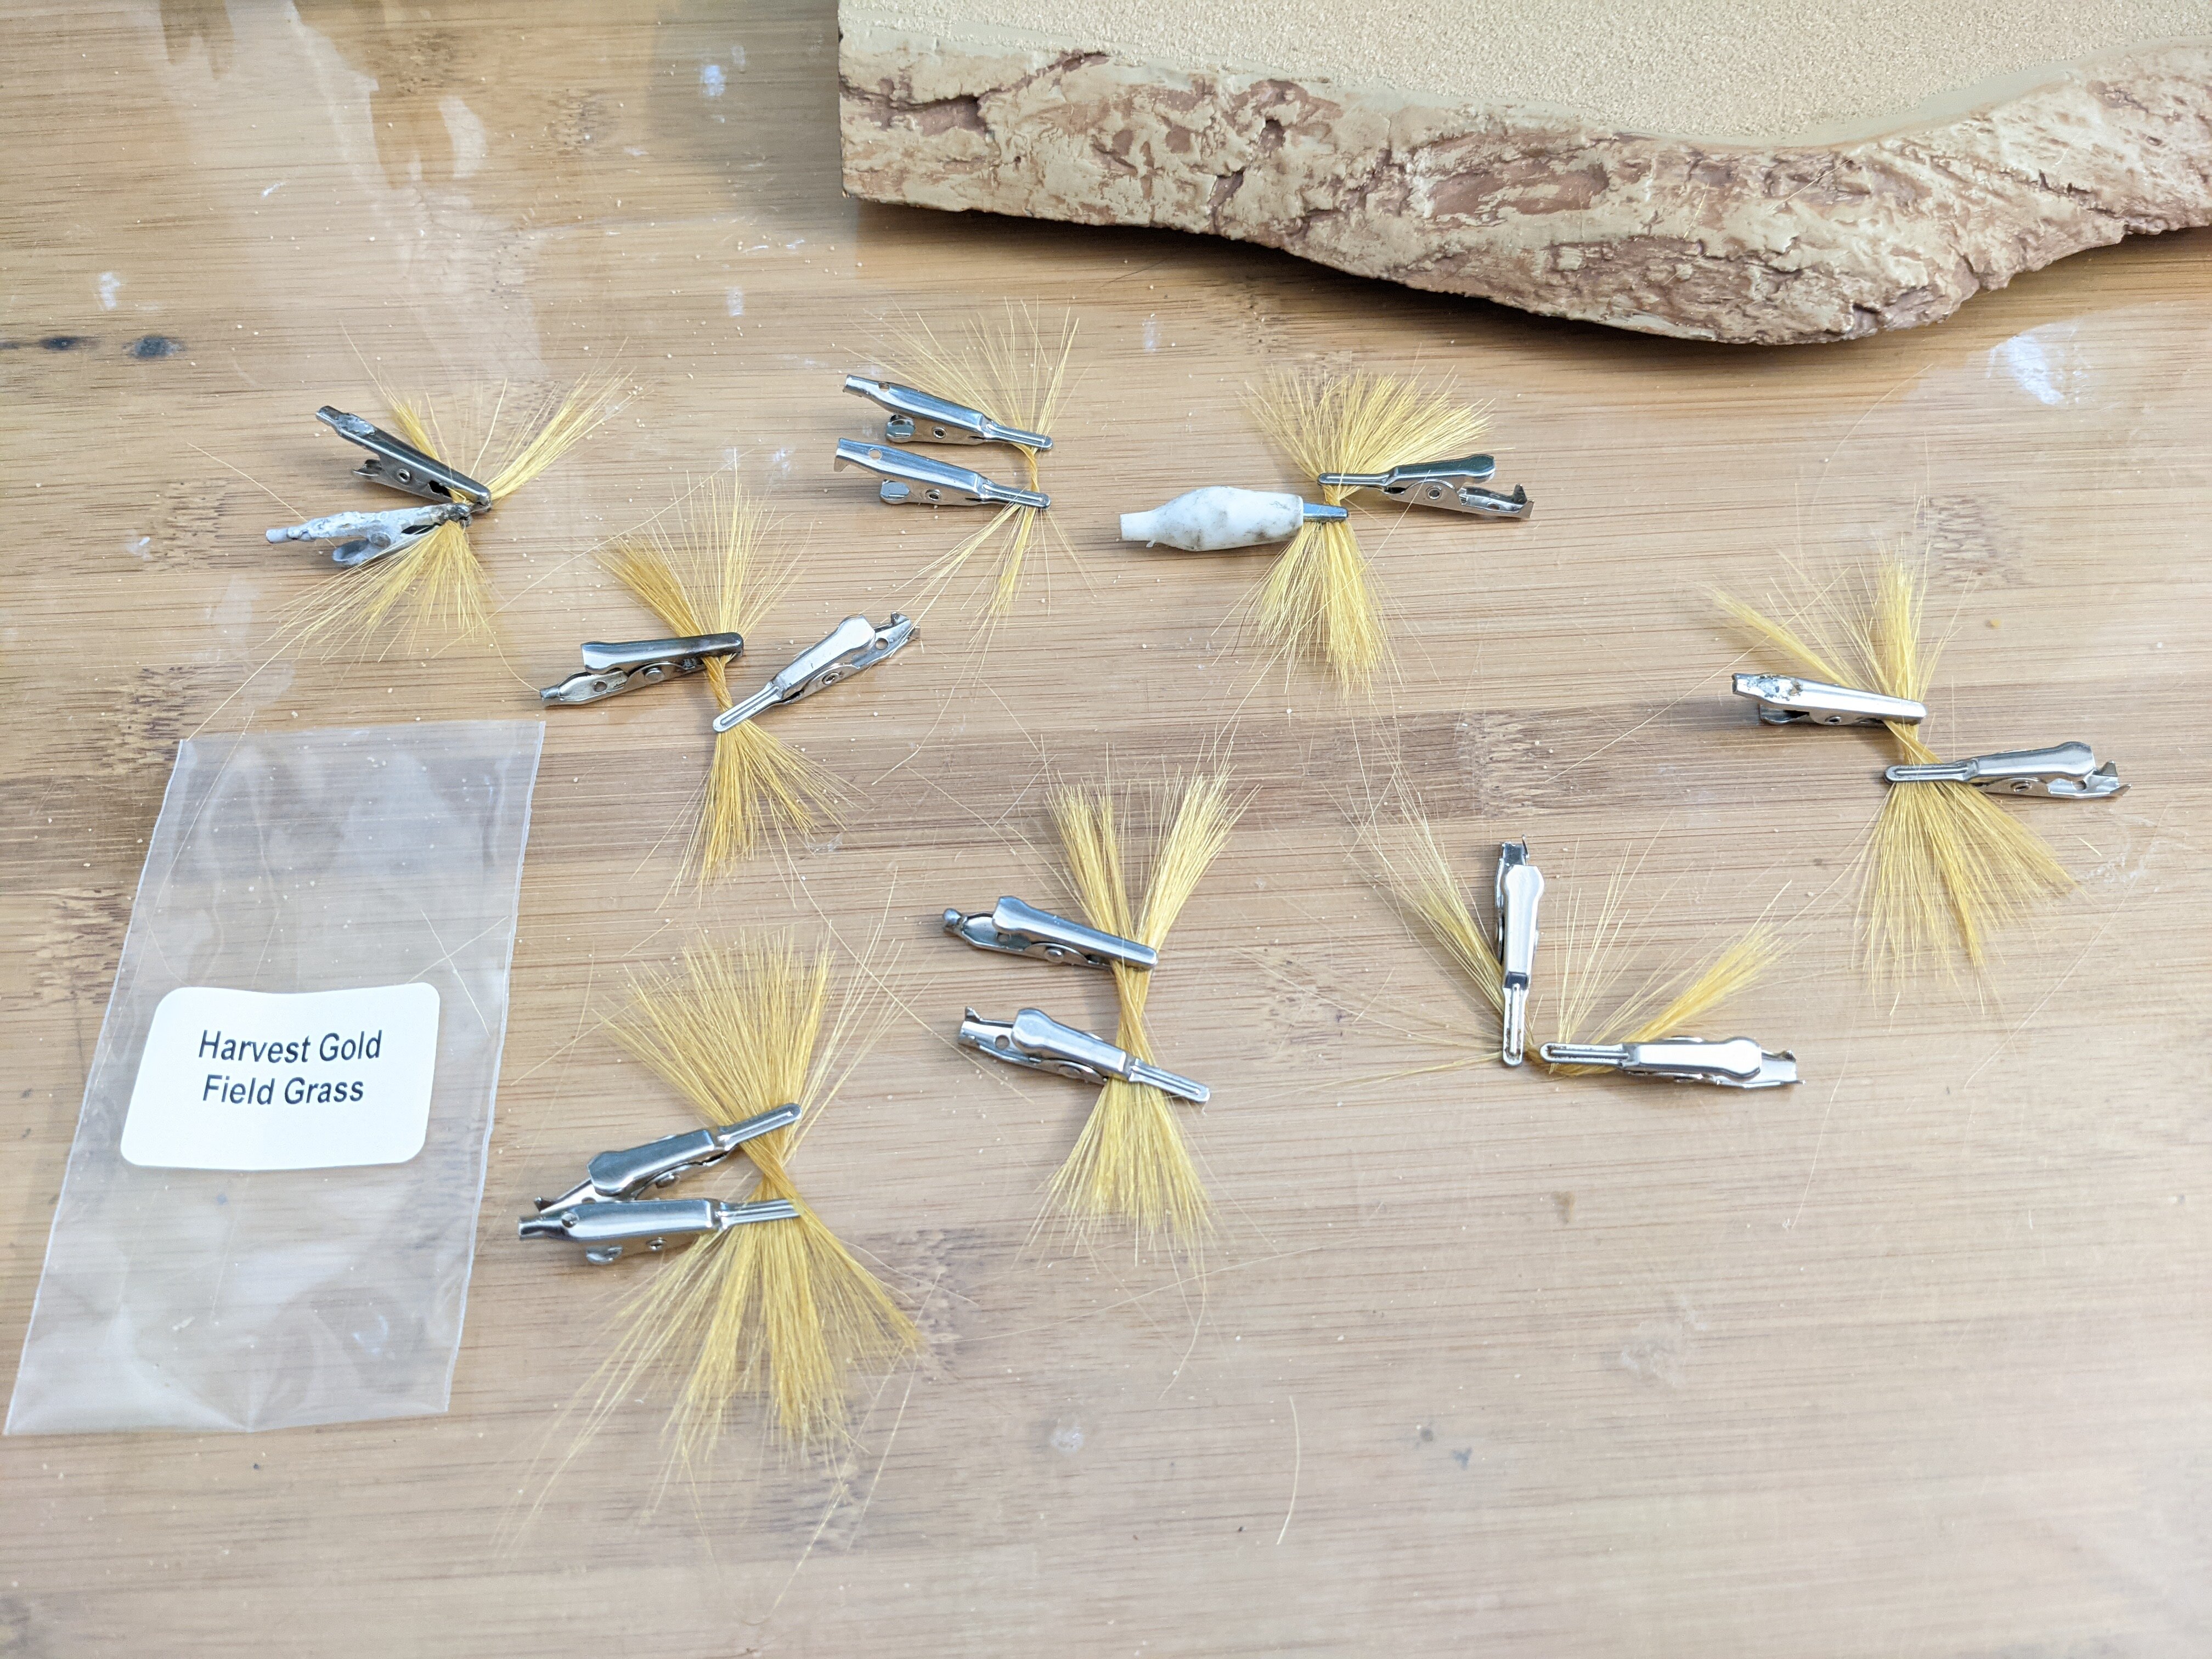
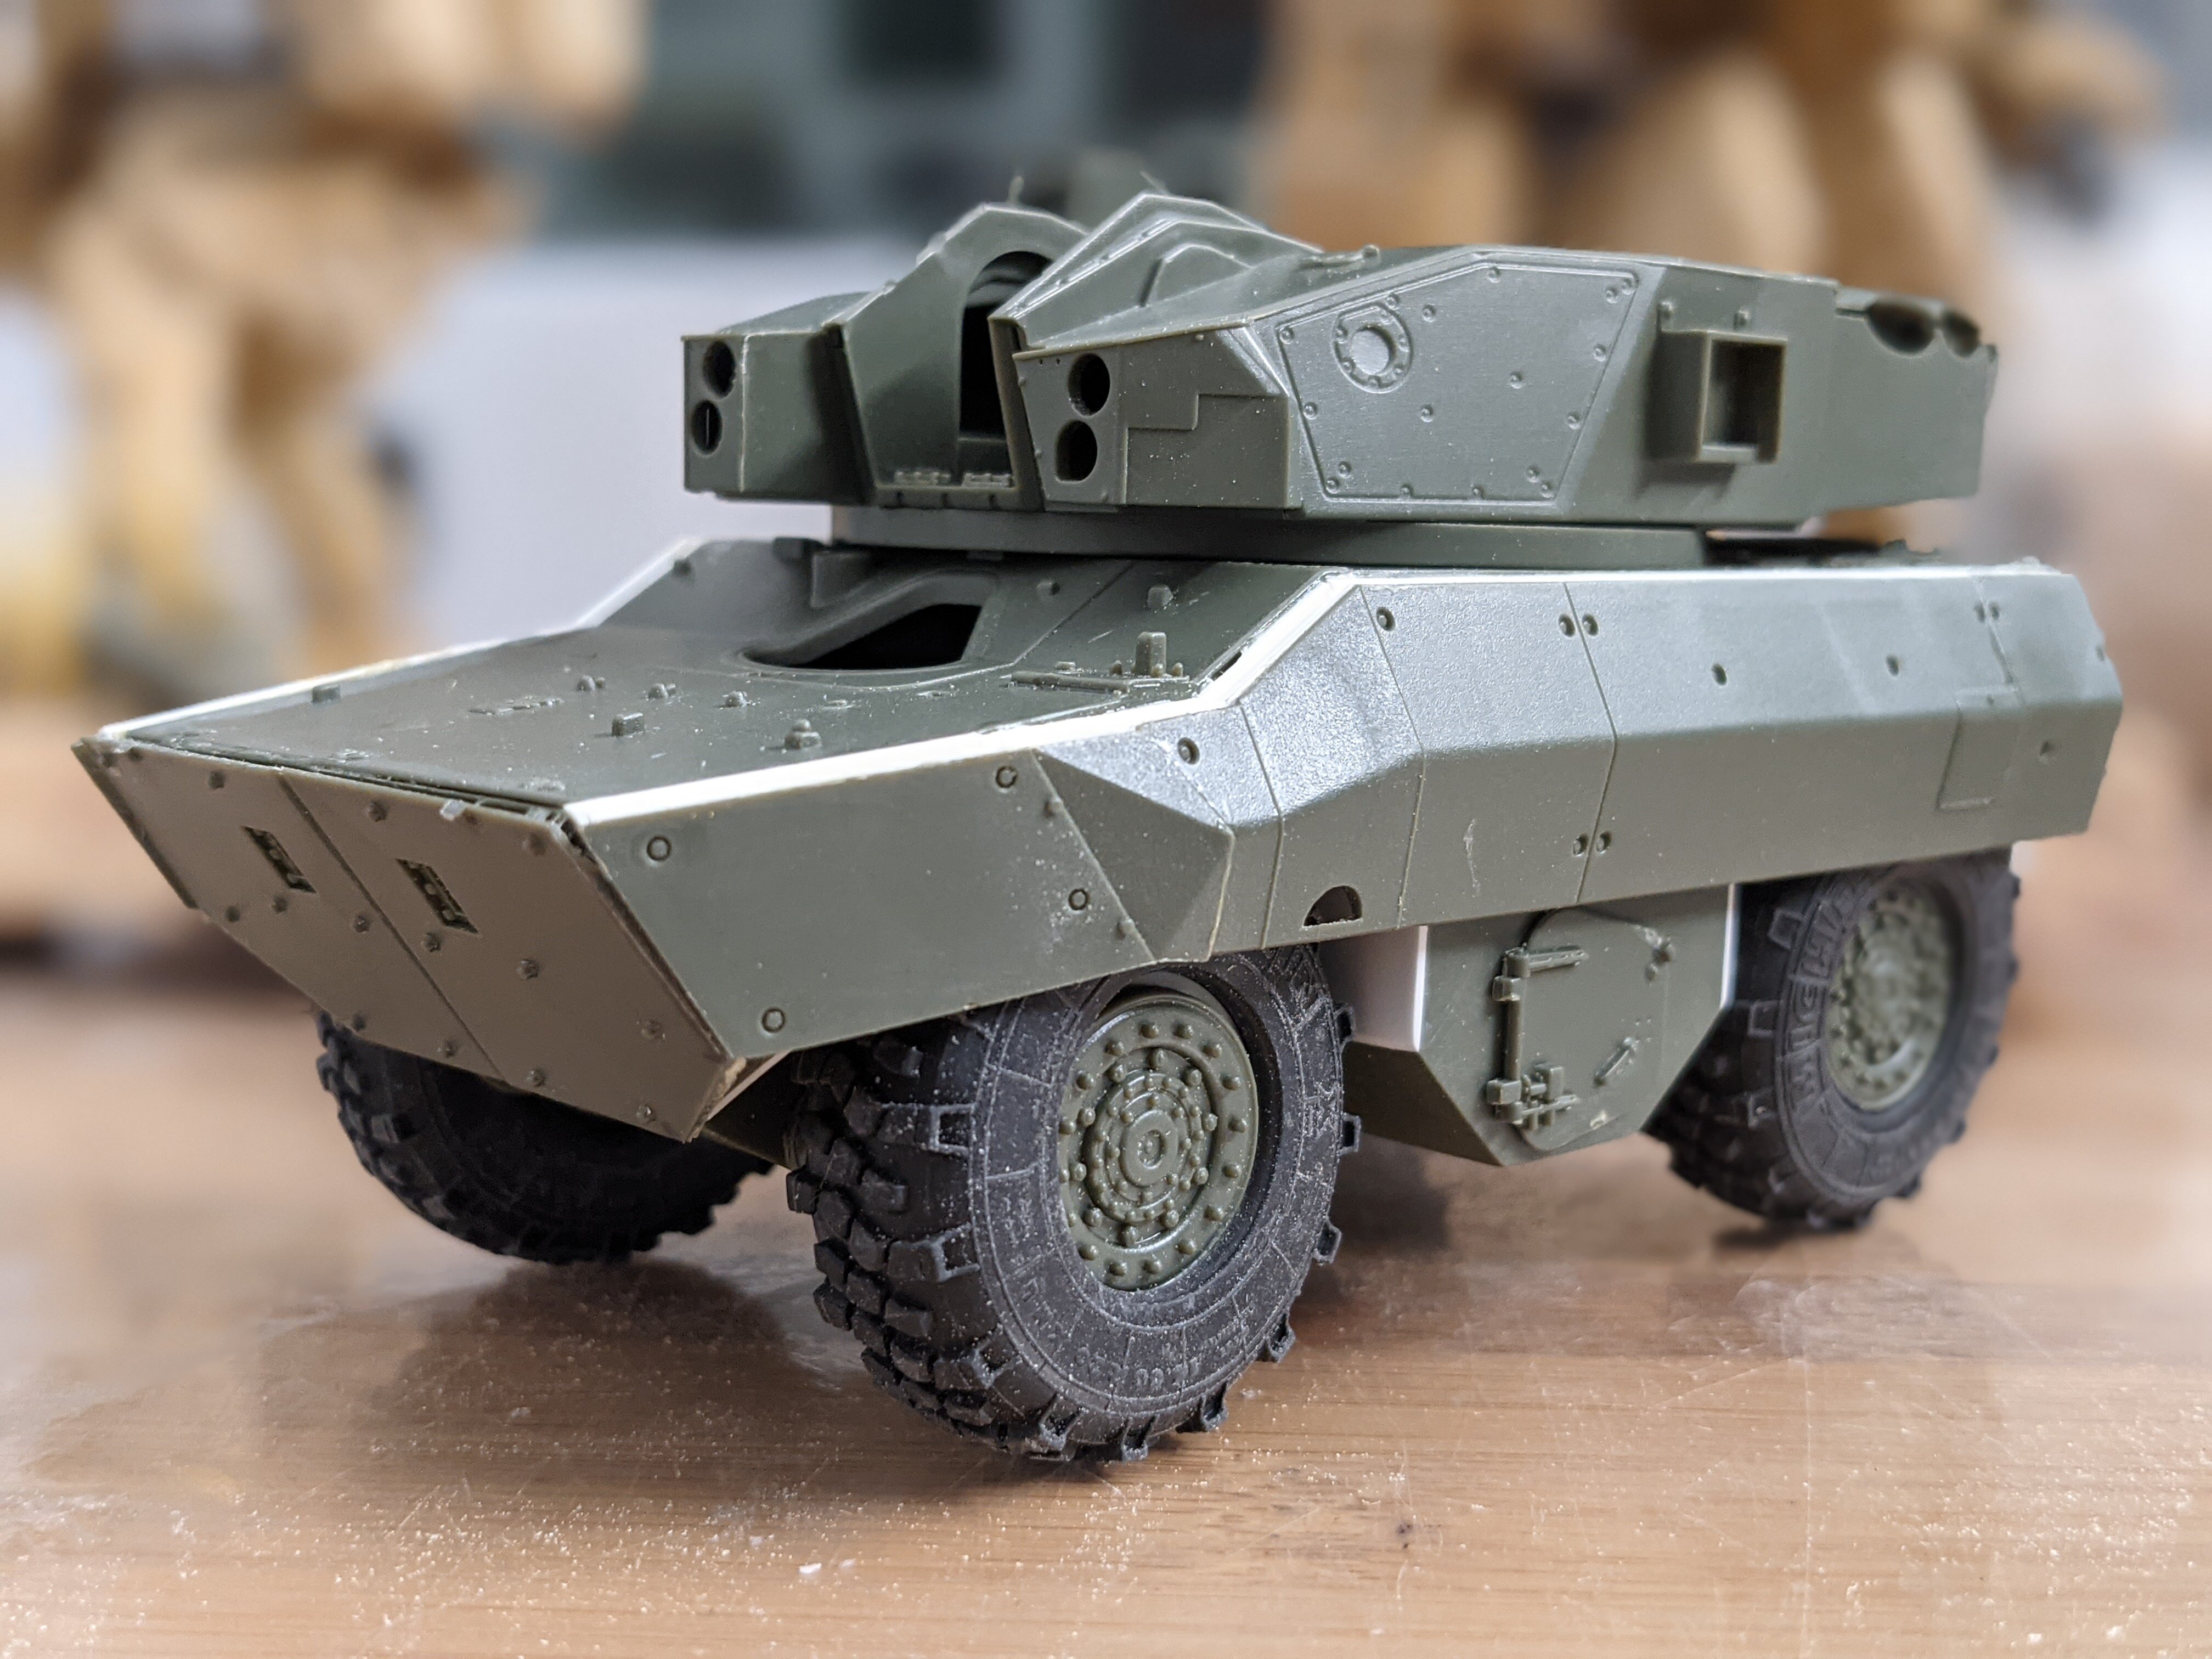
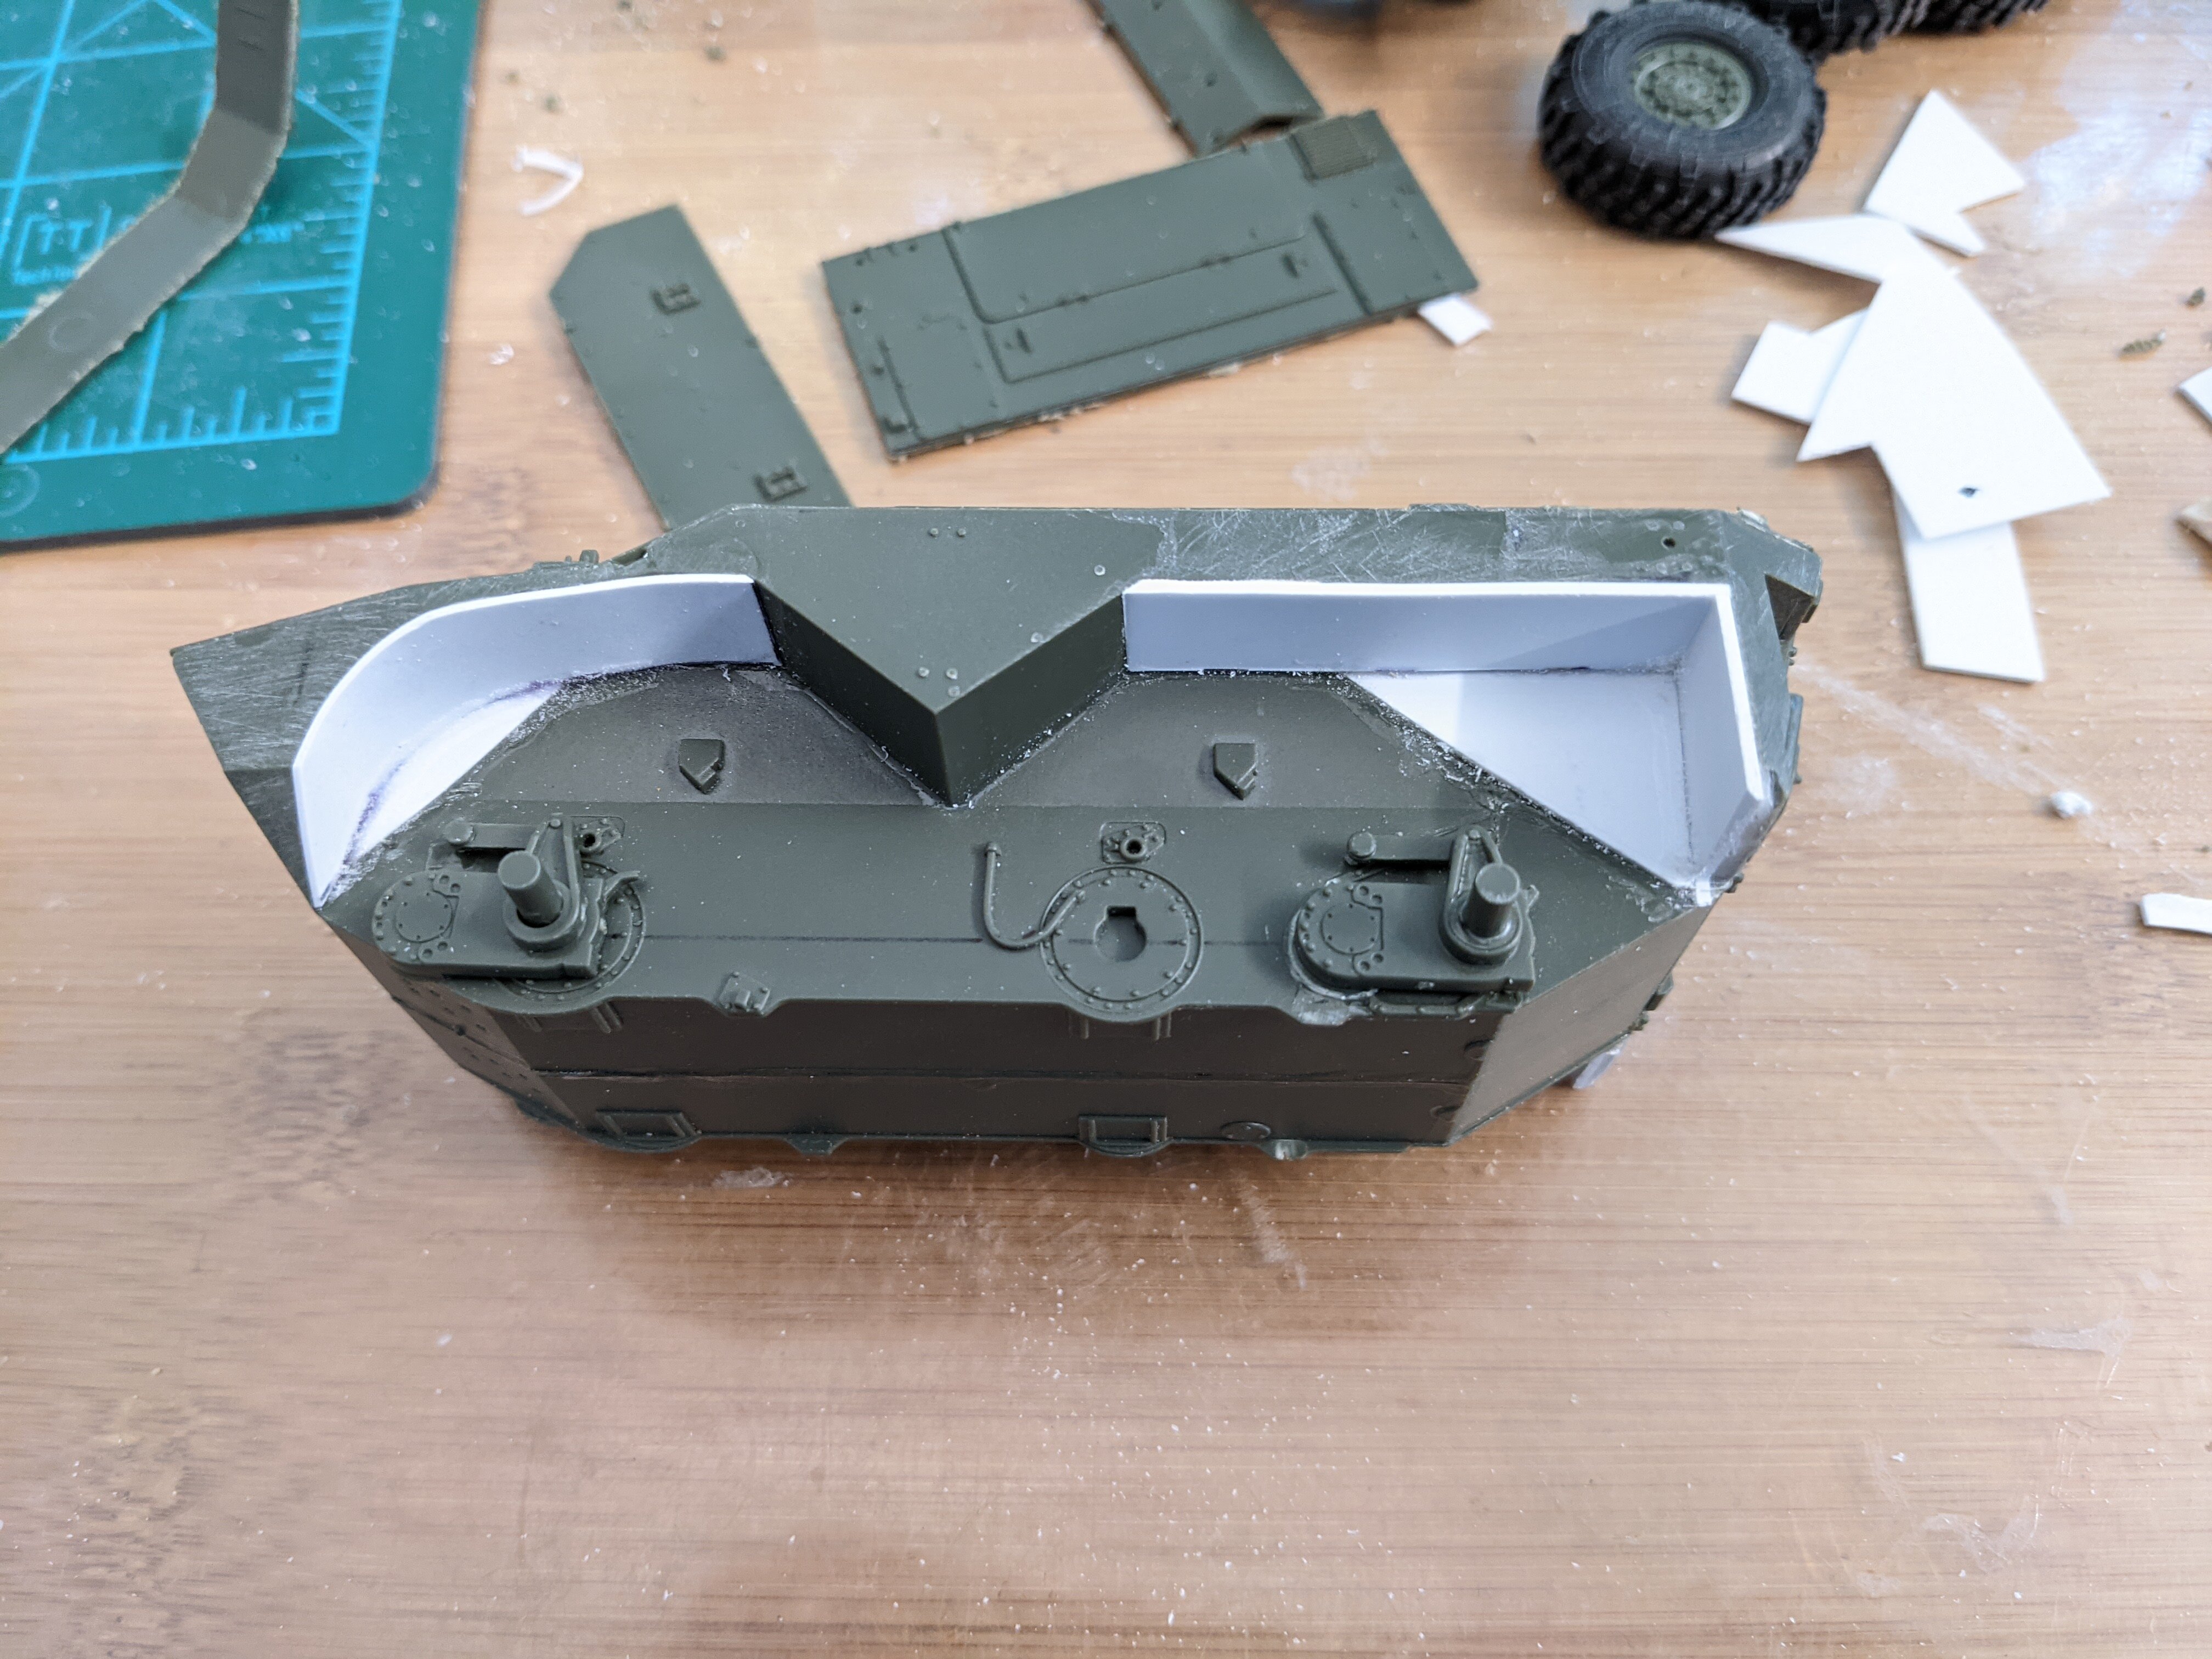
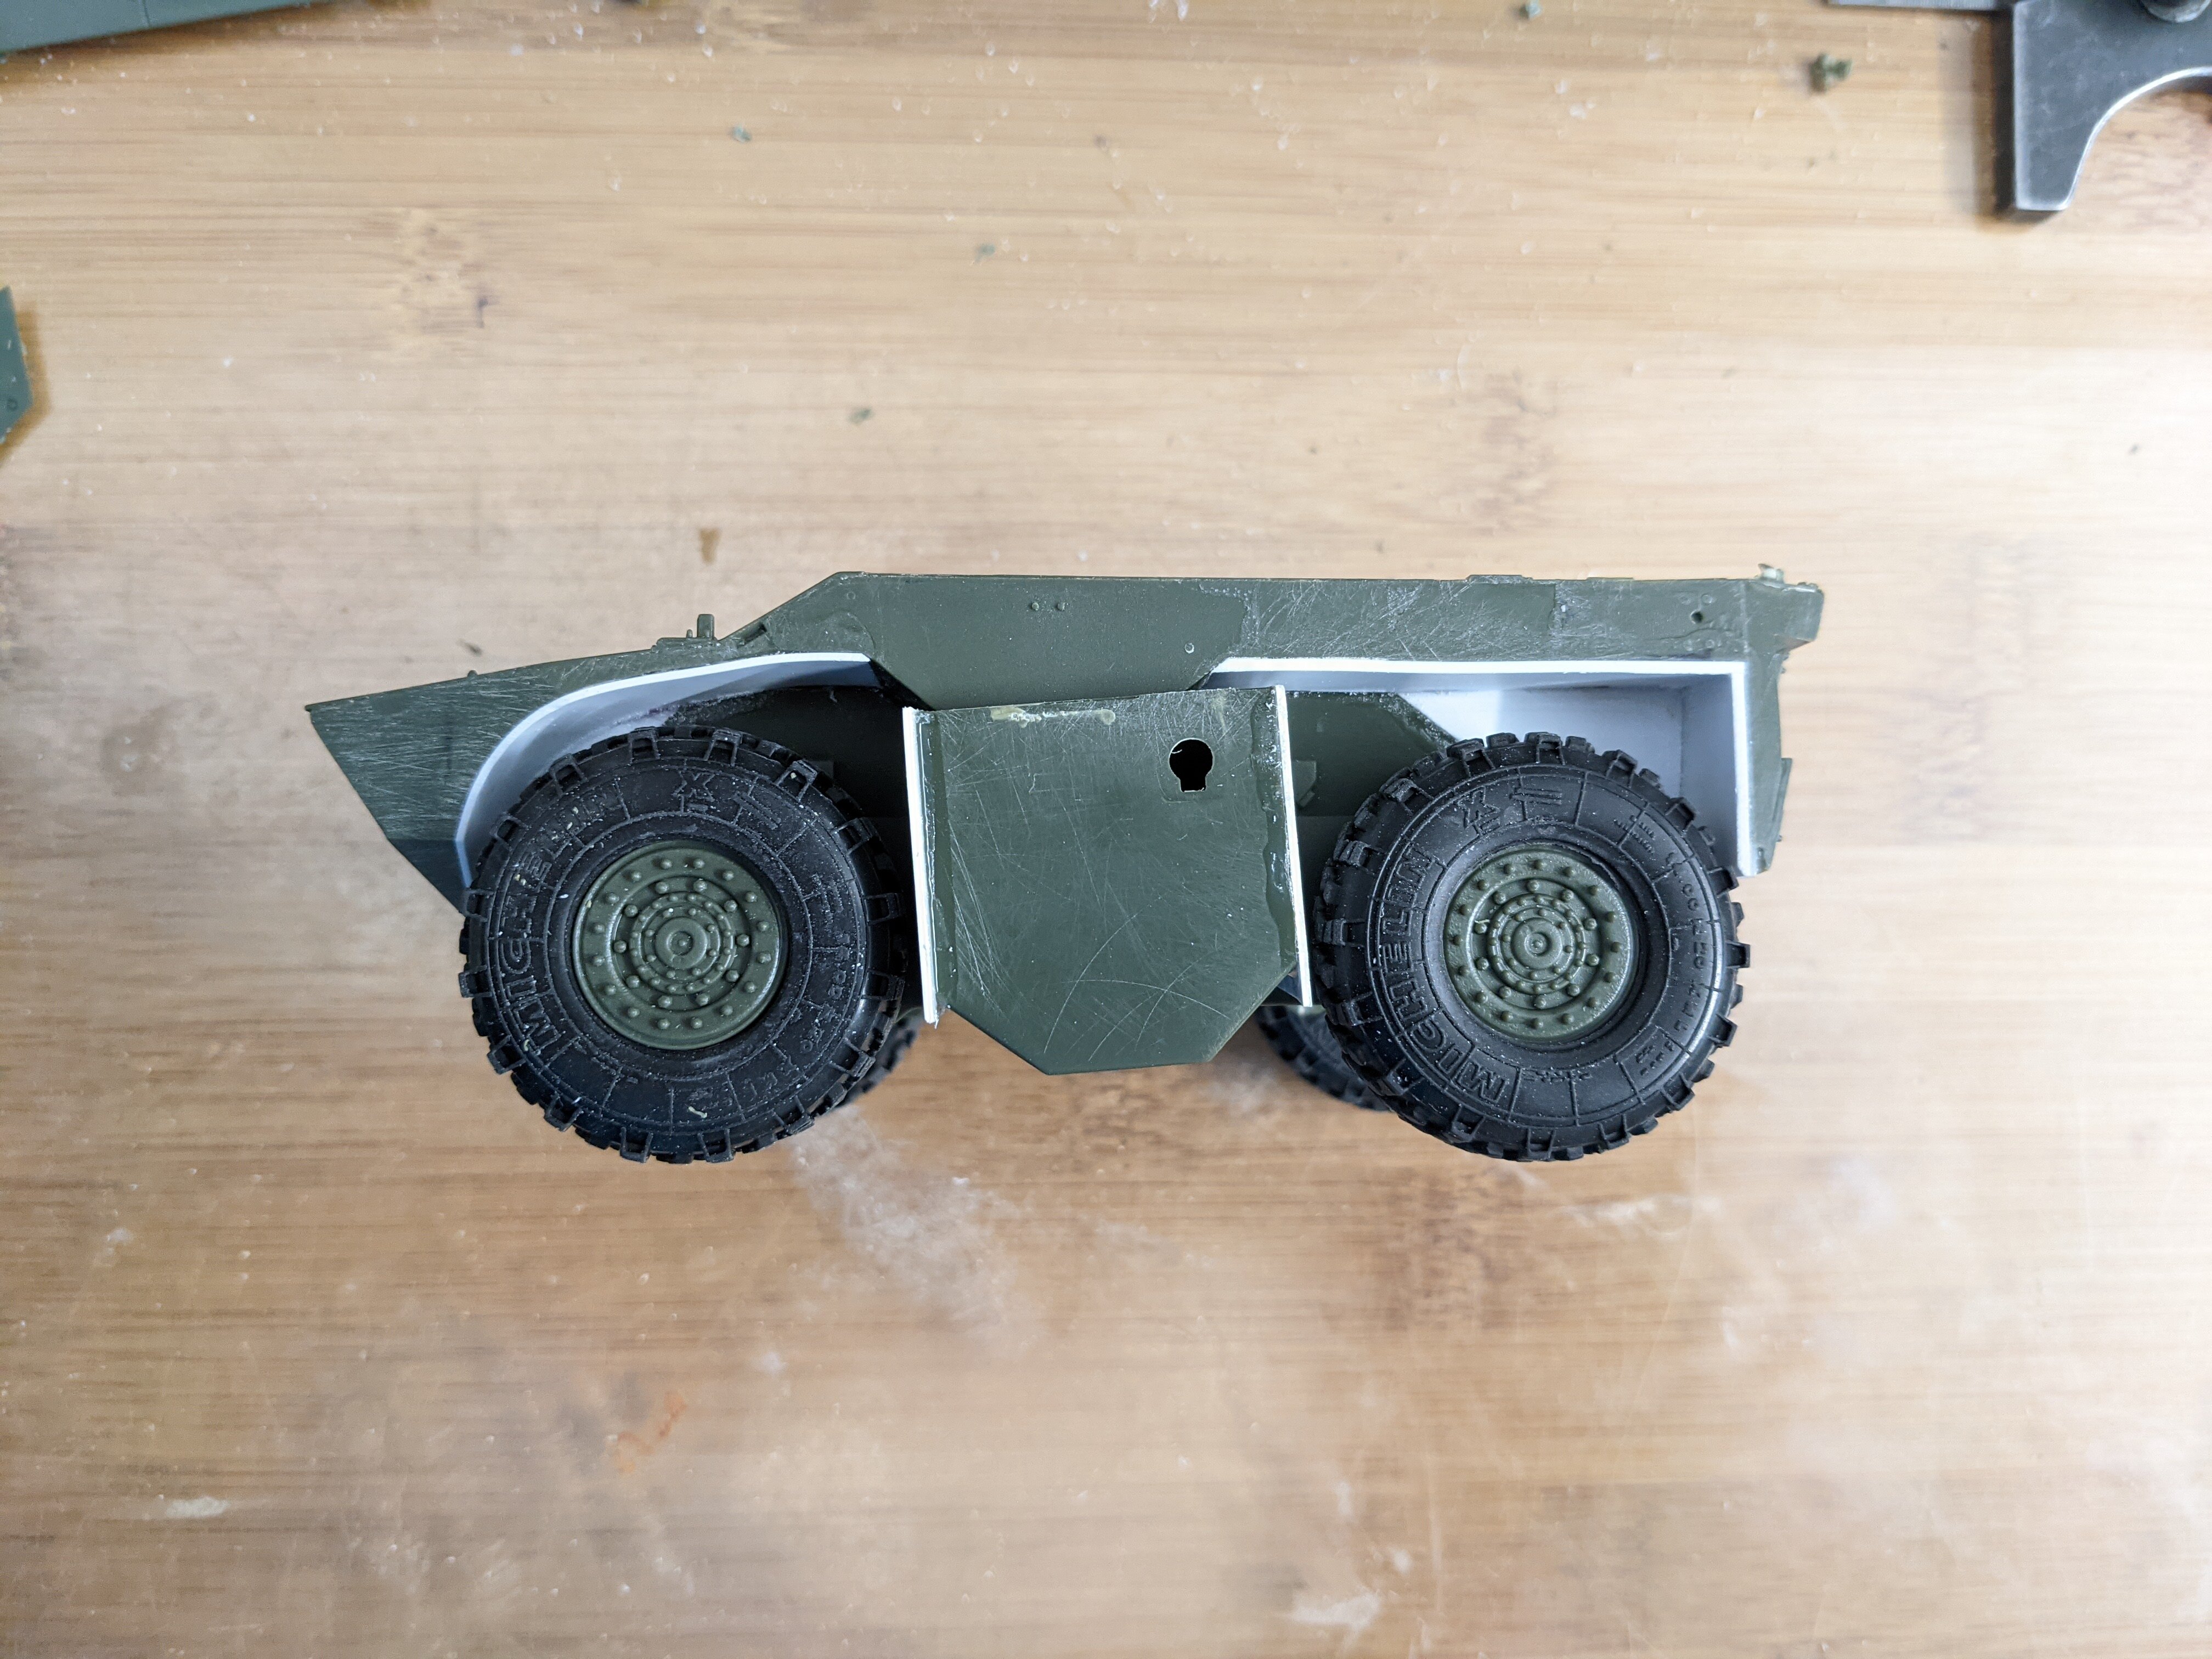
@pengbuzz That's cool! Nice action pose and exhaust effects! Getting a little bit more work done on the "twins." This is the layout "plan" that I hope looks at least similar when done. SSSHHHHHHhhhhh, don't tell nobody, but I got grass in clips on my workbench drying. And then a little bit more work on the base and finish on the ARMOR. There is still A LONG way to go! And some more work on the armored car affixing the skirt armor and wheel well areas. The silhouette almost looks like a minivan! That's it for now, thank you for checking in! - MT
-
@derex3592 Cool. It looks good and has a great sculpture to it. Especially compared to other versions. @505thAirborne That is a unique color scheme! I'm looking forward to the finished assembly. - MT
-
@derex3592 Your Zentraedi ship looks cool! Which kit is that? @Grayson72 Both models look awesome! You must have got a certain local member to print the white helo markings? @arbit That sucks about your decal sheet! For the inkjet paper, do you have a good coating to seal the decals once the ink fully dries? A coat of Microsol Superfilm over that will seal them perfectly and prevent splintering. The inkjet paper is your best bet anyhow! I did laserjet decals for the Shinden NASCAR race scheme. I was bummed to find out the toner is actually raised and adds height / bumps to the decals. I'll never use it again. The printer also didn't have as high a resolution - at the highest setting. I hope the new paper works out great for you! - MT
-
@arbit I'm glad it helped you out! To scale stuff in PPT: - Page (canvas) size means nothing except for the size of decal sheet you want to create. As you probably already know, just leave enough room for your margins (about 1/4" / 6mm) since most printers don't print across the whole page. - PowerPoint has a grid you can scale against when drawing: https://support.microsoft.com/en-us/office/show-or-hide-gridlines-in-word-powerpoint-or-excel-47b1189c-f867-479e-a208-34ee54055f6f I included this link for the related sub-links on the page too. There are other tools there that will help. I use grids on my screen for business too. I'd be lost without them. The grid can be customized - this will also make your life a lot easier! - Double left click on an object and the dimensions should appear in the top right hand corner of your screen. Its also under Drawing Tools > Format > Size. You can also resize objects in increments there too. So if you bring a scale scan of your object into PowerPoint, you should literally be able to draw right on it. I've done this with photos of objects to test paint colors on them. You could do it with eyes! Another tidbit just in case you don't know, the cool part about vectored drawings is you can always go back and edit them later vs JPEGs. In PowerPoint, right-click on your object and select "Edit Points". Right click again on the line in this mode and you can, "Add, delete, open path, or make a curved segments." PowerPoint does all of this as a secondary function, so sometimes it is buggy. Resizing shapes (like eyes down to 1/48th scale) can also be buggy sometimes too. I've found limitations depending what shape your making or drawing. Purpose-built software like the other guys mentioned does all of this much better and without some of the hang-ups. I hope this helps. I look forward to "seeing" your eyes! - MT
-
Thanks, Pengbuzz! The three dots I keep ignoring😄.
-
Hey, we can't edit posts anymore? @derex3592 Your Titanic is looking GREAT! The pencils are a nice touch too! That cat looks so realistic too! (popped up right after I posted this thread)😅 - MT
-
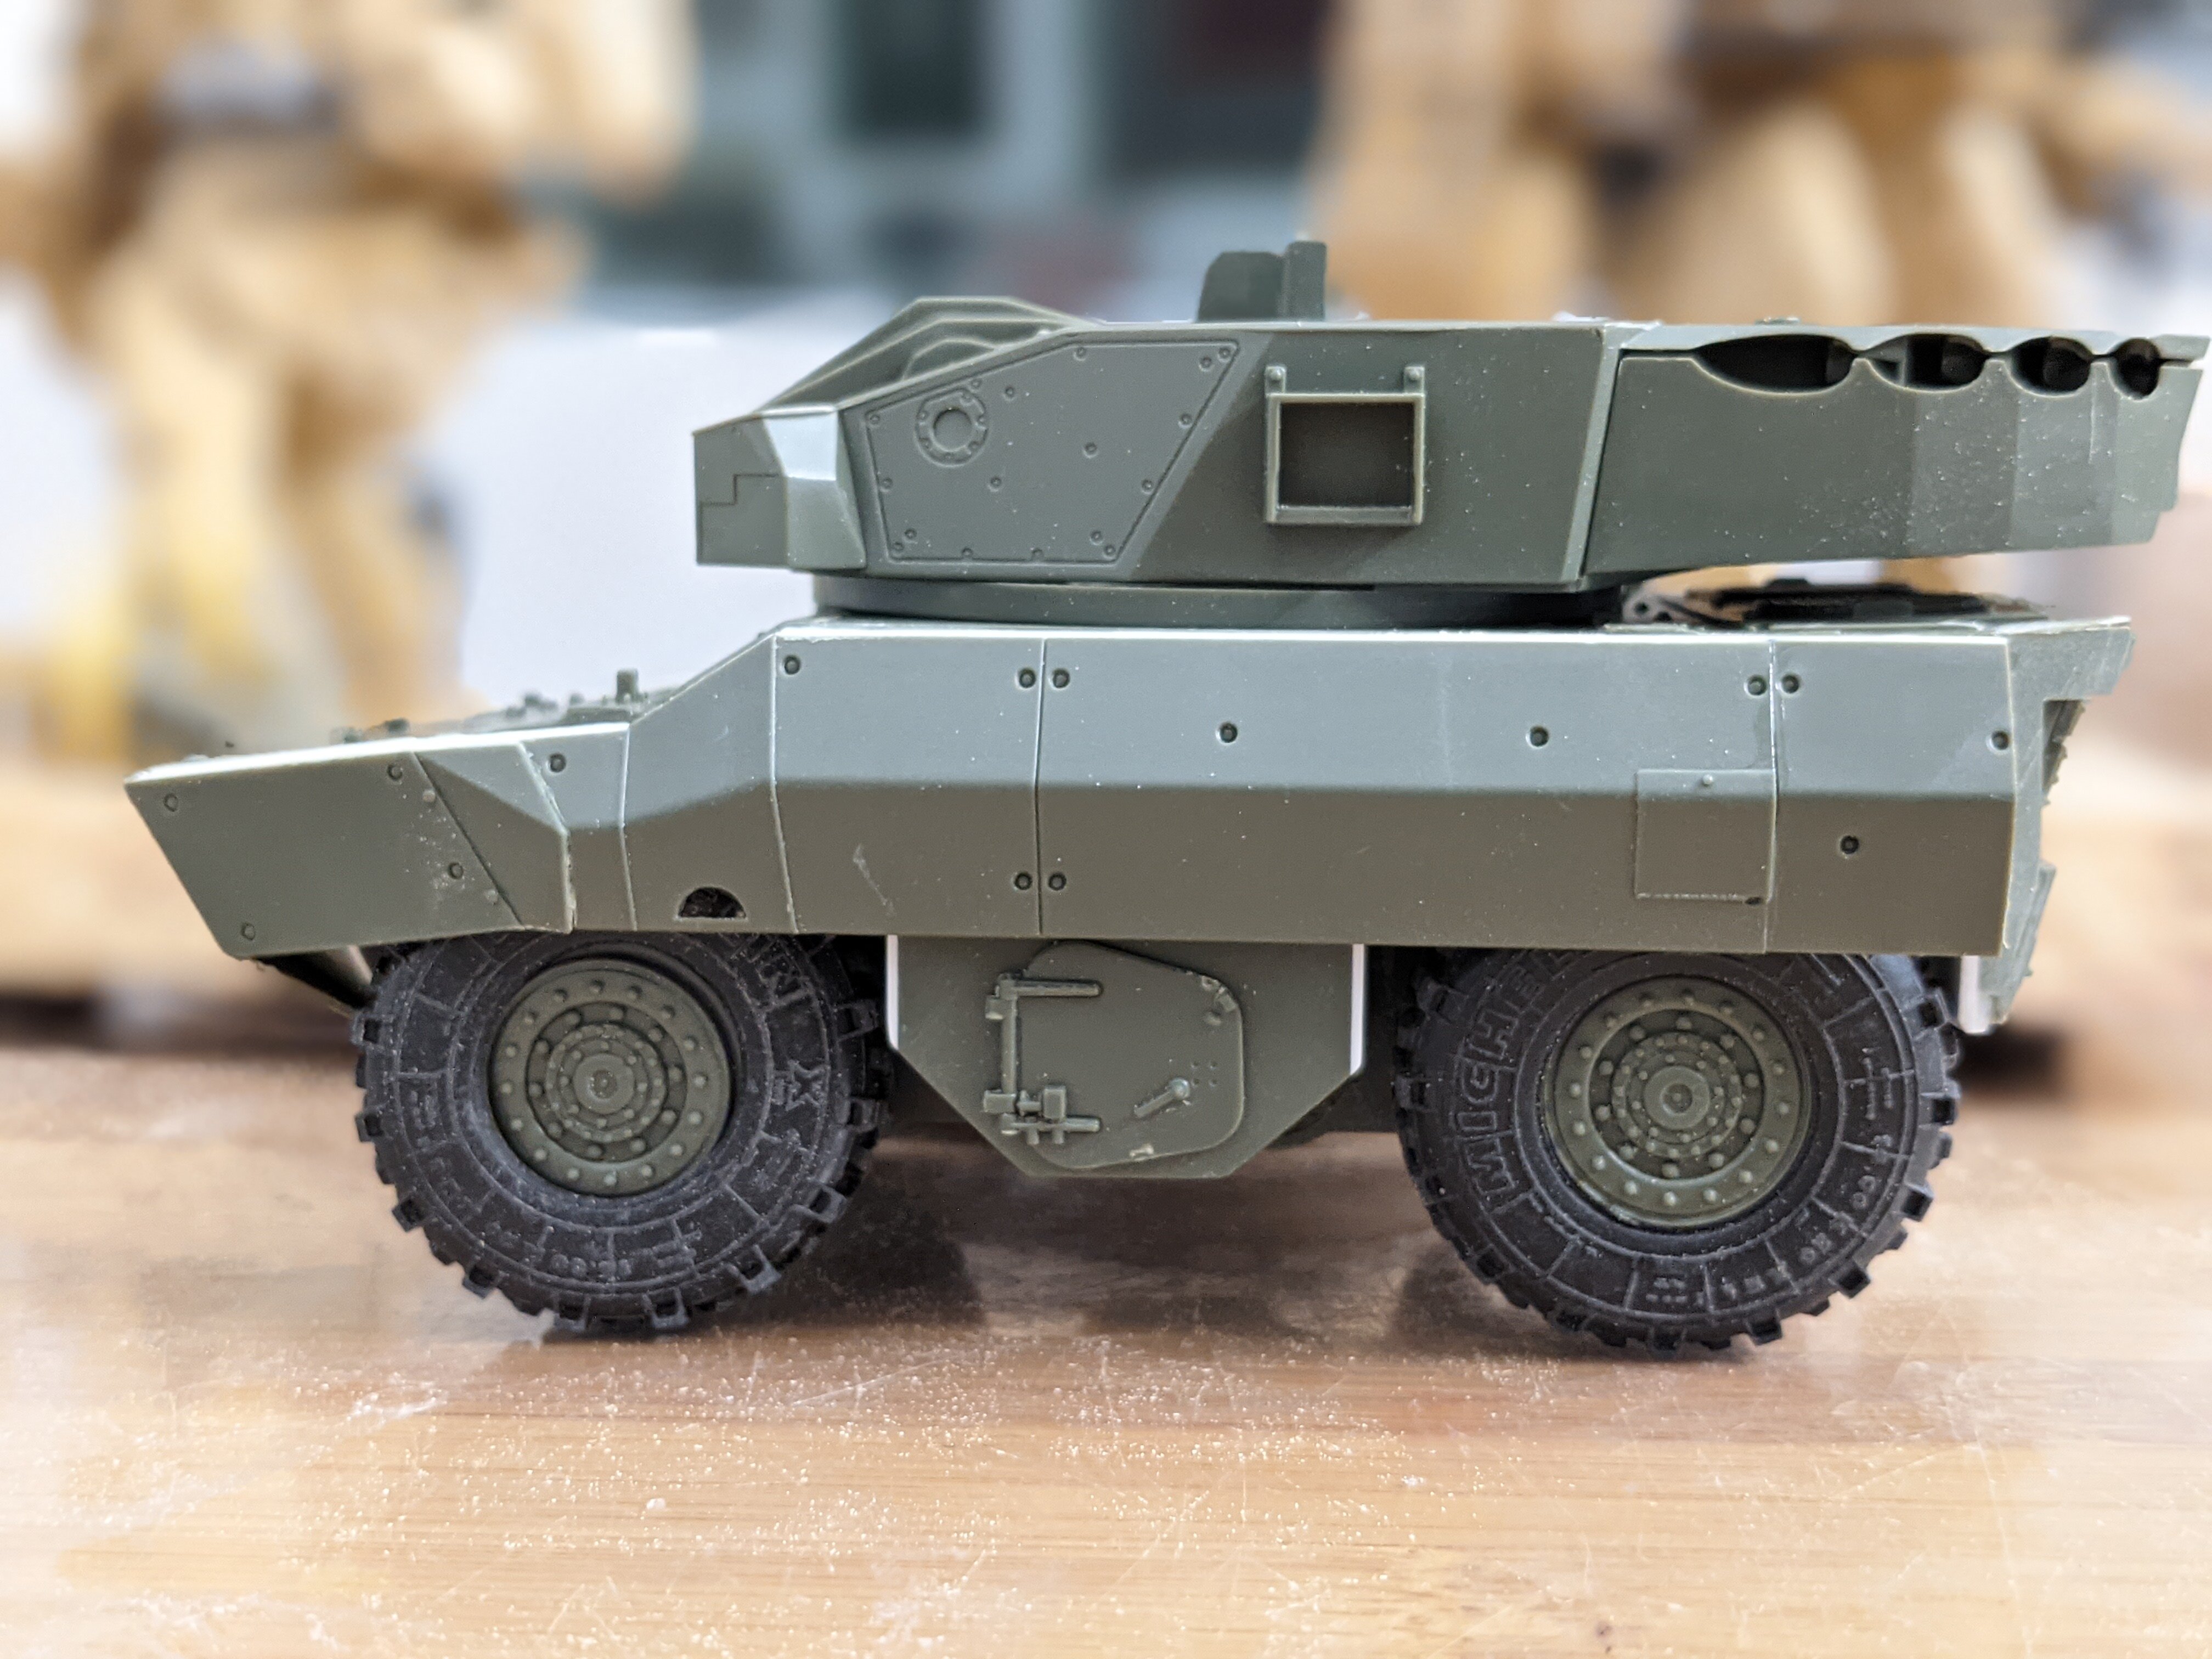
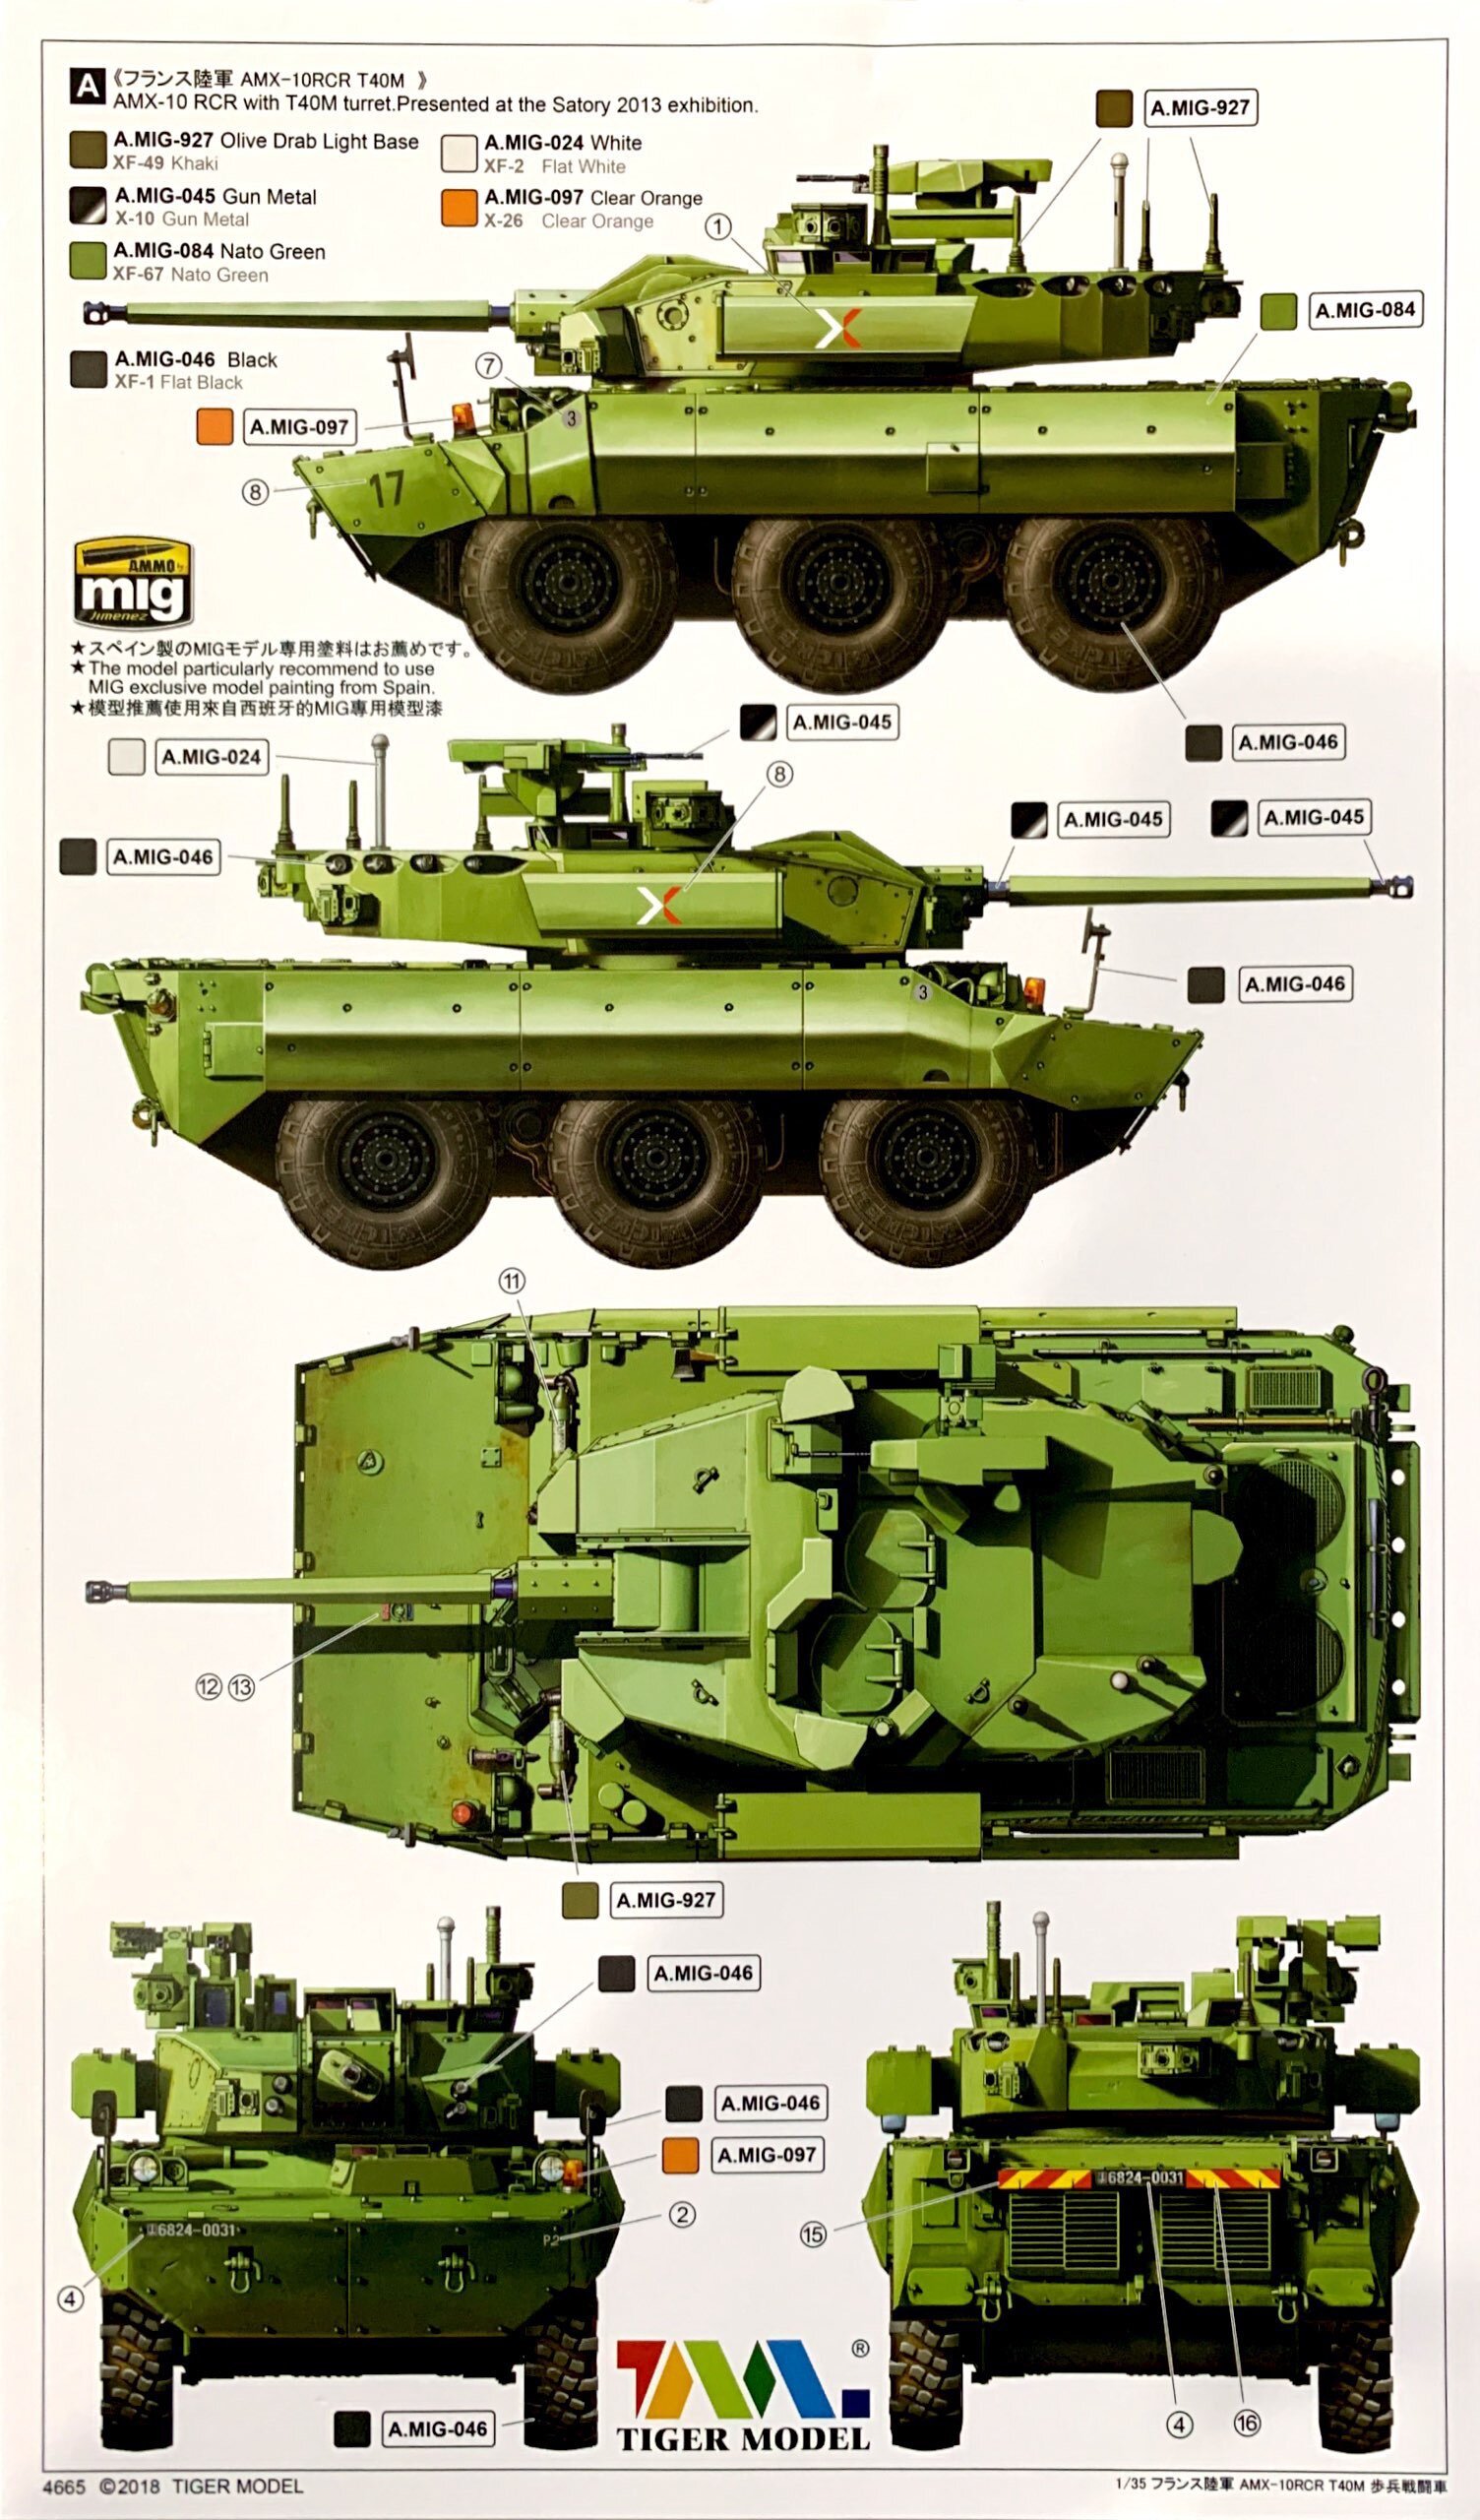
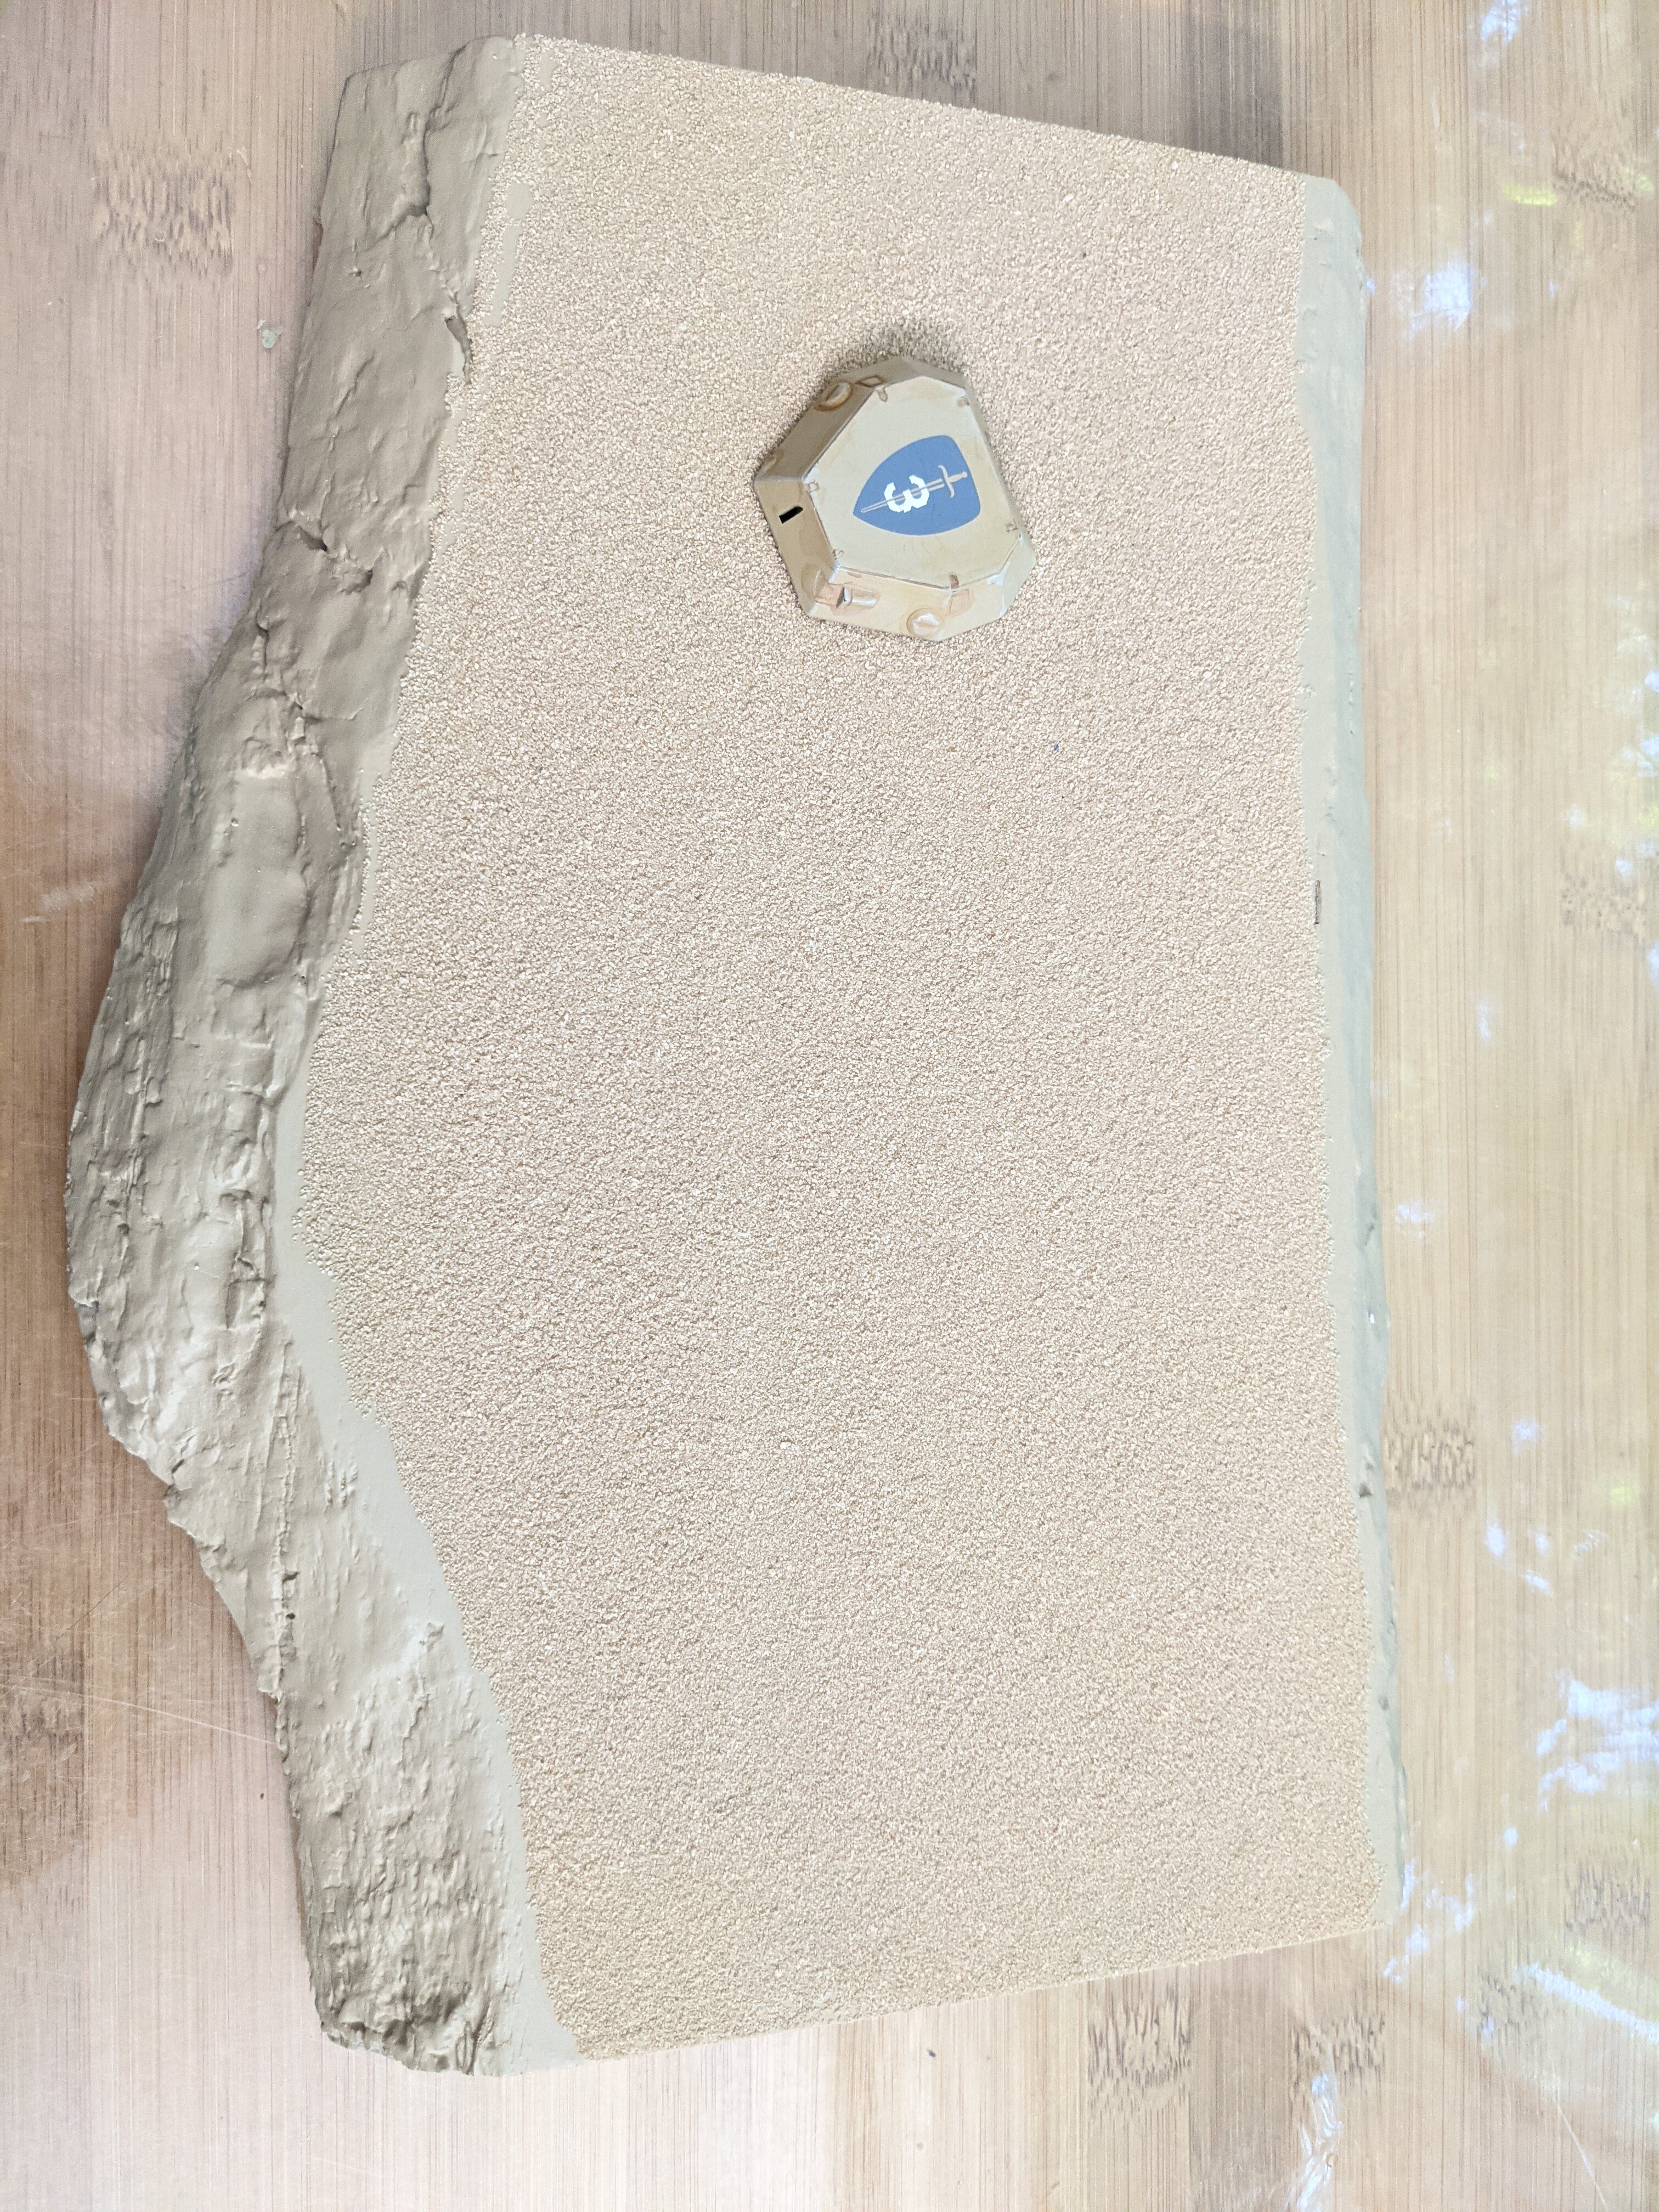
@arbit Those prints look great and so does your Freyja! It looks like you're figuring out the the whole eyes thing - they look good too (and kinda creepy). I agree with everyone else that mentioned vectored artwork. Professionally speaking, that is almost all I use. When I do use bitmaps / JPEG images, it really limits what i can do. Especially if I find that "perfect" background image, but it's too small for what I'm working on. When you go to enlarge it, everything gets pixelated. One thing a lot of people forget about is if you are comfortable with drawing in PowerPoint, those are vectored images. PowerPoint is far from the best tool to create in, but a lot of people have it and use it, but not to its full potential. Vectored images scale perfectly (for the most part) and usually print with better sharpness because of how the printer reads the files. @vsim Your VF-0B is looking good! Yeah, your efforts paid off. The lines are nice and sharp! Its been slow going, but I go more work done on the diorama. Most people paint to look like sand, I found sand to match the paint! Then I glued a layer onto the base. The third part of the diorama is a wheeled armored car. I started with the Tiger Models T-40 NEXTER Turret kit. Its a great model, but waaaaay too big on the base and bigger than what I wanted for a small, lightning fast deployable strike team. For you car guys, the next step was to "chop and channel" the chassis (say that ten times fast). Then created new wheel wells. The good news, wheel wells get caked in mud, so my seams will "disappear". And some fillers to go between the naked wheel wells (just temporarily fit before trimming up). That's all for this weekend. Thanks for checking in! - Phill

-
I'm sorry about your job, but you made great fixes for your valk! - MT
-
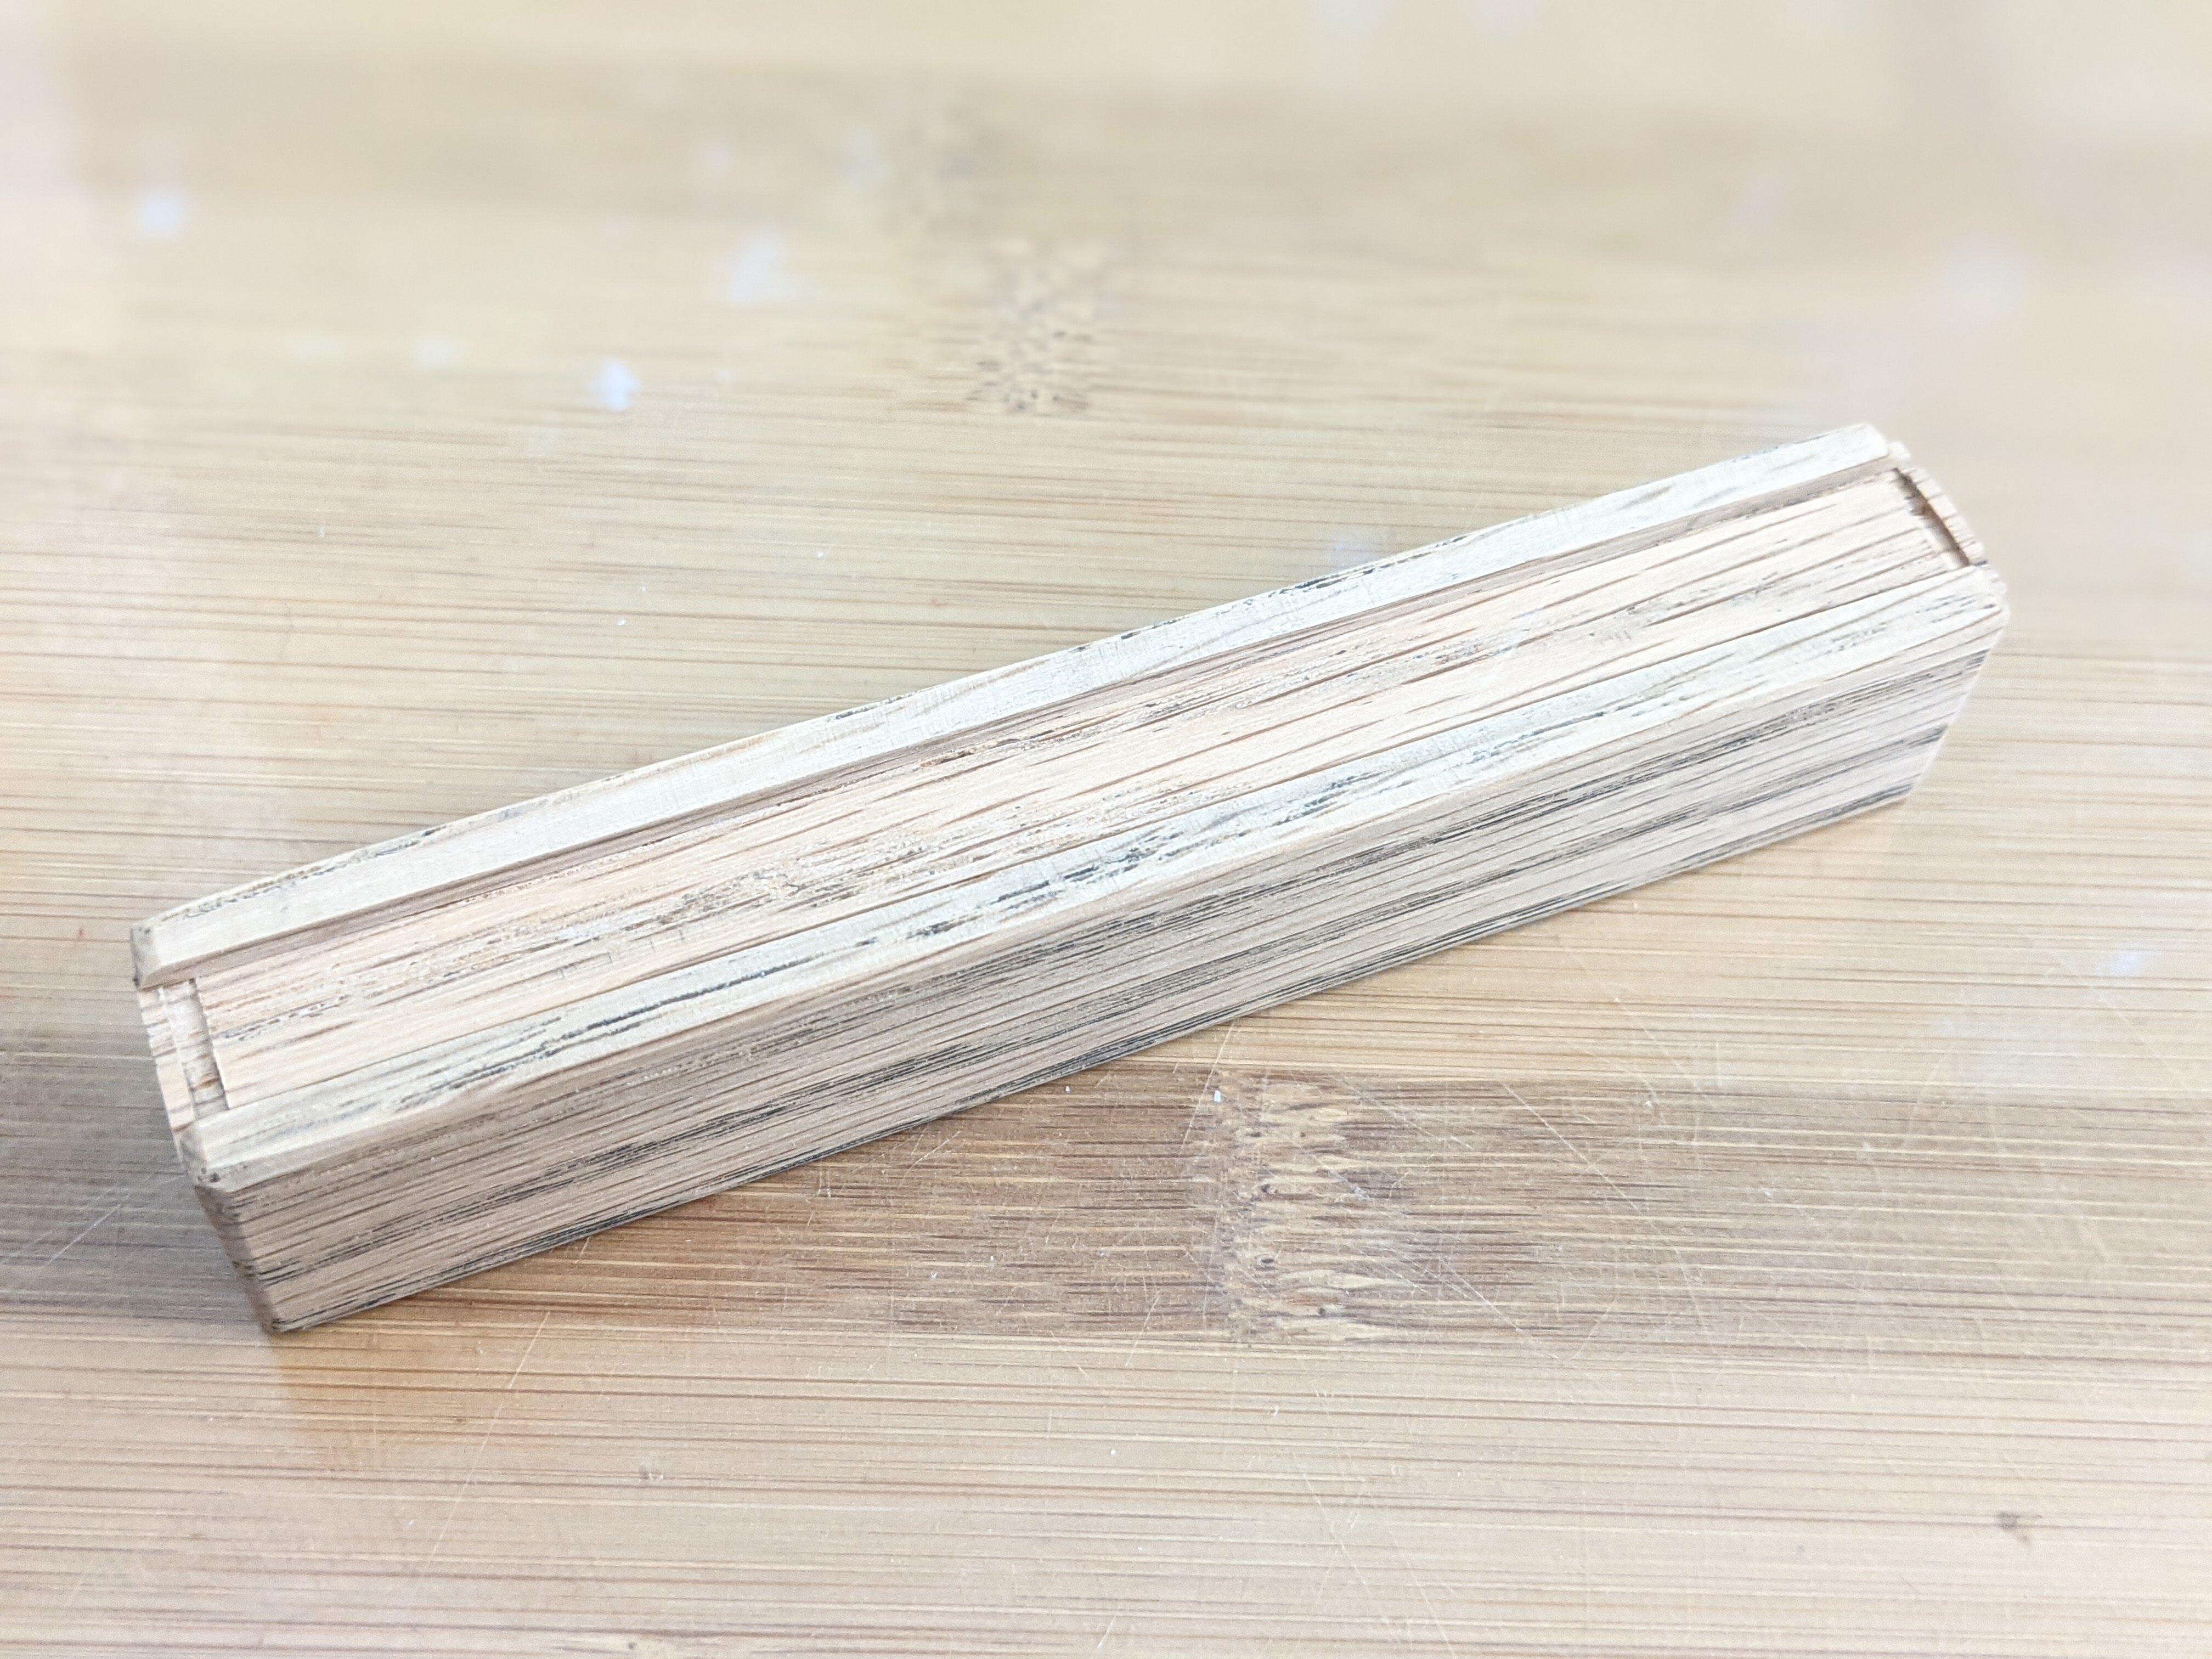
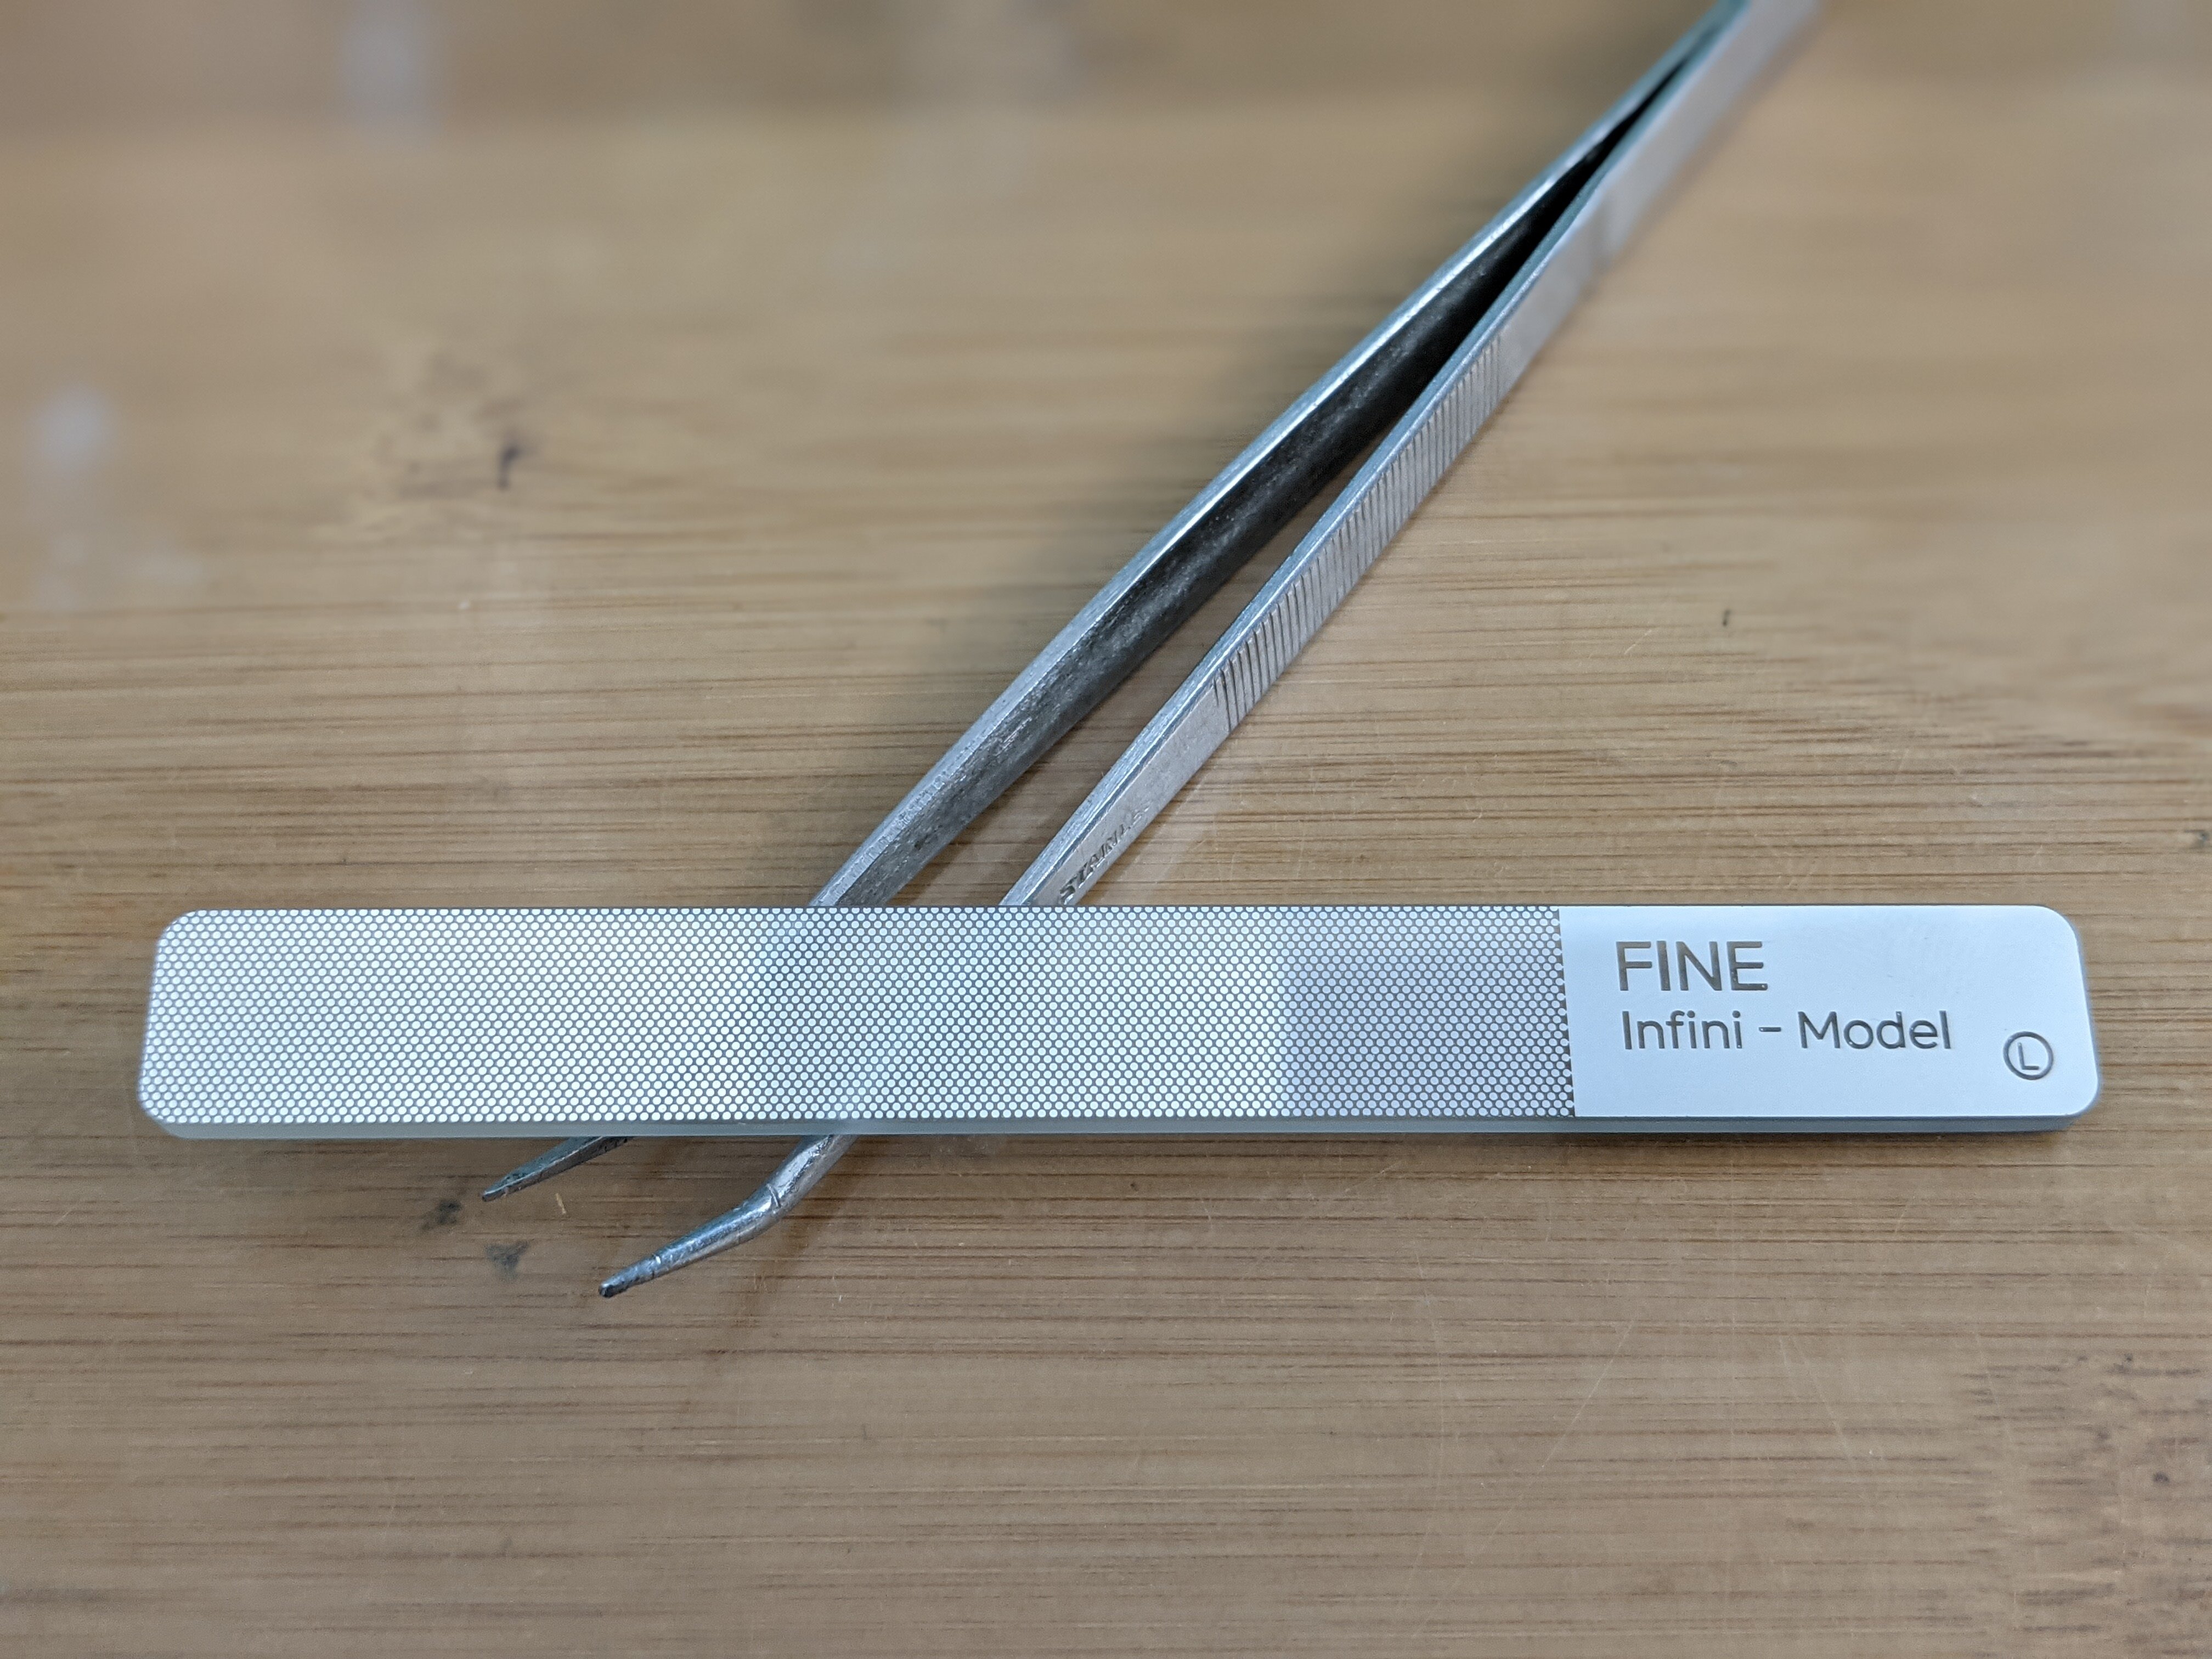
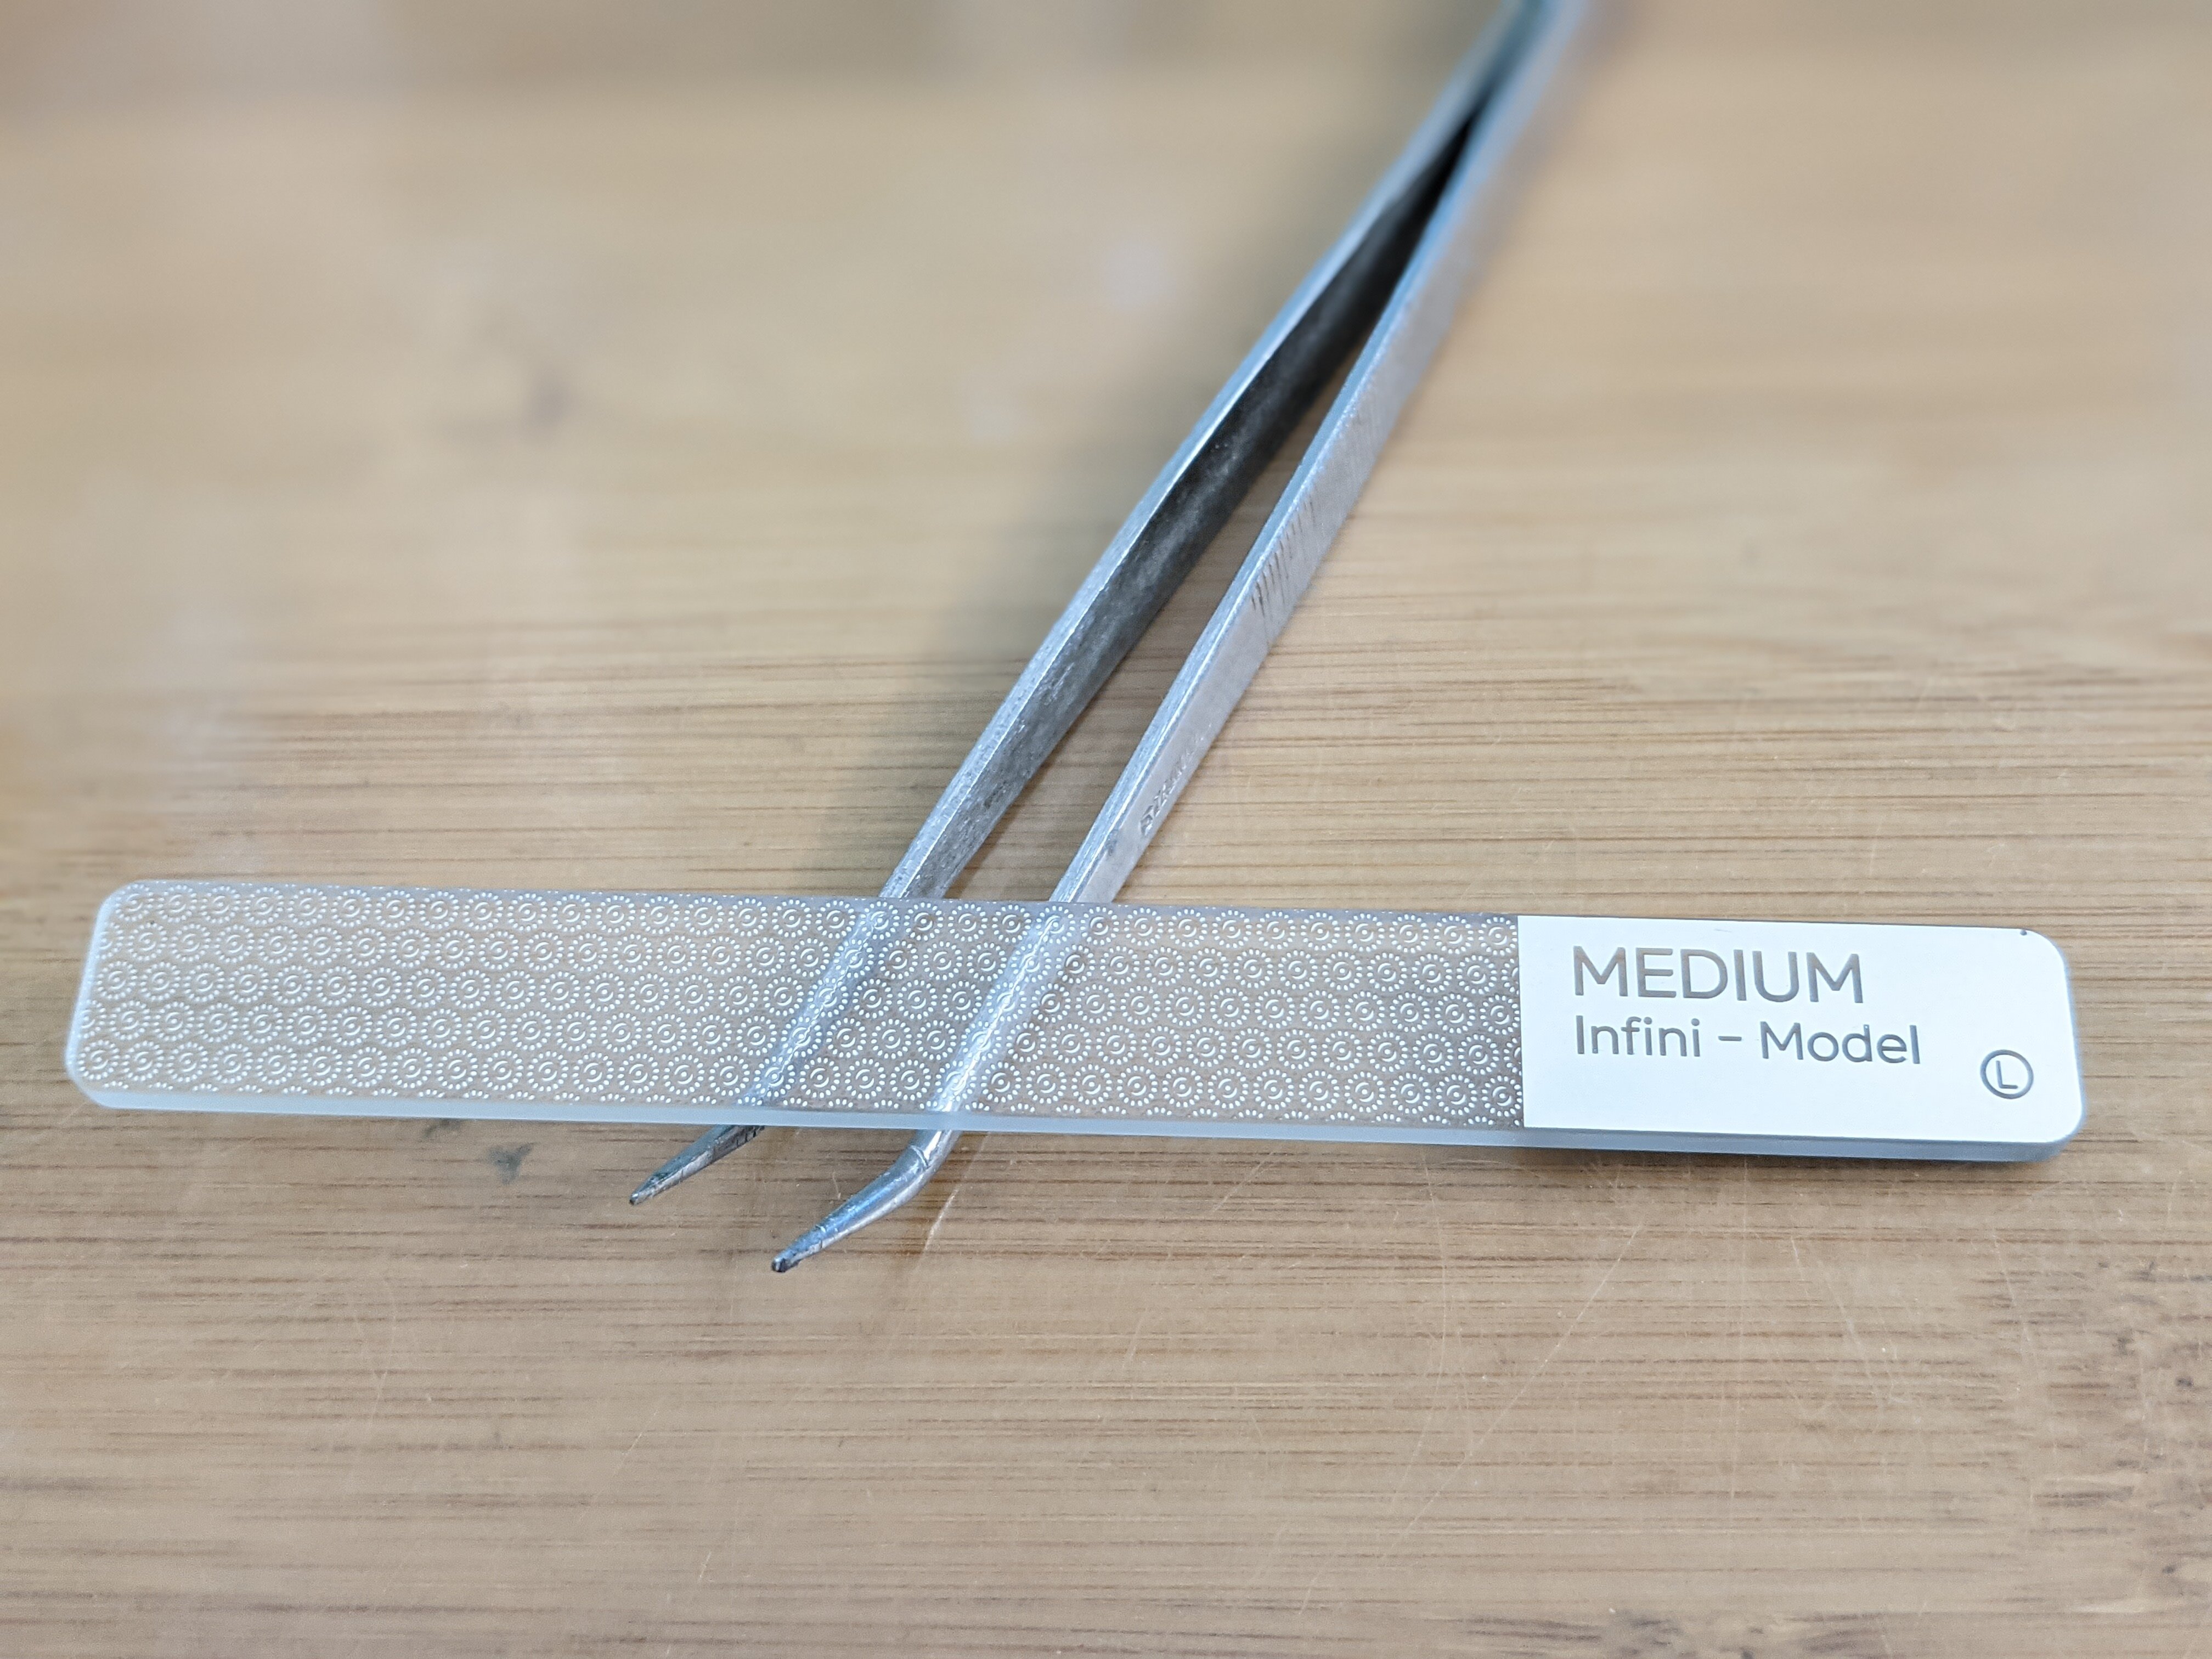
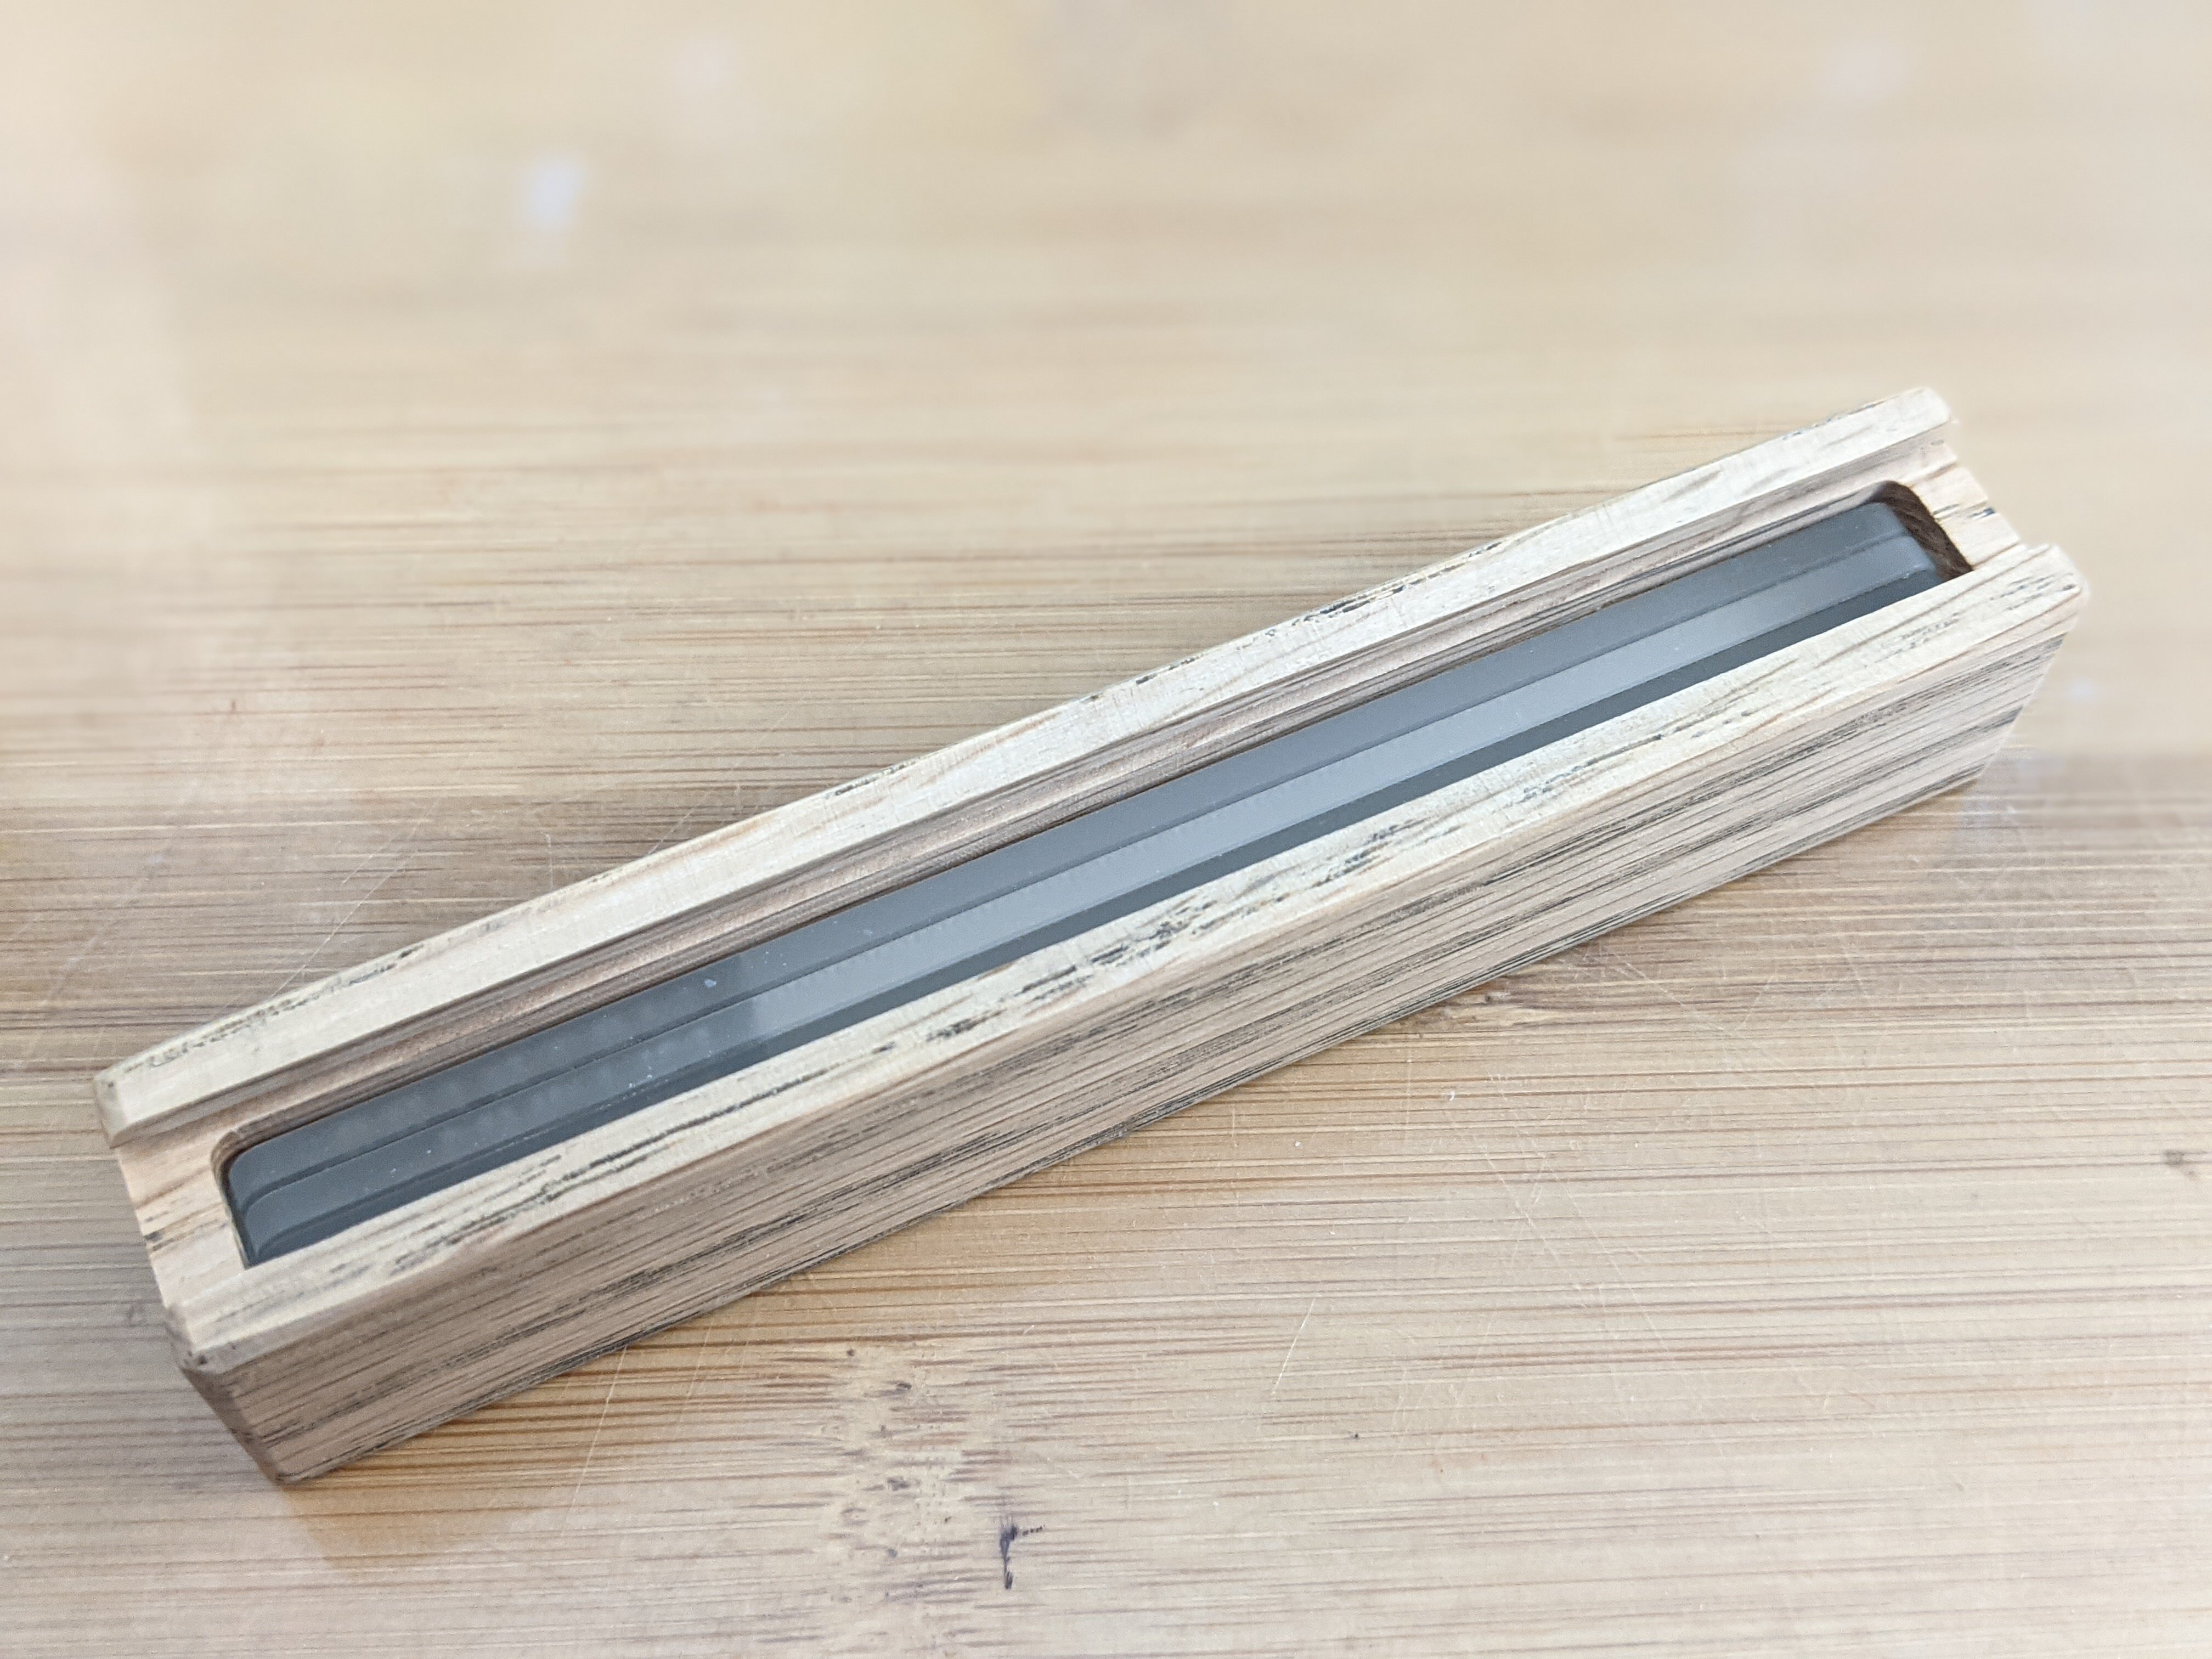
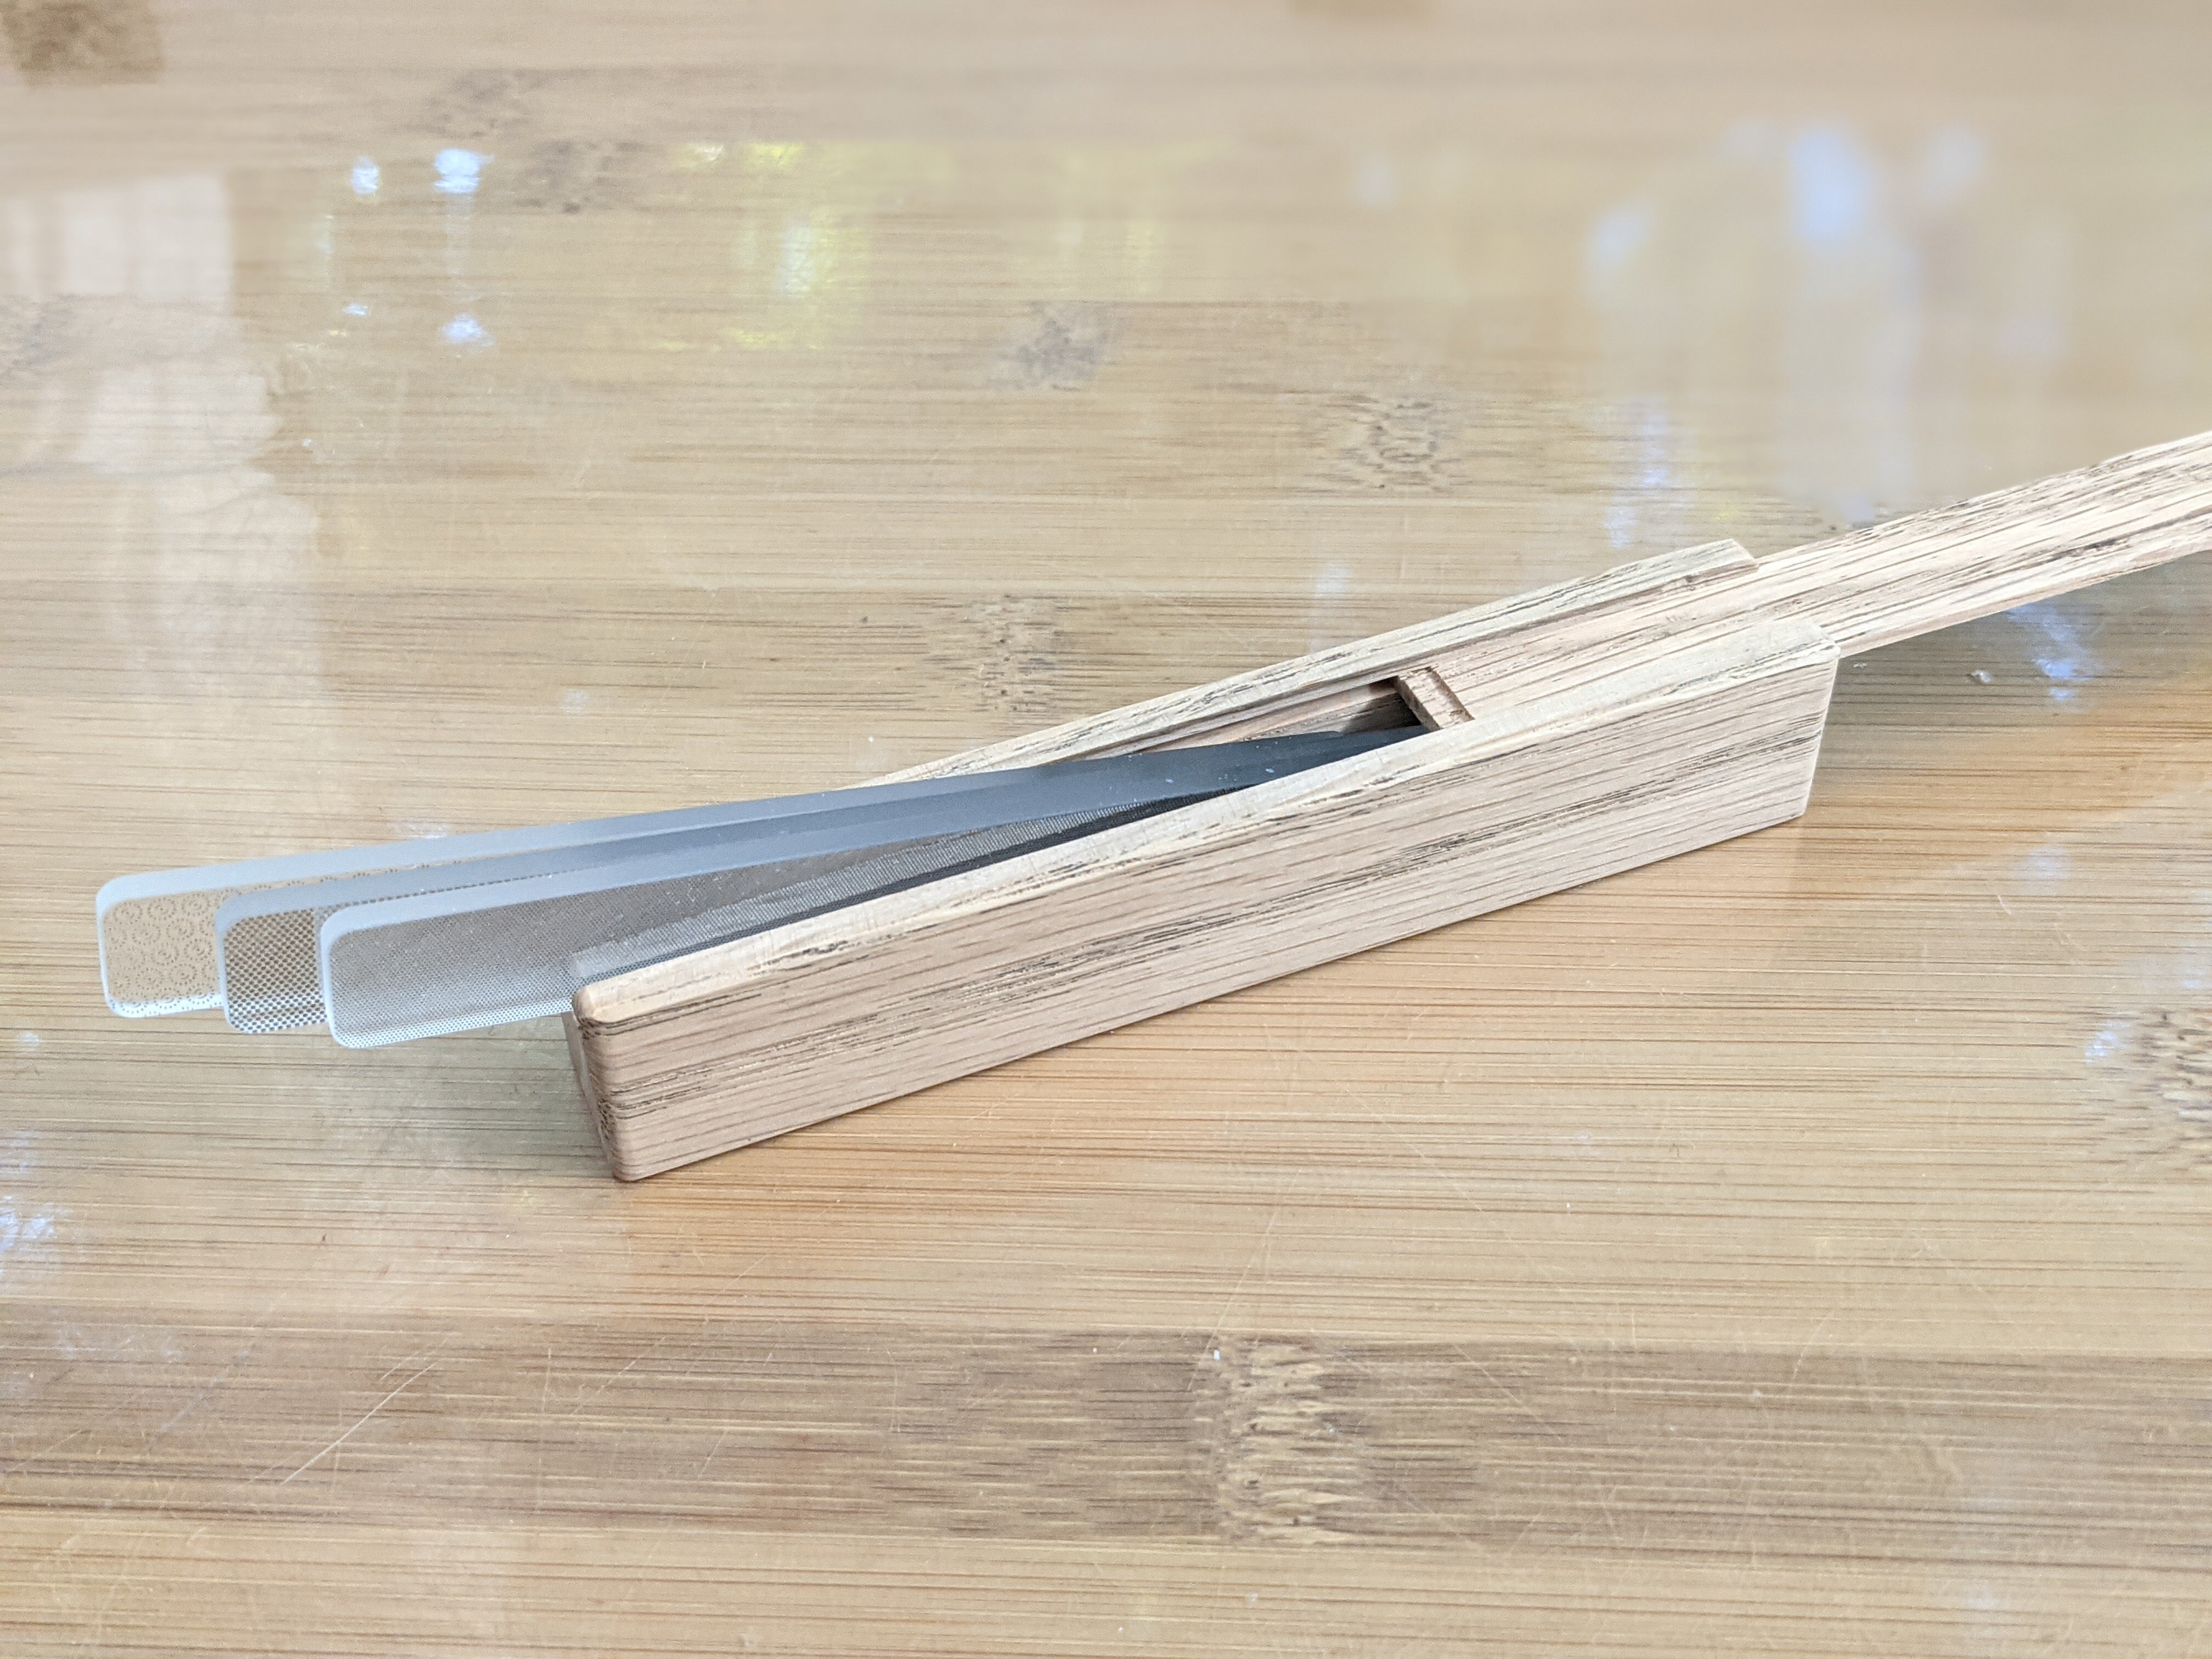
@pengbuzz Cool! Does it get sports and movies? @electric indigo That shield is cool! Gonna be fun masking that and keeping the edges clean. A bit of a review and build. Last month someone in our club brought in a glass file and showed me what a glass-like finish it can give to styrene. I looked all over and found them at Newtype. The brand I found is Infini Model. They have two sets (still in stock); small and large sized files. I got the "Large" set. https://newtype.us/t/tool/file The set of three is $24.95. That's about average since individual glass files are about $8.00 each. My camera did not want to focus on it very well, but here is a 3mm shiny sprue tip with only the medium grit used, not the Fine and Superfine as well. The whole thing is SHINY like glass. Standard sandpaper will never do what these do, and in a few seconds. The glass is cool because it is transparent too. You can actually see what you're doing. A little less with the finer files because they are more populated with cutting area. So what are the files made of? I don't know for sure. My educated guess, they are heavily bonded stainless steel photo etch to the glass substrate. The files are VERY sharp! They recommend cleaning them with water. You can also wipe them lightly with a rag. The files are glass, so I wanted to keep them in something safe. So what did I build? I built an old school box. Kickin' it in the 1890's old school box! I milled-out a small piece of oak. And then made a slide cover out of that scrap thin piece I knew I'd need some day... And all three files together. Hopefully this review helps someone here out! I thought the files were that cool, so I took the time to post the review. Back to the "twins" this weekend with shading and landscaping the diorama they'll go with. Thanks for checking in! - MT

-
The 'Hey look at this really cool model build I saw' post
MechTech replied to Shawn's topic in Model kits
At first I thought it was a screenshot for someone saying, "I'm going to build this." Then I saw the base. AWESOME build! - MT -
@Gabe Q Better late than never! Your valk looks great! Nice and clean finish! I think you panel lined it just right too. @pengbuzz That's great the USB adapter worked. I usually use batteries, but will have to try that. I've only used USB for LEDs. - MT
