MechTech
-
Posts
4650 -
Joined
-
Last visited
Content Type
Profiles
Forums
Events
Gallery
Everything posted by MechTech
-

Hachette Collection 1/24 VF-1S (subscription collectable)
MechTech replied to CF18's topic in Model kits
I'm glad it worked out! The sound of the wing actuators reminds me of the ones from the F-15E. When they flew overhead, you could hear the pneumatics drop the gears down and flaps. - MT -
Fatal Mistake: Built legs prematurely on the Bandai SD Set 1
MechTech replied to Hexi's topic in Model kits
The razor saw is a good idea! One of these saws and the handle they show below will work. Then just sand your seems before gluing. Hopefully that helps - MT https://www.micromark.com/Special-Hobby-Ultra-Smooth-Saw-Blades-Package-of-5 -
Nothing like some great ole' SD valks! They look good! - MT
-
Hachette Collection 1/24 VF-1S (subscription collectable)
MechTech replied to CF18's topic in Model kits
Sorry, I'm just seeing this now, you MAY be able to swap the wires. Two wires is for a straight DC motor - which you can easily swap. Four wires is usually for a stepper motor which is completely different. Two of the wires are for the coil, you have to find the correct ones. Its lengthy, but this may help you: - MT https://electronics.stackexchange.com/questions/70643/how-to-reverse-rotation-direction-of-stepper-motor -
The 'Hey look at this really cool model build I saw' post
MechTech replied to Shawn's topic in Model kits
That modified Hachette valk is AWESOME!!! I'd have to give it two thumbs down for not actually flying - just kidding! That was A LOT of work! - MT -
That's cool news! EVERYONE used to sell models. Now its more of a specialty thing. - MT
-
"Regult - Standard Type" in big letters. I can hardly wait for the other types. Hasegawa milks their molds like dairy farmers. I'm SURE there will be more versions coming soon too! - MT
-
Those are BEAUTIFUL - even before the sanding of the bias lines! I'm tempted myself to get a printer just to make these! - MT
-
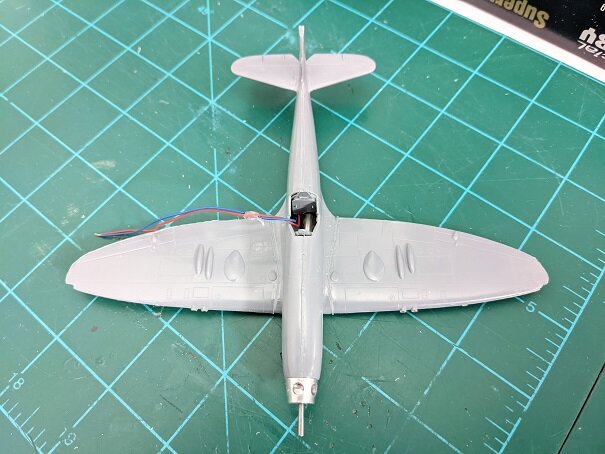
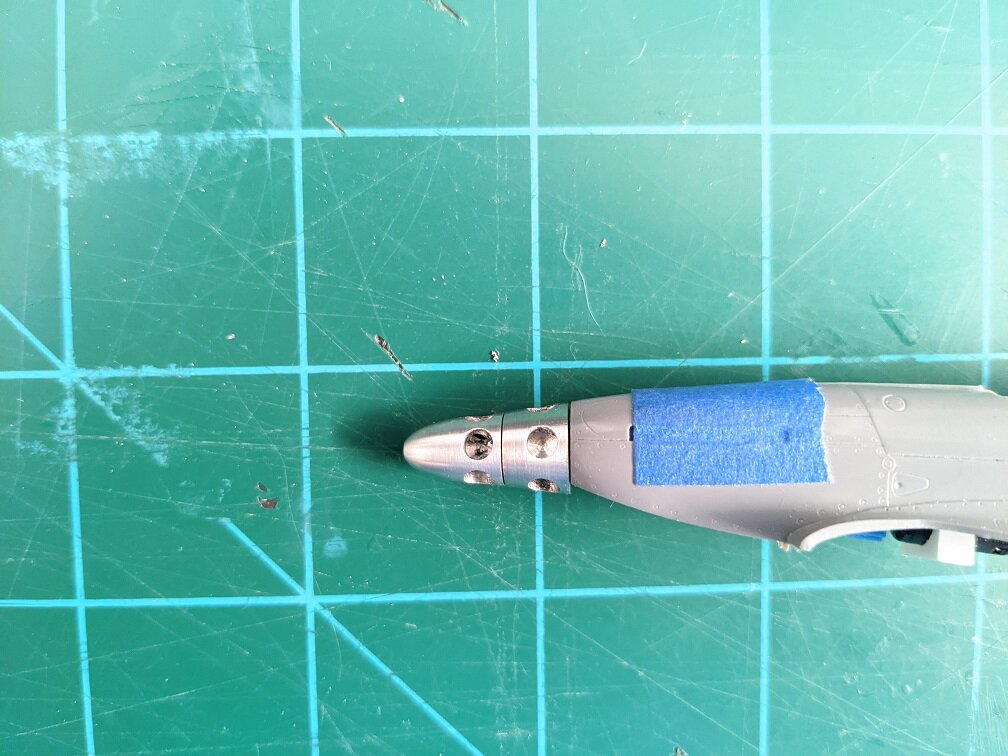
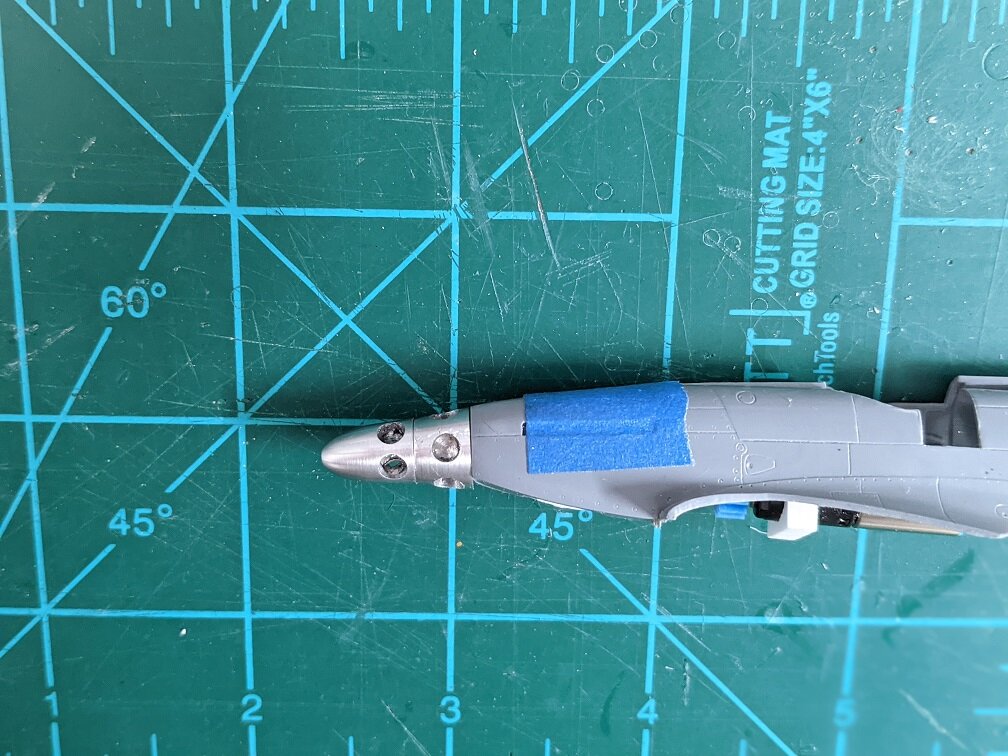
@Zolana Welcome aboard the forums! I definitely gotta start getting into 3D stuff! A little progress this weekend, but it took a lot of time! All of the parts on this Special Hobby kit fit great, but I spent extra time making sure the joints fit as best as I could get. Then I soaked all of the joints with lots of glue. I'm hoping to avoid puttying it. The wheel well doors were fun and the rest of it went together well. The horizontal stabilizers were trimmed to make them sweep back on the leading edges. The wing roots were also filled with glue and stretched sprues. When I sand this down in a couple of days, I hope the seems are gone! Not only will the flying surfaces be trimmed (to include the wings), but I had to find another seat and find a pilot. This is how you make a seat fit on top of a motor also in the same cockpit area! There's hardly any seat left! Even the headrest got trimmed back. That's it for now. Thanks for checking in! - MT

-
@pengbuzz I'm sorry and I understand! Alright guys, don't kick my butt! I just saw these advertised on MicroMark. The TV, arcade and handheld game all play videos/audio from a micro SD card. If you wanted a tiny screen and audio for a project, this might be a good idea! I also saw they have similar elsewhere. This might be a good way to bring that large scale cockpit or bridge to the next level! - MT https://www.micromark.com/search?keywords=tiny kit
-
Thank you very much guys! Yes, I love the ability to improve upon things when they're not quite right. Look at all the aftermarket stuff out there to "fix" stuff. @pengbuzz That is too bad about the canopy! Don't give up though! If I can fix all of my mistakes (and there has been a lot just on this project - so far), you can too! @electric indigo Great decal work on the Harrier! Getting all that clear to disappear is tough! Part of the lined area on the wing is also where the whole wing comes off the bird to work on the engine and associated systems - not popular with the ground crew. - MT
-
@pengbuzz Cats eat bats! Yeah, back to the cat! Quick update for the week. Got the props coated with a final coat of flat. I thought the first intake (not completed) was too big and not very "sexy" looking. So I did a second one and machined it on the rotary table to get a nice curve to it. The LOTS of shaping by hand to get the rest of it into shape, Also in the ROUGH stages, the exhausts and associated cowling. The tubes are actual stainless steel, so I'm hoping some heat treating will give them the correct "burnt color. I put the gearmotor on a 1.5v battery and got it to turn s-l-o-w-l-y. Now the GIF doesn't look so bad, but its too slow. Can't win them all! That's it for now. Thanks for checking in guys! - MT
-
Thank you, guys! I appreciate it! I'm redoing the intake and starting the cockpit now. More photos soon hopefully. - MT
-
Thanks for posting! And FINALLY a carrier in 1/60 scale! A better looking command car too! On a side note, some are cannon and some are not, but the Tomy "Little Armory" 1/12 scale weapons go perfect with the Labors! The sniper rifles equate to about a 76mm cannon - MT https://www.hlj.com/search/?q=little+armory
-
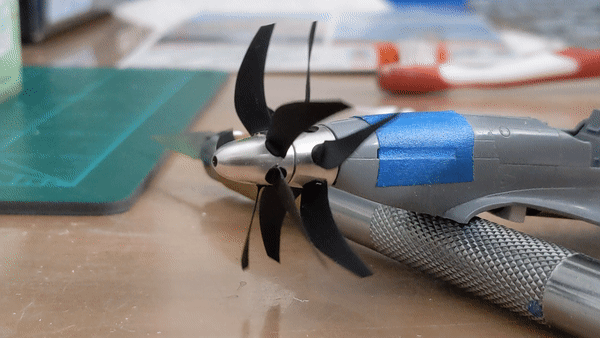
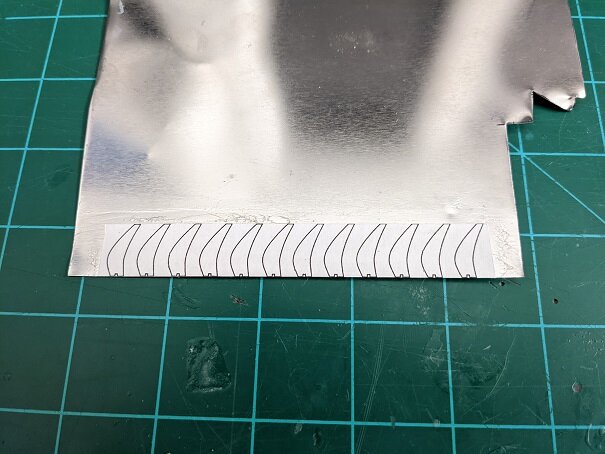
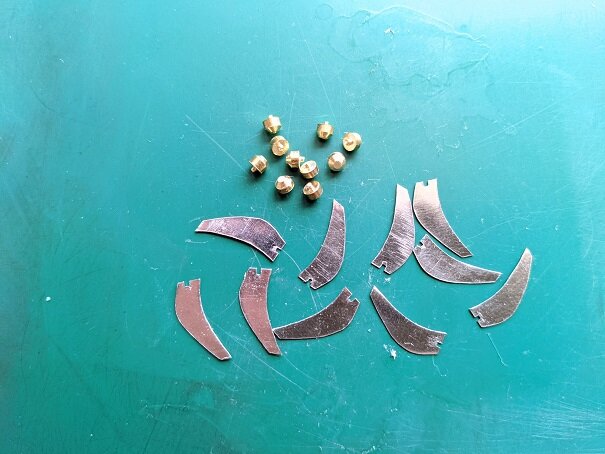
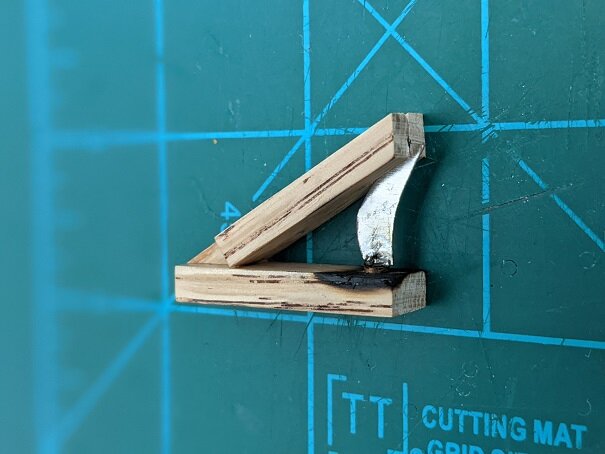
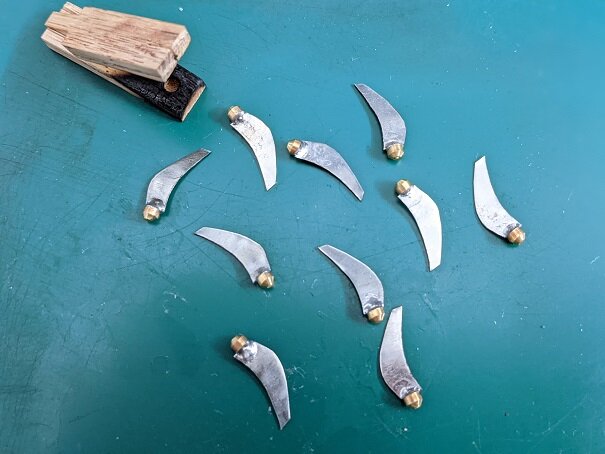
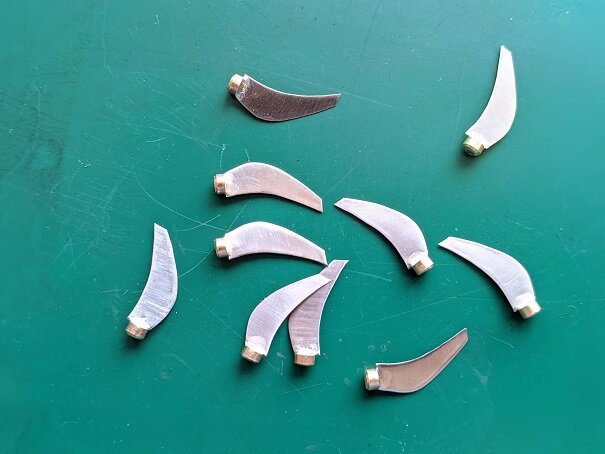
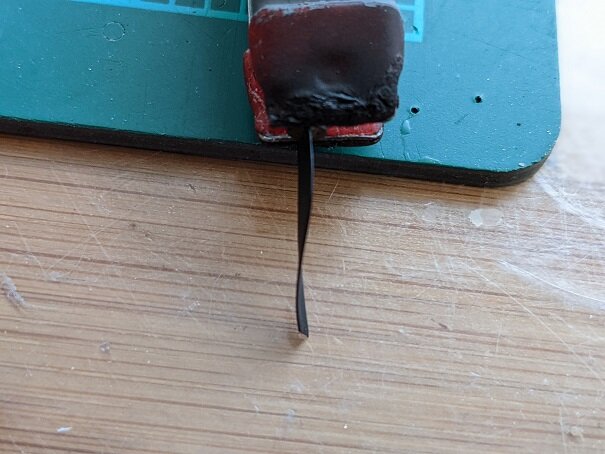
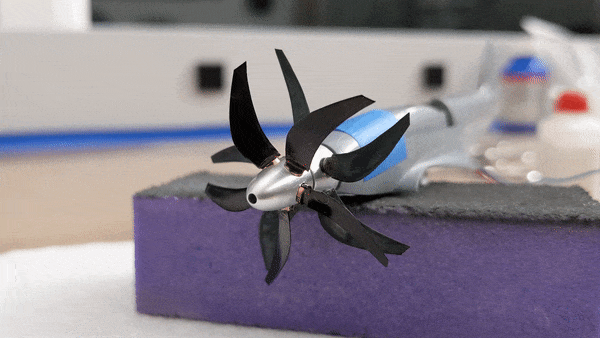
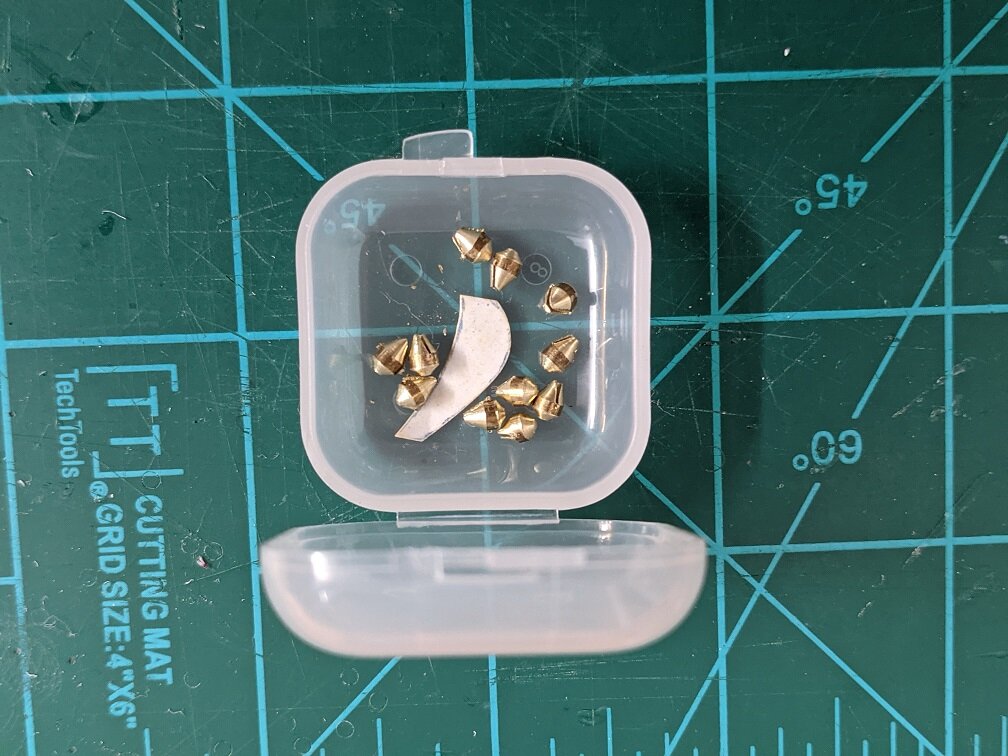
@electric indigo That cockpit is looking great, especially the detail on the pilot! You'll see that I WISH I could use regular blades. The kit comes with ALL of the modern blade versions too! @Bolt Looks like someone is getting all those old kits built up! The Pod looks great! I believe you captured the design from the graphics spot on! Its almost like an evil clown paint scheme. @arbit Thank you, I'll have to check that out! We've been watching "Mythbusters" on TV lately too! Your figure looks great! You also pose a great legal question too. So, the coconut can failed! I couldn't roll it out flat enough and it had mini valleys. So it did get tossed in the end! The next idea that I was trying to avoid was soldering the blades to brass pieces. They'll have less strength, but still WAY better than styrene. So I drew the blades, printed them and contact cemented them to a sheet of K&S tinned steel (the tin allows the solder to adhere better). The lathed brass pieces and the hand cut and filed blades. Gettin' jiggy with it! I made a hardwood jig to hold the pieces while they were soldered. Sometimes you have to make parts that won't go on your model at all. The soldered blades. And a "slightly" burnt jig. The blades after they were carefully milled at the solder joint for uniformity. Then put on double sided tape on my mat and sanded with medium and fine sanding blocks. The sanding put nice edges on the blades. I then blued all the blades with gun bluing compound. The coating wasn't even and looked awkward. So I merely coated them all with a Sharpie marker! They were also given a slight twist like real blades have. They just need to be buffed and another coat of matte finish sprayed on. I'm still working on it, but a new piece for the air intake to go under the nose. And the blades together. Here they are only inserted part way, not all the way in. They will sit in flush with the face of the spinner. For some reason the GIF makes them look like they're spinning in the wrong direction🙃, but they do work properly. That's it for now. Thanks for checking in guys! - MT

-
@derex3592 Thanks! Sometimes I think I'm mad too! Your ship is looking great! The lighting really does add an authenticity to it. @Dobber Your version is looking great! I love the fact that it is smooth instead of "ole skool" stepped and "LEGO rough". Both spinners are good now. I like the look of the second version better now anyhow. The gearbox and spinners are also the correct angle now. If you look REALLY hard, you can see this scrap of steel sheet become propellers after I sand it and then trim them out of it. They'll then be treated with bluing compound to give them a cool color and sheen. Oh, and the juice was good too (with coconut chunks in it)😁 Hopefully I'll get the blades done this week. - MT

-
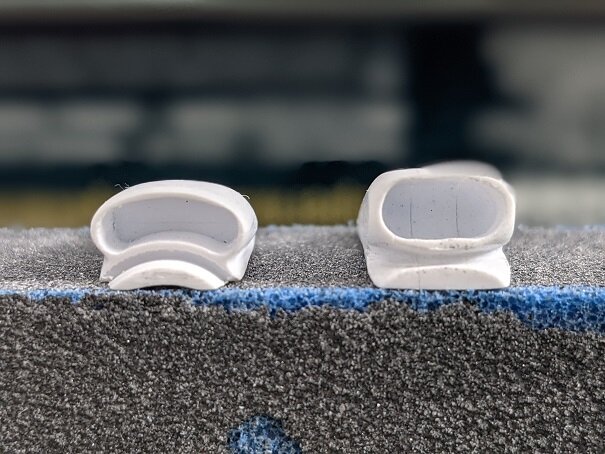
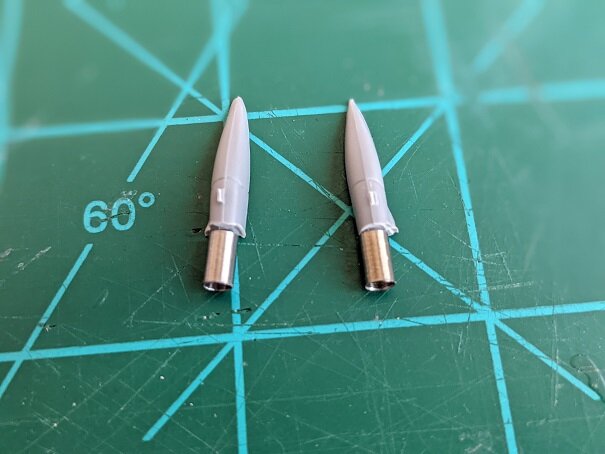
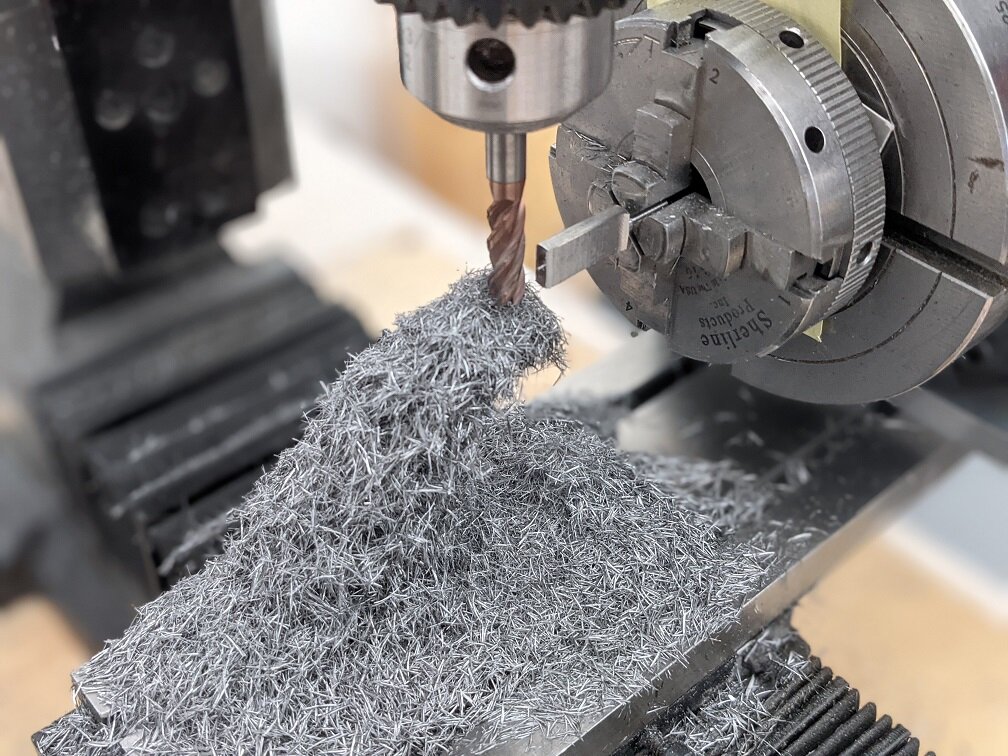
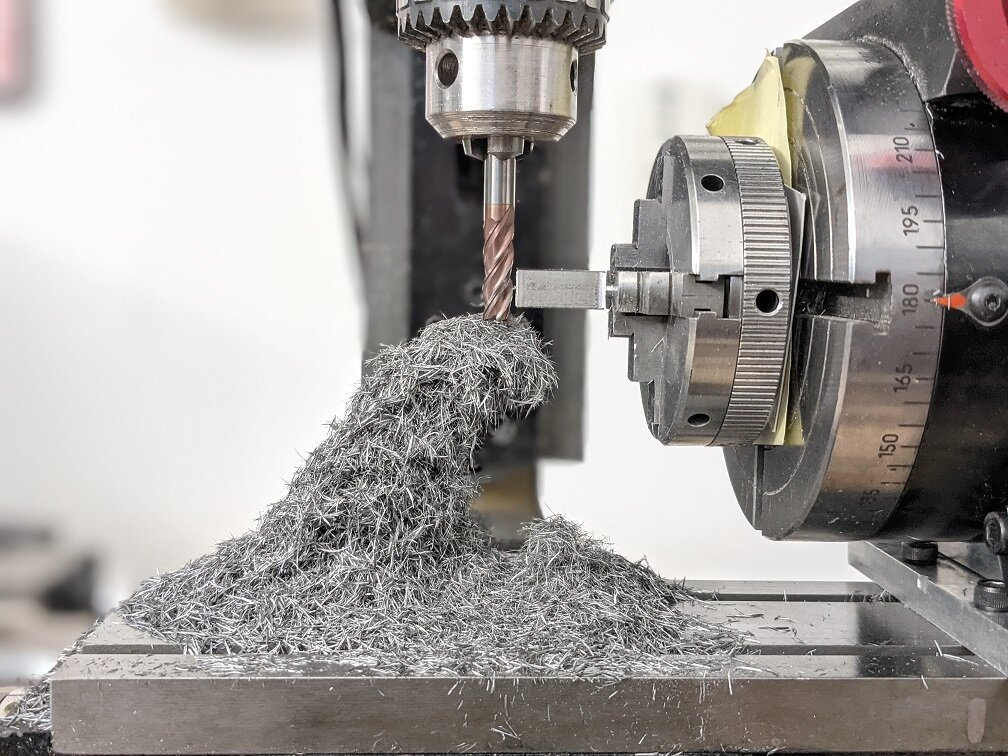
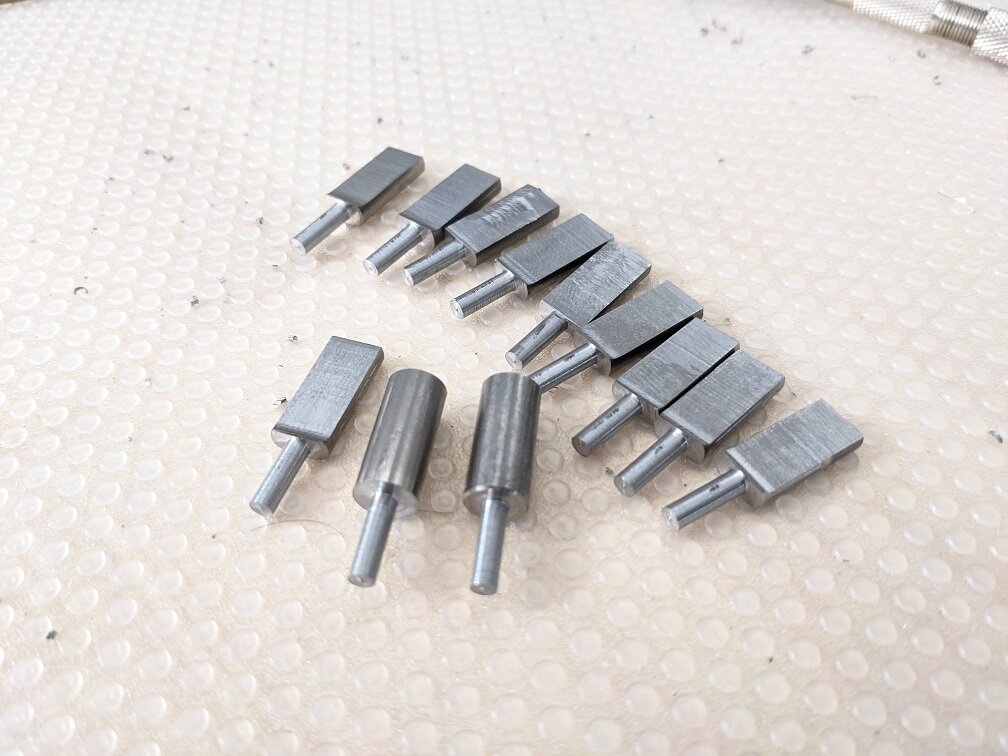
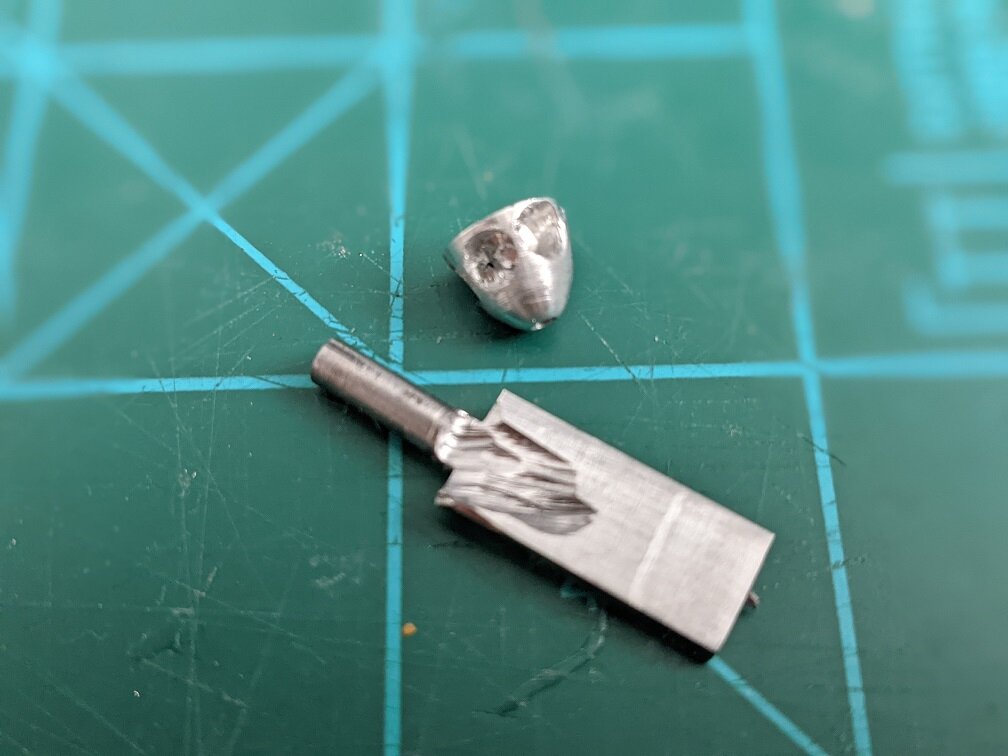
@derex3592 Those PE windows and lighting are looking good! @electric indigo As usual, your paint is looking great! The Turbo Spitfire is coming along slower than hoped. I turned a beautiful spinner for the end nose, and then realized somehow it got all scratched up! I don't know how. I don't know if I can just buff it out, so maybe a second spinner will have to be lathed. The plan was to machine blank blades and then mill the final shape into them. I spent hours testing and making the blanks. You can see by the pile of shavings - this is is lot of machining! So what happens when I go to do the final machining? THIS! Just to show you, the spinner I screwed up too. The prop blank deflected and and got mangled when I went to machine it. Even in steel, it couldn't take the force. So all those hours of work down the tubes. Plan B was to make some brass inserts that go into the prop hubs and then cut thin steel blades from an old can. Hopefully I get that done this week. And what the blades will look like too. That's it for this week. Thanks for checking in! - MT
-
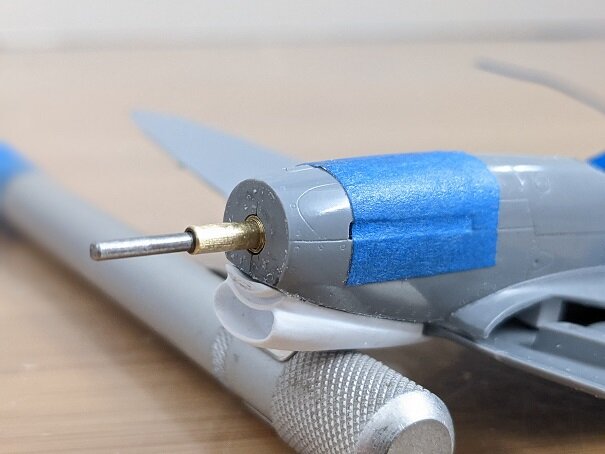
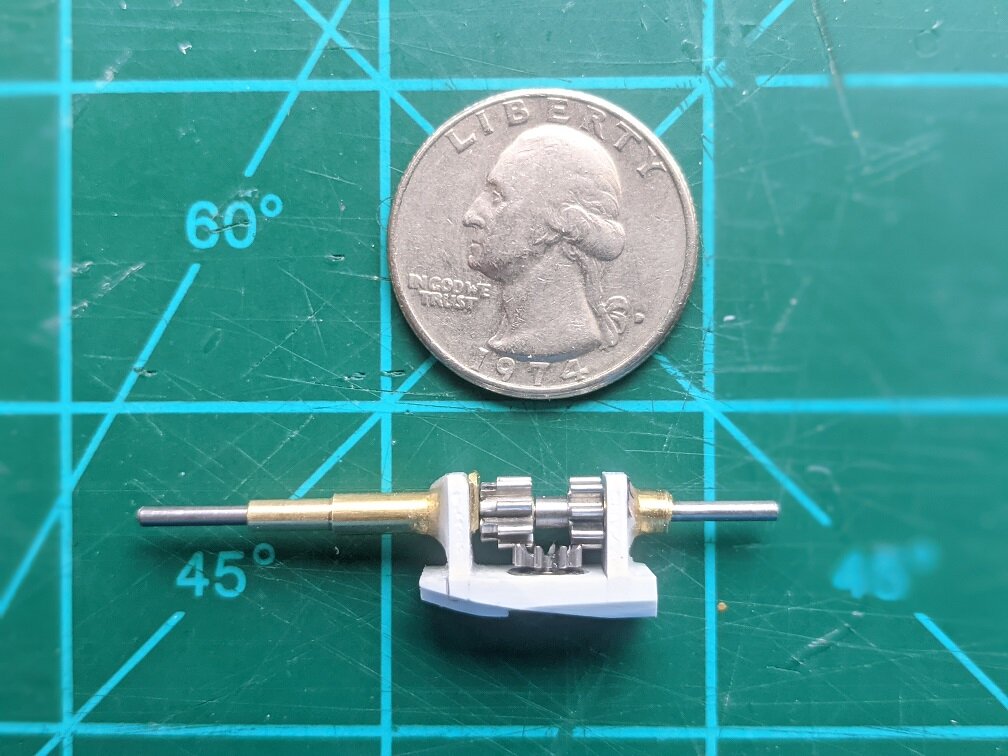
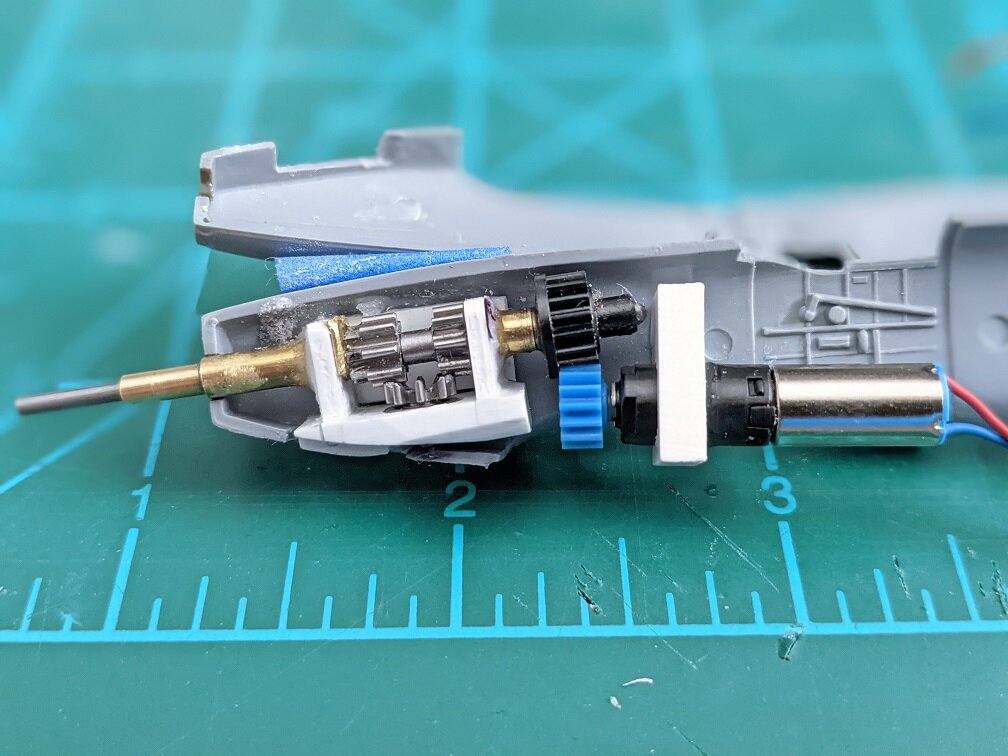
@arbit Thank you! I believe the gearmotor is 60-90 RPM, 3V. I bought them a couple of years ago. No problem. If you note the output shafts are in two steps. The gearbox has TWO shafts coming out of it (on the prop side). One shaft rotates counter-clockwise (the brass extension) the other clockwise (the steel one). That is what the crown gear is for. Each horizontal axis gear has one shaft attached to it (brass or steel). There will be two prop hubs with fan blades counter-rotating from each other. If it was an actual plane, this would be used to eliminate torque and control issues. I attached a similar setup in the photo below. Here is a sample of a 3D bevel-geared box with a video in their link to see how it works. https://www.thingiverse.com/thing:3873918 I hope that makes things clearer. I didn't realize until after you asked. The gearbox as is, looks like it does nothing!😁 - MT
-
The 'Hey look at this really cool model build I saw' post
MechTech replied to Shawn's topic in Model kits
WOW! $5300 for a model! I'm in the wrong business! - MT -
That is TOOOooooo funny! The two franchises coming together could cause a break in the space-time continuum!🤣 - MT
-
It's looking great! - MT
-
3d Printed Gu-15 Arcadia gunpod for Yamato 1/60
MechTech replied to Captain Global's topic in The Workshop!
@CaptainGlobal That's a great mod and thanks for sharing the file! - MT -
I hope everyone is enjoying their weekend! May this year be better than the last! New project. Long story, but I'm working on a modernized version of the British Spitfire. This version will be 1/72nd scale and have counter-rotating, fan blade props. Part of last week and this weekend was spent just trying to make the gearbox and drive mechanism. First the gearbox. I had some metal gears from old shell timing fuses (bought as scrap online). I bored through the center of them on the lathe. My lathe has been off-center for a while, so part of what I had to do was re-machine the lathe tailstock holder. After fixing that, two gears had different sized holes drilled. One for the steel shaft and one for the hollow brass shaft to go through it. Then the last gear was milled like a "crown" gear. This is where teeth stick up for 90 degree meshing. The shaft of the crown gear sits in a 2mm ball bearing. The case is of course styrene - carefully aligned what seemed a thousand times to make everything mesh smoothly. Everything else sits on brass tube bushings. When one gear drives the crown gear, the crown gear drives the other gear in the opposite direction. This was the smallest and most simple gearbox I could conceive. The whole thing is going to move slow enough to be seen, like when an engine first starts up. so a micro drive (6mm diameter) geardrive was used. Yep, it looks like my pilot will be straddling the motor! The black plastic gear is from an old camcorder and of course, I had to bore that out too! It was tough finding a gear to mesh with the blue gear. I got one of the two prop hubs machined in aluminum and fitted over the first (brass) shaft. This is actually the second prop hub, the first was messed up testing techniques. It also looks like I need to re-align the gearcase a little too! There is a normal, 3 degree, down-ward angle in propeller aircraft. Despite using a jig in assembly, it looks like I need to decrease the downward angle just a tad. The current nose makes it look worse until the air scoop is installed below it. That's it for now. Thanks for checking in guys! - MT

-
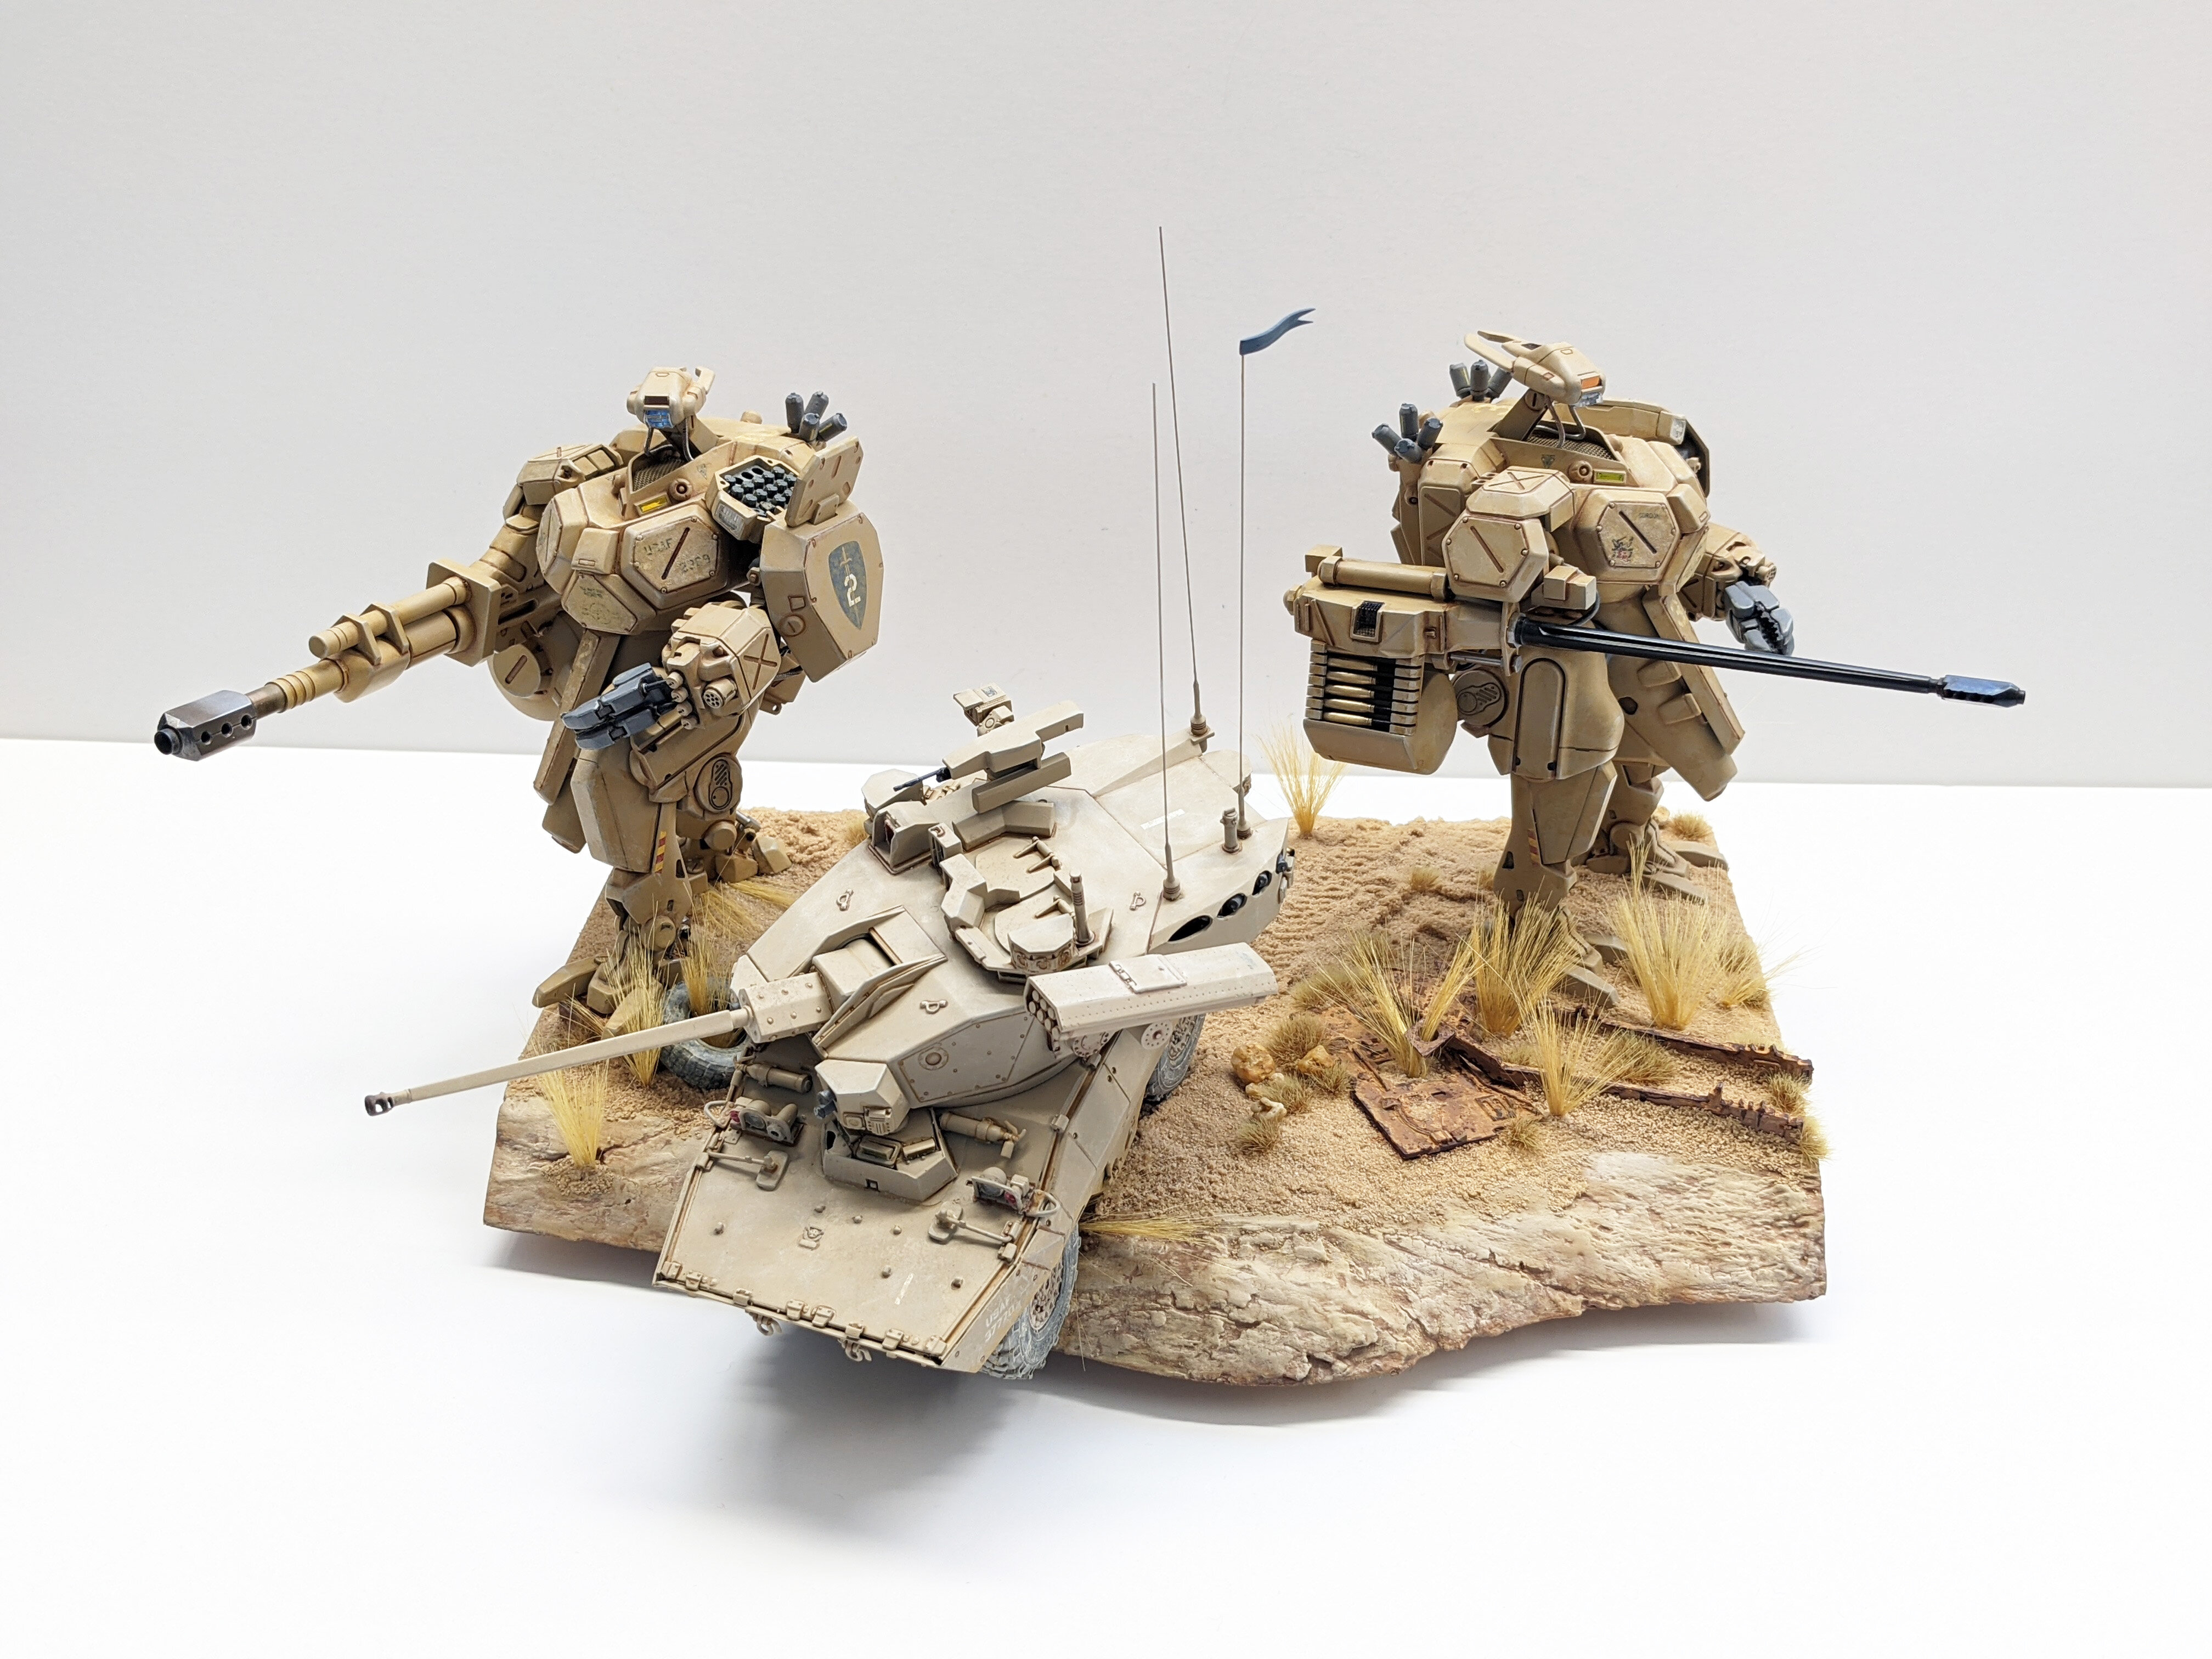
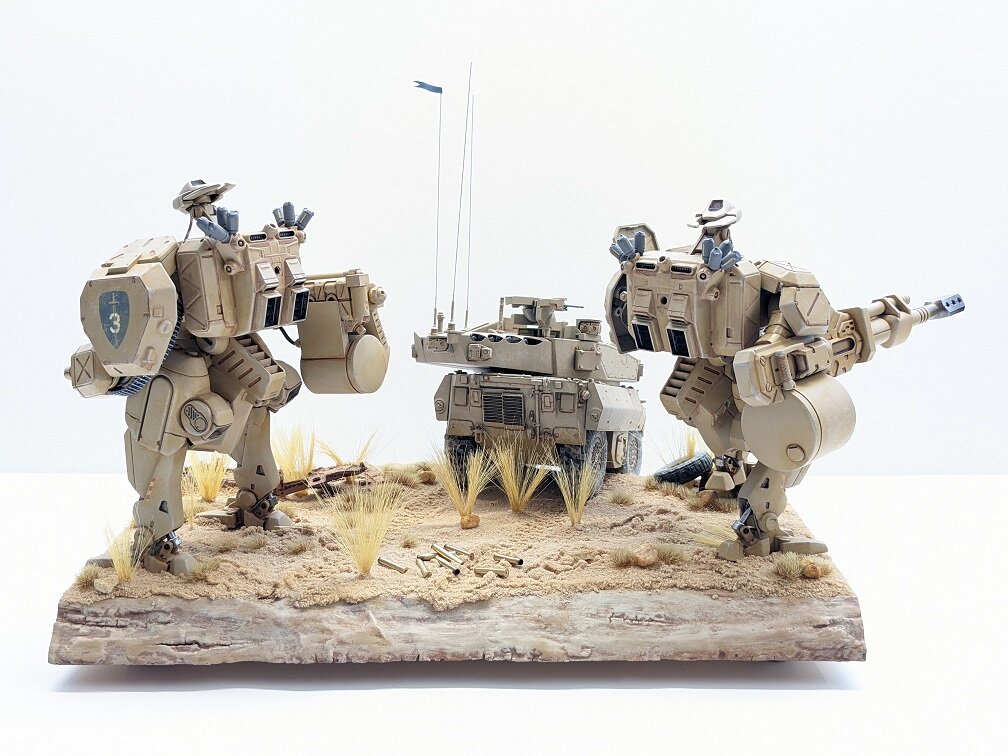
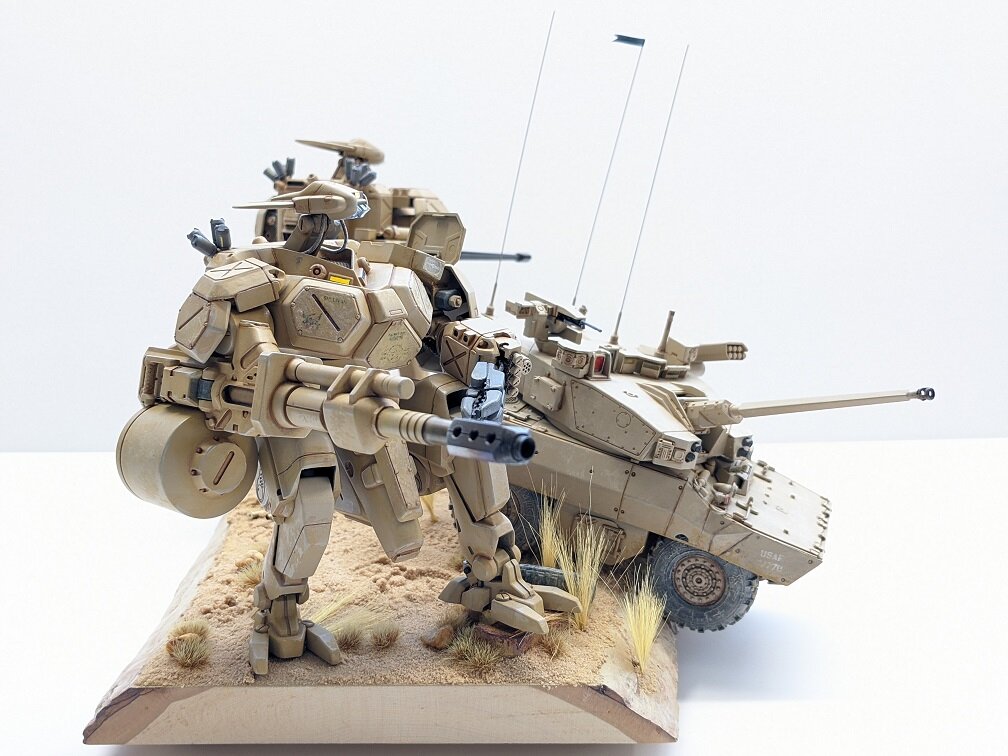
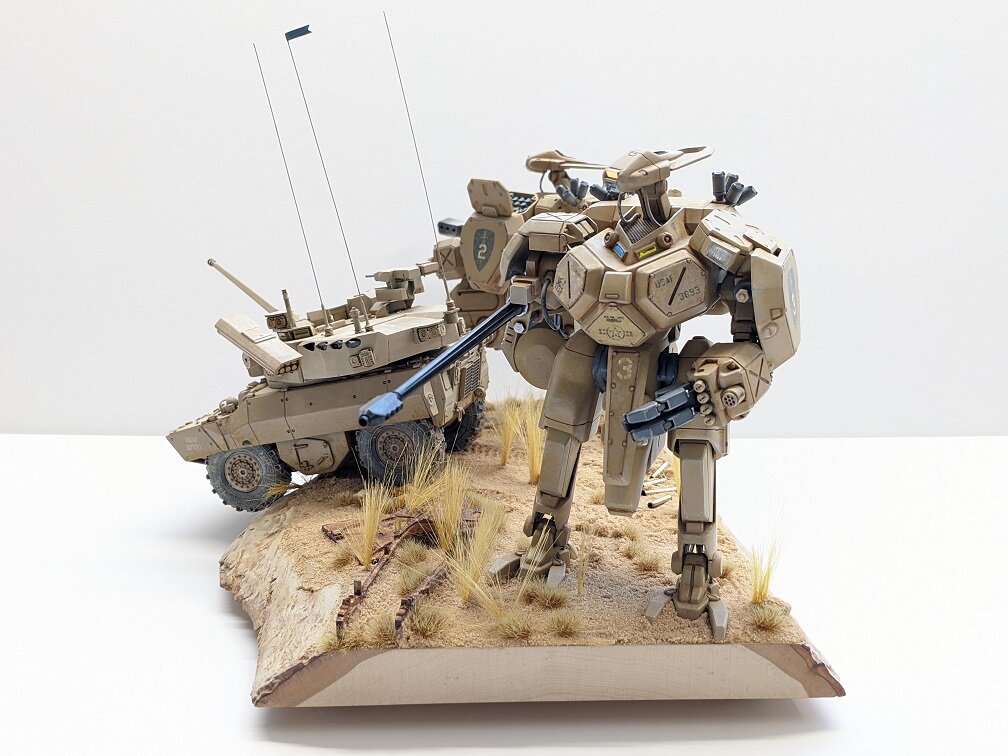
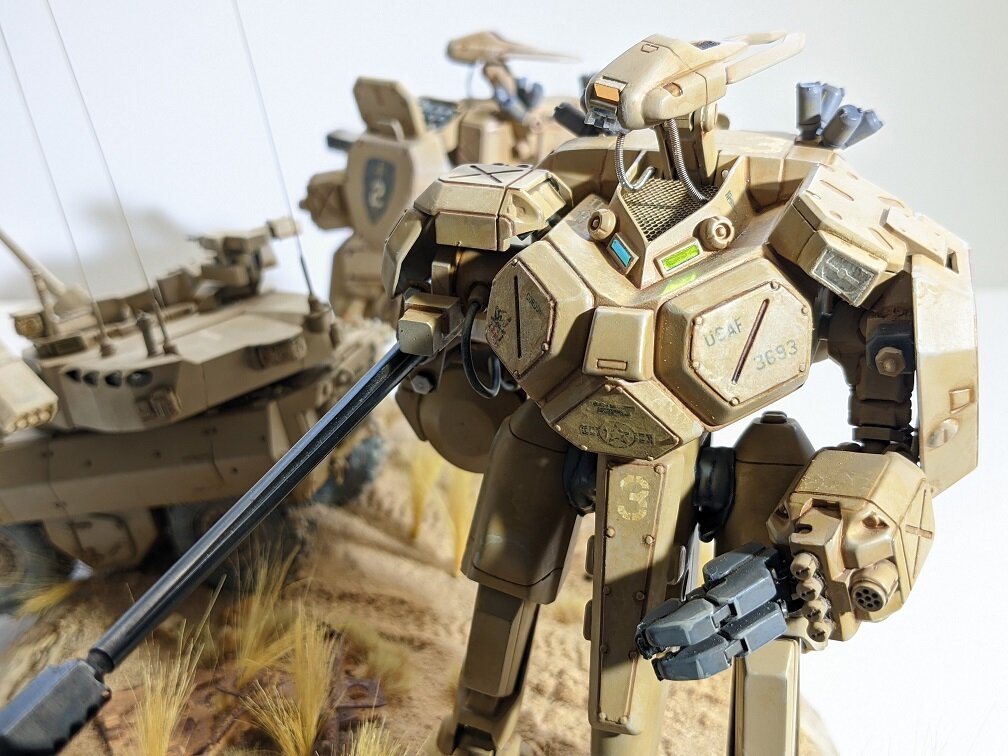
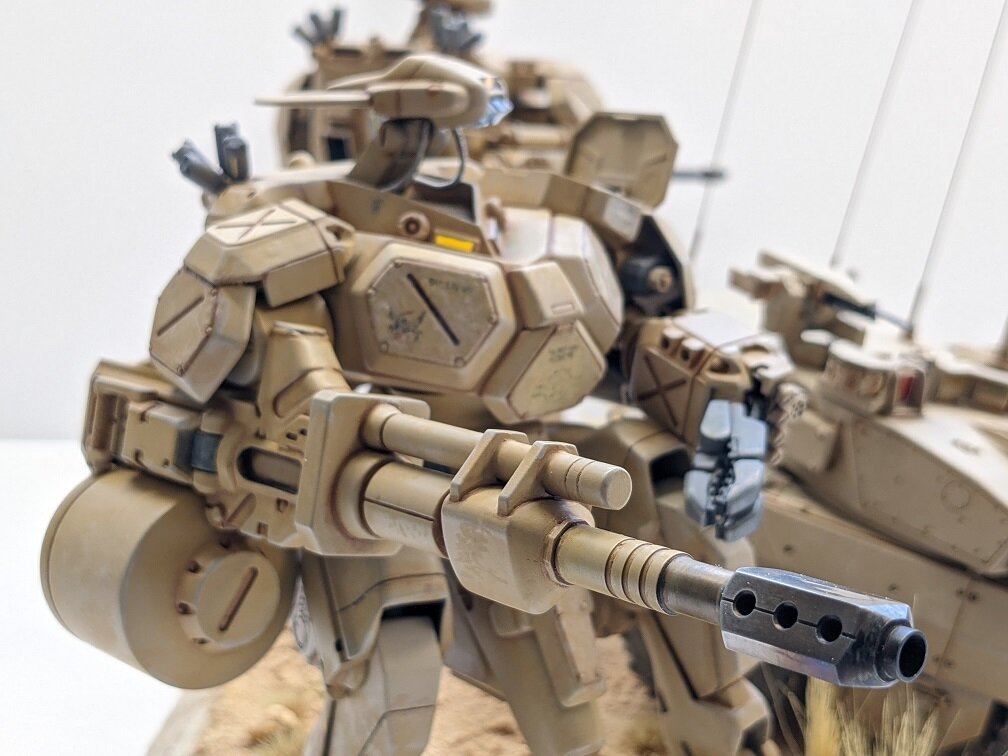
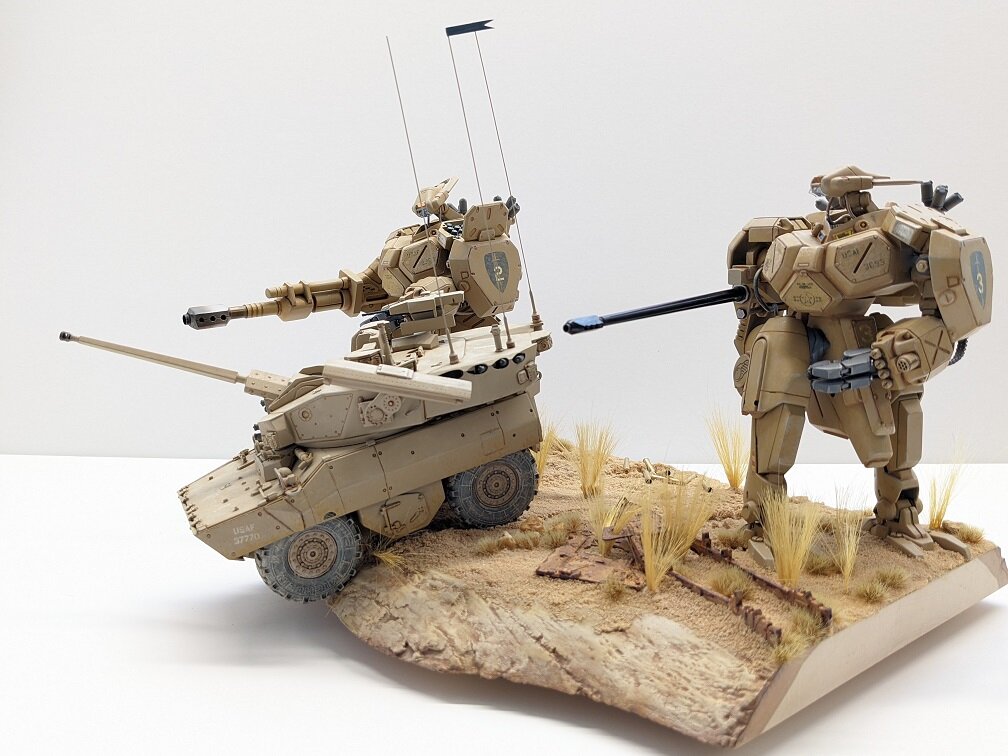
@Thom Thank you! I'm hoping to enter it into our club contest mid-year. I didn't even know I was building something in that category (sci-fi). @pengbuzz If there was only room left on the base, then I could practice my resin skills for simulated pee🤣 @arbit Thank you very much! I did work hard at the sand and matching colors. The tank was part of the plan all along. If we ever went mechanized like this, I don't think we'll ever completely get rid of wheeled or tracked vehicles. They're cheaper and faster. I wanted to show them together in a more realistic environment - if that were possible. The inspiration was literally holding pieces together decades ago to try and create a more realistic mecha, similar to MADOX or VOTOMS. Emphasis on the more realistic or contemporary. Thank you. I need to make a photo booth. I just grabbed some foam board and a spotlight! There are too many shadows and not everything is lit evenly. Thank you guys for all of your support! - MT
-
@neptunesurvey BEAUTIFUL lighting job! The mix of LED colors looks VERY realistic too! I believe that is a combo mill and lathe? Those little UNIMAT are pretty cool! Alright, I'm calling this project finished! I think this and the lighthouse are the only finished, complete models for this year😁 The hip joints looked naked so I made boots to fit them from an old melted Ingram model (you all know how the vinyl melted the styrene on those). I believe the rest are self explanatory... Let me know if you guys see anything that needs fixing. I've been staring at this project waaaay tooo long! It's ALL starting to look like sand now! Thanks for checking in! - MT