MechTech
-
Posts
4702 -
Joined
-
Last visited
Content Type
Profiles
Forums
Events
Gallery
Everything posted by MechTech
-

1/72 Reactive Armored VF-0S Macross Zero
MechTech replied to Less than Super Ostrich's topic in Model kits
That looks good! As an alternate weapon, it could just drop it on a sub . - MT -
Ahhh, you sliced up a "Ford" (F-4D) Skyray! One of my favorite 1950's carrier planes next to the Cutlus. It looks really good though! That's still a very modern looking airframe, especially with your modifications. - MT
-
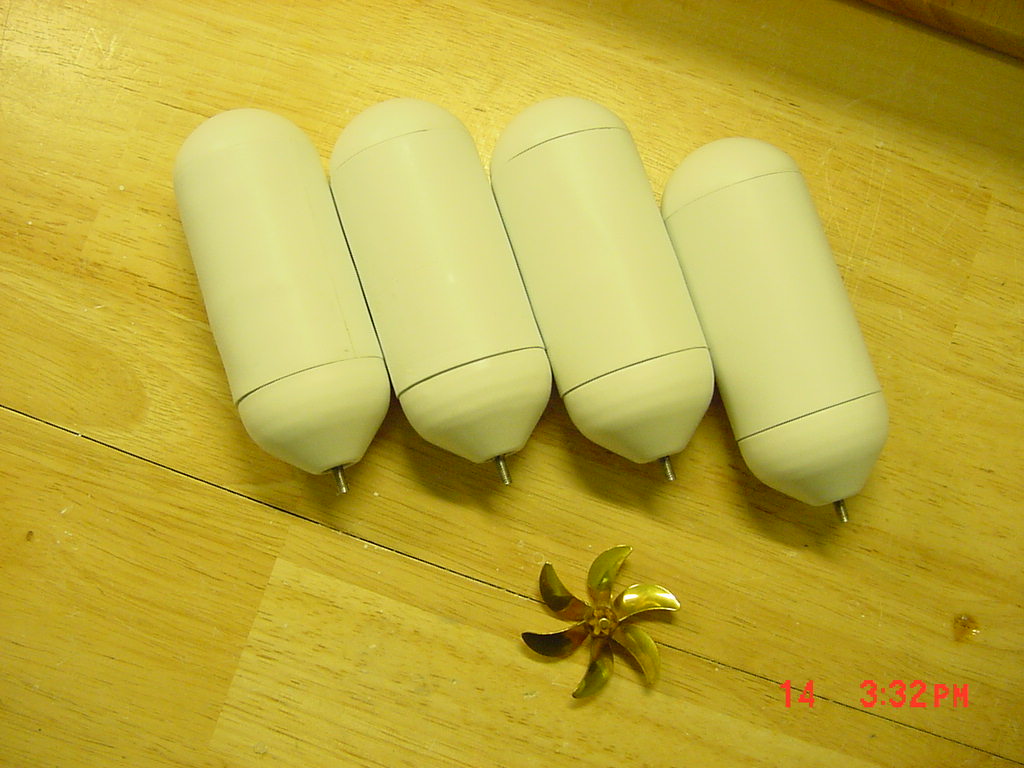
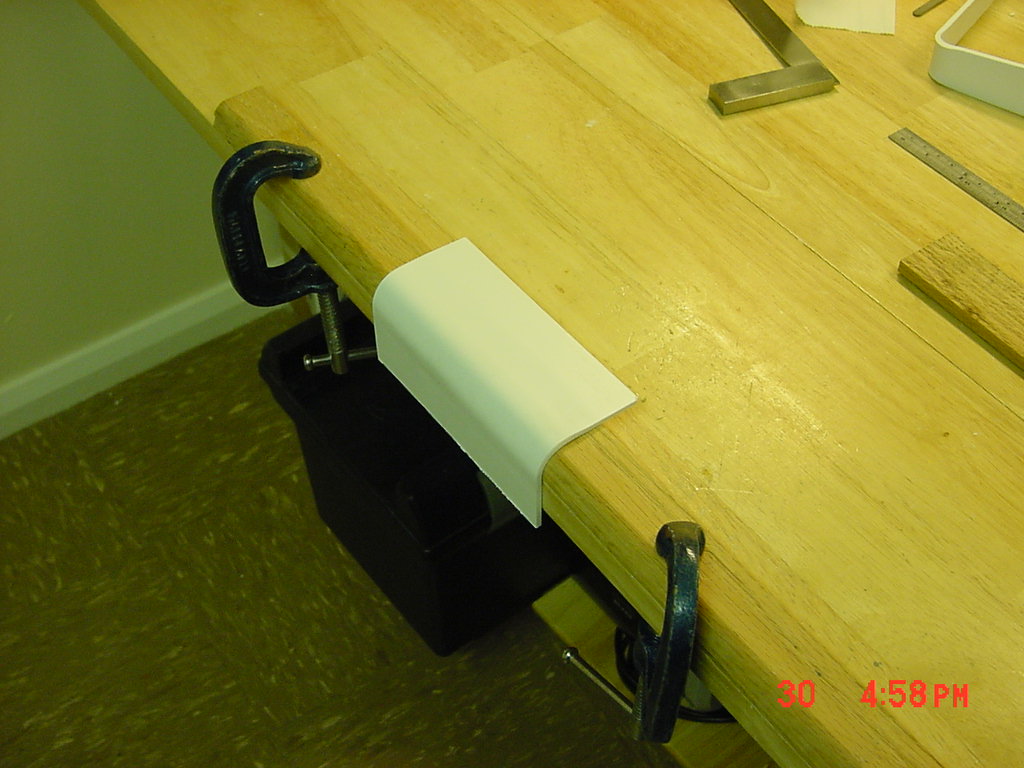
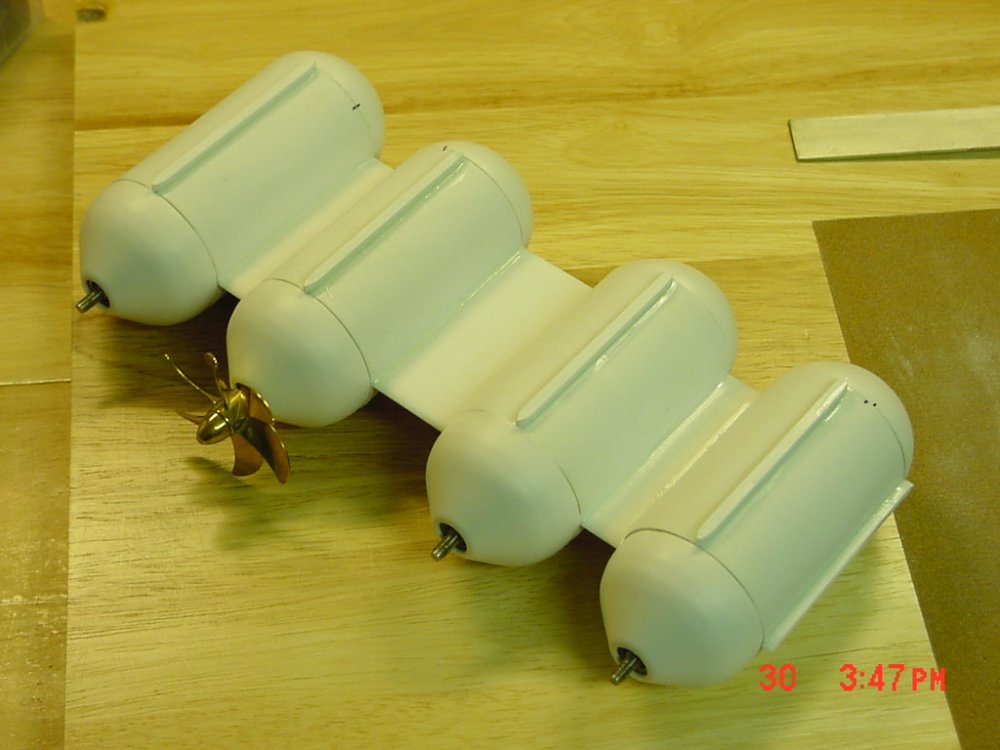
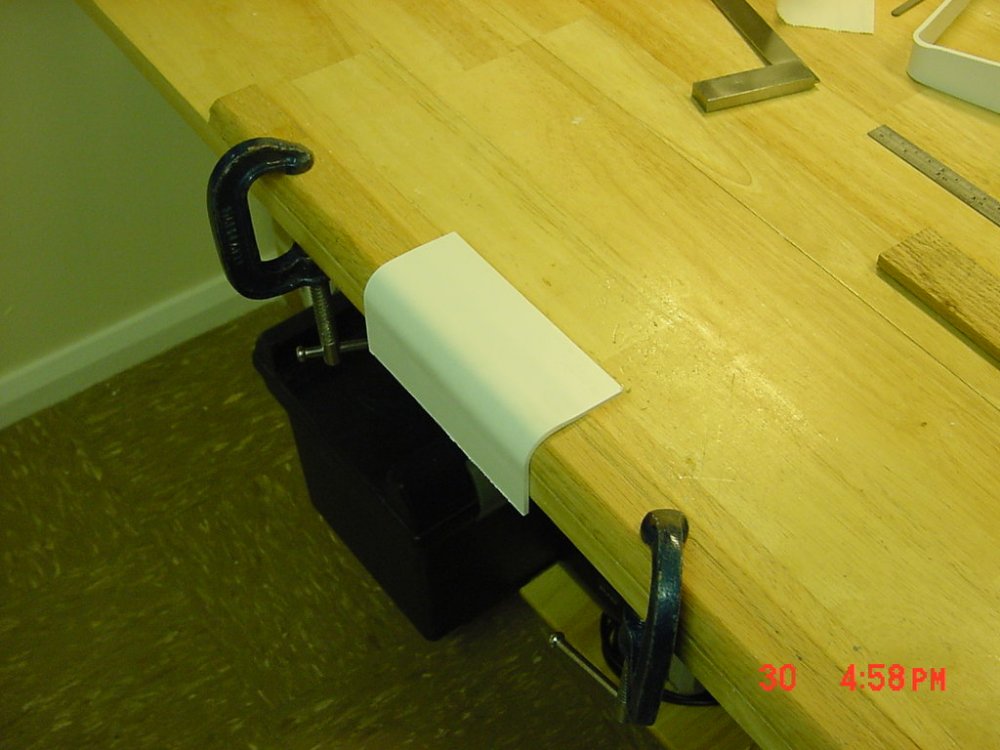
UPDATE: 30 SEPTEMBER 06 Been busy with "real life," and engineering some of the parts and fittings. Here's the latest: [attachmentid=37006] As before, here's the coompleted parts. Remember that the ends have gaps because they must be removeable for maintenenance. [attachmentid=37007] No, it's not a rejected Naboo ship design from Star Wars, but it kinda looks like it. These are the pods attached together. There will be a hollow brass shaft fitted to the very center of the assembly. The shaft will steer the pods as one unit and lower/raise them into running and storage position (remember the original design has the "boxes" too far out of the water. [attachmentid=37008] From the backside showing the struts where the outer "boxes" will be attached to. [attachmentid=37009] "Smashing toast Grommit." Toasting plastic to heat up a line to fold for the boxes round corners. The boxes will be made of 3mm thick styrene to help support and brace the assembly. [attachmentid=37010] Forming the rounded bits of the boxes. These will be trimmed down to 1/4 round to be put on the corners, making the box edges rounded off like the original design. That's it for now. I better get some sleep. - MT


-
I've tried baking soda and it was alright, but it will get clumpy and crunchy like cobywan (sounds like a cookie recipe ). - MT
-
That looks great. I agree that the colors look great too! - MT
-
So we've got a fair share of various model companies out there.
MechTech replied to Spatula's topic in The Workshop!
Last I heard, Tamiya was suing Trumpeter for copying their kits. The two I heard cited in the lawsuit were the 1/72 PT-15 and 1/350 Enterprise Carrier. -
Don't build two side by side, just build one that transforms! - MT
-
That looks awesome! Were'nt you the one that did the Isamu with the fancy box art to go with it? - MT
-
1/72 Reactive Armored VF-0S Macross Zero
MechTech replied to Less than Super Ostrich's topic in Model kits
My "Styrene" sweet tooth is tingling again. Ahhhhhrg! And I gotta buy more supplies for the Daedalus! Hmmm, Christmas is coming up sooon!? All those missiles are making my mouth drool - even in 1/72nd scale (it's not the model glue - honest ). - MT -
I'm gonna get hit for saying this, but it reminds me of the "Thunder Hammer." Yes, I'm sorry I brought that up. - MT
-
What do REAL panel lines look like on REAL red (purple) aircraft? I could only think of one team, the Red Arrows (they're excellent by the way). Here's their website: http://www.raf.mod.uk/reds/gallery.html Note there are panel lines in some places, and not in others. The question is if you're going for "display team clean," or "Miriya and I just took on the Zentraedi fleet." - MT
-
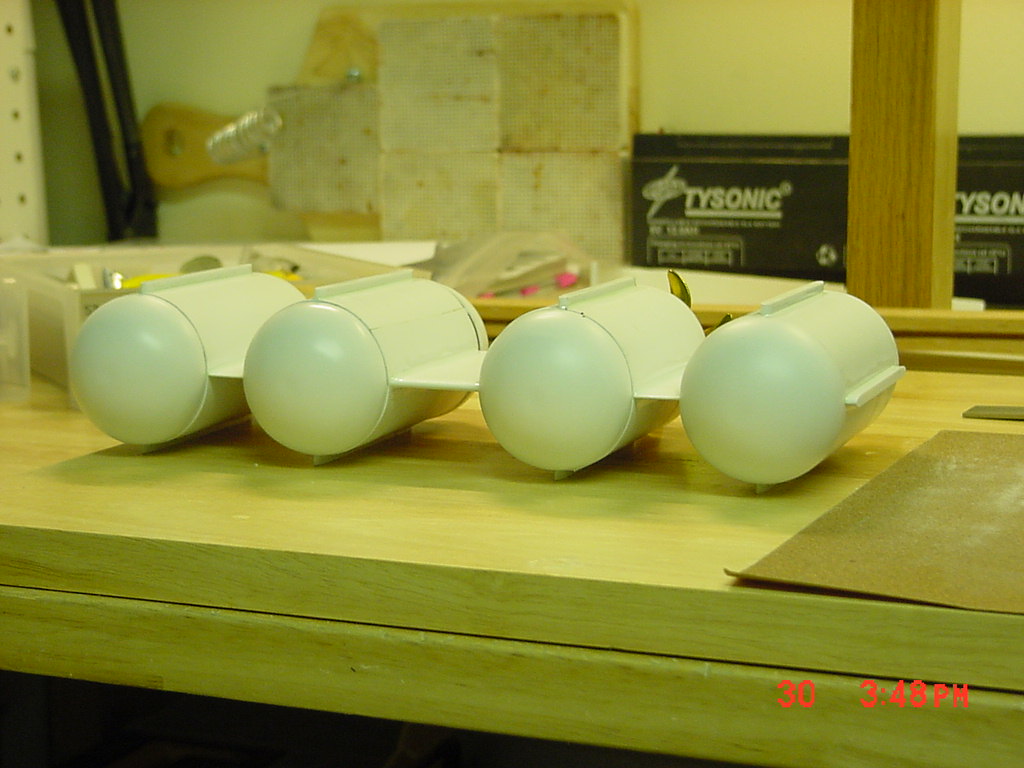
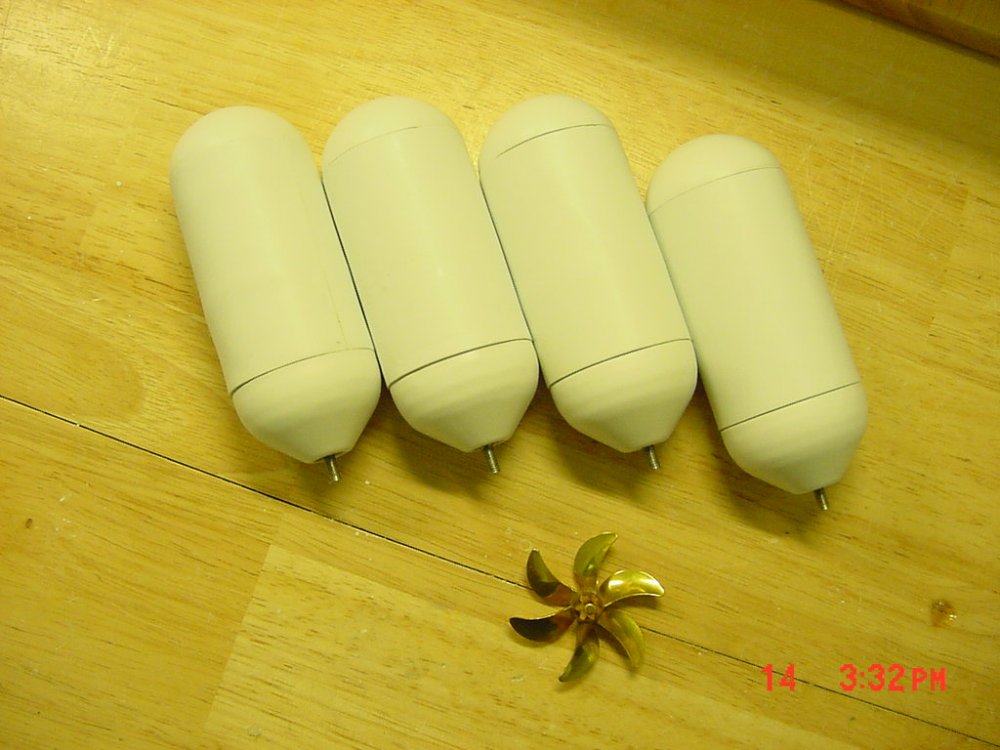
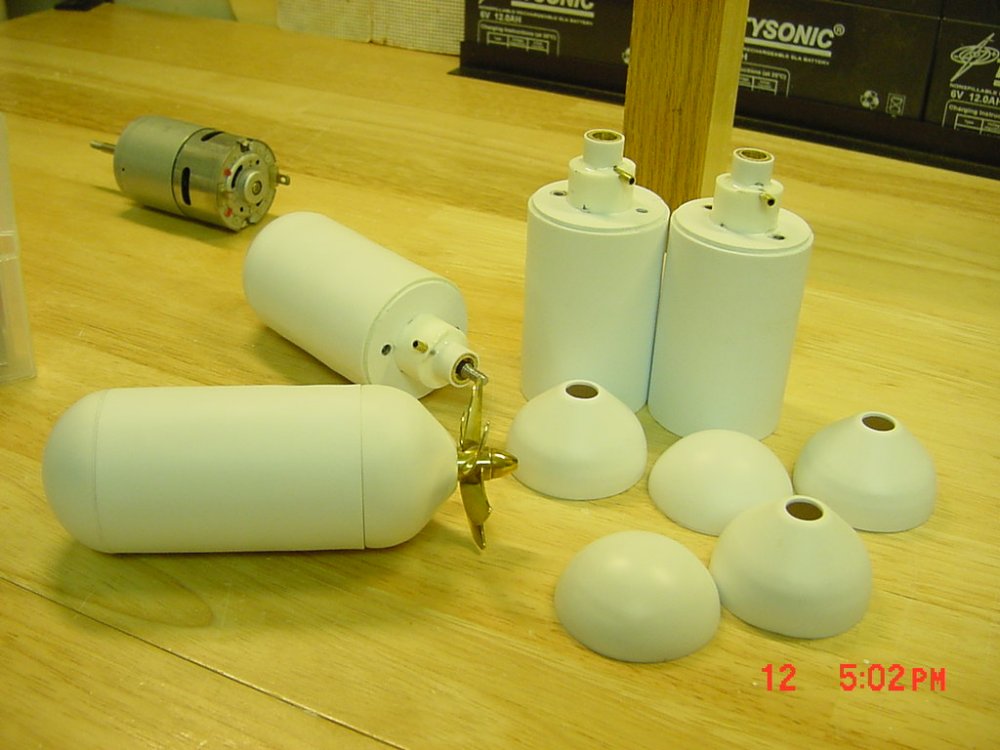
Thanks guys, I'm humbled! I now have four pills, errr, pods. I now have to make the internal braces to support the front shaft and hold the cowlings (note the big gap in them). When I'm done, the back ends will be sealed on with silicone RTV, it'll also fill the gaps. The front cowlings (where the props are) have to come off for oiling access. Speaking of that, I still have to fill the front of the tube sockets with silicone to make a water tight seal. These will be completely underwater, so I'm sorta building four submarines! - MT

-
AWESOME work! I can appreciate all the changes he's made. Not to mention the difficulty of taking weak material like styrene and adding brass hinges and other stuff. And yes, I bet he doesn't transform it often. Just the paint alone starts wearing off! Great engineering!!!
-
Yap, I be knowticen' : I forgot to mention, that day I used it, I slept lowsy that night. I was all hyper. I didn't think much of it because I was on holiday and going back to work the next day (who likes to do that). - MT
-
So we've got a fair share of various model companies out there.
MechTech replied to Spatula's topic in The Workshop!
It's not confusing. In the early 90's Ford couldn't build a reliable minivan so they bought the Nissan quest (called the Mercury Villager now). I've got one. It's got Ford and Nissan stamped on all the parts! Moral of the story, you gotta look in the box. Imai isn't known for they're accuracy, but I've got a 1/144 F-20 Tigershark that has great detail and accuracy. The weapons weere excellent too (often overlooked - especially in 1/144)! - MT -
So we've got a fair share of various model companies out there.
MechTech replied to Spatula's topic in The Workshop!
I agree with most of Dave's comments. On another note, Revell Germany is TOTALLY different than Revell USA. I've got two 1/144 helo's from them (Chinook and NH-90). They have everything including the screw holes represented! Excellent engraving too. I just bought the awesome/newly released AN-124. It's got a seperate interior from the outer skin! Unfortuneately there are few companies that you can buy from and get an "ace" every time. Another reason I scratch build or modify so many things! - MT -
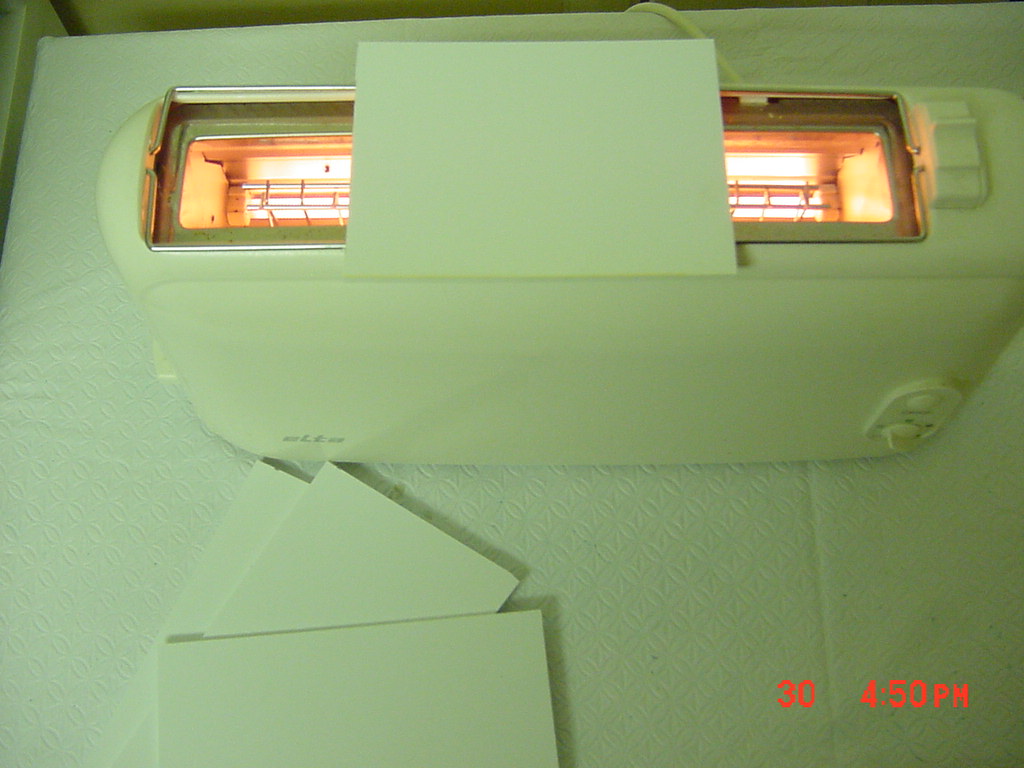
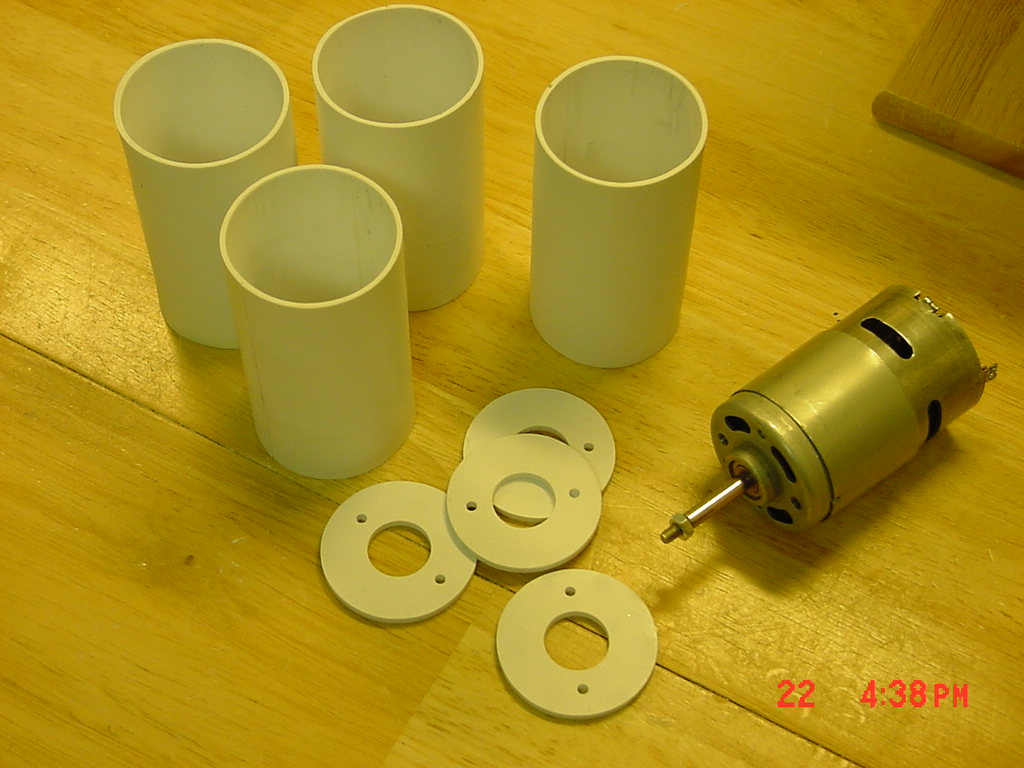
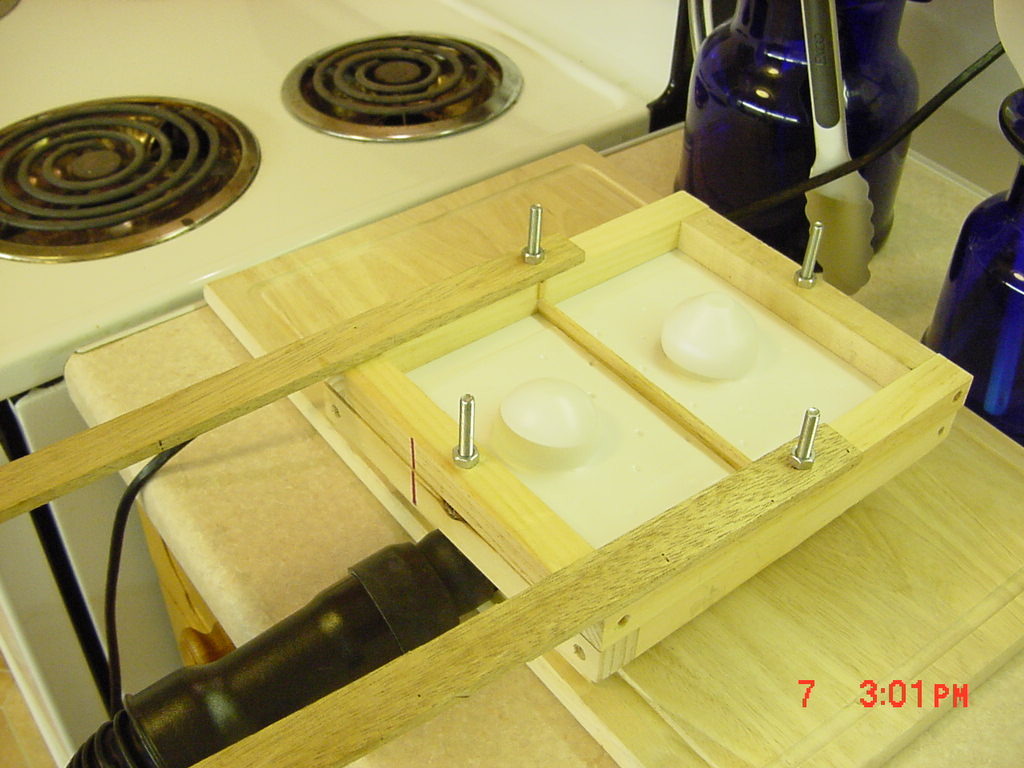
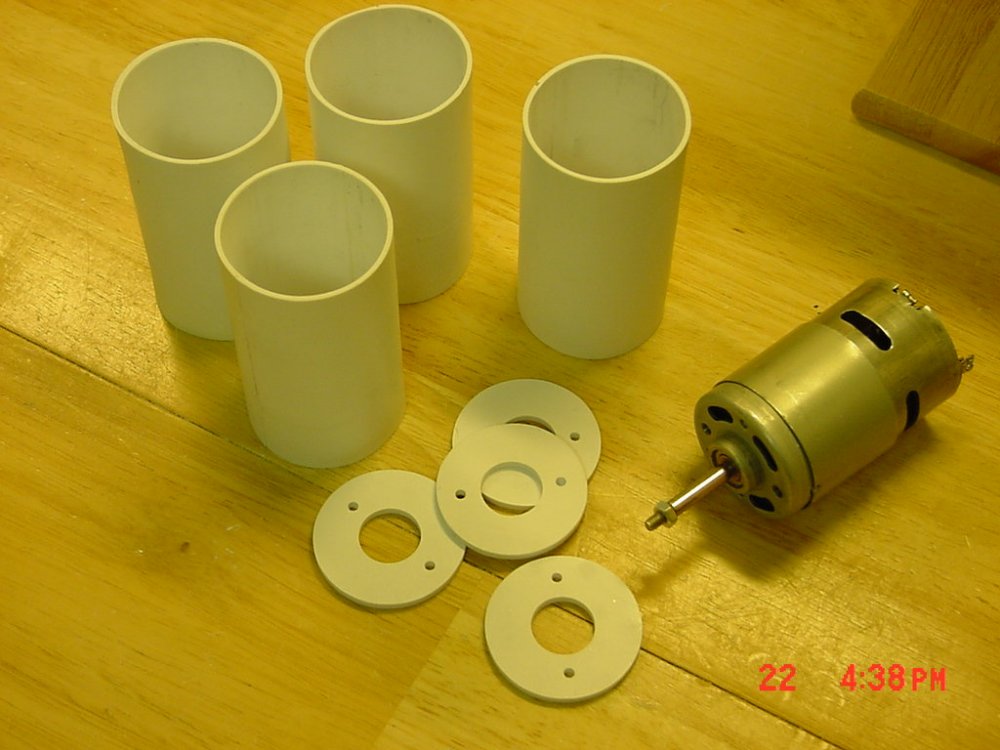
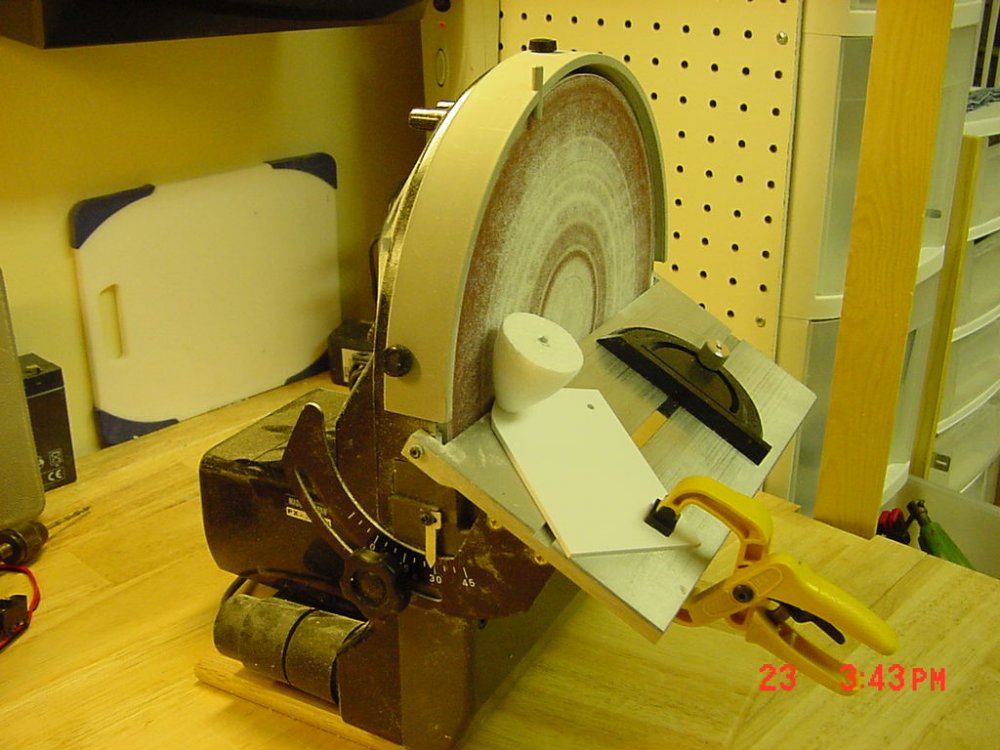
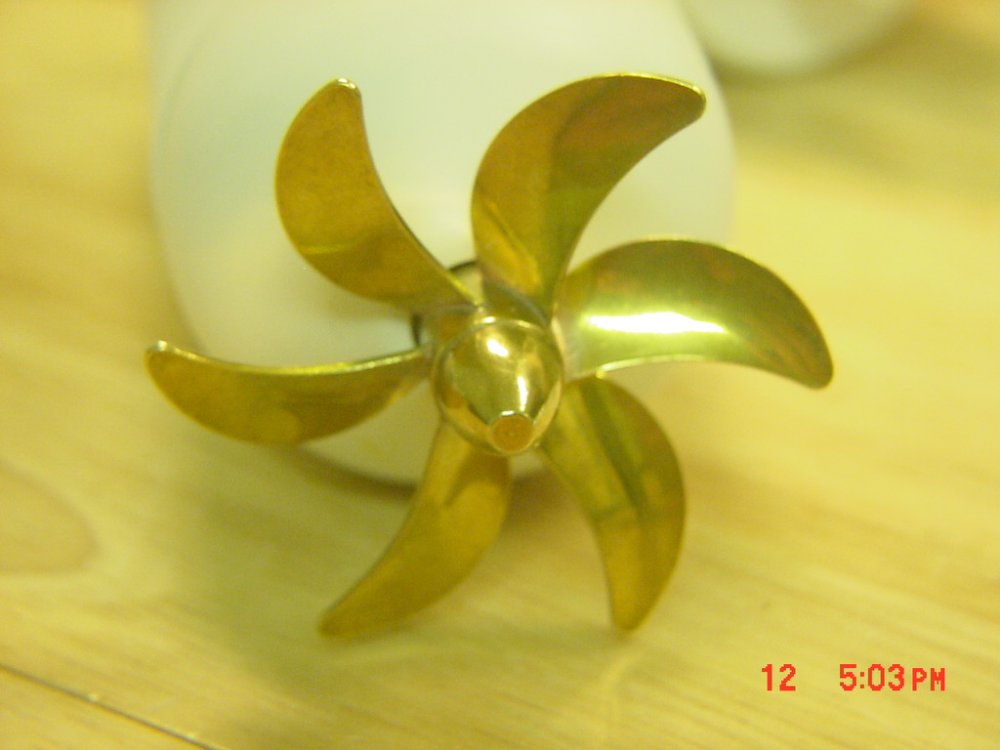
UPDATE 13 SEPTEMBER 06 Still working on the motor pods, they're an engineering feet all in themselves. The small box that the Daedalus thrusters are in on the model doesn't give me much room. They also sit way too high on the design than on a real ship. The main props ALWAYS go as low as possible on the ship for higher water pressure around the prop; that means more power out of your propeller. Here's the tubes with motor mounts. How to make lathed parts without a lathe! Here's a pod with the motor mount glued on, stuffing tube attached, and a small tube epoxied on to that, with a larger tube filled with epoxy around that. The front shaft area has to be water proofed since the cowling that goes around it is not able to make a complete seal. The MDF male form for the vacuum forming the fron cowling is in this picture. The paper cut out is my guide for making prop shaft braces to fit around the plastic prop shaft supports. This is what I had to make before I could do any vacu forming (with cowling sample) Vacuum forming cowlings; hot of the stove top! An assembled pod (goes together like a plastic Easter egg - looks like a pill with a prop on it ) This was as hydrodynamic as I could get with the short length available inside the thruster box. One of the 50mm props, I love those curves! What to do when not building (this is all Japanese and I made it so it's still fits the thread ) Giant Shrimp, Somen, and Edamame! Glad I already had dinner tonight! - MT


-
Thanks for the heads up! I had no clue. Like I said this stuff was new to me, but now I know better! I'll probably reserve it for areas requiring higher strength. That's the great part about these forums, someone always knows something you don't! Thanks! - MT
-
Hey guys, I accidentally discovered a new type of glue that uses a different type of non-stinky solvent. The solvent in it is Trichloromethane Methylene Chloride. This stuff has no solvent smell and it works fast! You probably won't get headaches from using it in large quantities either (though some of you might miss that ). Still use good ventilation though!!! "Trike" can irritate your lungs/skin badly. This stuff is perfect for those of you in small apartments or are tired of your wives complaining about the smell. It's water thin, works and dries fast and is a very strong solvent! Works great for dissimilar plastics joining too! The brand here I've got is called EMA Plastic Weld ( http://www.ema-models.co.uk/shop/prodpages/page-PPC-2P.html ). For the U.S., Plastruct makes it ( http://www.plastruct.com/pages/CementGuide.html ). This stuff has been around awhile, but I have never heard of it. I've used about everything on the market and I wish I knew about this stuff a while ago so I'm getting the word out! It cost me £2.50 / $5.00. Many of you might have used it, but I've never seen it or heard of it before. Hope this helps someone! - MT
-
Lookin' great! I wondered if you got any further along these past couple of weeks. Don't give up and finish the set. - MT
-
Clean paint jobs. I haven't seen one of the 1/170th's built up in a while. Zaku style, now that's different. - MT
-
Don't worry, there's a shallow ramp area I can safely keep her at arms length. Will post pictures soon! I didn't expect the boards to be back up yet. - MT
-
It's too big for the tub! I'm gonna try in a shallow area in a nearby reservoir. The two halves are different displacements so independantly they will be different. I'll have to put them together and then add everything inside to check balance. Gettin' closer to launch day... - MT
-
Thanks haterist! I sure hope it floats! If it doesn't, it's gonna make one heck of a static display! I hope to get more done on the motor pods this week - stay tuned - MT
-
Hey Isamu, if you've got one of the 1/72nd scale Imai kits, they're pretty good all around. Hope it works out for you. - MT