MechTech
-
Posts
4650 -
Joined
-
Last visited
Content Type
Profiles
Forums
Events
Gallery
Everything posted by MechTech
-
He's stripping ! Now you can have a stealthy and translucent SDF-1! That kit looks like it has better detail than the old one I have! Keep up the good work and WELCOME! - MT
-
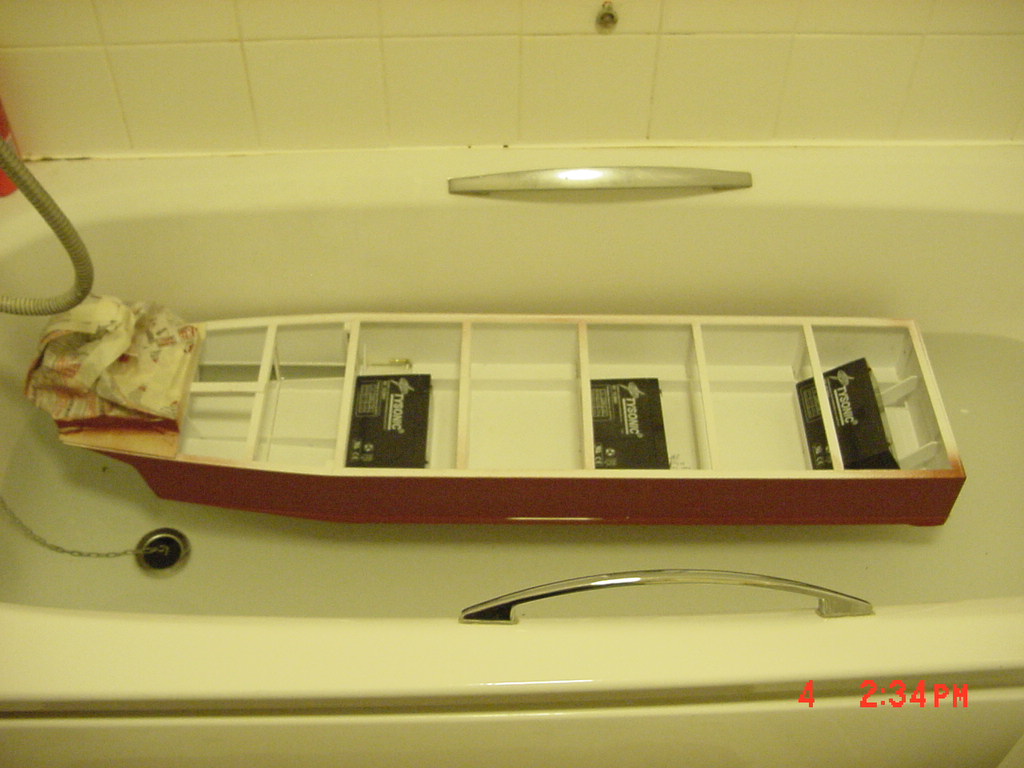
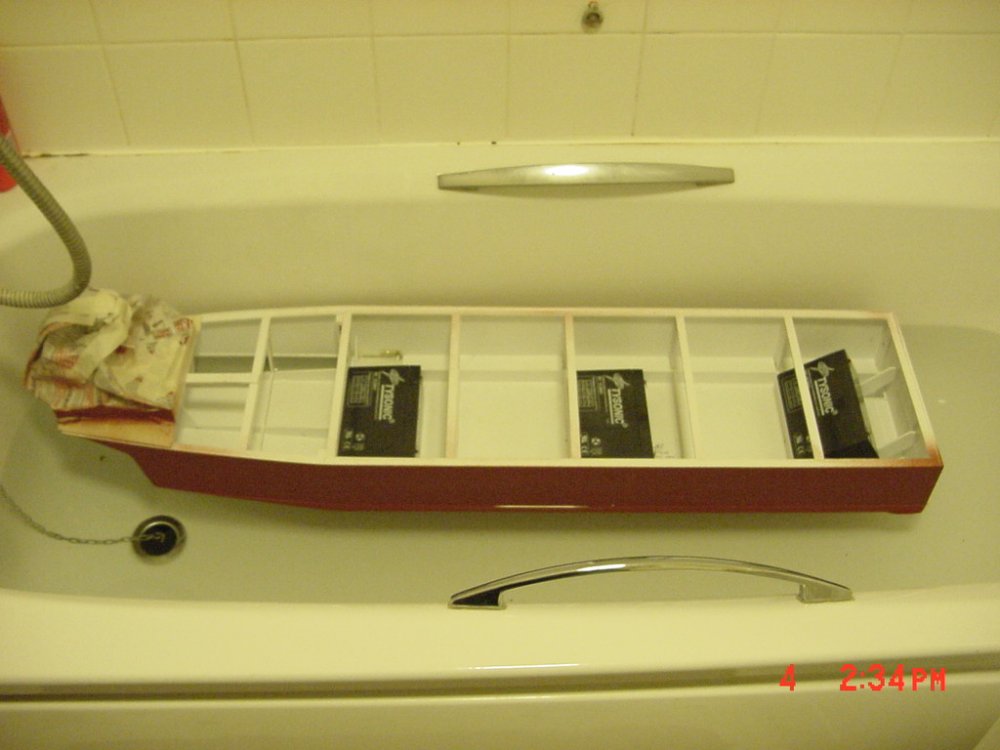
UPDATE 4 DEC 06 FLOAT TEST! YEA IT WORKS! NO PROBLEMS! [attachmentid=38635] Here's the front. It's so stable, you can rock it with the 4.5lb battery on top! [attachmentid=38636] Here's the back with all three batteries (13.5lbs). Plenty of buoncy to spare! I think I'll have to add some weight to the hull (still have more goodies to put on anyhow). When the winds and rain let up, I'm going to the reservoir! - MT
-
My favorite stuff is goo gone: http://www.magicamerican.com/googone.shtml I haven't had it ruin any styrene stuff and I wash any residue off with off the shelf isopropyl alcohol it doesn't seem to mess with paint either. It;s probably fine for ABS then too! - MT
-
At last someone makes one! Looks great! - MT
-
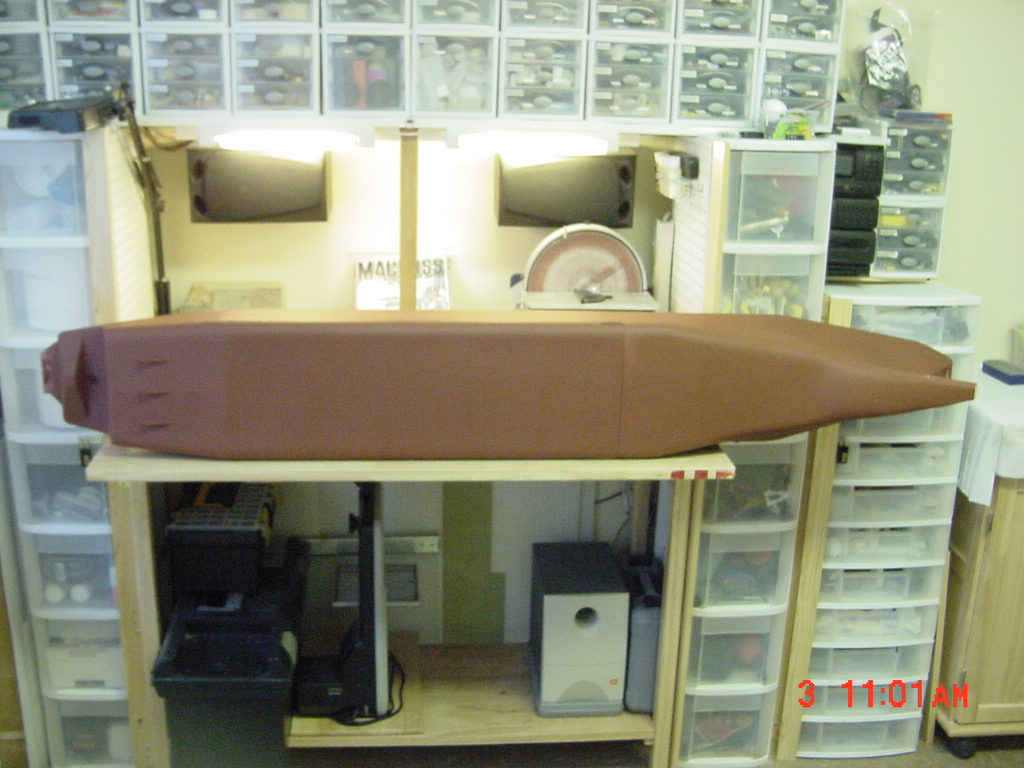
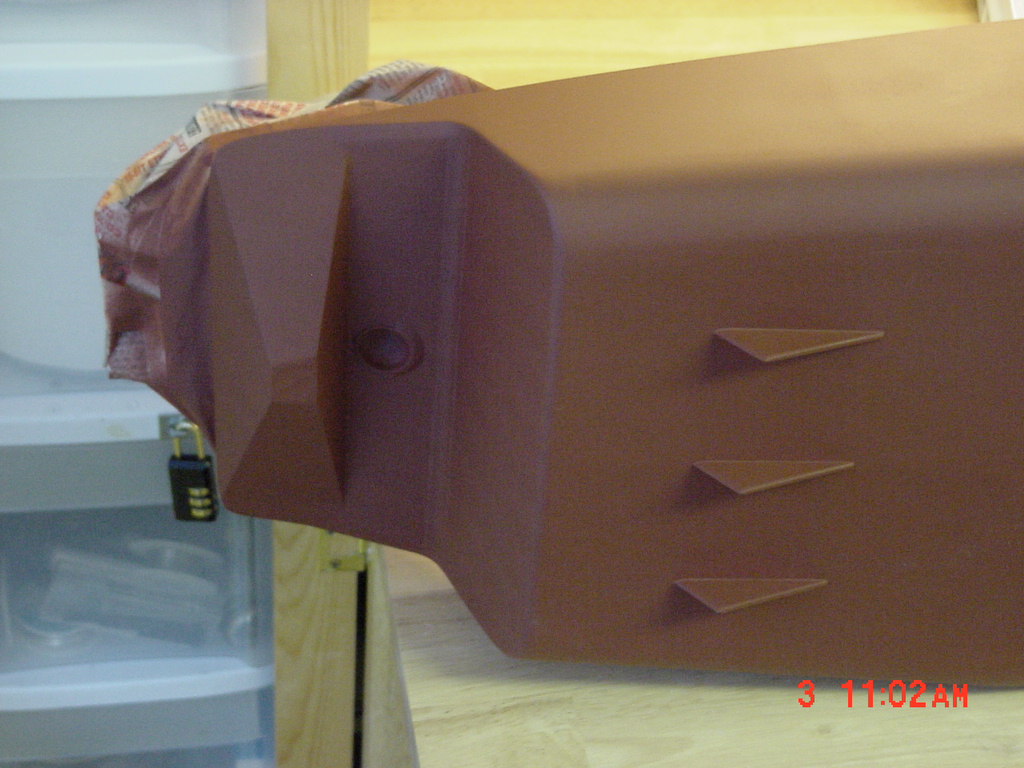
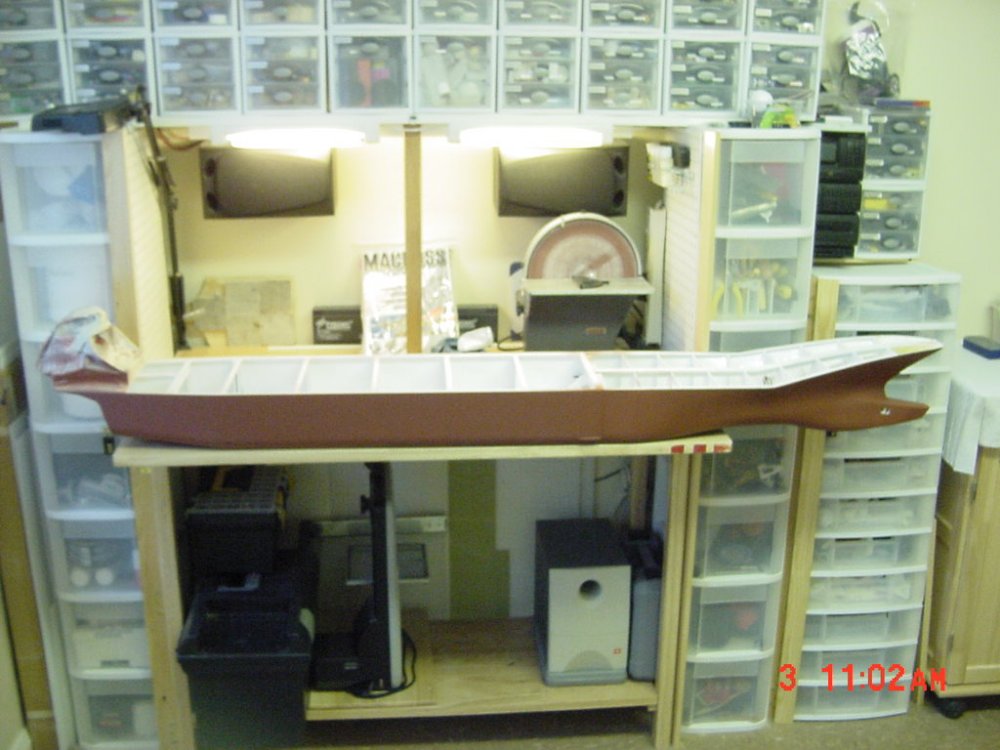
UPDATE 3 DEC 06 PRIMER!!! Hey SDF-1, sorry about the files. Funny thing is, I can't open them either!!!??? If you know of another way to post these, I'd be happy to do it. Like how some people post the picture directly into the thread - I don't even know how to do that. Thanks for the compliments Thor. Each thruster housing in itself is watertight. The covers with silicone RTV seal the back - that's easy. The front has a plate that holds the motor on with two screws. Each plate has a tube assembly filled with epoxy around the shaft seals. The shaft seals are a grease seal on the front followed by two brass rings that also seal the shaft. The area between the brass rings is filled with silicone oil (the silicone oil won't harm the styrene). If you look a few days back you can see the oil fill spouts. The primer revealed a few flaws (like I thought it would). You can see the width of the beam a little bit better now. After I glued the three skegs on the back (that's what they're called on a surfboard) it reminded me of a surfboard! [attachmentid=38624] Side [attachmentid=38625] Bottom [attachmentid=38626] The stern (three hydrodynamic skegs on the right). After my wife and I looked at several drawings, we agreed this type was the closest to canon (verses having a squared of rear right on top of the motor box). This week it's float test time!!! - MT


-
Thanks guys! Some more plastic work to the rear (conflicting drawings to choose from) and it's paint time! The front half has primer on it now! I'm changing the actuators for the stabilizers (old ones too weak), and it's time to make her ready to run. I've gotta float test her to figure out where the batteries go best. Maybe this weekend! - MT
-
Thanks guys! The scales are tipping now towards the show colors! I'm gonna have to work on some shades of blue and red. Maybe dark gray for the upper deck??? - MT
-
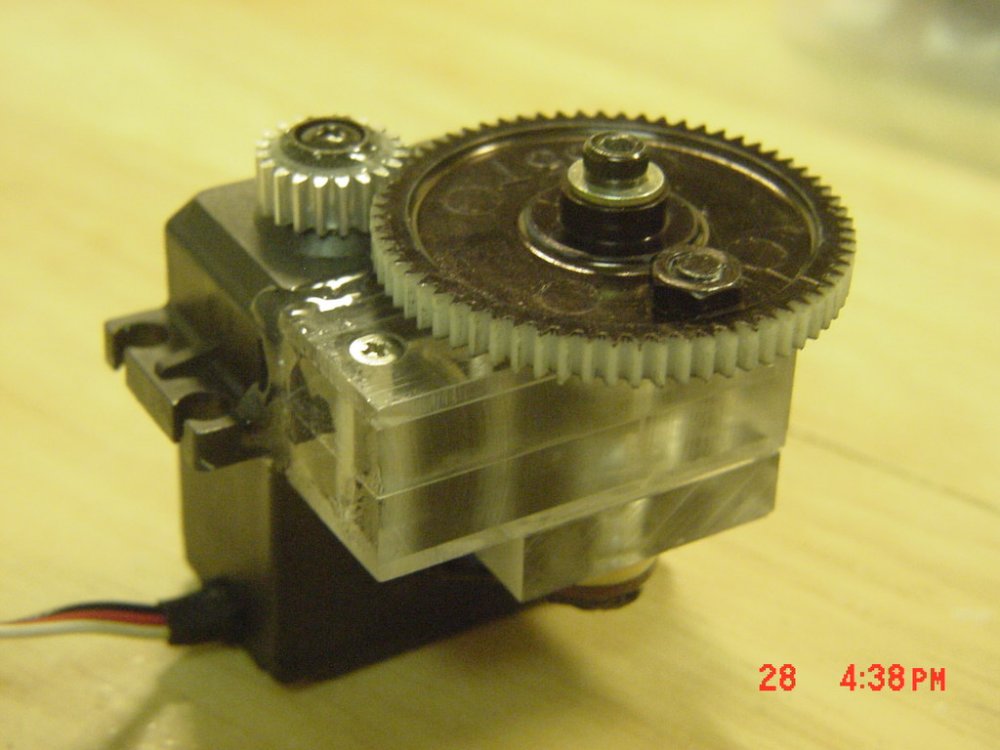
UPDATE 28 Nov 06 Thank you honneamise for the humbling words. I've been wanting to build something like this for about a decade now. It's all those years of collecting parts and models to build this thing that help keep me going. Not to mention tonight's test! Your work is awesome too by the way. I always wanted to build models professionally, but it's not my calling. Thanks isamu too! I'll let you know when it's ready to go! It might be spring time by then!? Yeah! We got steering now! If the MPEG's work, you can see for yourselves... [attachmentid=38553] This is a Futaba 3802 sail servo (brass gears and bearings) heavily modified. The stop pin on the inside is removed to allow 360 degree constant rotation and the potentiometer has been moved out to the external gear (you can just see it under the acrylic box). What used to drive a giant sail arm, now spins a pinion gear. That turns the spur gear giving me more power and a slower steering rate. The giant nut on the spur gear is part of a stop mechanism (underneath) to keep the gear from ripping the potentiometer apart should a bad radio glitch occur. [attachmentid=38554] Steering in action (MPEG). [attachmentid=38555] Steering in action showing the gears working (MPEG). This is only a test and all of the mountings and hardware still need cleaning up and lubricating. But all work and no play... I borrowed the receiver setup from my other 1/200 ship for now. I can't seem to get the MPEG's to work. Anybody got some ideas? - MT Steering_Side.MPG Steering_Below.MPG
-

1/55 Bandai "J" Head Laser Recast - Anyone Doing Plastic?
MechTech replied to Skull-1's topic in The Workshop!
Did you guys try the brass rod thang? Or just use brass tubing? Try breaking that! Besides, I know you're not playing with your toys . - MT -
Nice custom! Yeah, I could see AMD sponsoring mech racers. Hmmm.... - MT
-
Awesome work guys! I know you got lives and everything, but it's about time!!! - MT
-
Nice BIG FSS kit! I had the Led Mirage with flame thrower in 1/100. Those designs got style - MT
-
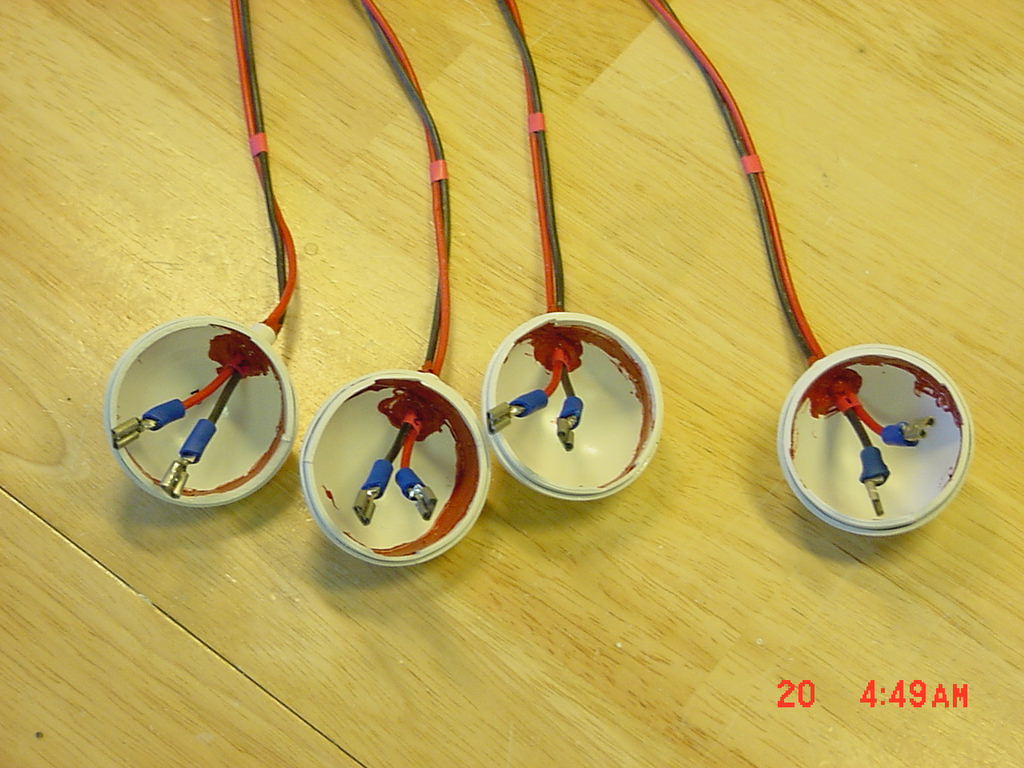
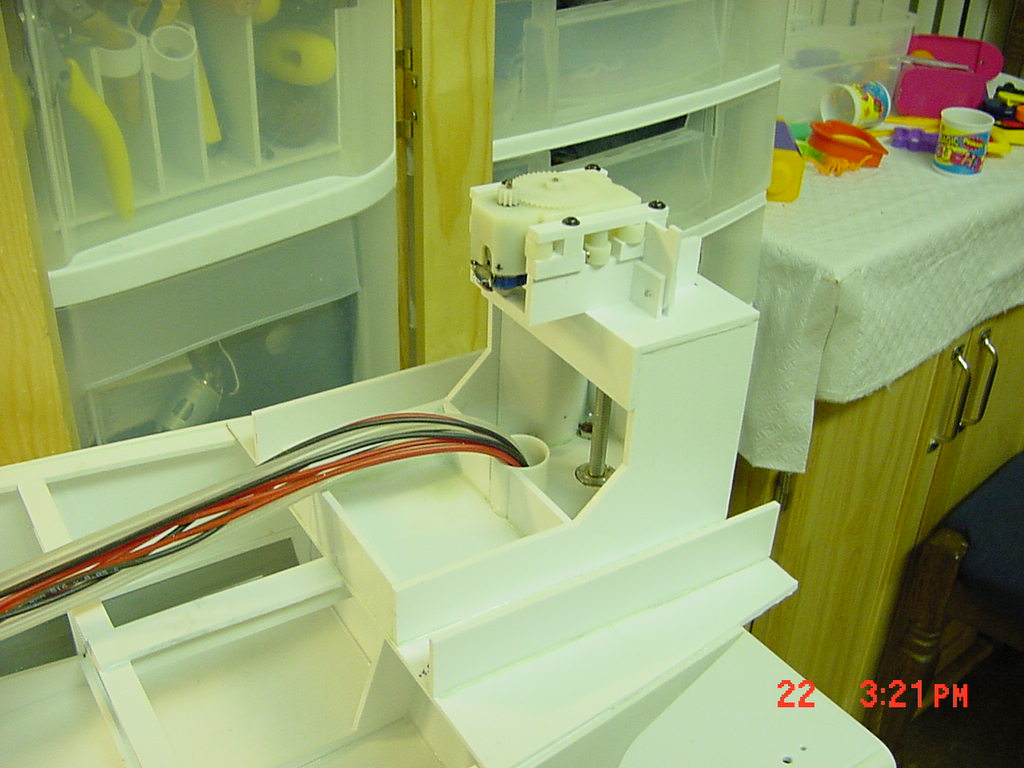
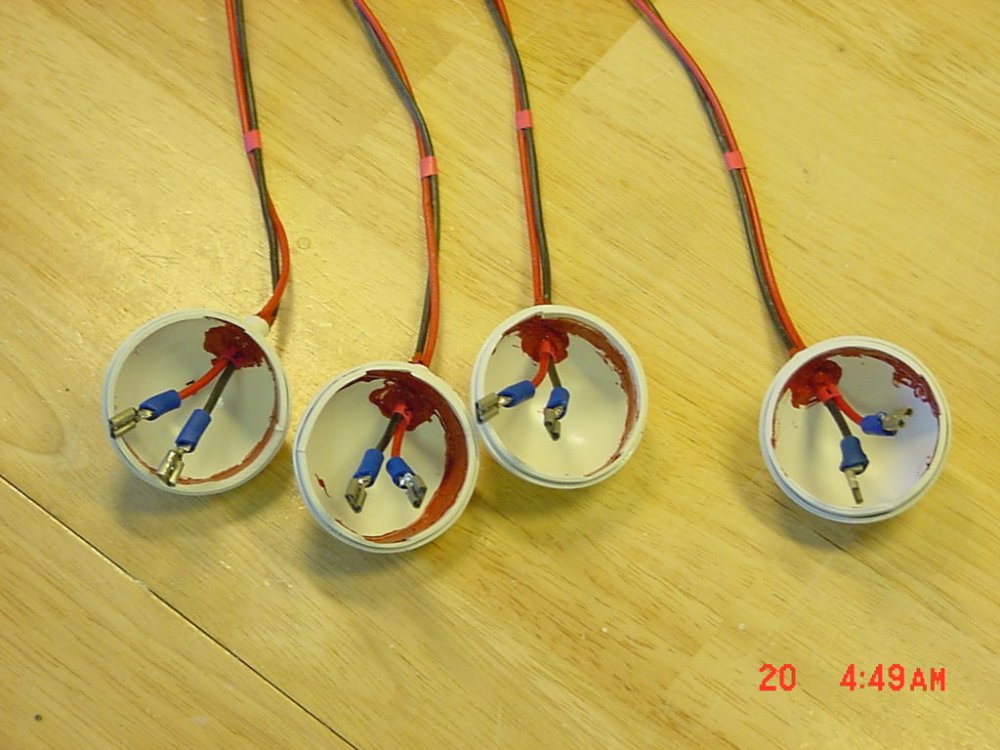
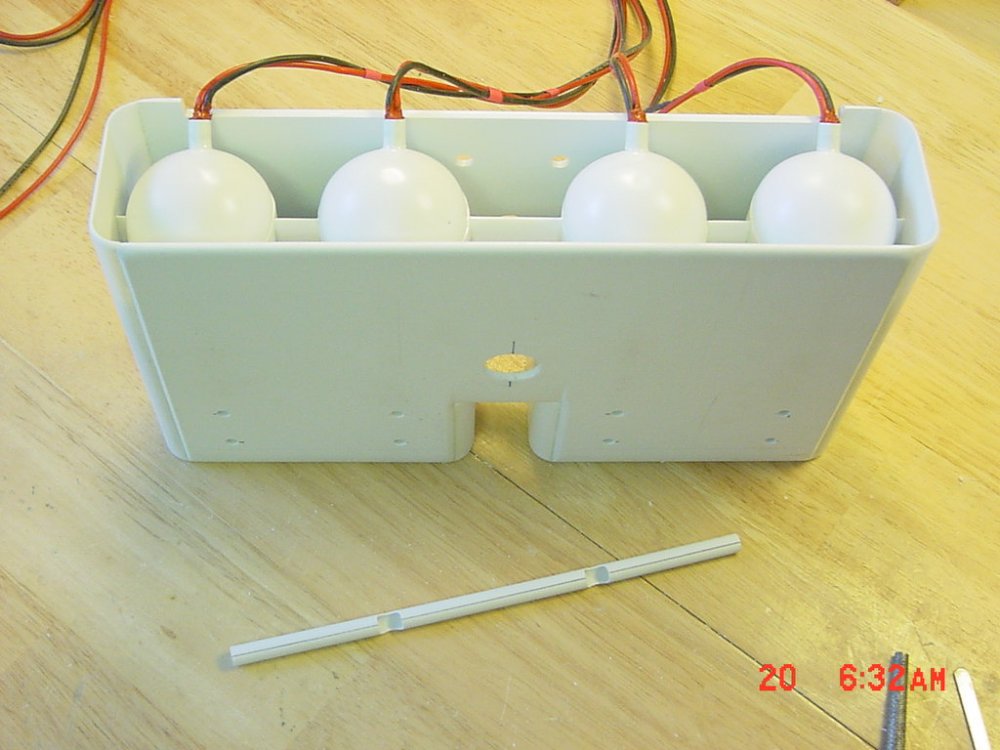
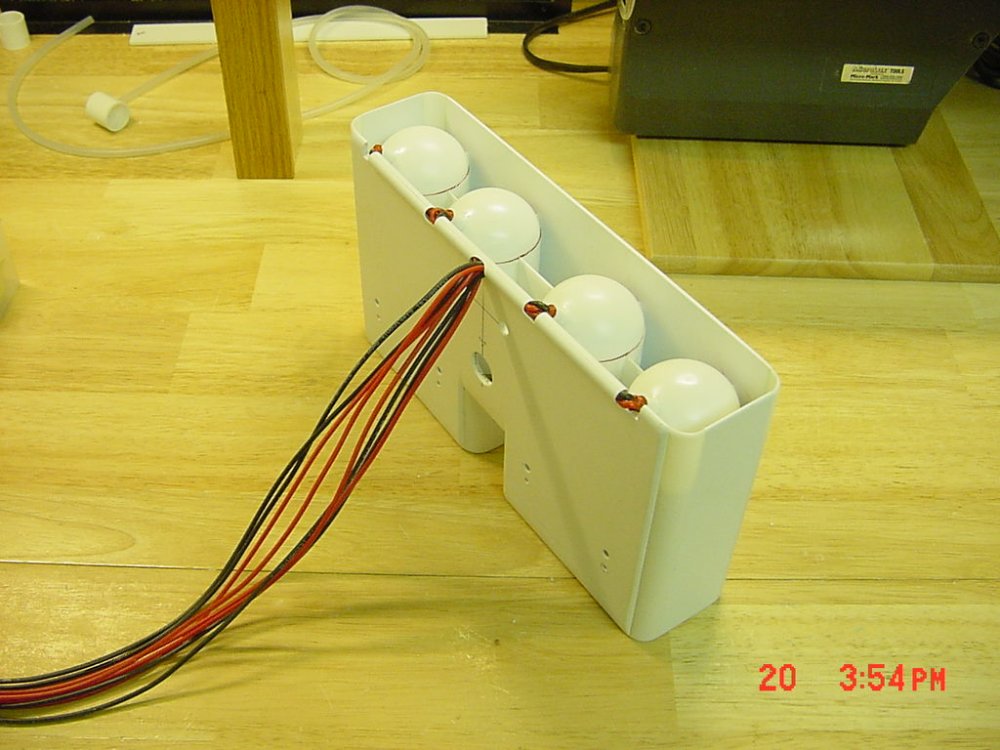
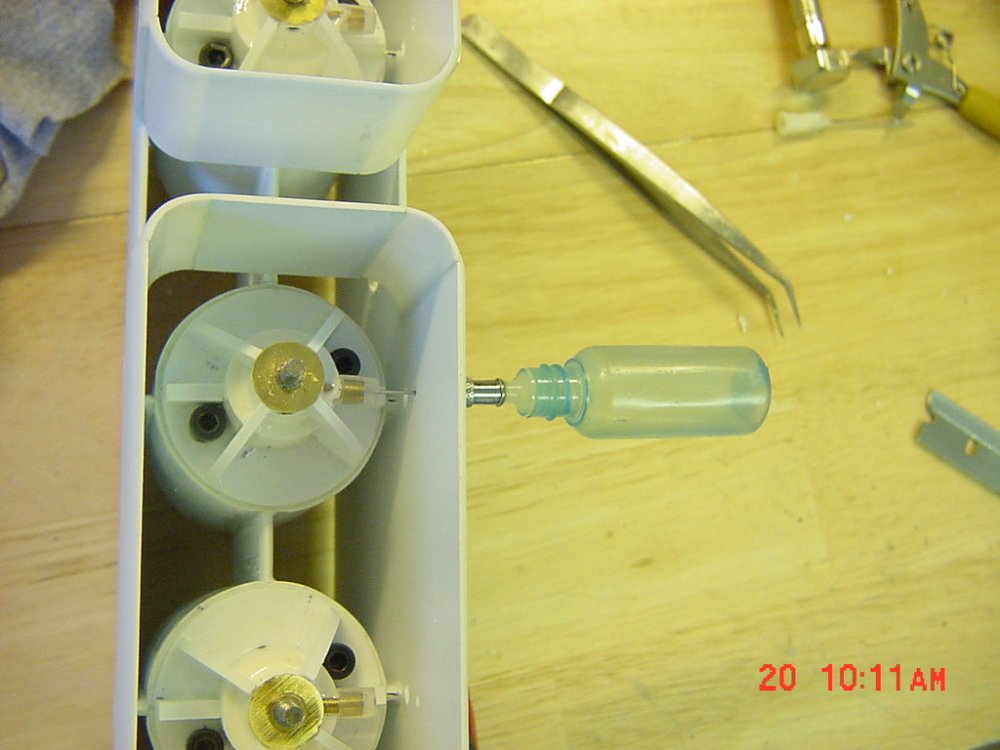
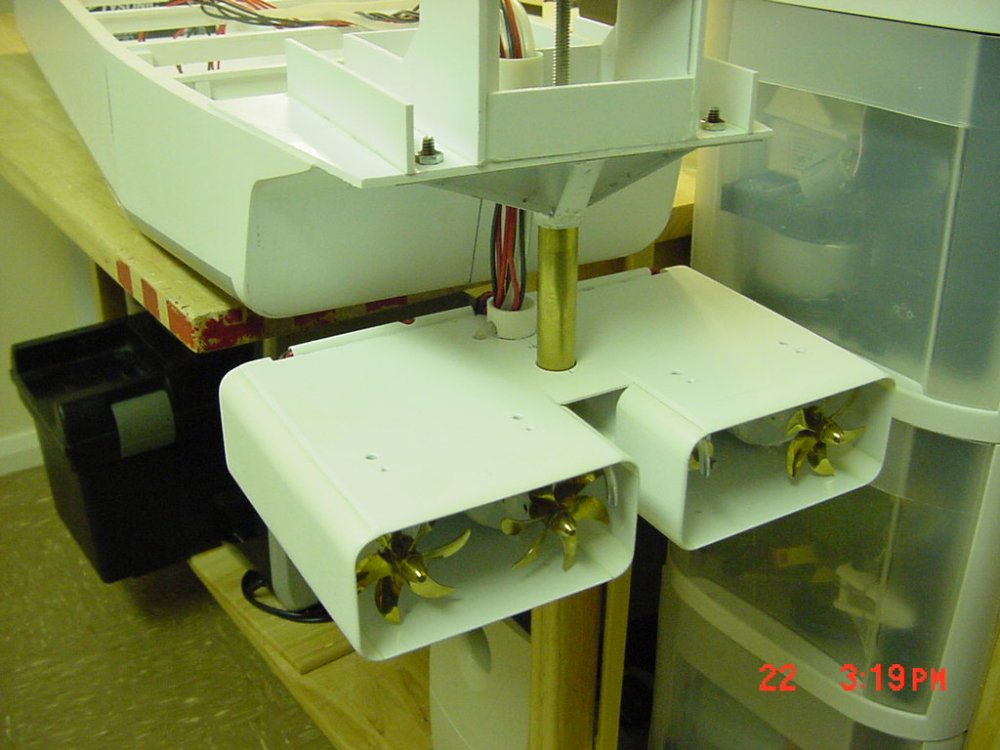
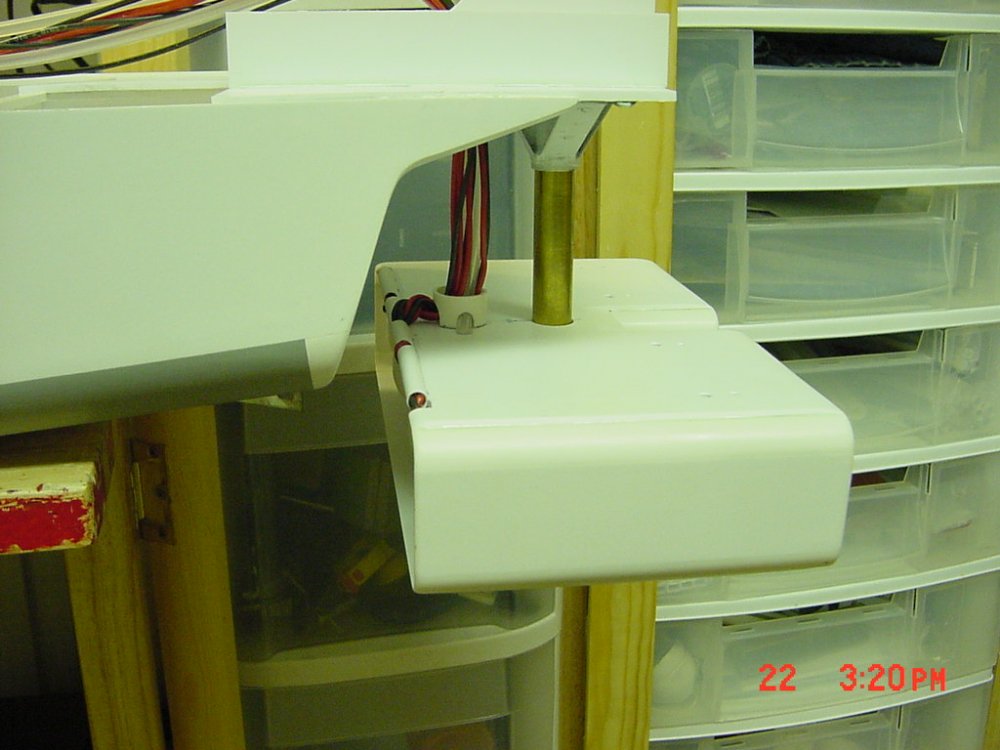
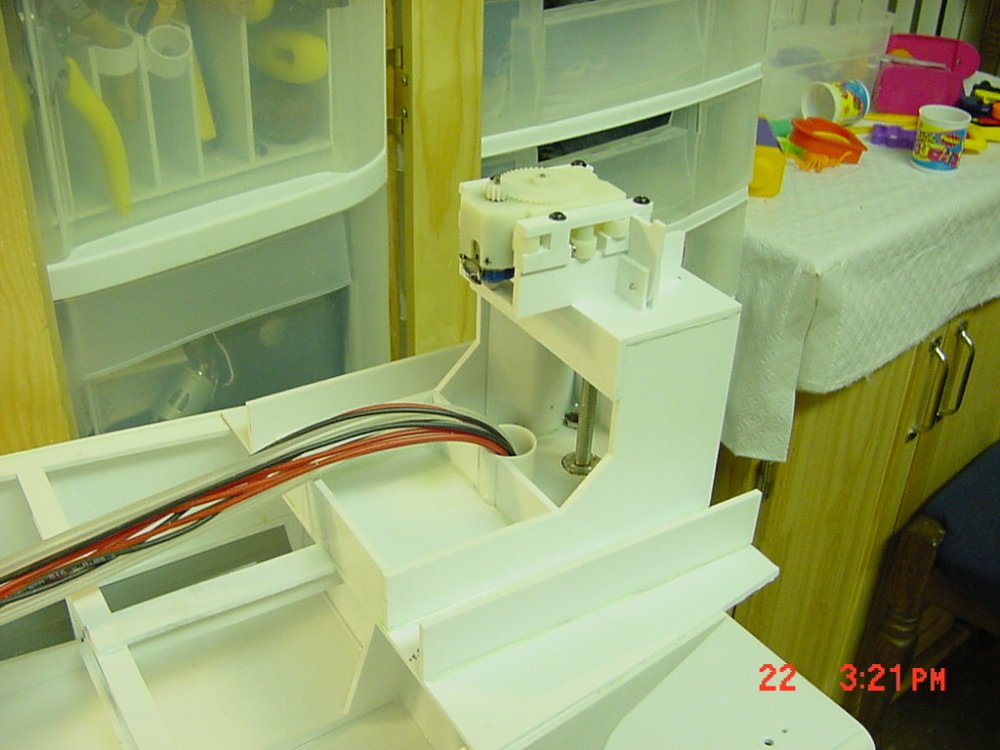
UPDATE 16 Nov 06 Almost done with the motor pod! [attachmentid=38391] Sealing the wiring connections. [attachmentid=38393] The wiring harness. [attachmentid=38394] Completed wiring of motor pods and ends sealed up with silicone RTV(note red rings). [attachmentid=38395] Oiling points (clear silicone tubing sealed with clear silicone RTV) Insert an oiling needle and you still have a seal (this way I won't have to keep pulling off the cowlings). [attachmentid=38396] Embilical chord and support shaft (one propeller is on back order). The silver rods just visible on the insides of the two boxed ends are water pick-ups to cool the speed controlls. [attachmentid=38397] Here's another angle. The wires come in from the back, and the water tubes on the sides. They all slide up and down freelly through the embilical chord pass through. NOTE: this is only a test fit, not finally assembled, it still needs paint before completion. [attachmentid=38398] The embilical chord pass through. All the cables and tubes will be bundled together with a sleeve to make passing through here easy and smooth. (my children's work area - my tablesaw - in the backround). Back to work! - MT
-
I was wondering if someone was going to post that link. Thanks Dave! - MT
-
So far it's about a tie. A lot of help you guys are . I'm still on the fence about this one... - MT
-
That rocks! It makes me wanna sing the Canadian national anthem. Oh Canada... - MT
-
Gerwalk Mode Shoulder/Arm Position - What is anime accurate?
MechTech replied to Skull-1's topic in The Workshop!
Do these help? [attachmentid=38315] [attachmentid=38316] Hopefully these official drawings will clarify things. - MT

-
Gerwalk Mode Shoulder/Arm Position - What is anime accurate?
MechTech replied to Skull-1's topic in The Workshop!
Do these help? -
Nice work! I used to think it would be cool to be a member of thunderbirds, until you see a GIANT Tachikoma looking into your windshield! - MT
-
Thank you everybody for the compliments and comments! Please keep the suggestions coming! - MT
-
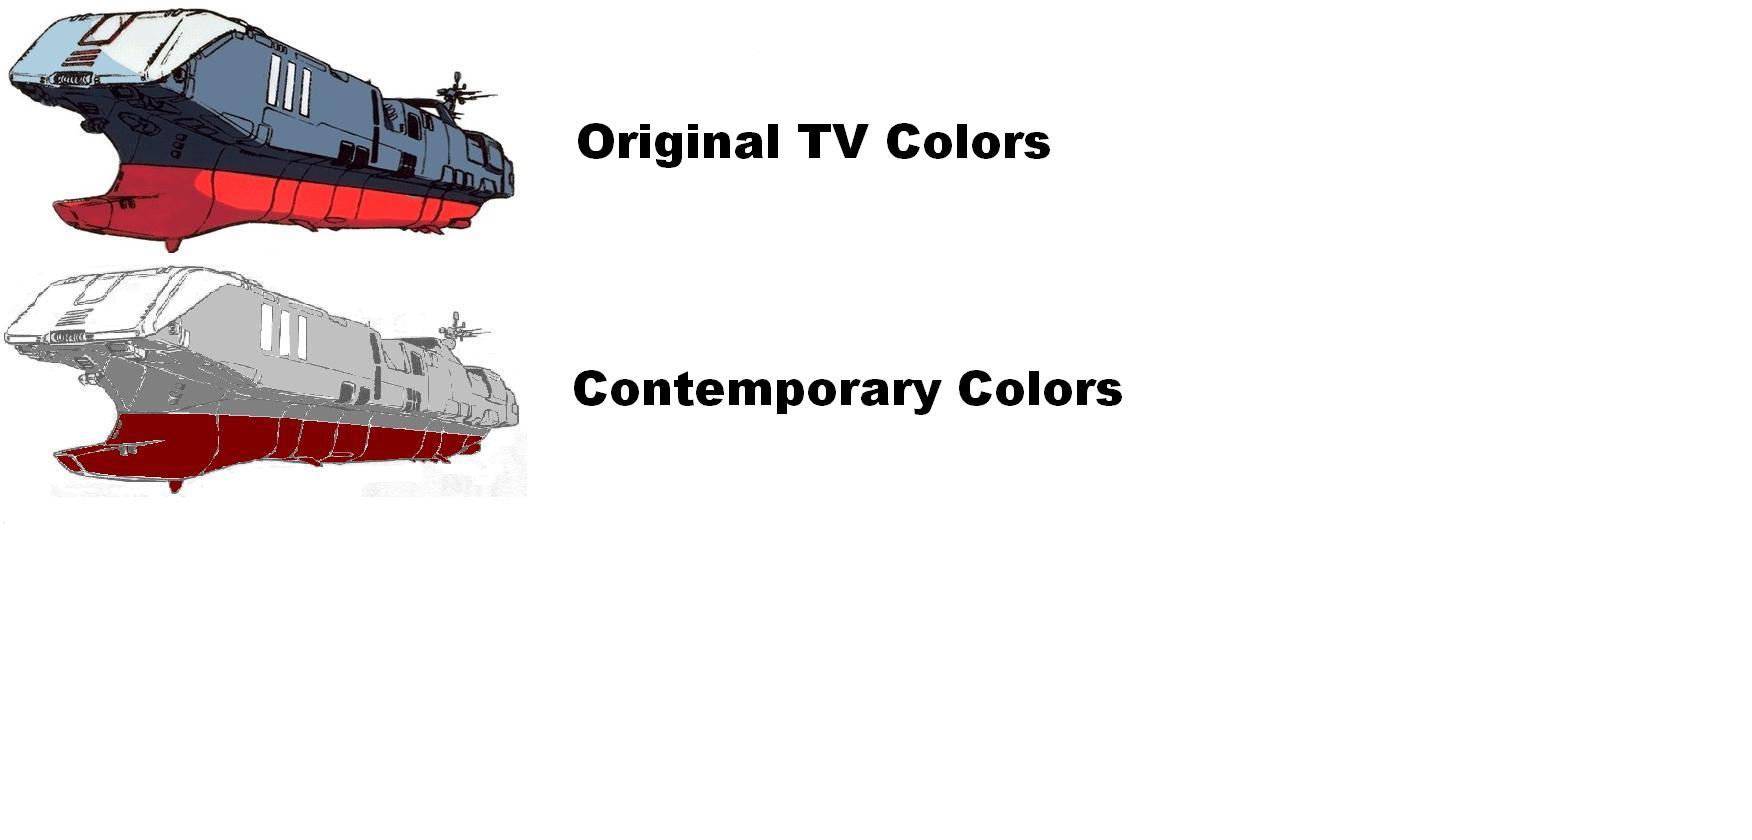
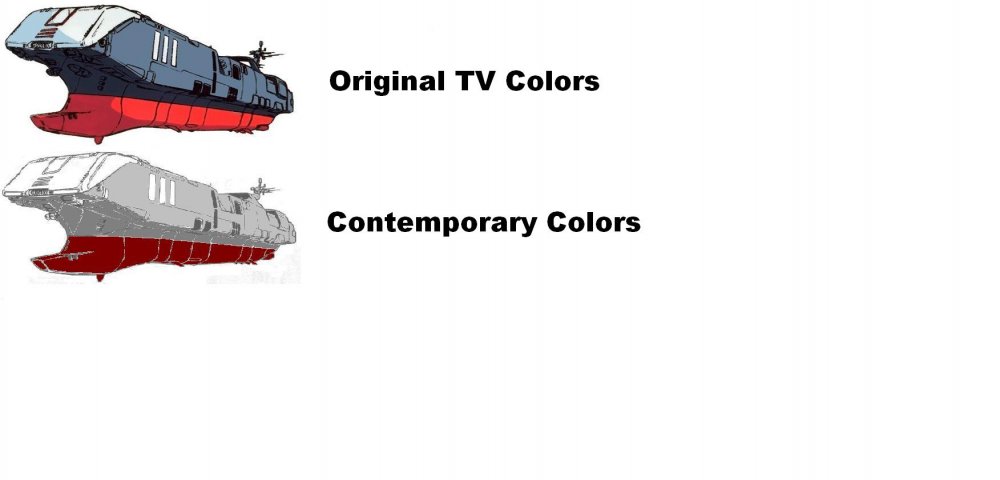
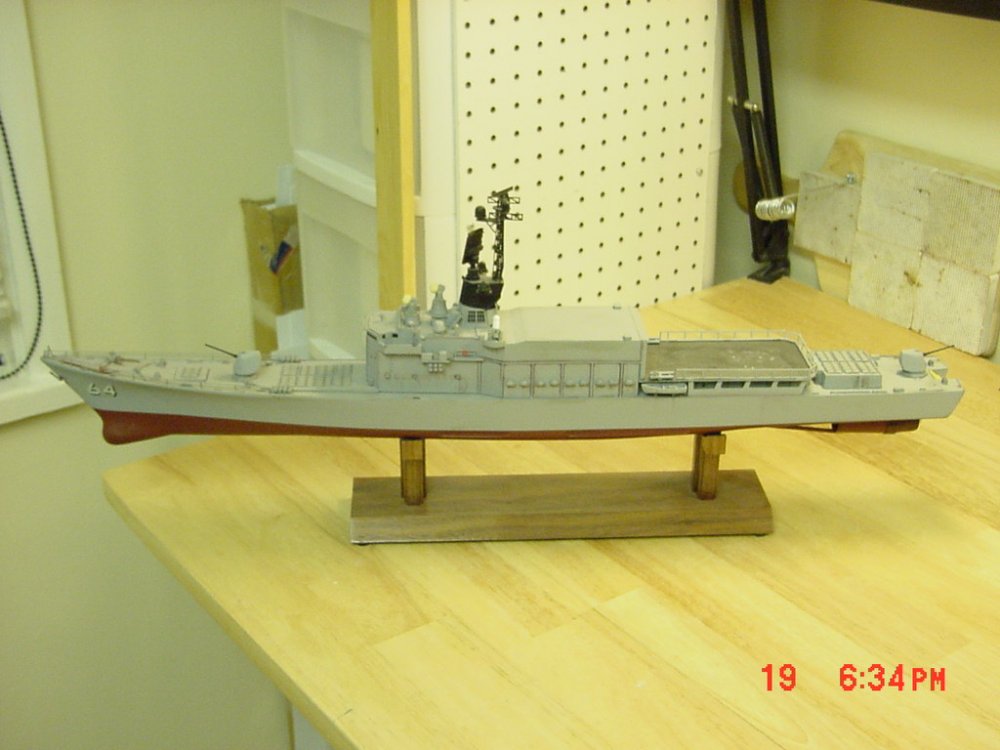
Hey EVERYONE, I need your help! All you artists out there that have been studying Macross art, (some of us for years now), I'm finally getting to the point where I need to start painting the LOWER portion of my 6 foot long Daedalus model: 6 Foot Daedalus Build Up IF the polling buttons work, (the polling buttons didn't work) the choices are: 1) The traditonal Blue/Red/white scheme from the TV series ------------------------------ OR --------------------------- 2) A contemporary naval scheme (like the low viz schemes on the valks, not canon, but cool). The attached picture has a ROUGHLY colored in contemporary naval version for color comparison. [attachmentid=38294] ROUGH color comparison of the two. Here's a 1/10th scale model of the IJN Battleship Yamato to give you more "contemporary" colors that I'd use for that scheme. Battleship Yamato Colors [attachmentid=38296] [attachmentid=38297] Same actual colors used before - light gray and ruddy brown. Either version will probably have an asphalt/dark gray colored covering like on most ship flight decks. Feel free to post other visual aids or suggetions. I'm really stuck on what color scheme to use. Thanks for your time and inputs with helping me build this project! - MT

-
Lookin' Good! You might as well go all the way and put a colored lens in with reflective backround like that one guy did a couple of months ago, can't remember the name. Keep it up! You guys seriously got me thinking about gettng a 1/55. Can't beat the classics! - MT
-
I'll never look at a box of sugar smacks at the store again ! - MT
-
I really love the fast pack portion of the 1/170 kits, they're perfect for 1/200, but are stretched on the 1/170 bodies. Hey Bushy, you might want to get some "N" gauge figures to go with your kits. Find a good train shop/hobby store. The ones in the factory sets are actually 1/100 (TOO big). The vehicles are too big, but perfect for 1/100 stuff. - MT
-
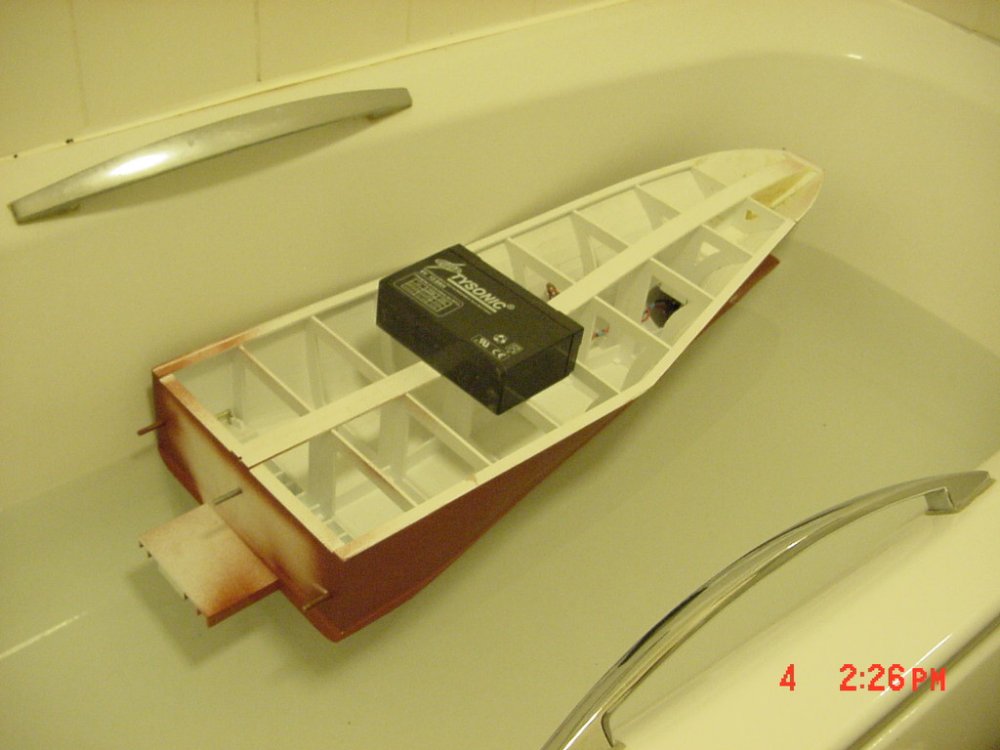
Thanks guys. I'm actually waterproofing some potential week spots and finishing a couple of others not finished yet. I'm hoping to at least put it on the water soon! Hooking everything up will be the easy part. Sailing to America, well, let's just say it's not a Coast Guard registered vessel. - MT