MechTech
-
Posts
4679 -
Joined
-
Last visited
Content Type
Profiles
Forums
Events
Gallery
Everything posted by MechTech
-

Are Variable Fighters Aeronautically Feasible?
MechTech replied to Hereticpoo's topic in Movies and TV Series
I believe a VF-1 could fly (fighter mode). Gerwalk mode would be fun to see work. The wing loading is the issue. As everyone else said; thrust to weight ratio. If the wing will take the the load, it will work. It might land at 200MPH, but it would fly! The VF-1 is made in a flying profile model, no special "Extra" flying surfaces - with tail-o-vators. Besides, a lawn mower can fly!!! (it was the best argument I could think of next to the whole bumble bee thang). Oh, and then there's that whole possibility of transformation thang too... - MT -
The aerial view looks realistic! Hey, I can see my house from here! - MT
-
Whats Lying on your Workbench MKIII
MechTech replied to HWR MKII's topic in Hall Of The Super Topics
Thanks Fly-4. I'm building foam lined crates! Mustang - I guess every cloud does have a silver lining - Gundam Ole' school goodness. HWR - I was wondering when you were going to release that thing! - MT -
Small destroids? Strange Never seen these resin kits!
MechTech replied to Ranger565's topic in Model kits
Welcome to the boards Vintage Macross? "I think I have everything SDF in 1/200 except the Nosjadeul-Ger and the Gnerl" I didn't know those were made in 1/200!? And yes, if the destroids are 1/200, I'd love to buy/borrow them for more destroids. I don't have enough to properly populate even the front half of my ship! I might have to throw some valkyries in to take up the space. - MT -
Don't forget the married geeks category too! Hey wait, that's me! - MT
-
Whats Lying on your Workbench MKIII
MechTech replied to HWR MKII's topic in Hall Of The Super Topics
Hey Cowie. The barrels aren't bad really. About $92 (US) right now. The average tank barrel is about $10 so these are a good deal (9 pcs). BIG, heavy and a lot of brass. The Kotobukiya guys have it down. My complaint, where were they in the 80's . The Yamato is for when I finish the Daedalus; deadline is Aug 09 - I think I can, I think I can... - MT -
Whats Lying on your Workbench MKIII
MechTech replied to HWR MKII's topic in Hall Of The Super Topics
Well, whatever it is, the "tank" looks great so far! What's on my bench (besides the Daedalus): Speaking of 1/144, I thought this would be of help to someone. I just got my stuff from HLJ today. Some cool tidbits: The polycap set is from Fujimi and has tons of parts for EVERY scale on it. Note the coins for comparison. This is a comprehensive set of polycaps and for a few bucks too! It says "1/144" but that's overly generalized. The Kotobukiya parts are gatling gun muzzles - note coins for size again. Both are musts for scratch builders! Every size you'll probably need for gatlings. The brass barrels are AWESOME from Pit Road. I've got the 1/200 Yamato from Nichimo (52" long) and these are night and day compared to the low detailed stock barrels in the kit. I just need some 75-88mm 1/32 scale brass ammo and I'll be armed up for the BIG 18"-46mm main guns. I love HLJ. I should buy stock in them - MT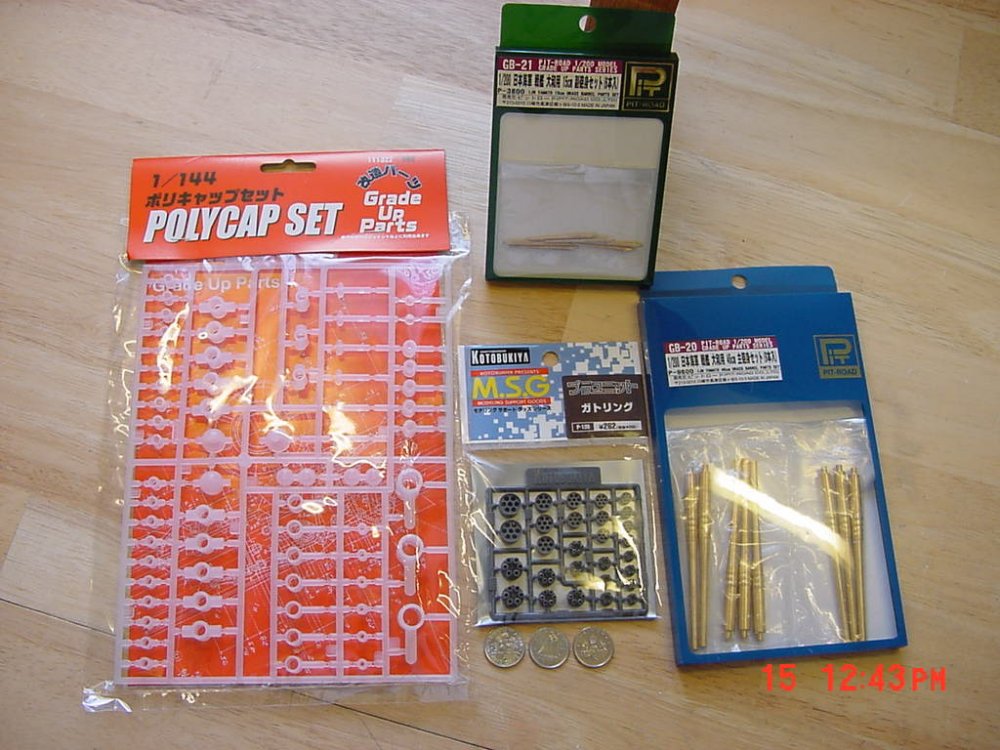
-
Thanks guys! I'm pushing for August 09 for TOTAL completion! Most of the engineering bits were in this part up front. The rest will be down hill from here! The only engineering bits left are an overhead crane (one done), Internal doors, and two elevators on the side. They are easy compared to the ramp which took months all by itself! - MT
-
Small destroids? Strange Never seen these resin kits!
MechTech replied to Ranger565's topic in Model kits
I might be interested if they ARE 1/200! Some pictures with a referance point like a ruler would be great. - MT -
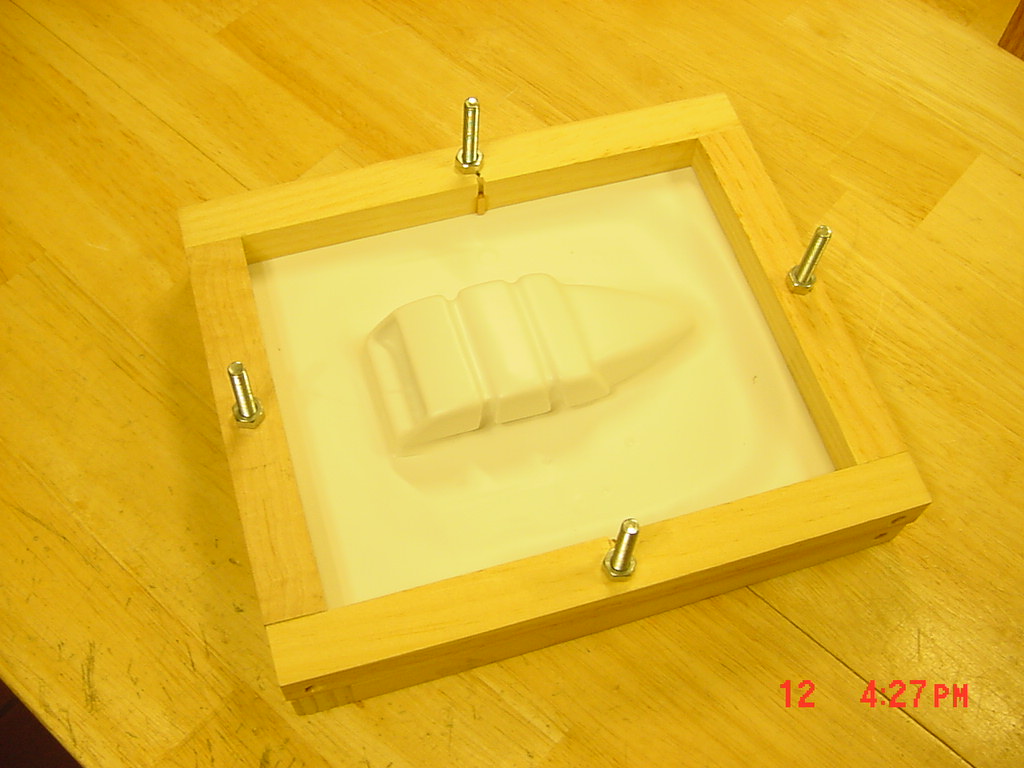
My "machine" (more like wooden frames) is home made. Just a box with a lip that two frames with styrene sandwiched between them and bolted together. I use a household vacuum cleaner, nothing special. I'm on my second unit and built from memory. A search and I found these videos. Scale down from this industrial unit and just heat over the stove/oven and quickly pop it on the box. http://www.imperial-armor.com/videos.html Also search you tube. There are TONS of videos on there about it. - MT
-
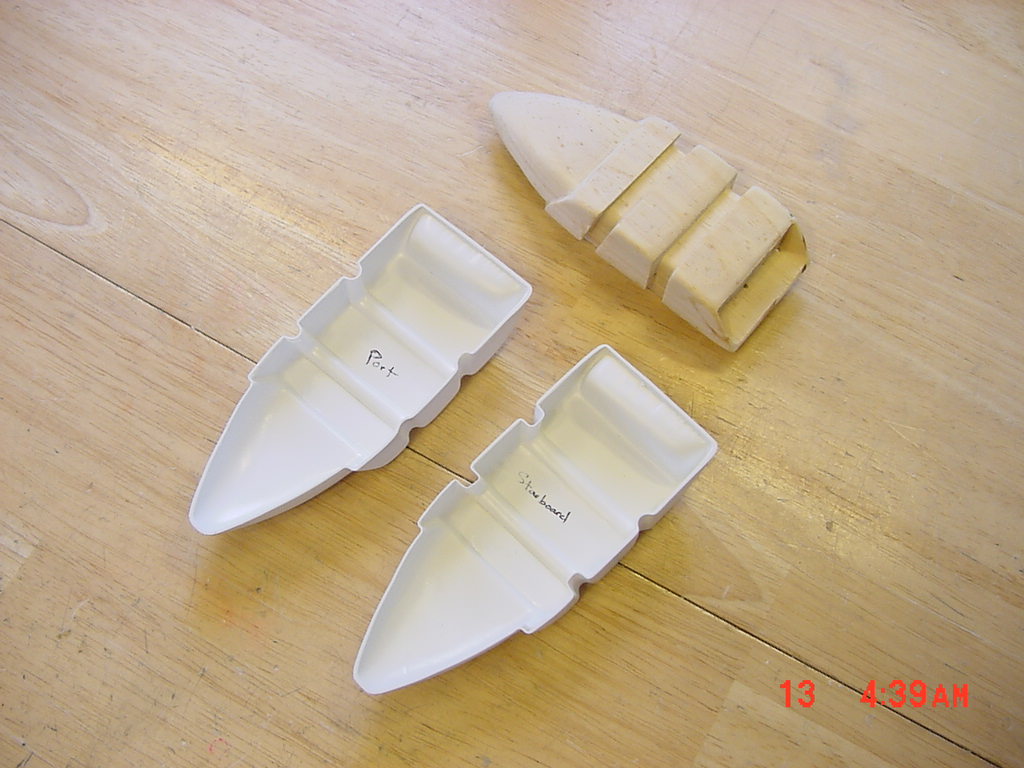
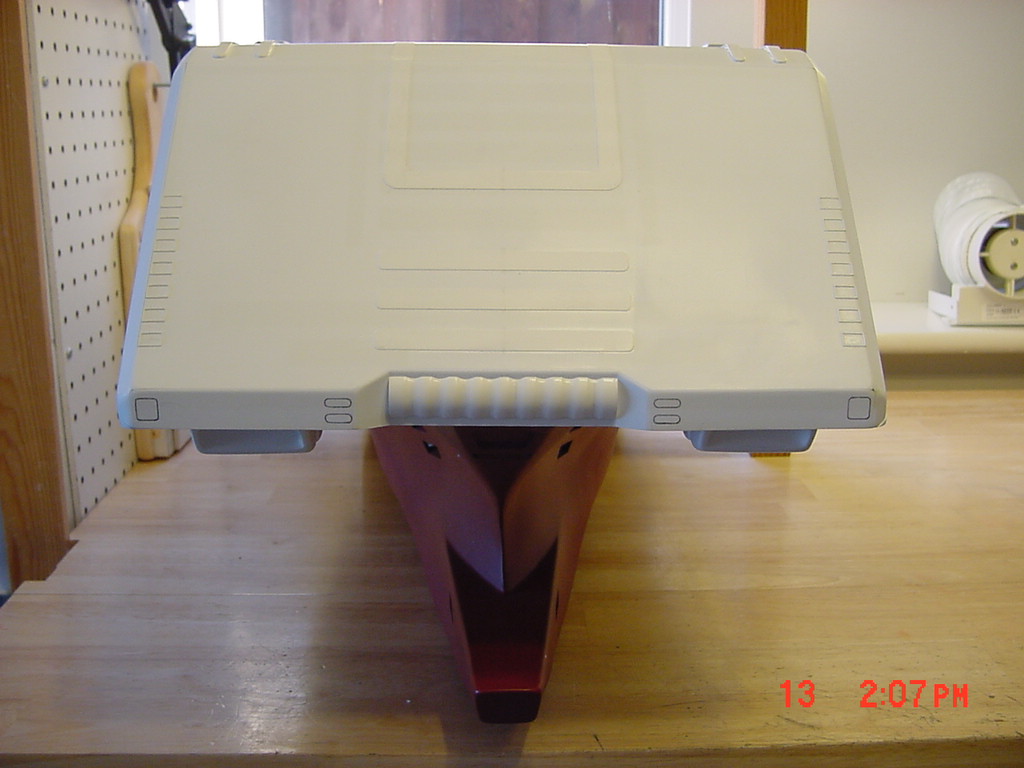
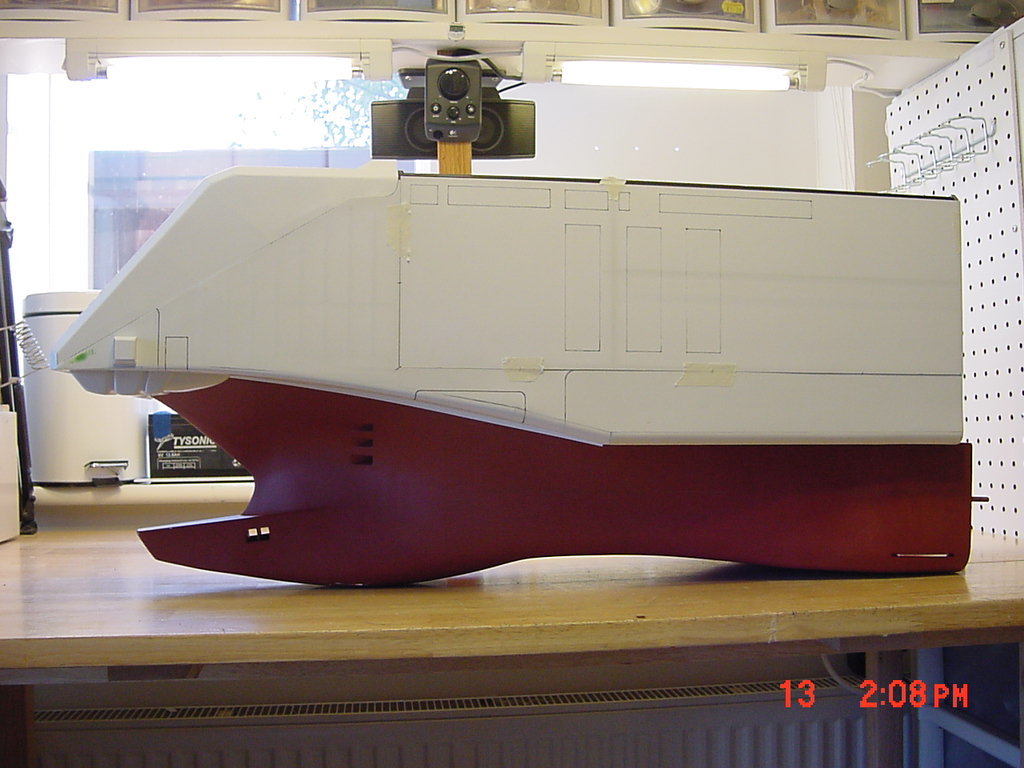
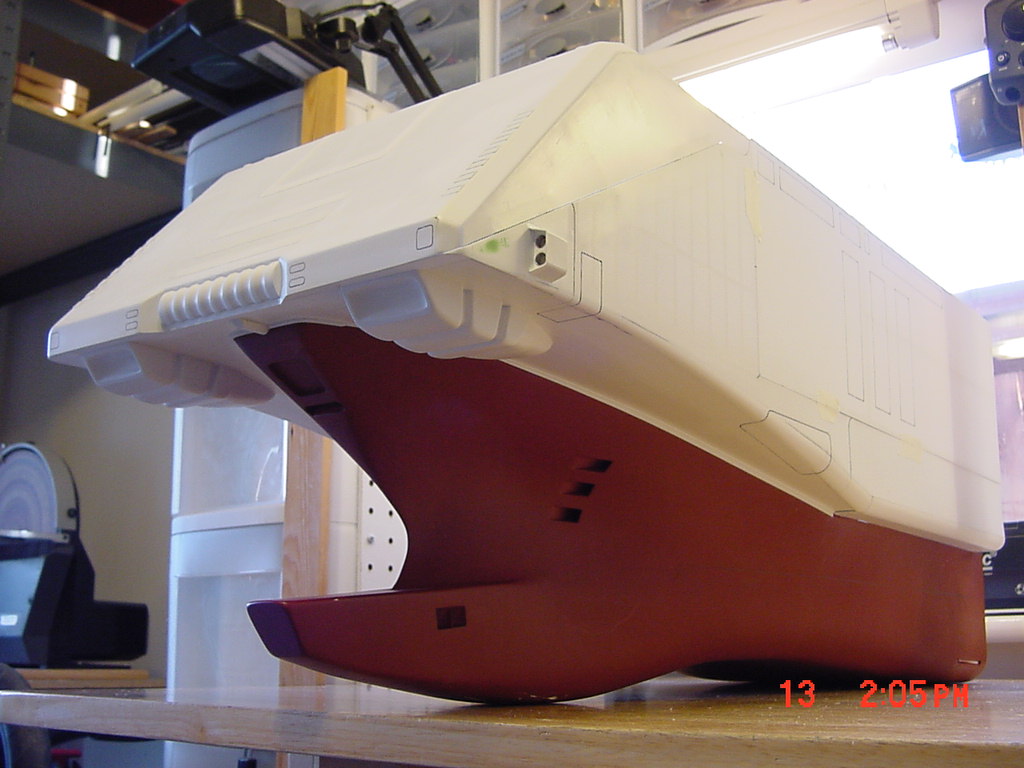
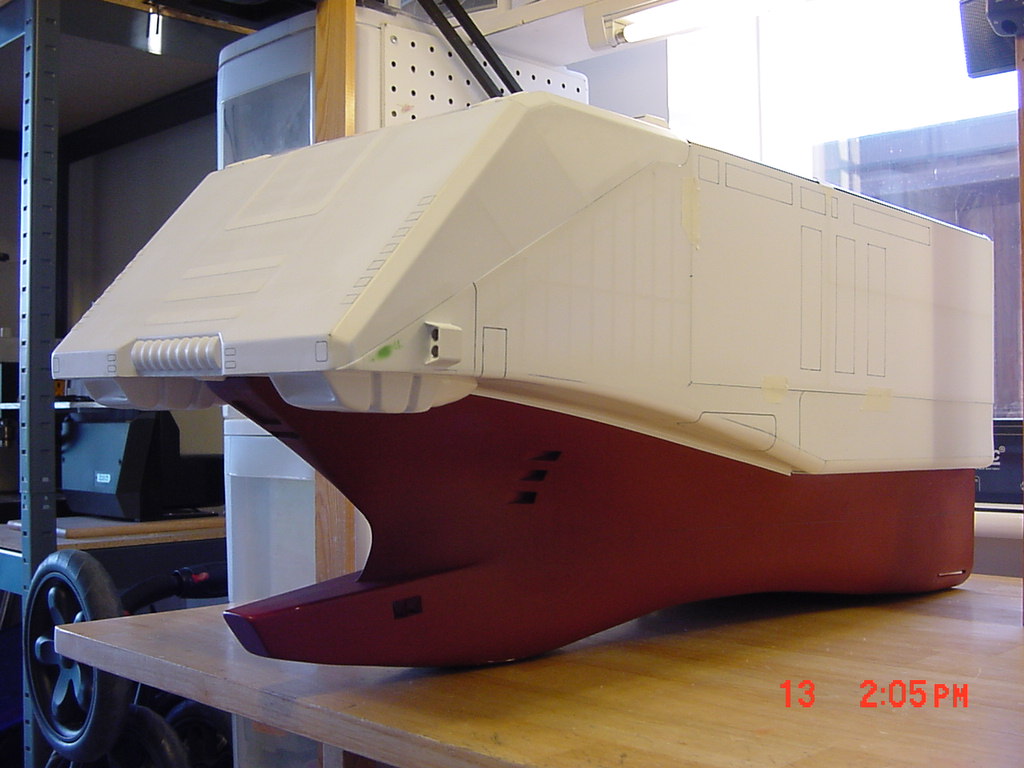
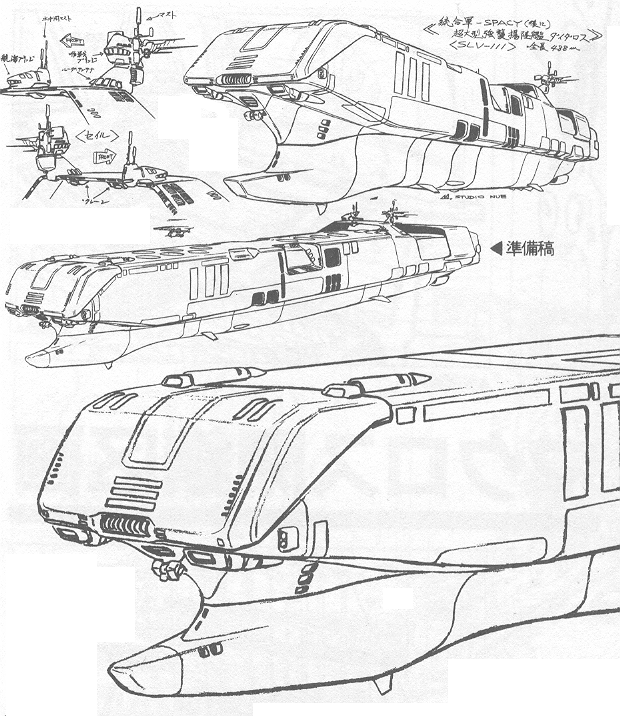
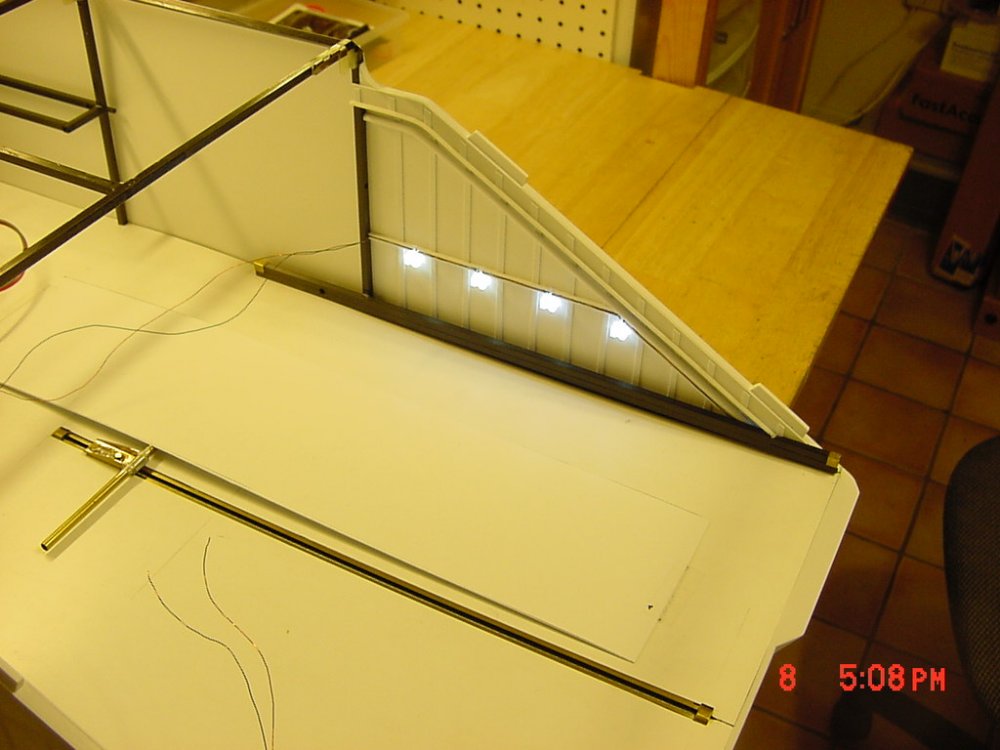
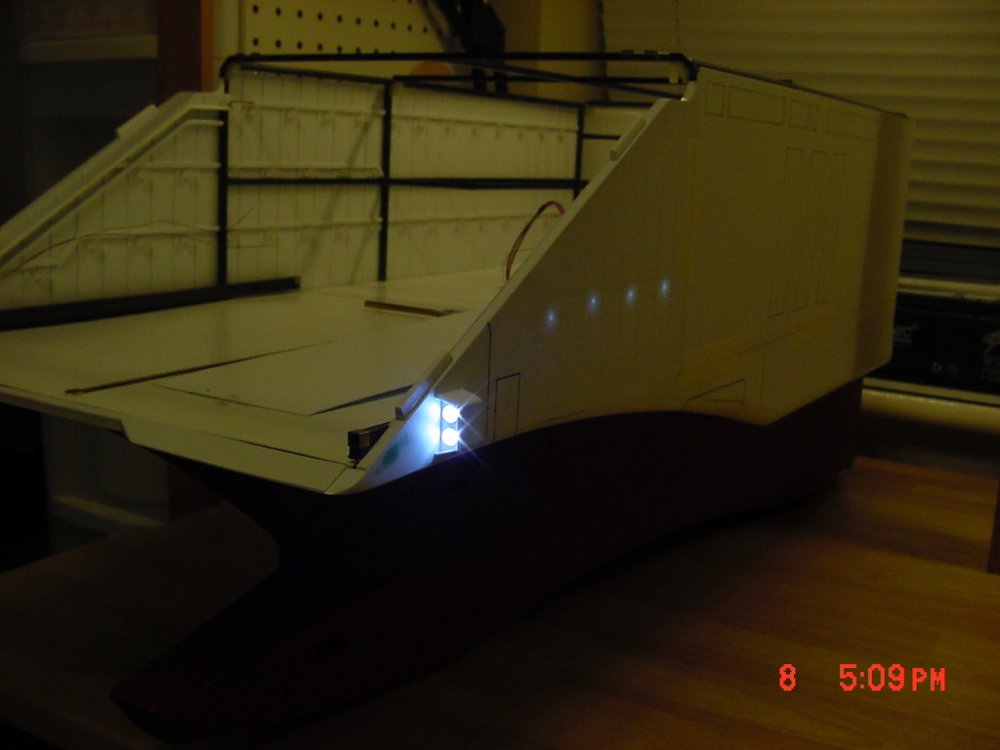
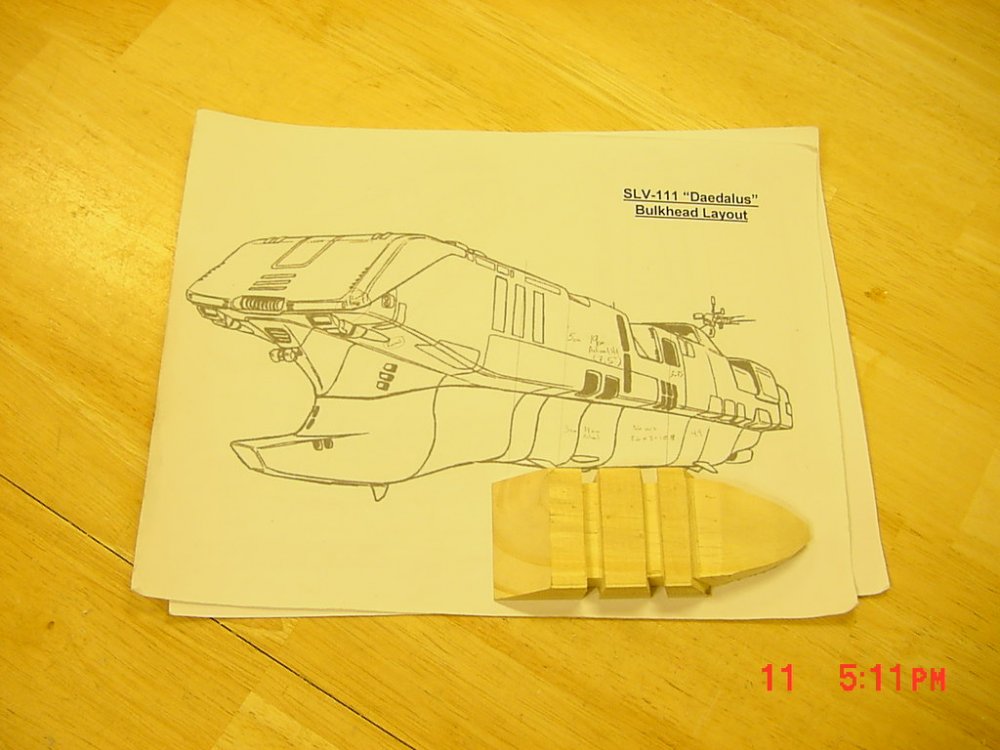
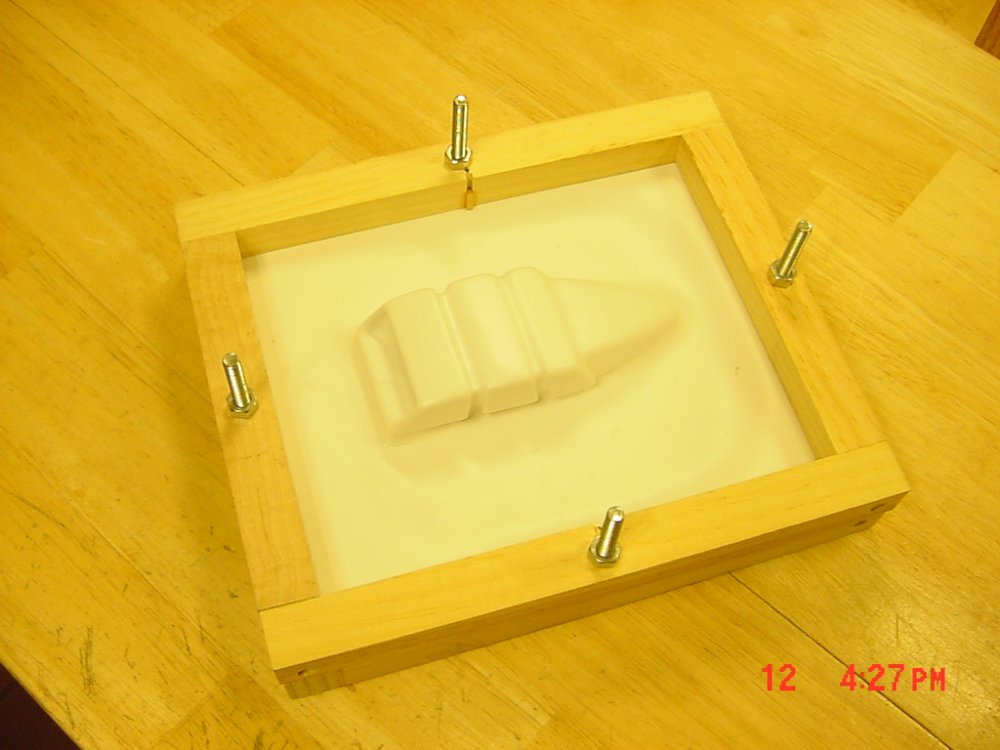
First off, thanks for the compliments guys. Those of you who think I'm building another Macross vessel this large need to lay off the solvent based glues ! It's taking me a long time. The Promethius would be done by the time my children BOTH graduate college - 20 years from now! The SDF would be completed by the time I retire! By then nobody would know what the heck Macross is (like most people I meet don't anyhow). UPDATE 13 Sept 08 The external parts of the front half are done minus the top. The top has to come last due to fit, engraving and installing the motorized cranes. Added the port wall lights (I mistakingly said that wall was done earlier - I decided to add the lights afterward) and the headlights. Made the two thingies underneath that I have no idea what they are. I doubt they're headlights (got those already). Maybe a weapon or more deflector shields . Anyhow, they were complexed shaped, had to be strong and light, so vacuum forming was the solution. The rough male mold and best drawing to interpret it A vacu formed piece Two completed parts (best of the five I made) Front shot Completed port side Lower 3/4 view And the "money shot" with comparison So did I miss anything? I've been looking at this for so long now, it's easy to miss something. NOTE - I'm using the lower sketch as my example from the line drawings. It's most accurate and consistent perspective wise. Also not photographed but made recently, two clips to hold the front hanger deck to the front hull half and tapered angle strips to seal where the two pieces mate. The seal will repel water and improves the appearance. It's visible in the "lower 3/4 port" picture. One item not canon is the small half tube at the center front. It covers the ramp extend/retract drive. That's it for now. Next I'm working on the inside details. Part model, part diorama, and a lot of electrical work! - MT


-
Whats Lying on your Workbench MKIII
MechTech replied to HWR MKII's topic in Hall Of The Super Topics
The tank looks great, which series is it from? It reminds me of MADOX. - MT -
Ron's THE Diorama Dude! Awesome work (and I know a lot of it too)! - MT
-
Thanks Dave! I was throwing the idea around too. Maybe taking Imai's kit and giving it some love or converting a gashapon (to keep all my stuff in 1/200 scale). - MT
-
Bandai 1/72 Scale Macross Frontier Plastic Models
MechTech replied to Graham's topic in Hall Of The Super Topics
Thanks for posting the lineart! The gear is even chunky in the lineart! I guess its the additional armor on this valk. I know it sounds weird, but I've similar things with Miyataki's drawing too (mainly Daedalus/Promethius). They actually put a lot of thought into the design; they just didn't draw something and say, "this looks cool!" Animation has a lot of engineering errors in it! I learned NEVER to use animation screen shots except for color - and even then using several shots for consistency. - MT -
Talk about night and day - big differnance! The camera I'm using is the old Sony Mavica with a floppy drive! I like the compactness of files though and that I can stick a macro lens on it without the external parts moving. You've seen how closeup some photos are we have to take here on the forum. - MT
-
You know, I think I would actually buy a Commanchero in 1/72nd! (forum gasps). I would definitely buy MANY in 1/200th (I've got to make some anyhow). I think a lot of people have been waiting on the Commanchero come to think of it. - MT
-
Bandai 1/72 Scale Macross Frontier Plastic Models
MechTech replied to Graham's topic in Hall Of The Super Topics
carzooyah, most of Bandai's kits have been made with ABS for the joints recently. My son's Votoms AT acts liek a toy with the detail of a model - without even painting it! Those metal pins would HAVE to go through ABS, styrene would bust (trust me on that one). I'll be getting one soon too. - MT -
Small destroids? Strange Never seen these resin kits!
MechTech replied to Ranger565's topic in Model kits
The destroids look like Dark Horse recasts (originally metal). The Monster (out of proportion), is smaller than 1/200 it looks like (not a whole lot to compare with). HWR's right, make your own parts! You've got referrances from a good Imai kit, right? You can do it! - MT EDITED: I take it back, they are originals. I just happened to be looking at my Dark Horse figures and the detail is different. These look like original art all done in 1/200 scale. Why didn't I find them!!! - MT -
Hey, this needs to be with the custom/scratch built models! Jenius - it looks like the cockpit slides back into the chest; outer plate folds down over it. The model actually looks rugged to me. He's used 2 and 3mm thick plastic. That's what's holding up about 30 pounds of motors on my ship! - MT
-
Dude, look what you started! I was just checking threads and my son says, "wait, go back go back!" It's the red valk. He wants one now too! Too bad I don't have one to spare OR red paint (yeah!) - MT
-
They're just lurking and waiting to pounce on it! Just watch Thanks for sharing Cowie! - MT
-
Bandai 1/72 Scale Macross Frontier Plastic Models
MechTech replied to Graham's topic in Hall Of The Super Topics
I gotta laugh. The tone of this thread has gone from doom and gloom to "I gotta get me one." I'm sure there will be variants to include armored ones! - MT -
Whats Lying on your Workbench MKIII
MechTech replied to HWR MKII's topic in Hall Of The Super Topics
Nice! My son wants the E wing and my daughter wants the Min Mei doll! - MT -
Ranger, Ditto on the VF-4! PM me a price if you wouldn't mind - there's two! Also, is GTC still around? I'm looking for more 1/200 Tomahawks/Defenders (besides the two you have). My ship is bigger than I thought! Thanks man! Acro Ray is right on the money by the way. In fact, the newer kits have injected parts to stop droop in thin and long parts like gun barrels etc... that may lower the value. In fact, the newer kits are cheaper now. I paid $500 bucks for one back in the 80's (of course I wasn't married then ) - MT