

wm cheng
-
Posts
4343 -
Joined
-
Last visited
Content Type
Profiles
Forums
Events
Gallery
Everything posted by wm cheng
-
Hey MN, So sorry to hear about it - I for one am very grateful for all your efforts and look forward to your goal - just getting caught up on the soap opera now Also estatic that its alive again - I sincerely hope you will recoup your losses. Any chance of pictures or where it is at this point? Thanks again MN!!
-

Airbase Tour! 124FS/132FW. F-16CG Blk 42's
wm cheng replied to David Hingtgen's topic in Anime or Science Fiction
Hey now I know who to come for pictures when I get around to doing my F-16! Did you ever get that second resin intake piece for the 1/72 Hasegawa kit? -
Think I've narrowed down my new airbrush choices
wm cheng replied to David Hingtgen's topic in The Workshop!
My compressor is the Italian made SilAir (by Werther International) it is model S.A. 15 with a 1 gallon tank and 88psi max pressure with auto shut-off and it came with a really high quality regulator and oil & moisture tap. I think the closest thing to it now is the SilentAire DR150 at around $465usd but mine is 1/3HP. Man, its truely silent - I often forget and leave it on for days... The 1 gallon tank doesn't last long, maybe 15min or so (till the compressor kicks in to top it up again), but the comrpessor automatically kicks in at 8 bars and shuts off at 10 bars (its european, so I don't know what a bar is compared to psi) but it never lets the tank fully exhaust, unless I turn off the unit. One can only effectively use I would say 1/2 the capacity of the tank - since after that, it no longer can maintain an constant 20 psi or so that is needed - it eventually just trickles out. I found that out the hard way (I bought a tank that can be refilled at a gas station) and it's capacity wasn't long enough - I was always worried that I was going to run out at some critical moment. Now, its sitting around - taunting me as a lesson (don't cheap out). It just became too much effort to go out and refill it every 15-20mins! Please get your moisture & oil tap at an airbrush art supply store, not a hardware store. The filter sizes and tolerances between a pneumatic power tool's requirement and a fine artist airbrush are like night and day! In fact, many pneumatic power tools require a certain amount of atomized oil in the air supply to lubricate the parts - which would be disasterous when trying to paint a model Remember; "you get what you paid for..." if its too good to be true, it probably is... little grasshopper - okay off my soap box now -
Think I've narrowed down my new airbrush choices
wm cheng replied to David Hingtgen's topic in The Workshop!
Hey David, There is no easy magical answers here, everyone will have their favourites (that's why they choose them in the first place). However, with airbrushing, a whole new set of variables are introduced that all must be toyed/experimented with to get the desired results (not to discourage you - but I believe it is a necessary step for all modellers to grow into). Unlike spray cans that have a fixed pressure (at least until you reach the end of the can ) fixed flow and spray pattern - all these are variable in both single action and double action brushes. Again, I would never recommend external mix brushes - they aren't much better than spray cans, and can get quite frustrating. The worst part of external mix is that they spray much coarser than internal mix ones - and depending on the air pressure, they can achieve quite pebbly/orange peel results especially with gloss paints. Very few airbrushes are going to provide a controlled swath/line much wider than 2" strips unless you hold the model so far away - but then the pressure from the brush reduces to a dribble and you shower your model with a wide mist of dried paint particles. Don't worry, its pretty easy to spray even consistent coats with just about any internal mix airbrush once you've master how much paint flow and pressure is required. Just think of it as spraying back and forth in 25% overlapping 1-2" wide swaths (making sure you start before you hit the model and ending after you've gone past the model). Build up the colour in thin even layers, never try to do it all in one go. You will very quickly master this - and very soon you will want to control the airbrush into finer lines - this is the trap that will cost you more money and effort sooner than you think When you can control the line or spray finer, then you don't have to mask as much - saves a lot of time masking and money in masking tape. Once you get used to how smooth the airbrushed finish is, no hand painting will ever be satisfied in your eyes so you end up airbrushing everything - even the tiny stuff to get that smooth sheen (opps, am I revealing a bit to much obssessive compulsive behaviour on my part ) However, with this new found freedom, you need to experiment with a whole new set of variables: 1. How viscous to thin existing paints for the airbrush to spray consistently, the thinner it is, the smoother and better control without clogging (less likely to dry in your airbrush) your process will go, but more coats are required to achive opacity. Its different with white than darker colours - and its different between different types of paint such as acrylics than laquers. 2. How much paint flow to spray (double action requires pulling back on the trigger and single action requires the needle adjustment on the back of the airbrush) onto the model will affect how much paint dries on the surfaces. Too much and it will pool up, too little will result in a dusting that might rub off or create a rough surface. Also, this has a direction relationship to how wide your spray patterns become, the less the flow, the finer the line etc... 3. How much pressure is required to get the paint flowing inside the airbrush and onto the model. Again this differs depending on the paints used, Tamiya acrylics usually use 20-25psi, while laquer clear-coats 15-20psi and those Alcad metallizers 10-12psi also depending on humidity and temperature. I always have to experiment on a piece of scrap everytime I sit down to spray since conditions always change slight - so a really good regulator at the compressor end is essential. Lastly noise is a factor, listen to your compressor in operation first. If you spray outside, you need to be considerate to your neighbours. The silent ones like SilAir are truely silent (not 90db) like you don't know when its on unless you touch it. Good luck. -
Hey GunnerX, That's great - fantastic work and shading. Let's see more pictures!! Come on everyone - let's see a revival in model building! Good job, how about a little streaking to go with that panel shading, especially around those vents on the back
-
Think I've narrowed down my new airbrush choices
wm cheng replied to David Hingtgen's topic in The Workshop!
Hey David, Cleaning the airbrush isn't that big of a deal - you don't need an ultra-sonic cleaner. The key thing is do it right away, don't let it dry overnight or anything. You don't really need a sink either. Here's how I do it - I usually clean it right at my work bench. When I am finished with the colour, I always have a bottle of blue windex (only works for Tamiya Acrylics) sitting around, I dip my brushes into it when I am done with them - but I also use it to flush out the airbrush when I am done with the colour. I also have a dedicated crap brush (use an old fine brush - it will be wrecked, but it will be dedicated for this purpose) that is small enough to poke up into the siphon area of the airbrush and the color cup siphon tube. When you are ready to clean, remove the color cup or bottle and open the needle up full and spray the remaining colour that's in the airbrush into the garbage to empty the airbrush of color. Put the windex bottle (with siphon feed) up into the airbrush and spray full to get the entire airbrush filled with windex. Reduce the flow by adjusting the needle till its around 50% flow and continue to spray into a white paper towel, occassionally (with the windex spayed towel) block the nozzle so it back washes through the airbrush back into the color cup or bottle. Remove the airbrush needle and look for any signs of dried paint (usually after the tapered tip but in the first 1/5 of the needle) around the trigger area. If there are any dried paint, dip that into the windex solution and wipe with paper towel - carefully avoiding the tapered sharp tip (do not touch this if possible). This needle is the only part of the airbrush I take apart on a regular basis to clean, everything else stays put. Put the needle back in, and spray - check that the spray stains on the white paper towel is windex blue and contains no hint of colour. When you get practiced, this whole process should not take more than 2-3 minutes. Longer to type it. I replace the blue windex bottle with fresh windex once every model or so - it can get quite gummy before the windex looses its power. Worst with metallics or darker colours than light. If I am using laquers or metalizers, than I repeat the same process but with the corresponding thinner or solvents instead of windex. Of course the original color cup or bottle needs to be cleaned too if you are planning to switch colour, so that's what I make my trip to the sink for. Hope this helps you reduce your trips to the sink. I'm not sure if mine is the 200NH, when I bought mine 18 years ago, they had no letter designations after the number, but it looks exactly like the one in the photo. Try and get the IL fine head and needle assembly if you can. Oh, compressors - if you can afford it, get one with a tank. I was using a $12 re-built refrigerator compressor for 10 years before I got my SilAir. I can tell you that it wasn't worth it - it made me dislike airbrushing. It kept over heating. The smaller air compressors only allow you to work for brief stints of time before you have to let them cool down - plus the hotter air tends to be more moist. With all compressors you need a decent air regulator and I would suggest an oil & moisture tap. I can tell you that my SilAir is absolutely silent, even when it kicks in automatically to replenish the airtank - in fact I've left mine on for days forgetting to turn it off. I can only tell when once in a while, I hear a slight swish/pop, when the pressure relief valve goes off. Its absolutely worry-free and highly worth the investment. Make sure the tank ones you look at have auto-shut offs when its full, and it would be nice to have them auto-replenish as well. Just another worry taken off your hands to allow you to concentrate on the model. -
Think I've narrowed down my new airbrush choices
wm cheng replied to David Hingtgen's topic in The Workshop!
Hey David, I really recomend an internal mix - external mix brushes are just too coarse and provides no sense of control. I've been using my single action Badger 200 for over 18 years now (planning to upgrade to a double action when I develop the skills) but it has served me so well that I haven't had any need to replace it. I use this for everything, from spraying the primer to the fine post-shading weathering. Its really cheap and simple to completely disassemble for cleaning. Because its so simple, it pretty much runs anything through it - even thicker stuff that won't run through "artist" airbrushes like IWATAs. In all these years, the only maintenance is that I got a new IL Fine head and needle (I was rather rough with it in my high-shool years and sat on the original needle) and a new braided airhose (because I stripped the thread while attaching it to an aircompressor). Pretty good workhorse for 18+ years! Highly recommend it! I might start looking at a double action badger sometime in the next few years (maybe for its 20th anniversary ) PS. I also recommend siphon feed, since it can take a small color cup as well as larger bottles and you can airbrush in any odd angle to get into tight spaces.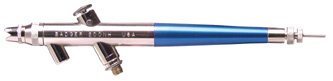
-
Hey anyone remember "Starblazers" or Space Battleship Yamato's wave motion gun - didn't it have some flywheel/dynamo to build up energy and some coupling had to be disengaged from the main engines and re-engaged to the front gun before firing? Maybe there are some anime fans at the Navy
-
Oh yeah... can anyone translate the following photos: 3, 17 & 24 - I'd like to know what they are doing there - is that glue or Mr. Surfacer? Odd that they glued the main gears in before they painted the legs - Man, is that panelling over done!
-
Wow! Thanks so much for the scans - they're a great size and will be excellent reference later on. Thanks again.
-
Welcome to the boards!! Always nice to see more modellers - great work!! How did you do the Minmay in the back?
-
Found another nice step-by-step build-up.
wm cheng replied to David Hingtgen's topic in The Workshop!
I don't mean the colour match, I mean the "thickness" of the paint - if I ever remove paint, I always remove it to a panel line - otherwiset the "thickness" layer will always show though. -
Found another nice step-by-step build-up.
wm cheng replied to David Hingtgen's topic in The Workshop!
Thanks David excellent tips - now I just have to adapt all those steps to a 1/72 scale!! Man that model must be huge! That guy is insane - I can't believe he went to fill those seams after he painted and decalled the model (I would of called it a write-off). I don't get how he can spray after the sanding and get it to match up with the surrounding layers of paint (primer and finish coat). Whenever I sand after I painted, I can never get the new "repaired" paint to properly match up to the old existing paint. No matter how thin he paints the finish coat, if you break it - there will always be a line that shows up?! -
Yep, I know its a bit expensive, but if you just use the real deal for thinning it lasts a long time - I usually go through a large bottle of the Tamiya thinner every 5 years. Ask yourself - is it worth it to save $5 but you could ruin hours of labour on a $50 model? I find ultimately, cost of materials is nothing compared to the cost of labour involved in model making (its not like we are mass-maufacturing). The windex blue stuff is great for cleaning, but I wouldn't use it to thin, it breaks up the paint into tiny little pigment particles.
-
How to get sanding dust out of panel lines?
wm cheng replied to David Hingtgen's topic in The Workshop!
Make sure your brush is wet too - otherwise its like sandpaper - the water really helps lubricate. -
Omigod!! Where can I get that Y-Wing!! Is that the ill-fated SMT Y-Wing? Is it in scale with the 1/48 X-Wing (AMT/ERTL)? Please would someone sell that kit to me? How much is it worth? Fantastic job mslz22!! (Can you tell I love it!) Post some more pictures.
-
Hey thanks LTSO - great answers. Man... away for a few days and all this happens Yeah, I wished I archived the older threads, I still have all the photos, but it would be too much of a pain to remember and type up the text. I'm thinking of doing a VF-1S with the gears up (in Roy's colours to keep my VF-0S company) - I think it's a short little project, what do you guys think?
-
YES! I definitely agree, I love that cannon fodder (if you mean twin engined bird kind of like a wierdass F-15). Man! I really wish for injection molds too, I guess the Bandai ones will have to do for now - they aren't too bad. But it would be great if Hasegawa took over though. I need to see a front and side view of this new plane - this angled view makes it look assymetical - its a little hard to determine the orientation of the control surfaces. But I certainly second everyone here's love for the mech design of this series I'm dying for an art of book on the mech! (or an subbed version of Operation 4! )
-
I can't seem to find anything on "Fighter Pilot" - is it also made by Jane? A little more detail please Thanks. Has anyone heard of Lock-ON? It still might be too realistic.
-
Hey is there some equivalent arcade shooter type sims for the PC? - all the PC sims I've tried seemed just a little too involved for a short blast-em round. All I want is action and eye-candy.
-
Nada... not much. After the VF-0, its been pretty quiet here. Looking for a job - so I didn't want anything to detract from that in case something starts up soon. And trying to conserve money. Been itching to do my 1/72 Hasegawa F-14A in the Jolly Rogers scheme to put next to the valks, or a 1/72 VF-1S in Roy's colours to put next to Roy's VF-0, but they would take a few weeks. I was looking at something shorter, maybe a Monogram Viper (I've got the resin cockpit and photo-etched parts) but that may take to long too. Just kind of in a holding pattern hoping that some of you guys will post to hold me though this dry spell.
-
Sure, sounds like it could work. But I just used thinned flat black - in very light coats - amost a dusting. You might need a lot of the Tamiya clear smoke since its really light and doesn't show up on dark surfaces unless you coat it many times. The problem I might forsee is that due to the many coats you might need to see the smoke, you might end up "filling in" some of the engraved panel lines to the point where they may not read in an oil wash. You might want to do the oil wash before this "post-shading". Additionally, I've found out that a lighter post-shading also works on planes that are darker in colours - especially at the leading edges of the panel lines. David was nice enough to send me this pictures a little while ago to show some weathering on demonstration blue aircraft.

-
Excellent work indeed LTSO!! I love the metallic sheen in the red. Thanks for sharing the photos - it really looks great. Have you thought about weathering the gun ports or rear thrusters a bit - just a bit of shading can bring out a lot. Can't wait to see your VF-22. Yeah, scratch building the interior is tough, especially since the kit has a flat-bottomed cockpit - Milia has to be cut at the waist! I guess you can't have the hinged legs and a hole for her to stick her legs through too . I scratch built a cockpit for her in my high-school days for your kit - its pretty crappy, but I keep it around for sentimental reasons now.
-
Hi all, Does anyone have a english subbed version of the latest Operation 4 of Yukikaze, I'd like to finally find out what's going on after watching the raw version. Great mech dogfights and ships - too bad that there's no plot nor charactrers.
-
Great work! LTSO. Try taking some pictures in natural daylight - the colours might be closer. Can't wait to see more when you are finished.
