wm cheng
-
Posts
4346 -
Joined
-
Last visited
Content Type
Profiles
Forums
Events
Gallery
Everything posted by wm cheng
-
I use ModelMaster laquer clear coats, and they have been perfectly stable on top of my oil washed Tamiya acrylics (they are designed not to yellow over time). Future will give you an extremely glossy/shiny finish to the model - I'm not sure if that's the intended final finish you want for a military aircraft - a brand new car maybe. People often use future to give a clear, glossy smooth surface to decal on, then clear coat with something else that will give a flatter sheen. Also just a tip, very glossy surfaces tend to look more toyish, - flatter finishes tend to look more like scaled down machines. Even if the actual object is quite glossy in real life, the scaled down model miniature will look more proper if it is flatter/matte than its real life counterpart. (Do not clear coat the canopy unless its with future though...)
-
Good Job VF-19!! Keep it up - please encourage all around to keep building. You've done a good job of hiding the seams if you didn't paint it - it means you couldn't fill them either (otherwise the filler will show). It goes to show how thoughtful the Hasegawa decals are - even if you don't really paint it, it still comes out great. I would suggest the next time you do a wash, don't do it in black. Maybe only do the flaps and airbrake holes in black, but keep all the other panel lines in a light grey so they don't show up so strongly. You could vary the wash with varying degrees of grey to make some panels stand out more than others - generally the revits should be the lightest grey (it will add a bit more life to the overall panelling). Keep up the great work! (by the way, NICE EX-girlfriend to buy you that D-SLR - what did you do to become an EX? ) I wish I could get my wife to by me anything electronic!
-
Is it too late to ask for a highly detailed launch arm for 1/72 Hasegawa models? (under the others catagory)
-
I must agree with Cobywan! Hey John, is this too late to request a nicely sculpted launch arm for the 1/72 Hasegawa - maybe with a metal tube insert for strength? I'd definitely buy a few of those!
-
Correct me if I'm wrong, but I don't believe thats canon. It looks like someone photoshoped some atlas-like launch vehicle to the top & bottom of the YF-19.
-

A Star Wars Tv series after Eps. III?
wm cheng replied to 1st Border Red Devil's topic in Anime or Science Fiction
Hey, how about an "unscripted drama" aka: Reality show about a bunch of rebels in a trash compactor where they have to bob for water monsters or climb a bunch of obstactles? Every episode the imperial council will have to vote out a hapless rebel to be ejected into space! Darth Vader could be the host. Man it's all these reality shows that are putting people like me out of business!! Don't support them Support my addiction to Macross!! -
Hey a little off-topic here, but how do you get a wallpaper to stretch across two monitors? I have a ATI Radeon 9200 card with a dual monitor setup (1600x1200 primary 21" and a 1280X1024 secondary 17") but they both display the same background - the 17" just displays it cropped. Is there a setting that I am not aware of that will allow a big graphic to stretch across two monitors or two different backgrounds per monitor? Thanks, Wm
-
A Star Wars Tv series after Eps. III?
wm cheng replied to 1st Border Red Devil's topic in Anime or Science Fiction
HEY!!! I worked on Earth Final Conflict! Making Sci Fi is more fun than watching it Plus it paid the bills. There should be more sci-fi be it TV or feature in general - plenty of room to move around (plus it pays for the Macross stuff ) -
Hey - don't forget about the resin backseat Minmay! Backseat Minmay 1/72 - $10
-
oOOHH! I would definitely second Mechleader's suggestion of a seated Minmay for the back seat of the VT-1 (main reason I haven't started one) - preferably with Minmay's full head and pony tail with her holding her helmut.
-
That looks fantastic - way to go Jesse!! We all here at MW are deeply appreciative of all your efforts!
-
Wow!! Fantastic casting John!! looking good
-
Hey, if it frees up room for stickys does that mean someone could sticky my build-up threads (at least the pointers to my build-up threads... which I've been politely asking for the last year?) http://www.macrossworld.com/mwf/index.php?showtopic=691 I still get weekly PMs about where to find my older build-ups! I don't mind - love the interest, but its answering the same questions over and over again. I'll update this thread whenever I get a new build-up or photos of my models...
-
Absolutely fantastic work John!! Thanks for posting the pictures and allowing us to follow along your process. It looks great - I will definitely be ordering one or two for sure!! Can't wait to see your build up - by the way, will the Hasegawa VF-1 be removeable after construction? Looking forward to the launcher as well...
-
Hey thanks for letting me know... (I found out here before Hobbyfan) I was just going to transfer the prize to Monkey-N for the 1/72 Booster project!! Why didn't we see more Macross entries from here? Not that I'm complaining... Thanks (nice to feel loved)
-
Fantastic work John! Good pictures, I see what you mean by the right amount of bulge - it looks great! What do you think about the "teeth" details around the bell openings? Would you consider casting that knee/bent part so that we can adapt a regular Hasegawa fighter kit instead of using the strike/super and omitting all the fast packs? They are cheaper - less waste too Looking really good!
-
Hi all, There's a little Macross modelling contest going on at Hobby fan. Check it out! http://hobbyfan.com/gallery/view_album.php...ame=album588&s= Vote here: http://hobbyfan.com/forum/index.php?showtopic=3030 (Connection is a little slow)
-
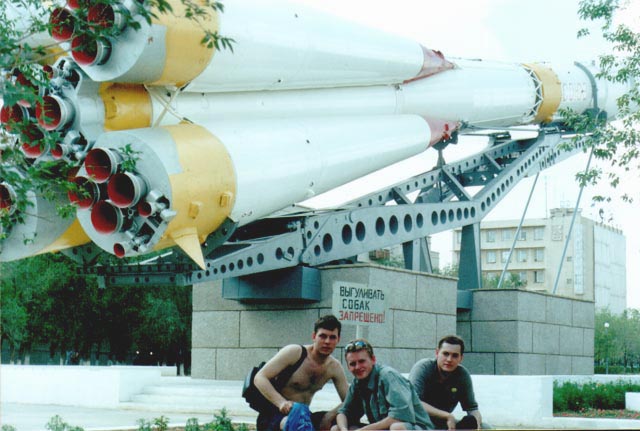
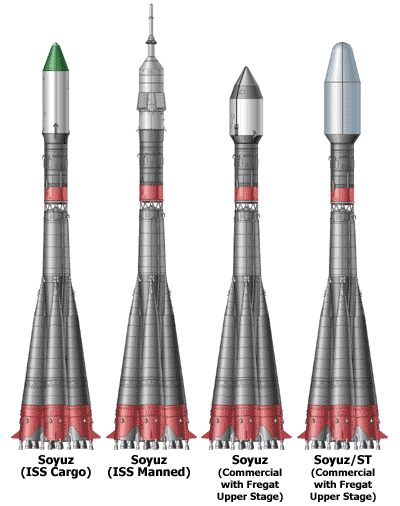
Maybe seeing how the Russian r-7 rockets / Soyuz detail their exterior might inform you on how to panel line or add riveting details to the Booster.
-
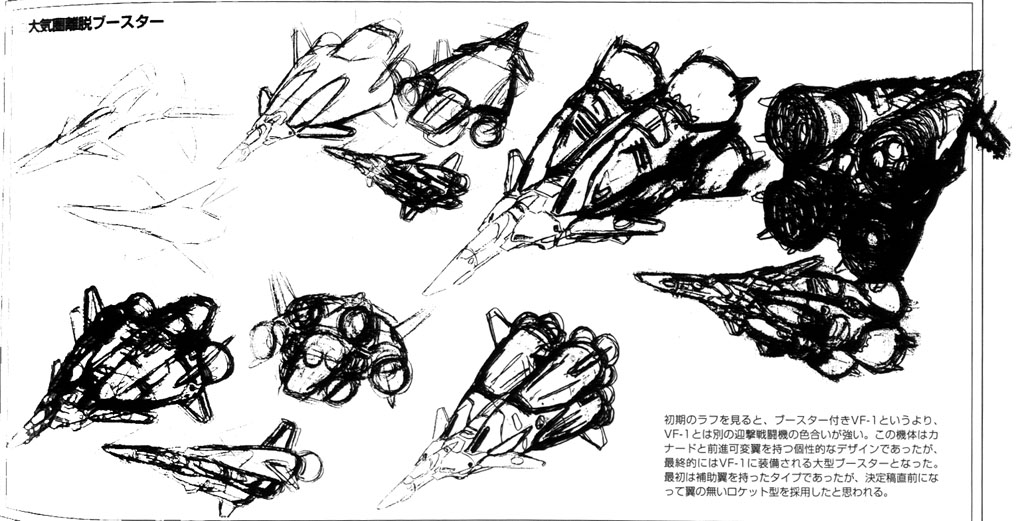
I guess here's some conceptual inspiration...

-
Sorry if its already been posted here before - but I thought it was pretty well done. http://www.01.246.ne.jp/~eri-shun/gall_macross.htm http://www.geocities.co.jp/Playtown-Bingo/9768/gallery.html
-
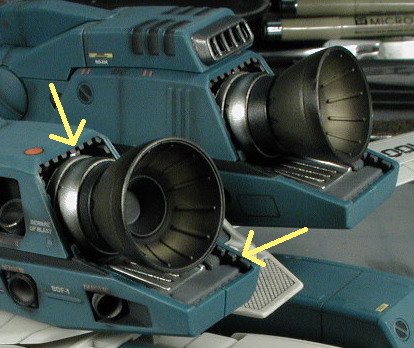
Hey John, So true... maybe you could provide a plan top and bottom view next time you take a photo. Proportions are always difficult - especially when they are hand-drawn. Below are the teeth details I was talking about earlier.
-
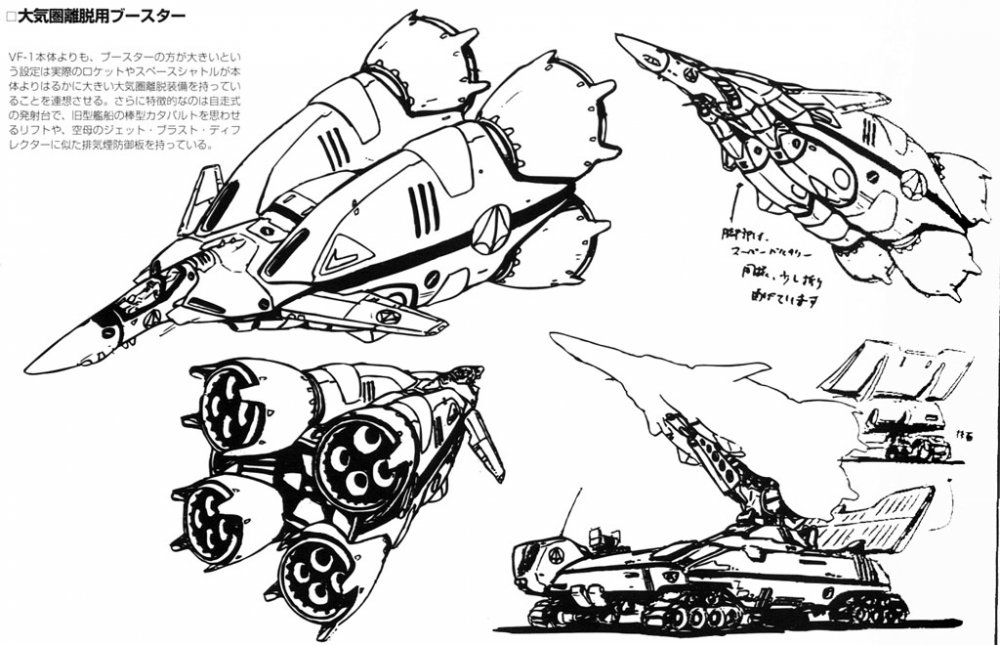
Hey John, I assume you have this scan already - its in the Perfect Memory, but the Design Works also has it and its a bit bigger (although I'm not sure if its any clearer) I believe these are the only published "canon" designs for the Booster. Please don't take this the wrong way - may I just comment that it seems as though the booster maybe a bit "fatter" in plan especially around the UN Kite symbol, then taper in quite a bit to tuck itself under the big engine bells. This is especially evident in the rear 3/4 view, it shows the fast packs to be almost as fat as the engine bell's diameter, then the tail sweeps back to the 5:30 position on the top right bell. However, I think you've captured it dead on in elevation. Additionally, I would like to add as a wishlist detail, that when you come around to the openings, ie: the pack opening to the rear engine bells - what do you think about adding some "teeth" details around the edge of the openings like the Yamato fast packs? Please don't take these as critizisms - you do fantastic work - please just think of them as comments or suggestions (you know tone is always lost in e-mails). Forever your admirer and fellow Canuck!
-
Great work John, Hey I was wondering if this would also be a good thread or place for Booster references. If anyone has any colour references - I would love to see them. I scanned this concept sketch out of the Design Works.

-
Fantastic work John!! Great details up the "pipe"! Love the rivets - especially the ball joint - fantastic!! Will the ball joint be operational in the finished model - or will it just be for positioning - then glued in place? I'm so glad that you're back - great to see a master at work!
-
This is absolutely fantastic - thank you all for making this possible. I am such a great fan of yours John - I will be looking forward with great anticipation. Might I suggest that what ever is in doubt (I know there is a lack of clear information on this particular mech) please error (creative adjustment) on the side of making the boosters sleeker (narrower more in keeping with Hasegawa's interpretation of the Valkyrie) Any chance of adding some smaller panel lines and rivets like the Hasegawa kits so there isn't so much of a textural difference between the styrene kit and the resin kit? Good plan about the raffle, wow a chance at a John built model!! Will PM ya Rob this weekend about it!