

wm cheng
-
Posts
4317 -
Joined
-
Last visited
Content Type
Profiles
Forums
Events
Gallery
Everything posted by wm cheng
-
Rate it in terms of what? Detail or accuracy: 9.5 (excellent engraved details) Seams or fit: 8 Engineering: 9.5 Difficulty to assemble: 3 (easy) Paint: 1 (very easy - all white ) I'd say the VF-1 fighter was the easiest to build and would recommend as a beginner model - all you have to do is paint it white and everything else could be done with decals.
-
Ugh! Stay away from that stuff like the plague. The liquid that oozes from it melts plastic quite easily, and when hardened its really tough to sand down. The Tamiya putty is much better, finer to sand for bigger gaps. Better yet, the Mr. Surfacer is great for smaller seams.
-
Thanks so much Jim, It means a lot. I have just recently heard of the ARC site through David H. our resident aircraft expert around here - and I am checking it out - very nice site. I'd like to learn more about real world aircraft too and apply it to these Macross models. Please consider posting some of your work here too. Looking forward to it. Wm I just wished I had more time to do more models more frequently!
-
All the new Battlestar Galacticas are on eMule/eDonkey network. They have aired on SkyOne in the UK - I am downloading episode 11 today - but they have all 11 so far. So for those who can't wait, I'd recommend getting them that way - all the commercials are cut out! Unfortunately its only a 12 episode season for now.
-
Oooh! I like that grey scheme better- damn, I might need to get another VF-0D! Any real aircraft modellers out there? How would one reproduce that light whitesh grey around some of the panel lines in the CGI rendering? Any real world references? I've read some good weathering details on the navy's TPS grey schemes, but they only really work on 1:32 scale aircraft, its just too hard to replicate it in 1:72.
-
WCG Ha!! LOL That's a good one! gotta tell the wife! HWR MII, I too want to build a Hikaru's strike battroid at the end of DYRL (pretty far down on my list though) with the gun pointing at you, but I fully understand that I will have to do some major modifications to the shoulders and hips to get the battroid into that pose. There's certainly some animation magic going on in that pose - you can't even get a Yamato toy to do it properly. At least its an excellent base to build/modify upon.

-
Hey what's going on? Why is everyone bashing Hasegawa lately? I don't want to rant - don't read this with CAPs on - but I just have to pipe up. I love them (no, I don't work for them or have any family members who own stock in them ) They are my favourite aircraft injection styrene manufacturer if not the world's best manufacturer (with the possible exception of Tamiya when they make their own kits instead of reboxing others) in a rapidly dwindling hobby. Details withstanding, the quality of the styrene, the decals, the engineering with respect to build steps and painting is unequalled. How much bitching would be going on if AMT/ERTL got the licence to Robotech and were the only kits available? Does anyone remember (or worst yet... built) the older IMAI or ARII kits of the 80's?! They were awful in every aspect, they were all pudgy and gawky in proportions and had next to nill poseablilty. The only good thing about them are my childhood memories and the boxart (IMHO). Hasegawa makes models, models by nature are miniature detailed replicas of something - mostly ment for display. If you want poseability or transformation, then get a toy, that's what they are for - of course toys sacrifice some proportions or details in favour of durability. Sorry I can't agree with anyone that says the Yamato toys are better proportioned than the Hasegawas - the Yamatos (which I love and own quite a few) are at best a compromise in every mode. Remember this was a hand drawn animation, even the originals are massively deformed from mode to mode - the artist just chose to make each mode asthetically more pleasing (at the expense of actual transformation). Additionally, lest we forget that even among the "canon" line art from Studio Nue - the panel line details and specs to the mech changes from drawing to drawing. As far as I am concerned the Hasegawas represent the best in modelling technology - and the best proportions in fighter and battroid modes without sacrificing for transformation practicalities. Any movement and poseability is just an added bonus - but I have to admit, once I get it in a pose I like, my models are almost never moved from that pose. I have the Yamato toys to play with. But Hasegawas are eye candy - and as far as that is concerned, the additional "ad-libbed" panel lines and revit details just adds to that "wow-factor". Call it re-interpretation 20yrs after - at least all the inventions make sense from a realistic aircraft construction point of view. There could of been a lot of other arbritrary details that weren't appropriate that could of been added. When you have a flight line of Hasegawas starting from the VF-0, VF-1 to the YF-19 & YF-21 you see a steady progression of larger and larger panel segments and fewer and fewer revit details, which seems entirely appropriate for the different eras of aircraft construction. Similar to seeing the 60s Phantom, next to the 70s Tomcat, then 80s YF-22. Believe me, from someone who has built a few models in my time - I find the Hasegawas the best on the Market, and the fact that they chose to start concentrating on an entirely fictious subject (which is a departure for the company) that was over 20yrs old still seems like a dream to me! (hop off my soap box now...) If it weren't for the Hasegawa Macross kits, I doubt I would of gotten back into modelling after high-school.
-
Man I love this series - just saw episode 10 "Hand of God" and its great sci-fi! Anyone have an answer to the playstation question? Those Joyride figures look pretty good - anyone actually see one of them? What's the quality like? Is this "Lowdown" an episode or a special features extra?
-
Wow, thanks Graham, I didn't know about these trading figures, I'd definitely get them. By they way, to all those who have played the PS2 game, is there a mode where you are inside the cockpit, so that you don't see your own viper? Thanks, Wm
-
Did you see my reply to the post: http://www.macrossworld.com/mwf/index.php?showtopic=11807 check about half way down. I've got the True Details seats with the Verlinden Cockpit update set - and I've got some True Details canopy masks - I'd love to find some aftermarket tail cones, as the included kit ones aren't that great - maybe a photo-etched kit, but I haven't found anything yet. Also, resin one piece/seamless intake section would be nice - but haven't sourced it out yet.
-
Yes! Jesse, I'm an aftermarket detail junkie too! I think my aftermarket parts for my Hasegawa F-14 cost over twice what the kit lists for! I second any and all those aftermarket parts. I would buy anything Hasegawa makes in at least duplicates - one to build immediately (or as fast as I get around to them ) and one to keep in the box. If I have only one - then it becomes too precious to build. Wierd eh? But tops of my list would be: 0. Detailed Launch Arm with ARMD base with stoplights (hey, anything happening on the resin front for this - I remember seeing some work on this a while ago) 1. VF-4 2. Any of the MacrossII Valks 3. VF-11 4. VF-X All Hasegawa in 1/72 scale of course.
-
I hate customs and brokerage! I once had to pay $100cdn for something that was around $150! when all the taxes, duties, customs fees and brokerage fees were accounted for!! Ohh, I'm jealous, that Tamiya F-16 is a beauty - too bad its so big, I don't have a place to put something like that - why can't all these 1/32 scale ultra-detailed kits be scaled down to 1/72 - I might go blind building them, but at least I would have space to display them afterwards.
-
I bought mine just before Christmas at a local Toronto hobby shop. A bit expensive at $60cdn, but at least there's no customs & duty.
-
YES! I love this series now - it had to grow on me. Being old school, I loved the old series in its cheesey kind of way (of course I was 8 and haven't seen any episodes since then - but it held good memories for me) I hated how they changed the series in the pilot - but now, after I gave it a chance, I love the characterizations and story writing. It is the best scifi on TV today - unfortunately, that's not saying much since there isn't much original programming anymore with all those reality shows! I can't wait till it airs in Canada, I am watching them as I download them through eMule ripped off of SkyONE UK. And I look forward to every one. I am still not a fan of the technology yet - the Galactica interiors are too retro clunky and the Vipers & Raiders don't do it for me yet. Its the story writing and strong characters for now (hmm, what a change for TV!)
-
Welcome back into the fray Macroadster! Great work! Especially your first one after getting back into the hobby. We need more modellers! Looking forward to more great posts from you.
-
Wow, there's a resin Star Destroyer!! That's something I'd like to see - any more info on it? Nice collection MechLeader - and yeah, no amount of Hasegawas is enough!
-
I really like Hasegawa's interpretation - I feel it's more realistic and gives it an authentic aeronautic feel.
-
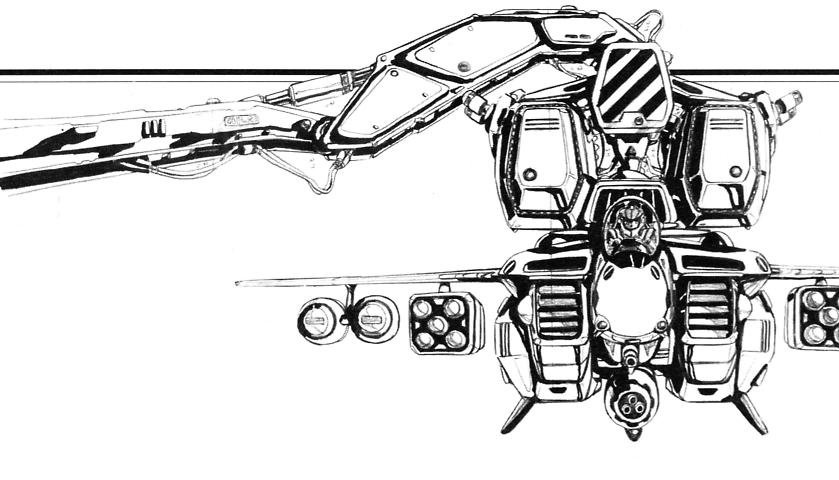
I LOVE IT! I LOVE IT! I LOVE IT!!! This has got to be my most sought after item! ever!! THANK YOU, thank you Jesse & Gundam Head. I was wondering what you did with your WF kit (I was jealous when you said you got one - but then I saw it, and re-considered) This is fantastic - I can't wait, its so exciting. I would like to make two requests, can the actual head that attaches to the Valk's packs somehow allow us to incorporate rare earth magnets to allow the Valk model to be detachable after construction - I'd hate to have to glue the Valk into the arm. Secondly, in the line art, the articulated arm section before the yellow and black caution hatched joint mechanism has three very distinct panels that stick out, but the WF model has them as recessed areas like truss webbing - I'd prefer to see them as three panels that stick out with rounded sides (more like the lineart). Again, thank you so much for all your efforts and keep us updated. And Jesse, if you need anything at all from me, or if there is anything I can do to help - just ask.
-
Hi all, I'm currently home sick - nasty cough - trying to do some work at home though. Haven't found the time to work on this kit yet - with all this Christmas stuff going on. Hopefully I might get a few hours in during the Christmas break. Although, everytime I walk past the work bench, its calling out to me. Sorry to hear about the pits Mule, yes excessive putty can damage your kit, I haven't ran across this problem in years. I mostly ran across this a long time ago, when I tried to sculpt something out of the putty, but as long as you try to keep the layer of putty thin, and allow it to dry before adding another layer, it shouldn't be a problem. Sometimes, when you leave the putty in the tube a while, a whitish ooze separates from the grey putty - this is exactly like styrene cement - this is the putty's solvent, and this is the stuff that will attack your plastic if its not properly vented and allowed to dry. If it separates, try to mix it back into the grey putty. I've also found that if the putty is too dry, you can use liquid cement and that will "thin" out the putty as well - almost to the consistency of Mr. Surfacer. But treat it like solvent cement, don't apply too thick a coat, or it will eat away at the plastic before it can properly cure. I applied a liberal amount of putty to certain parts of the valk, but they are relatively thin layers, just spread over a larger area - and I haven't had any "melting" problems yet (knock on wood... )
-
Hey all, I hope this isn't off-topic, but what about a flight sim thats simple, more arcade like - with plenty of eye candy. Any suggestions? Something like Ace Combat 5 but for the PC?
-
Ahh, the generation gap Boy I feel old...
-
Oh, what problems? I've had mine for over 20yrs, and its still fine, all original parts, except a needle and head - which is 8 yrs old (I wanted the fine tip, the airbrush comes with a medium tip) I spray laquers and metalizers all the time through it - what type of problem? However, I am looking at getting a double action (also syphon) one soon - I think I've "graduated" up to one of these - and I will be looking at IWATA (better quality) or Badger (easier to get parts/accessories around here)
-
HEY I just realized your choice in names - GOOD CHOICE!
-
Wow!! How lucky to have gotten that particular kit! Congratulations! We've been looking for this kit too, but haven't gotten it yet - but it sure is fun trying!! We wish you all the best on your little bundle of Valkyrie breaker - err... I mean joy! I guess it will be time to move all your toys & models up a few levels in the next year or so eh?
-
Sorry everybody - this thread is definitely on the back-burner for a while. I just got a job (thank God!) so it will be a day here and there maybe on the weekends. If anyone else wants to start a thread of their build - I would be most interested (hint, hint... Jesse)


