wm cheng
-
Posts
4319 -
Joined
-
Last visited
Content Type
Profiles
Forums
Events
Gallery
Everything posted by wm cheng
-
Well... wow, that's steep! - its time to bite the bullet - count me in if its under $300 all inclusive (and if I'm still working )
-
Hey Jesse, Wy don't you show us - give us some pictures!
-
Oh Man! That's great news!! I'd be in for 2 or 3 of whatever Hasegawa can throw at us - especially the fighters!!
-
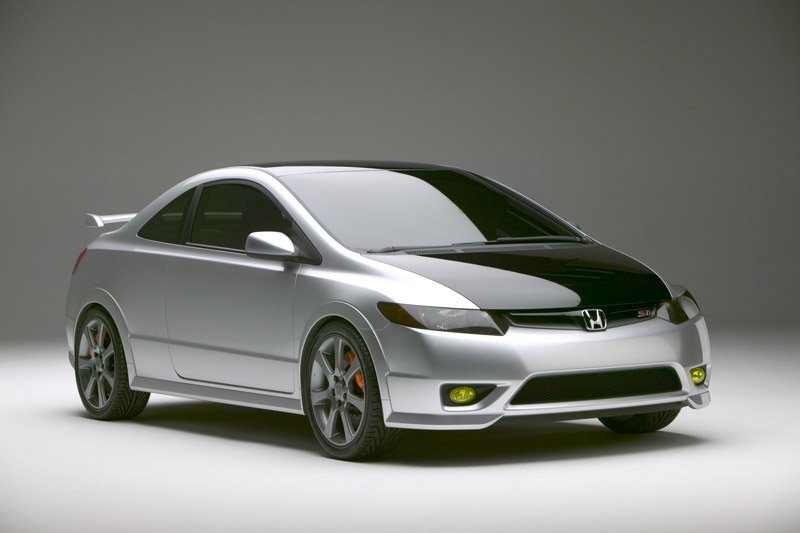
I'm liking this... it looks like the Civic Si is returning to its former glory (200hp 16valve DOHC!) http://www.edmunds.com/news/autoshow/artic...08/page014.html http://www.hondanews.com/CatID2001?mid=200...037548&mime=asc
-
Wow AlphaHX - great photos, Are there any more photos? What's the site? I love them - great references.
-
Sure acrylics stick to styrene - its all I use (Tamiya). You might be confused with regular art store acrylics - never use anything not meant for modelling (maybe except for future, but I don't even use that stuff for clear-coats)! Hmm, 56F is kind of cold - I wonder if that together with an air can might result in lower than normal air-pressure - you know the lower the temperatures, the lower the compressed air pressure is inside the can. Additionally, there might be something going on in the differences in air temperatures between indoor and out, if you're home is 70F and you take it out to the garage, the plastic may not cool down to 56F by the time you spray it, conversely, it you take in cold plastic after its sprayed into a warm house, it may condensate slightly which works against the paint drying. Try to airbrush at room temperature whenever possible. Humidity is probably not a factor at colder temperatures as it tends to be drier. You mention a pebbly surface - if its kind of like an orange-peel effect, it maybe because the gloss paint is too thick - or you are spraying in too thick of coats. Try thinning it more and spraying lighter thinner coats. Try switching to spraying flat or semi-gloss paints, it goes on much more smoothly, then spray a clear-coat in gloss to get the finish you want - that's what I do - I hardly ever spray gloss paints anymore - too picky and not enough coverage. Flat white is 5X better at covering dark spots (ie: putty) than gloss white of the same brand. Good Luck, Wm
-
You need to be a little more specific. If you've got pictures of it on the model - that would be best - but its a little vague to diagnose right now. What do you mean by droplets? Is it really humid where you work? Do the paint beed up into droplets on the surface of the plastic? Is it plastic you are spraying onto? It could be release agents on the model that wasn't properly scrubbed off or greasy fingerprints. Are they droplets in the air - then it could be low air-pressure - are they sputtering or creating a splattering pattern on the model - all indicative of low air-pressure or partially clogged airbrush nozzle. Lastly, you mentioned that you stir the paint with the back of the brush handle? Why, you should use the actual brush, it will mix it much more thoroughly. Good Luck.
-
Welcome back Devin, I hope all is well again... I'm so sorry to hear about your troubles. I hope we can help. The end of 2004 and the begining of 2005 hasn't been a great year overall, too many negative things have happened to us all - lets hope for a brighter future. Looking forward to more great work, Take care.
-
Yes, anyway of convicing Shawn to retrieve a few of my step-by-steps from the old boards too - I'd be happy to put them together if we can get them back.
-
Hey Jesse, I'd be happy to contribute any of my built pictures to this very worthwhile endeavour - just let me know what you need from me. Unfortunately I don't have much in the way of rare kits, but I do have the Hasegawa photo etched part on your list and I'd be happy to help. Hey! whats this about Platz doing a PE part for VF-0 & SV-51??
-
I hope it doesn't go to a major network - although while ensuring funding, it would just water it down to be consumable by the stupid masses. The more execs that get their hands involved - the more directions and personal egos BSG needs to absorb - thus creating a rambling comittee runned story lines instead of a singular vision which most sucessful show requires. Smaller cable shows can be edgier and push the envelop - creating a fresh re-interpretation which I fear BSG may loose if it goes to the major networks.
-

WM Chang! Could I get some shot of your VF-1 Cockp
wm cheng replied to broadshore's topic in The Workshop!
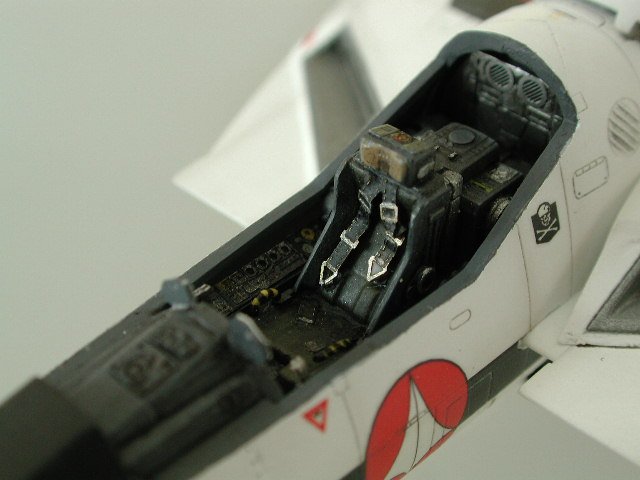
Well, it depends how much of a stickeler for details you are. As I said, the side consoles are devoid of any controls whatsoever - they are a green armrest (according to the TV lineart). So all my side console controls are made up. However, the front console is molded and decals are provided by Hasegawa for the DYRL version, not the TV version - so no HUD. Its easier to do the DYRL version since thats what the Hasegawas are based on. The canopy frame latch lugs are pretty accurate to the lineart. Also, there are no yellow & black emergency handles on the seat that I have added. -
WM Chang! Could I get some shot of your VF-1 Cockp
wm cheng replied to broadshore's topic in The Workshop!
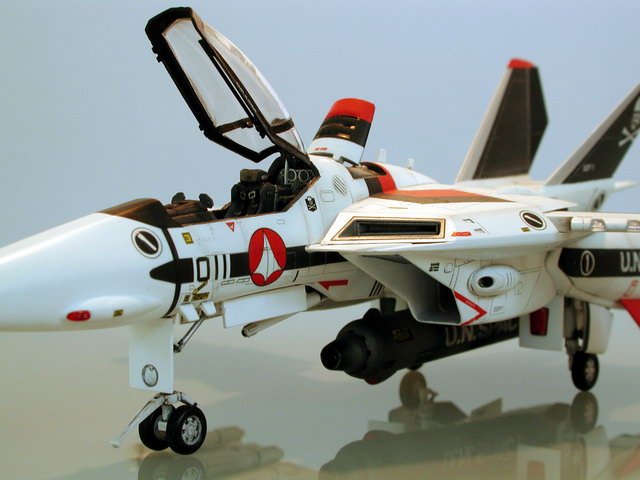
Last one... I would be less timid on the weathering (especially after the VF-0) the next time I build one of these again. I can't wait to get back onto the VF-1 + Booster!!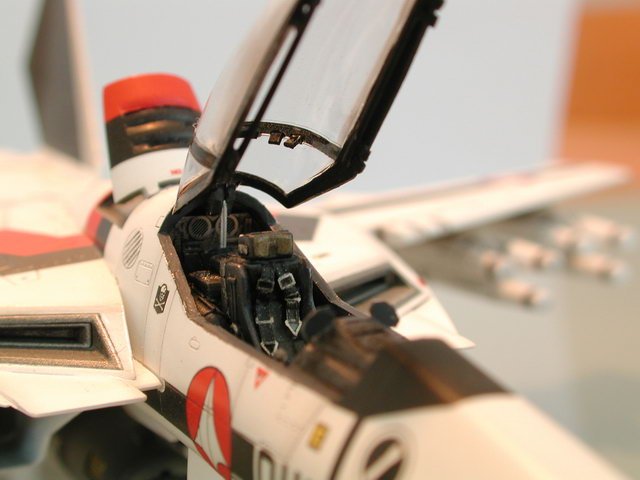
-
WM Chang! Could I get some shot of your VF-1 Cockp
wm cheng replied to broadshore's topic in The Workshop!
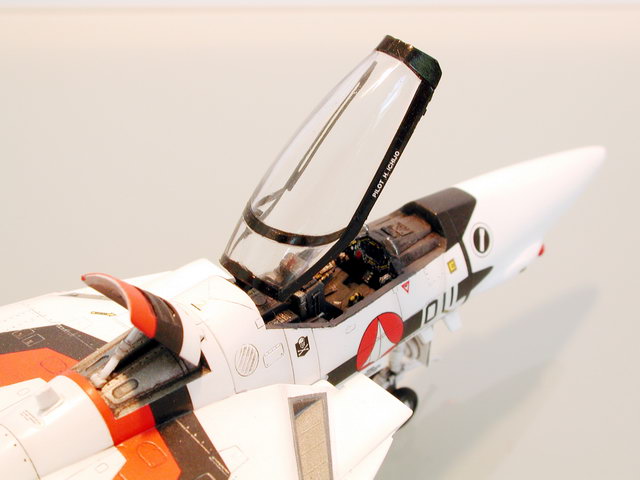
Oh, yeah, there's a paperclip (non-corrugated kind) holding up the canopy - the real metal shows up well as an hydraulic actuator.
-
WM Chang! Could I get some shot of your VF-1 Cockp
wm cheng replied to broadshore's topic in The Workshop!
-
WM Chang! Could I get some shot of your VF-1 Cockp
wm cheng replied to broadshore's topic in The Workshop!

-
WM Chang! Could I get some shot of your VF-1 Cockp
wm cheng replied to broadshore's topic in The Workshop!
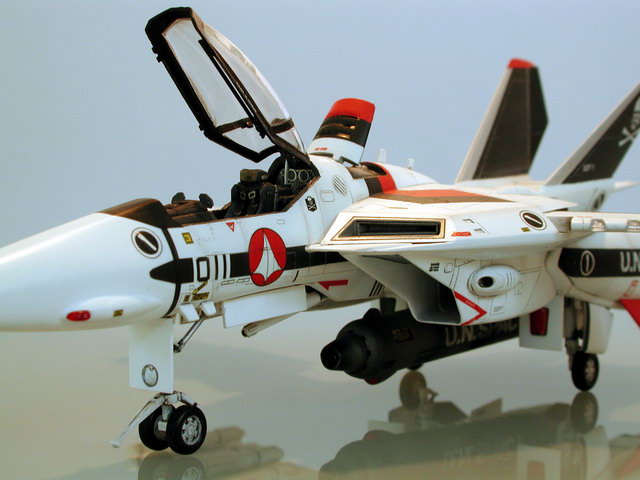
Boy... I haven't looked at these shots in years... This one shows off the bits in the canopy frame well.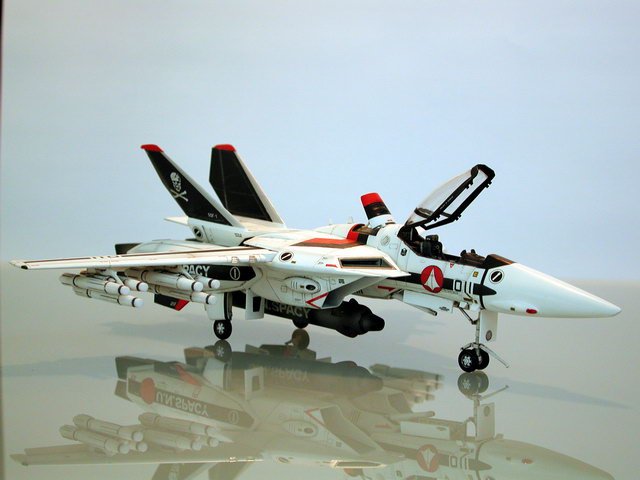
-
WM Chang! Could I get some shot of your VF-1 Cockp
wm cheng replied to broadshore's topic in The Workshop!
-
WM Chang! Could I get some shot of your VF-1 Cockp
wm cheng replied to broadshore's topic in The Workshop!

-
WM Chang! Could I get some shot of your VF-1 Cockp
wm cheng replied to broadshore's topic in The Workshop!
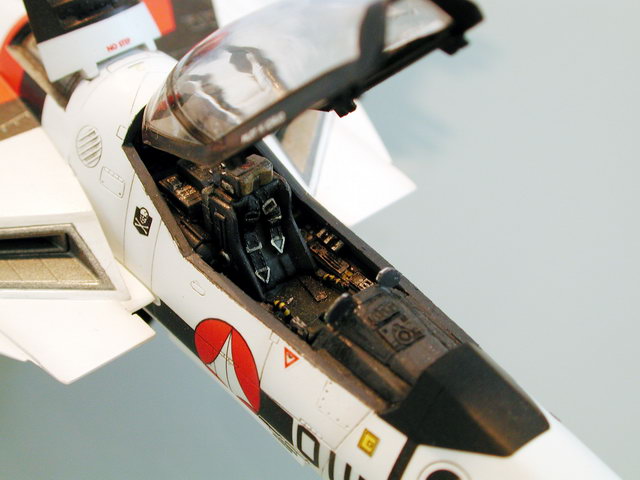
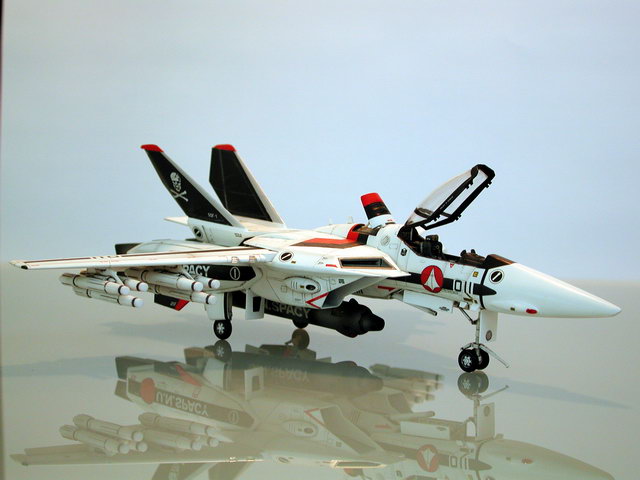
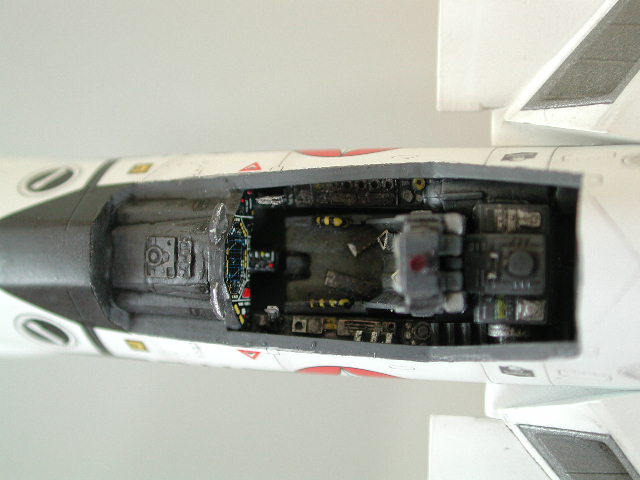
hEY Broadshore, its chEng!... Ask and ye shall recieve... Okay - word of warning, this is not accurate to the lineart of Macross. In my over-detailing zealousness I forgot to look up my art books before going to town in "gaking" up the cockpit. In fact, the Hasegawa kits have it right, the side consoles are indeed featureless armrests and are supposed to be green cushions with no controls on them. But I like to show a little more detail when it comes to cockpits - especially since the model has all those realistic rivits all over it anyways. The side consoles where built up with spare photoetched console pieces (mostly WWII aircraft) but layered up to appear more complicated. Same with the forward bulkhead where the HUD should be. I re-built the mirrors, since I felt that the Hasegawa ones were just too thick. I glued various bits and pieces of styrene to the canopy frames as per the lineart of my various Macross books to represent the latching mechanism. The back bulkhead is a piece of photo-etched add-on by Hasegawa especially designed for the VF-1. The seatbelts are from a WWII aircraft. I wanted to drill little latch openings on the fuselage frame but couldn't figure out a way to get such a small hole to be rectangular.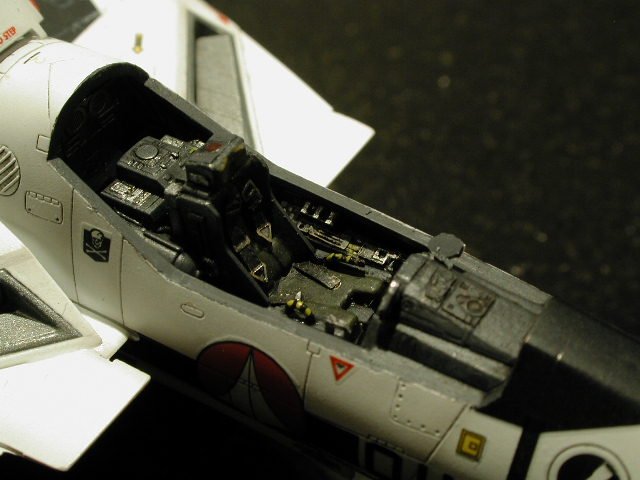
-
EXCELLENT WORK!! Fernado... And I didn't even like this design to begin with - but thats it, now I've gotta get one of these. You've convinced me! Wonderful stance... thanks for the photos - can't wait to follow through on your painting techniques. A truely unique model - keep up the great work! Wm
-
Why not an 1/32 Scale Tamiya Valkyrie (like their F-16 Viper) while were're at it, with removeable thermonuclear engines with supplied engine cart, operable flaps and brake, rubber tires, white metal cast landing gears and maybe a retractable pilots ladder!
-
In oils, I get White, Black and Brown - from that you can mix almost anything you need, the browns are good for a bit of rust and brake/hydraulic fluids. The white is good to do panel lines on black surfaces, and the white & black together gets shades of grey for the actual panel lines or streaks. In chalks, I've only used the same; White, Black & Brown also. Pick a medium brown, so that you can always lighten it with the white or darken it with the black. Good luck.
-
Yep, you've got it Sar. The extra "revit" details are actually already on the kit, just really faintly (I guess the way its released from the molds) all I did was use a pin-vise with a very small bit and drilled out the faint impressions. I only made an indent, I didn't drill all the way through. Very easy, because its very soft plastic. The shading is done after I did a black oil wash on the parts to pick out the detail. Then I airbrushed really thinned flat black and just airbrushed where I wanted the shading to be. I immediately protected this very thin delicate layer with a semi-gloss clear-coat when I was happy with the finish. The little "fence" after the wing sweep is a piece of corrugated styrene that you could pick up at most hobby/train supply stores - there are quite a variety of textures to choose from. The magnets (rare-earth magnets to be exact - very strong, its needed since there's a bit of plastic to work through) are in the leg portion, and the steel washers are on the back of the fast pack portion so that they will become removeable after the model is built. Good luck, lets see some pics...
-
You're right, 1/72 scale is much smaller, a lot of weathering techniques for larger scales don't look right in 1/72 scale, I had to re-learn/experiment with a lot of techniques before I can get something I liked that looked proper in this scale. I had to forgo some weathering like watermarks in 1/72 scale, that I find only sucessfully achieved in 1/32 scale. From what I gather 1/35 scale is military tanks and vehicles, not many planes made in that scale - so aircraft weathering is pretty different from vehicular weathering - a lot less drybrushing. Good luck & post...