wm cheng
-
Posts
4346 -
Joined
-
Last visited
Content Type
Profiles
Forums
Events
Gallery
Everything posted by wm cheng
-
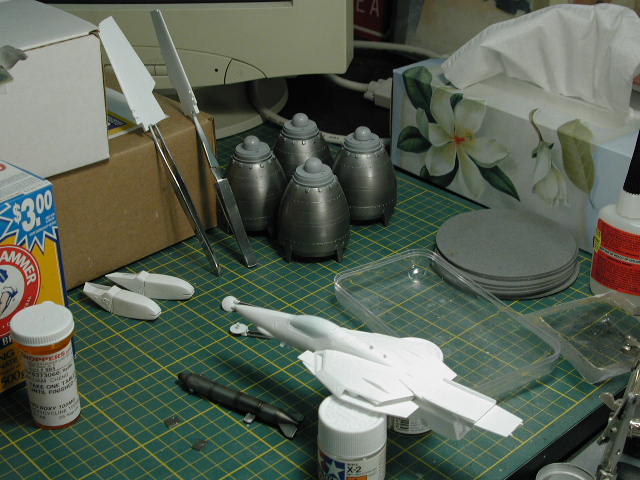
Now I am masking the white portions off to do a dual tone light grey on the Valkyrie. I want to darken up the Valkyrie so it doesn't appear to stark white against the Boosters, but I don't want a grey plane, I still want it to appear essentially white. You can have quite a bit of latitude since eventually, the black lines of the decals are so stark - it hides a lot of tones of grey. I essentially want to subtly shade the Valkyrie from light to dark towards the tail at areas that are in direct contact with the Boosters (if I'm successful in the end - one shouldn't notice the shading too much - the Valk and Booster should look like they belong ) My first past was really too strong - I went over some areas too many times. The contrast was just too much here; I should take my own advice; build up in layers! Well, not to worry, I just went over the entire thing with white again - this lightens the grey and evens the shading a bit more to my satisfaction. That abrupt change from white to grey at the chestplate area will be just fine when I apply the yellow & black stripes - you'd hardly notice the difference - that area won't be stark white hitting the front of the Boosters. Wow! its late - I've just put on another coat of semi-gloss clearcoat to seal in the shading and provide a protective layer for my post shading tomorrow (in case I don't like the post shading, I can strip it back (undo) to this point). And I'll let it dry overnight without my meddlesome impatient fingers getting all over it!


-
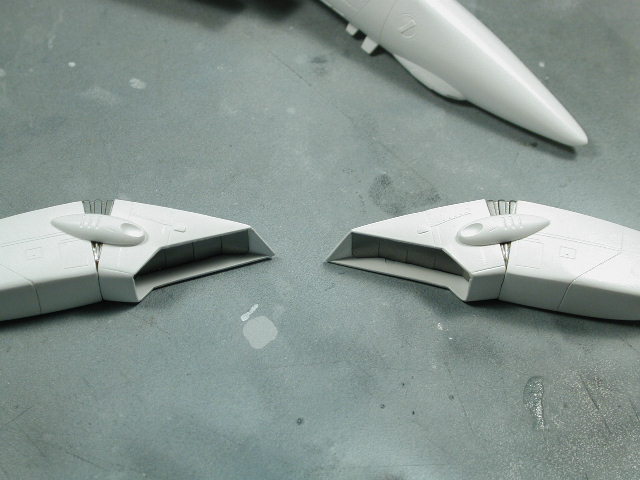
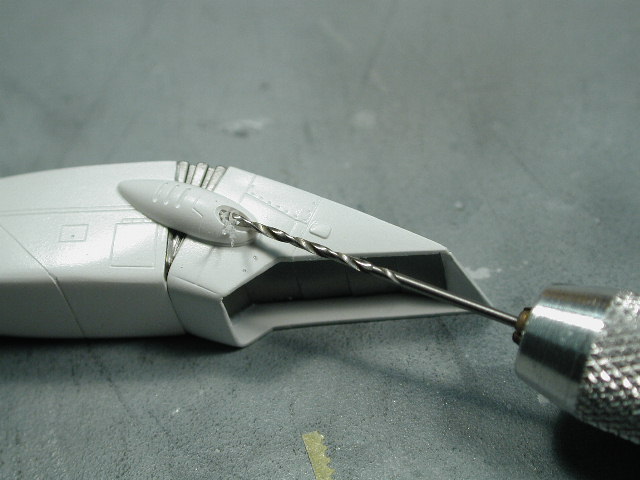
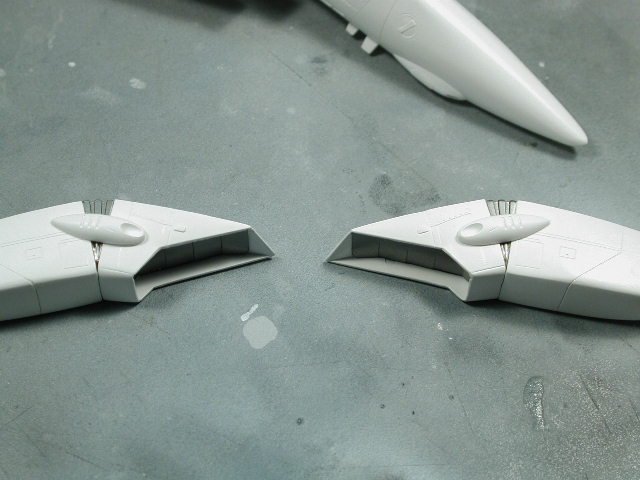
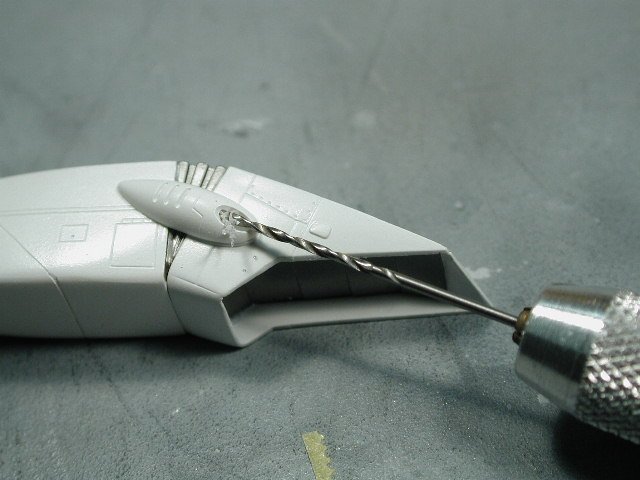
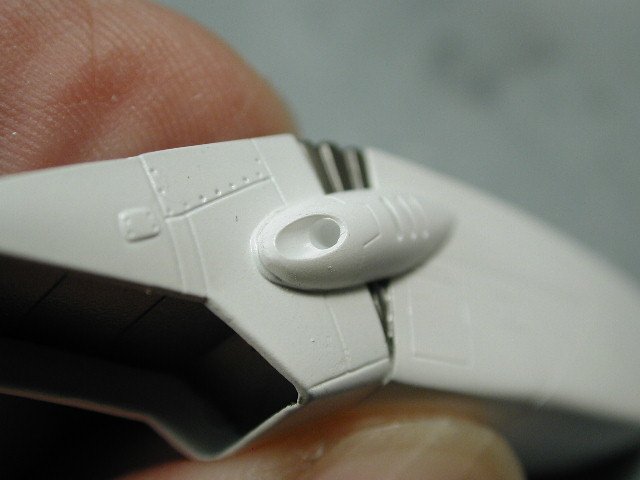
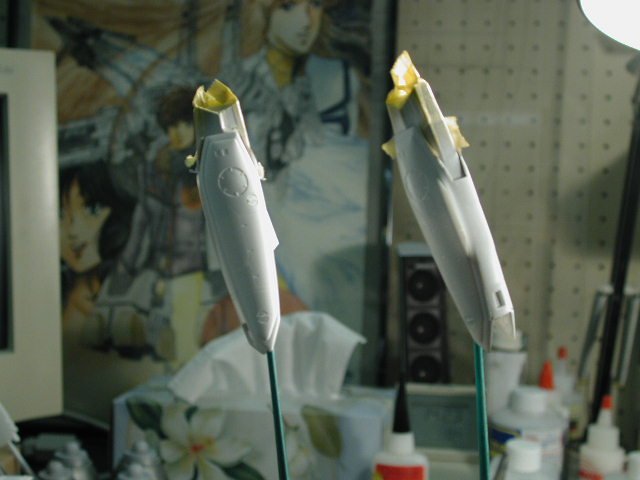
I can finally add those little bumps on the side of the intakes - I keep worrying that I'd loose them. I crazied glued them in - since its styrene being attached to resin (actually with a layer of paint on top - but I didn't think it matter too much since these bumps don't take much stress) Now, I thought while I still had the intakes as separate pieces, I'd drill out the bumps. It looks better as an intake or vernier thruster, so the hole adds some detailing especially when we come to the dark wash. Again, I start with a smaller pin-vise bit to locate the hole then work up to the bit of the intend hole size. Here's a shot of the competed hole, you don't have to drill too deep.
-
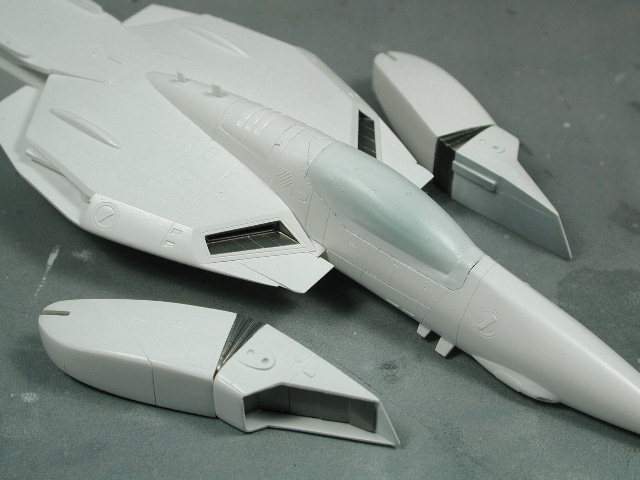
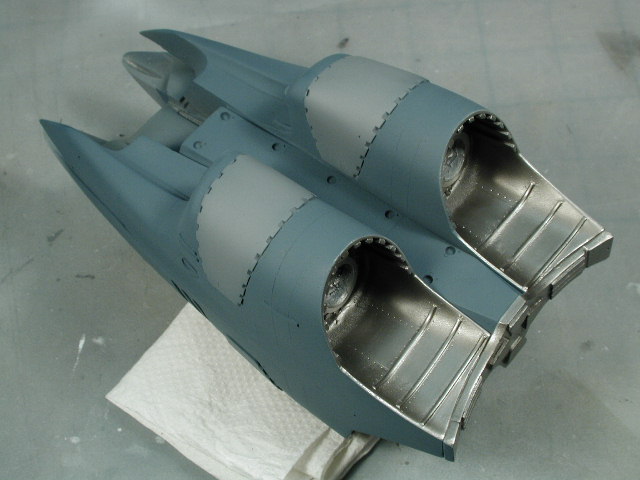
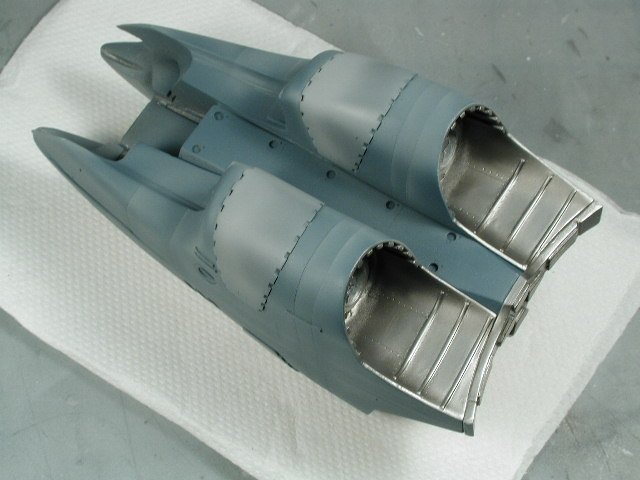
Here's a shot of it done - with the masking removed. Its really not that dark - but because its highly reflective, it seem darker than it is.

-
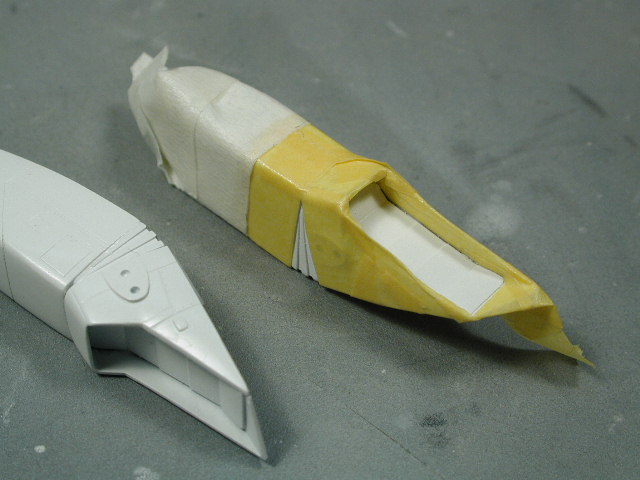
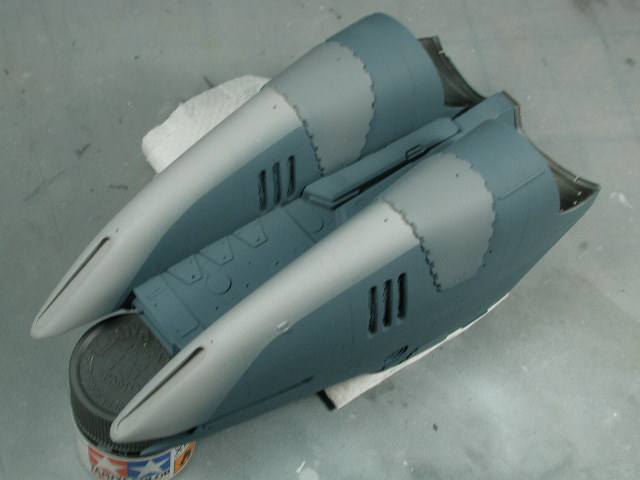
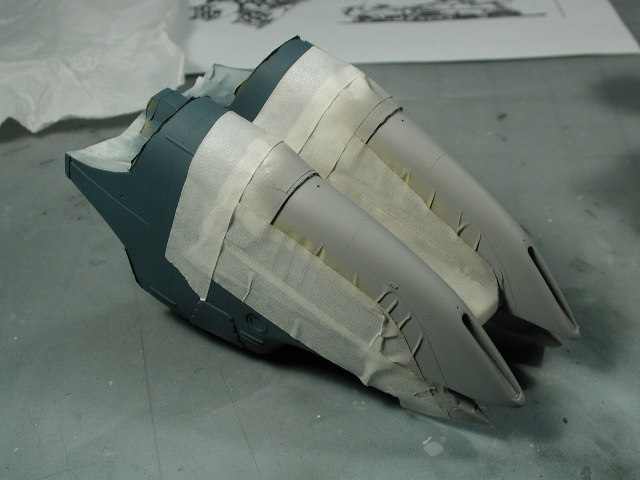
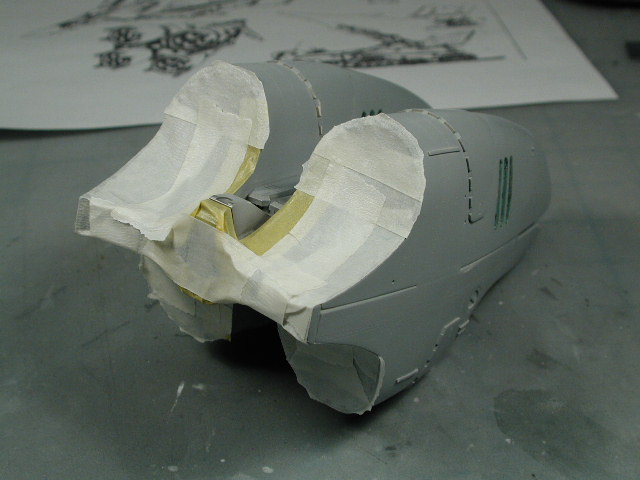
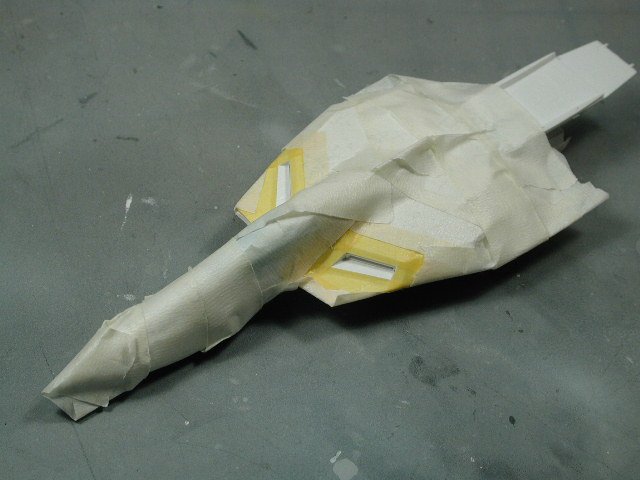
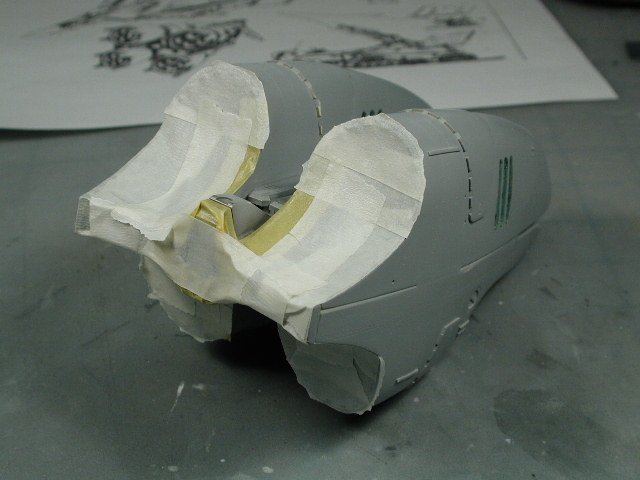
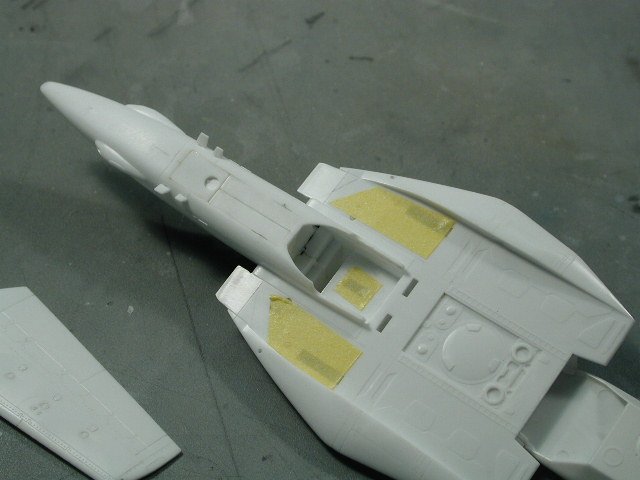
Thanks for the kudos! although, Ido, I'm beginning to know what you mean about the blue/grey colour scheme (i'm not that confident about it - partly because its departing from canon - and seeing Bertt's sure looked nice ) But I'll reserve judgement until I get a little further along and get them both together (its all an experiment ). I'll just hold off the decalling of the booster till I'm sure. Glad the decal worked for ya though. OK, I'm on to masking for the metalizer steel portions that couldn't be painted separately. It was great that the Captn' provided the resin cast of the modified intakes - however, since it was molded in once piece (which saves construction and sanding) the intake covers couldn't be painted separately. Additionally, I didn't use the Photoetched parts for this kit (which would of made painting them separately a breeze). So I have to mask out all the white around it leaving only the leafs of the intake cover exposed to the metalizer. Now with hindsight, it would of been easier to paint the portion metallic steel or grey, then mask it off and paint everything else white - but hindsight is 20:20! oh well... I've gone a little overboard here wrapping up my Valkyrie like a mummy, but I hate overspray especially on white! Again the yellow is the good stuff - the Tamiya masking tape, and the rest is the cheapo regular masking tape after I stuck it to my jeans first to get some of the stickiness off.

-
Spatula, don't be discouraged, the wing tabs and sprockets become misaligned all the time, exactly what Grayson said and you have them back in order! When you attach the wings, it will never do that again. Try to leave them operable - you'll be happy you did in the end. Which lights dropped? The wing tip or the two wing root lights? You can always file a new light from the clear plastic sprue that the lights were attached too. If you're sanding is good, you can glob on some gel-type crazy glue where the light is supposed to be and file back down to get the proper profile (careful that the crazy glue is harder than the styrene). I usually use white glue to glue the clear pieces on. Ok, I just sanded any little imperfections left and re-coated the Valkyrie with its final coat of white. Then I sealed it in with the ModelMaster Acryl semi-gloss clear coat. No pictures of that - just a boring white Valkyrie for now. Probably will start some patches of grey on certain panels with some post shading tomorrow. I concentrated mostly on the booster for tonight. After I got the base coat of colours down, I started to weather it, with a reverse post-shading technique, mainly where ever I would normally shade dark, I used a lighter Sky Grey to pick out the leading edges of certain panel lines. I also sprayed a very light gradated overall coat of Sky Grey from the front to the rear - blending in the various shades of grey (the idea is that the front gets worn a bit and is lighter) also to lessen the contrast between the booster and the Valkyrie. I want to add interest to the greys so that there are no solid patches of colour - always some type of variation. I got out my old VF-1A super as a guide to the weathering and colour range for the booster. Lastly I sealed this very delicate light misting of Sky Grey in with ModelMaster Acryl semi-gloss clear coat again. I plan on a dark oil wash tomorrow to pick out some of the details.

-
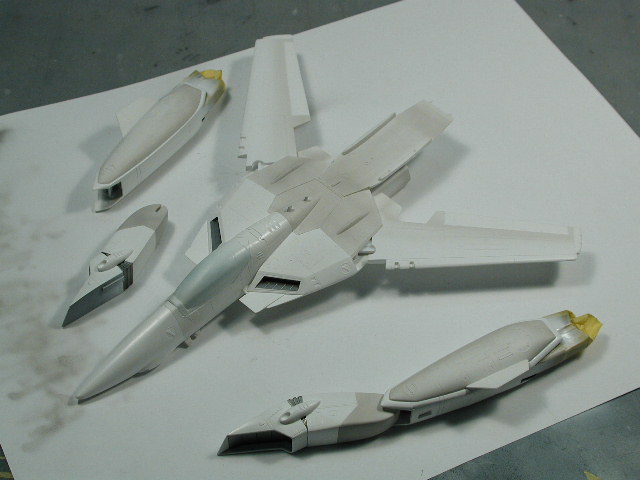
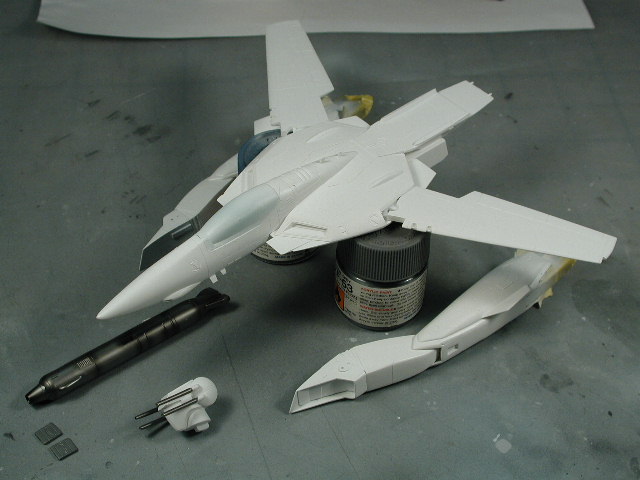
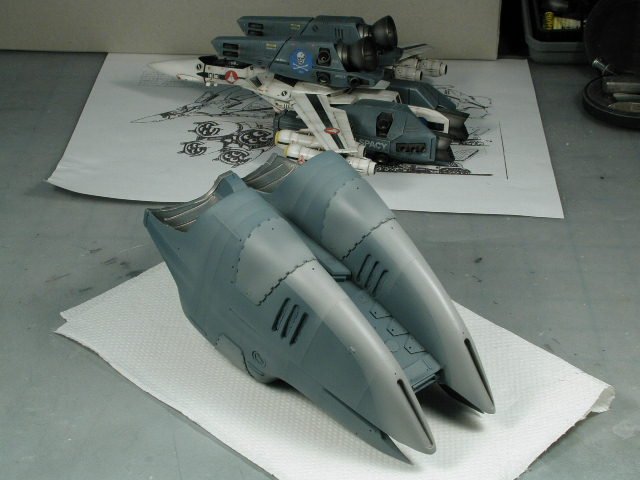
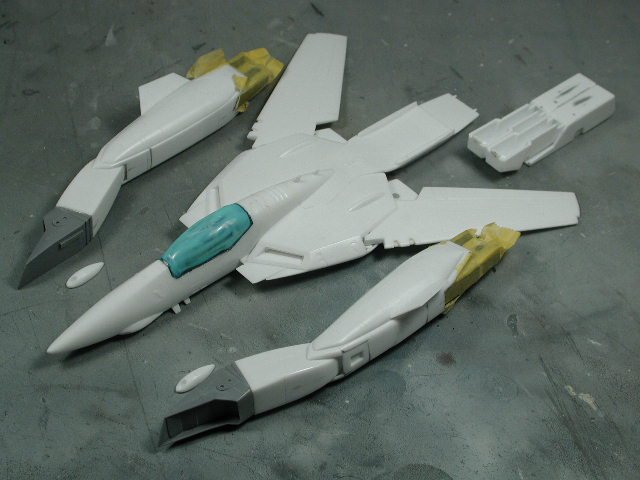
This is the stage the Valkyrie is at - its ready for some shades of off-white and greys - I plan of doing a darker version of the white (yellow & black) Roy's colours with more shades of grey and more weathering so it ties into the greys of the boosters a bit more. It will be Roy's plane after Hikaru took it over - so it will have Hikaru's name on the canopy rails. Now the flat finish on the boosters are still pretty fragile and doesn't stand up to much handling - especially if you have any nails. I will spray the entire thing down with a coat of Model Master Acryl (its actually a laquer) semi-gloss clear coat to protect the finish. The semi-gloss will make the entire booster appear darker (kind of like its wet) but I have to keep in mind that it will be flat and lighter in the end. I just couldn't resist a dry fit! I plan on spraying a lighter grey to work all the greys together a bit more over the clear coat, and start to weather and delineate some of the panel lines on the booster once the clear coat is dry. I have a final bit of sanding to smooth out some irregularities on the white Valkyrie and a final coat of semi-gloss white (I mixed 70:30 flat:gloss white) to get a semi-gloss that is more durable than flat paint, but have some of the covering characteristics of flat paint.

-
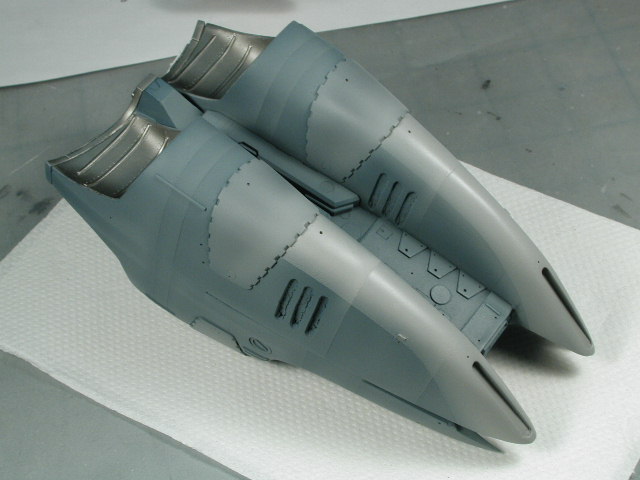
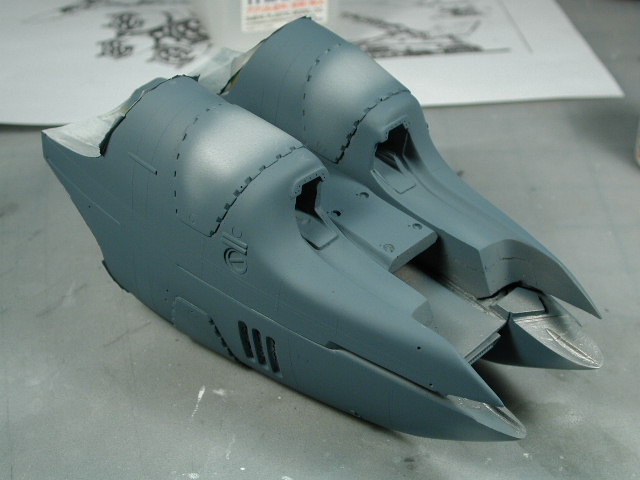
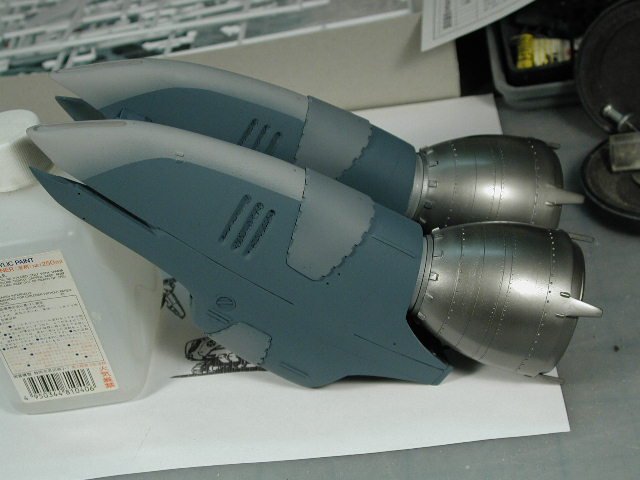
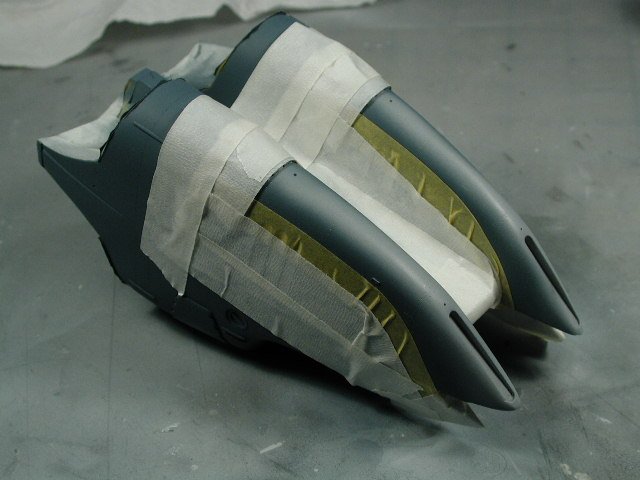
Well the main three shades of grey are on it now. The sharp line between the front sky grey portion and the main body of blue/grey was a little too strong in contrast. So when I returned with the medium blue to fix up some of the scratches that occurred while I was handling it during the masking - I also decided to spray medium blue over the areas where the different greys were delineated to soften the contrast between the colours. Keep in mind this is still the basecoat. I still need to feather the greys from a light to dark from front to back, apply some post shading weathering effects and generally lighten the tones so they tie together more. But overall, I'm pleased with the restults.


-
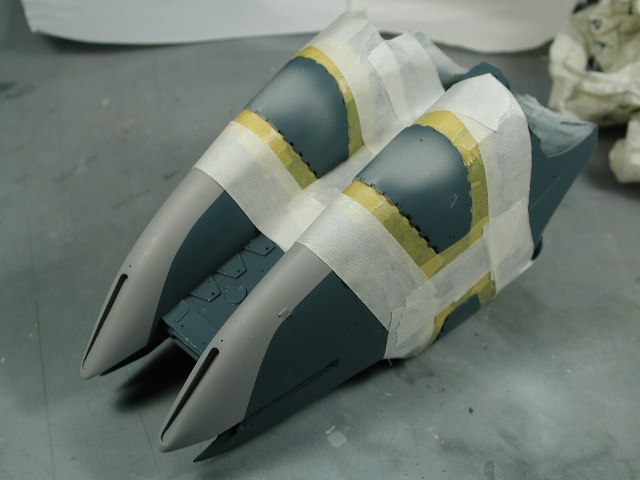
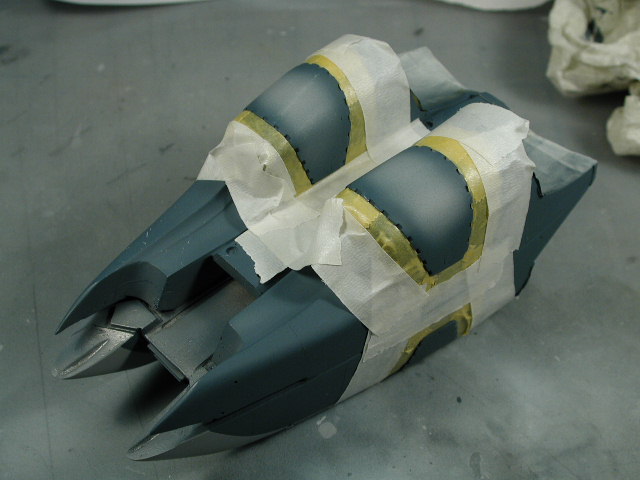
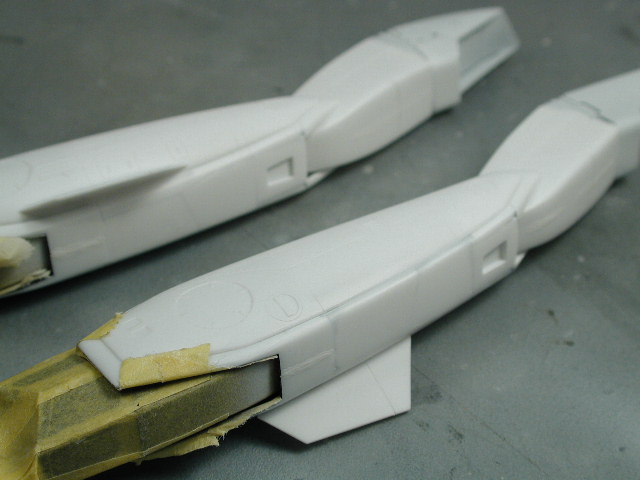
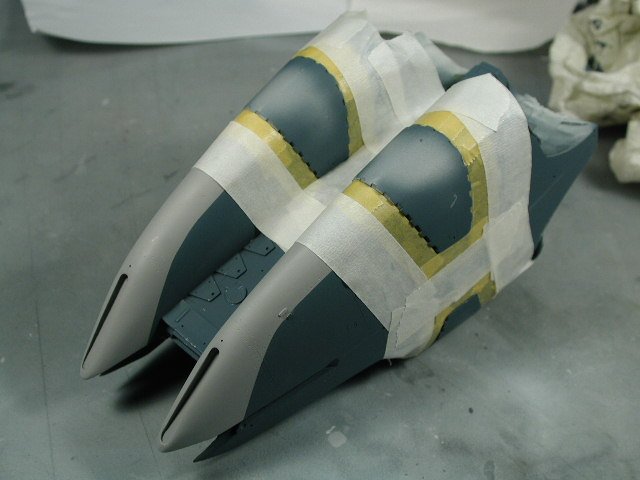
Next I decided that the raised areas on each of the booster humps were going to be another shade of grey. I decided on XF-53 Neutral Grey. Again I taped off the areas using the good Tamiya masking tape for the edges and the cheaper stuff all around. Becareful with the flat paints (especially unsealed Tamiya) its a beautiful thin coat, but very delicate to scratching. Just handling the boosters and taping and masking I accidentally scratched off a few sections of the basecoat. I'll go in and repair it later.

-
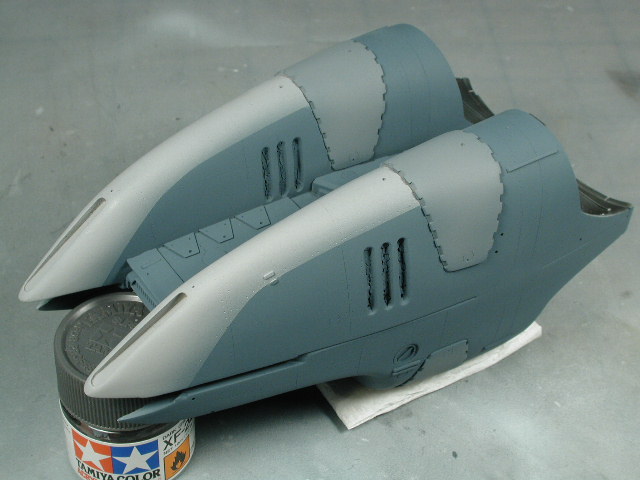
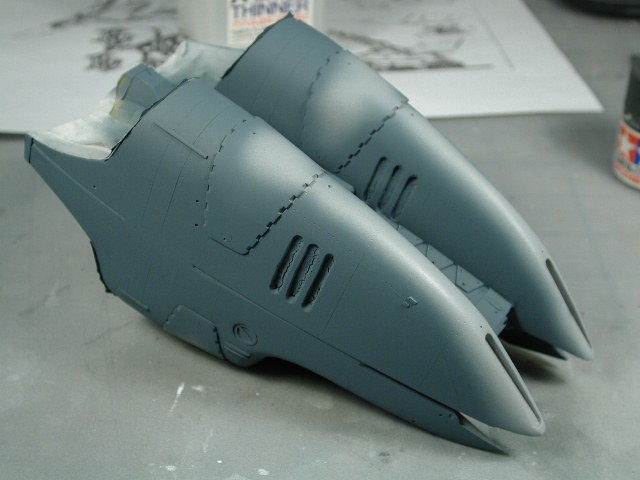
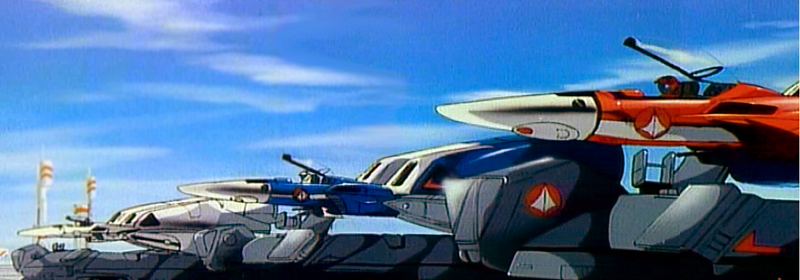
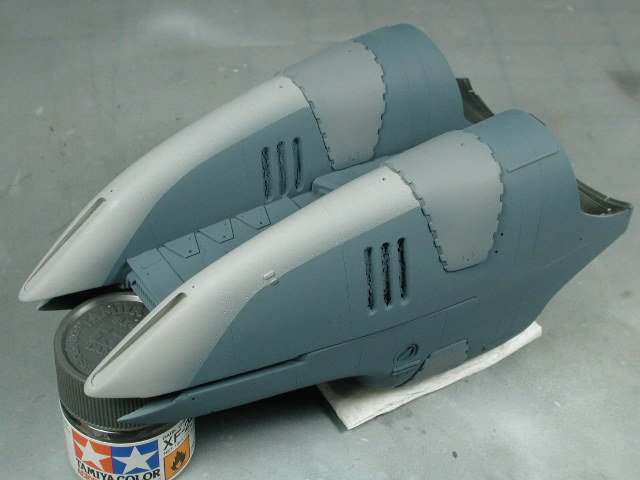
Now onto my next colour - I've decided that I would like a light shade on the top panel (like the white area on the Max & Millia boosters in the screen capture). I am going to try to make the boosters go from a light grey (portions close to the Valkyrie attachement points - to minimize the abrupt contrast) to a darker shade towards the engine bell end of the booster. I use the good stuff (tamiya masking tape - yellow thinner tape) on the edges where I want a straight line. I follow the Captn' scribed line on the outside faces and try my best to interpret the line on the inside faces (I will learn to scribe my own panel lines soon - but this isn't the project to learn on ). I use the regular masking tape (light tan) stuff for all the other areas that aren't important. I then carefully spray the lighter XF-19 Sky Grey onto the intended areas. Always spray away from the taped edge to get a nice sharp line. And try to spray lighter so that the paint is almost dried when it hits the surface - you don't want the paint to seep underneath the tape. Also if you spray towards the tape, you could get a bit of underspray underneath the taped line.

-
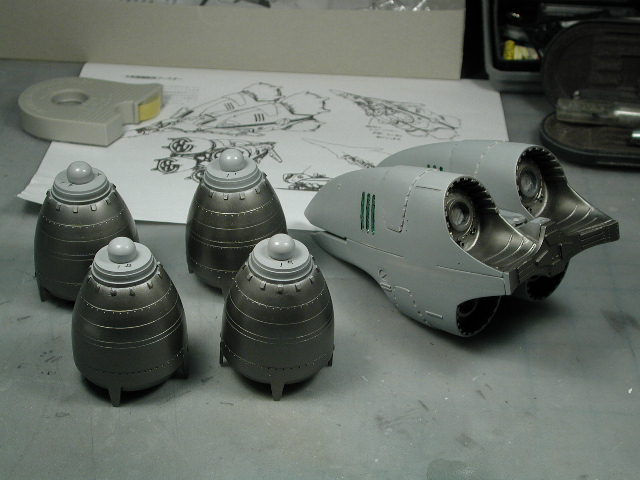
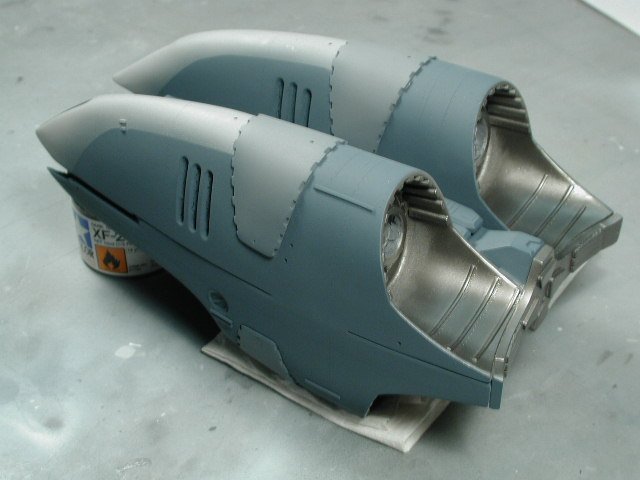
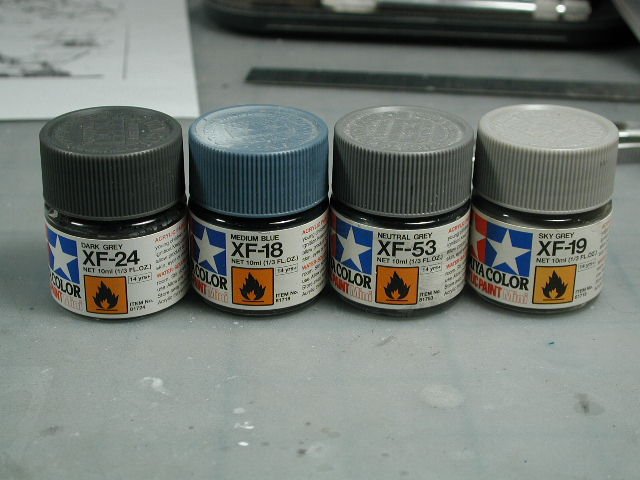
The colours I plan to use... I start off my masking the rear portions that I've already sprayed with Alclad Metalizer Steel. Then I spray the entire thing with XF-18 medium blue - this will form the base colour that I will work from (its the same colour I used for the fast packs on my VF-1A super)


-
Ido, the Tamiya acrylic white (Flat) covers better - however, you can't sand it - where as the Mr. Base White is at least a little bit sandable if you're careful. I've gotta find a decent white primer! I didn't know you can clean it with alcohol too, why can't you clean the airbrush with alcohol too? The long strip of black on the wings is a toughy - just use lots of water and don't apply any decal softeners until its in its final position. I apply it with lots of water and play with it until its down and blotted out (press deeply with a paper towel so that it sinks into all that nice engraved details and rivits on the wing), then apply some decal softeners or solvents over top and around the edges before it's dry and DON'T TOUCH IT!
-
OK, I had a little time last night and this morning. The first thing was to get the Valkyrie up to snuff. I had to do a nice white coat over the entire thing. I did it in several lighter coats. Every once in a while I'll get fluff/lint cought on the surface of the drying paint (I guess I need to vacuum my basement!) - I'll let it dry, then very lightly sand that area with 2000 grit sanding film to remove the fluff/lint (and slightly around the area). Then re-paint over the affected area until you can't see the repair.

-
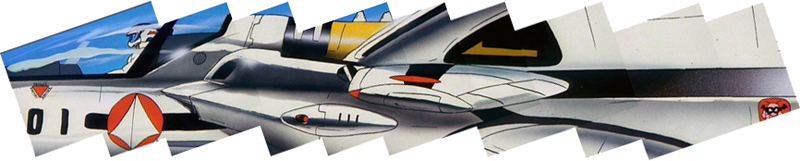
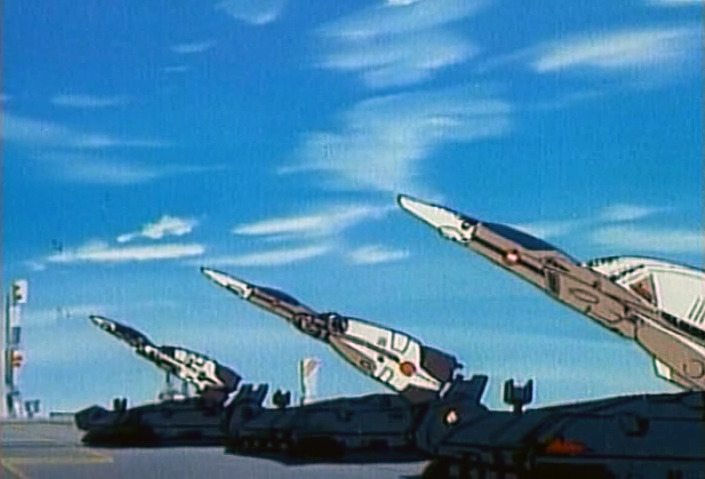
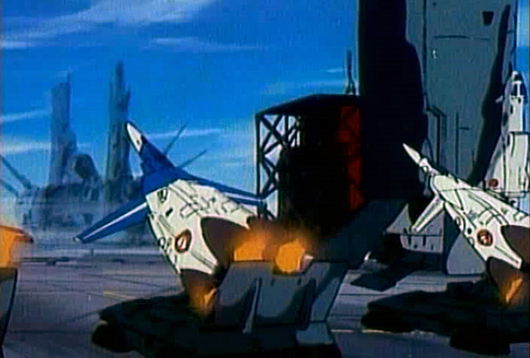
David, I don't think I could duplicate the effect at this small scale anyways I'm just using it as a guide/inspiration - its always useful to have real-world references. Ido, argh - you're right, it doesn't sand as nicely as a primer should! At least its a laquer (I hate spraying laquers, it stinks up the place and its harder to clean brushes and airbrush!) so it does bite better into the plastic - and it does sand better than the Tamiya white (which doesn't sand at all). Thanks for the rivit scriber tip - I'll order one the next time I have something from HLJ - although I'm not quite the stage to scribe my own panel lines and rivits yet Brett, that looks fantastic! hmm... I starting to have doubts about my fastpack blue/grey idea... It really looks good - pretty accurate to the TV episode screen captures. Here's some of the captures I've collected; (if anyone has any other references - I love to see them...)


-
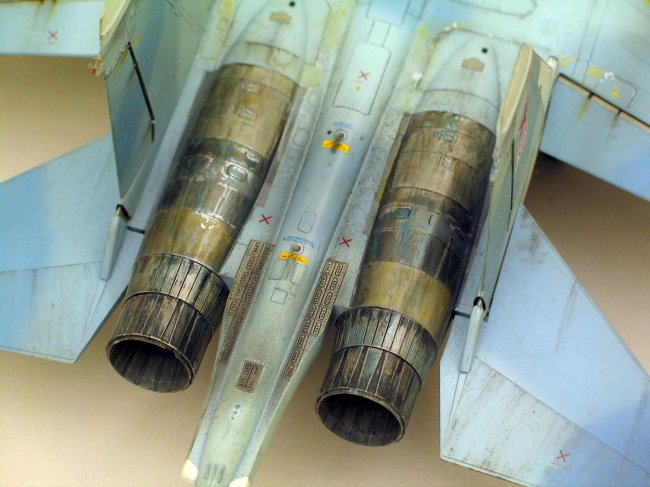
There's a great article; Heavy Metal Flankers (Painting weathered bare metal finishes) by Paul Brown over at; http://www.aircraftresourcecenter.com/ Go to Tool 'n' tips section - its under bare metal finishes. Great site! I was thinking of experimenting and doing something like this real Flanker photo(but much less weathered or used) Of course his model is 1/32 scale which is much bigger - I want to try to reproduce some of his effects in our much smaller 1/72 scale. I think it gives a good reference guidline though.


-
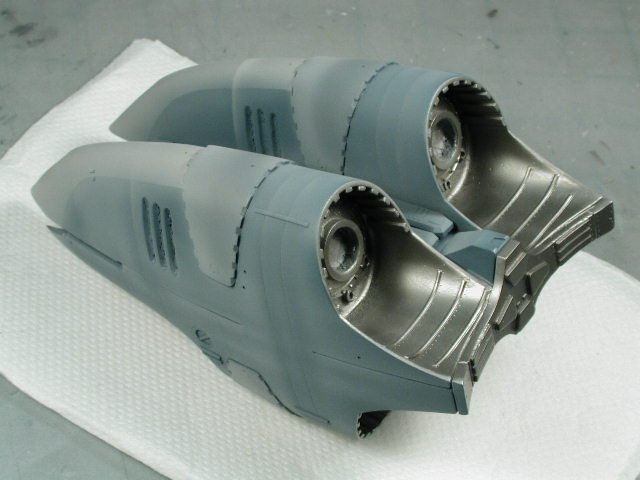
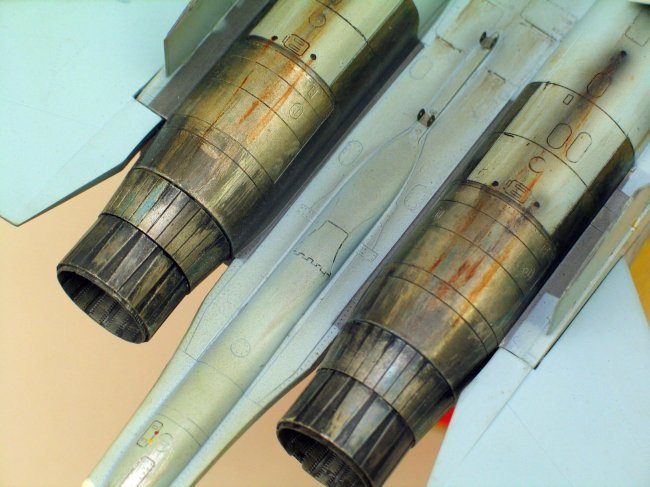
While I'm letting that dry - I thought I'd go ahead and start painting some of the pieces with the AlcadII Metalizer Steel as a base coat. I didn't mask anything off yet - I'll mask the greys on top later. But I was maybe planning on doing several shades a metal and trying some burnt metal type effects (since there is so much area to the engine bells - it would add more interest to them)

-
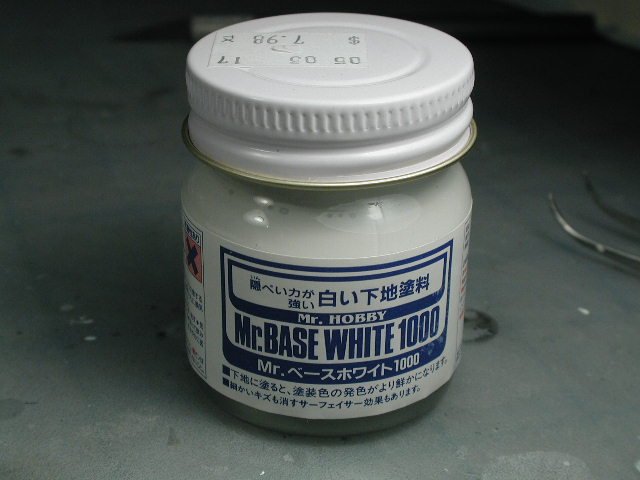
Well... yours truly was either too eager to get the sanding over with or I've just been out of the loop too long - but after the primer, it revealed quite a few seams that I should of paid more attention too. Luckily its primer and not paint - so its sandable. I started by painting a strip of the Mr. Base White 1000 over the seams that I want to re-sand - it will act as a Mr. Surfacer to seal and build up the seam for me to sand down Argh.. I hate this (but nothing is worst than a stupid seam...)

-
I'd thought it might be good to mask some areas off - from the primer so that when we glue these bits and pieces on, we have styrene to styrene contact - instead of gluing to the paint.
-
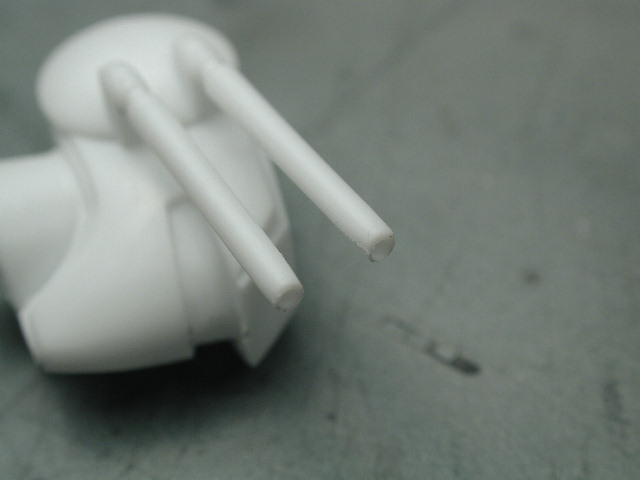
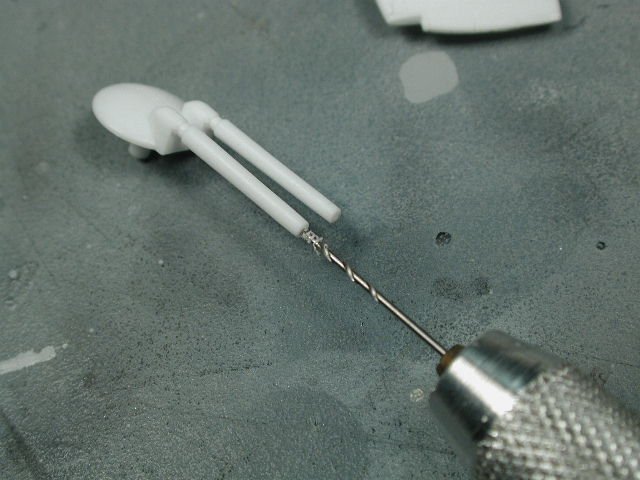
I thought I'd also get the head lasers ready for painting at this stage now too. It looks a lot cooler if you drill out the ends of the lasers. I started with a fine/small bit for the pin-vise - the trickiest part is trying to center the bit in the end of the antennas/lasers. Start very gently all you want to do is get a dent in the middle of the lasers. Then, once you're satisfied that you are reasonably centered, I then move up to a larger sized bit. You don't need to drill too deep - just 1-2mm depression is enough to give the impression that its a hole all the way through. Here's a shot of the finished product before the metalizer paint.

-
So I went out and got this Mr. Base White 1000 primer. I'm so glad they finally made one in white instead of the grey - it makes painting white planes easier (since the grey requires so many coats to completely cover it). However, maybe I thinned it down too much (50:50) it doesn't cover as well as I hoped, it gives a great smooth primed surface to paint on - but you need many coats to completey cover any non-white marks.
-
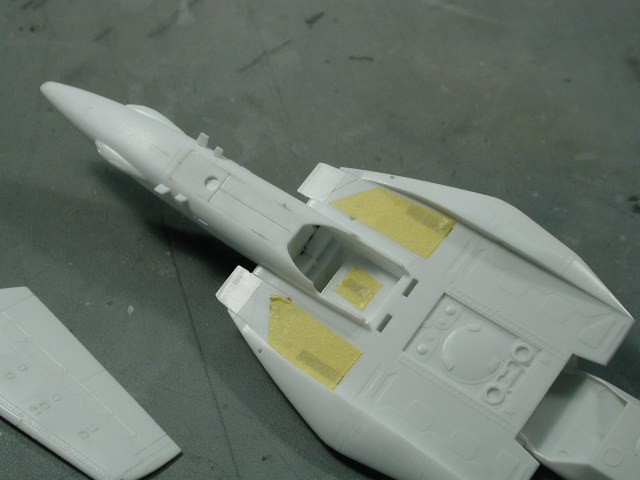
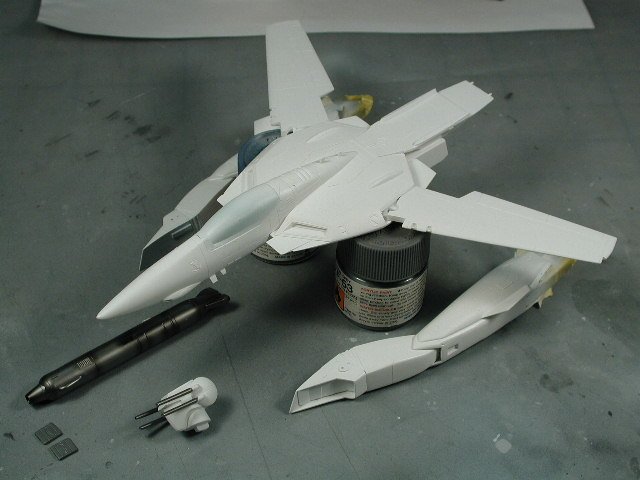
Basically, I'm prepping for a overall coat of white primer - to make sure all my seams are sanded and sealed properly. At this point, I sealed in the canopy and protected it with some liquid mask (which I can peel off at the end of the airbrushing. I've also glued on all the delicate little antennas and the vertical stablizer fins to the legs. You want to glue all these bits now since I want the solvent-type cement to actually have styrene to styrene contact (for some strength). You don't want to glue to paint or solvent, since the connection will only be as strong as the paint is to the styrene. I want to get everything white first, then see if there is any need for repairs. If the white primer is good (I intend to use a thinned down Mr. Surfacer 1000) then I might be able to get a coat or two of Tamiya white in there. Leave those hip bulges out for now, since I have to paint the accordion detail behind it in metalizer steel first. I hope to get to a coat of Alcad metalizer steel for the hip bend accordion thingy, the intake shields, the arm doors and the engine bells and back end of the boosters by the end of the day today.
-
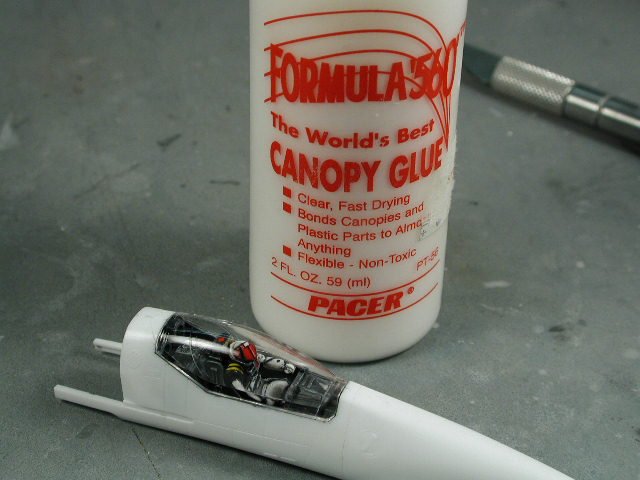
This is the canopy glue I use (its very much like white glue) it dries completely clear, and its somewhat flexible when dried which is great when the canopy doesn't perfectly match the fuselage. I've also used white glue - which works very well.
-
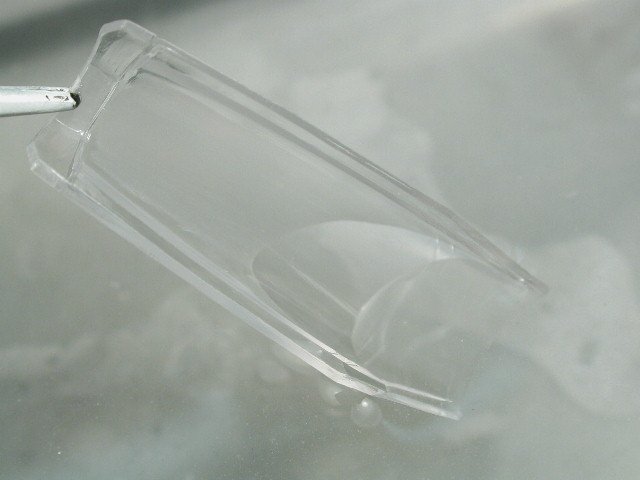
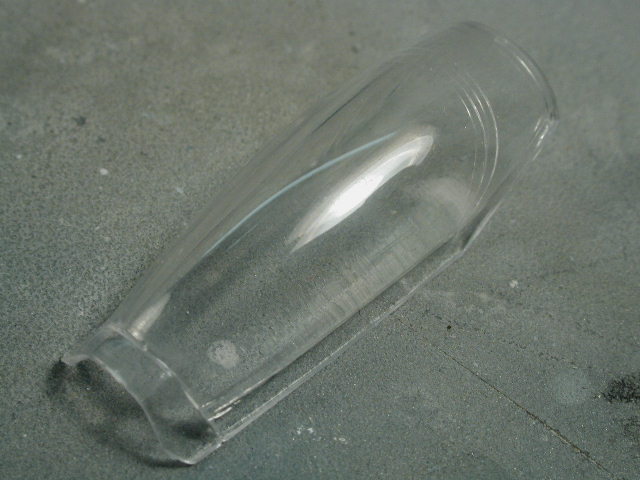
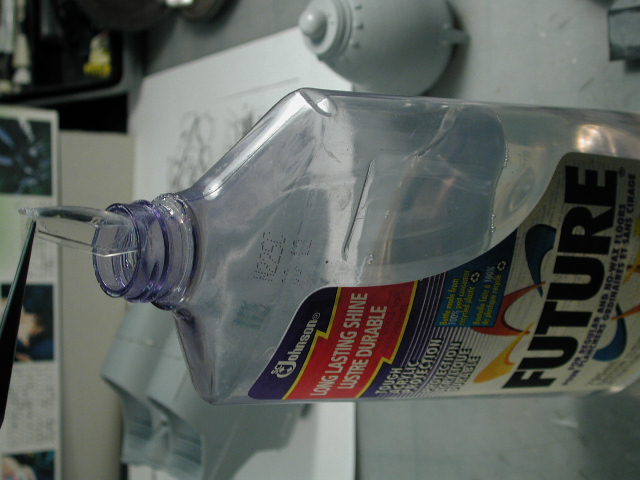
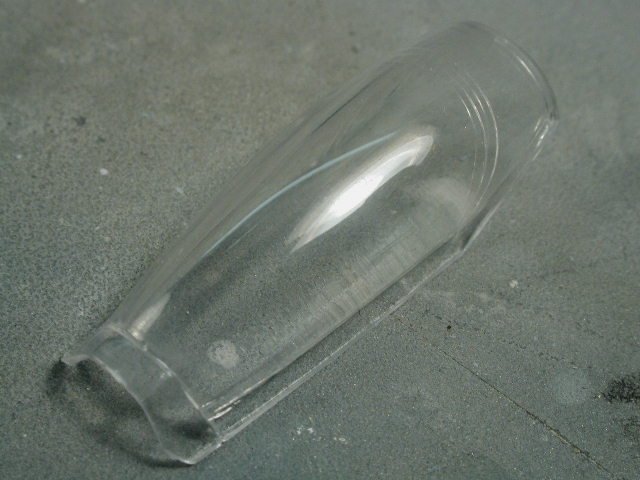
Yep, the liquid acrylic (Future) seeps into all the microscopically fine scratches (which refract the light giving the foggy appearance) and in effect, flattens the surface of the canopy - filling in all the tiny dents and imperfections. That's why I dunk it in water to see if it goes clear, since the water does the same thing (it just doesn't stay) Now, remember to let it dry overnight - at least 12 hours before you touch the canopy, or you'll get impressions of your fingerprints on the future coat. Always remember that there is a coating over your canopy part now, and if you're not careful, you can scratch it off or etch it away. Future is suseptable to ammonia based products such as blue Windex or Humbro masking fluid - keep these away from the newly Futured canopy - and handle it gently. I prefer to glue it to the plane (which seals in the inside surface) right away as soon as its dry. And I paint a coat of liquid masking fluid to the outside to seal/protect the outer surface too.
-
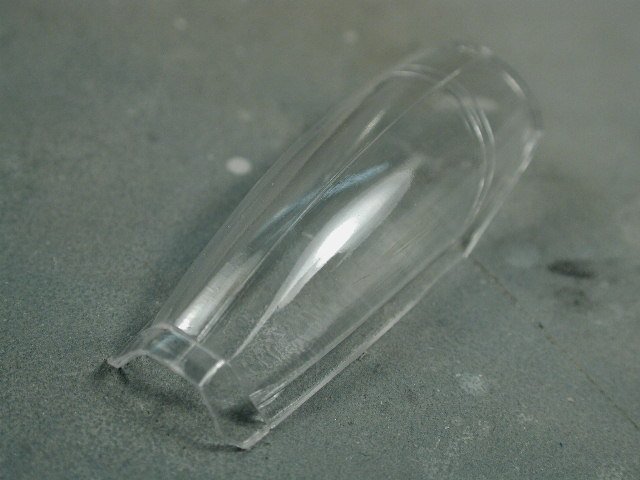
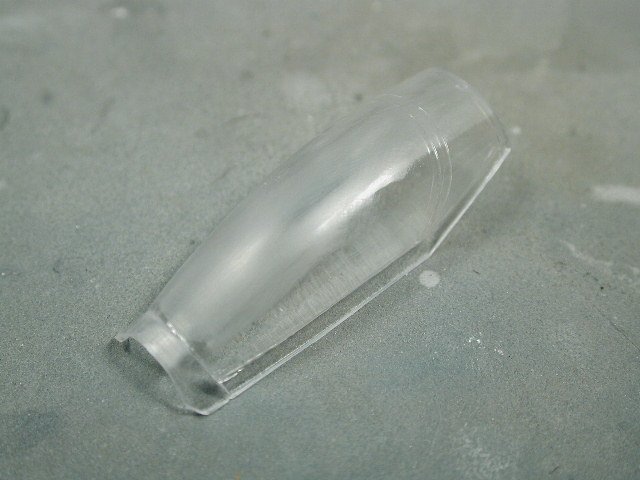
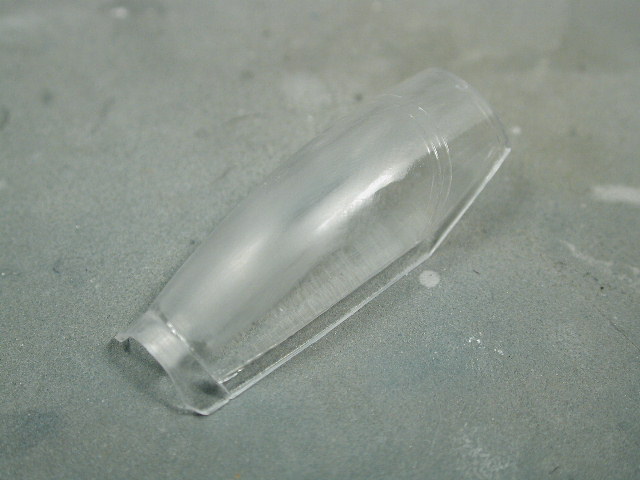
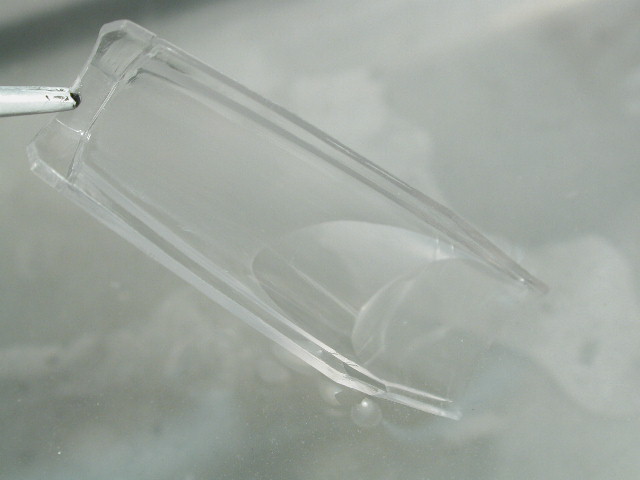
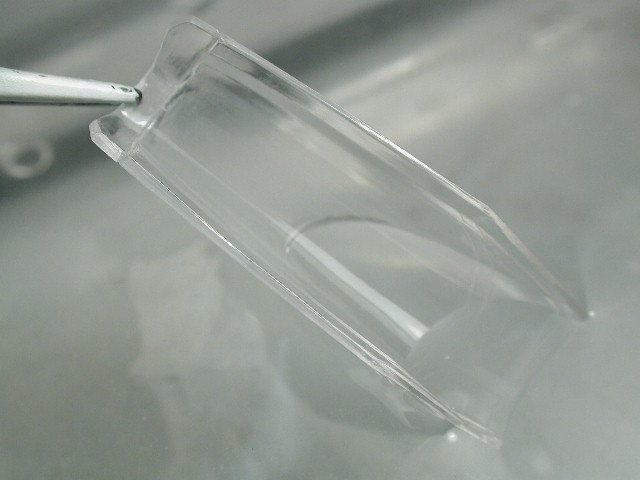
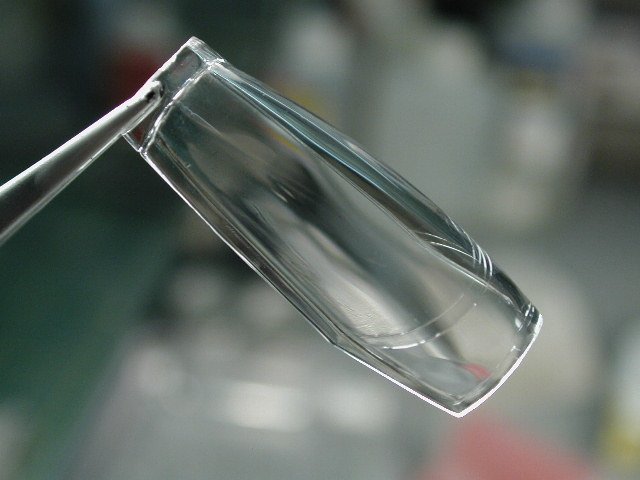
Sorry guys for the delay... been away a while with some family health issues, plus I'm still sick... (but don't count me down yet) I hope to do something tomorrow and post... Spatula, don't worry about stealing the thread - that's what it's here for, I'd like to hear your problems too and hopefully be able to help (if I can) The best way to get help is post a picture of the problem - its worth a thousand words! What kind of scratches are you talking about? (1500 grit should not be able to make definable scratches - its should just fog) I suspect you may be dealing with something less than 1500 grit. Future is not a necessity... it just helps out, but if you don't use future, then the only way to eliminate the foggyness is by using a rubbing/polishing compound like Tamiya. I merely said it was like toothpolish, but I don't mean to use toothpolish instead Like Stamen said, I'd hunt down the Tamiya stuff, its purposefully for plastic models and worst case, order it online. David is absolutely right, when you get as good as he is... you can skip a few steps and use fewer levels of grit sandpaper to do the job. However, its been over a year since I built my last model (its kind of like starting over again...) I need a few models to get back into the groove of things before I feel confident enough to start skipping steps. Sanding clear parts is a feel thing, and thus is hard to explain - but once you get the feel for it, its no different than any other opaque part (I just wanted to try to alieviate any fears or the stigma behind scratching and repairing clear canopy parts) All of the tips given is good advice... but just remember that different things work for different people. Basically the long of short of it - get the canopy to a foggy state (no visible lines or scratches), then to eliminate the fog do one of the following; 1. Buff with a rubbing/polishing compound and rag until clear (ie; Tamiya compound) 2. Dunk in Future Floor Finish (which turns the foggyness clear) Or be extra cautious like me - do both I don't think there's a danger of oversanding "through" the canopy (unless you're using 50 grit paper or a file! ) but the danger is pressing too hard and splitting or cracking the brittle canopy. Remember the clear parts are much more brittle than the styrene pieces. And I don't know of any repair that will seal in a crack all the way through a clear piece.
-
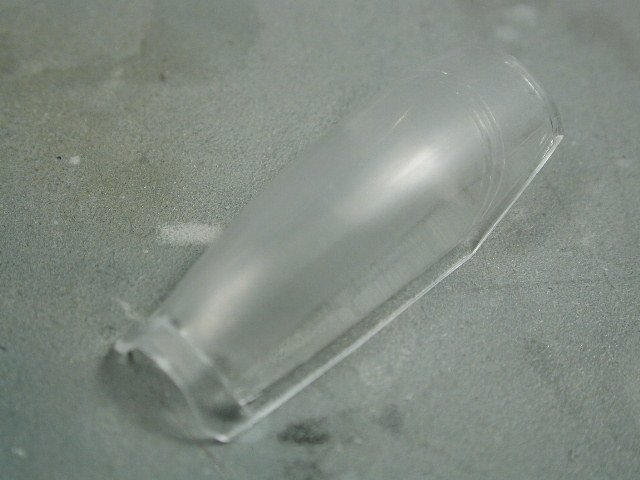
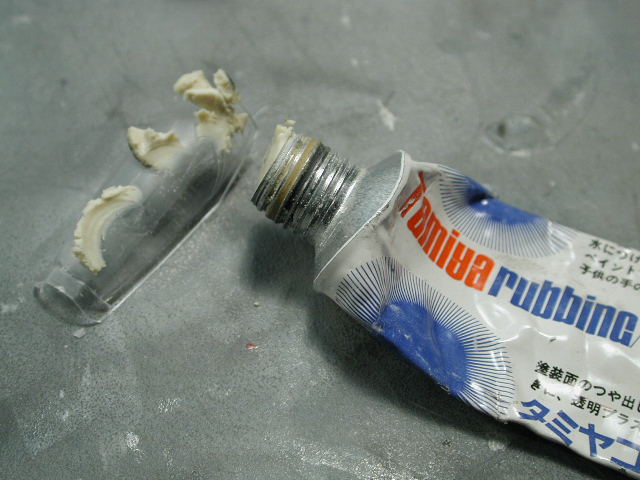
5. Some people skip the next step and jump right to coating it with future floor polish at this point - but I add another step here. I use Tamiya rubbing compound (kind of like toothpaste) and polish out the fogginess in the canopy. I usually use a piece of cloth (preferably lint-free) or paper towel and polish the entire canopy. I do this even on canopies that have no seam (or requires no work), it gives a shinier more polycarbonate like appearance and makes the canopy appear "brighter" 6. Lastly, I dip the entire thing into future floor polish. Make sure that you are in a relatively clean and lint-free room (which is near impossible for my basement work area - but I do this before I sand or airbrush for the day). Make sure there are no air bubbles trapped - keep dipping it back in if there are imperfections on the surface (worst case - you can strip it with windex and try again - I think its the amonia that strips it off). I usually hang it to dry at an angle so that the excess Future builds up in one corner and I would occassionally dab that corner with a paper towel to soak up the excess. You don't want a bubble of excess future to gather at the corners, they turn milky over time. I usually put my work lights on it to help speed up the future curing. And no sanding or airbrushing while the canopy is drying (in fact I leave the room all together to stop debris from being kicked up into the air)


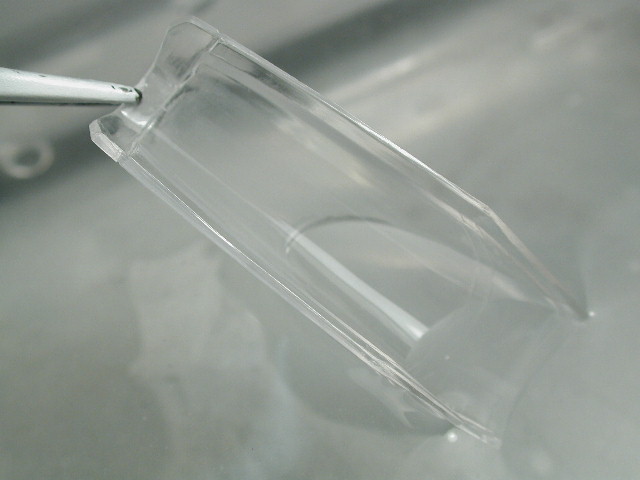
-
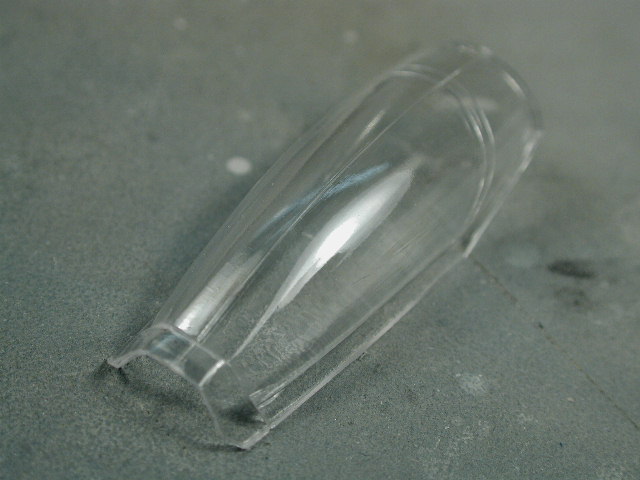
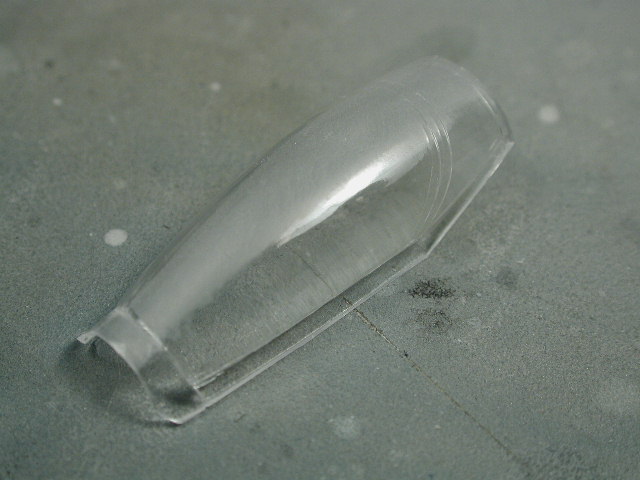
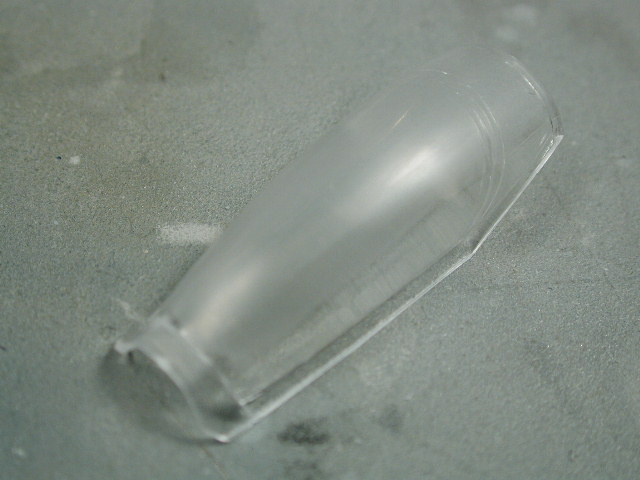
Thanks for the kudos everybody - I like the feedback... Sorry for the delay... I've been sick the past week with a cough - hopefully I'll get better... Great to see your stuff Brett! I really like your details. I was going to weather and detail both the booster and Valkyrie at the same time using the same materials - so I have to get my Valkyrie now up to the same primed state as the boosters. I realized I hadn't sealed the cockpit in yet, so I have to work on getting rid of the seam on the canopy. As most of you know by now, there is a seam running up the middle on the outside (thank god!) of the canopy which was a process of a 3 part mold which allows the canopy profile to bubble out realistcally like modern fighters. I'll briefly outline the steps involved... Always be gentle here, the clear plastic is much more brittle than the styrene and won't stand up to too much pressure (I always try to hold it from behind with my fingers supporting the underside of the bubbled canopy). Its always better to undersand (you can keep going if need be) than to sand too deeply and scratch the canopy too much (just more finishing/polishing work later on). 1. Clear canopy with seam 2. Lightly sand with 800 grit (careful to just sand the seam portion) 3. It looks horrible now... but its gotta get worst before it gets better - now move up to 1200 grit and sand a little bit more (in a larger area) 4. Finally, I move up to 2000 grit and sand in an even larger area (careful to always overlap the sanding areas with a finer grit film) It should look uniformly foggy at this point with no visible swirls or lines. I usually double check the work by dipping it into water from the underside, the part where the water touches should appear absolutely clear (if not, even future won't hide the scratches).