wm cheng
-
Posts
4346 -
Joined
-
Last visited
Content Type
Profiles
Forums
Events
Gallery
Everything posted by wm cheng
-
Unfortunately, THESE ARE the Bandai kits. Hasegawa doesn't have the license to produce Macross Frontier AFAIK. That would be a dream come true!!
-

Bandai 1/72 Scale Macross Frontier Plastic Models
wm cheng replied to Graham's topic in Hall Of The Super Topics
So its an off-shoot of the SV-51? -
Bandai 1/72 Scale Macross Frontier Plastic Models
wm cheng replied to Graham's topic in Hall Of The Super Topics
Does anyone have a picture or drawing that shows what this VF-27 that everyone's talking about looks like? I must of missed it in the previous episodes (however I haven't seen the latest 7th episode yet). -
+1!!!
-
Bandai 1/72 Scale Macross Frontier Plastic Models
wm cheng replied to Graham's topic in Hall Of The Super Topics
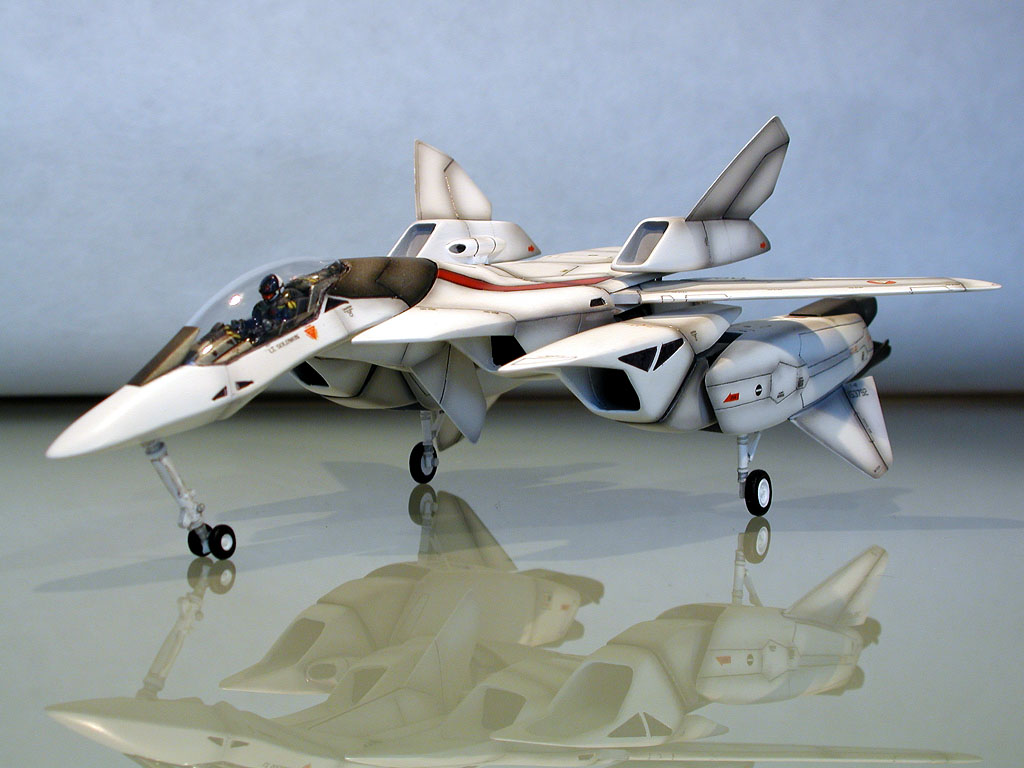
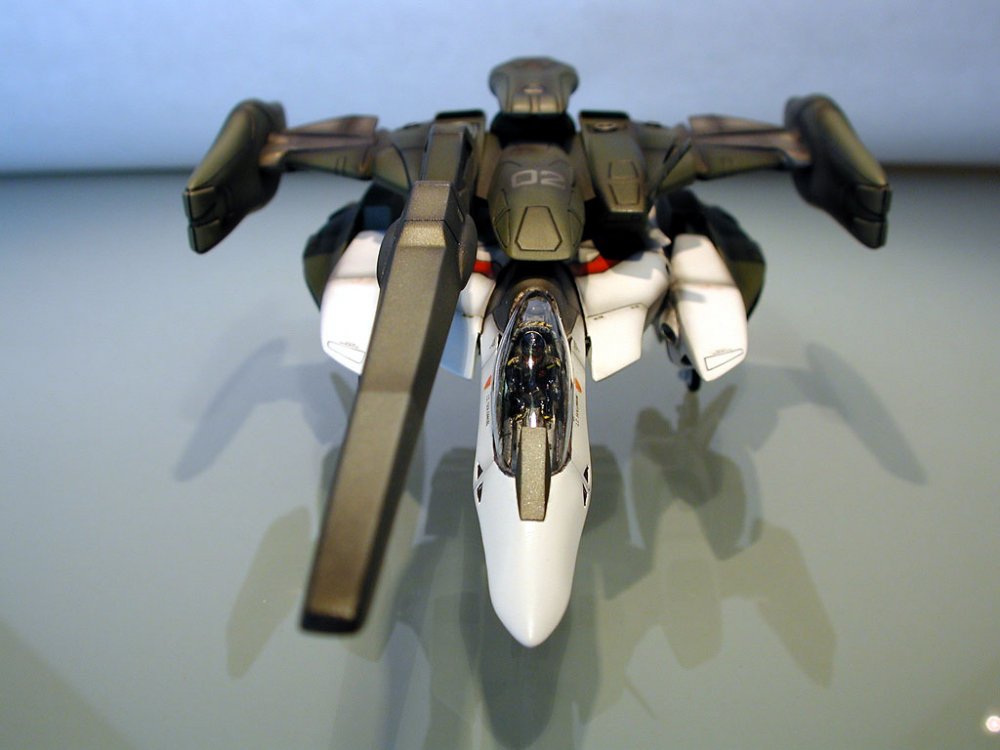
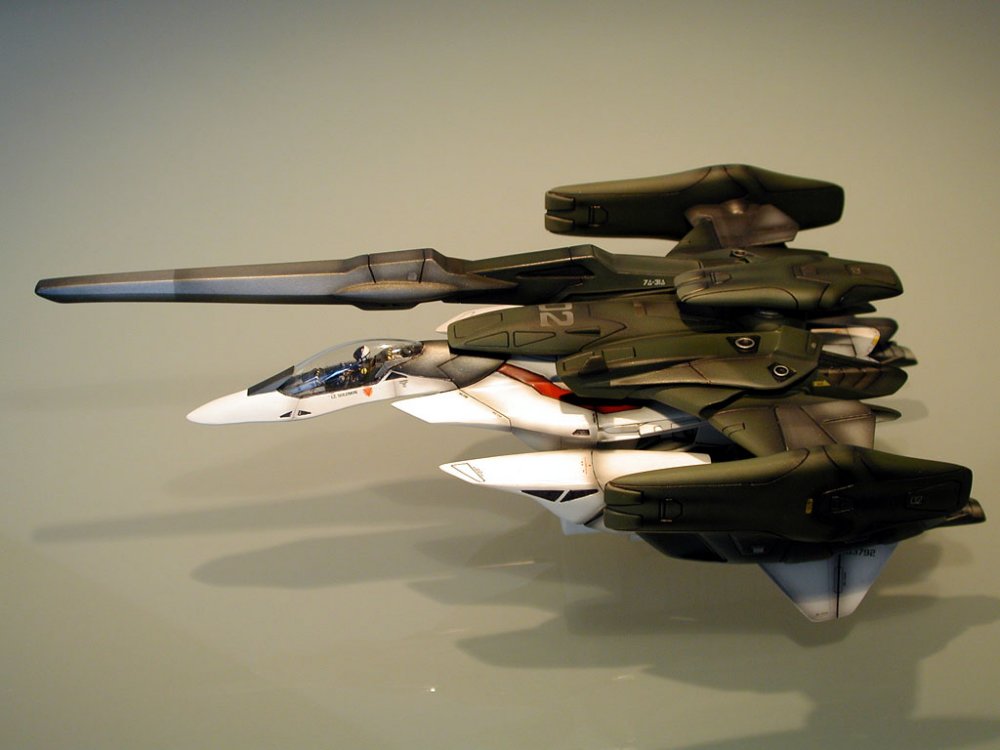
Well, nothing I've seen or read about here has changed my initial assumptions with Bandai (unfortunately). Yes, the overall shapes and proportions are good (as can be expected when they have access to the original CAD digital files). However with any transformable model (or toys) the logistics of transformation always affects the realism of the model (they just can't make hinges and sliders small enough to be hidden successfully - just look at that massive ugly hinge on the top of the fighter mode at the root of both of the main wings!). I just wished that they just concentrated on the model and made that as realistic as possible and left the transformation to the toys (toys are meant to be played with while models are meant to be looked at). As with all Bandai models, even in their EX line, they never seem to add anything (or make up details) that wasn't in the original anime artwork - which is a shame. Their Yukikaze EX models are a prime example of good faithful reproduction, but with nothing added to embellish them - they even retain the stupid panel lines that end in the middle of a section with no apparent intersection (see the top/back of the airframe) - it just makes no construction/assembly sense! What elevates the Hasegawa models is their artistic license in adding appropriate details (not just revits, but proper brake lines, hydraulic reserviors in the gear wells, actuator structs, APU access panels, re-fuelling panels, avionics bay access, engine bay access... the list goes on!). Its just not practical to add all the details in the anime art when you see it swoosh by in a few frames and the limited time its on screen, its always in motion. However, a model is static, and meant to be admired, at that level of scrutiny the few anime lines just don't hold up well. Perhaps at this point I should also clarify my position of revits. Yes, old aircraft are pop-revited, and newer aircraft are usually countersunk allen head capscrews - but they are usually represented on small scale models as little tiny dents (so we call them revits, but they are not the old "Titanic" iron revits of the Industrial Era). Has anyone seen the new Hasegawa F-18F kits, they have tons of revits on a new aircraft and give the overall model a tremendous sense of scale. Yes, it probably not "realistic" to include all these panel lines and revits on scale aircraft that is so small and modern - but these are just "artistic cues" that gives a model a sense of scale. Look at all the Sci-Fi filming minatures that have tons of panel lines or shading that make it look like the thing is made up of thousands of tiny panels (like the Starship Enterprise Refit or E versions) - realistically wouldn't someone have painted the entire vessel after assembly?!, no its a visual cue to give something small a false sense of scale and grandeur. Its the inclusion of familar "real-world" cues that grounds science fiction designs into something believable. I for one is grateful for anything that gives something as small as a 1/72 scale plane detail and visual interest - otherwise you'd just have a model like those painted wooden airliners in a travel agency's office - nobody really ever admires those or give them more than a second's glance. In fact those giant gaping seams and hinges on the top (most visible portion of the model) due to its ability to transform do exactly the opposite! it makes the model seem smaller and more "toy" like. That hinge on the back seems like it would be at least 5ft long and 12" in diameter - wouldn't you think in the future they could come up with a better way of hinging something - if we were to take that line of thinking that in the future they'd come up with better ways to put together an aircraft than with revits?! Bandai doesn't have to add revits to make the VF-25 better, and yes there could be a newer futuristic way of fastening/assembling aircraft, but it needs to add whatever that would be AND it should make an attempt to add more than just what the anime shows because it is a static model (maybe smaller exhaust vents, panels or some other sci-fi patterns... and the like). I just haven't seen Bandai do much of that... even the PG models are exactly what's been drawn, I even have their giant 1/350 scale Yamato, while its a technological marvel of a kit, its still lacks any details on such a huge kit that gives it a sense of scale (other than the photo-etched railings - but that was in the original anime lineart). Personal, I hate their multicoloured sprues and plastic, what a waste... I have to prime them all (because of the bright saturated color base) and paint everything anyways. In fact, its just an added step to prime everything. Plus I always cut away all those "snap" pins, they never really register properly with the seam and are just a pain - another "extra" step one needs with Bandai models. I guess its great for the younger audience and those just learning to build, but personally its more work for me to build a Bandai kit. That all being said, of course I will buy the kits when they come out if only because they are the only ones that will be available for a while anyways. I had hoped they would have had a little more out than just the painted prototypes by now - however, lets just hope they take their time and not rush it out just to burn all us early adopters and release a fixed version 1.5 of the kits a few months later like they did with their Yukikaze kits! -
Bandai 1/72 Scale Macross Frontier Plastic Models
wm cheng replied to Graham's topic in Hall Of The Super Topics
Hmm... it does have the lines and shape of a Gundam kit ;-( No fine aircraft like access panels or rivets ala Hasegawa. Not too overly impressed so far, but I was never that much in love with the Battroid designs anyways, I love the aircraft look. -
Moscato Atmospheric Booster + Hasegawa Valkyrie 1:72
wm cheng replied to PetarB's topic in Model kits
Wow! Really fantastic work PetarB! What a great scheme, you really pulled it off. I especially love the red thruster bell interiors just like the Vostok Russian rockets - it really adds a sense of realism and grounds the scheme. Excellent clean build and fantastic work in the weathering, just enough to look realistic, but not too much to look worn and used (thats the easy trap we can all fall into). Great placement of stenciling decals too! I LOVE IT! Come on everybody else! lets see yours... -
I'd be really happy even if they came out with the VF-25s like their Fix Figuration type toys (non-transformable, with limited poseablility), with the amazingly detailed matte finish paint schemes and every tiny stencil printed all over the complex double curved surfaces! They are like pre-built models - the accuracy is amazing!
-
Hey thanks man! I'd love to get a copy of these word documents too! I too wished that some of the older links were recovered, I sometimes refer back to them to remind me of what I did back then too. PM me for my e-mail when you get them done.
-
The PlayStation 3 Thread 80GB Edition
wm cheng replied to Gaijin's topic in Hall Of The Super Topics
uh? I don't get any album art on any of my MP3s at all. I use WMP11 to stream, and I embed the album art right in the MP3s themselves - my itunes has no problems seeing them, and WMP11 has no problems seeing them, but the PS3 just displays the default MP3 icon for all of them. Is there something I need to turn on for the PS3 to see/read album art? -
Oh, I didn't know that about resin canopies. I guess I didn't lose out too much getting the recast - the original was so expensive at the time. I didn't know about your thread on the VF-0 - but I just checked it out, its coming along great! Thanks, I really need the "hit" to follow along other builds when I don't get the time to do my own. My VF-2SS was my very first posting here on MacrossWorld, in fact, it was because I found this amazing place that got me back into modelling and Macross after my University and career hiatus! I think the threads were long gone (it was built and posted way back in 2001) - the original URLs might be in my links page, but I think they refer to a MacrossWorld over 3 crashes ago and are gone forever (too bad, I often wanted to look back to see what I said about it and how "green" I was). It was also my first attempt at a resin kit too (after reading a lot of posts about what to do and all the pinning and stuff). Now looking back, its was painted really poorly - the post shading (new to me back then) was just too heavy and obvious as well as the panel lining (which I did with a marker, before I knew about oil washes) - I've often contemplated re-painting this beautiful design every so often, but my backlog of un-built stuff always beckons me beforehand. The only modifications I did were to make the fast packs removable - since I loved both designs so much (with the packs and without) and couldn't get another re-casted kit back then - I went through the trouble of devising a pretty primitive pin system to remove the packs. Overall I am pleased with the results in the end (except the horrible post-shading paint job). Here's a few pics from an era long ago... (I hope you don't mind me intruding on your thread?)


-
Looks fantastic!! So glad you posted and actually built it. I thought the Musasiya original would have had a clear canopy?! I got the hobbyfan recast and was so disappointed with the milked canopy too (I then wished I had bought an original instead of a recast) but in the end I got a friend to vac-form a new canopy for me from the old one as a pattern. It all worked out in the end - I loved the design, I would just go crazy if Hasegawa got their hands on this design. My wishlist for hasegawa would be VF-2SS, VF-11, VF-4. Thanks for sharing (yeah, I never ended up building the 3 drones either)
-
I not so sure if its wise to mix something ammonia based such as Windex with an acrylic paint like Tamiya - at least in the long term effects might be questionable. Might I suggest trying to airbrush at different PSI and mixture viscosities to get the paint to dry at a rate you want. I've found that by varying either the pressure or mixture of the paint, you can pretty much get it to do whatever you want. Then again, I'm a play it safe kind of guy... I still pay the extortive prices they charge for the "real" Tamiya thinner - my thinking is... how much is your time and effort worth? I'd hate to find out a few years down the line that I "cheaped out" on a procedure or a few cents here and there and have some finish start crackling or crazing on me. I've had a few models done that to me over the years - and boy am I sorry now.
-
Sorry to hear about the fins snapping off - a few of mine also snapped off too - a bitch to glue back, fill and sand. I think the resin is a bit brittle, plus its just a delicate protrusion - one of the reasons I "had" to get the launch rail, its the only way to properly display the model once its built so all the delicate parts aren't bearing on anything. Did you say in your post you did a mixture of Tamiya Clear Blue with Windex? Doesn't the windex react with any of the Tamiya acrylics? I use windex to either strip previously painted parts or to clean my airbrush between colours!
-
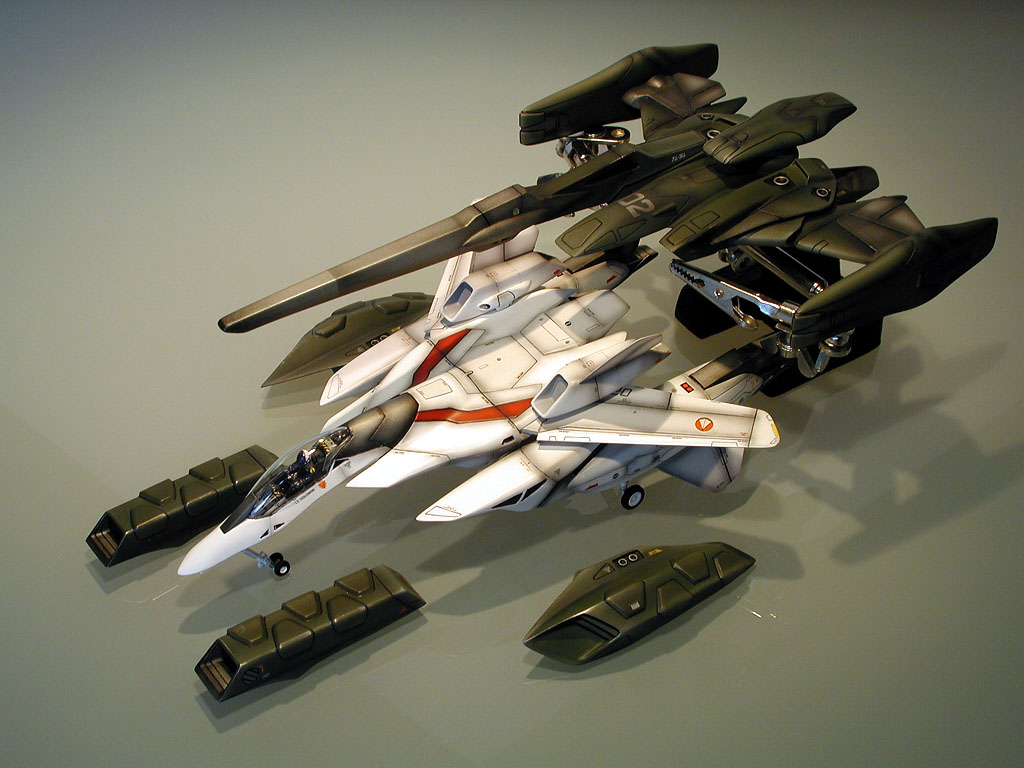
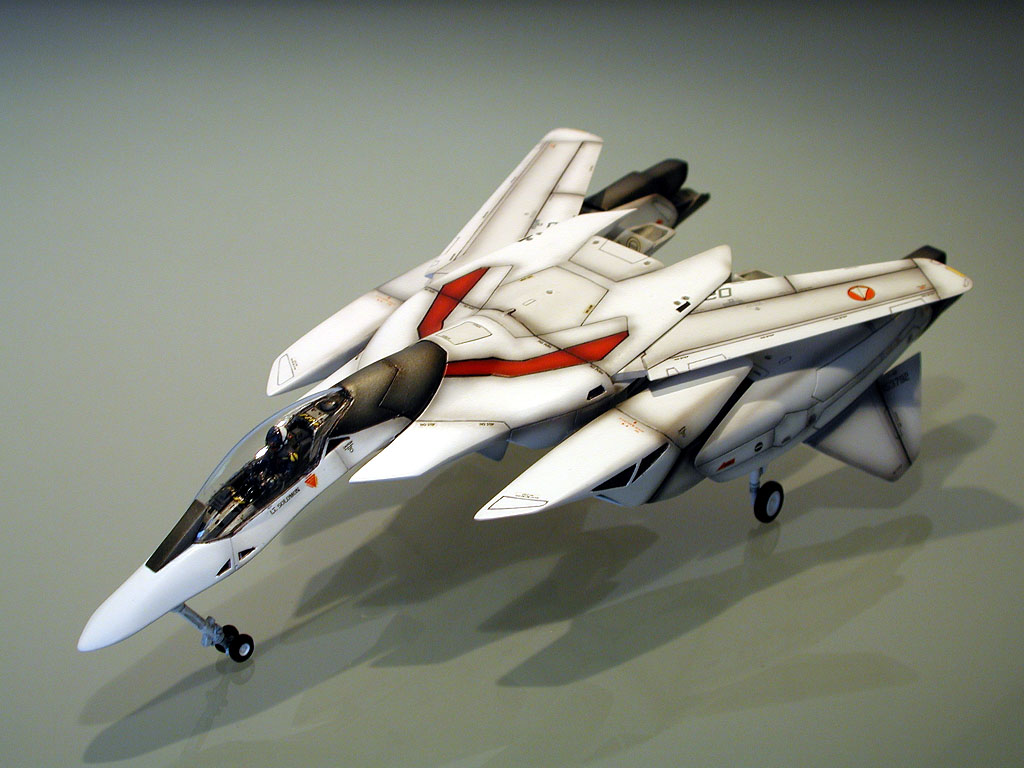
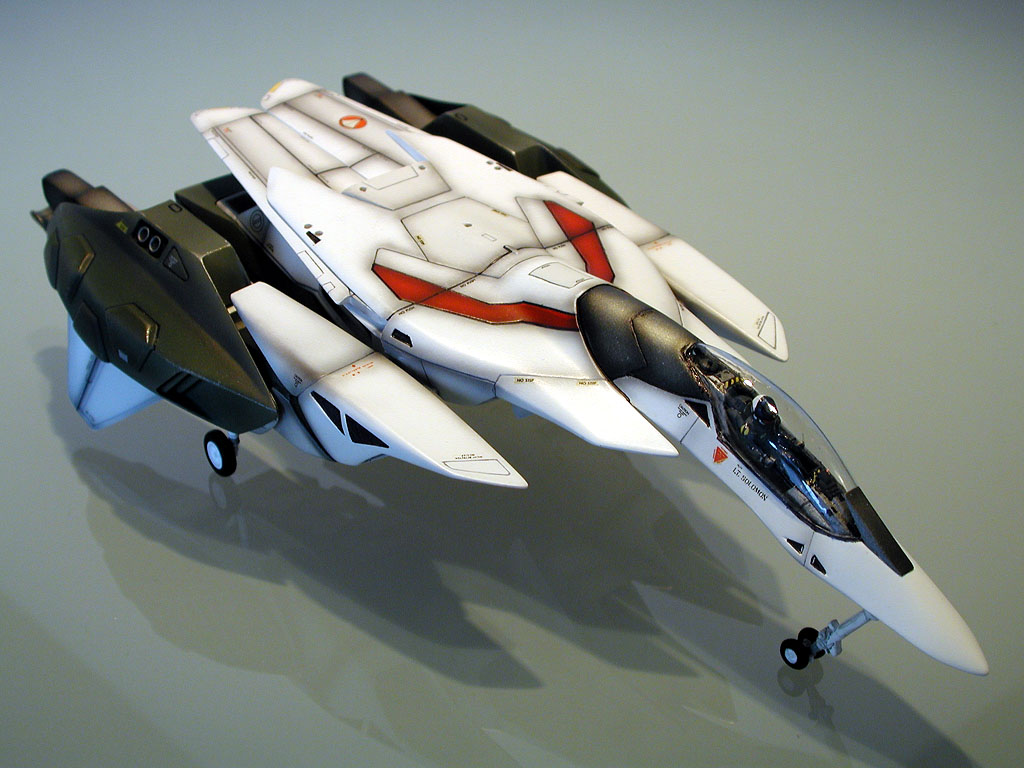
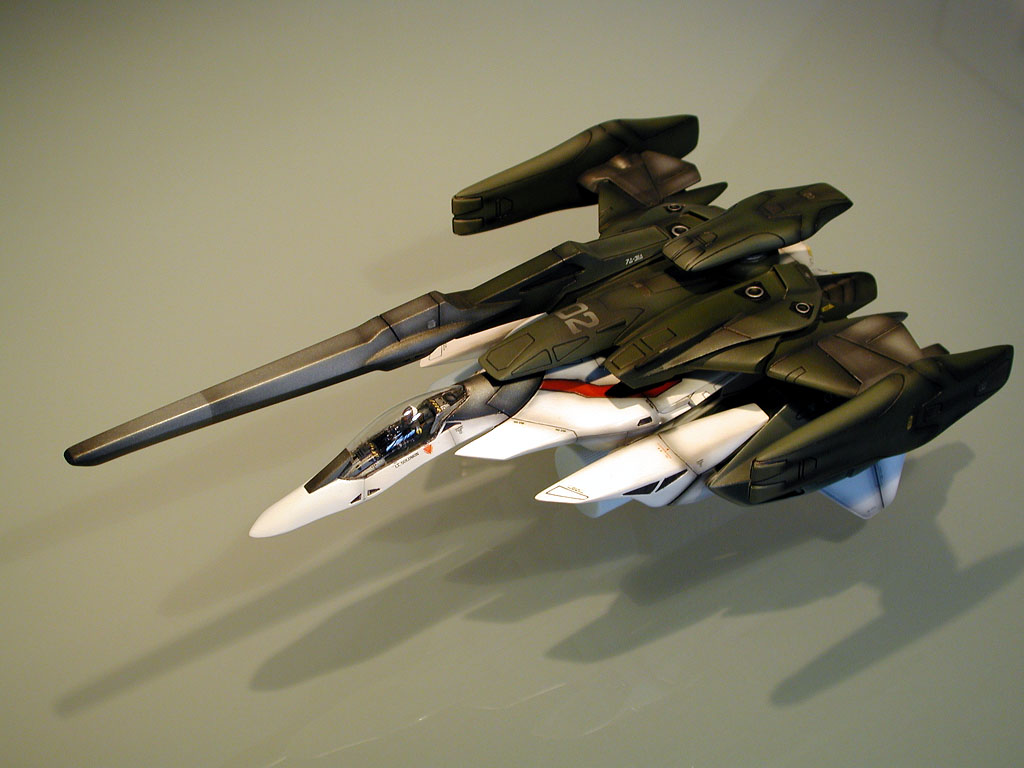
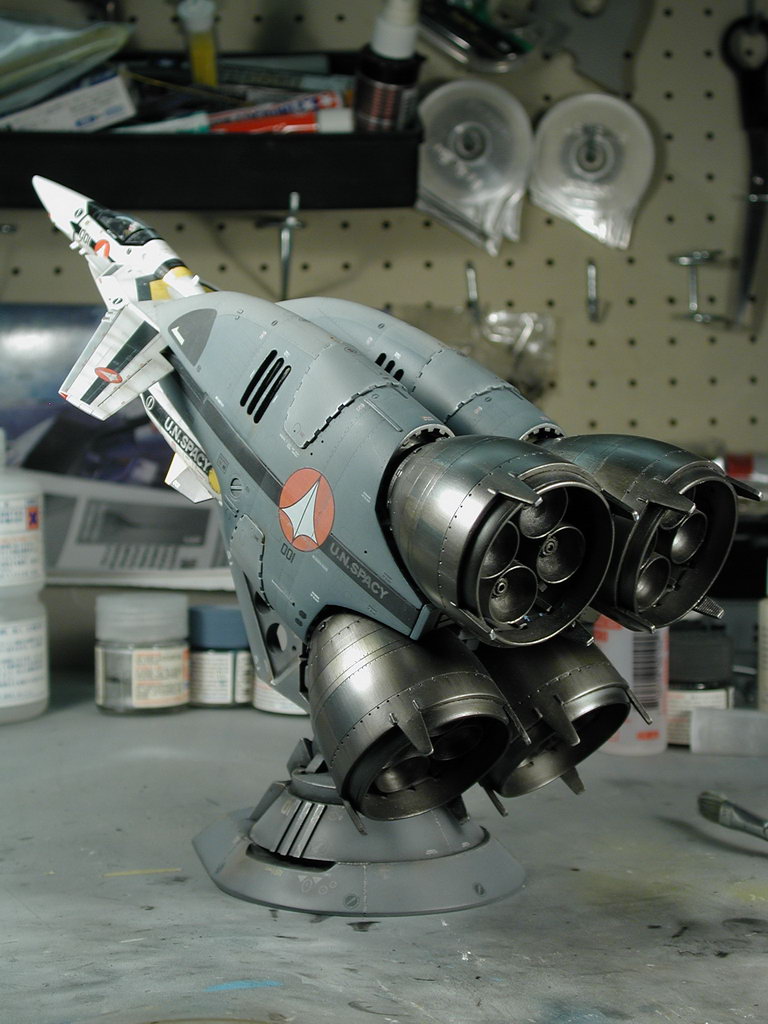
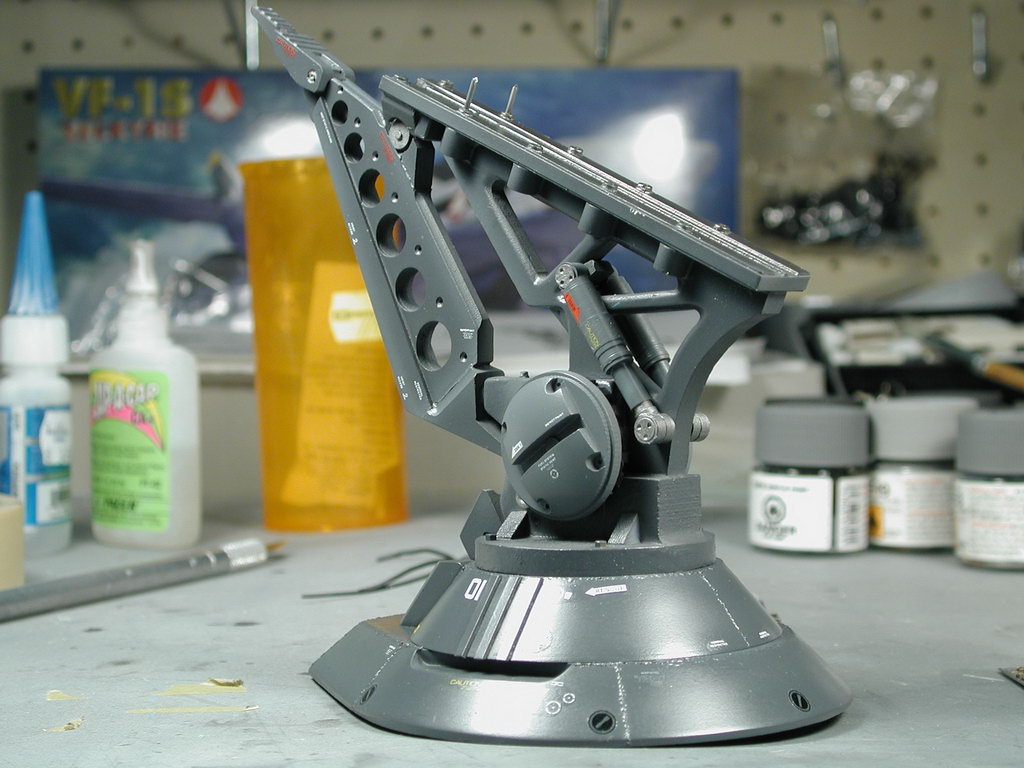
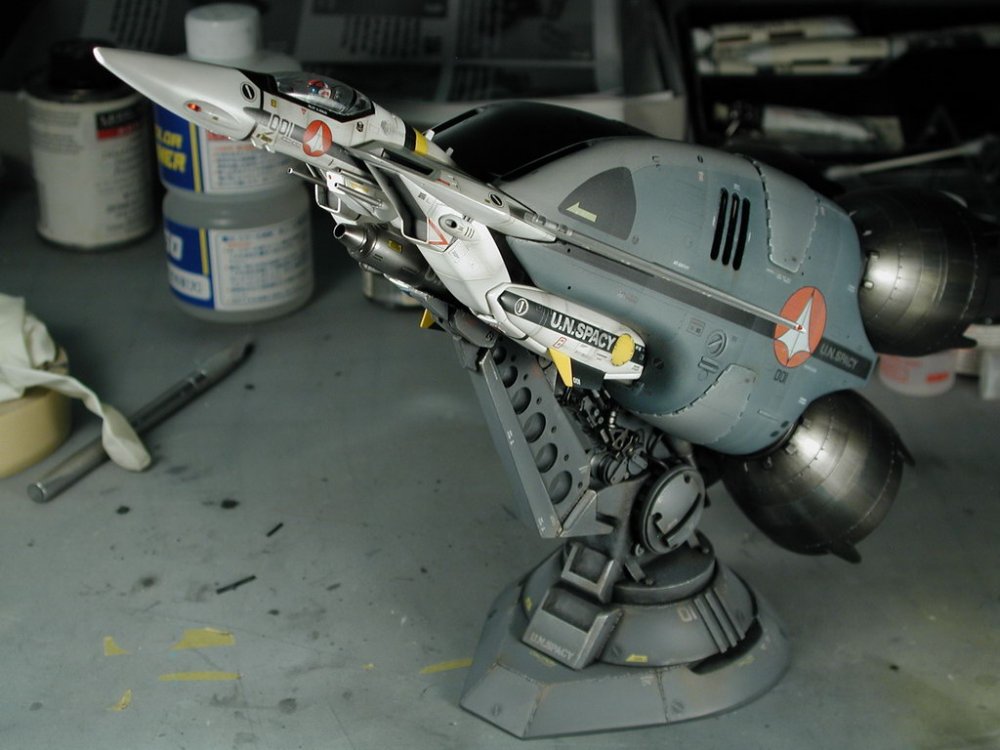
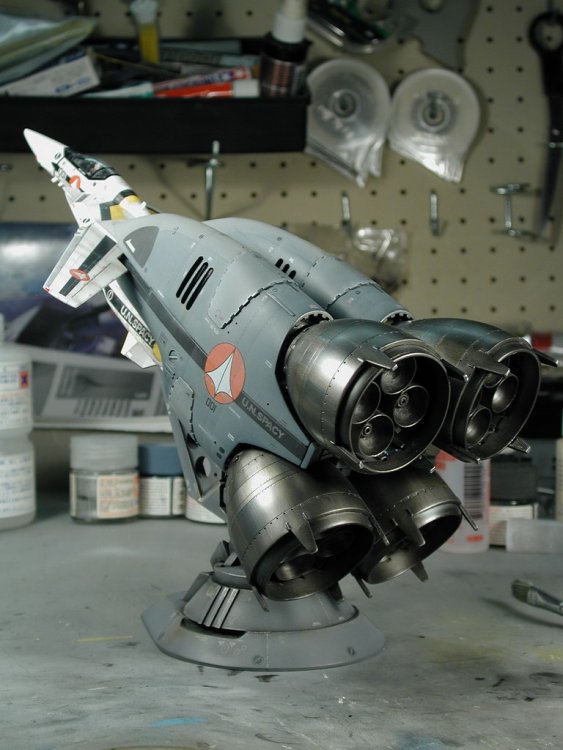
Here's whats on my workbench! Finally done... after 2yrs starting the Boosters (just before my daughter was born... then everything went on hold!) Just waiting for a sunny day to get some proper pictures of it. For those of you interested and missed my step-by-step build up; http://macrossworld.com/mwf/index.php?show...=23678&st=0 Hmm... what next... (something small and short)

-
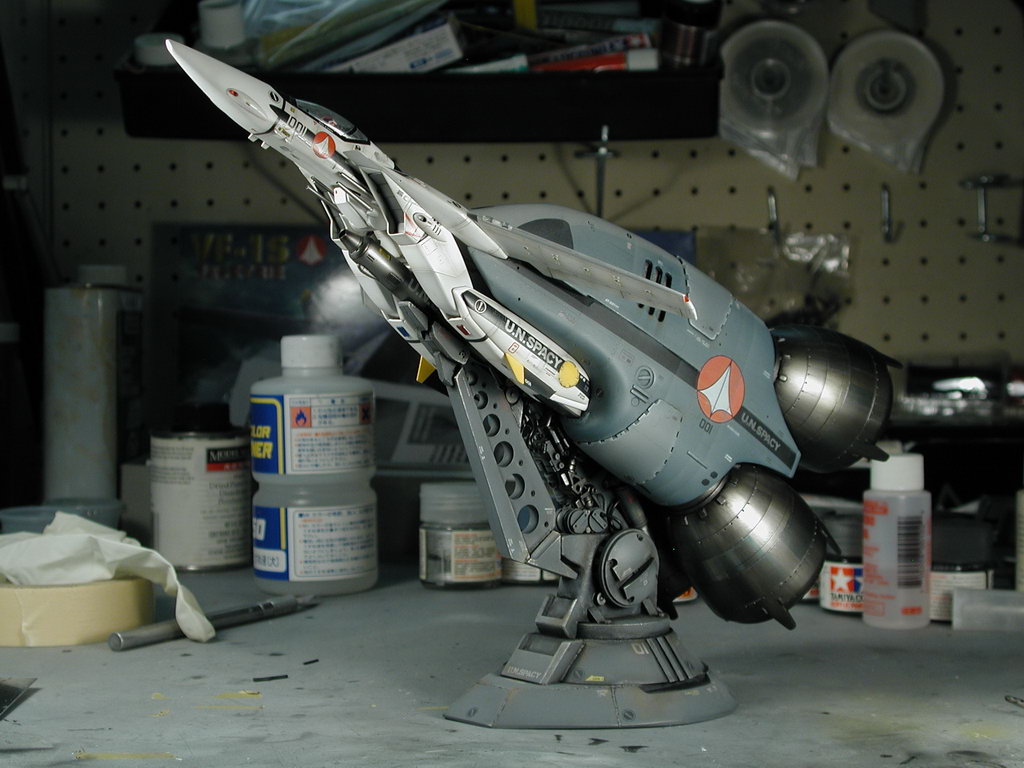
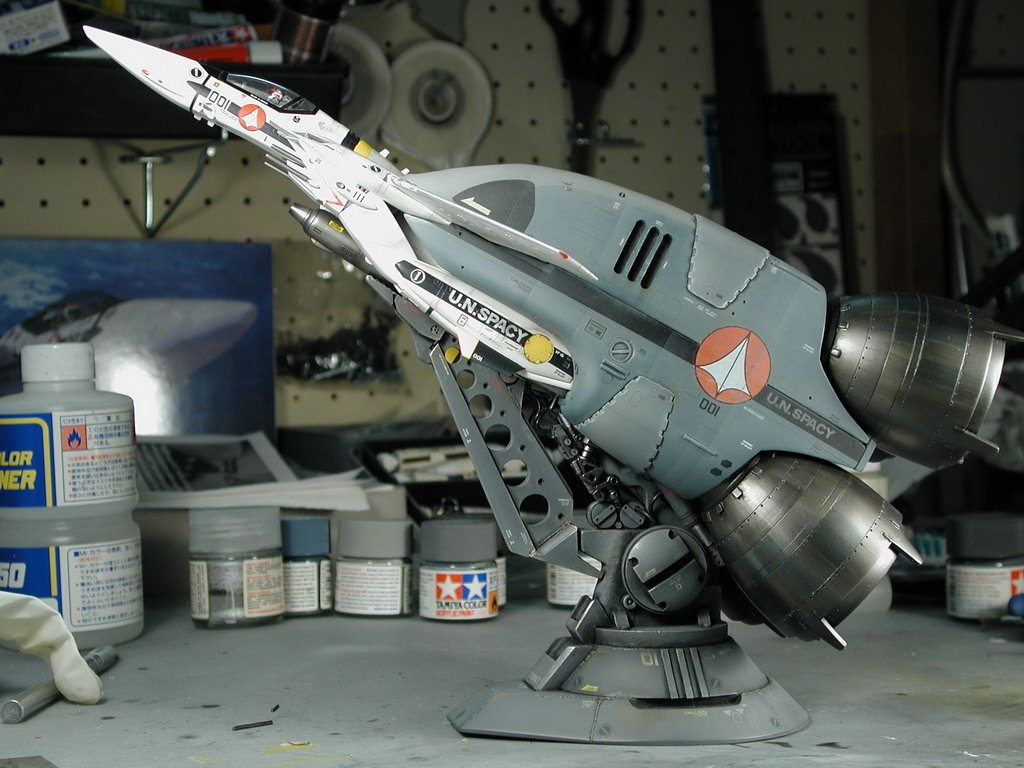
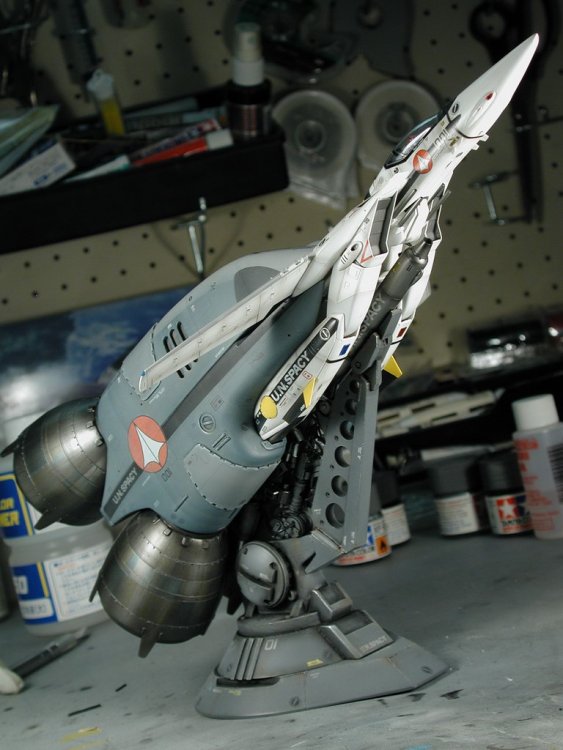
Thanks everyone for the kudos! (especially to my wife and daughter for "letting" me do this! - I miss modelling!) Here are some snaps of it all together on my workbench. As usual, I'll wait for a nice sunny day and take some real decent pictures of it outside with a nice neutral background and I'll post it under a separate thread in the models section as with all my other buildups. Thanks for following along - aah... it only took two years to finish this hehe. Can't say when I'll start the next one... maybe it will be just some small projects like the 1/144 scale Chara-Works Valkyries that can be done in a day or so. Come on! lets see everyone else's Launch Rail (and Vehicle if you've got one built! stop hoarding and start building - I need my fix too! ;-)


-
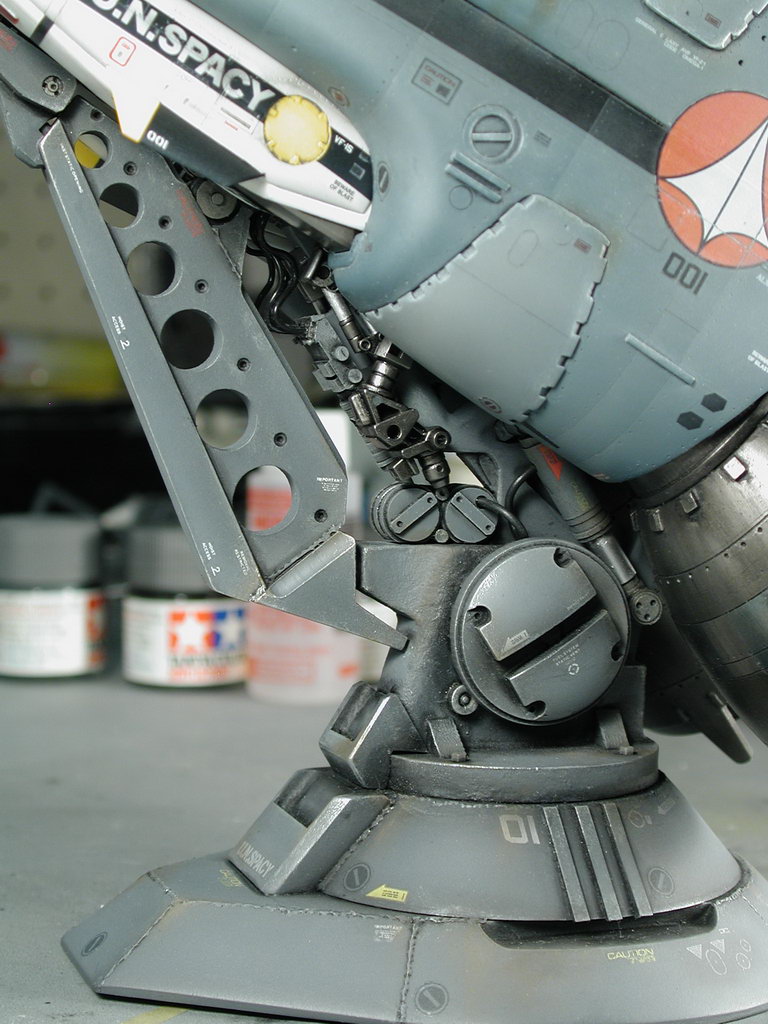
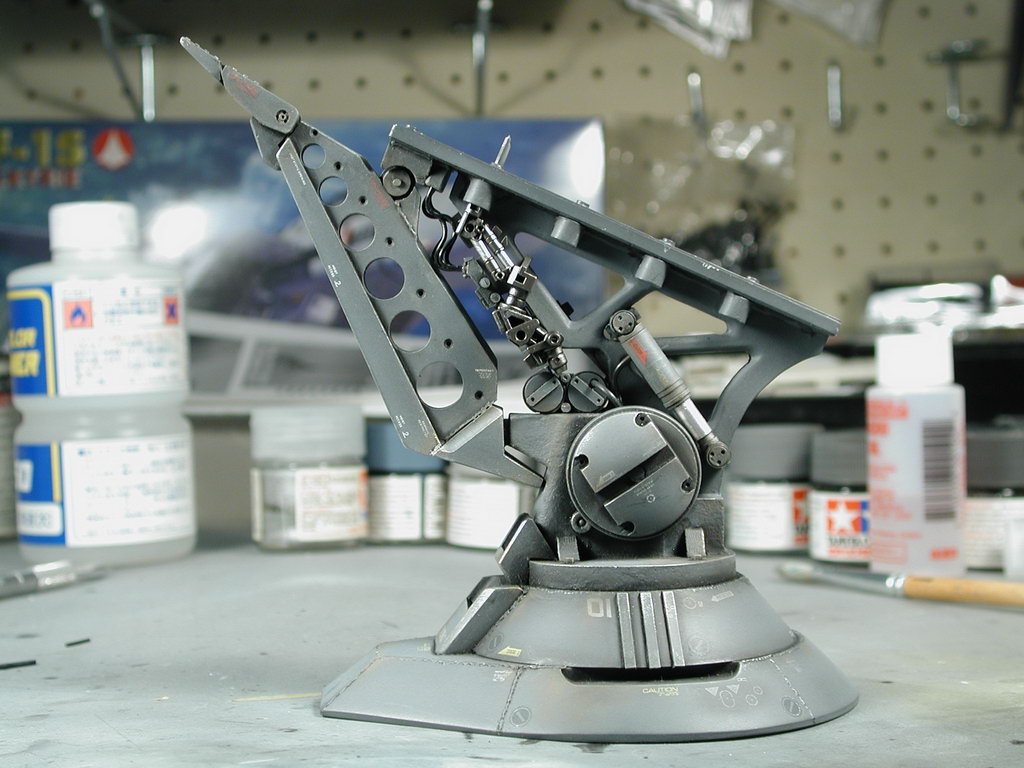
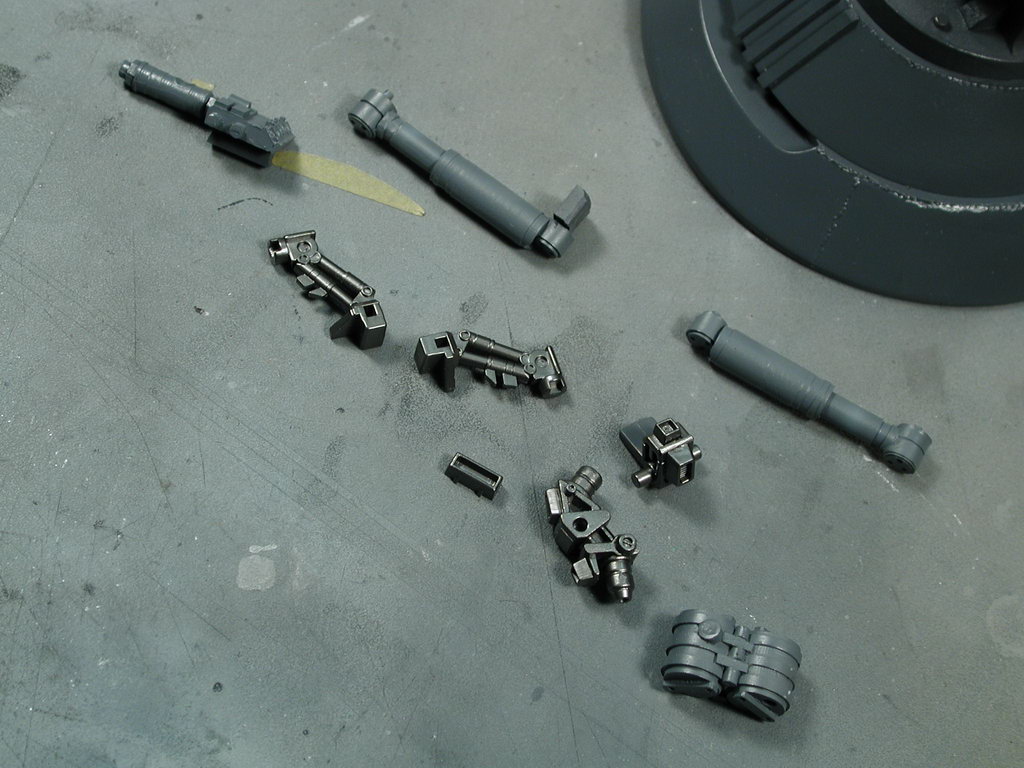
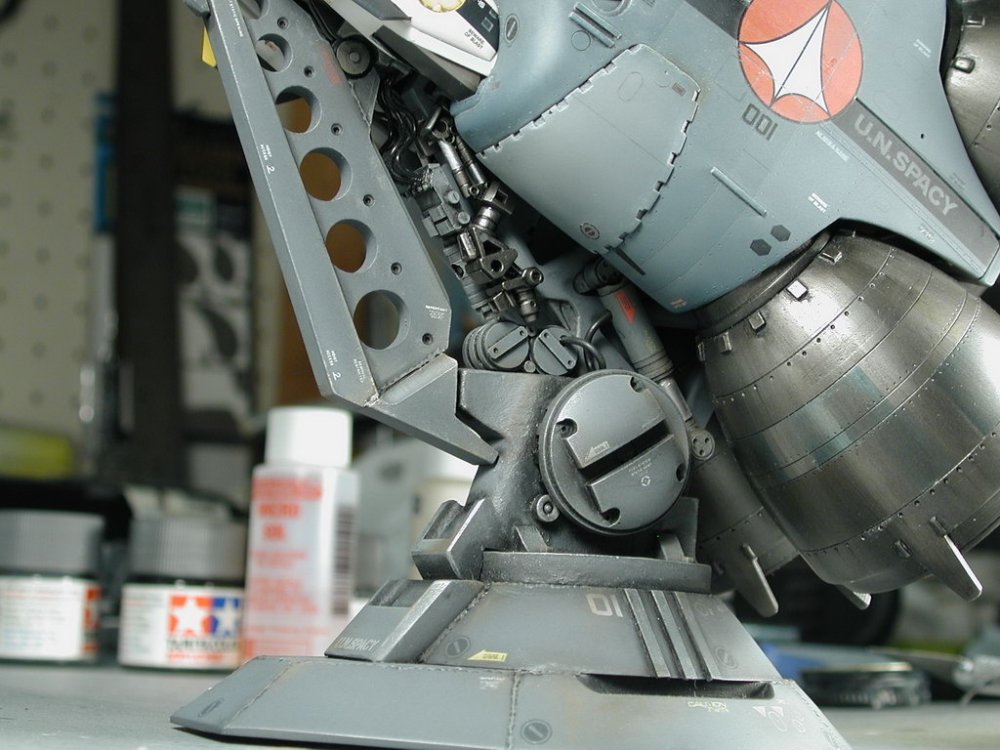
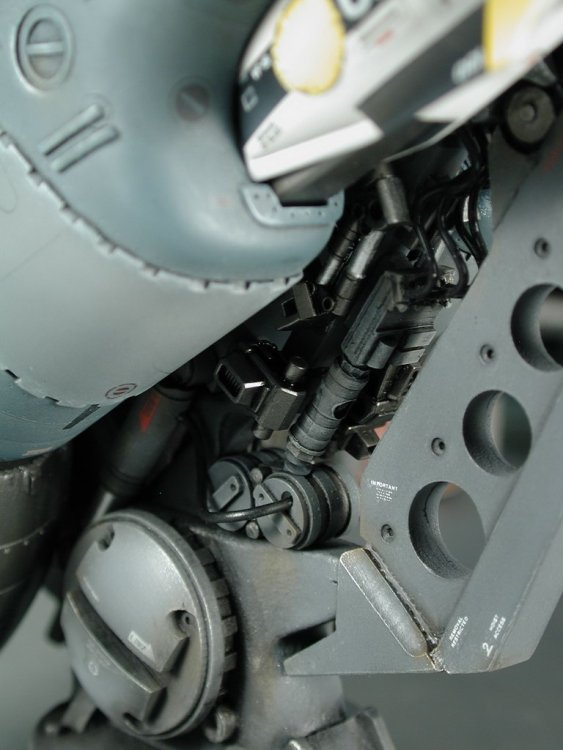
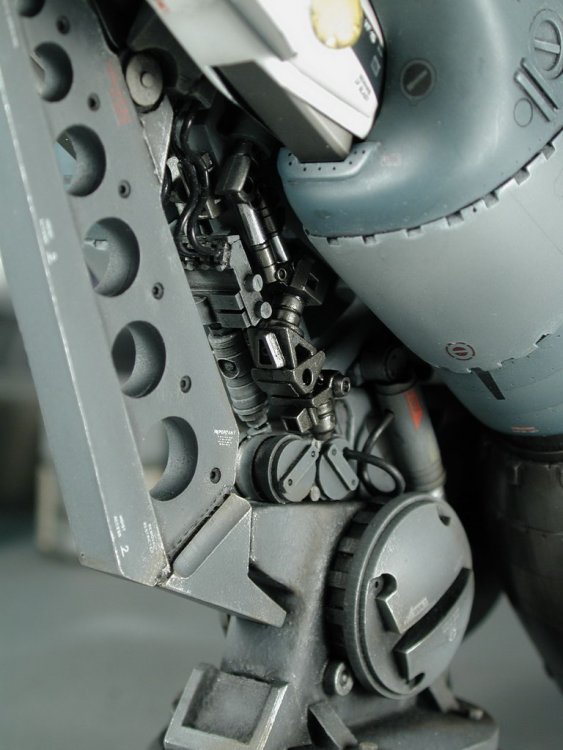
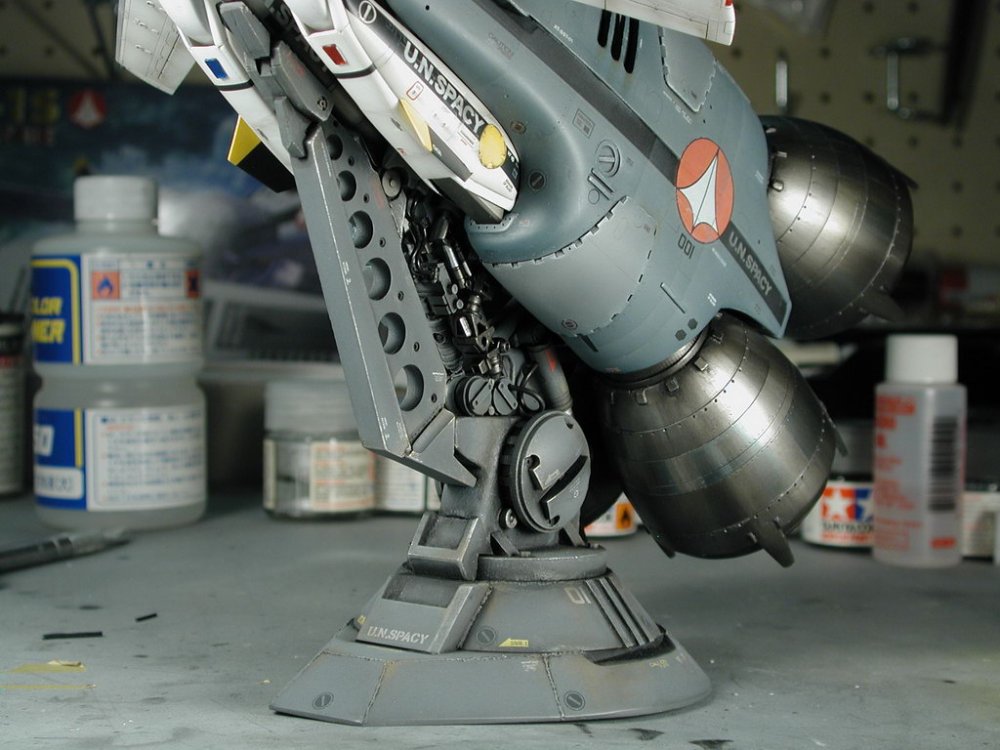
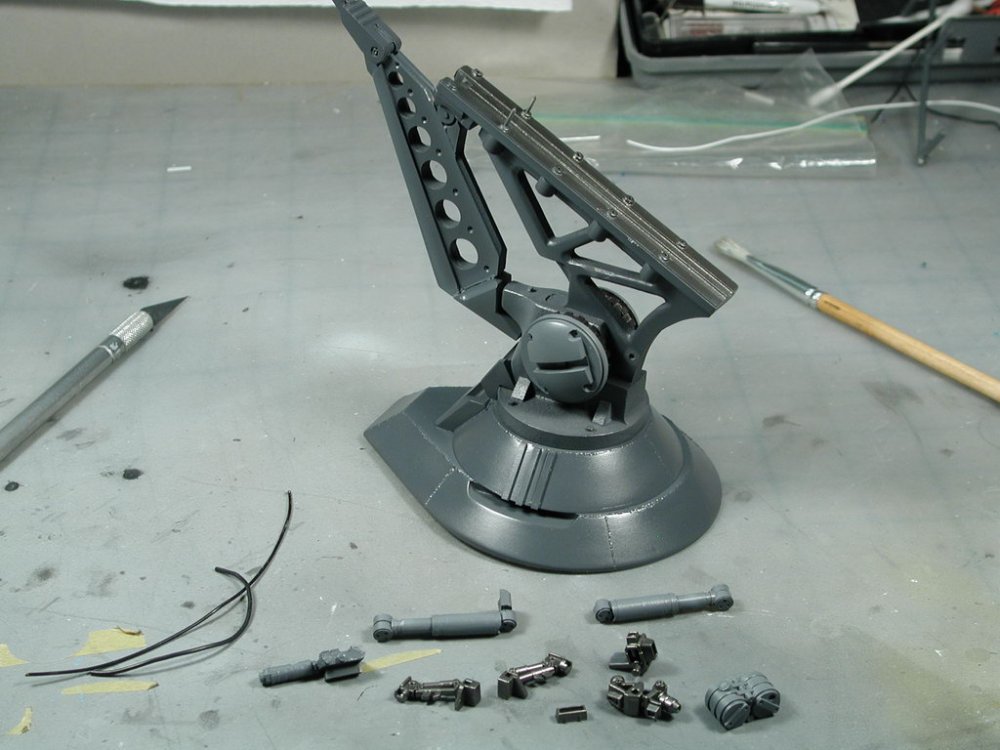
I finally paint the silver chrome onto the hydraulic cylinders - I found that the Tamiya Silver Marker the best most silver paintable paint that I've ever used (with the exception of Alcad Chrome Silver, but you need to prep the undersurface of that with gloss black and masking such small areas would be suicidal). So I usually take a small paintbrush and dab it on the paint marker to paint these small cylinders. But the high reflectivity really makes them stand out and believable. I finally get to piece all the "gak" and greebles together. I took some Tamiya rust weathering kit and smudged it on some areas to give it a browny/rust tinge here and there. Its been a while since I built a tank, but basically that was the finish I was after. I gotta break for dinner, will post some photos with the booster on later tonight...


-
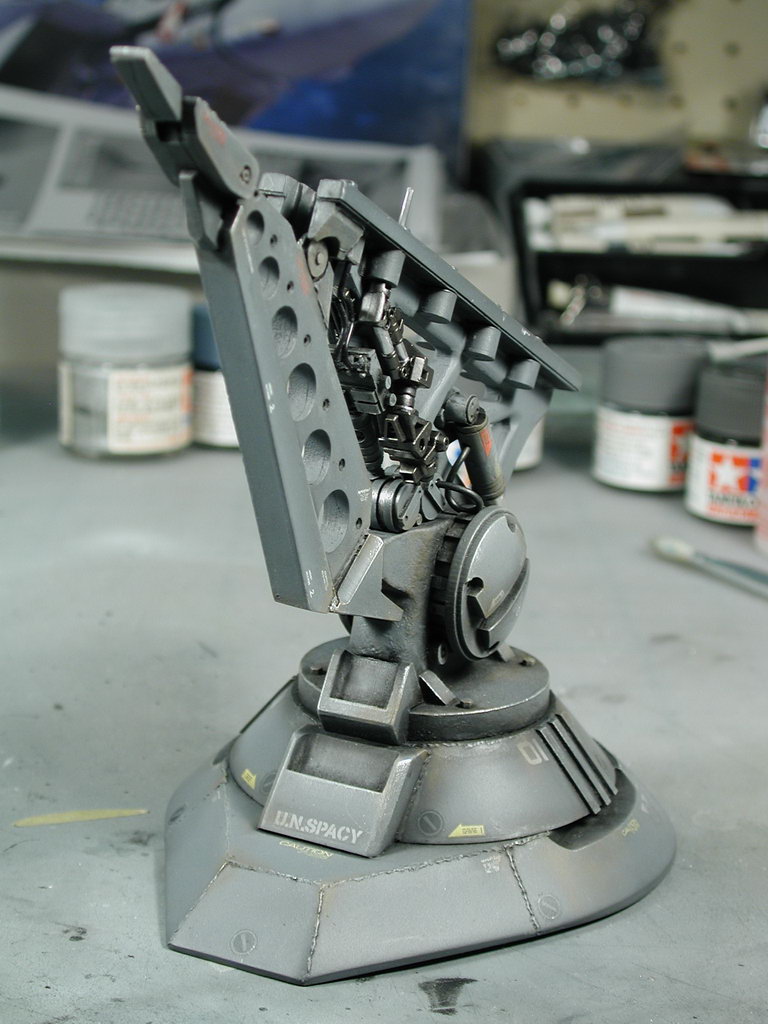
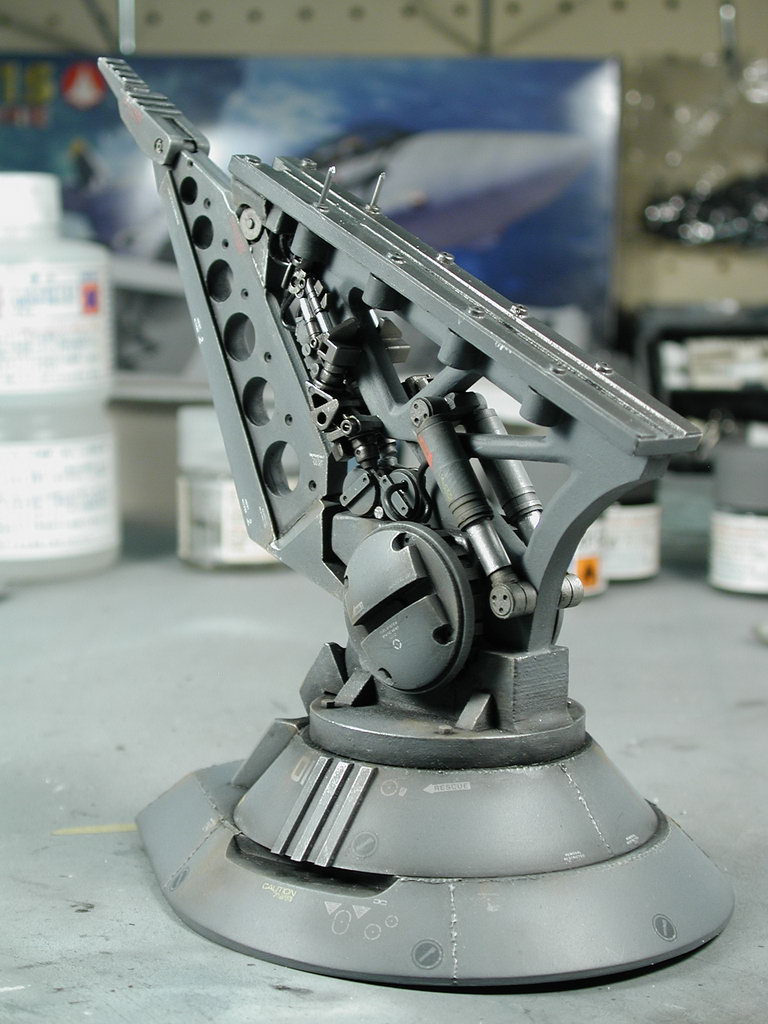
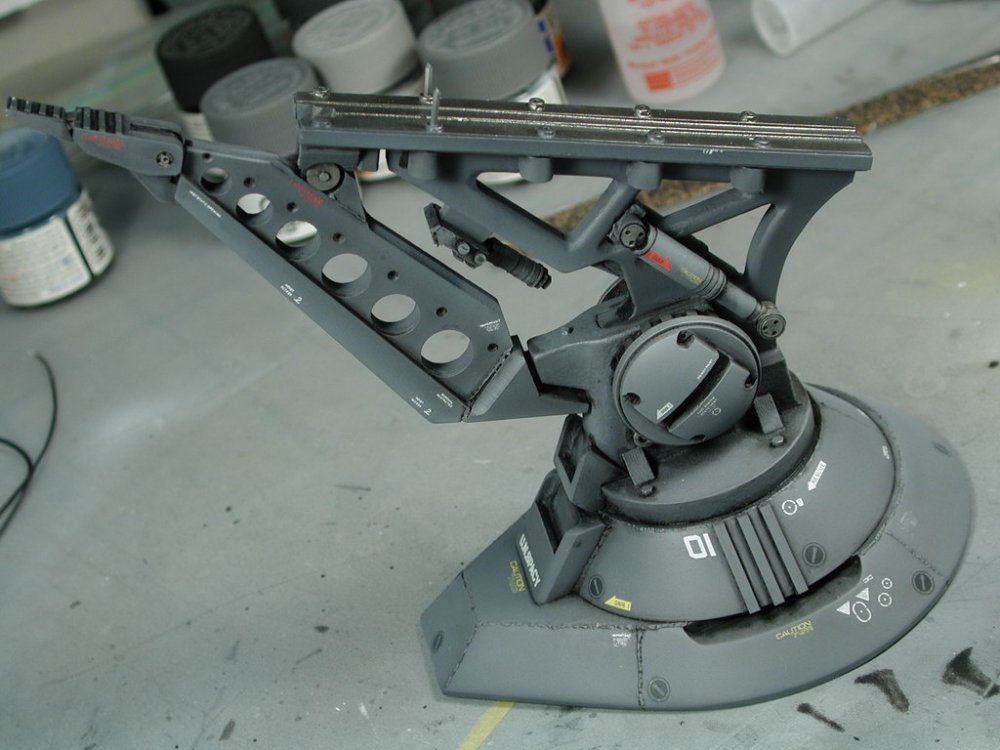
I then airbrushed some thinned dark grey over the decals to knock their brightness down and blend it more into the overall colour of the structure. I also airbrushed a thin black over all the seams and joints to further enhance the differences between the seams and moving parts - kind of like a post shading which I believe adds life to the flatter areas of colour. It also shades the decals a bit so they look worn in and "spilled on". I also dark oil washed the smaller bits. I then did a dry-brush with some light grey to pick out all the highlights - I then went over with some dry-burshed silver to pick out the corners so they look like worn or chipped metal.
-
Once I wiped the excess black oil wash off (I had to retouch here and there sometimes since I might wipe too much off) and got it to the point where I liked it, I sprayed a flat clear coat to seal in the wash and blend in the finish of the decals to the finish of the surrounding paint. Also weathering with the dry brush technique always works best on a flat/matte finish.

-
Oil wash time! As many of you already know, I use artist oil paints thinned down with low-odour varsol (mineral spirits). I like this combination since it allows a long time to work with the wash. I usually leave it to dry for a few hours before coming back to wipe it off with some paper towels. I decided to do a straight black wash rather heavily so that whatever remained, it looked like heavy machine grease.

-
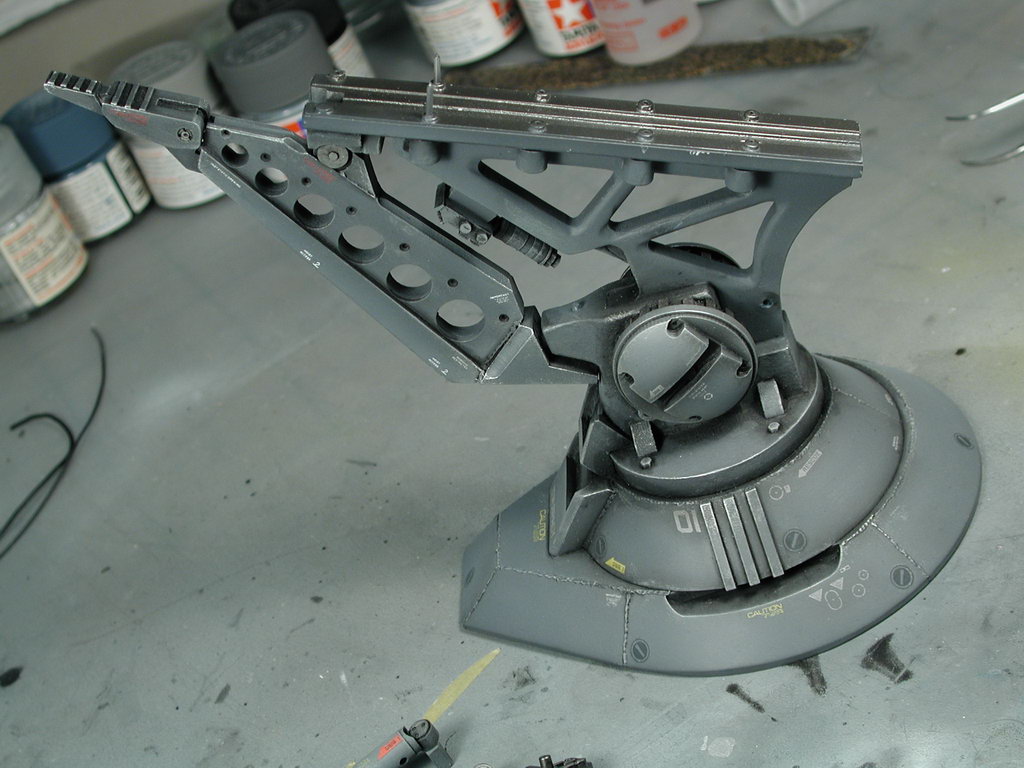
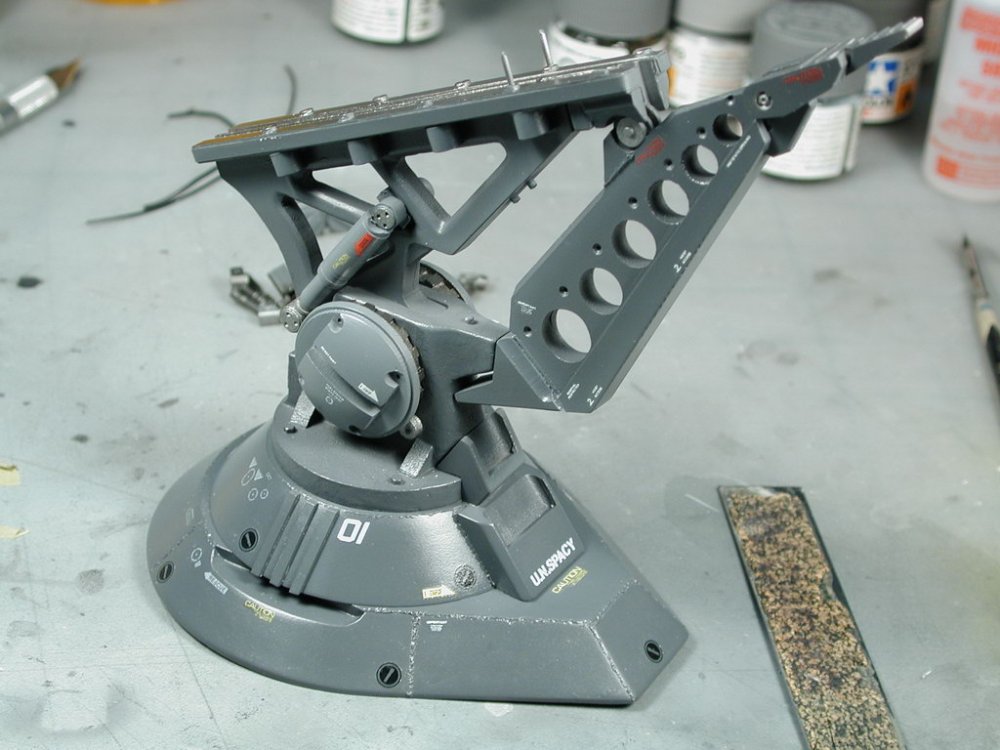
One of my favourite stages... the decalling! Again I dipped into my spare decal box as well as some very cool Wave Option decal sets that were specifically made for Macross a while back (unfortunately I don't believe they are sold anymore). The good thing about modelling for a long time is that you end up eventually amassing quite a collection of un-used decals. Whats also is good is that I used to rummage through the clearance bins at the local hobby shops for decals that they are trying to get rid off - mostly obscure aircraft, but what I look for is data stenciling which can be applied anywhere on anything. I mostly added white or grey low viz stenciling in areas that I find appropriate. If you look at a lot of aircraft photos, you get an idea of where stencils go, mostly to warn people of dangerous ports or areas or locate commonly used hatches and access ports. I just try to think of where people might want to label stuff on the launch rail to creatively get a pleasing placement of the decals with a few small hits of colour to bring some life to an otherwise dark and drab piece of military hardware. I tried to keep the pallet simple and in keeping with the VF-1S and booster by sticking to only reds and yellows as to my spot colours. I used a lot of MicroSET on the model first, then laid the decals on top of the bubble of MicroSET. I then press down with a damp paper towel to press any air bubbles out. If I see any details that need to show through or any excess carrier film then I dab on some MicroSOL on top to let it soften and set properly. Just make sure you don't fool around with the decals once the MicroSOL is on. You can use as much MicroSET as you need (it doesn't seem to harm the decals, but it will make it very soft and easy to fold) - but MicroSOL is the powerful stuff, once you dab that on, don't touch it until its dry! I am especially careful with these decals since as I mentioned earlier, its a dark undersurface with a flat finish on top (thats two strikes already!) so one has to be extra careful to not get any bubbles or silvering of carrier film. It was so hard to resist not putting a UN Spay Kite symbol on the launch rails - but I thought we had enough of that symbol on the booster and valkyrie.


-
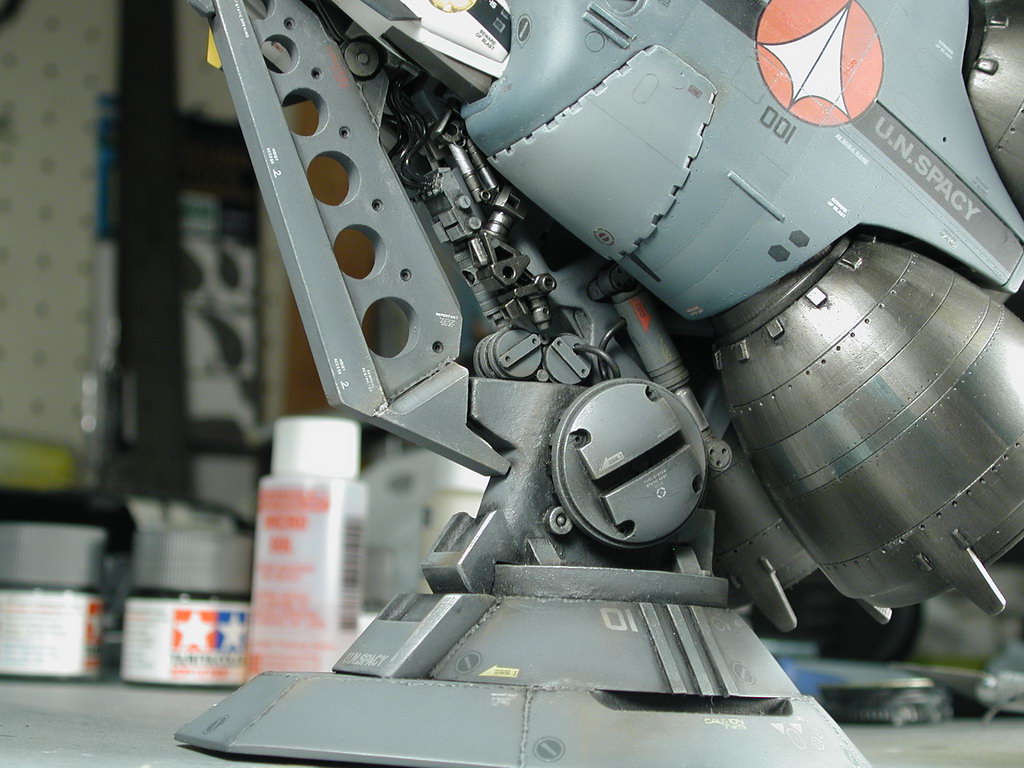
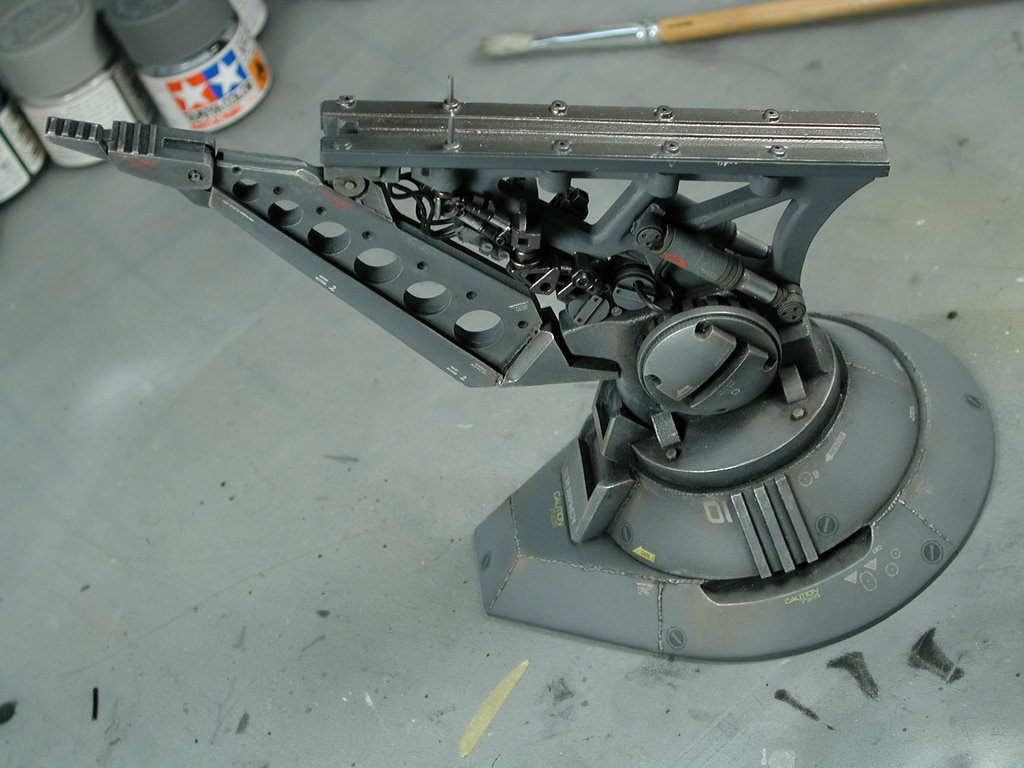
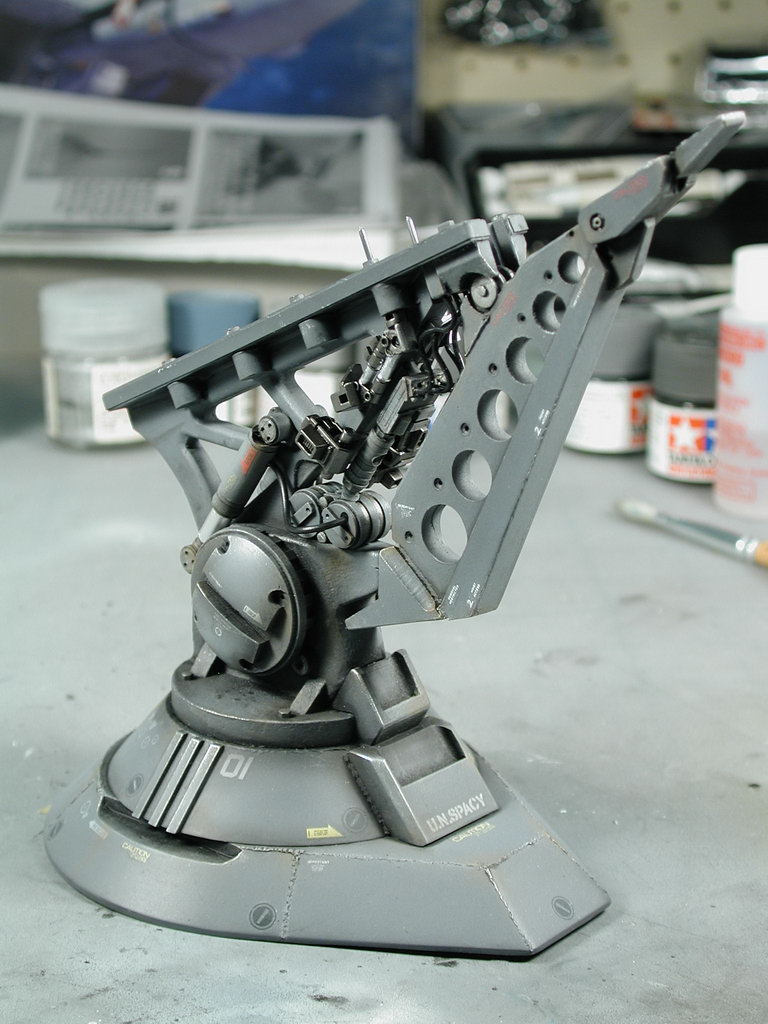
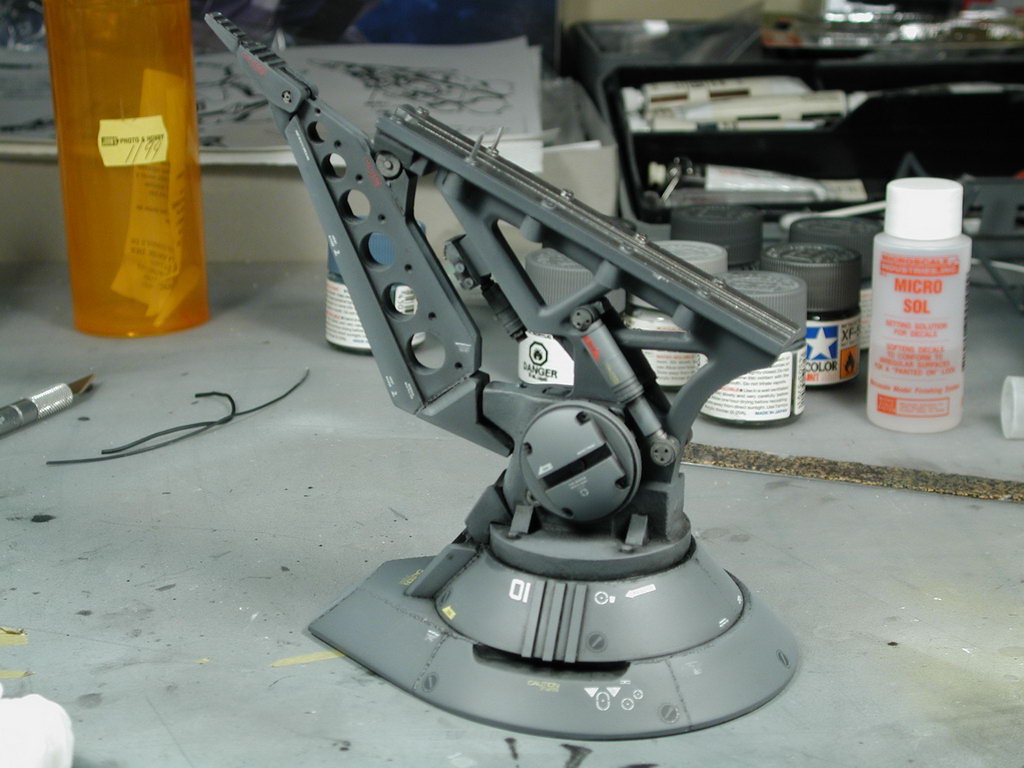
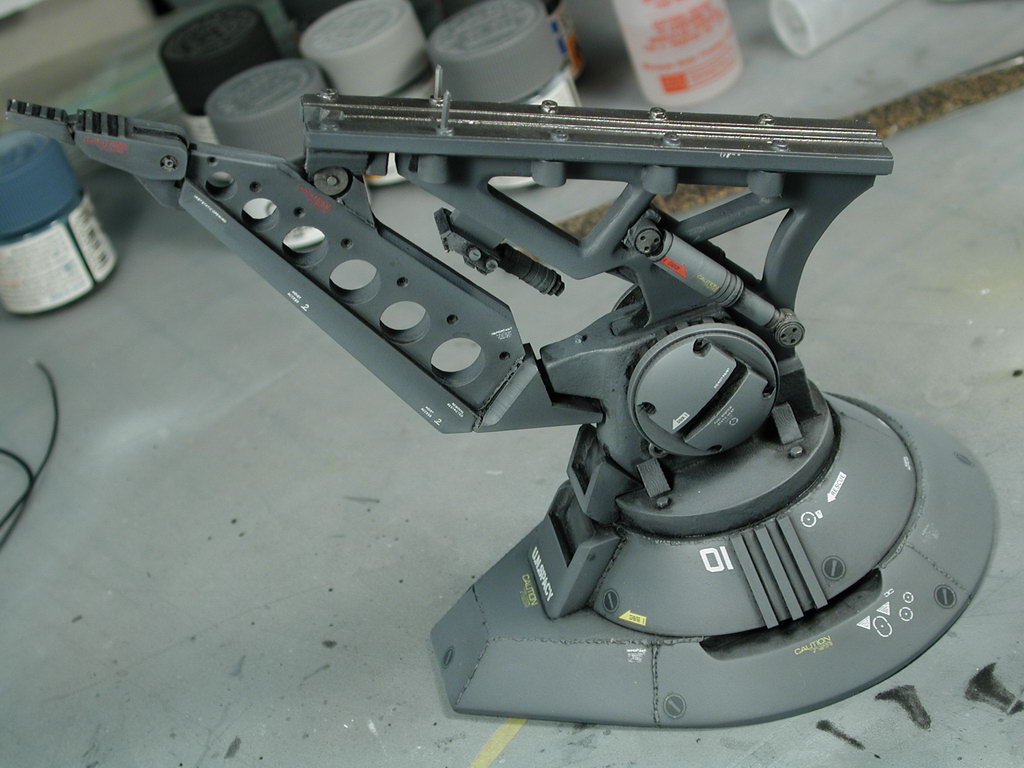
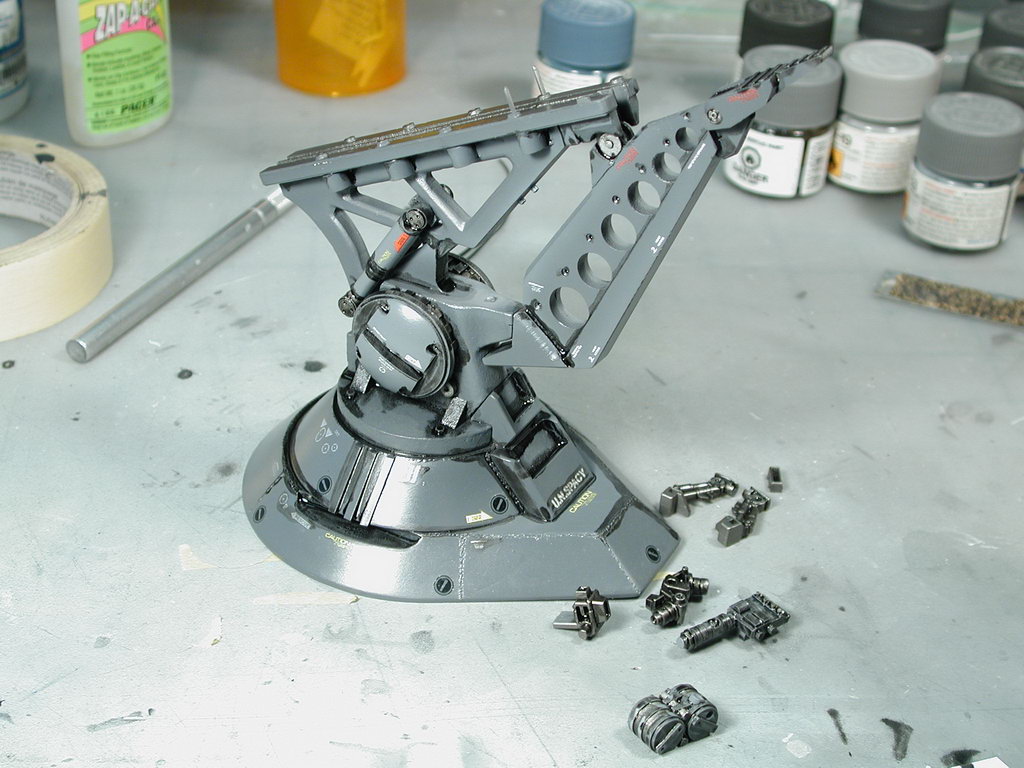
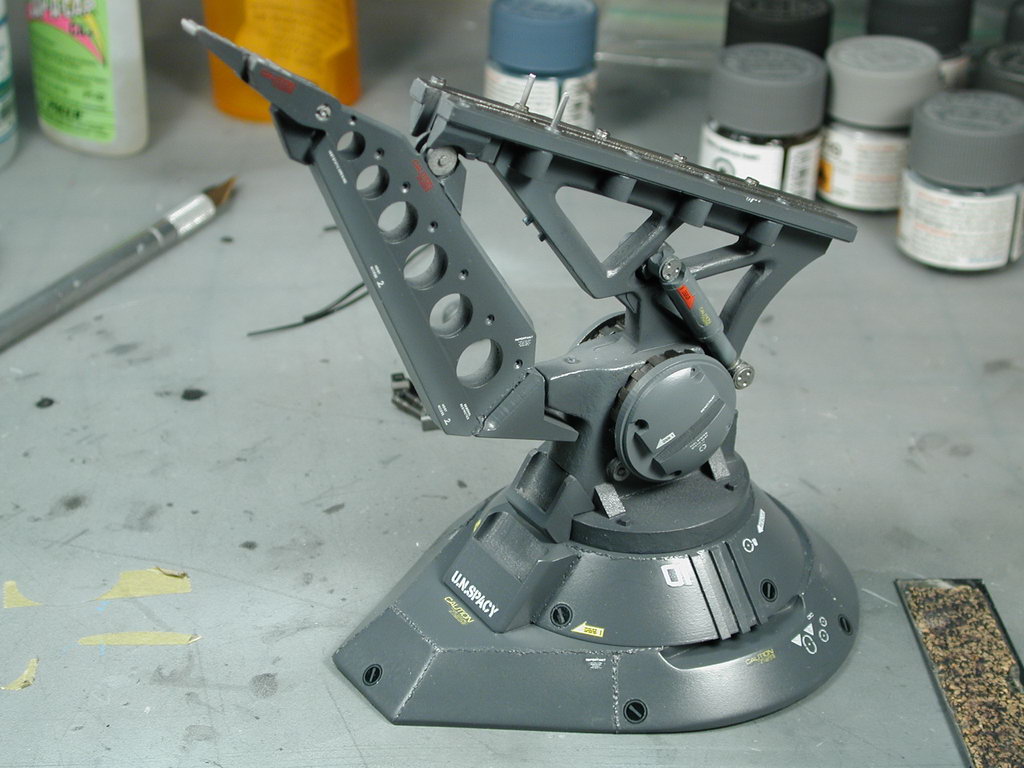
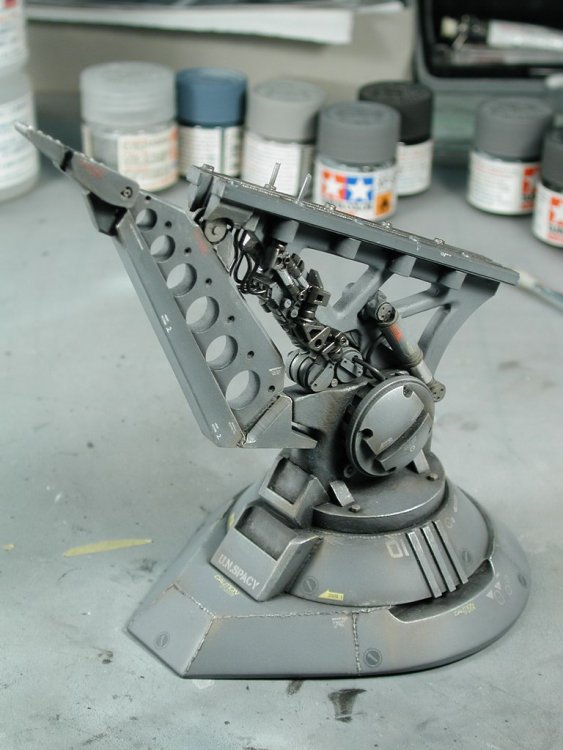
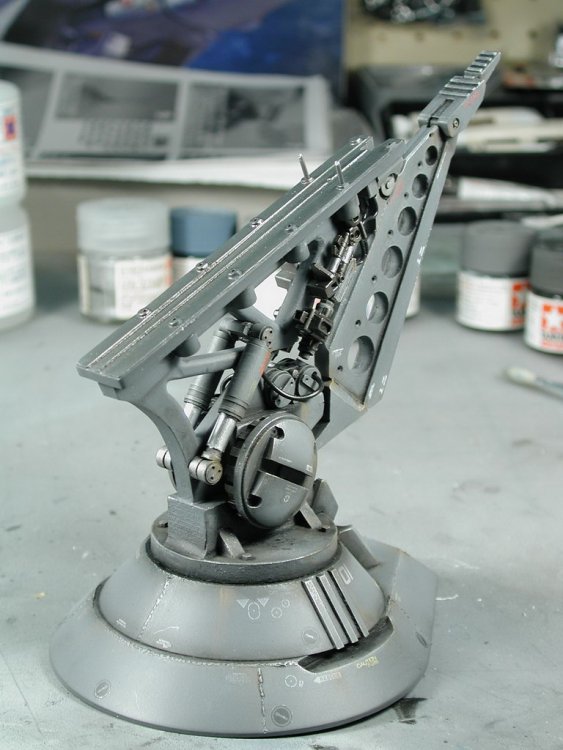
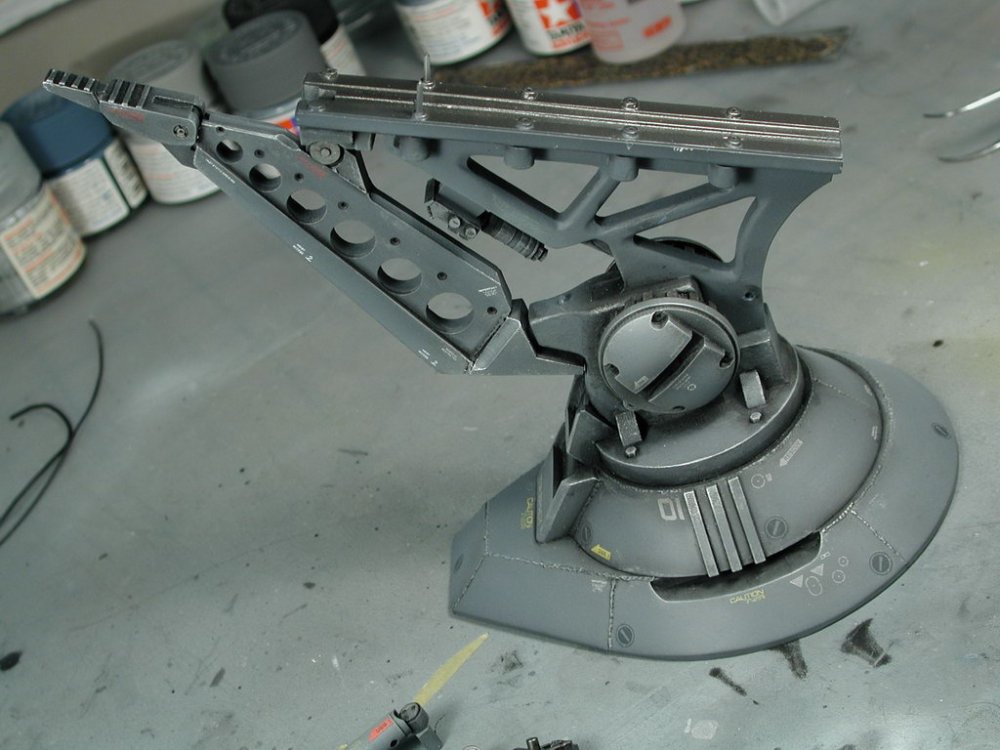
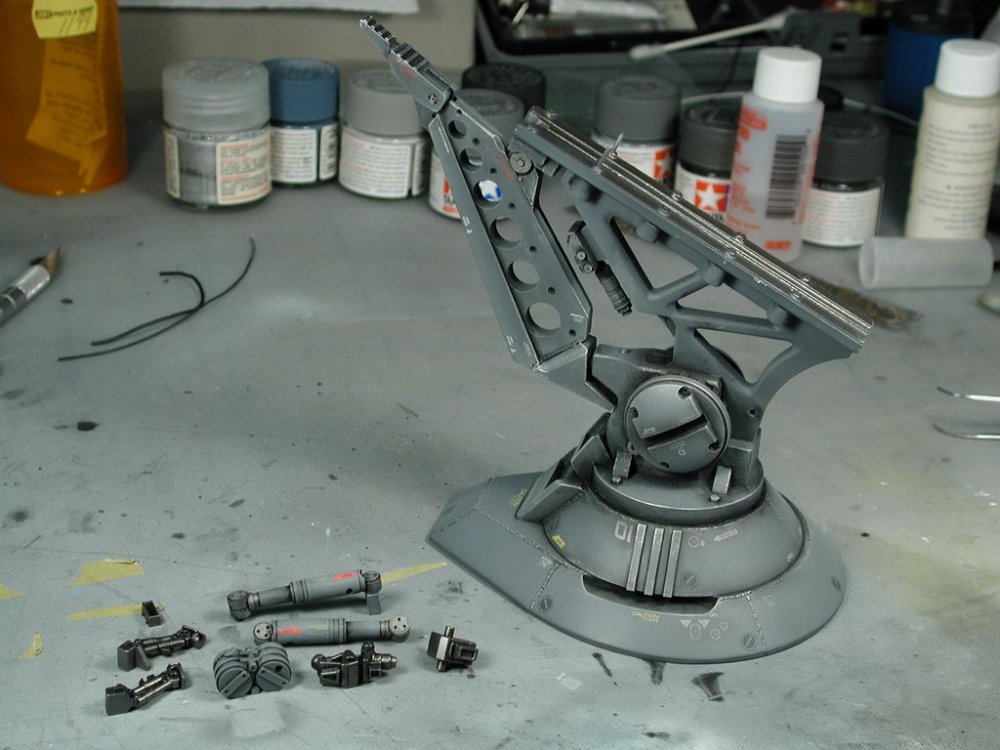
Yay! - my wife took our daughter to daycare and I got a whole day to finish up... I last left off assembling and gluing the main structure together and I primed it a medium/dark grey to see if there were any flaws. Of course there were some, but I had to weigh whether anyone but me would see/notice them versus the time I have left to finish this sucker off. It would be nice to have enough free time to work on these things so that I don't ever have to make these decisions - but unfortunately unless I win a lottery or retire, that's just going to be my dream! I rooted through my leftover parts to look for some suitable "gak" to dress up the machinery underneath the Boosters, I wanted it to look more complicated with hoses and actuators and such that look like its connected umblical to the Booster before launch. Its just a black shaded area in the lineart, so I'm free to make up something that looks cool out of what I have available. Landing gear stuff is always good (especially if you've built a few Valks with the gears up). I've used the main gears from the Bandai Yukikaze EX kit as well as some unidentified Gundam joint pieces on top of the great pieces that the Captain has provided with the kit. I decided to paint the launch rail in several shades of dark to medium grey so that it would blend into a carrier scene or look in place next to my ARMD Launch Arm. I airbrushed the smaller bits in Alcad Steel to get a darker contrasting metallic sheen to them. The idea is that the black oil wash will end up picking out the recessed areas and a light grey/silver dry brushing will hit all the highlights creating further depth from the shades of grey and metallic steel. Finally the bright silver will be painted to the hydraulic actuators (the actual part of the cylinders that move in and out) for contrast. The photos below also show a gloss clear coat applied (I used ModelMaster Acryl) so that the decals will lay down nicely without silvering or bubbles. This is an essential step since the final model is relatively dark and the final finish will be a military flat - both are typically bad news for the silvering of decals and their carrier film. So good surface prep is important.


-
Hey, I actually worked on my model for 2 stints of 1 hour each this last week - didn't get much done, just dusted it off, some clear-coat in preparation for decals and some base metalizing airbrush on the smaller greebles/gak that I am going to spruce up the structure with - I hope to get some update done to my thread sometime next week! I highly recommend the launch rail, it does provide an excellent "stand" for the booster! Unfortunately I am still at a loss for the vehicle, but the stand is good enough for the time being. Whats this about you making Macross pilot figures? I'd love one of Minmay in 1/72 scale with her long hair holding her helmet in the back seat of the VT-1 (its one of the main reasons I've held off building that kit!)
-
Bandai 1/72 Scale Macross Frontier Plastic Models
wm cheng replied to Graham's topic in Hall Of The Super Topics
Thanks for the vote of confidence! it nice to be remembered.... ahhh, its been so long since I built (my daughter takes up all my free time). Bandai definitely can make some quality models, but I'm not a huge fan of their multi-coloured parts - you've got to primer them grey and re-paint to the right colour anyways. If you paint directly on top of the coloured part, then whatever you've filled the seams with will show up as a different shade of that colour. Plus the coloured parts are never the right shade anyways. However, I don't think Bandai will give these small 1/72 scale models the Perfect Grade treatment - it might just be a EX treatment (I can hope!) but if they do well (sell well) they might consider doing a 1/48 in a Perfect Grade which would be more consistent with their sizing. I just hope I don't have to wait years or they don't rush out a version 1.0 of a kit that we all gobble up just to re-release a version 1.5 a few months later with the flaws corrected and better decals like they did with the Yukikaze EX models (which I got burned with!). Personally I love the revits on the Hasegawa kits! The more detail the better! Bring it ON! -
Lookin' real good!! Nice colour scheme too. I see no one is crazy enough to drill out the forward slot intakes eh? Don't blame ya, I thought about it long and hard, then decided against it. Are you planning on weathering it? It was a tough question for me, since its supposed to be disposable.