wm cheng
-
Posts
4346 -
Joined
-
Last visited
Content Type
Profiles
Forums
Events
Gallery
Everything posted by wm cheng
-

Whats Lying on your Workbench MKIII
wm cheng replied to HWR MKII's topic in Hall Of The Super Topics
ARGH!! Disaster stuck... In my stupid attempts to accelerate the drying process, I placed the kit a little to close to my lights and it deformed the canopy (beyond re-shaping it back). I can't believe how stupid I was!! I've got too much invested in this bird at this point. I called the store where I purchased the kit from, but they say that they have no way of contacting Academy to obtain a replacement part. I remember back in the day (20yrs ago) when I had a 1/32 Tamiya F-14 and I was able to purchase just the canopy tree again from the distributor (Borgfield Toys in Toronto, Canada). But it seems I may be out of luck this time around. So any one here with a suggestion on an avenue to pursue? I'd hate to purchase another kit just for the canopy (and I don't assume anyone here on these boards have a spare one - its not like its an option part?!) but you never know? I'm going to try the Academy web site. DAMN!! -
Whats Lying on your Workbench MKIII
wm cheng replied to HWR MKII's topic in Hall Of The Super Topics
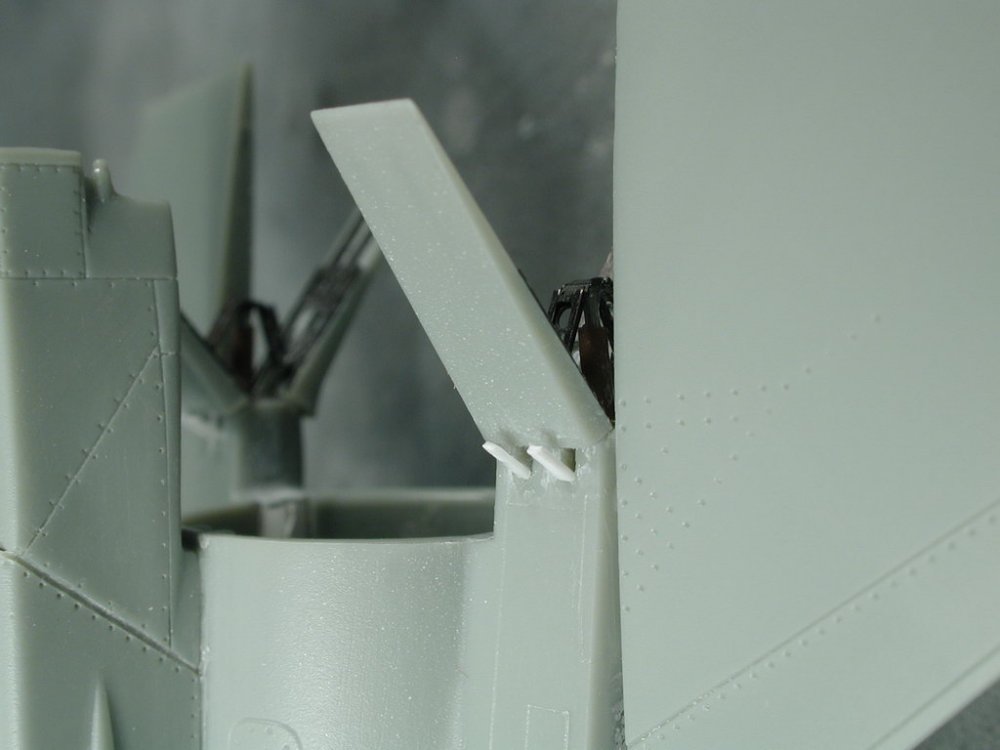
Some more updates... Argh... sanding... sanding... and more sanding... Did a primer coat to see the results, and I'm not a very good sander anymore. Man am I out of shape, a few years from modelling and I don't know how to sand again!! I still have some seams and blotches of Mr. Surfacer here and there, I keep sanding again, thinking I got it, then primering, and realizing its better but not all gone, then I get to the part where I start to loose the curvature of the surfaces and details, but the damn repair job is still there!! Argh!! at some point I've got to call it quits and walk away and call my losses and get on to another stage. The little sinkholes/devits on either side of the fuselage proved a bit problematic, I filled them with Mr. Surfacer, but the more I sand, the more the Mr. Surfacer stands out, its as though the surrounding plastic is softer than the Mr. Surfacer!! The horizontal seams by the cockpit has proved a challenge too, think I successfully puttied and sanded them smooth (at least to the light and my fingernails) I glued that little bump/hump to both sides of the fuselage, only to find out that the seam is still visible after primering. Now I have to sand that part around the nosecone antenna and humps, which is proving very difficult without erasing those small details! I love small 1/72 models, but now I wished it was slightly bigger like 1/48 or something. DID I MENTION I HATE SANDING NOW... I've never had such problems with my older Hasegawa kits, I don't know if its because I'm coming back into modeling after a 3yr hiatus and I am rusty or that there's just more filling to be done with this Academy kit, but the sinkholes on the fuselage sides seem to be just bad QC and all the little various injector pin marks all over the place! I wasn't a fan of the 6 piece intake assembly! And making the wings a glue on piece, it should of just been part of the top fuselage. It seems like its just parts sake for extra pieces sake. IMHO Plus there's this fine texture all over all the parts, that shows up if you spray Alclad metalizer paints without primering first. Great detail on this Academy kit, but fussy parts breakdown and assembly - thats my take on the new kit so far! Oh well, some more little bits and pieces here and their that I've been working on... Modifying the airbrakes seems to have paid off with the Eduard PE kit.

-
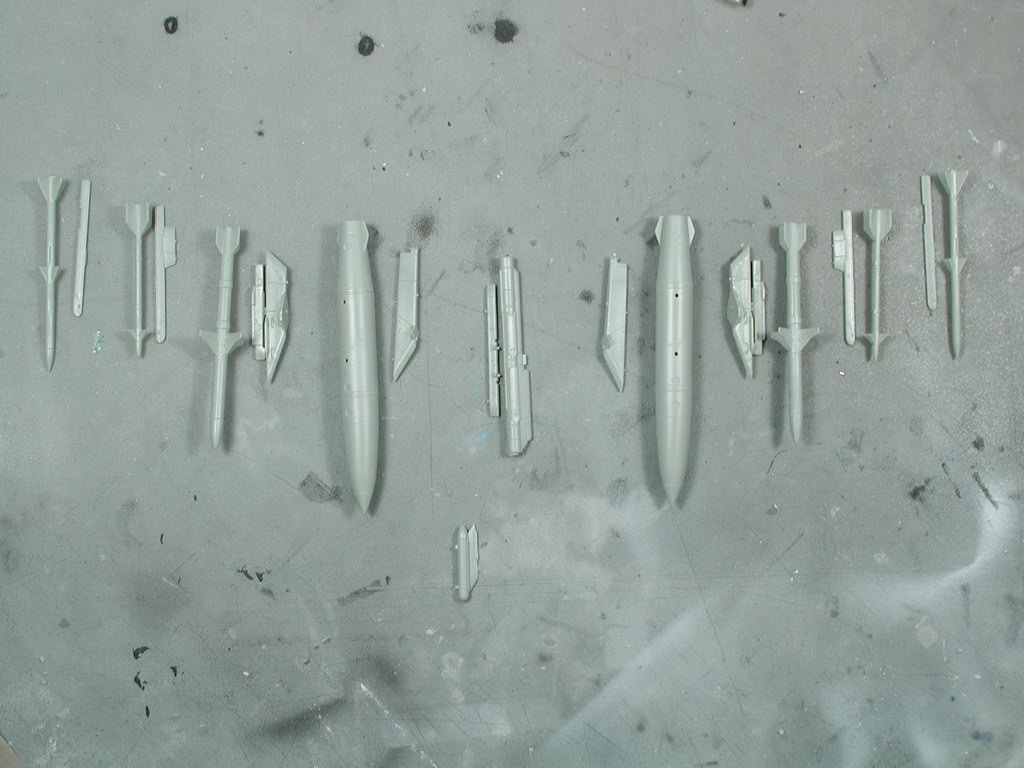
Yes it does include the towed decoy, I didn't use it since I think it looked a bit bulky on the ends of the wings there. The kit is really good, lots of good little details and modifying the Eduard Hasegawa PE parts to fit wasn't to difficult. HWK MKII, do you think I can put the sidewinders on the wingtips instead and switch them with the AIM-120s - even though I haven't actually seen any reference photos that show that layout configuration? Noyhauser, what info do you want to see or hear?
-
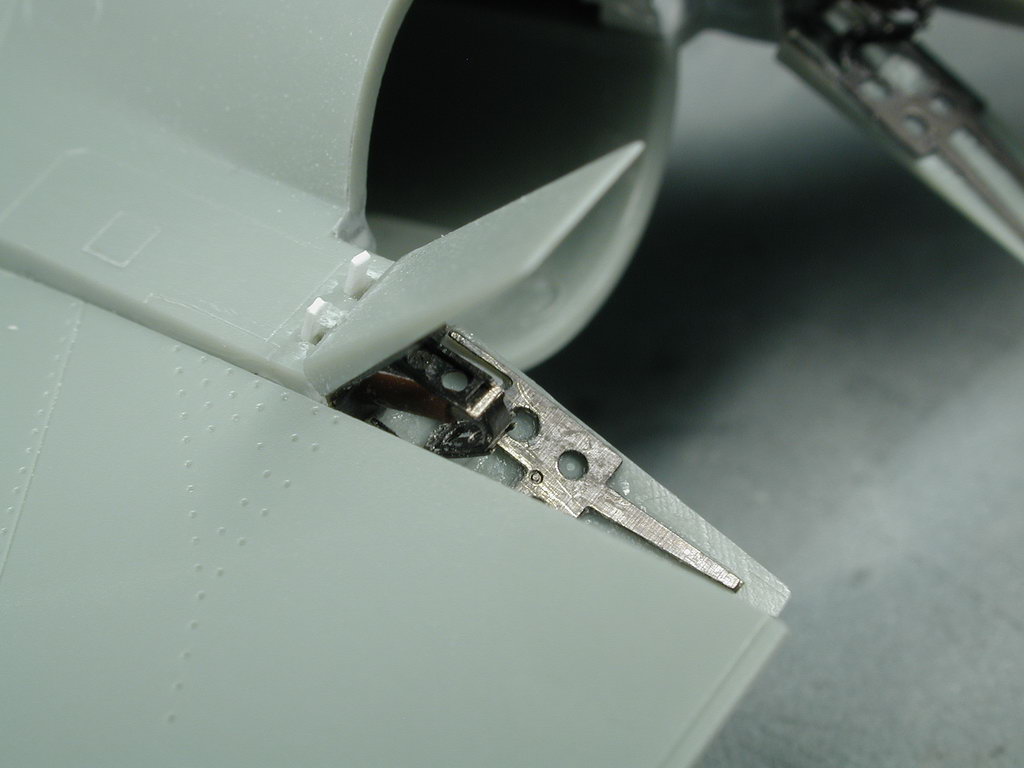
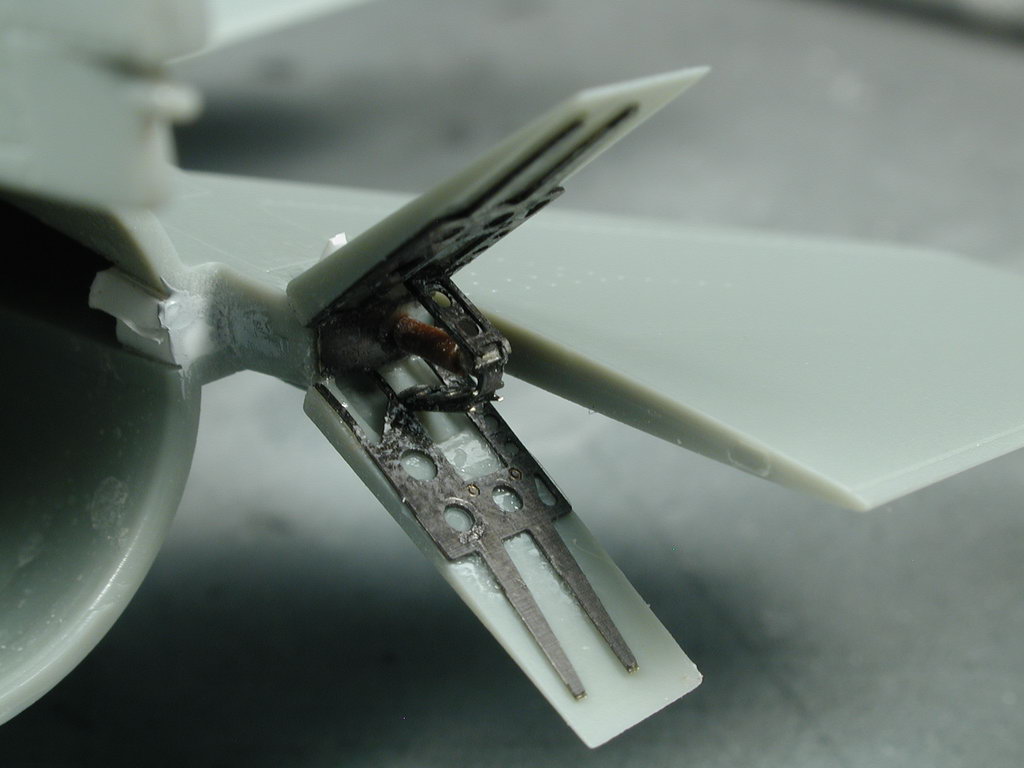
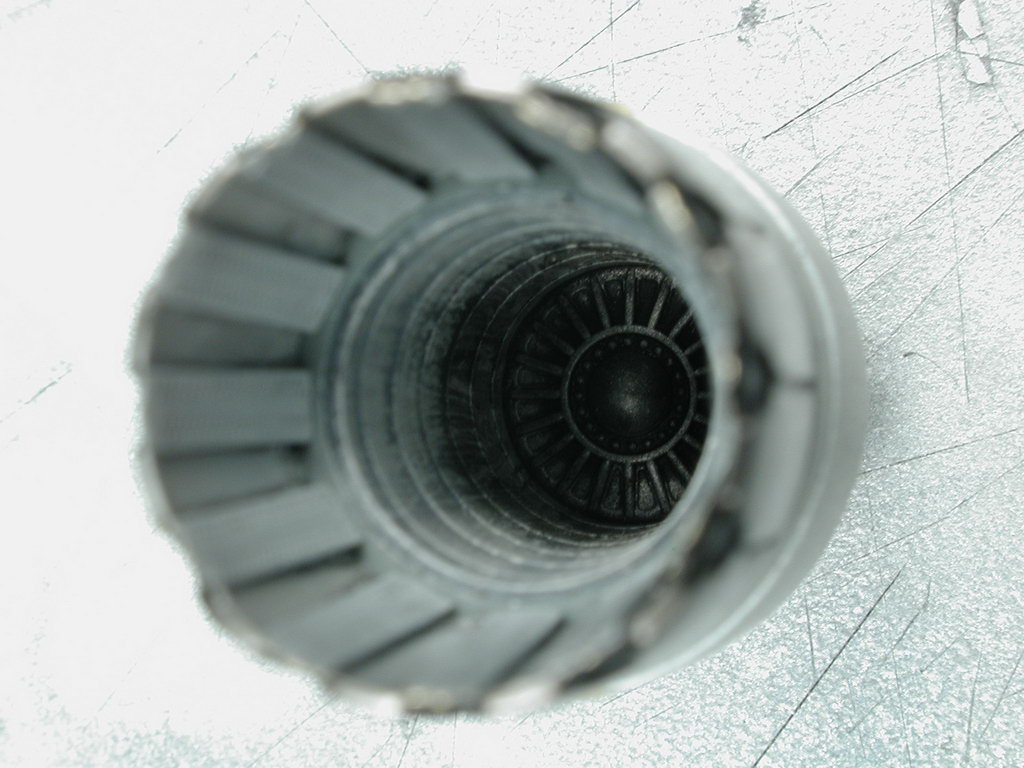
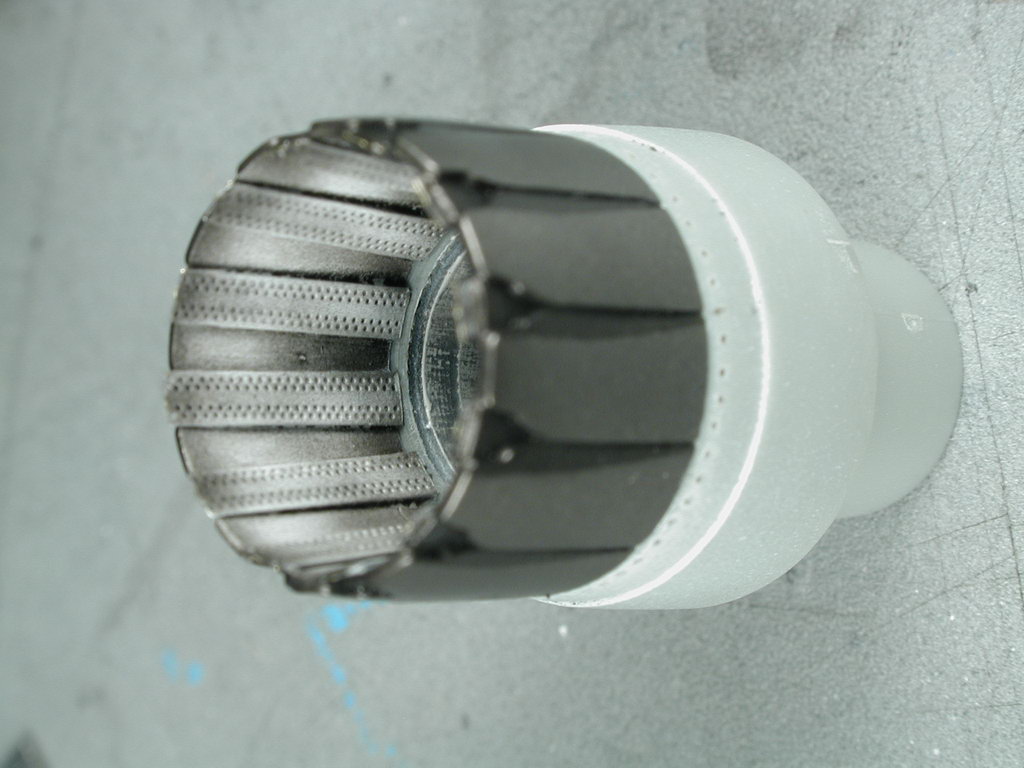
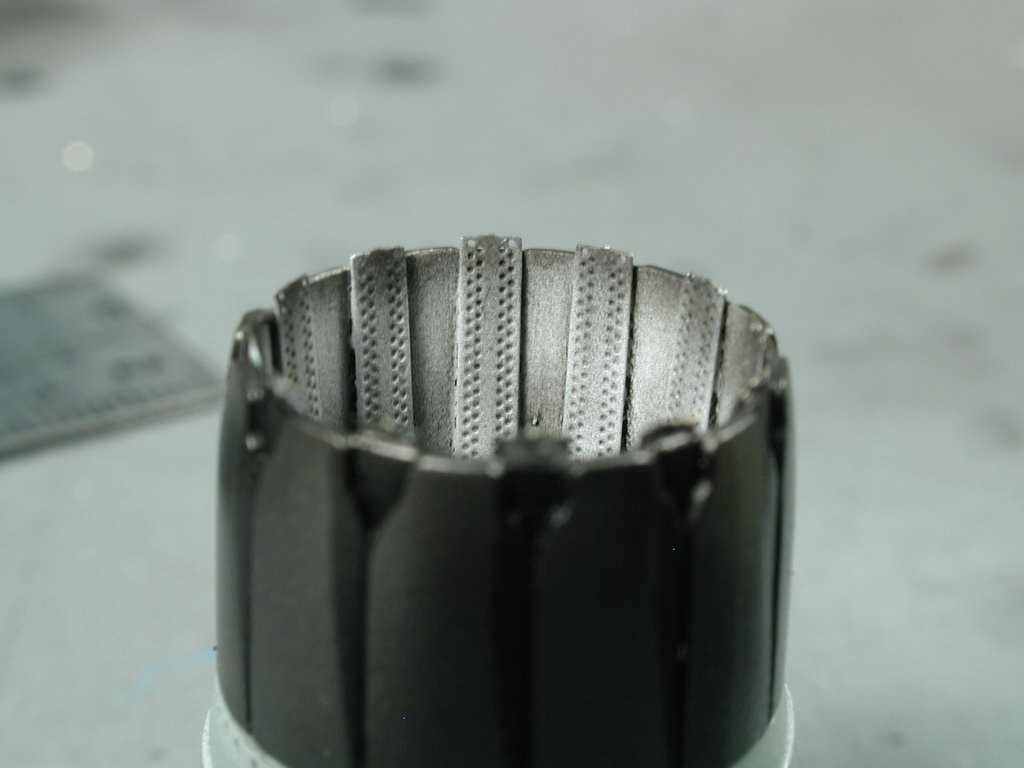
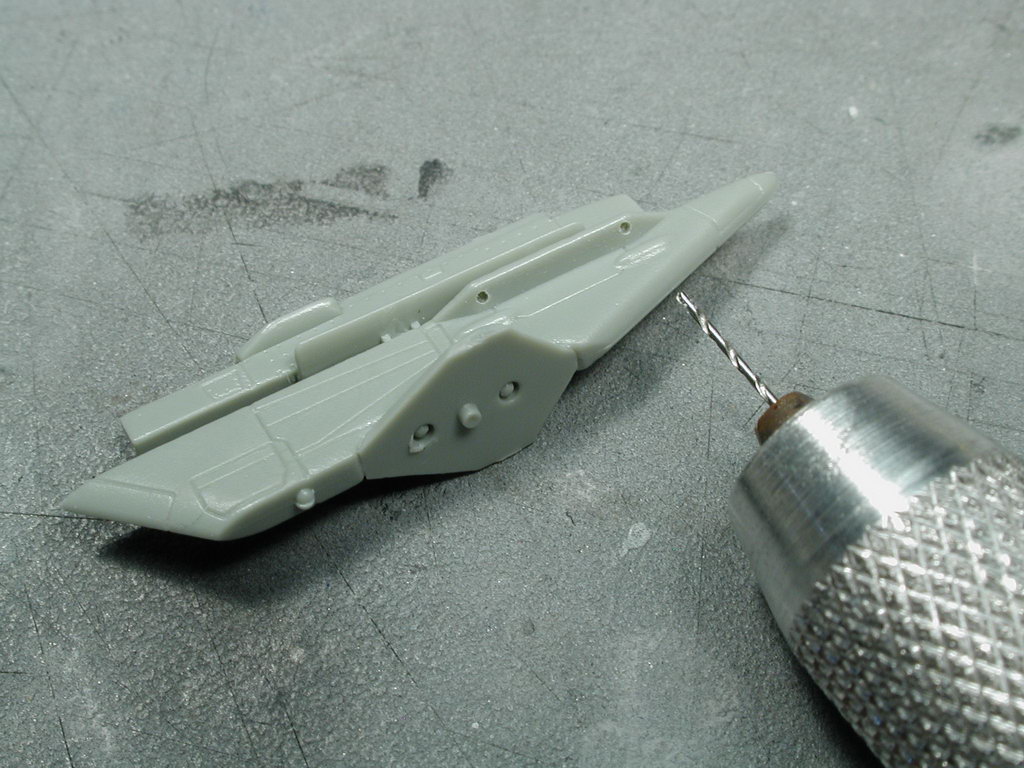
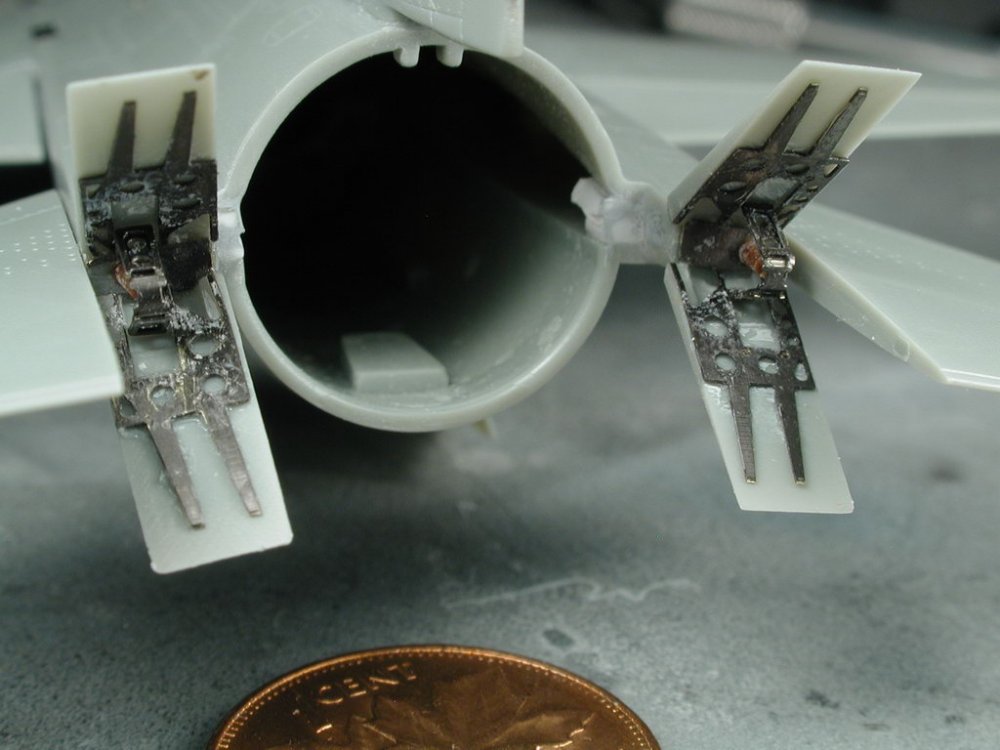
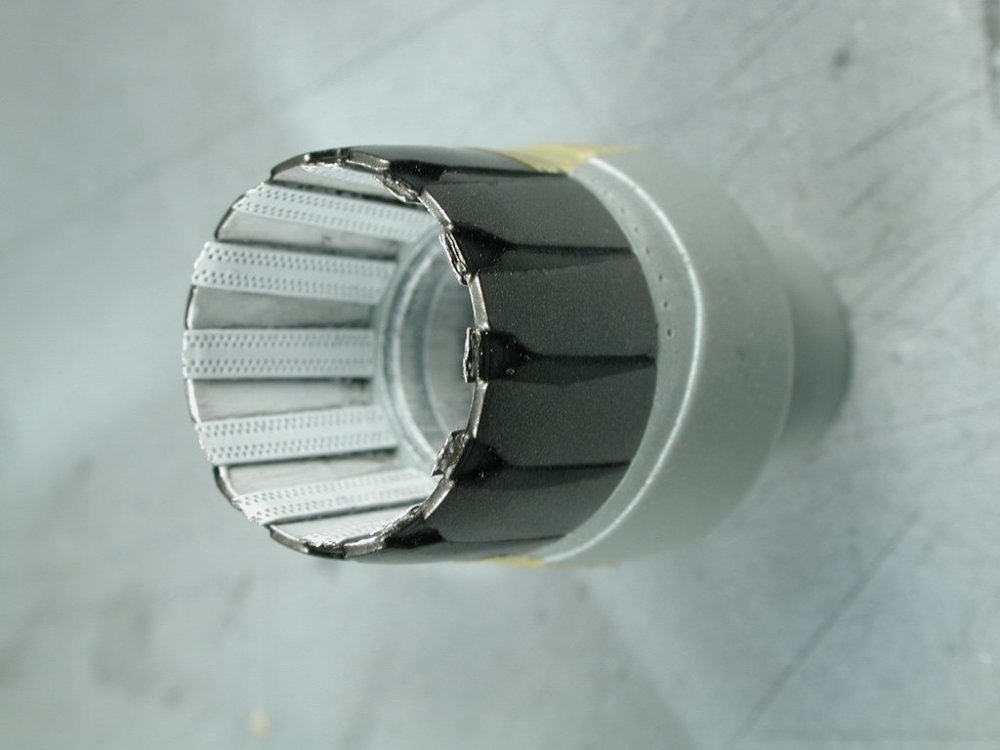
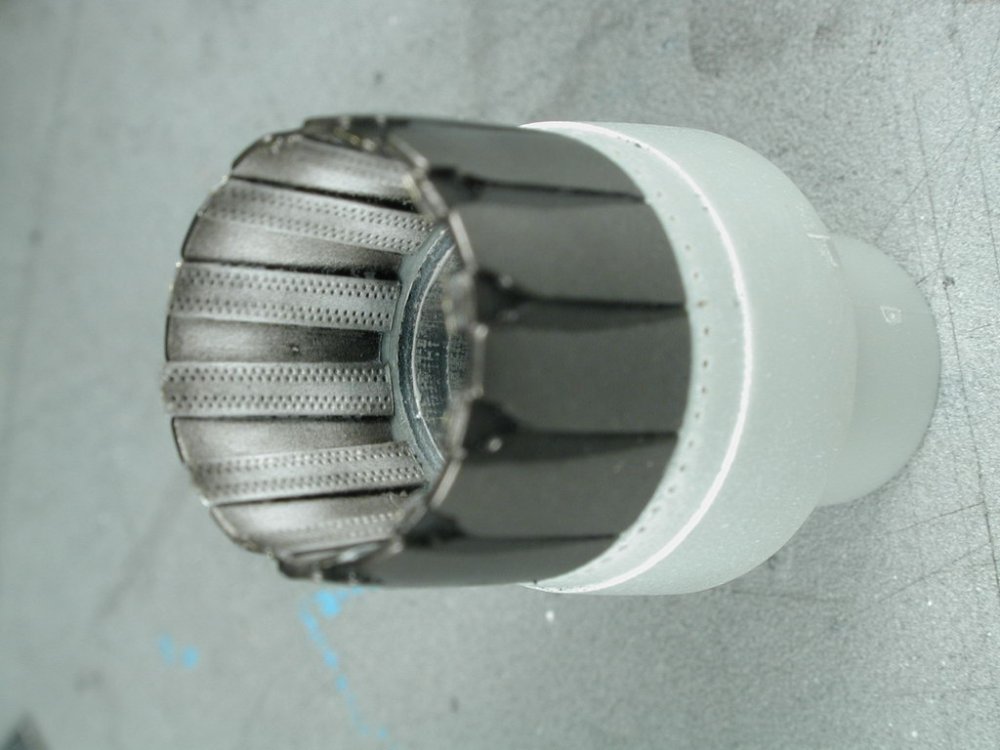
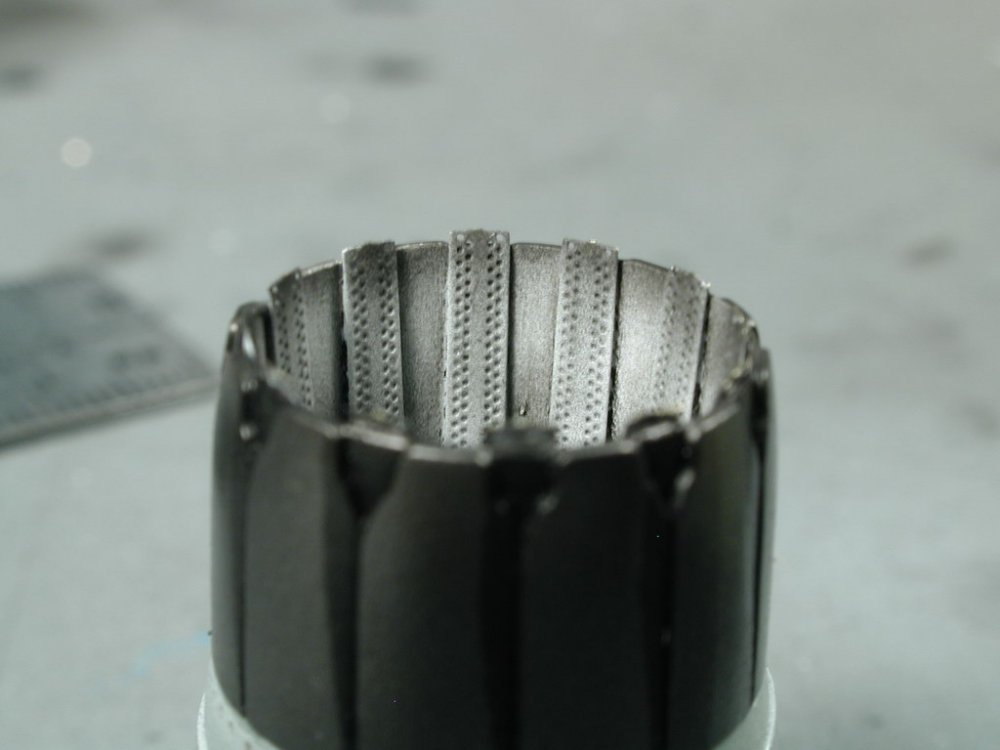
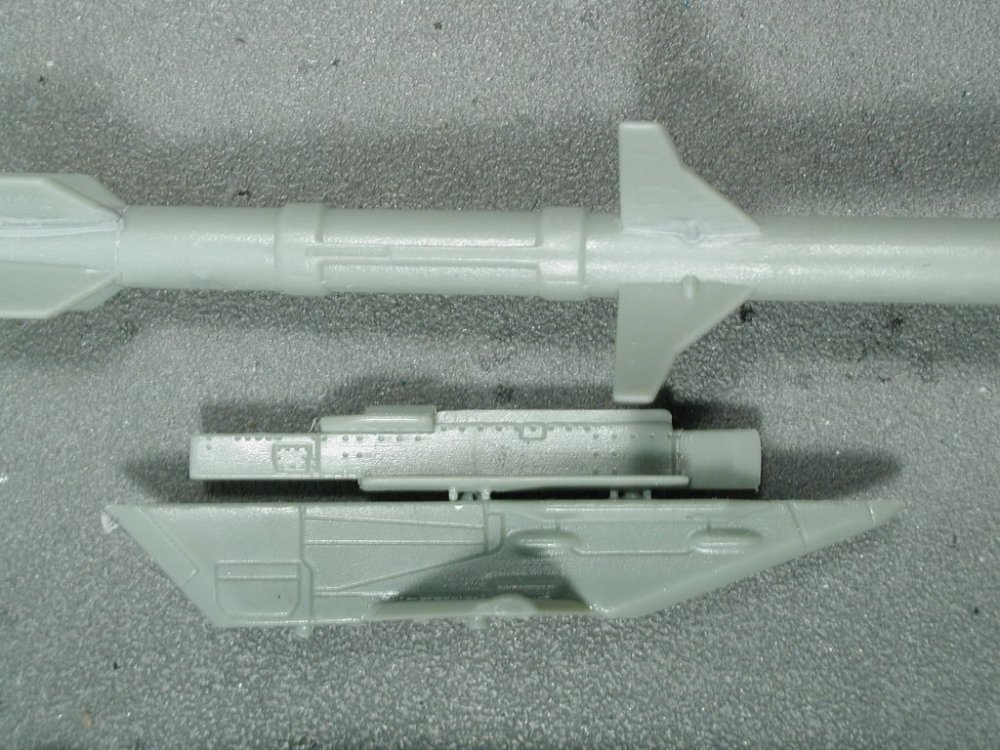
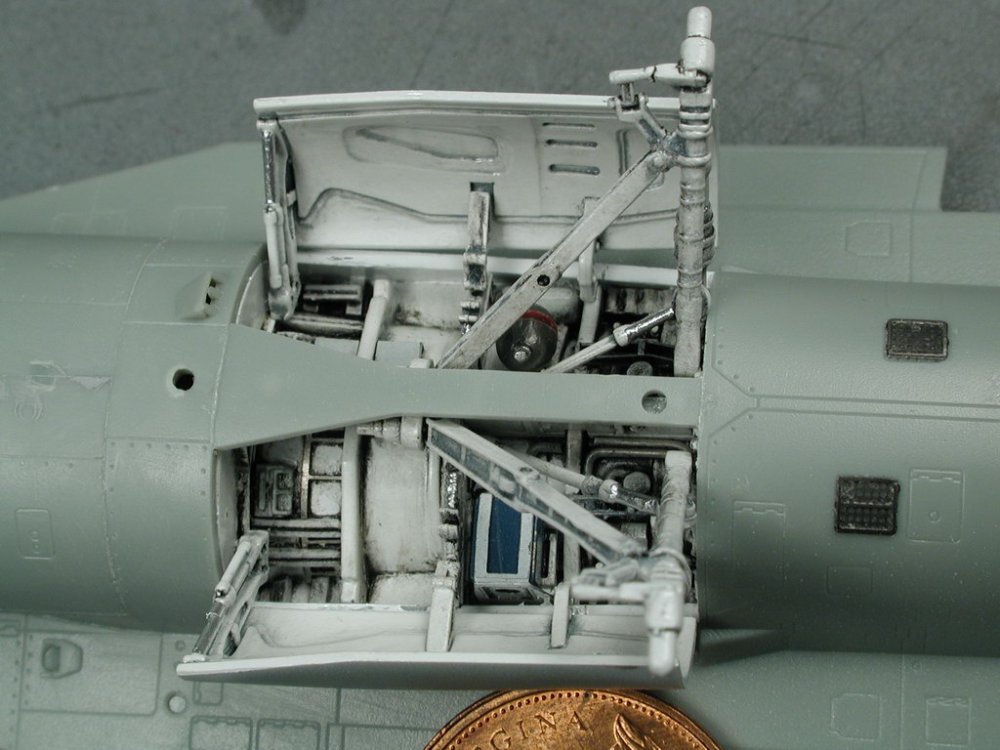
Hi guys, some more updates... Thanks for the info HWK MKII! I'll try to incorporate as much as I can (without redoing too much or damaging what I already have done). Some of the photos here show the exhaust can that I worked on. The Eduard photo-etched kit is for the older Hasegawa kit, so I had to modify the parts somewhat to fit into the Academy kit. I cut off the exhausted turkey feathers and glued them into the interior of the kits styrene can which is molded quite well for a stryrene kit, so its a hybrid thing which looks quite good given how small the part is. This is my planned weapons layout too (for our resident experts David & HWK MKII) Its what I tend to see in the photos online. However I originally wanted the Sidewinders on the wing tips, its seems more aesthetically pleasing to have the missiles diminish in size and mass as we get out to the wingtips. Any comments? Additionally, I started to drill some holes into the pylons (as per HWK MKII's suugestions) - but realized that the forward holes on the HARM pylons have nothing to contact with on the lower HARM adapter thingy? Hmm, I double checked the orientation of the glued part and its correct, I don't have any reference photos of the pylon attachment to the HARM missle do you have any? Thanks for all the info and suggestions so far! Wm (p.s. it really looks better in real-life, or maybe my eyes are just blurring the imperfections together, but all these MACRO photos really bring out the microscopic roughness of the paintjob that isn't seen in real life...) A comment about the kit so far; its really an excellent kit, the best I've but in a while, however some of the engraving is quite shallow so one must take care in sanding, there's a bit too much ejector pin marks for my taste, especially around some of the ordinance which I don't think is too complex that requires so many pin marks, and there seems to be a little over complex in terms of pieces, some really tiny avionics humps and bumps that should just be molded on are separate pieces requiring gluing or the tiny NAV lights on either side of the main intakes are clear pieces, but do we really need the extra hassle at this tiny scale? Sure its great for 1/32, but it all seems un-necessary.


-
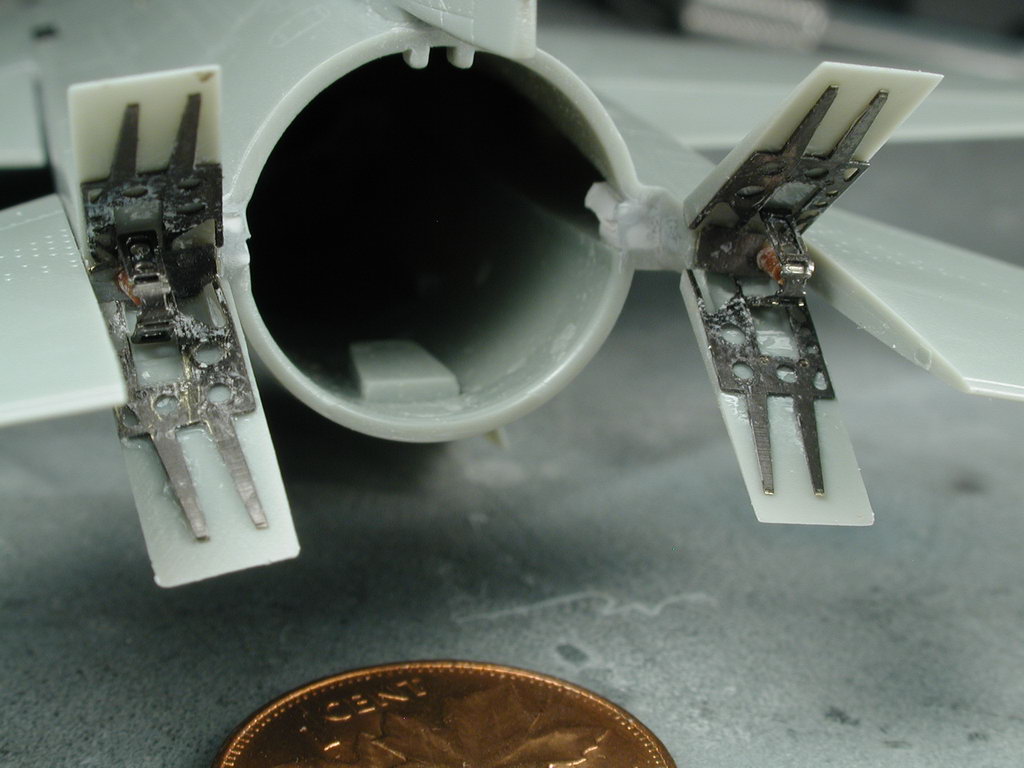
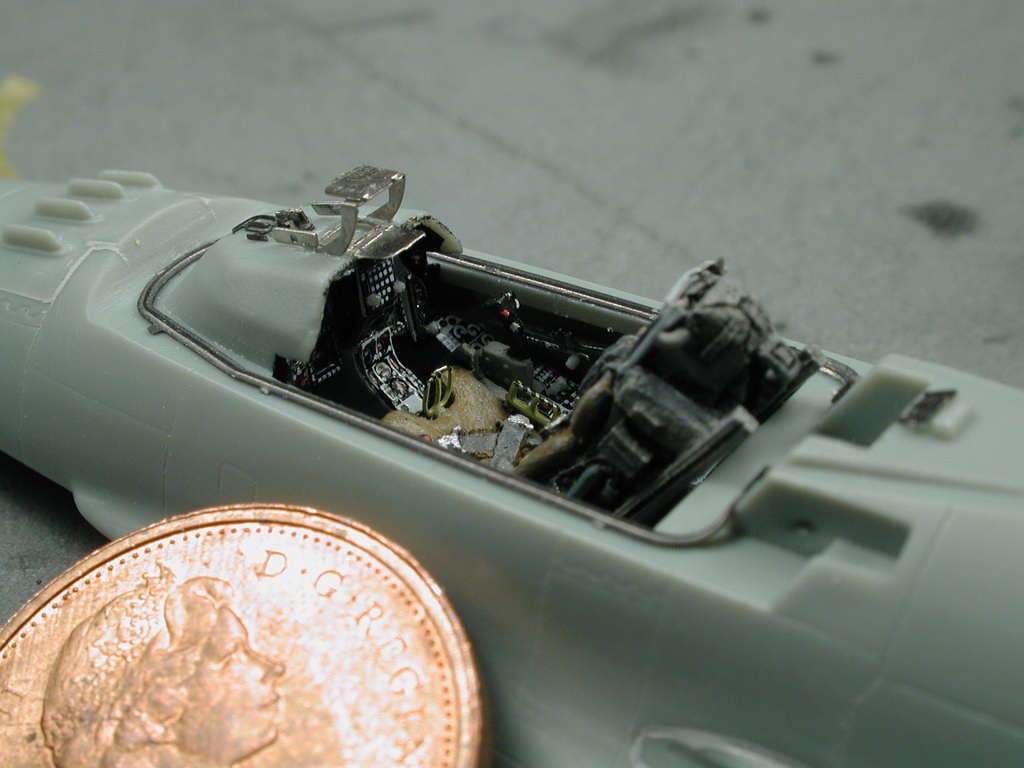
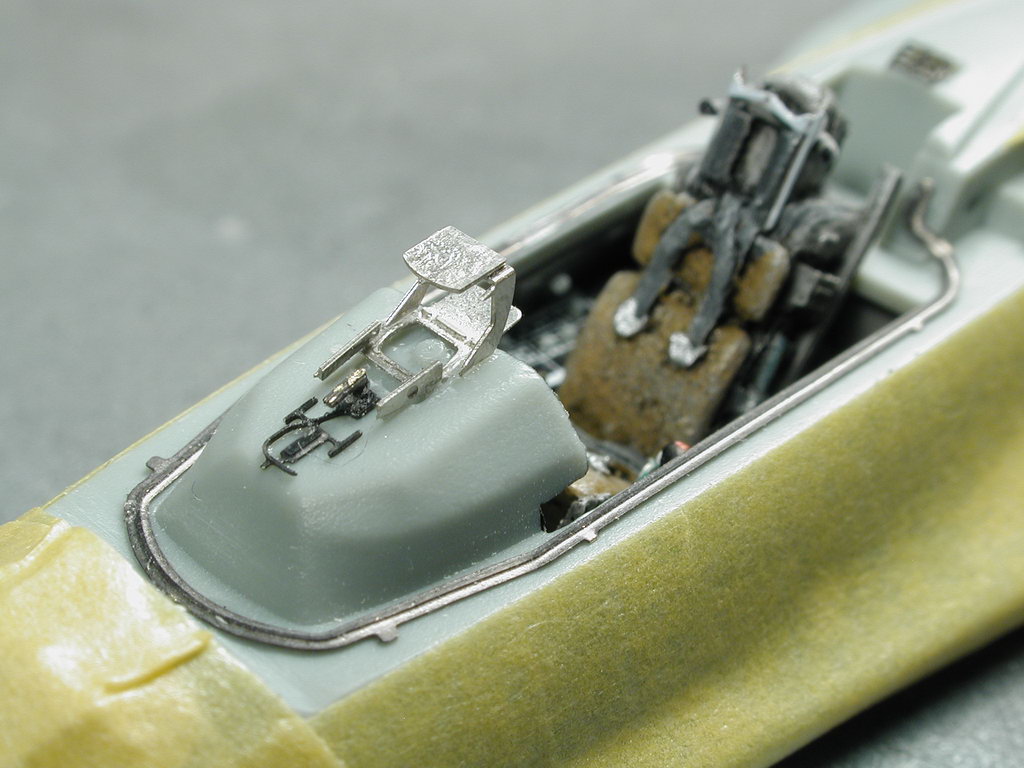
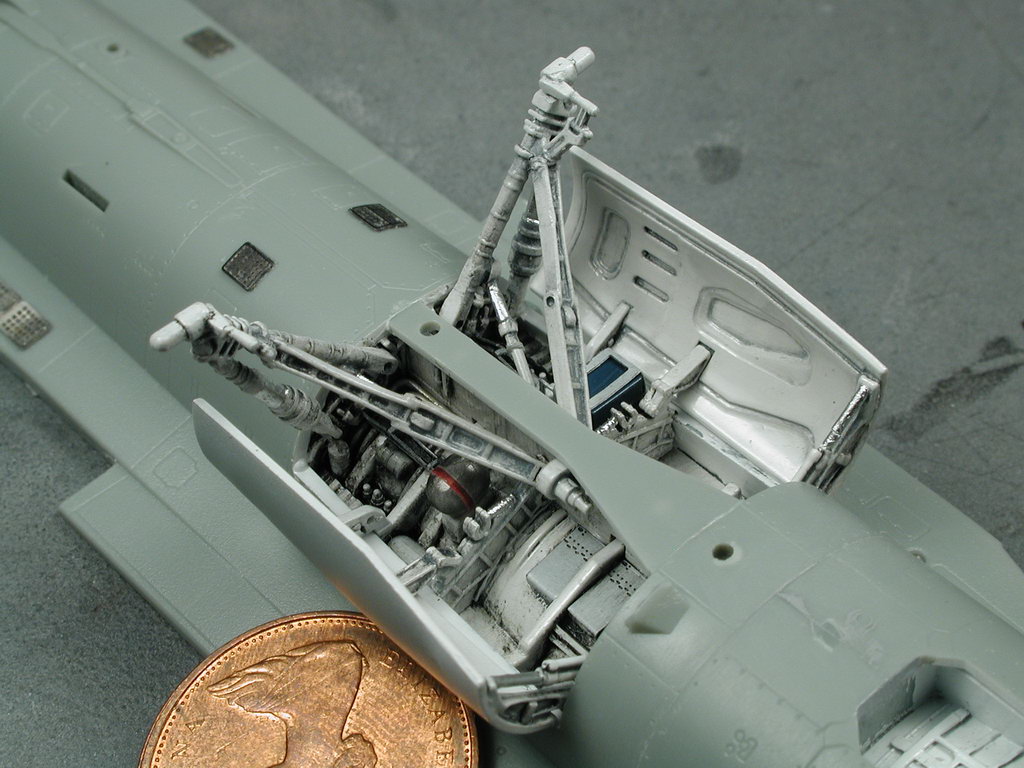
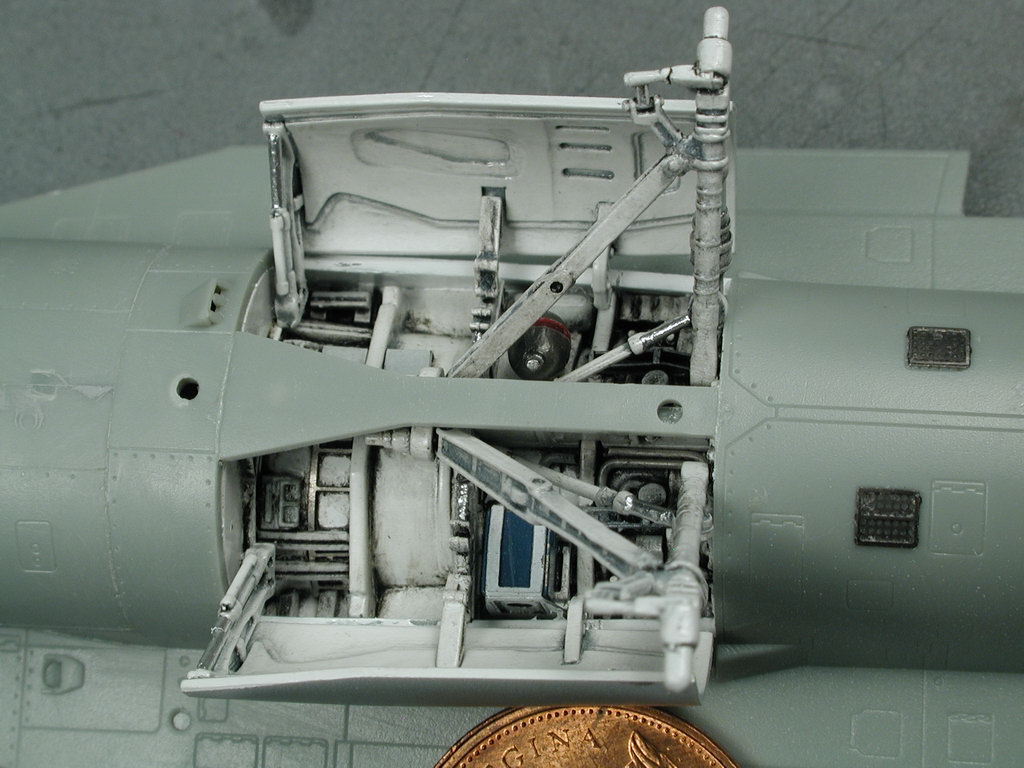
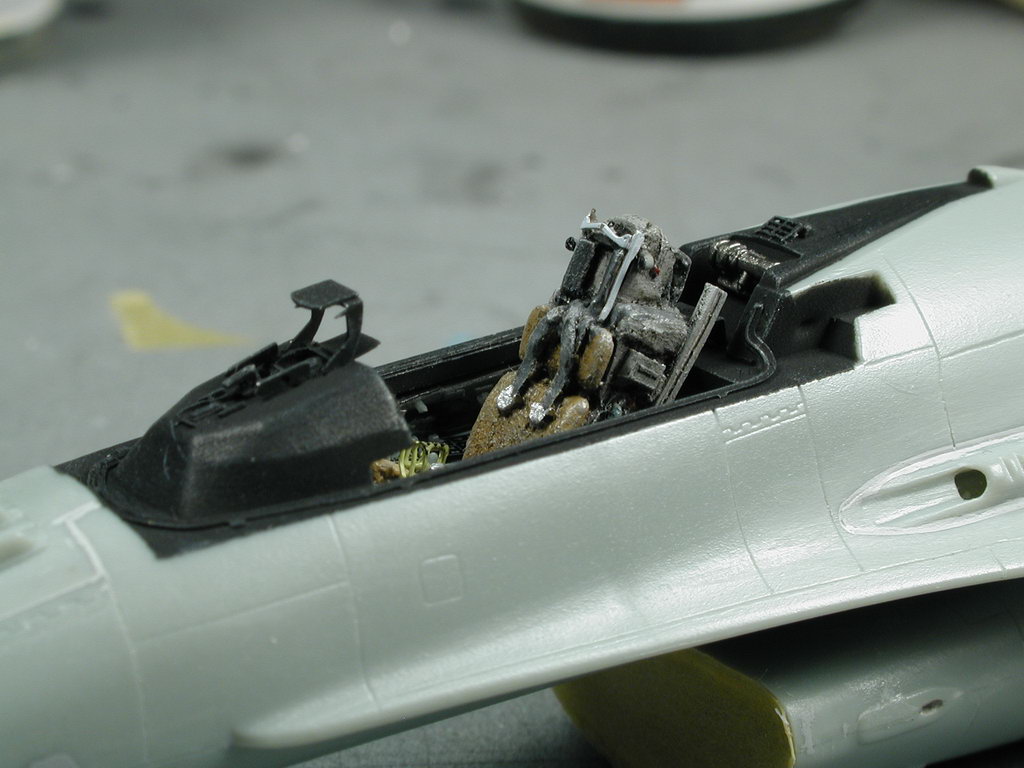
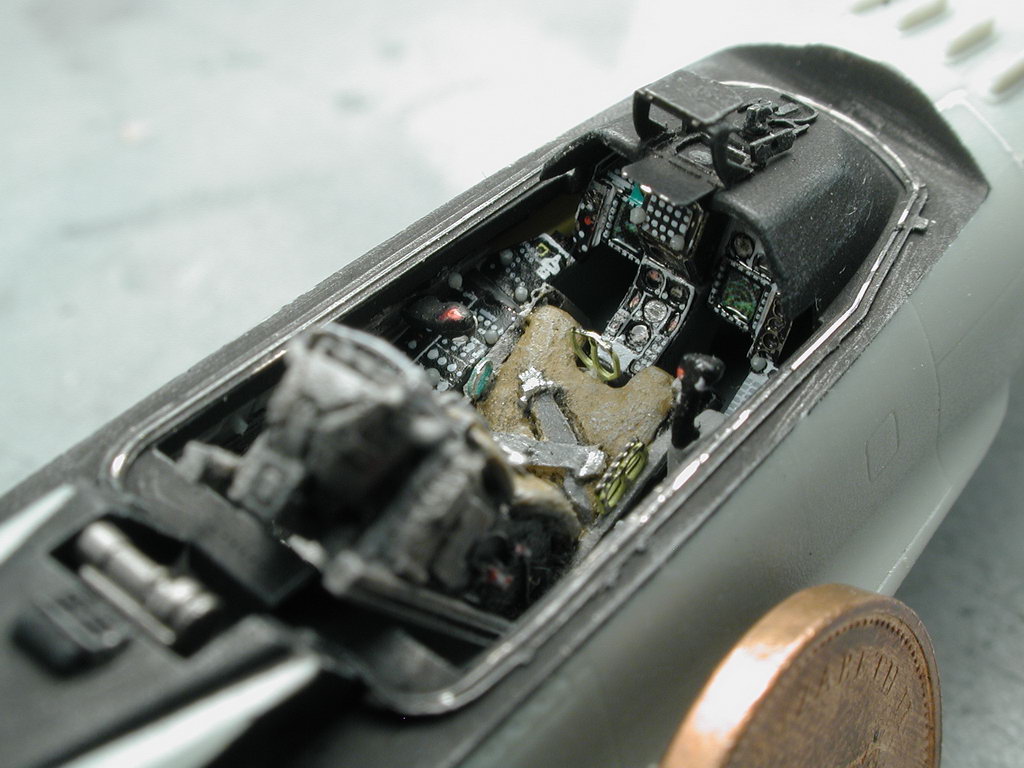
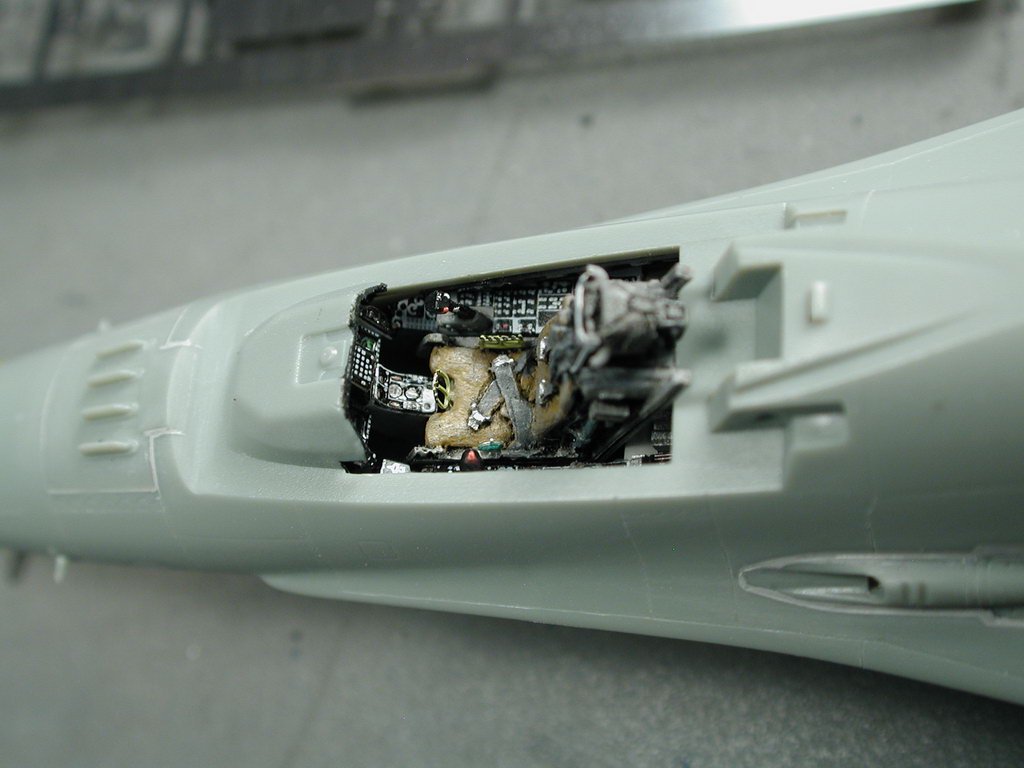
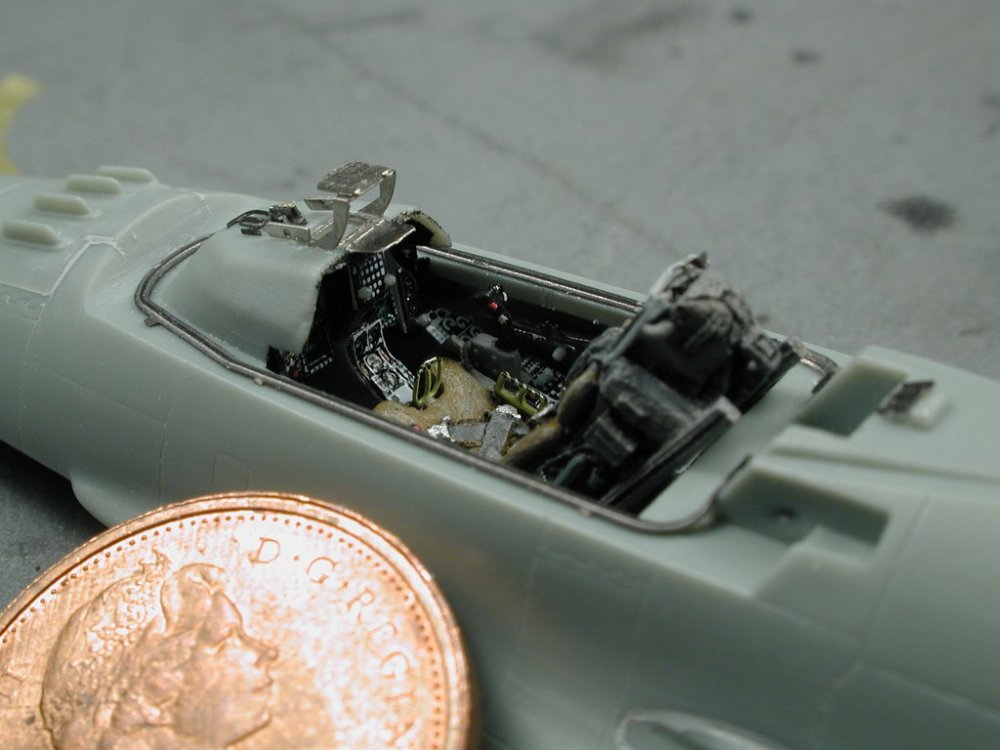
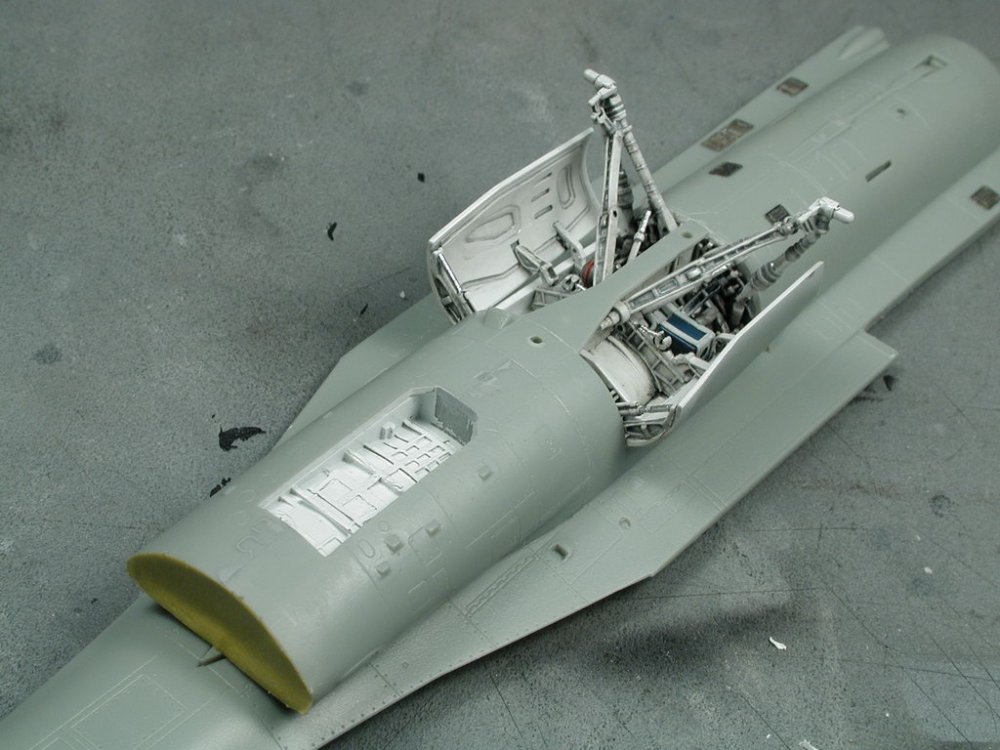
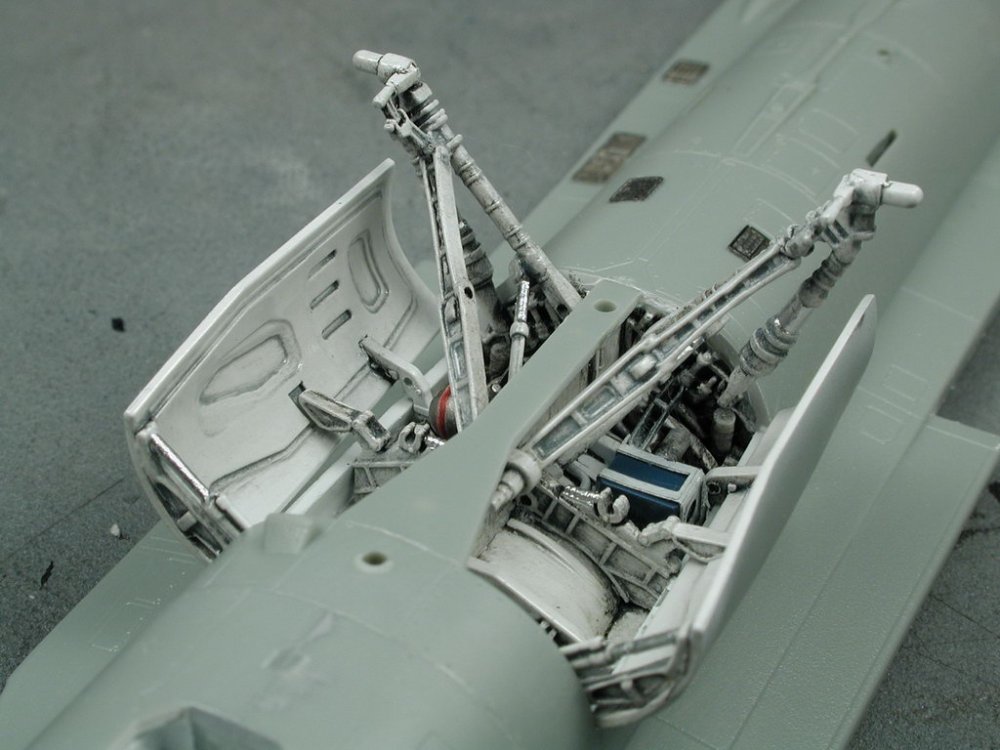
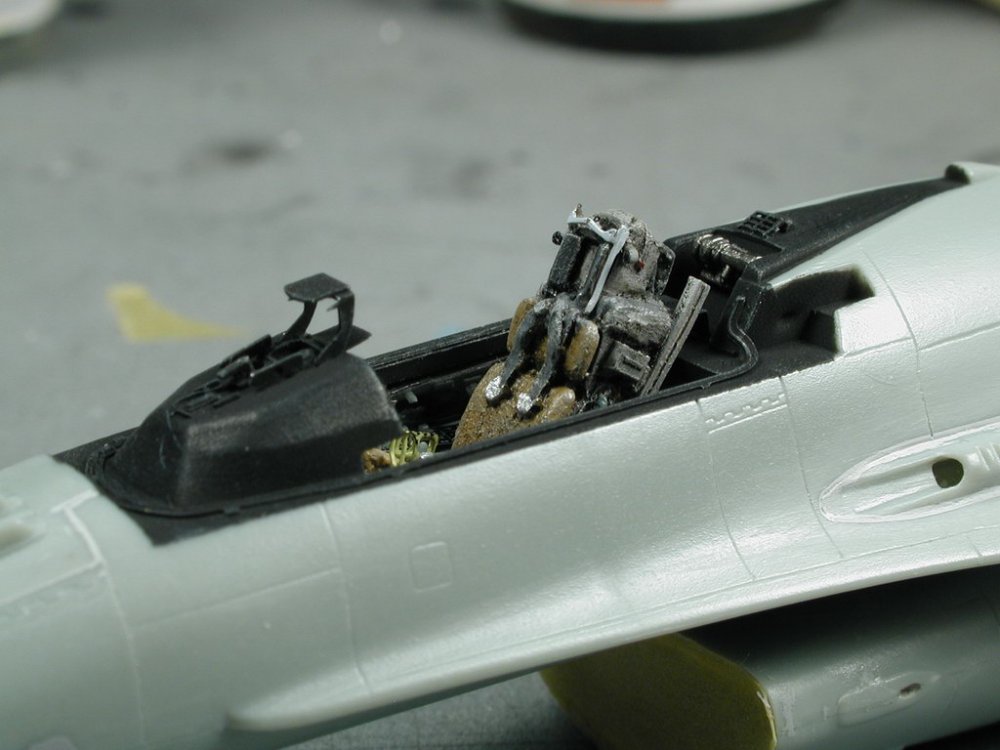
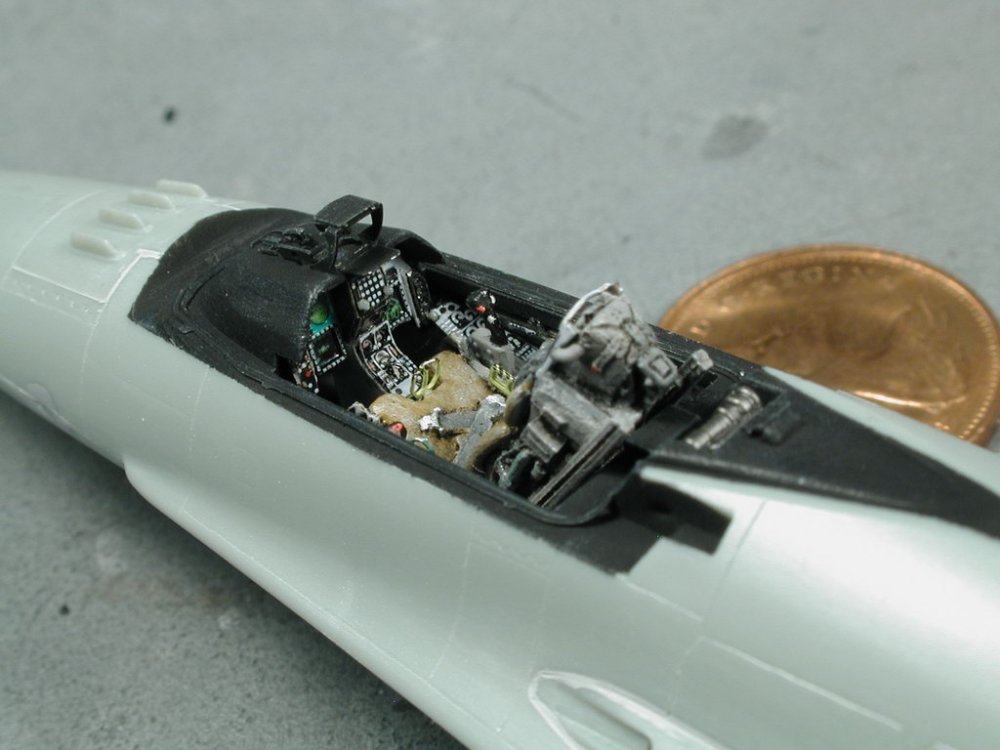
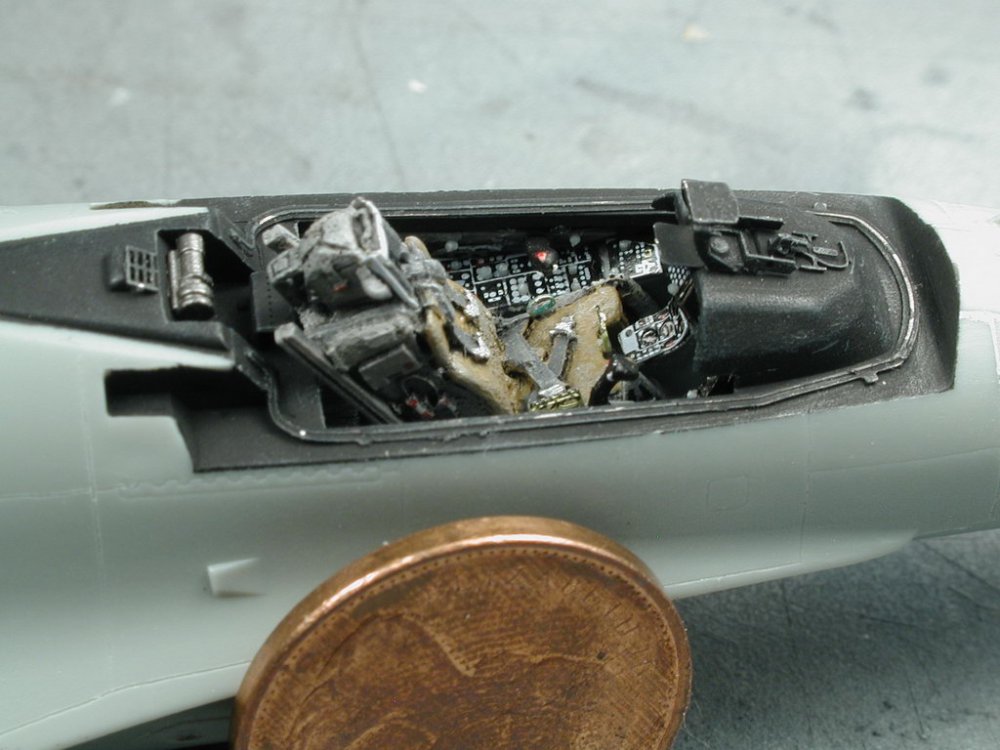
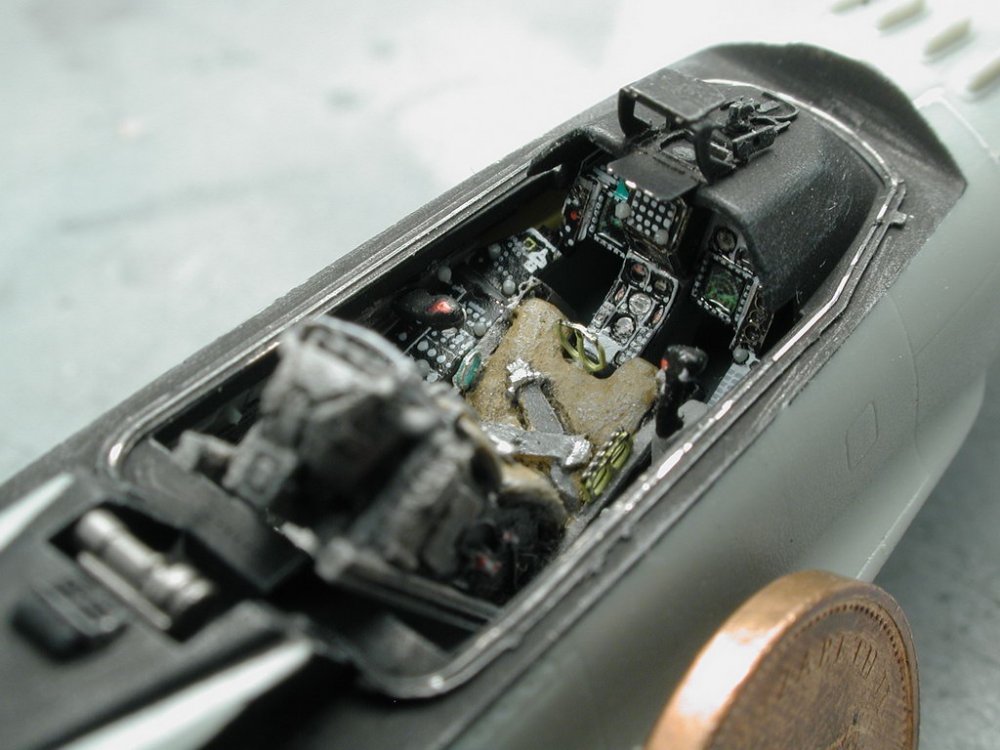
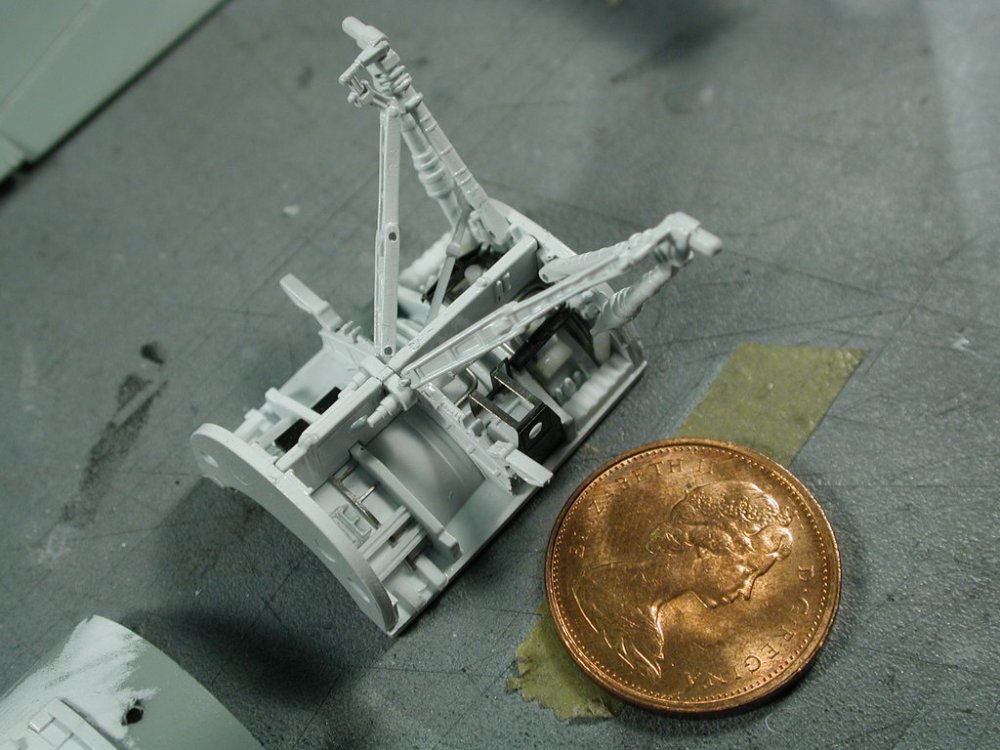
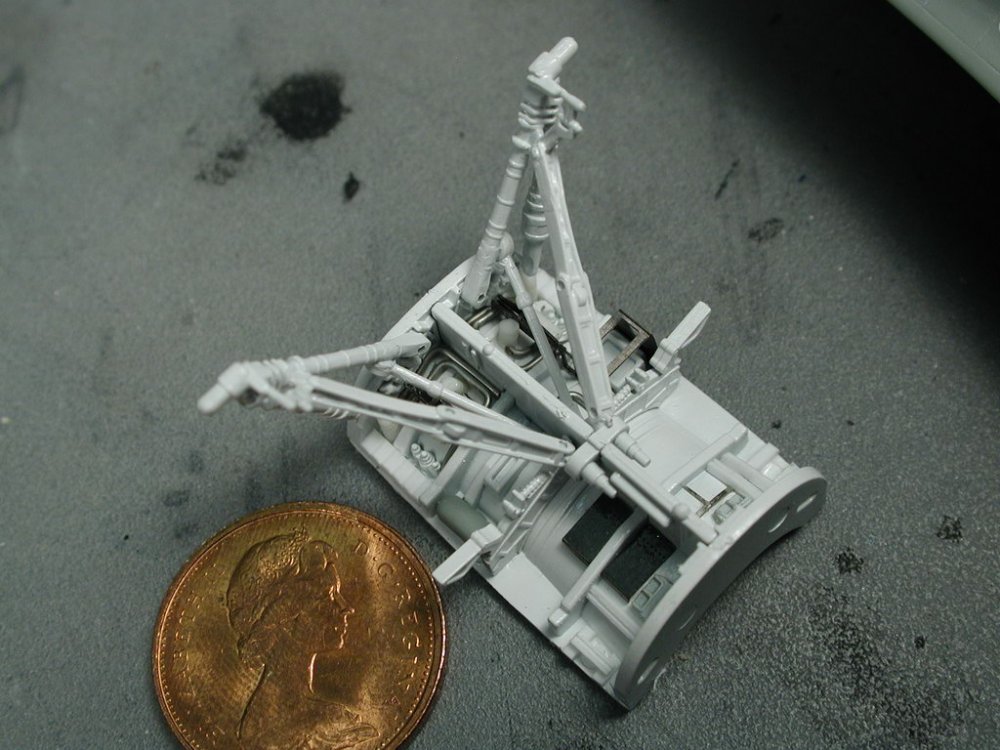
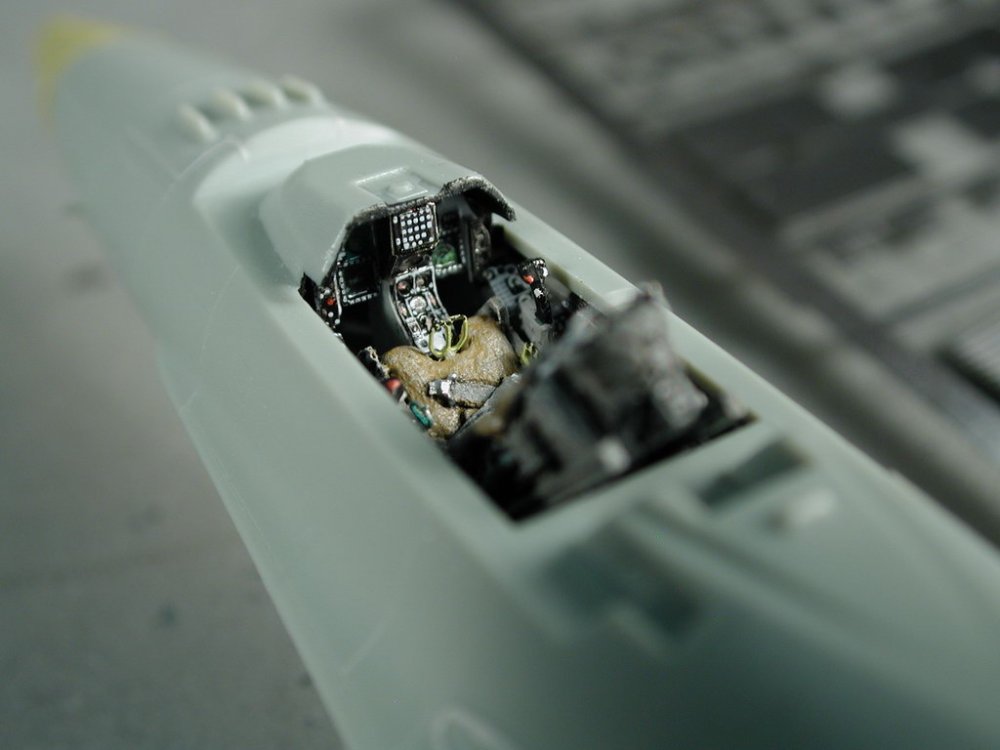
Hi all, I got a little more progress on my workbench... Boy, I'm feeling my age... gettin' old - these parts are so damn small!! I'm really happy about the Eduard Photo-etched kit I got for the F-16 and I'm learning a lot about applying the photo-etched parts to the cockpit. I love the HUD that's built up for the front console and the wrap around canopy gasket. Finally got past that damn intake!! After six separate tries and re-tries, finally got it together and looking decent, but there's still 3 flaws inside, but I've had enough - they will be flaws that I'll have to live with. I've learnt that there's no such thing as the perfect model (its the holy grail) that keeps me building for that hope one day... I've made a major mistake with detailing up the main undercarriage gears now. To get me onto something else other than that stupid intake, I started to work on the gears and got carried away before I started to look at my painting and assembly process. I should of waited and applied these details in the end, it would have been easier to mask a completely bare gear well when I came to painting the rest of the aircraft - oh well, live and learn, thats why I'm practicing in this piece of plastic and not a Valkyrie! So I've left off all the wiring, brake lines and hydraulic hoses till the end after the painting. You can get a sense of scale when you see the penny next to some of the images. Lastly, I just couldn't wait and wanted to paint up the fuselage portion of the cockpit and work the photo-etched parts into the rest of it with a very light bit of dry brushing to bring out the highlights and details. Well, a lot of sanding ahead of me! Finally the fuselage is together.


-
Bandai 1/72 Scale Macross Frontier Plastic Models
wm cheng replied to Graham's topic in Hall Of The Super Topics
Well, these seem to be a step in the right direction, at least the plane mode seems somewhat better than some of the prototype photos (not great, but the nose and canopy seem more in proportion to the rest of the plane). -
Thanks guys, I won't go into a step by step on this one... Its not really Macross related, plus I just want to get it done in what little time I can carve out for it! Thanks for the kudos and interest though. I'll periodically post any snaps I get as I get a chance. You can find info about Rosie the Riveter here; http://www.largescaleplanes.com/reviews/No...er/riveter.html Additionally I've found a cheaper alternative here (although I don't know how good it is); http://www.ares-server.com/Ares/Ares.asp?M...ct&ID=15200 Actually now doing a little research on it, I've also found a Hasegawa alternative; http://misc.kitreview.com/tools/rivetmakerreviewjh_1.htm They do get some getting used to - I practiced on a spare piece of styrene until I got the hang of it, but I still made a few mistakes which I had to sand over and fill with Mr. Surfacer to redo.
-
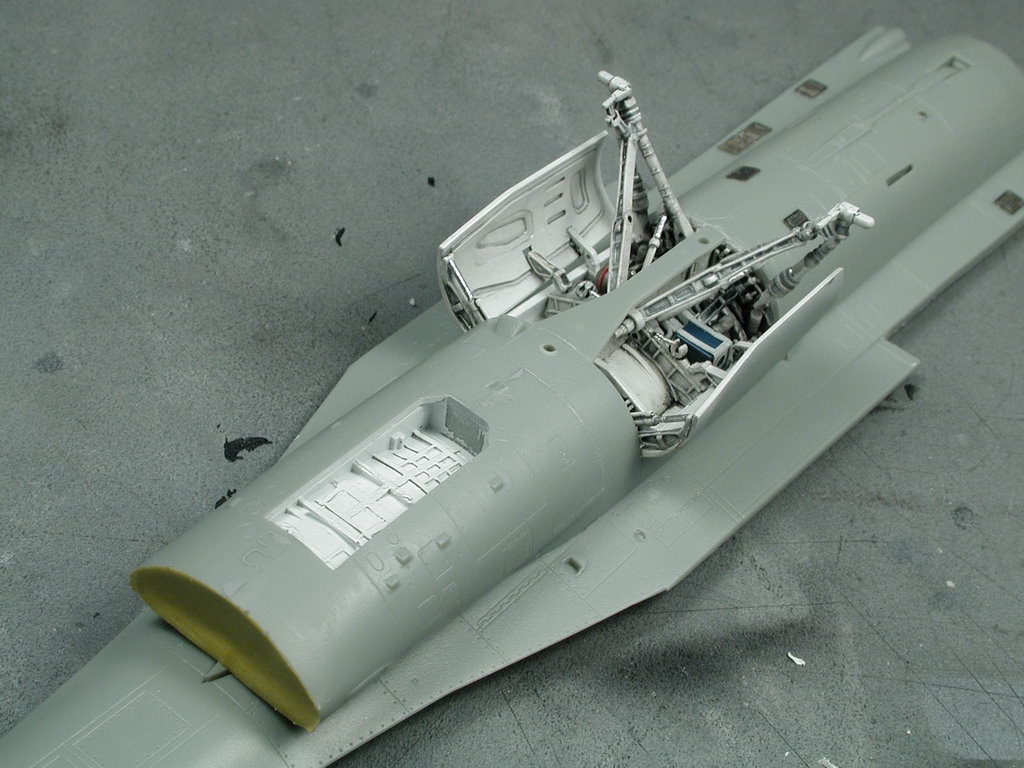
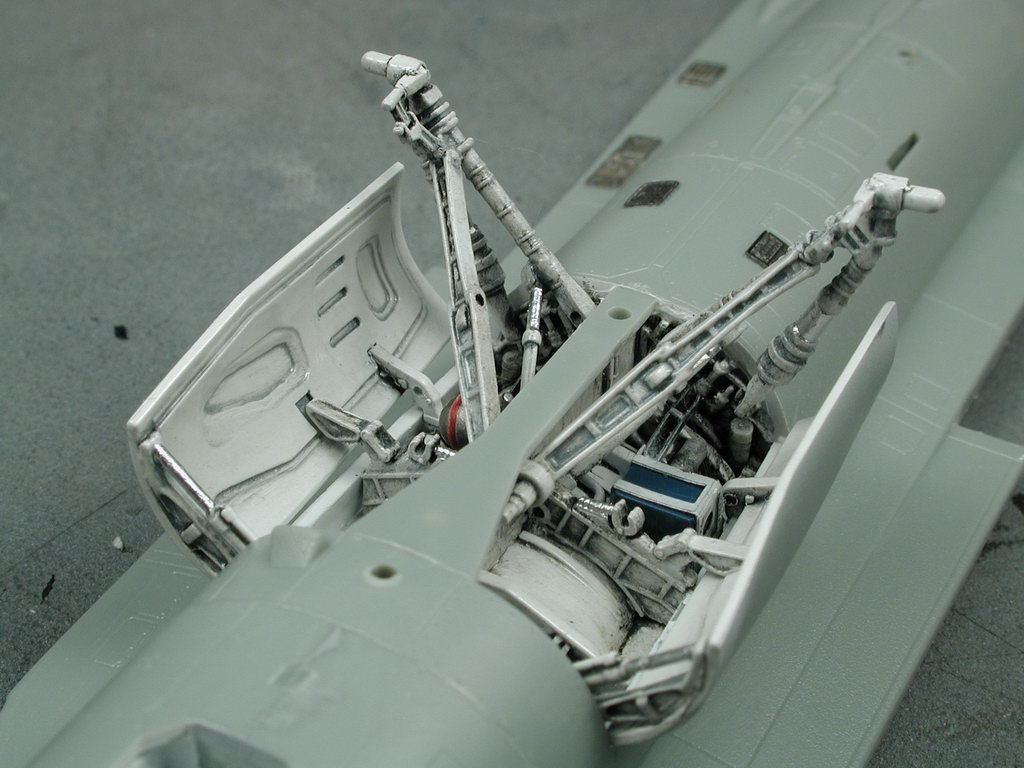
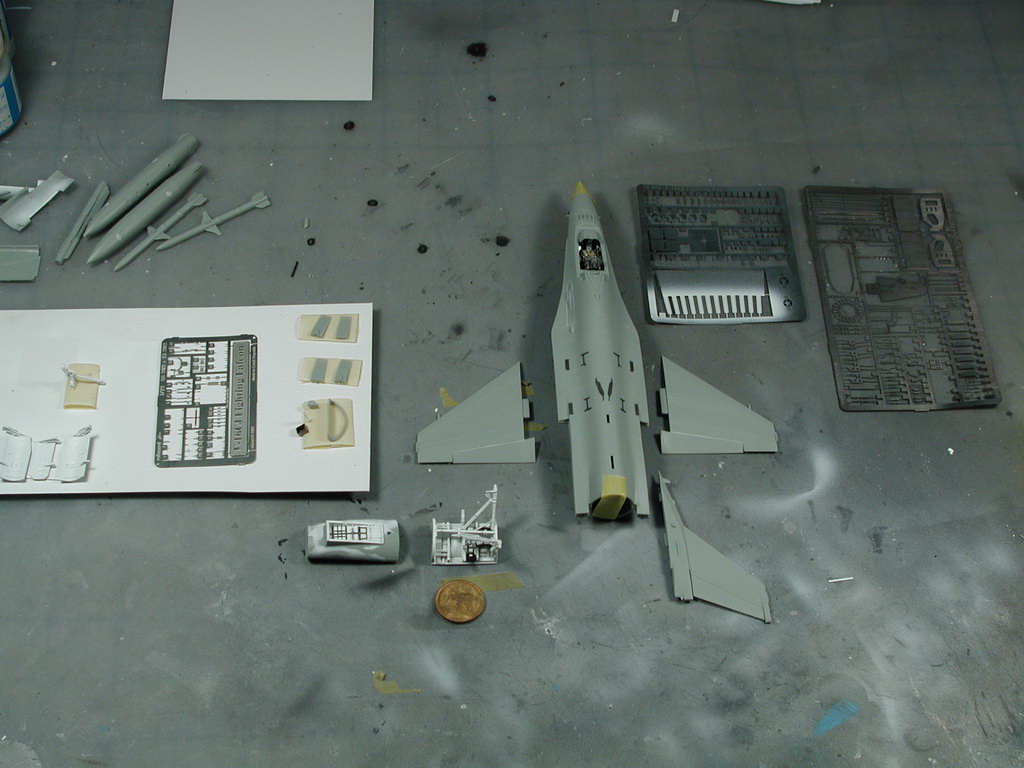
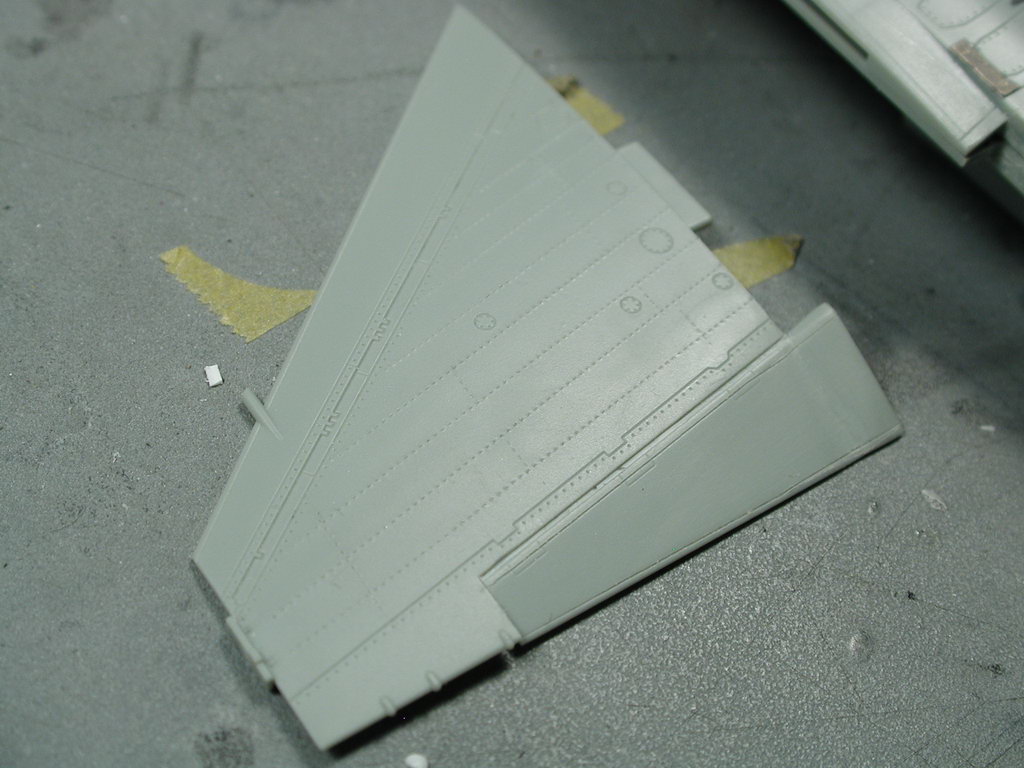
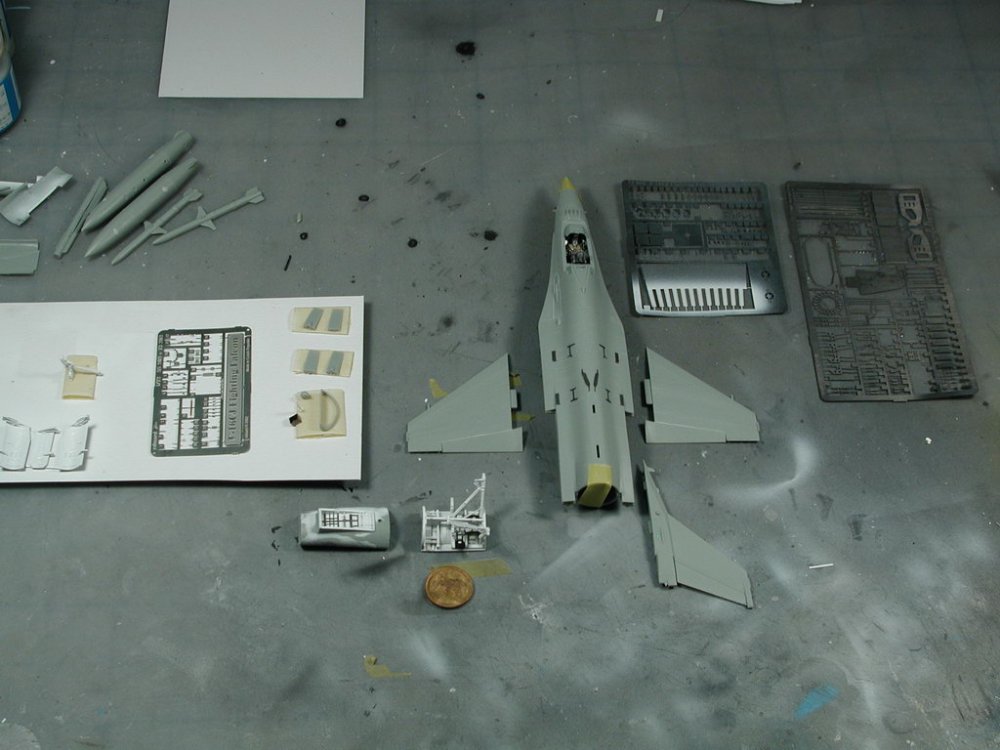
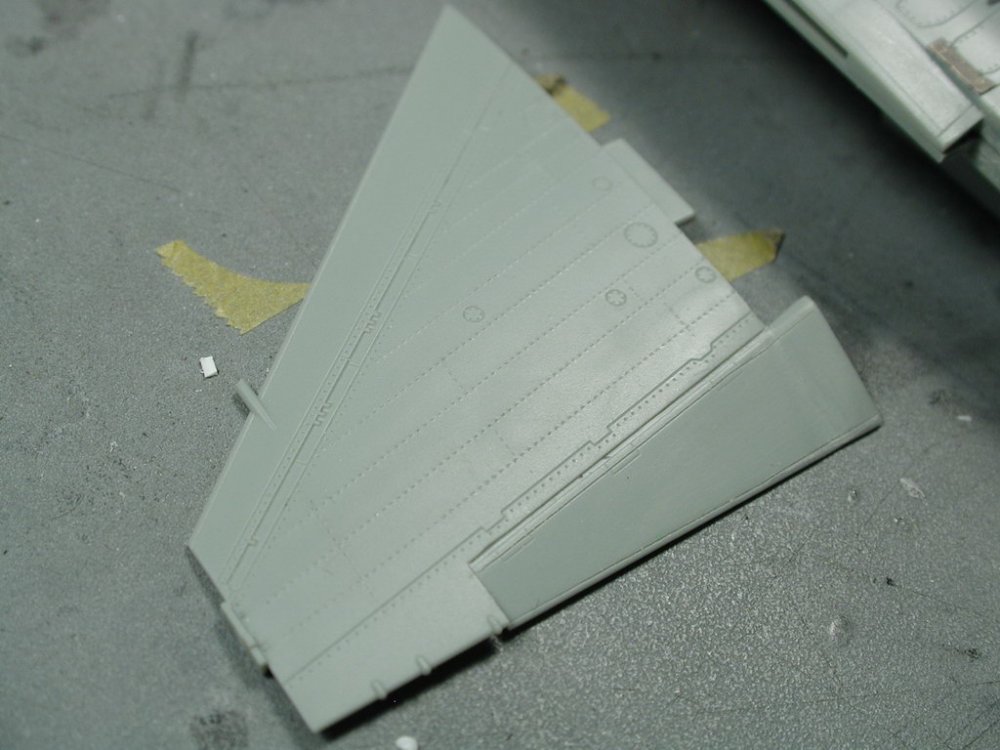
Hi all, I thought I could share what I'm trying to start on. After almost a 3yr hiatus on model making (my new daughter as some of you know - with the minor exception of finishing off a almost finished anyways Resin Atmospheric Booster) I thought I'd get my feet wet again on a simplier kit (my Macross stuff is too valuable to me to experiment and get my skills back on!). Its also an experiment to see if I could carve out any personal time for me (I'm sure some fathers here can relate!). After hearing so much good things about the new tooling of the Academy 1/72 scale F-16CJ - I decided to pick one up, and it was indeed amazing! Worth every penny and more, it is better than all Hasegawa kits except for its newest toolings and much cheaper too! Actually I find it better in most aspects - it was a very pleasant surprise as I had my doubts on anything not Hasegawa nor Tamiya. It was originally just to be a straight OUT-OF-The Box build to get my skills back, but as I got more and more into the subject (F-16) and the kit itself proved to be such a delight I ended up getting more and more into modifying it! When you got an already great kit to begin with, it lets you get creative and do mods - as opposed to spending all your time just correcting and filling in the kits errors! Anyways, just a few progress snaps for now. Its an amazingly small aircraft, around the size of the original VF-1 Valkyrie, so all the pieces are correspondingly small to. I started to detail the main gear wells with some additional parts, wires and photo-etched parts based on photo research. This is just the preliminary stage, it still has to receive its oil wash, some warning stenciling decals and another layer of brake lines and various wiring bundles (but I included a penny for scale). I spruced up the cockpit with the Eduard photo-etched kit and added small sprue switches and toggles - definitely the smallest I've ever worked on! I also used a True Details resin seat and fixed that up too, it didn't come with the ejection rails which I scratch built and the very distinguishing environmental sensor pitots "horns" on either side of the seat head-rests. I also borrowed a friend who has this tool called Rosie the Riveter and tried it out on the wing surfaces to do some structural revits of my own on the main wings. Since I decided to drop the flaps slightly, I also corrected the kits molding of the flaps (added the body piece to the flap and corrected the mold panel lines. I also cut apart the rear split airbrakes in preparation to build them in the open position. Anyways, if you guys are still interested in this non-macross related kit, I'll posts some more when I get more done. Thanks for sharing!


-
Bandai 1/72 Scale Macross Frontier Plastic Models
wm cheng replied to Graham's topic in Hall Of The Super Topics
Yep! same here, the Yukikaze EX and Ace Combat EX kits show they can do decent aircraft if they wanted (although they do like their chunky landing gears!) - but this just doesn't look sleek in aircraft mode. Oh well, looking forward to seeing what you guys can make of it here! ;-) -
Bandai 1/72 Scale Macross Frontier Plastic Models
wm cheng replied to Graham's topic in Hall Of The Super Topics
I guess Bandai is still telling us that all they care about are robots! I'm even more disappointed seeing the fighter pics now than ever (I always held out some hope - but not anymore...) I'm just not a robot guy, I love the aircraft, and now that mode looks like an afterthought. Its not sleek at all! and whats with that turned up duck nose?! What a lost opportunity!!! (at least it looks only slightly better than the toy) Yeah, that pilot looks more like a 1/100 scale pilot in the plane, in fact the entire cockpit tub and canopy looks really undersized (or the plane is really huge?!) The gears are just awful "toy pegs" - it even looks like the wheels are molded right onto the struts (total afterthought - anyone want to see good 1/72 scale gears, look at the academy F-16Cj kit!) Glad there's waterslide decals (don't worry Graham, rub-on transfers only work on small stencils - large stripes is pretty hard to do in transfer) - but it looks like I may pass on this - unless some of the fine modellers on this board here can prove otherwise. -
That looks fantastic!!! Way to go... how about a build-up thread to enjoy?
-
Hi all, I'm sure Graham is super-busy and I appreciate all that he's done for the site, so with his new review out for the 1/60, I guess the old SV-51 isn't going to get that transformation guide eh? I've still been too afraid to transform my SV-51, its quite unlike any of the other Valks, does anyone have a english transformation guide that they can point me in the direction of? Also tips & suggestions or points to watch out for for a first time SV-51 transformer would be greatly appreciated. Thanks!
-
Bandai 1/72 Scale Macross Frontier Plastic Models
wm cheng replied to Graham's topic in Hall Of The Super Topics
Wow! I'm afraid it looks like it will take a lot more than just filling and sanding to get this model looking right!! I'm so deparate to WANT to like this thing, I'm really disappointed with each successive photo I'm seeing - its looking more and more toylike. Yeah, that side on view on Photo no. 2 looks horribly gangly to the point where I don't know what to do to the proportions to make it look anywhere acceptable. The gears are horribly fat and lumpy for a 1/72 scale, similar to the EX version 1.0 of the Yukikaze (but that was 1/100 so they had an excuse) - but as far as I'm concerned, the gears for this 1/72 are pretty much un-useable for a model (maybe for a toy). Don't get me started on the wheel wells, yeah, they stuck a bunch of detail in there, but its so shallow, its a lot of work and time to cut it out and deepen it and re-build the side wells with details that are convincing (shallow wells were a thing of the 70s past model evils). Again, maybe if it were a toy that might be acceptable, but comon! hey its a model! I'm so bummed out! I love the mech design and this is all we get?!! Maybe I'll calm down a little later and look at them again, but its awfully close that that Bandai VF-2SS they put out a while back (complete with the coloured canopy)! -
Ok, Ok... it wasn't the hit we all hope for, but... Yours truely designed all the sets in the movie!! It was one of the best work experiences I've had in the industry in a while, met some really great people. Yes, the acting wasn't that great, but the original script was fantastic. It changed so much from conception to final exhibition. I can tell you though, the art department designed wonders, worked our asses off, and built fantastic things what were shot, but never made it into the film. In fact, there was enough shot to make 2 movies, but I don't know the reasons why so much was edited out. One of the parts most proud for me was the Colosseum build, I thought it was a pretty seamless transitions from the location of the actual Colosseum in Rome (the only film company to ever be granted access to it, they even denied Roman Holiday) to our soundstage construction in Toronto. I know it wasn't the greatest piece of celluloid, but a Macross Fanatic designed most if not all the built sets, so we can be a little less "brutal" on these boards here ok? Maybe it might get a life in rentals... (there was a whole section filmed in Tokyo in a high end physics particle accelerator lab where I plastered the graphics with tons of stuff from Macross data stenciling - even the portable scar generator device has the main pull from a Valkyrie's circular vernier thruster, you might see it if you go frame by frame on the DVD!)
-
I did a search... turned up nothing, where did Graham post scans from Great Mechanics? Thnx
-
Bandai 1/72 Scale Macross Frontier Plastic Models
wm cheng replied to Graham's topic in Hall Of The Super Topics
Yeah, my thoughts exactly, hating the blue/green canopy - I hope this is the same prototype that we've been seeing everywhere. It really makes it a toy, and I'd hate to have to try and vac-form a clear canopy... argh!! why can't toys be toys and models be for the big boys? ;-) -
Bandai 1/72 Scale Macross Frontier Plastic Models
wm cheng replied to Graham's topic in Hall Of The Super Topics
Isn't all the mech done CG in Frontier? - I know its stylized rendered to look hand drawn, but I think most of the mech is CG (just like Yukikaze). Why didn't they just use the CAD models from the show? Do you think even with the show's CAD models that they "fudged" the proportions? -
Bandai 1/72 Scale Macross Frontier Plastic Models
wm cheng replied to Graham's topic in Hall Of The Super Topics
Yeah, exactly... I'm a aircraft guy too. No surprise that Bandai would go for the Battroid mode eh - pretty Gundamish to me! I guess they stick to what they know. -
Bandai 1/72 Scale Macross Frontier Plastic Models
wm cheng replied to Graham's topic in Hall Of The Super Topics
Well... for one thing, I don't think there's that big ass hinge on the plane's back for the wings to fold up in the lineart. Also all the big gaps/seams between all the various moving parts should be filled, sanded and more panel line appropriate fine seams be re-scribed so its more like the drawings. There's probably plenty of bumps and pins along the way that needs to be cut off, or sanded to make it look sleeker and more like the design since transforming models always sacrifice "thin-ness" of parts for strength and durability. -
Bandai 1/72 Scale Macross Frontier Plastic Models
wm cheng replied to Graham's topic in Hall Of The Super Topics
I agree with ya completely - however, being the only kits available for the time being, I'll probably get them anyways and modify them to be in only the plane mode. -
Thanks so much!!! I'm so starved for any good mechanical art from this series - I love the aircrafts!
-
Which book is this that the scans are from?
-
Bandai 1/72 Scale Macross Frontier Plastic Models
wm cheng replied to Graham's topic in Hall Of The Super Topics
So do Bandai have ABS in their models? How does one glue styrene to ABS? -
Wow! a few days/weeks away performing fatherly duties and I almost missed this great thread!! Great job Rockhound! - great build up, some good tips and ideas (I'll definitely look into drilling out the slots - they turned out great - what do you see through the slots? I'd like to thin out the plastic a bit at the slots so it looks more like sheet metal - but that's what I'm saying being a "back-seat" modeller, I'm sure its too much work when I finally get around to it - hehe... ;-) The finished model turned out beautifully - what a great job on the decals and how they turn into the slots slightly too. Might I add a suggestion, maybe you could do a little light "post-shading" and panel oil-wash over the decalled areas so it would tie them into the plane a little bit more. Its a bit distracting (a dead giveaway that its a applied decal vs. painted area) that the "panel line details" disappears once it encounters the decal, and re-appears again on the other side and there is so much decals on this chosen scheme. Thanks for sharing. (p.s. did you do build up threads for your other models?)
-
Hmm... that looks suspiciously like the Bandai EX 1/100 scale model - look a the placement of the seams... and chunky landing gears... they might of just started out with the Bandai model and modified it to cast it. Although the rear view of the back vents are better rendered than the Bandai model.