wm cheng
-
Posts
4338 -
Joined
-
Last visited
Content Type
Profiles
Forums
Events
Gallery
Everything posted by wm cheng
-

Jarrod's Exhaustive Bandai VF-25F Review and Gallery
wm cheng replied to Jarrod's topic in Model kits
Fantastic work Jarrod!! I was at first really against this kit, but all the images I've seen lately (including yours) really changed my mind into this "must-have" kit now! A question about the decals... In one of the pictures it shows the new SMS logo applied to the black tailfin, but it seems like the decals don't have enough opacity to read properly against the black background - is this the actual case, or is it just a bad photo? Also some shots show on the main wings that the grey stripe actually reads through the SMS logo, is the decals that thin that it has no opacity, or is there a white decal underlay (like on the Hasegawa kits) or isn't the stripes cut out at the areas where the SMS logo is supposed to be? Thanks again for posting... you did a amazing job on your kit. Do you think there would be any opportunity to place rare-earth magnets inside to help lock it up in the aircraft mode? Wm -
Bandai 1/72 Scale Macross Frontier Plastic Models
wm cheng replied to Graham's topic in Hall Of The Super Topics
A question to anyone who used the decals... In one of the pictures it shows the new SMS logo applied to the black tailfin, but it seems like the decals don't have enough opacity to read properly against the black background - is this the actual case, or is it just a bad photo? Also some shots show on the main wings that the grey stripe actually reads through the SMS logo, is the decals that thin that it has no opacity, or is there a white decal underlay (like on the Hasegawa kits) or isn't the stripes cut out at the areas where the SMS logo is supposed to be? Thanks, Wm -
Bandai 1/72 Scale Macross Frontier Plastic Models
wm cheng replied to Graham's topic in Hall Of The Super Topics
Everybody's builds are starting looking great!! Kudos to you all. I wished I lived in those parts of the world. In preparation for my kit... does anyone have any good reference or links to good reference for this VF-25? I'd like to gather them all up in one place. Other than the HJ Nov issue and a few small screen captures, are there any good colour references to the cockpit or the internal mechanisms that are revealed during transformation? Thanks, -
Bandai 1/72 Scale Macross Frontier Plastic Models
wm cheng replied to Graham's topic in Hall Of The Super Topics
Hey Regult, what do you mean the Tamiya flat white doesn't stick properly? I plan of painting this sucker entirely when I receive this kit and I almost exclusively use Tamiya acrylics. Do I need to primer the entire model first? Flat white is tricky to get good coverage. Sometimes if the part is really molded in a dark plastic, I spray a grey primer first to bring up the shade and eliminate any color tint for the white to lay over - white never has good coverage, but also flat white is better than gloss white at coverage. So how does one glue the ABS parts? or is it designed so that the ABS parts don't need to be glued? -
Bandai 1/72 Scale Macross Frontier Plastic Models
wm cheng replied to Graham's topic in Hall Of The Super Topics
Hey Graham, that's a pretty good price, how about picking one of these kits up for me and mailing it over (I'll paypal you of course) and I'll do a build-up thread... -
Bandai 1/72 Scale Macross Frontier Plastic Models
wm cheng replied to Graham's topic in Hall Of The Super Topics
Can I ask how much people are paying for this kit? including delivery? The closer to Toronto, Canada would be of great help. There are several shops here that say they can get it in by Friday, but they want $74 CDN for it, I'm not sure if thats reasonable or did they jack it up. I assume with a full MSRP plus shipping and possible duties it could run up to around $70 CDN for it? Thanks, Wm -
Bandai 1/72 Scale Macross Frontier Plastic Models
wm cheng replied to Graham's topic in Hall Of The Super Topics
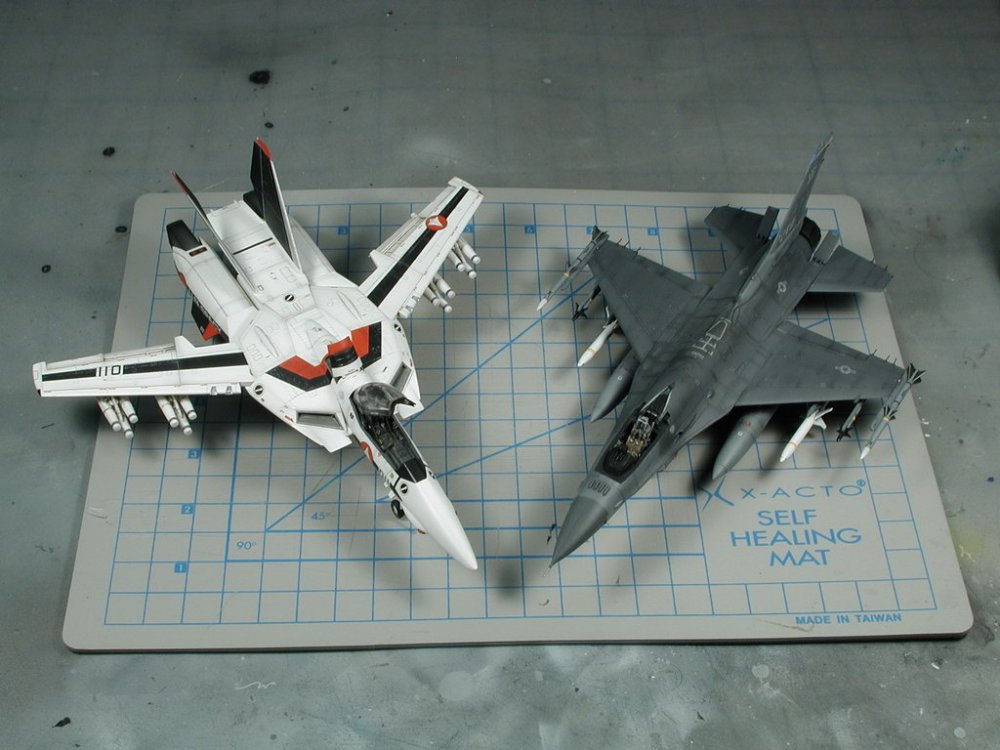
Hey Miriya, That Bandai Glaug you've started on for practice is probably going to be a disappointment and much harder to build than these new generation of Bandai kits. They really have improved a great deal over the last 20 years! I remember those old Bandai macross kits (re-packaged ARII or IMAI) from my childhood, huge seams, parts not lining up, seam lines running through major details, joints either too loose or too tight). Don't judge the new kit by your experiences with this 20yr old kit! I'm sure it will be much better! I'm personally going to wait till the dust settles a bit (too much hype and not enough funds at the moment) and see if Bandai release a version 1.5 (burned by their Yukikaze kits before!) or if there are going to be any aftermarket or photo-etched parts. Probably going to modify it to be permanently in aircraft flight mode (to avoid those nasty landing gears). Although I'm open to doing a step-by-step buildup thread if anyone wants to donate a VF-25 kit to me! hehe... -
Whats Lying on your Workbench MKIII
wm cheng replied to HWR MKII's topic in Hall Of The Super Topics
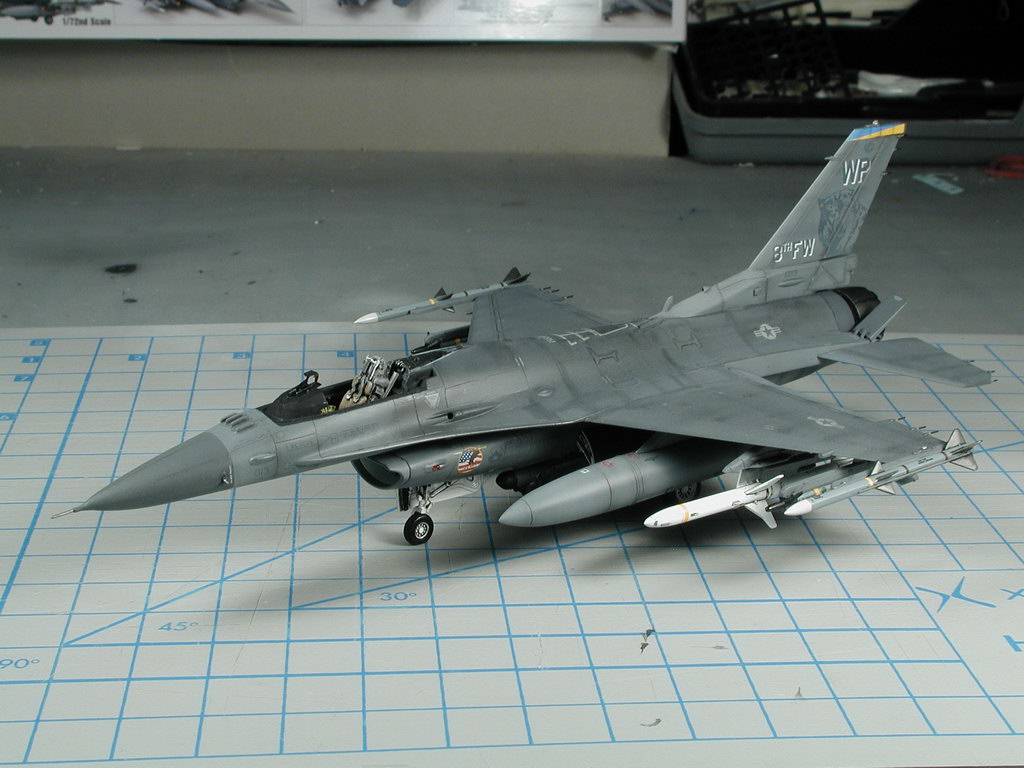
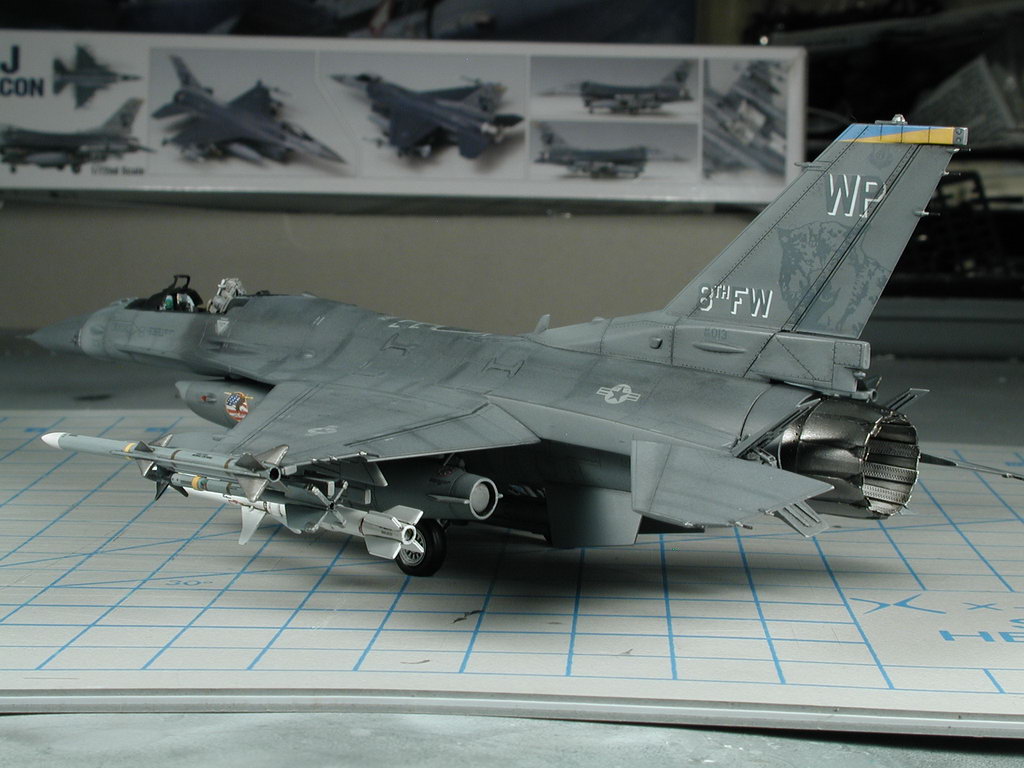
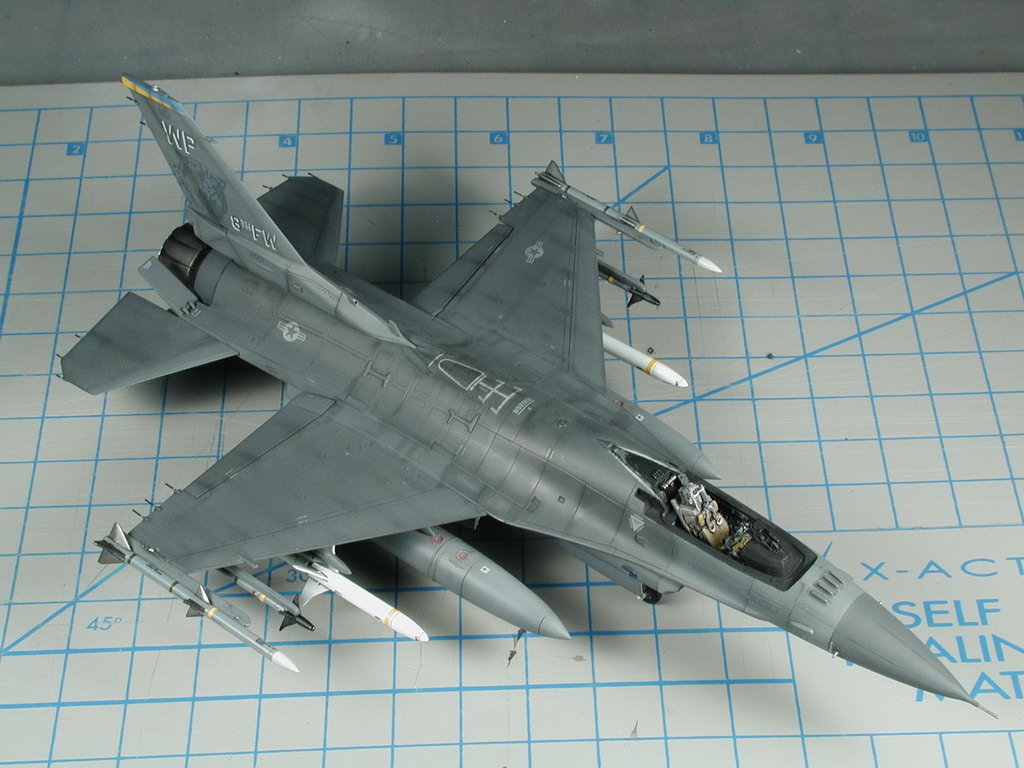
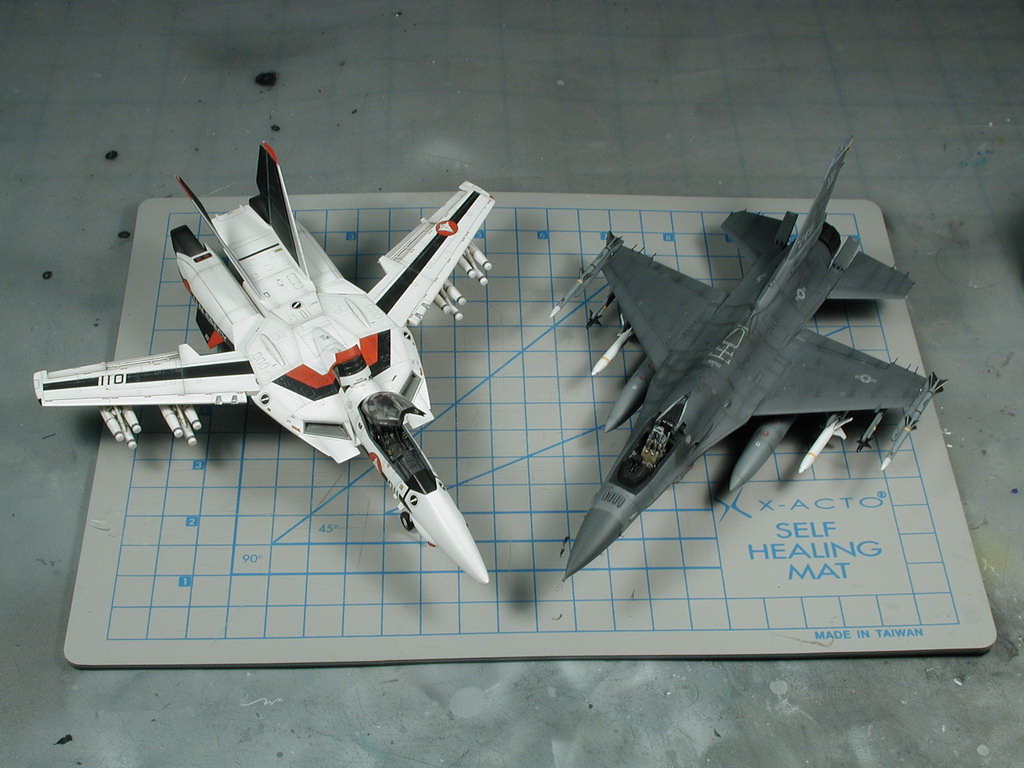
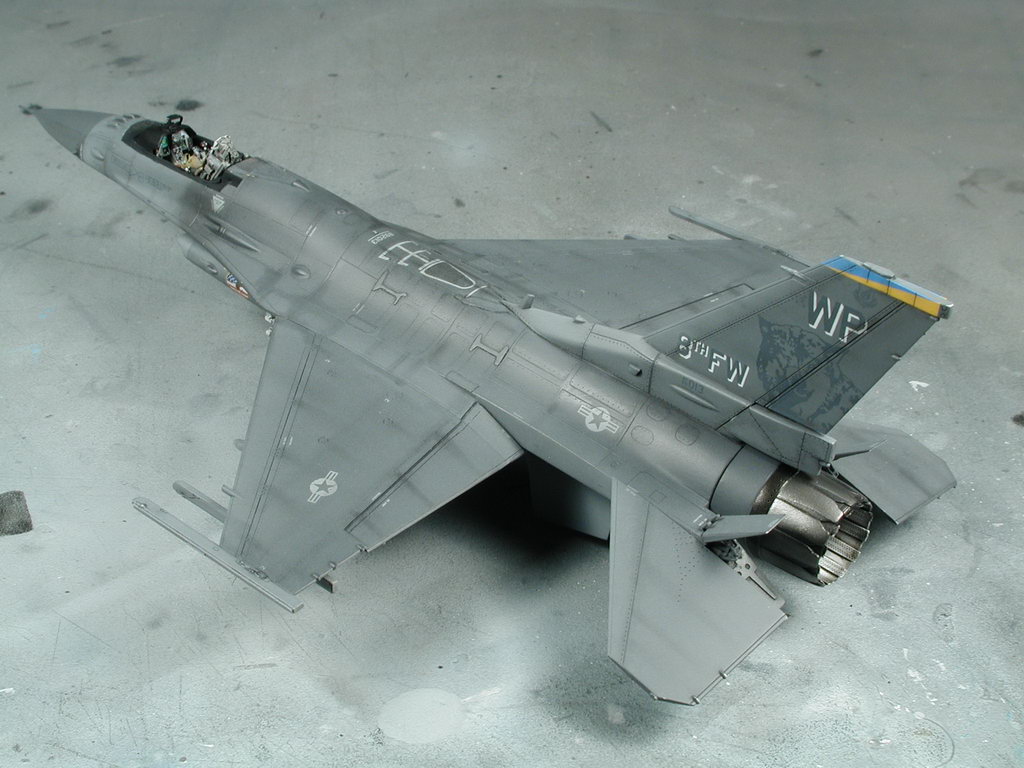
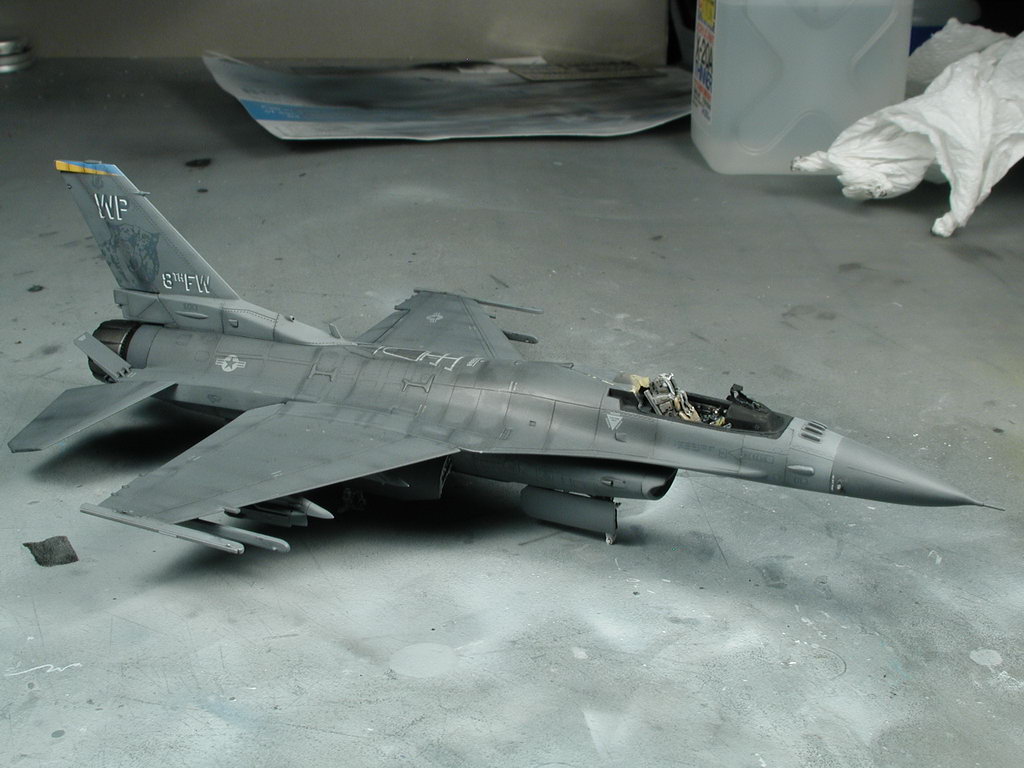
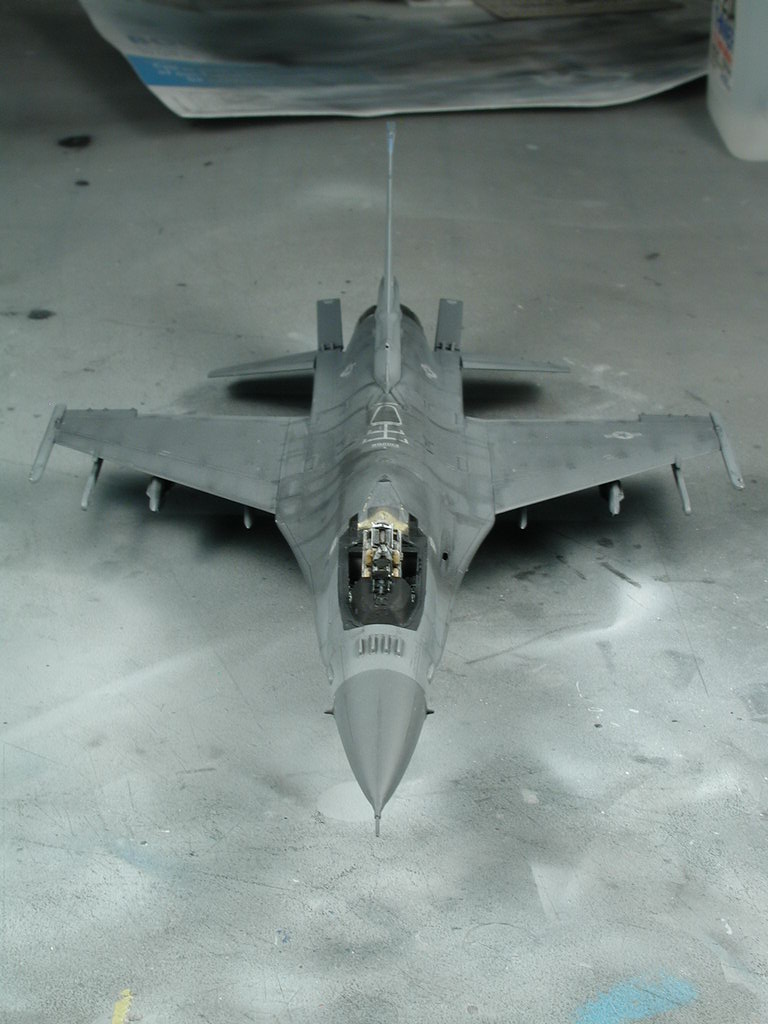
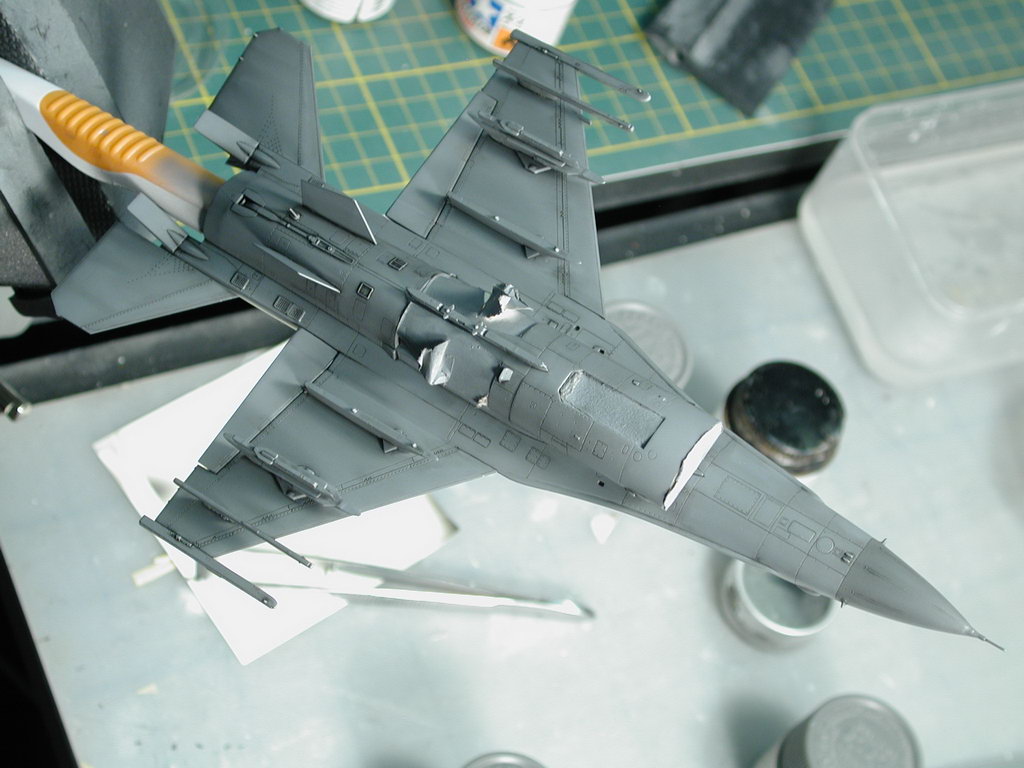
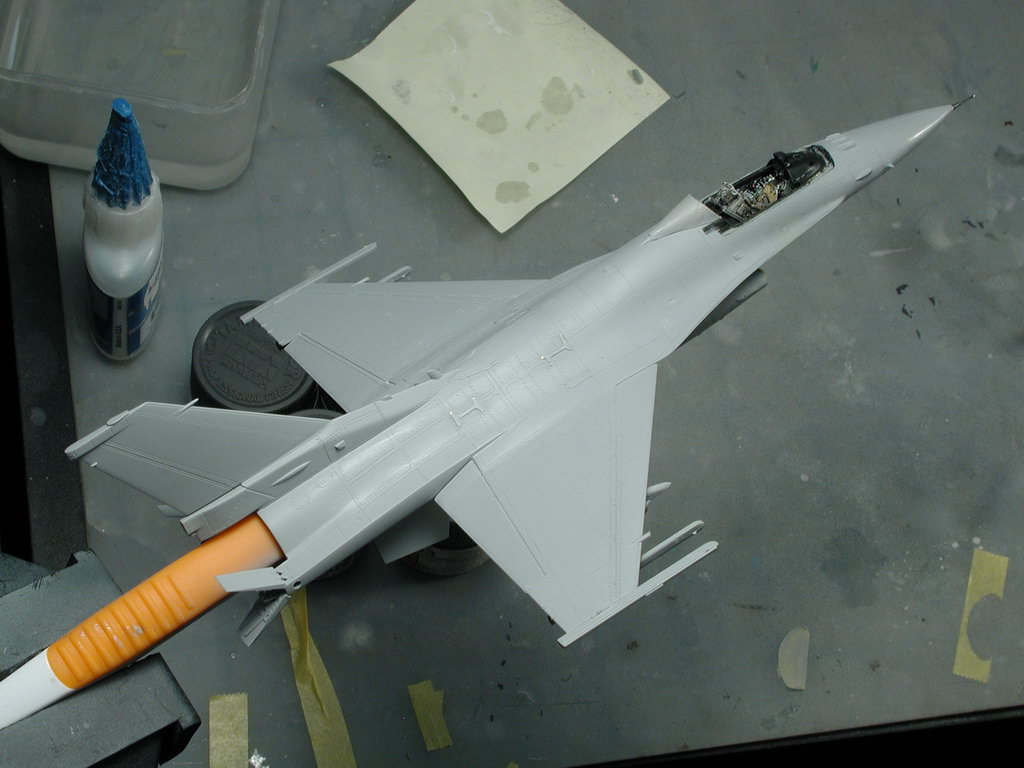
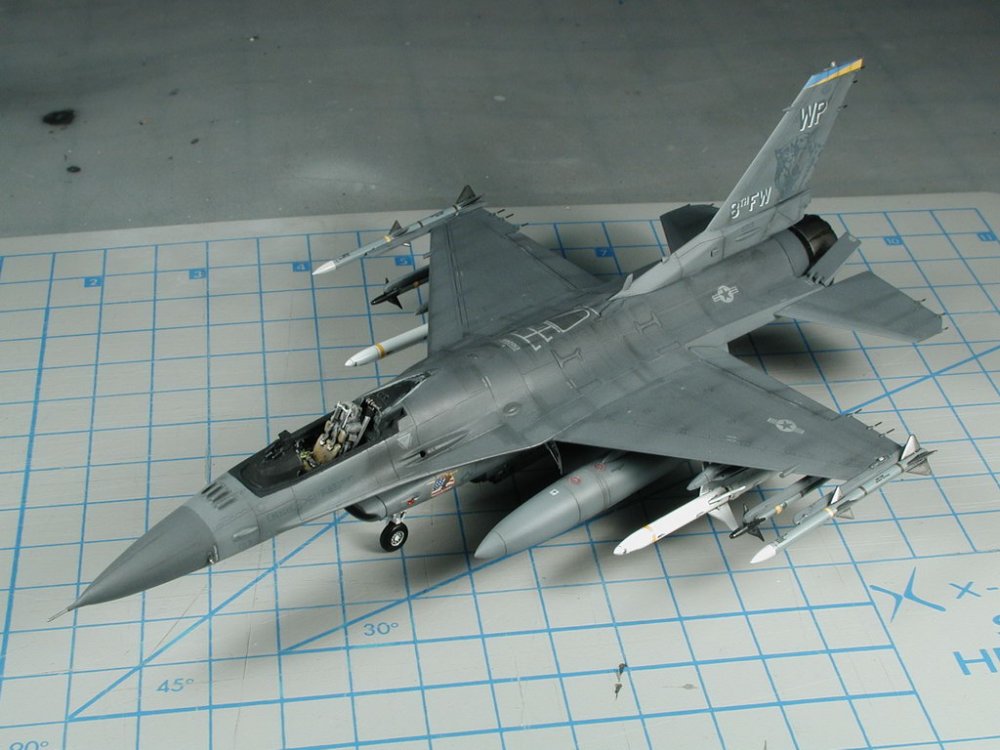
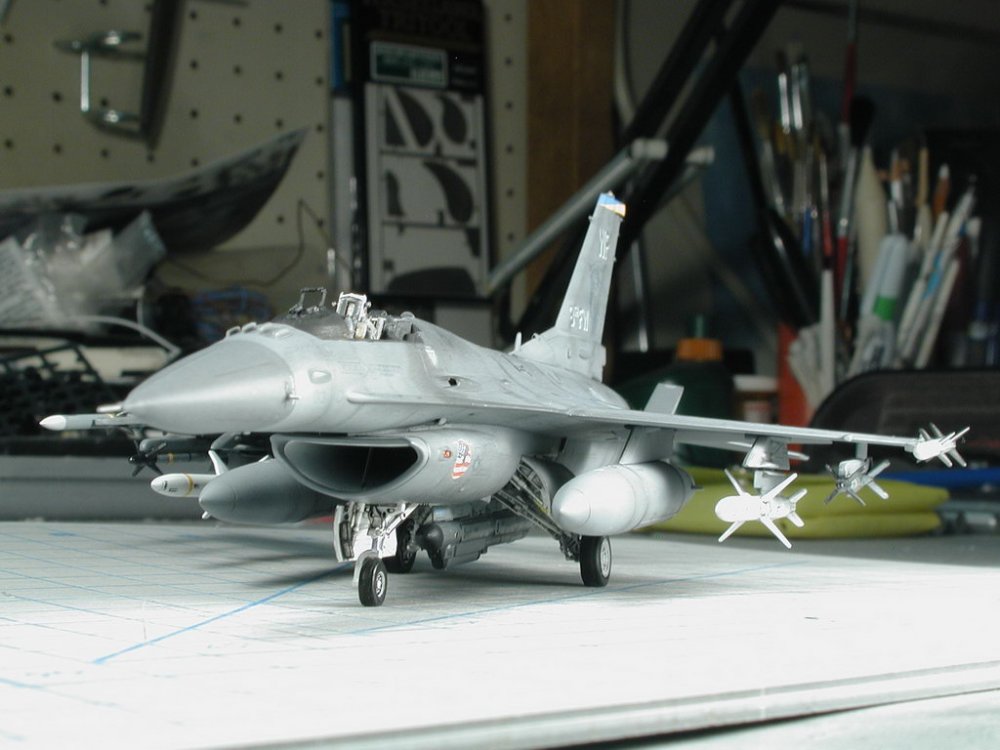
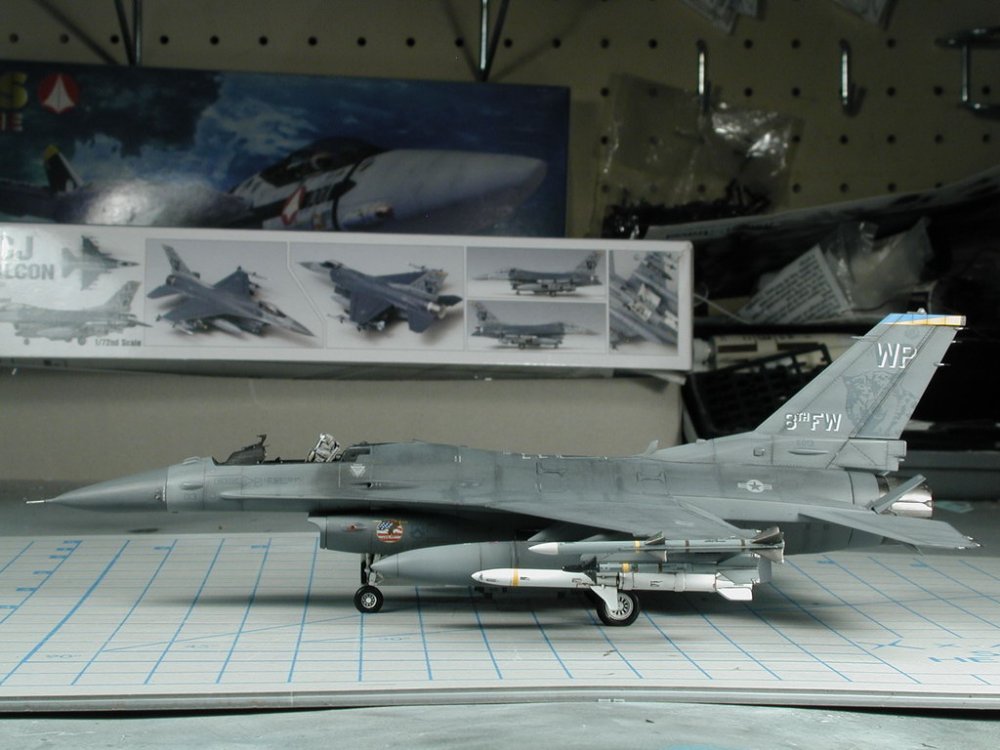
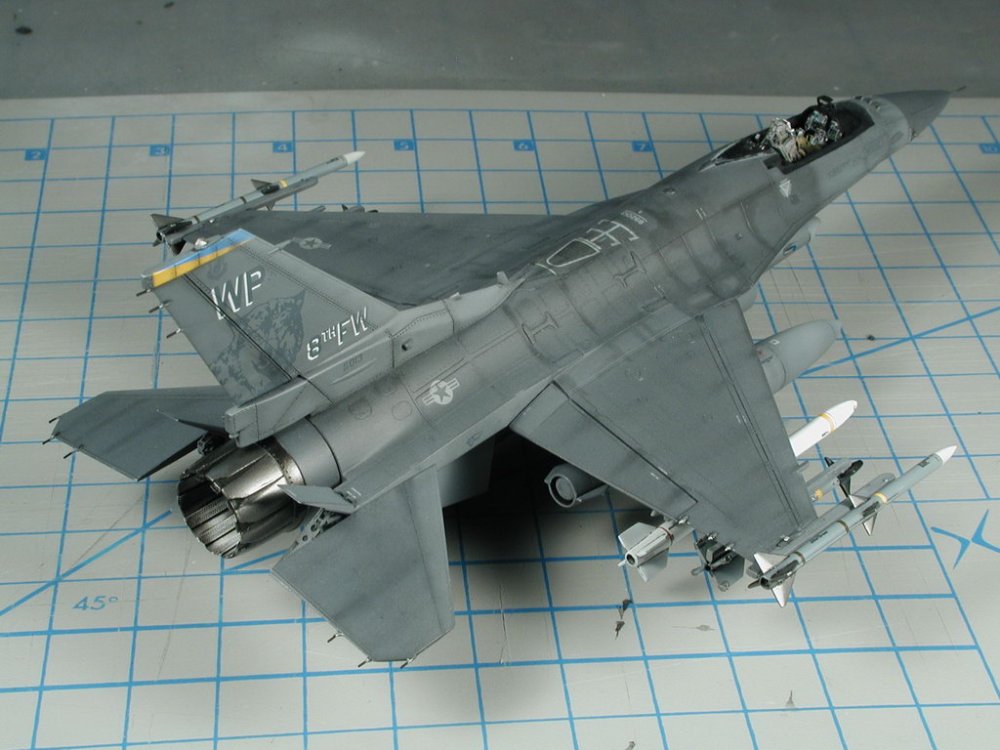
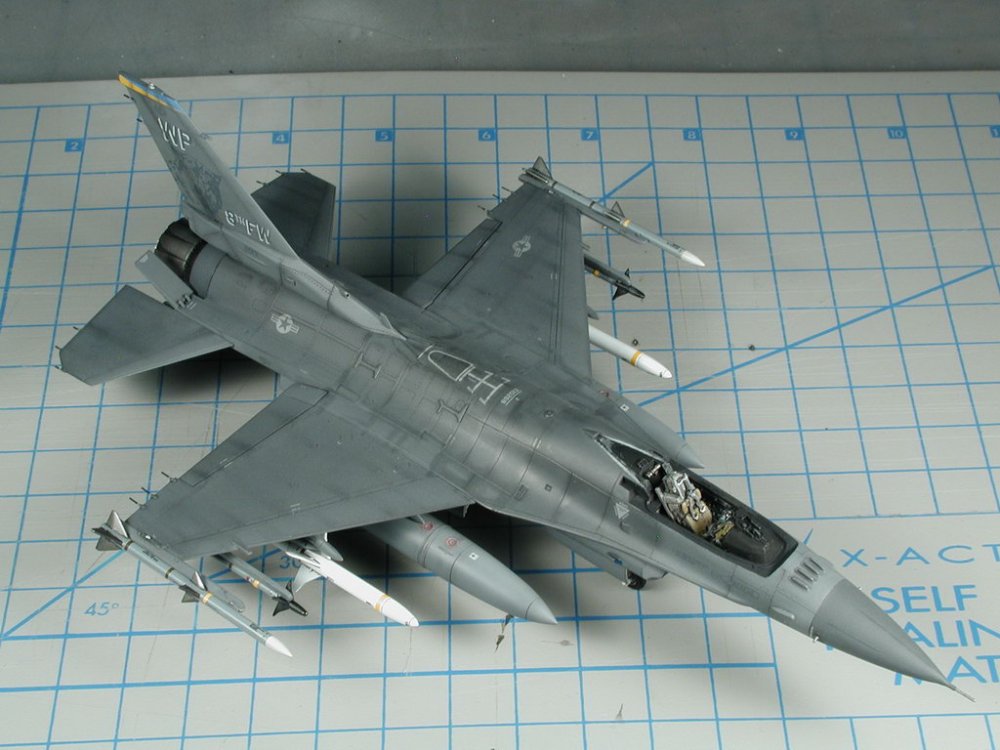
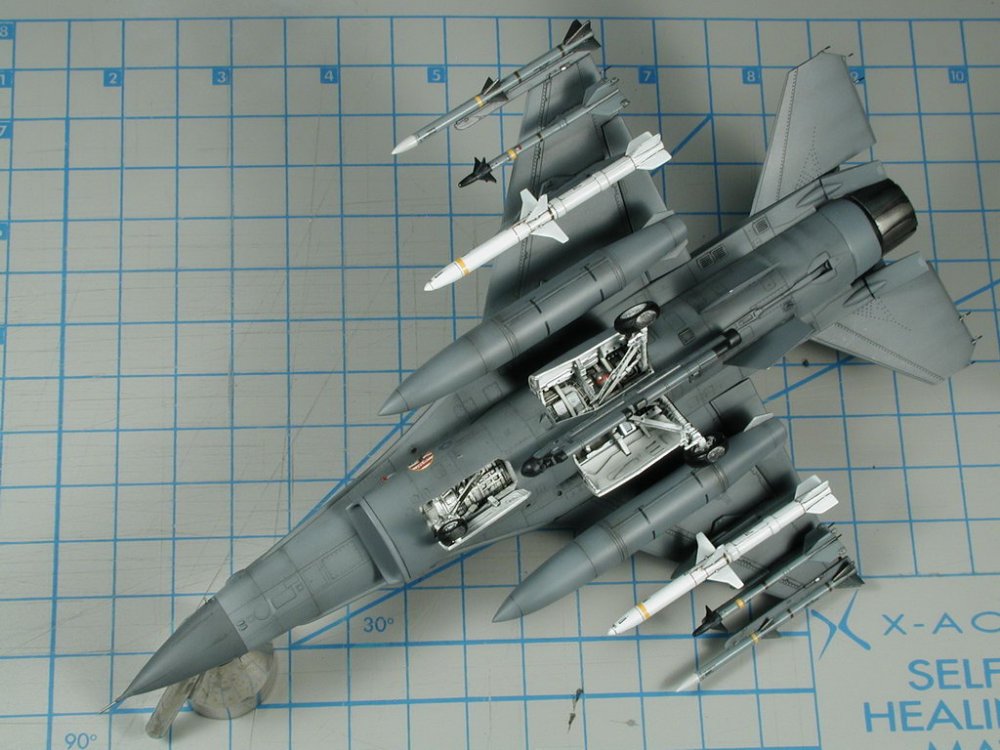
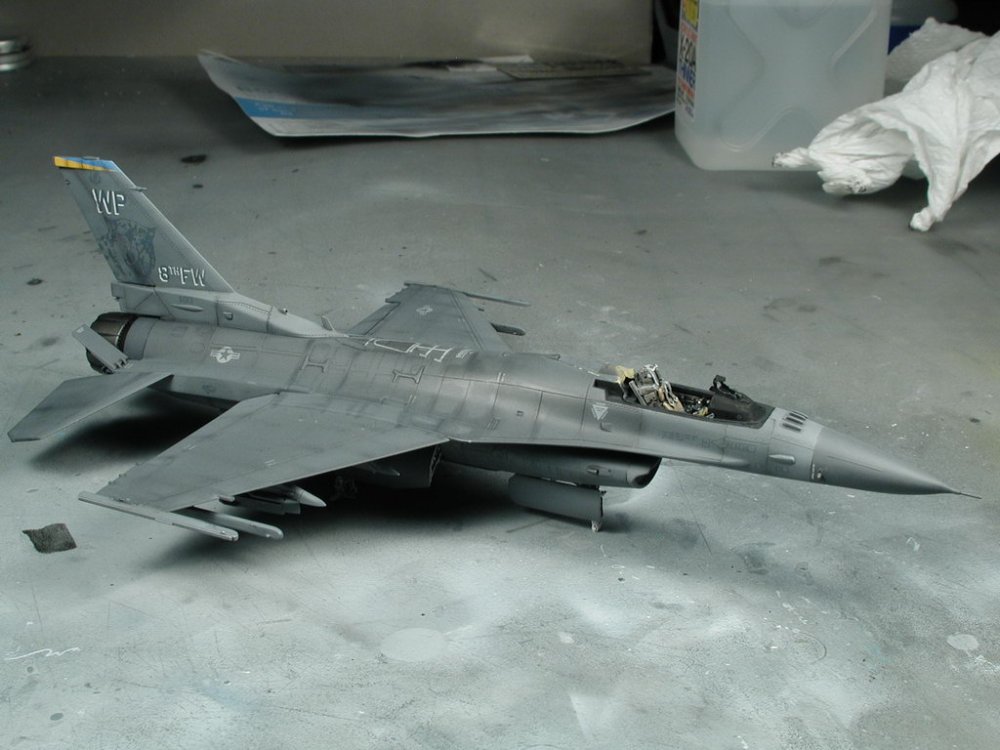
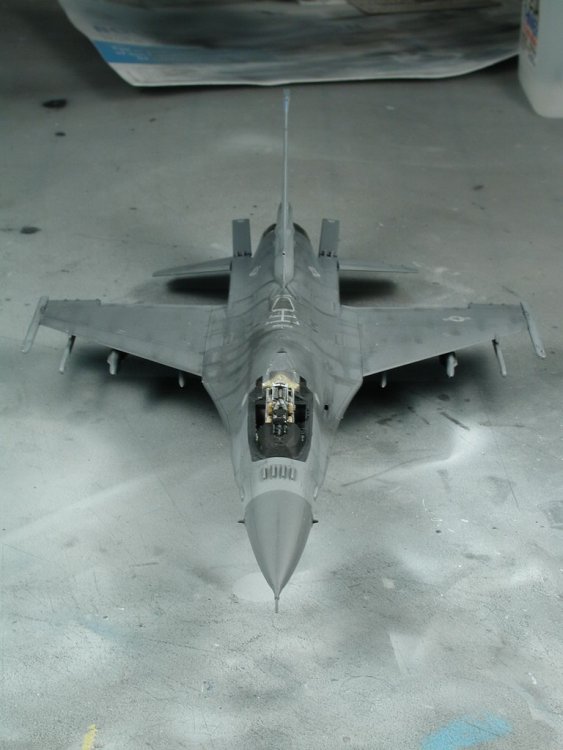
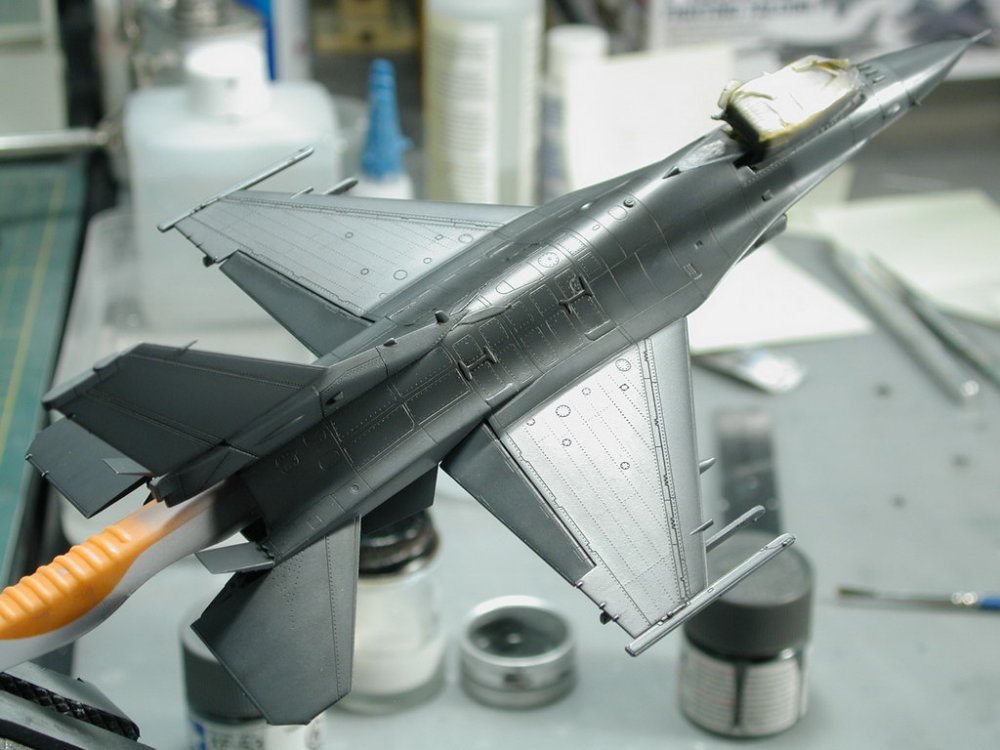
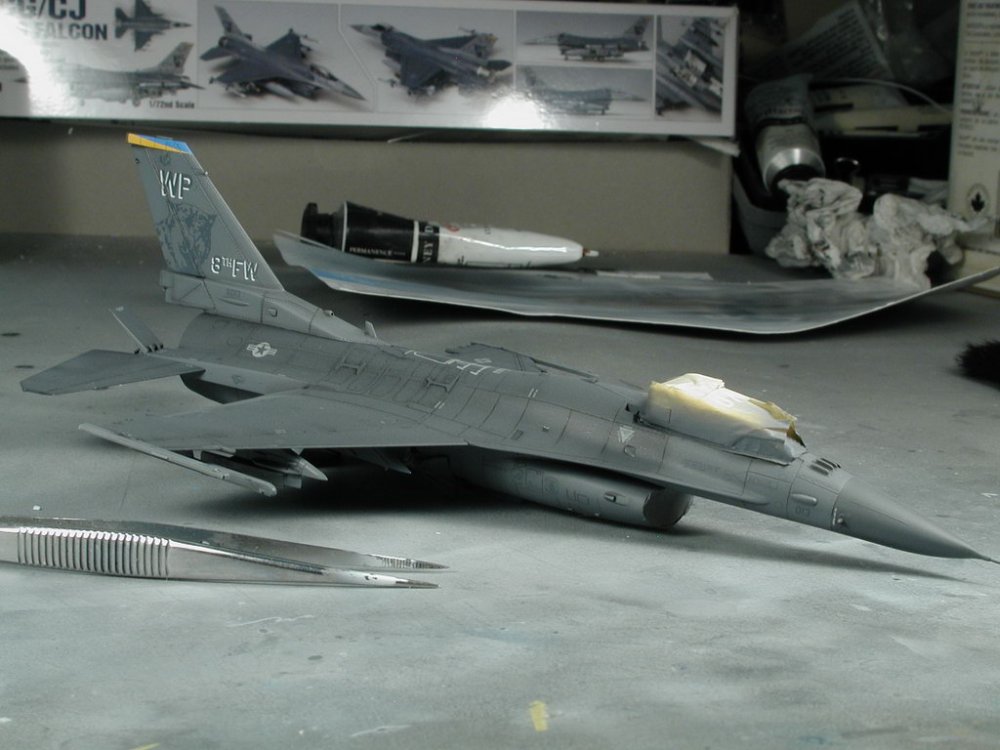
Adam, thanks so much for the offer (isn't the internet great!) - I've paypalled someone in Hong Kong that might be able to help, we'll see if I get anything in return. Fly4victory, yep, I was thinking of taking the middle carriage out to shorten it a bit, and take the entire grey body thingy out too so we basically have a flat surface to mount John's excellent Launch Rail right to the top of the vehicle, and yes the scoop would make an excellent blast-shield (it already articulates and everything!). I would of done it earlier if it wasn't a $110+ model - so expensive. Well, here's my F-16CJ - its the new Academy 1/72 scale kit, and the detail is excellent, especially the undercarriage. Its pretty much done except for the canopy (which I ruined and I am hoping to get a replacement). For those who are thinking about this kit; Pros: -excellent surface detail, a good amount of rivets (I love rivets - well not the iron steam era rivets, but the fastener details) -fantastic undercarriage details (best yet for 1/72 scale) -good ordinance and targeting pods selection -excellent cartograph decals Cons: -over-engineered for no real reason - some really complicated assemblies such as the 6 piece intake -un-necessary glue on parts like gun bay & misc bumps... (the bumps are a little to pronouced) -too many ejector pin marks all over the place (even on missles & gear tires?!) -lack of vent details after the bump on the gun bay -wings should of been molded to the top of the fuselage / in-correct flap panel lines However I don't have a point of comparison since I don't have either the Hasegawa nor Revell kits. However I held off building a F-16 in the past since I thought the Hasegawa kit was a bit old and the Revell kit had no rivet details - so seeing this kit convinced me to try it. This was originally supposed to be an OOB (out-of-box) straight build, to get me practiced back again at building models after a 3yr hiatus, but the kit was already so good that it just begged to have a few more details added to it. So I added the True Details resin seat and the Eduard Photo-Etched kit for Hasegawa (they don't have a Academy version yet) to this model and highly recommend these upgrades. I modified the flaps and dropped them a little bit as well as split the airbrakes (it such an easy mod that the kit really should of allowed one to open the airbrakes). I added sprue bits to the PE cockpit since the Eduard stuff is pre-coloured, but it looked a bit flat, so I added the sprue bits to about half the switches and toggles (although at 1/72, it was an exercise in frustration - the end result is pretty good if I say so myself) So here it stands for now... (without the canopy - which I hope to get in the next month or so...) Its a tiny plane. Thanks for all the help I've received over the internet with various requests, info and references.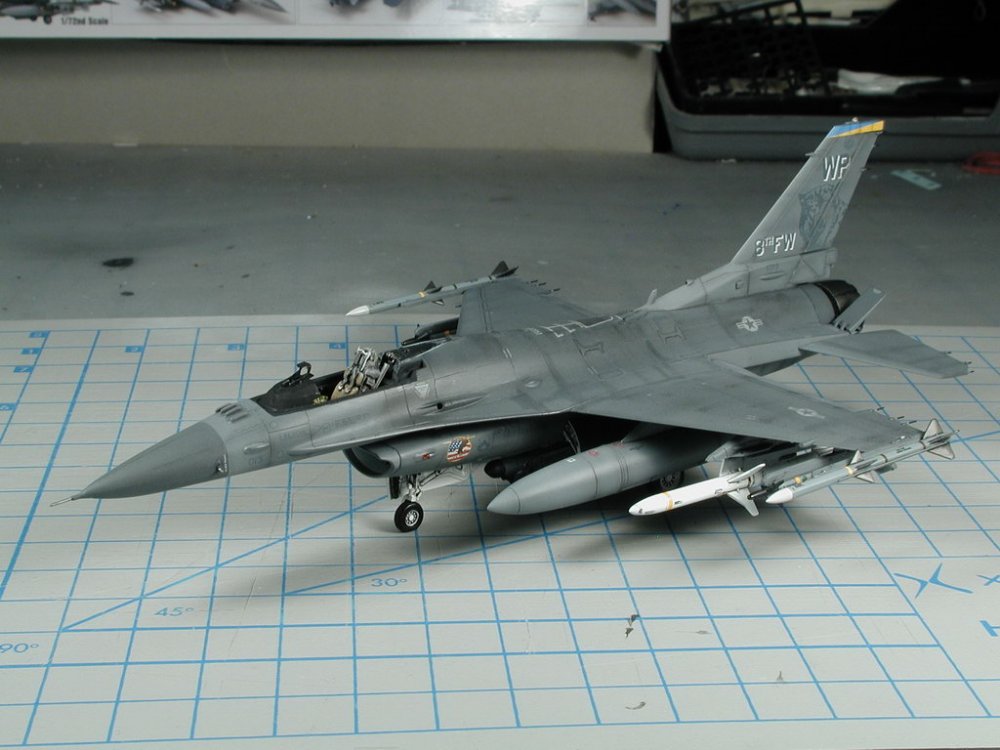


-
Bandai 1/72 Scale Macross Frontier Plastic Models
wm cheng replied to Graham's topic in Hall Of The Super Topics
Wow! Thanks for the scans Graham... the ones done up properly has changed my mind a bit on this model, I might have to pick one up someday. I still wished that Hasegawa would make a dedicated aircraft version. Even in the hands of the experts, it still looks silly sitting atop those spindly (yet at the same time, too thick) landing gears! -
Hey David, I installed XVID4PSP and during the previews at least, none of the subtitles show up - how did you convert MKV WITH subtitles to something the PS3 can play? Has anyone else gotten the Macross Frontier MKV (with embedded subtitles) to sucessfully convert to something the PS3 can plan in HD? Thanks, Wm
-
Whats Lying on your Workbench MKIII
wm cheng replied to HWR MKII's topic in Hall Of The Super Topics
Yep, I'm pretty sore about it, it was such a stupid move on my part too! totally my fault... ARGH... This has been the model from hell... don't know why though - maybe I've lost it, or am just too distracted. So what do you guys think of the YMT-05 as the base launch vehicle for the Atmospheric Booster launch rail? The first time I saw that kit years ago it hit me as a substitute for the booster launch vehicle. I know it isn't canon... and thats been holding me back (plus the $100+ price tag, not a cheap kit). -
Whats Lying on your Workbench MKIII
wm cheng replied to HWR MKII's topic in Hall Of The Super Topics
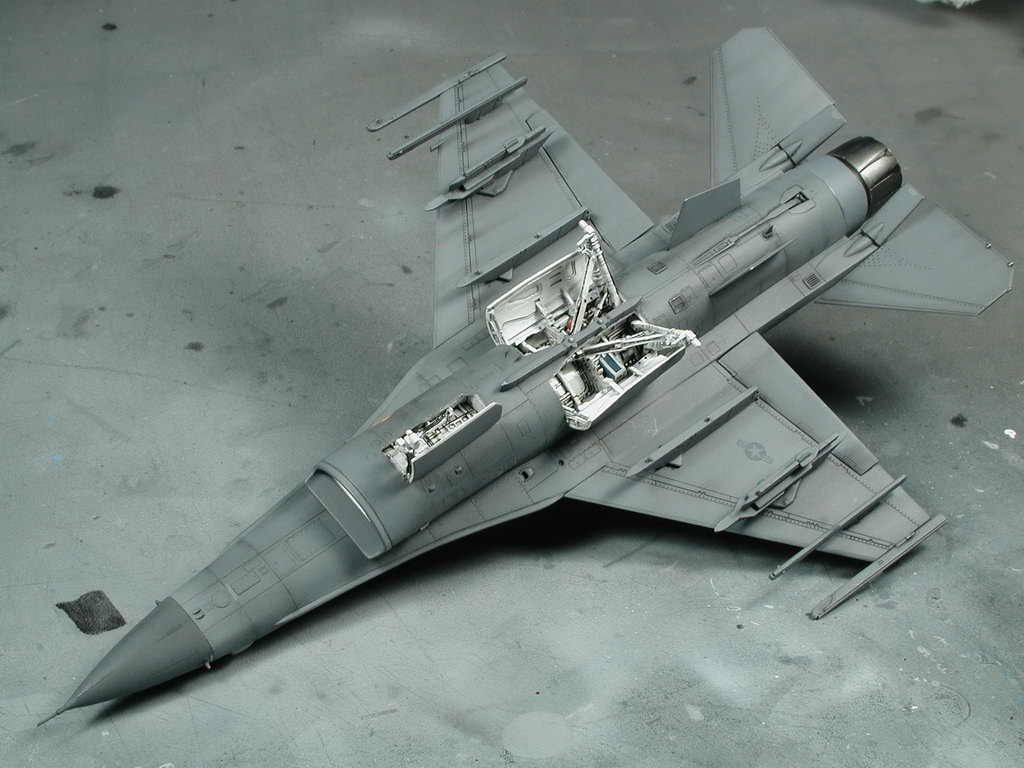
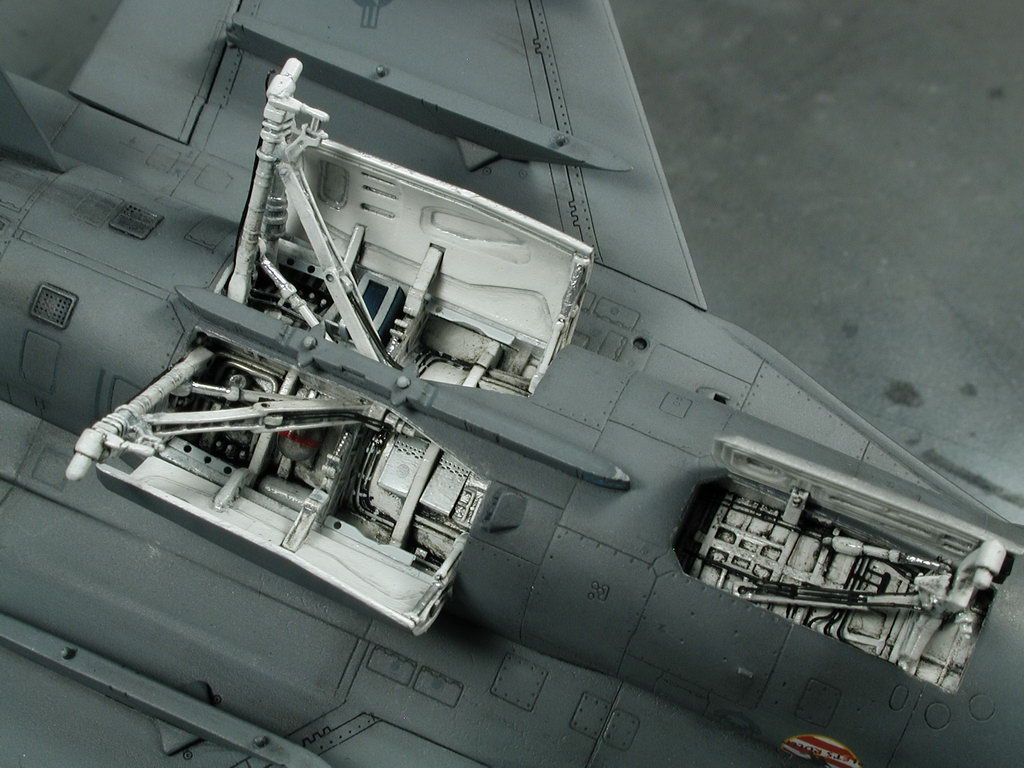
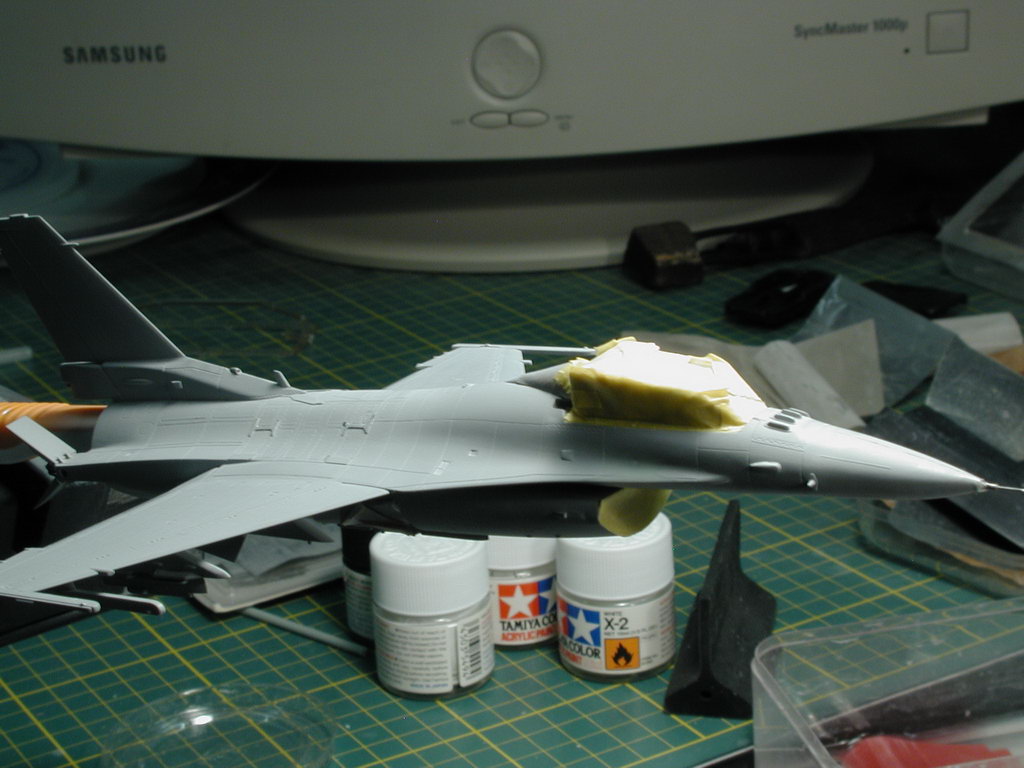
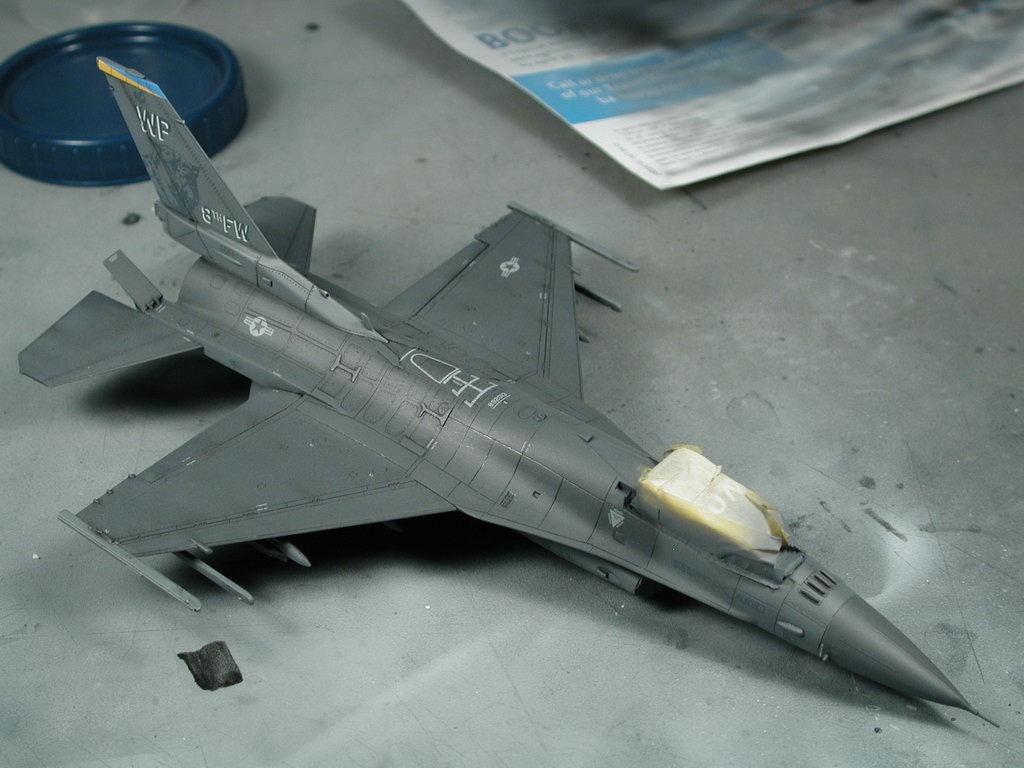
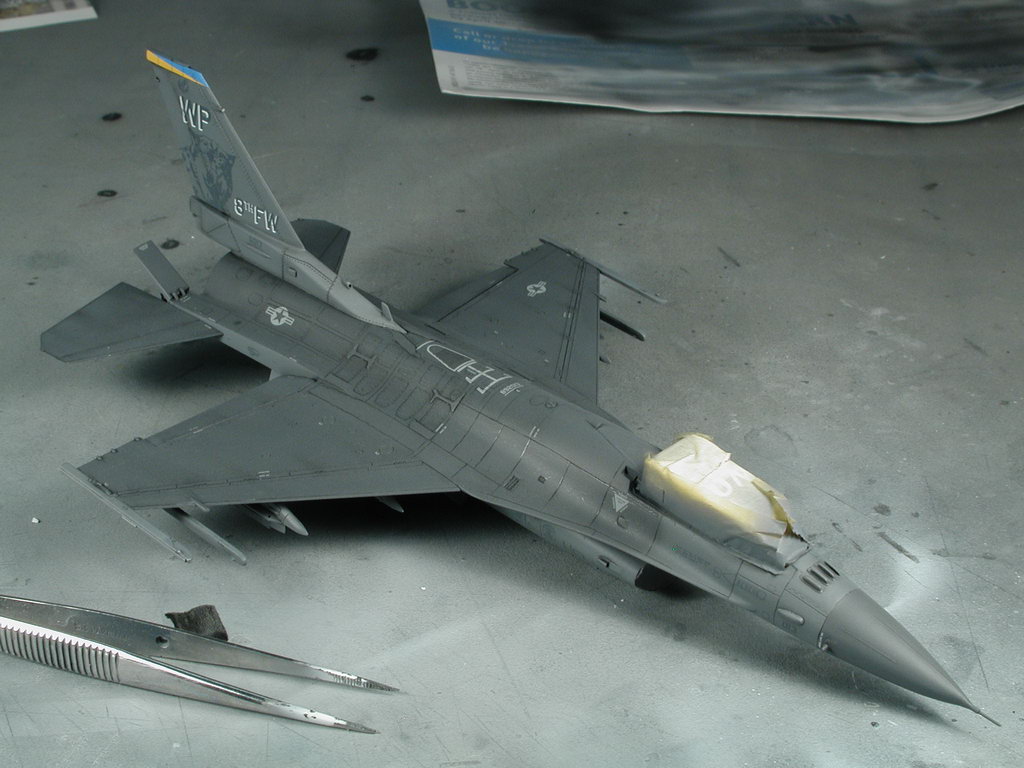
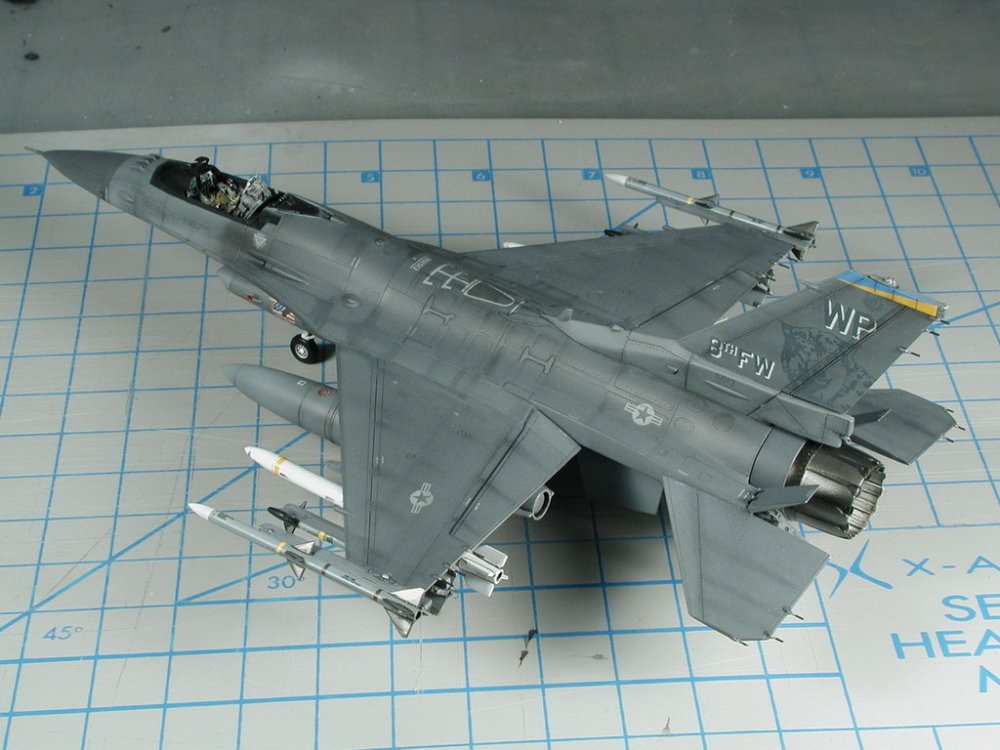
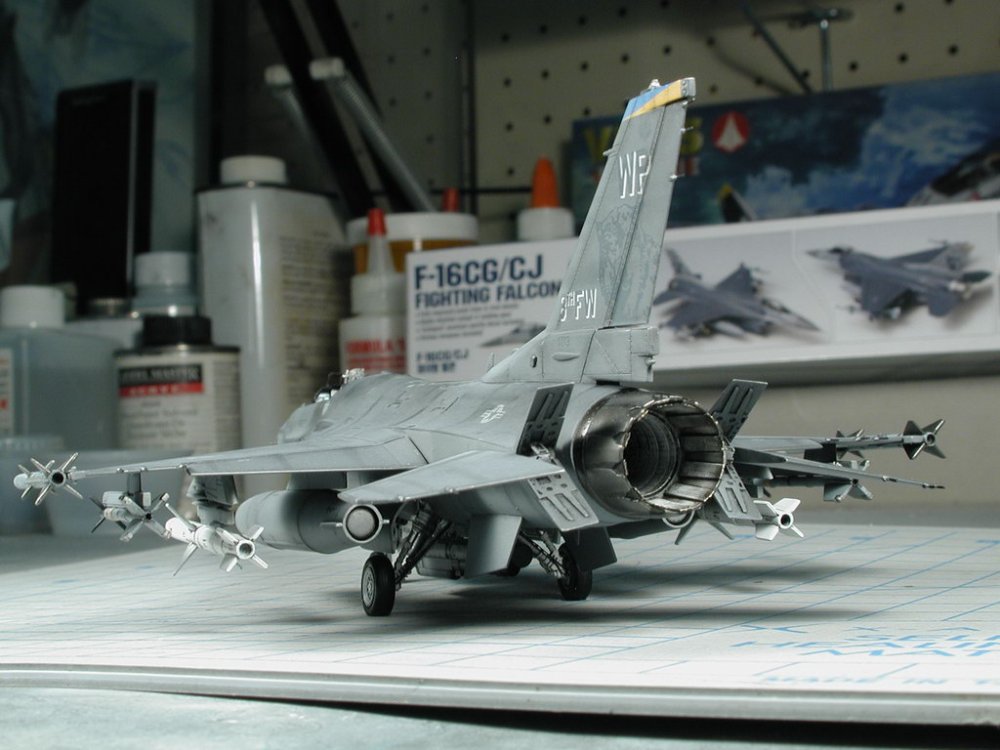
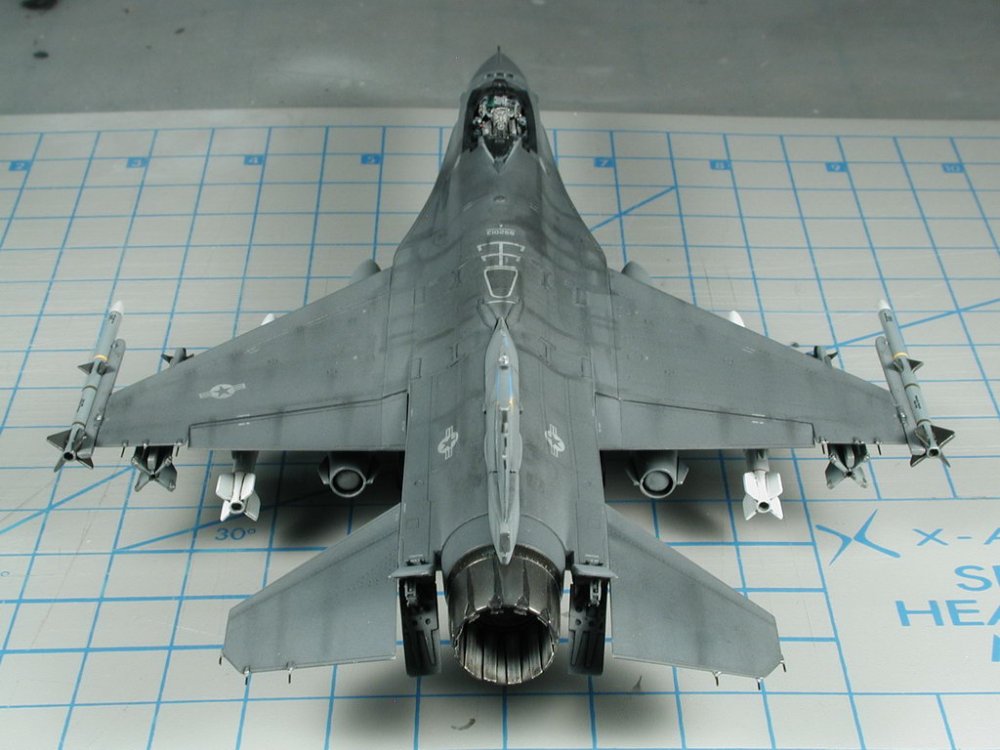
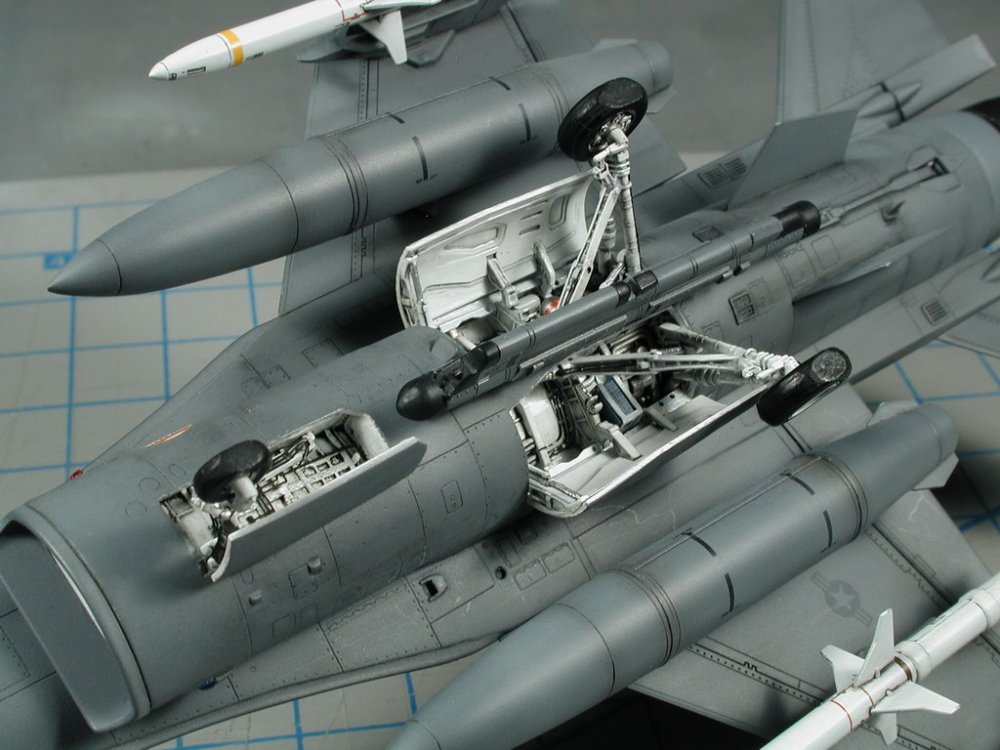
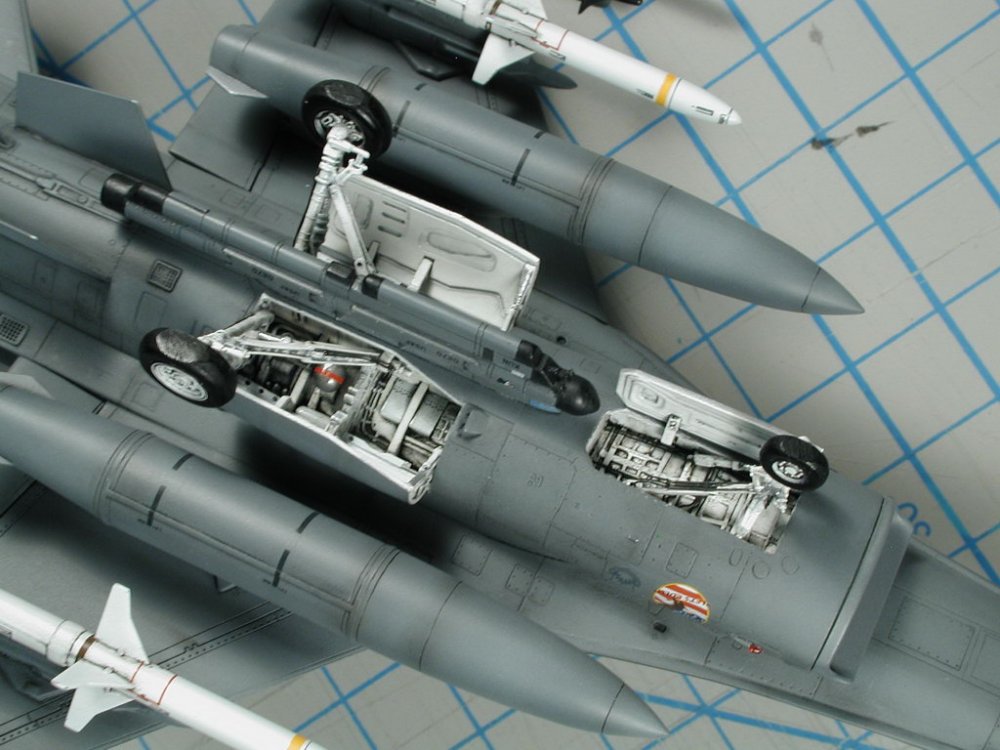
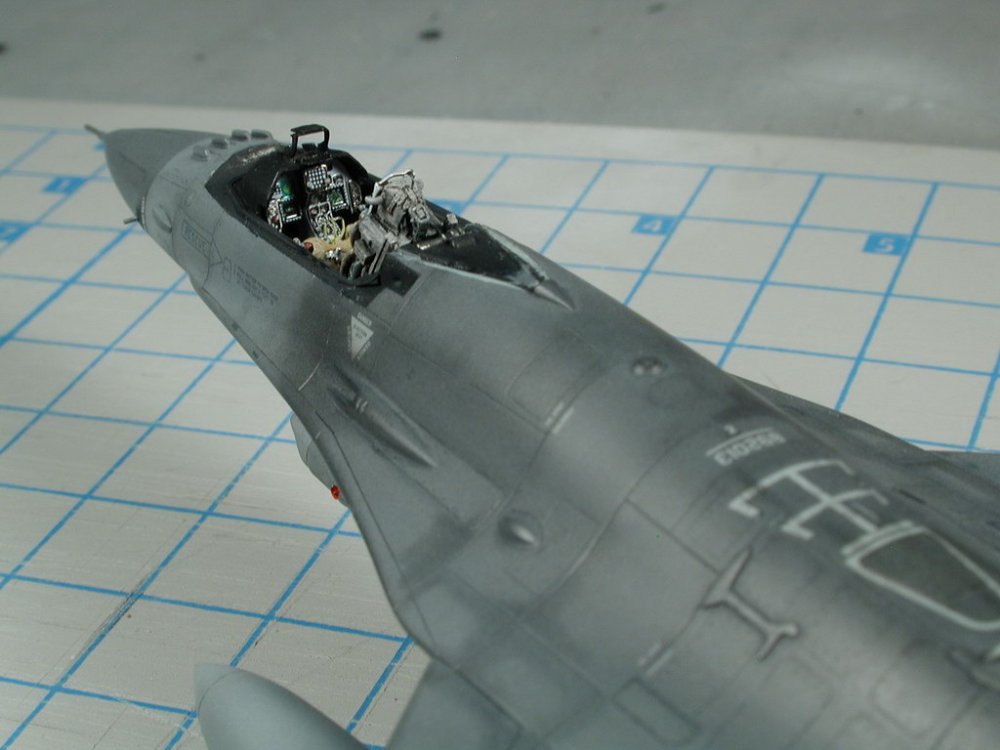
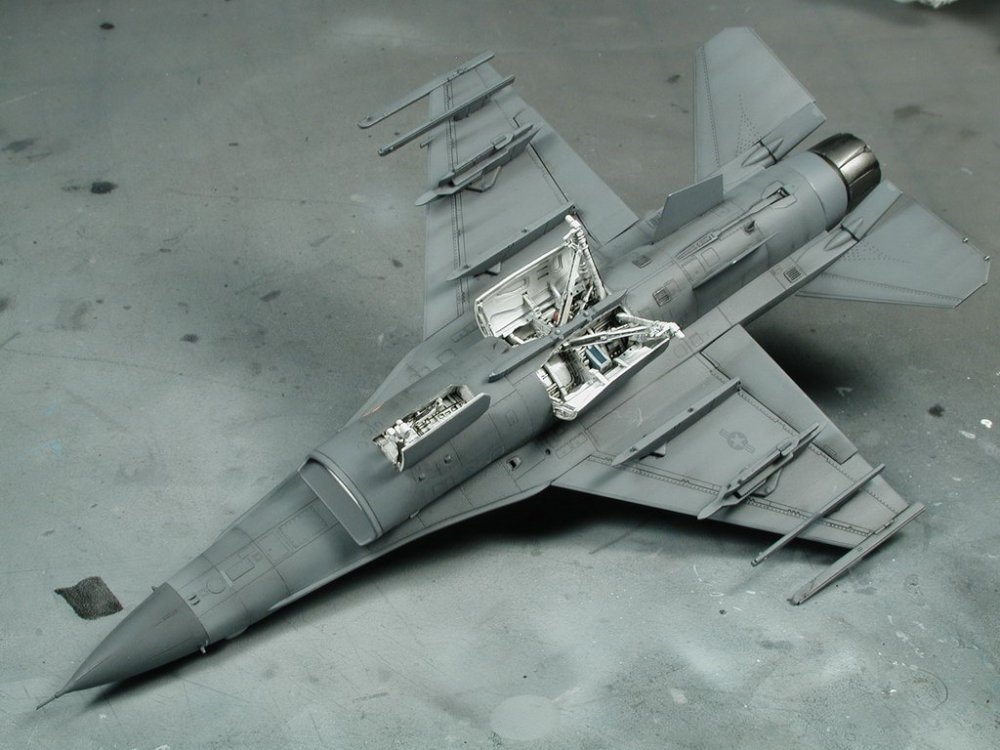
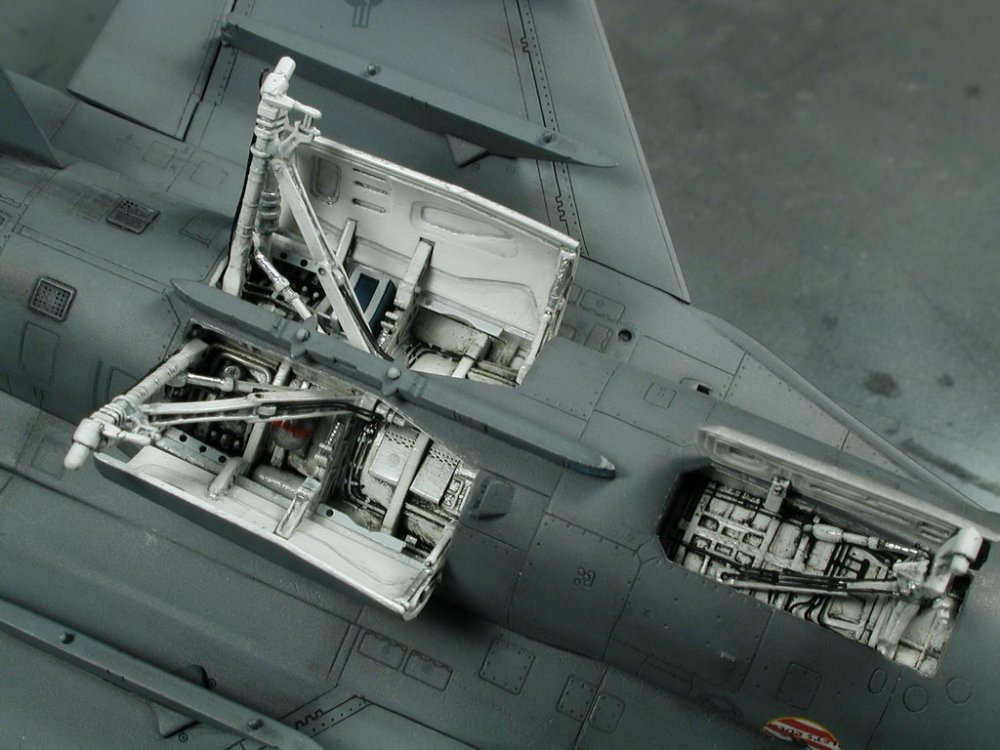
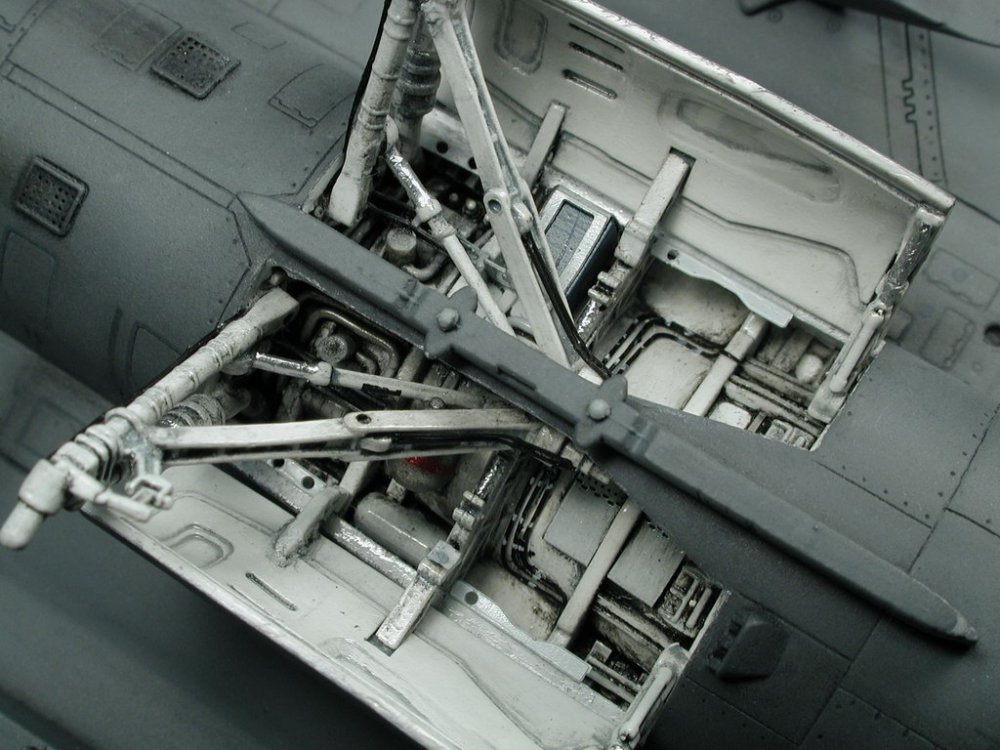
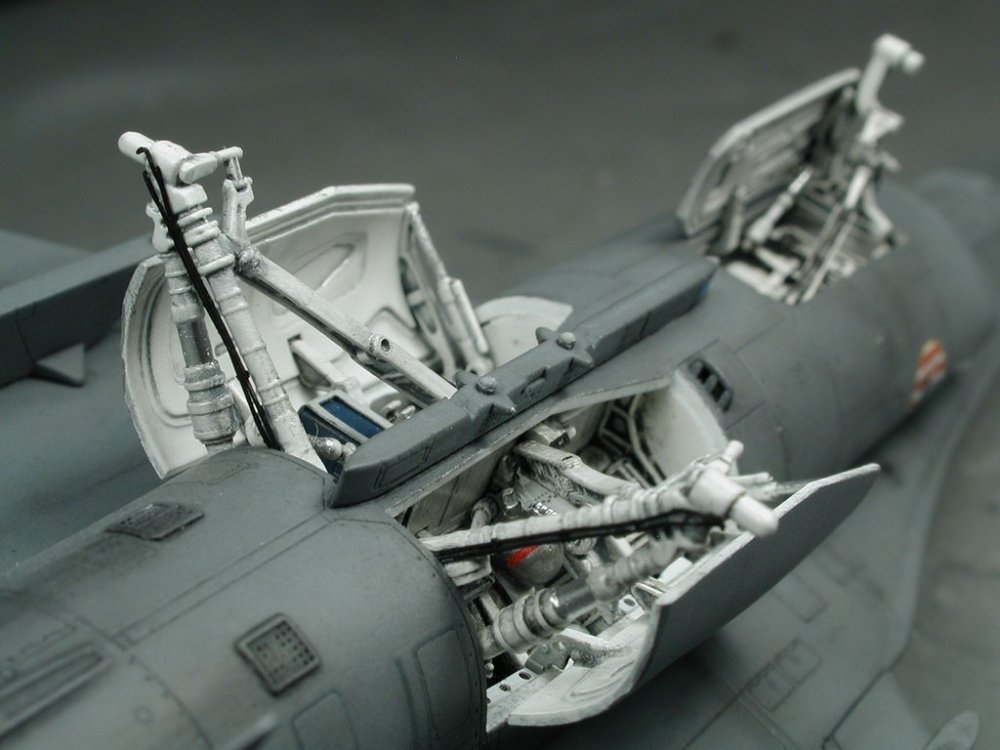
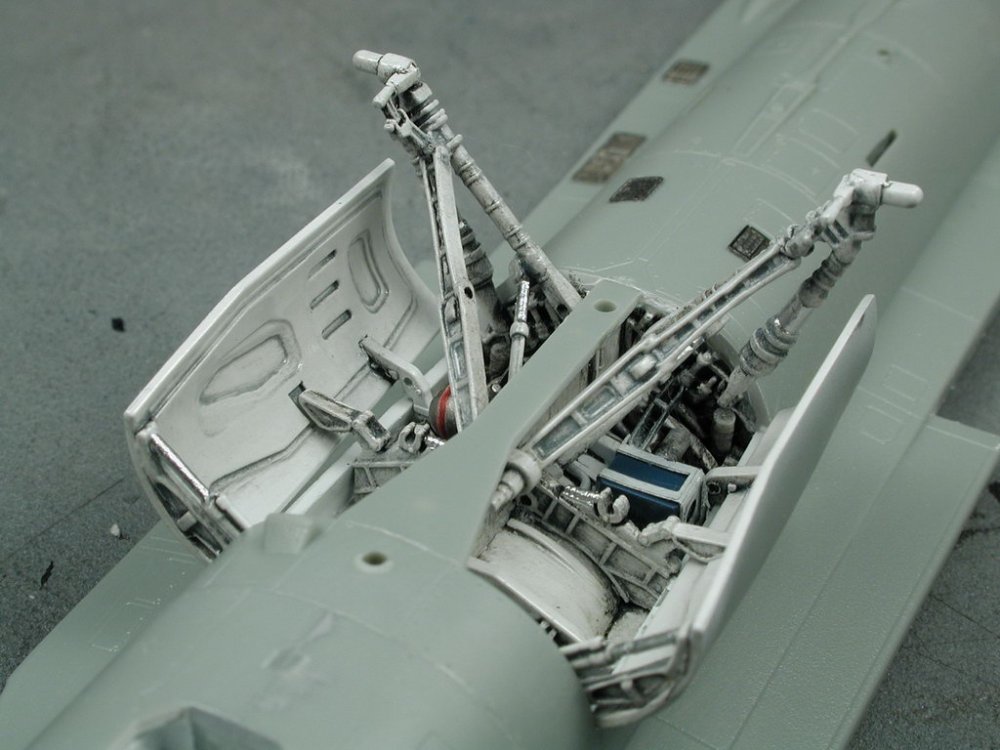
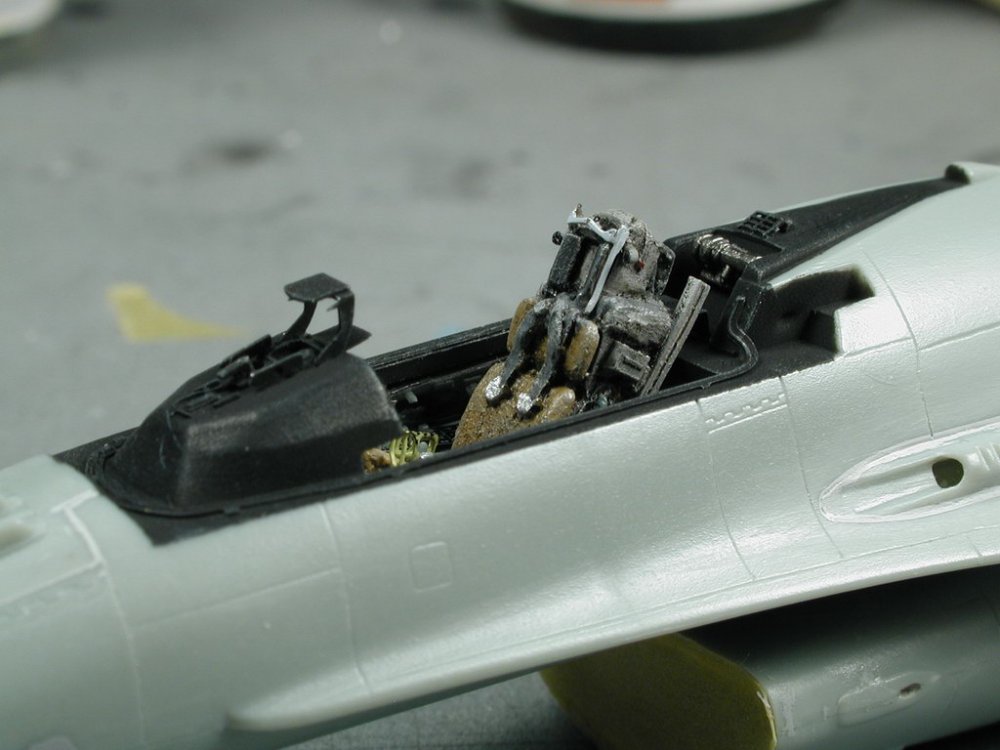
Got a good chunk done last night and today... my favourite parts, final detailing, weather, washes and touch-ups! I re-masked the cockpit area to re-paint the surround/seal gunship grey instead of the black I previously had (as per some very helpful suggestions!) although I don't think I can repaint the seat cushions black un-less I remove the seat and probably re-paint the belts as well. I tried something new in weathering this time, I didn't go the post-shading route I usually do (mostly because its more appropriate to anime subjects). I instead used the Tamiya weathering chalks and a pencil rub stick (basically a pressed rolled up paper tube) and rubbed areas into the flat clear-coat finish and burnished them to a semi-gloss around heavily used panel lines and access hatches. The semi-gloss effect has a way of darkening the paint so it appears like a post-shading, but when different lights hit it at an angle, it quite realistically reproduces some of the sheen effects I see in the reference photos. I kind of gotten carried away once I started doing this weathering - its a little over done, since most of my photos show they seem to take good care of these planes (unlike navy birds!). But hey, I like it, and its such a small model, it needs some exaggeration to bring it in scale. I finally got to glue in the tail cone which I've been itching to do for weeks! Its too bad that the lighter grey tone seems to be too dark (not enough contrast between the darker grey and light grey as well as the dark grey decal stenciling on the lighter grey paint - oh well, nothing I can do about it now, I had just trusted the Tamiya conversion guide, but unfortunately its not FS colour accurate - but I do love using Tamiya paints, so much easier to clean up!). I spent most of today detailing up the landing gear bays and structs. I did a large portion of work earlier on, then had to seal them up for the overall spray. I get to install the structs and doors now and add the hydraulic plumbing and brake lines, which I feel adds a lot to something in this scale. Most of it was thoughtfully provided in the Eduard photo-etched kit already, then I added a bunch of scratch build stuff to busy up the gear wells. Lastly I repaired the PE HUD (again!) - I keep crushing it whenever I turn the plane over to work on it (without a canopy! ARGH!!) I think I've broken every protrusion antenna thingy on this model! So many things have gone wrong with it, its sometimes feeling like an albatross around my neck - close to being a lost cause sometimes. After the wheels and lights, then its the ordinance, and then it sits for the long wait to see if can get a canopy.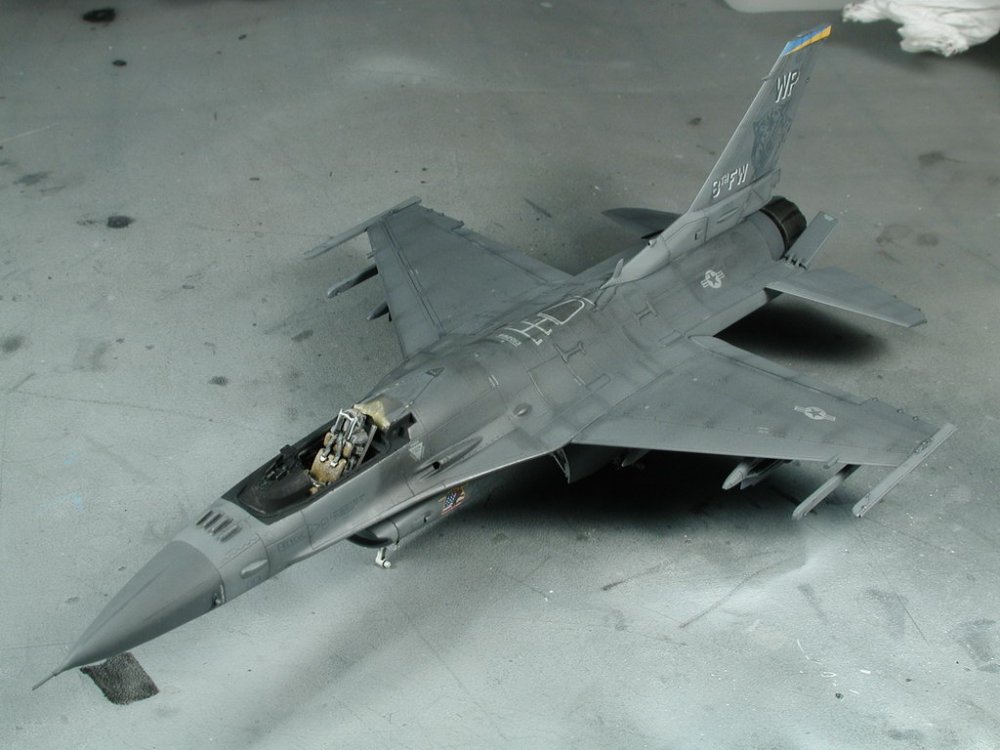


-
Whats Lying on your Workbench MKIII
wm cheng replied to HWR MKII's topic in Hall Of The Super Topics
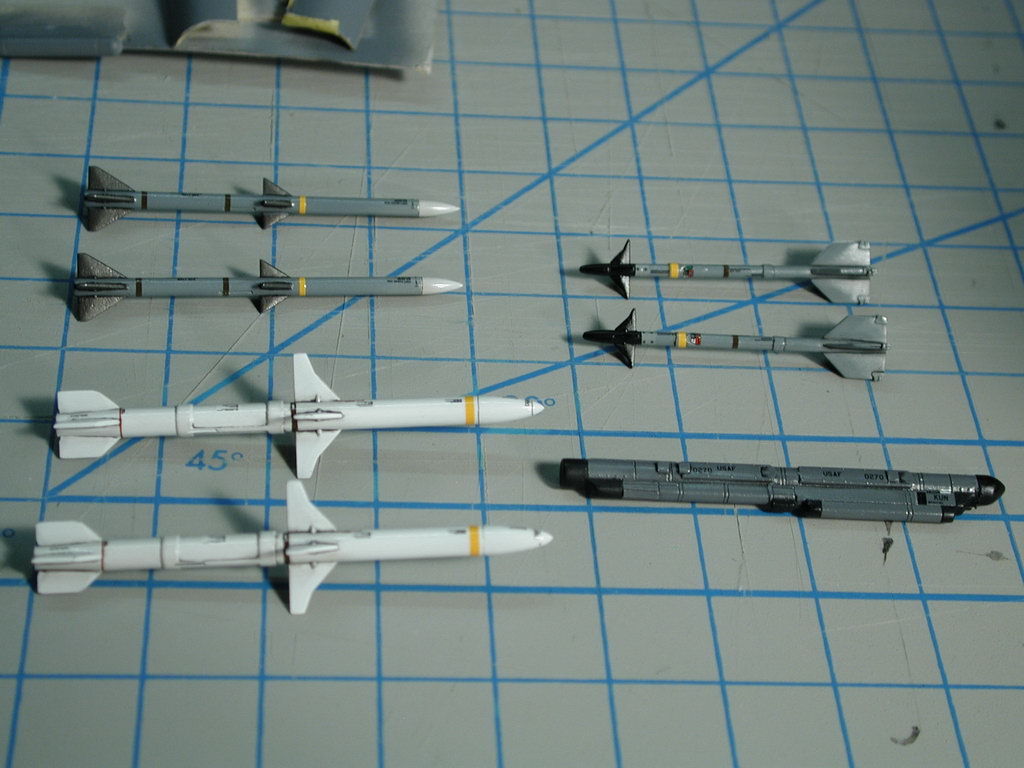
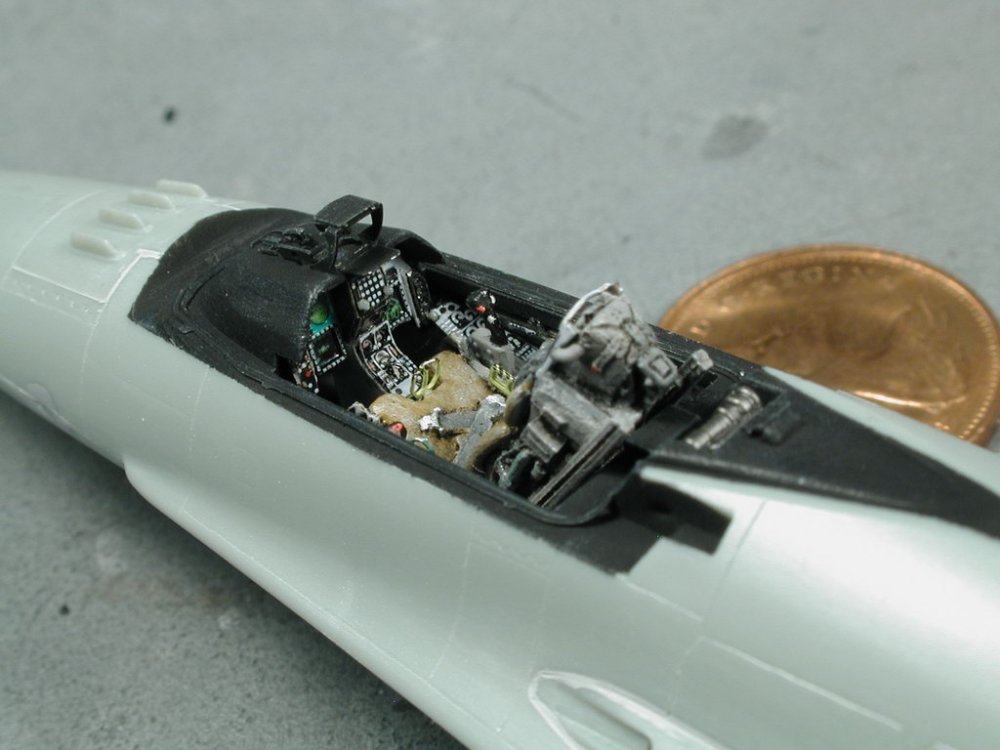
A few more updates... I made a little cardboard canopy (after I stupidly ruined my canopy and I am currently still looking for a replacement - I hope I won't have to buy another model just for the canopy part!) to help protect the delicate cockpit details while I handle the plane to paint. First was the grey coats, then I airbrushed some ModelMaster Semi-gloss to do an oil wash for the panel details and I did some initial weathering with the excess oil wash too. Once I liked it, I sealed it in with the Future (first time future user - after everything I keep hearing about it, didn't go on as smooth as I hoped, but it was ok, it was mainly used because I didn't want the decals to silver against a dark background especially when the final finish will be flat). I went to town on the decals - I love the Academy decals, the cartograph printed ones are fantastic (maybe a tad on the think side - but durable) and the carrier film was so close to the image that I didn't really need to trim - there wasn't really any excess to trim anyways - plus I love tons of data stenciling! Once that was done, I sealed it in again with future, and lastly I clear-coated it with ModelMaster flat now for the weathering stage. I plan on lightening the entire plane up with a lighter grey in leading edge areas to bring out some details with a tiny bit of post-shading and some streaking. I love all the decals for the missles too! (I found that the Tamiya equivalent paints seem to be a little on the dark side, the grey decals don't show up on the lighter grey paints as well as I thought they should - its "really" low-viz now) Thats it for now...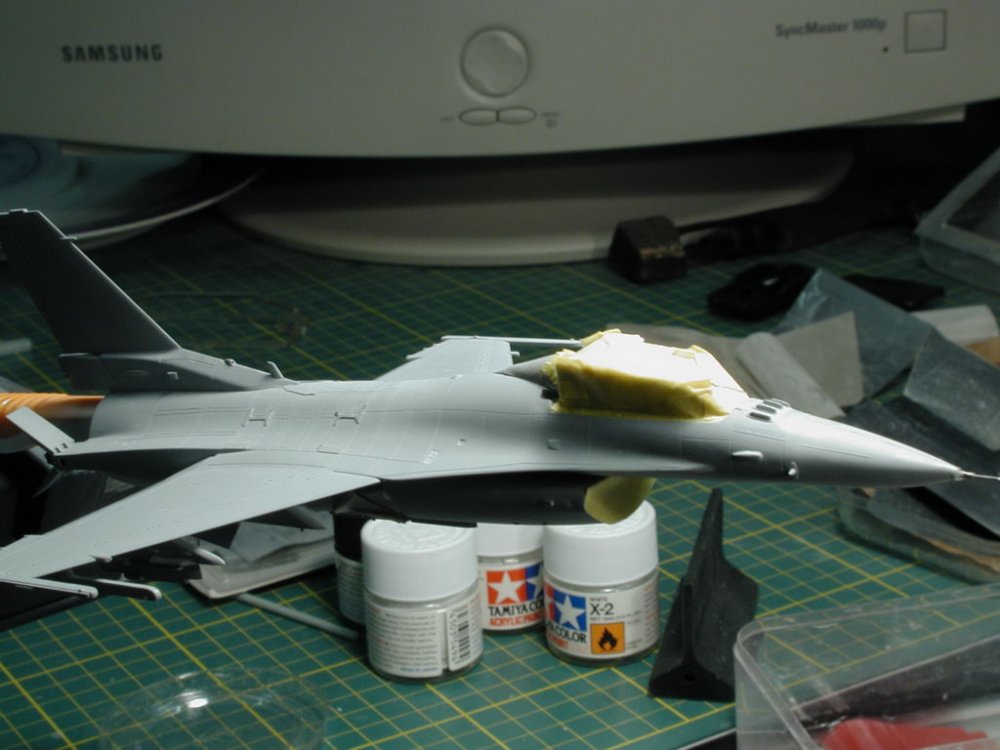


-
Whats Lying on your Workbench MKIII
wm cheng replied to HWR MKII's topic in Hall Of The Super Topics
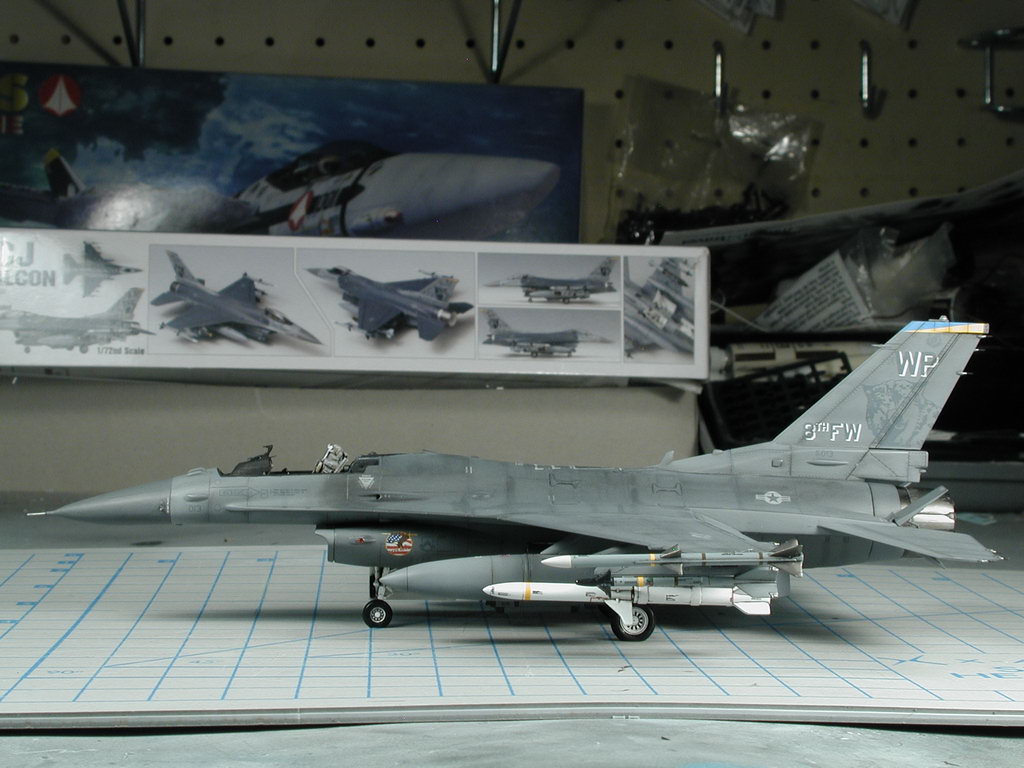
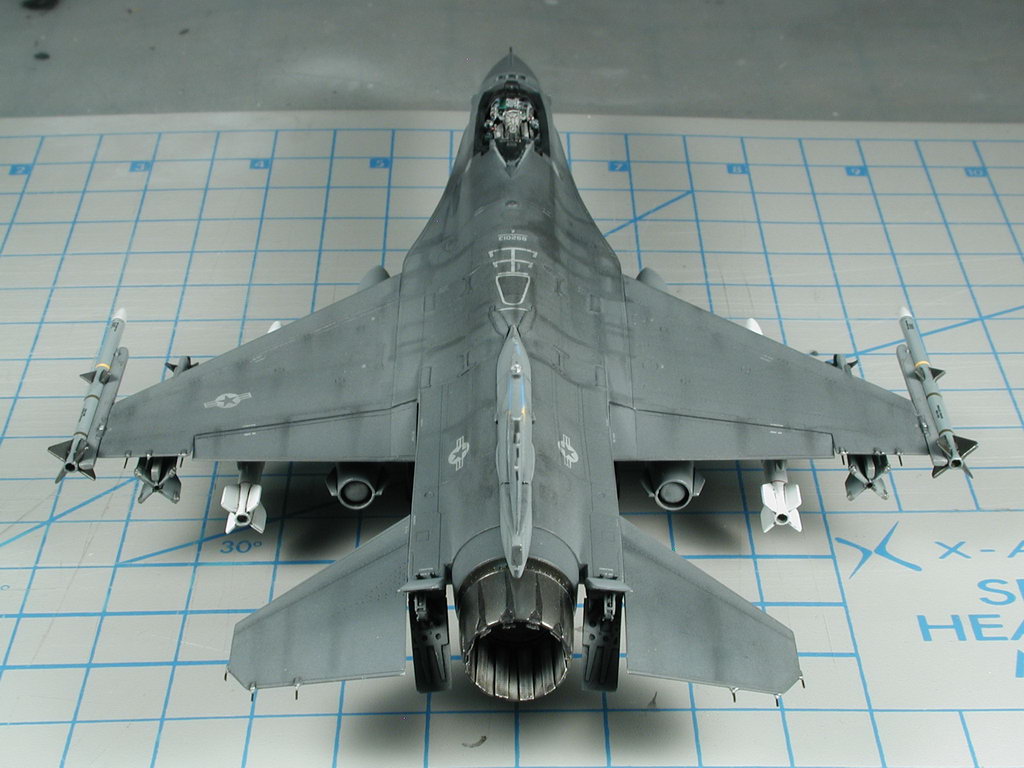
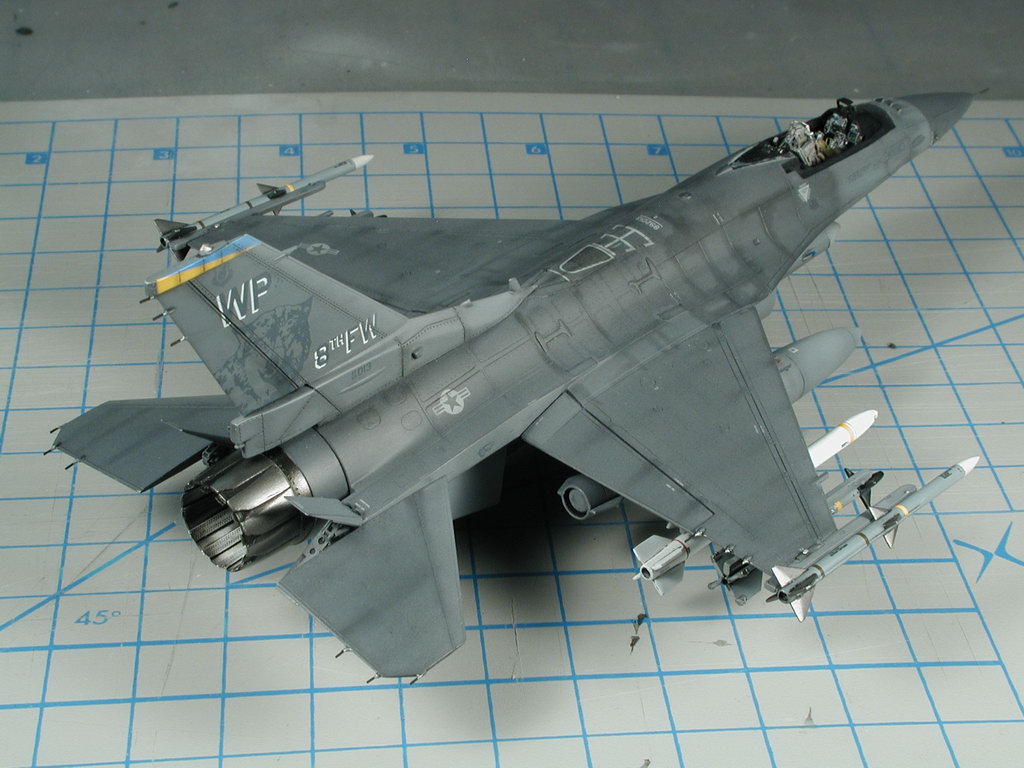
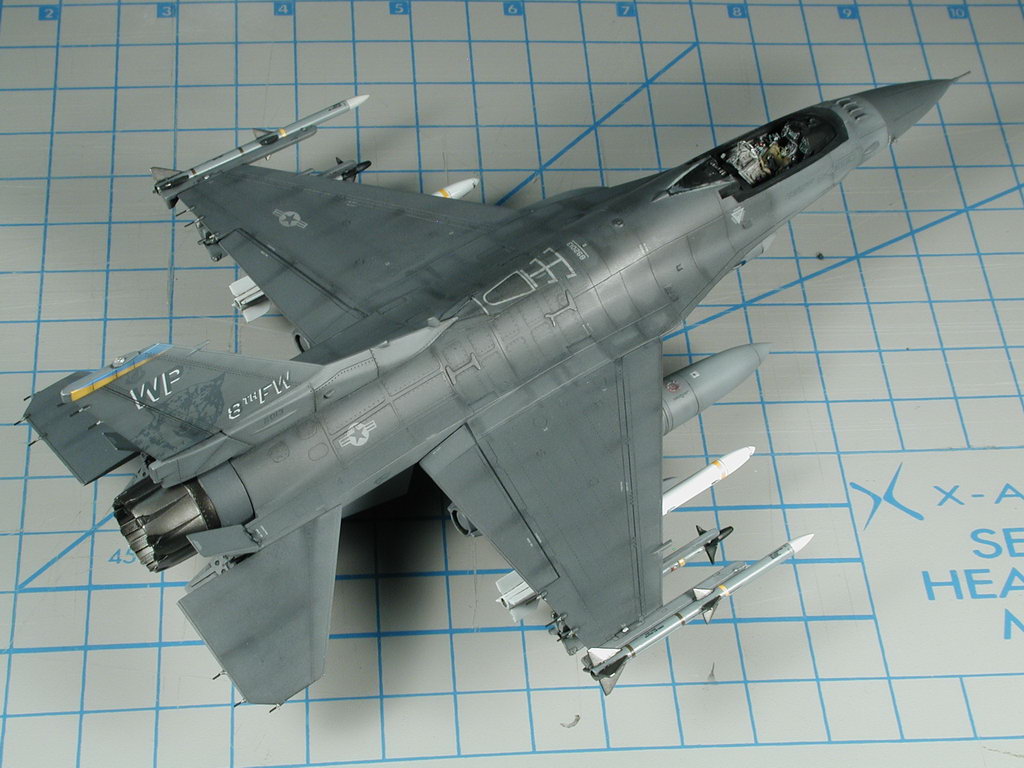
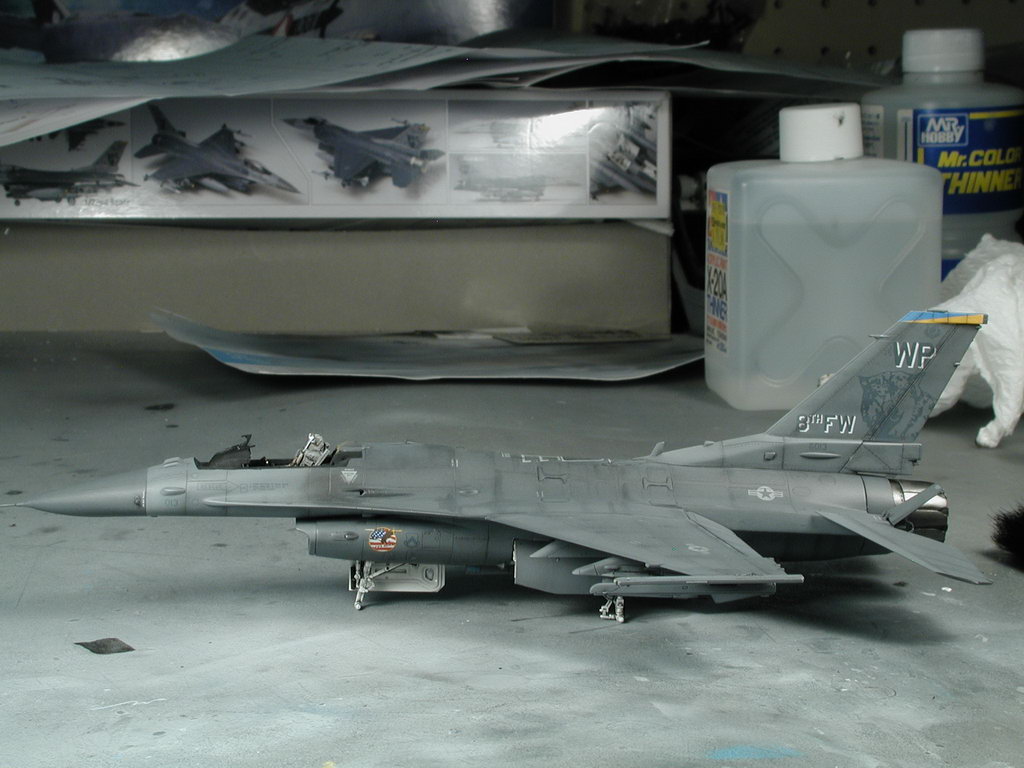
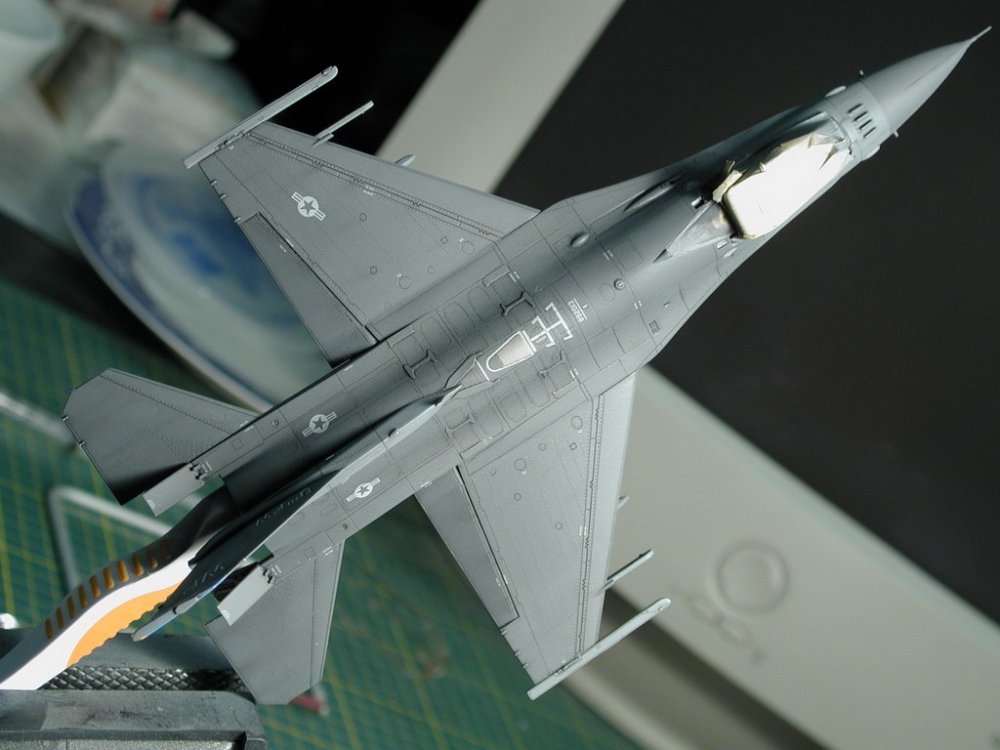
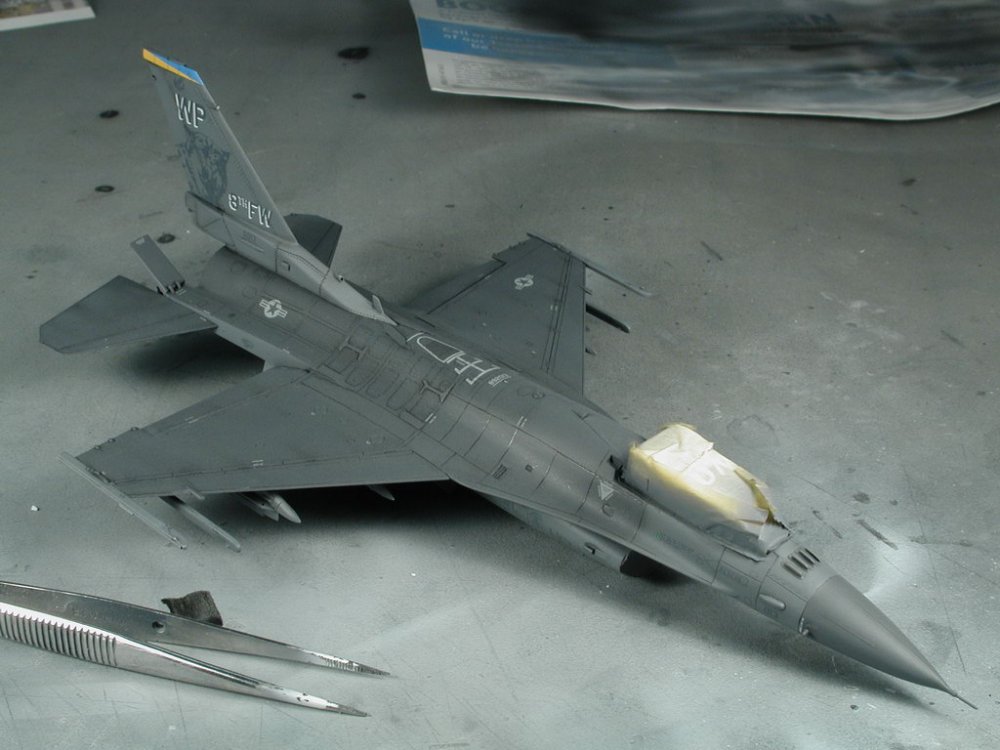
I actually added the stiffeners onto the model - they're part of the photo-etched kit (not included with the original model) I believe the Wolfpack are Block 40 - the only discrepancy are the four antenna bumps in front of the fuselage (I can't remember what they're called), but I read somewhere that some Block 40 aircraft were upgraded with them with the remainder waiting to receive the upgrades - or something like that (anyways, I tend to like the looks of them and added them in anyways). You know, your right about the Battroid thing, Macross subjects are so much easier cause you can just add any kind of detail you like and not worry about accuracy, with the web there's always so many experts around to notice the wrong bump or ECM fin! ;-) I do appreciate all the helpful comments though. -
Whats Lying on your Workbench MKIII
wm cheng replied to HWR MKII's topic in Hall Of The Super Topics
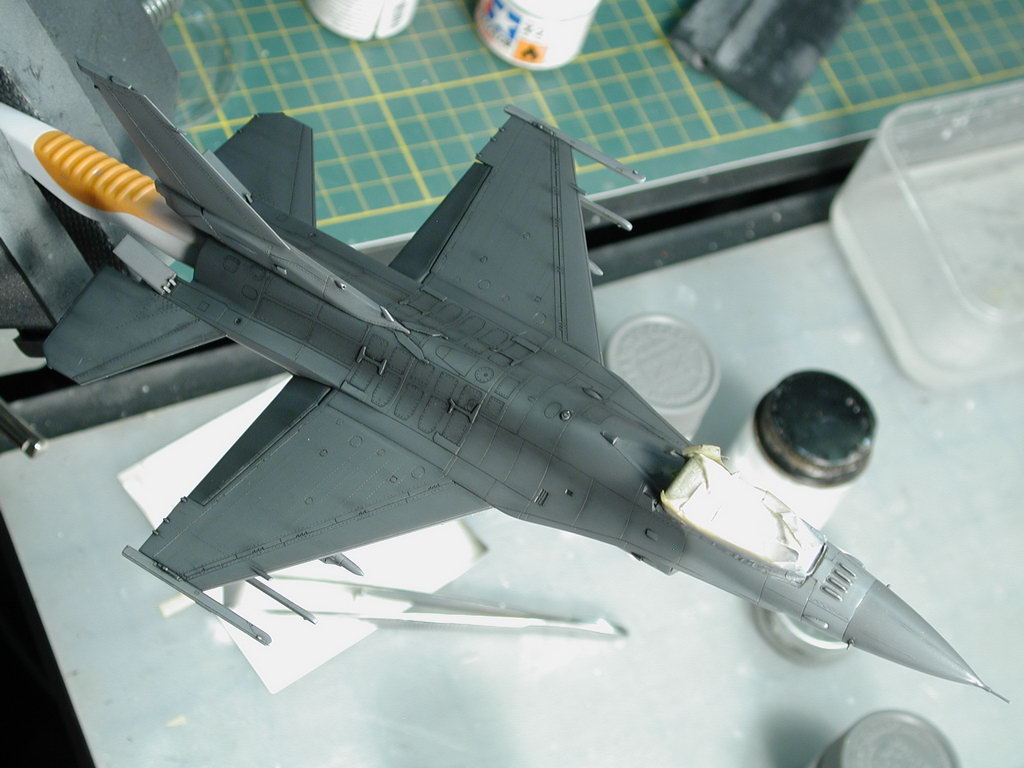
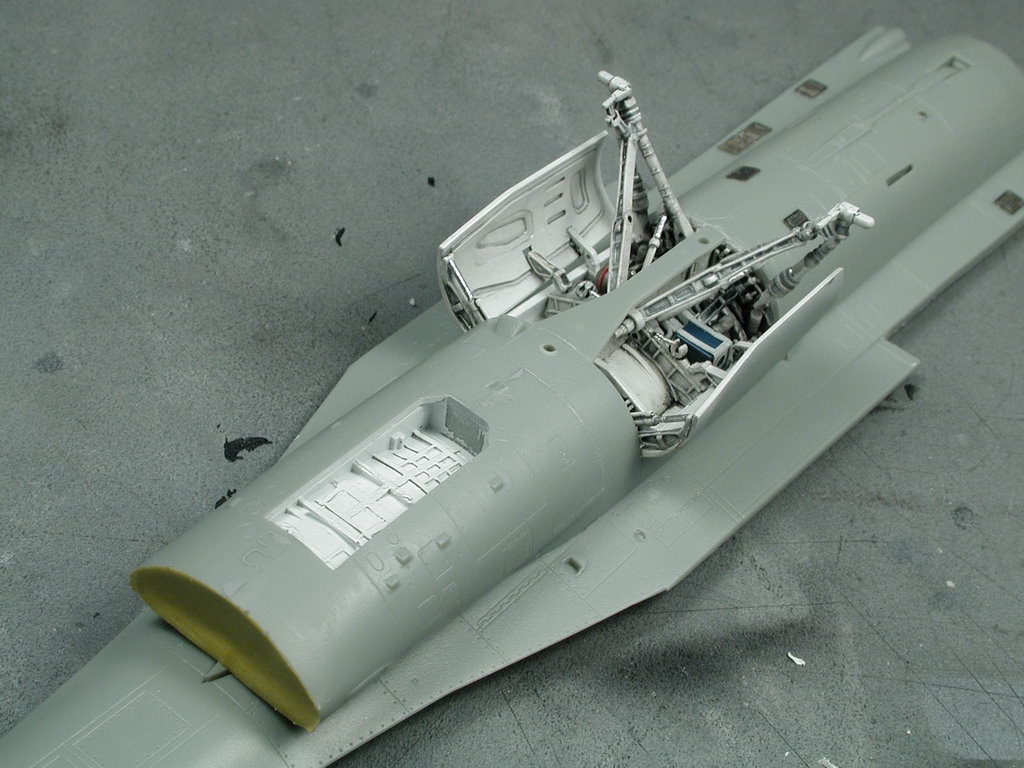
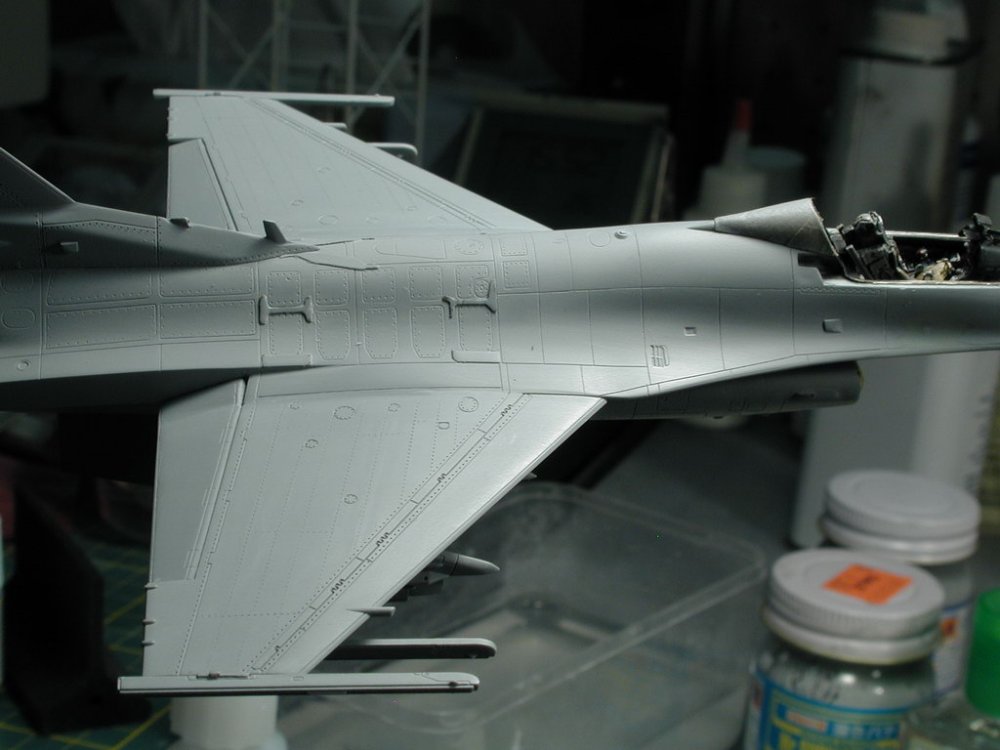
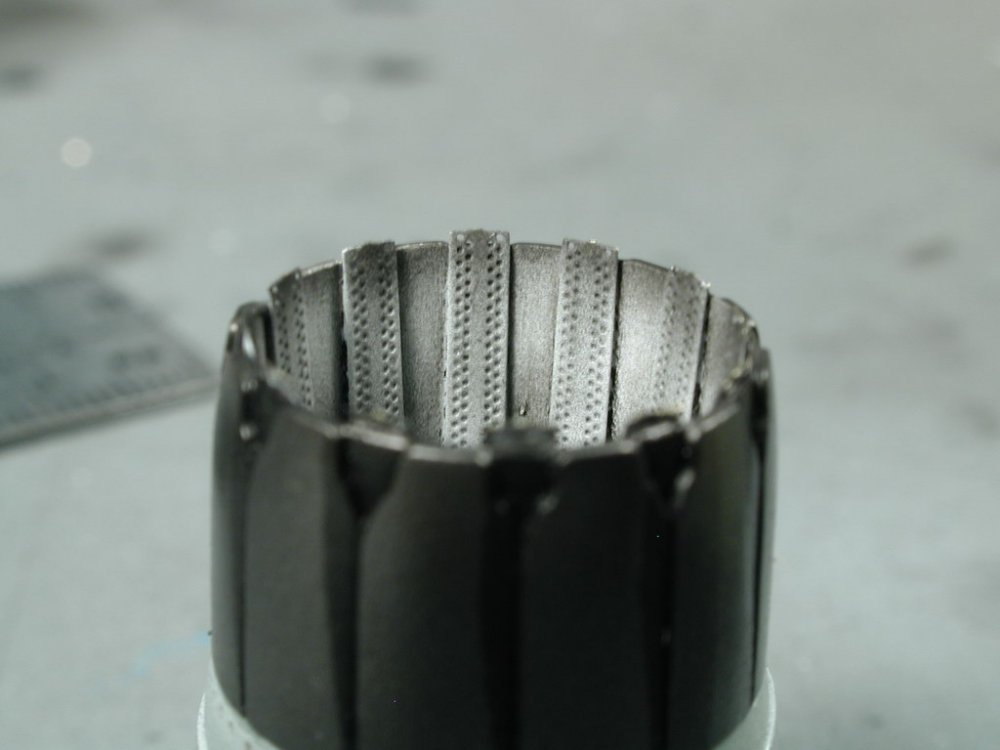
Thanks David! Contacted him... waiting for reply... fingers crossed! I can't believe this kit!! It must be jinxed... everything is happening to it... so frustrating. Last night (after being so careful) I took it to a IPMS meeting (I just joined up, newbie!) and promptly broke the nose pitot tube! and then also broke/bent the photo-etched HUD assembly in the cockpit - ARGH!! Whats going on... Oh well, I shot the whole thing with primer and a ton of mistakes showed up - mostly sanding seams and Mr. Surfacer marks that weren't feathered properly - MAN! this is modelling 101 and I still can't get the basics right... Well, these shots is after a few tries at sanding, re-primering and re-sanding - its finally starting to look right. Well, the accident had a silver lining, one of the guys at the IPMS meeting suggested that I shouldn't use the kit's plastic pitot tube anyways and that I should fabricate one out of hyperdermic needles - its so much stronger and the next time someone knocks it, they'll more likely get hurt than my model ;-) I LIKE THAT! Here's my first attempt at using two needle diameters to sleeve them - I think it looks a lot more convicing than before, and ITS STRONG! Still have to sand down the crazy glue around the base though. I also included some shots of the airbrake modifications to the rear using the photoetched parts once the primer is on them to even out the finish. The primer really picked out the wing riveting (trying to make this 1/72 scale look like the Tamiya 1/48) - for my first time, I think it turned out okay. So here's a few more shots of my current progress...


-
Thanks, I'll try the Xvid4PSP - downloading now. It would be nice to support native HD and not re-encode the video file like MKV2VOB (potential loss of quality?) I'm PC base, thanks for the Mac tip though, nice to know our "cooler" brothers have a source of anime too! It would be great for this to work, I'd much rather see MF on my HD Projector with a 100" screen than my puny 24" monitors.
-
Has anyone gotten the Macross Frontier MKV (HD) files to play with subtitles on the PS3? I've used mvk2vob to convert the MKV files to MPG files which are readable by the PS3 - however the subtitles don't come through. I think there is an option to get external subs on a file and merge them, however, I've gotten the Macross Frontier episodes dating back to the first one from numerous various subbers, so I can't really get the external sub files to a lot of the older episodes. I am hoping that there's another program that will covert the MKV files using the embedded subs to something that a PS3 can read. Any ideas?
-
Bandai 1/72 Scale Macross Frontier Plastic Models
wm cheng replied to Graham's topic in Hall Of The Super Topics
Yeah, I think one could make a pretty good non-transforming display model - even the aircraft mode is okay without the undercarriage in the newer pictures, the cockpit still looks undersized though. I wonder if the kit is around the same size as the Hasegawa VF-0? No matter how much you varnish to protect the decals, if the part rubs, the varnish or clear-coat will only delay the inevitable - as Graham mentioned, I think its a model that can be posed into a certain position and even occasionally transformed, but it won't stand up to constant changes like a toy. I am however pleasantly surprised. -
Whats Lying on your Workbench MKIII
wm cheng replied to HWR MKII's topic in Hall Of The Super Topics
ARGH!! Disaster stuck... In my stupid attempts to accelerate the drying process, I placed the kit a little to close to my lights and it deformed the canopy (beyond re-shaping it back). I can't believe how stupid I was!! I've got too much invested in this bird at this point. I called the store where I purchased the kit from, but they say that they have no way of contacting Academy to obtain a replacement part. I remember back in the day (20yrs ago) when I had a 1/32 Tamiya F-14 and I was able to purchase just the canopy tree again from the distributor (Borgfield Toys in Toronto, Canada). But it seems I may be out of luck this time around. So any one here with a suggestion on an avenue to pursue? I'd hate to purchase another kit just for the canopy (and I don't assume anyone here on these boards have a spare one - its not like its an option part?!) but you never know? I'm going to try the Academy web site. DAMN!! -
Whats Lying on your Workbench MKIII
wm cheng replied to HWR MKII's topic in Hall Of The Super Topics
Some more updates... Argh... sanding... sanding... and more sanding... Did a primer coat to see the results, and I'm not a very good sander anymore. Man am I out of shape, a few years from modelling and I don't know how to sand again!! I still have some seams and blotches of Mr. Surfacer here and there, I keep sanding again, thinking I got it, then primering, and realizing its better but not all gone, then I get to the part where I start to loose the curvature of the surfaces and details, but the damn repair job is still there!! Argh!! at some point I've got to call it quits and walk away and call my losses and get on to another stage. The little sinkholes/devits on either side of the fuselage proved a bit problematic, I filled them with Mr. Surfacer, but the more I sand, the more the Mr. Surfacer stands out, its as though the surrounding plastic is softer than the Mr. Surfacer!! The horizontal seams by the cockpit has proved a challenge too, think I successfully puttied and sanded them smooth (at least to the light and my fingernails) I glued that little bump/hump to both sides of the fuselage, only to find out that the seam is still visible after primering. Now I have to sand that part around the nosecone antenna and humps, which is proving very difficult without erasing those small details! I love small 1/72 models, but now I wished it was slightly bigger like 1/48 or something. DID I MENTION I HATE SANDING NOW... I've never had such problems with my older Hasegawa kits, I don't know if its because I'm coming back into modeling after a 3yr hiatus and I am rusty or that there's just more filling to be done with this Academy kit, but the sinkholes on the fuselage sides seem to be just bad QC and all the little various injector pin marks all over the place! I wasn't a fan of the 6 piece intake assembly! And making the wings a glue on piece, it should of just been part of the top fuselage. It seems like its just parts sake for extra pieces sake. IMHO Plus there's this fine texture all over all the parts, that shows up if you spray Alclad metalizer paints without primering first. Great detail on this Academy kit, but fussy parts breakdown and assembly - thats my take on the new kit so far! Oh well, some more little bits and pieces here and their that I've been working on... Modifying the airbrakes seems to have paid off with the Eduard PE kit.

-
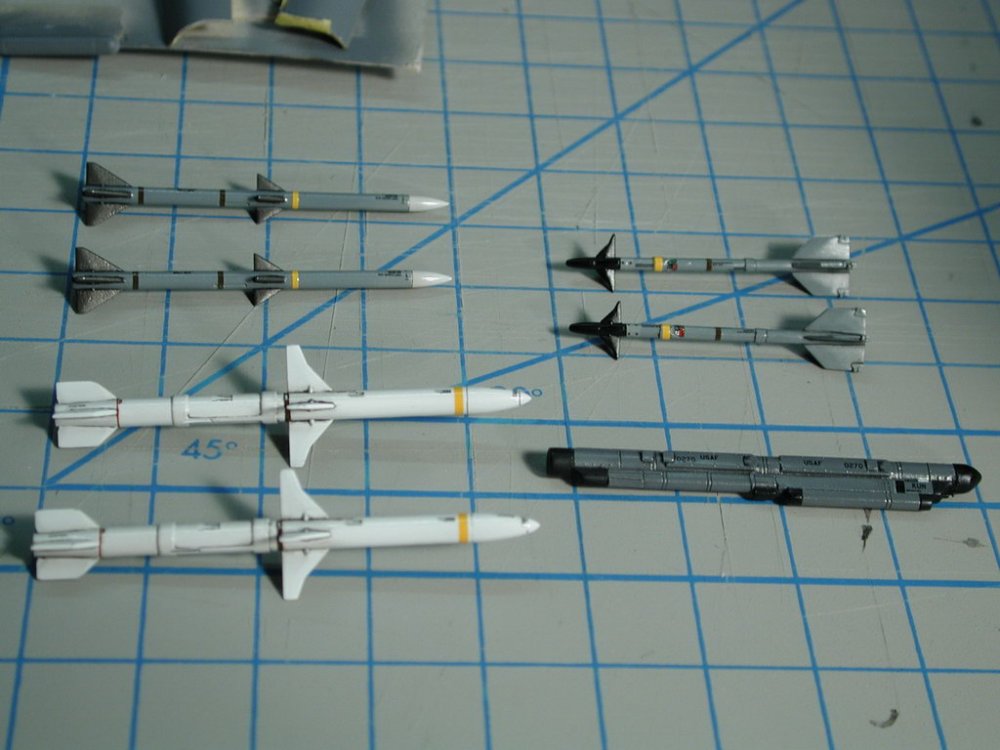
Yes it does include the towed decoy, I didn't use it since I think it looked a bit bulky on the ends of the wings there. The kit is really good, lots of good little details and modifying the Eduard Hasegawa PE parts to fit wasn't to difficult. HWK MKII, do you think I can put the sidewinders on the wingtips instead and switch them with the AIM-120s - even though I haven't actually seen any reference photos that show that layout configuration? Noyhauser, what info do you want to see or hear?
-
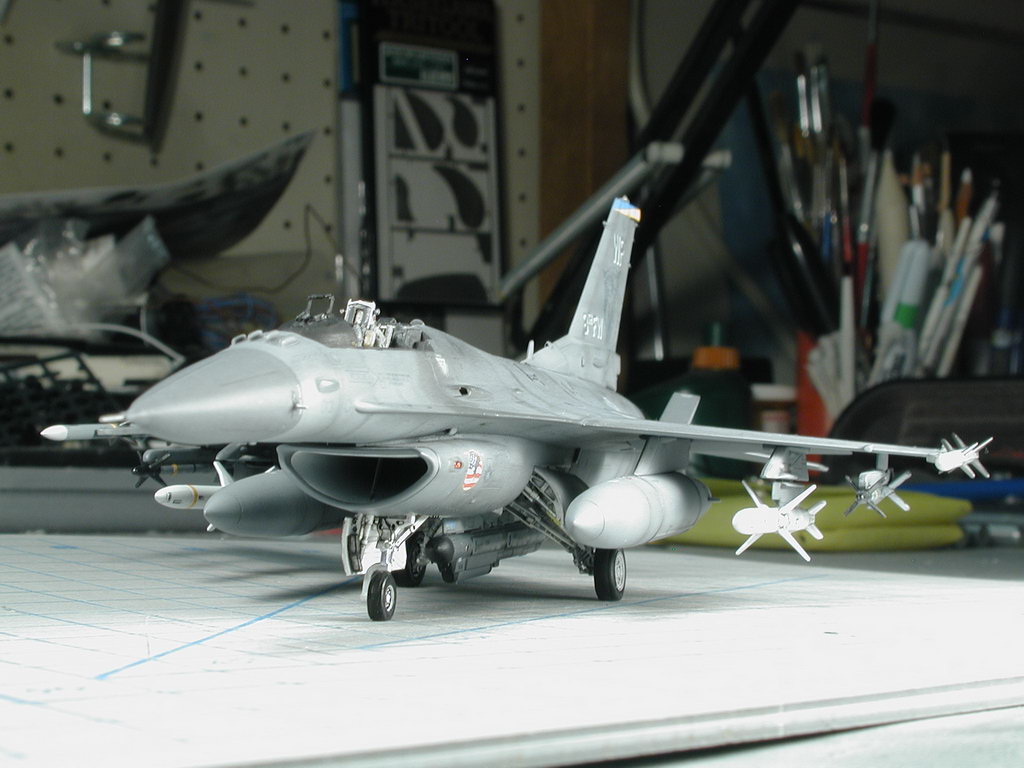
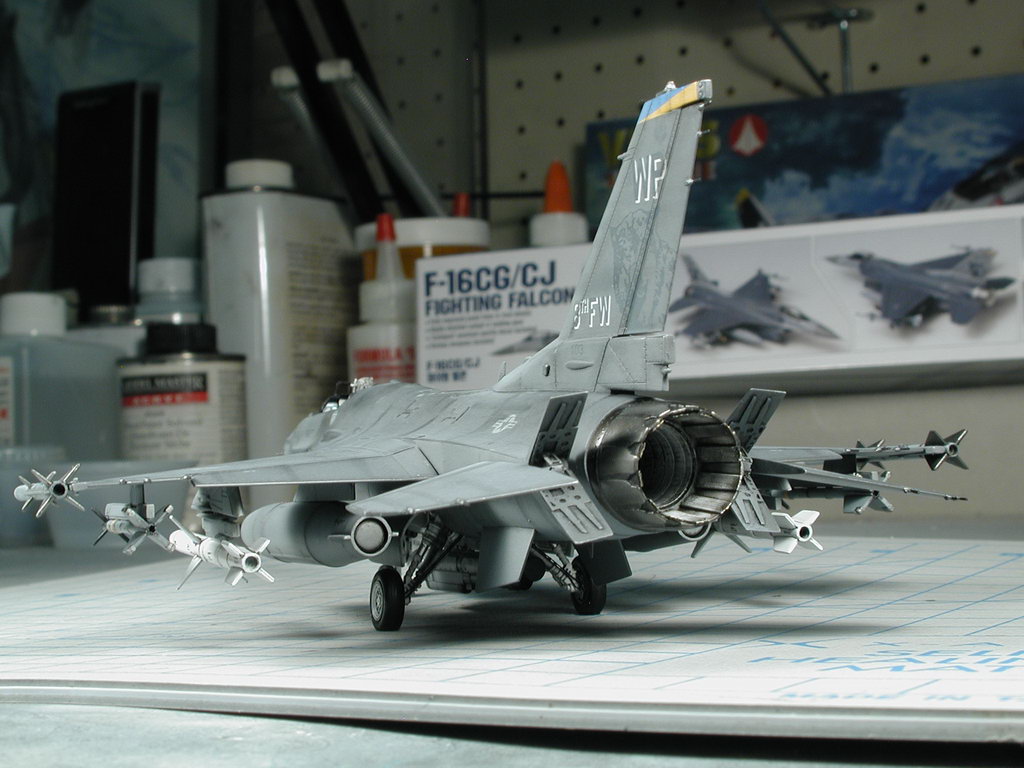
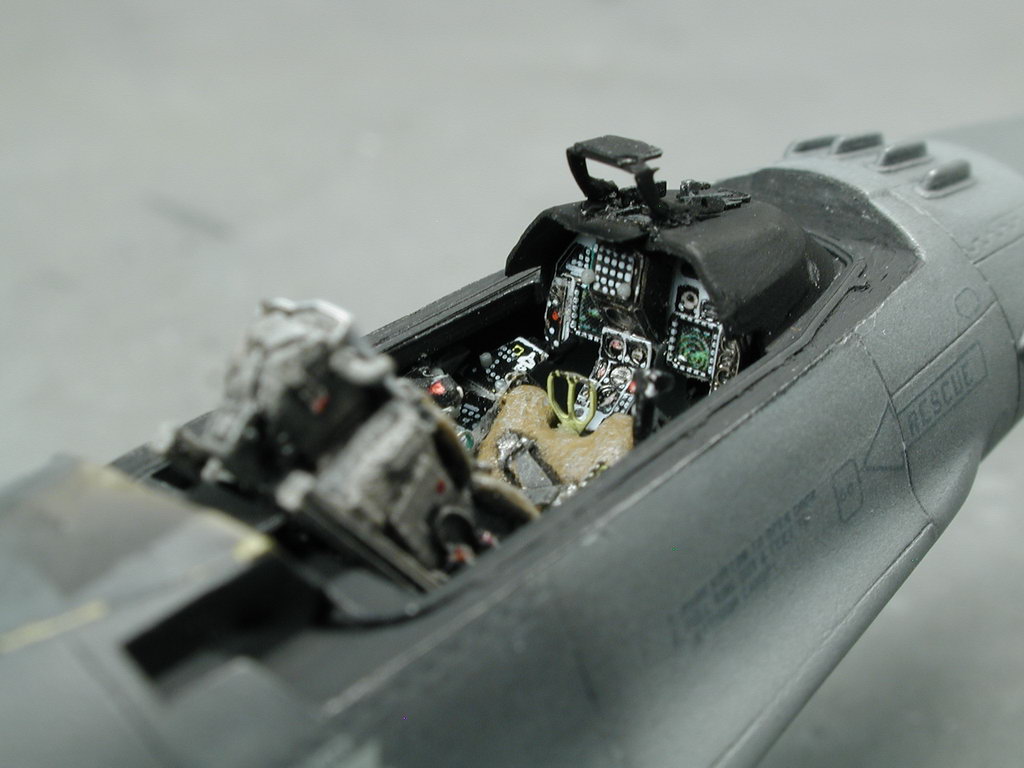
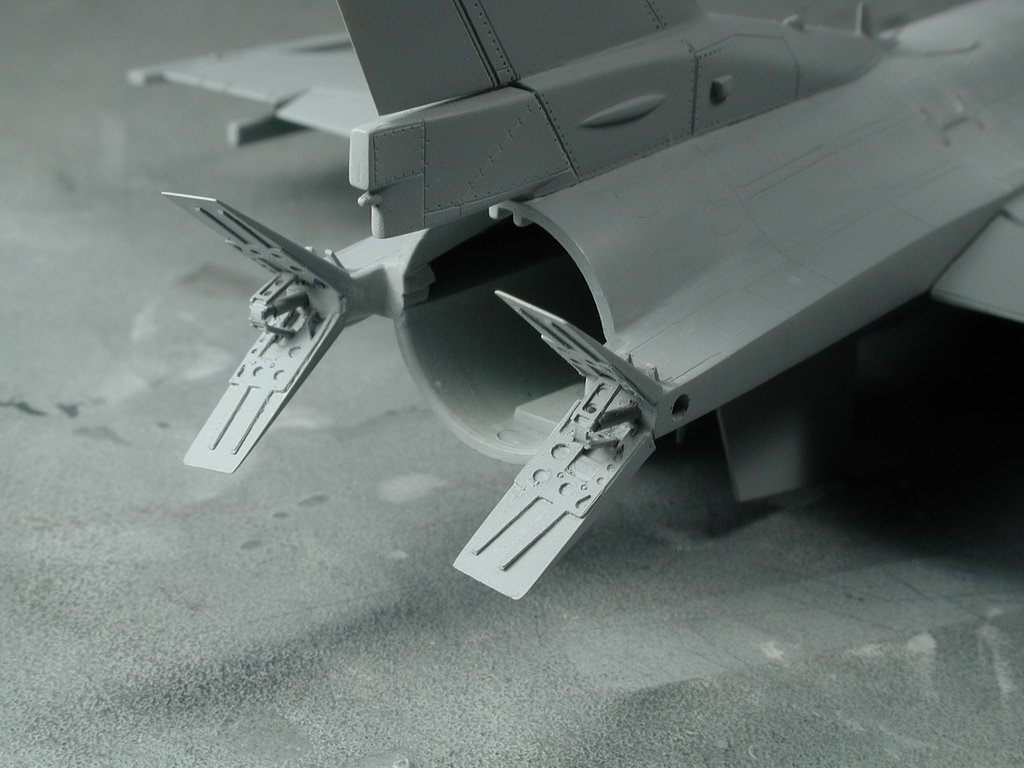
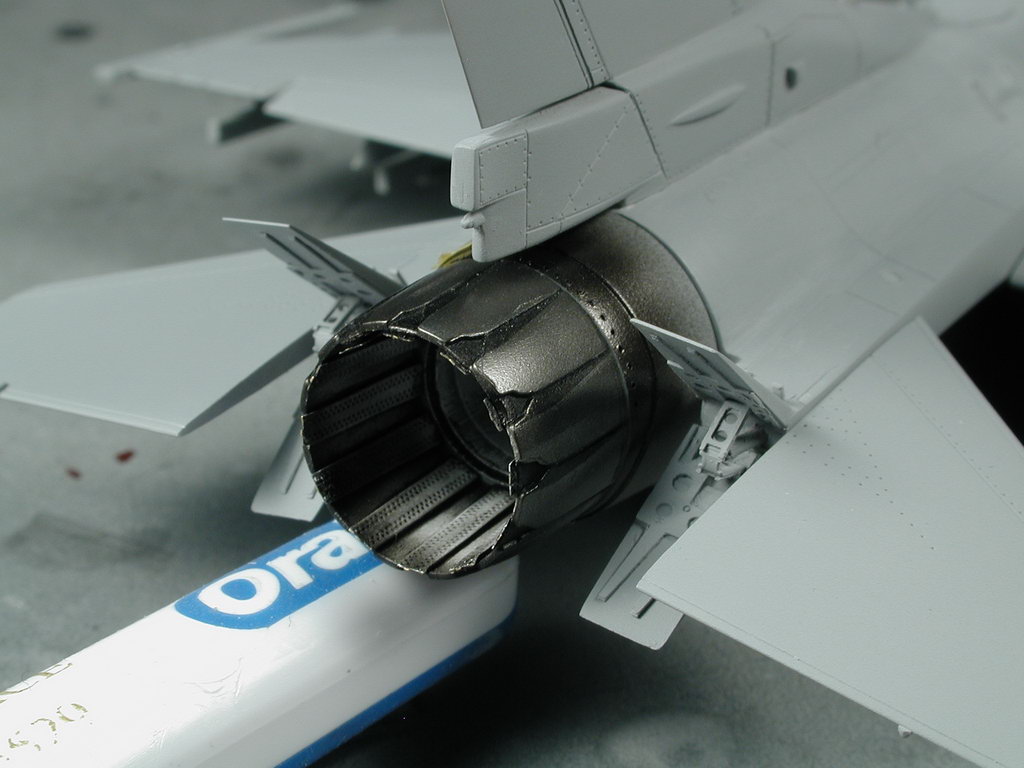
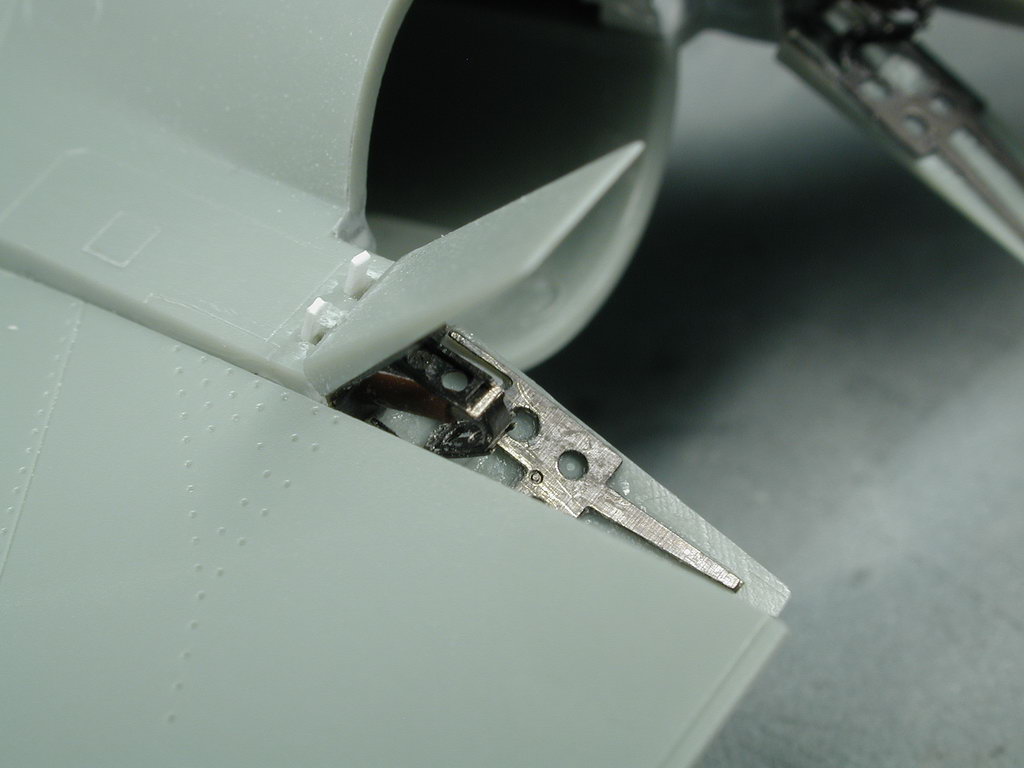
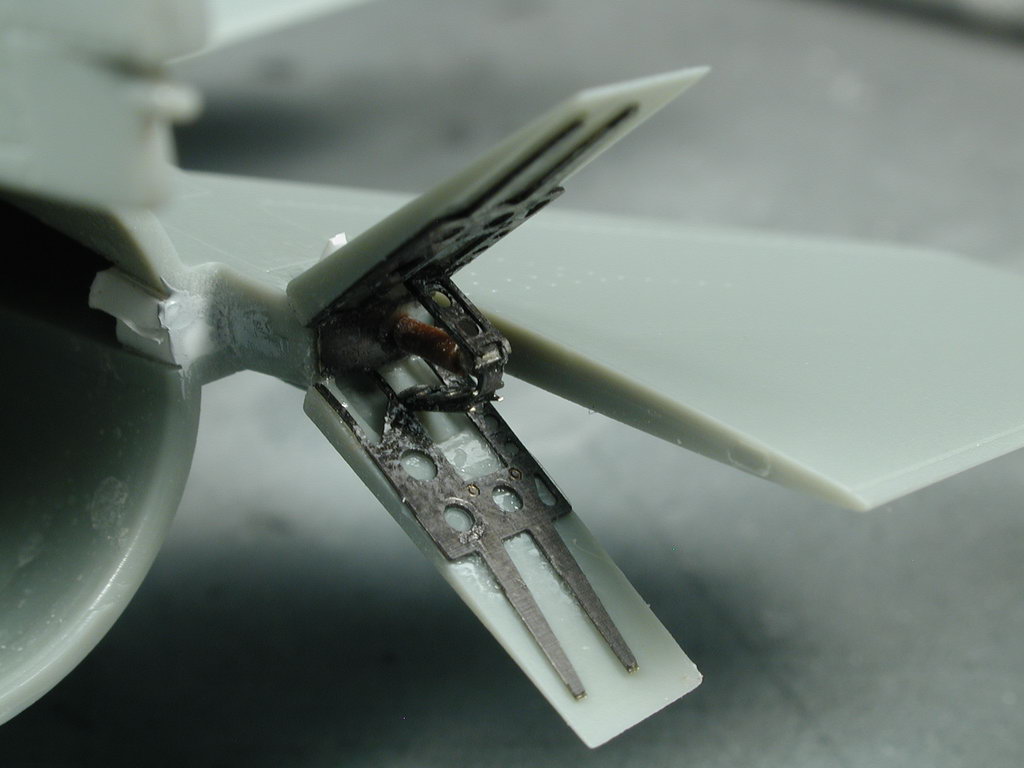
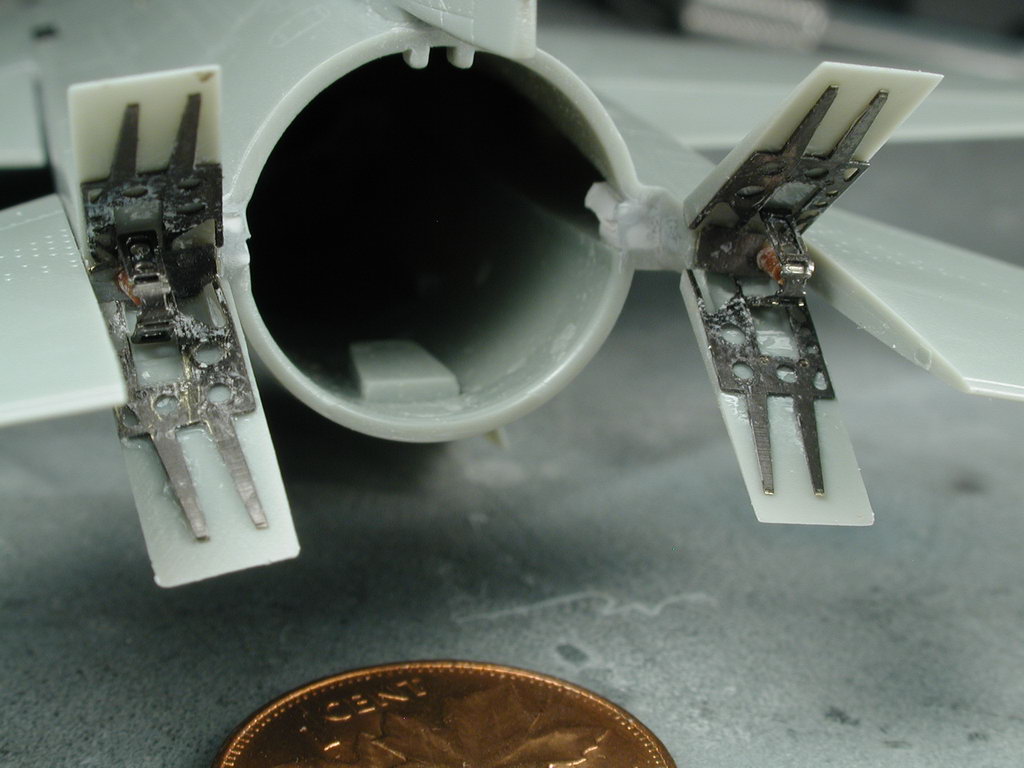
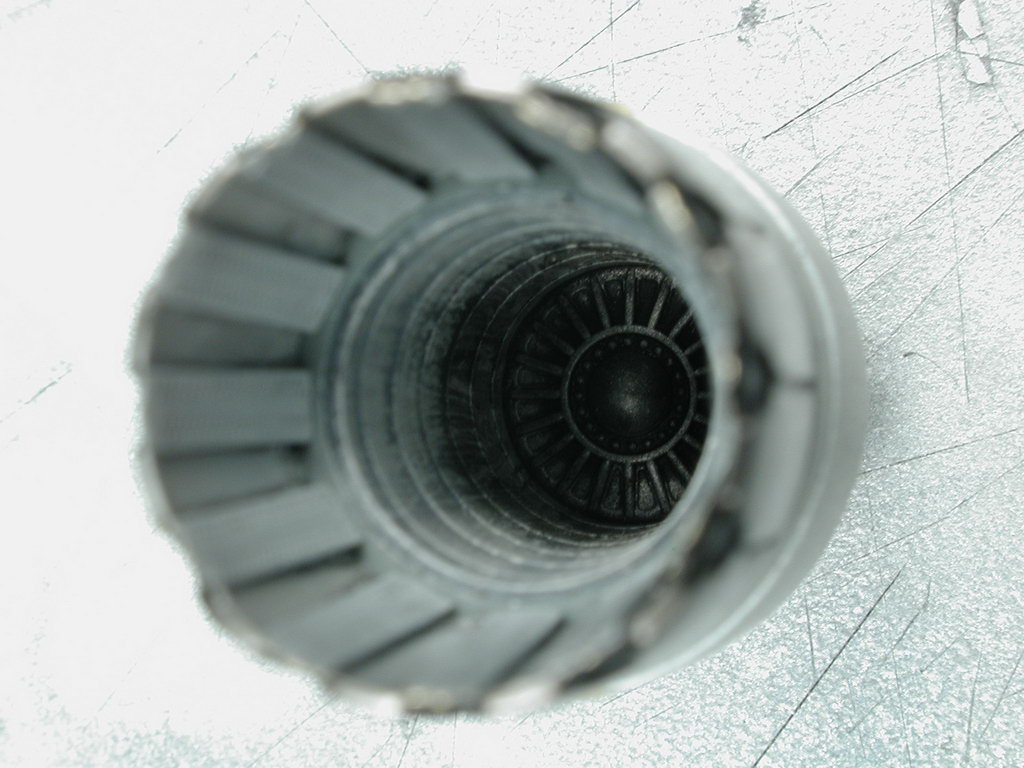
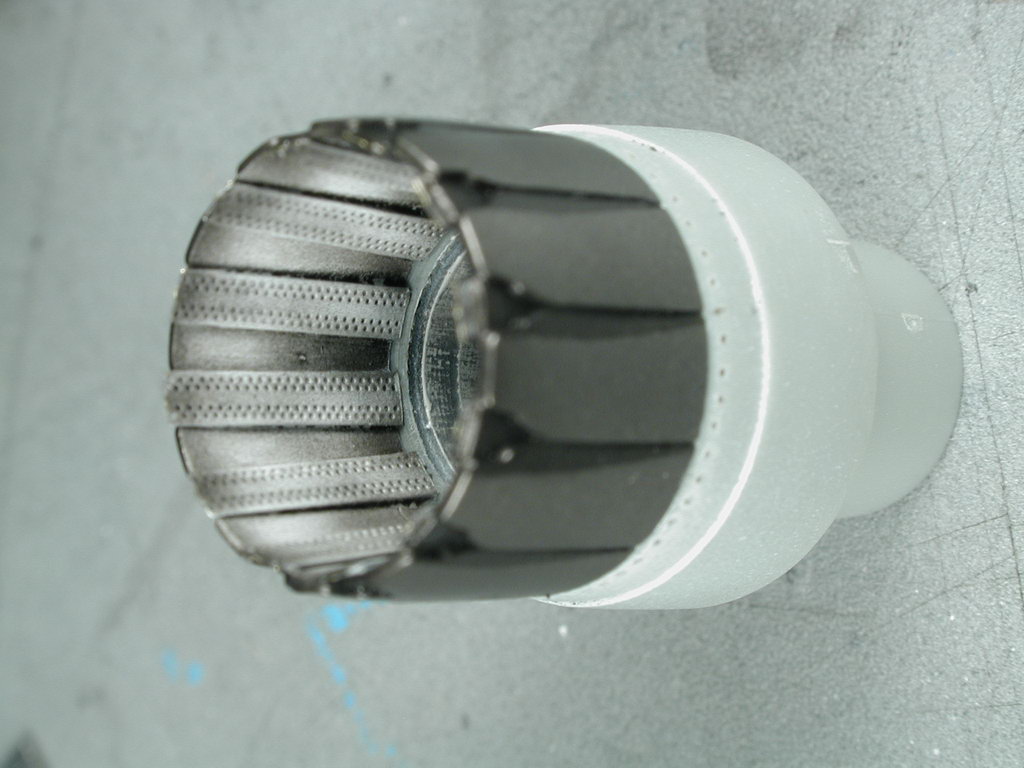
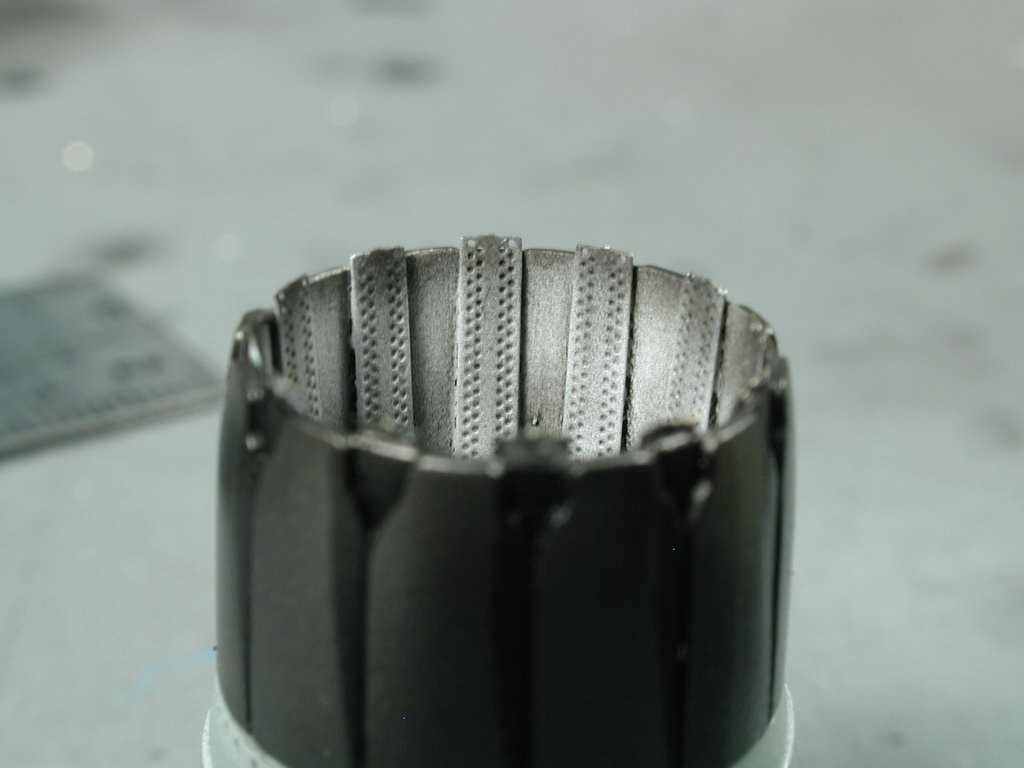
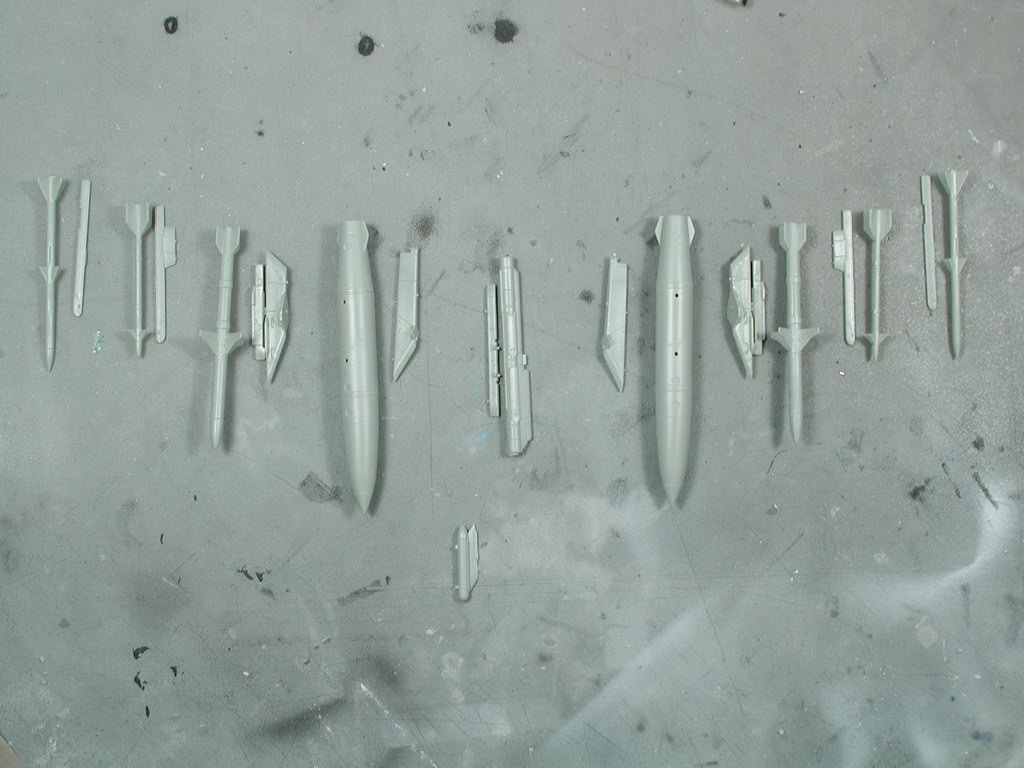
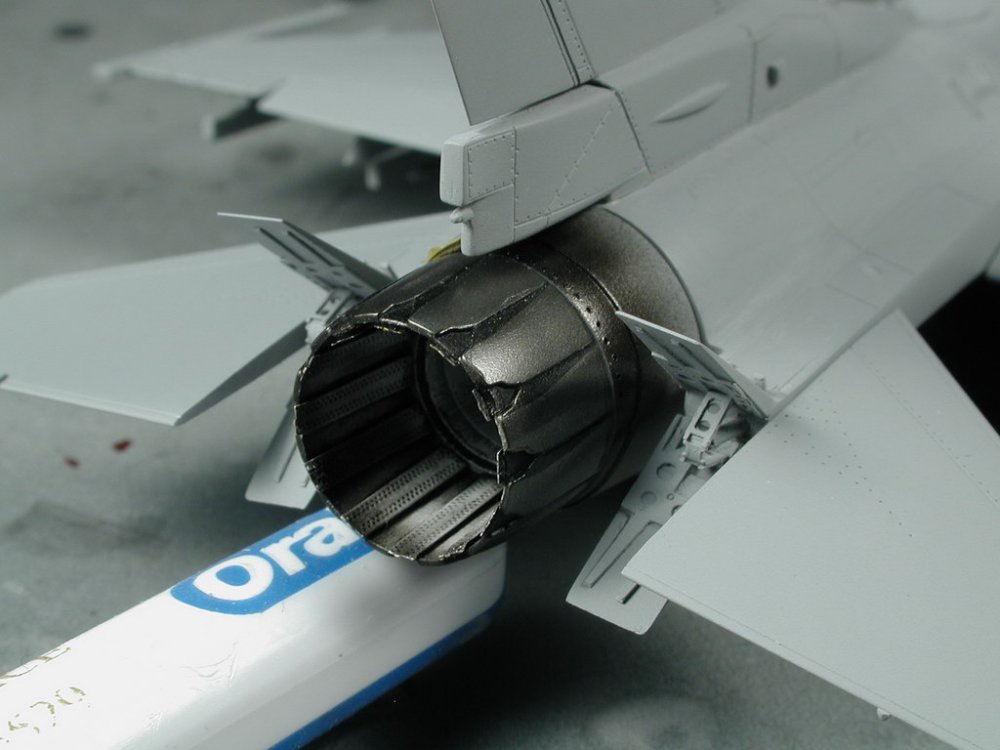
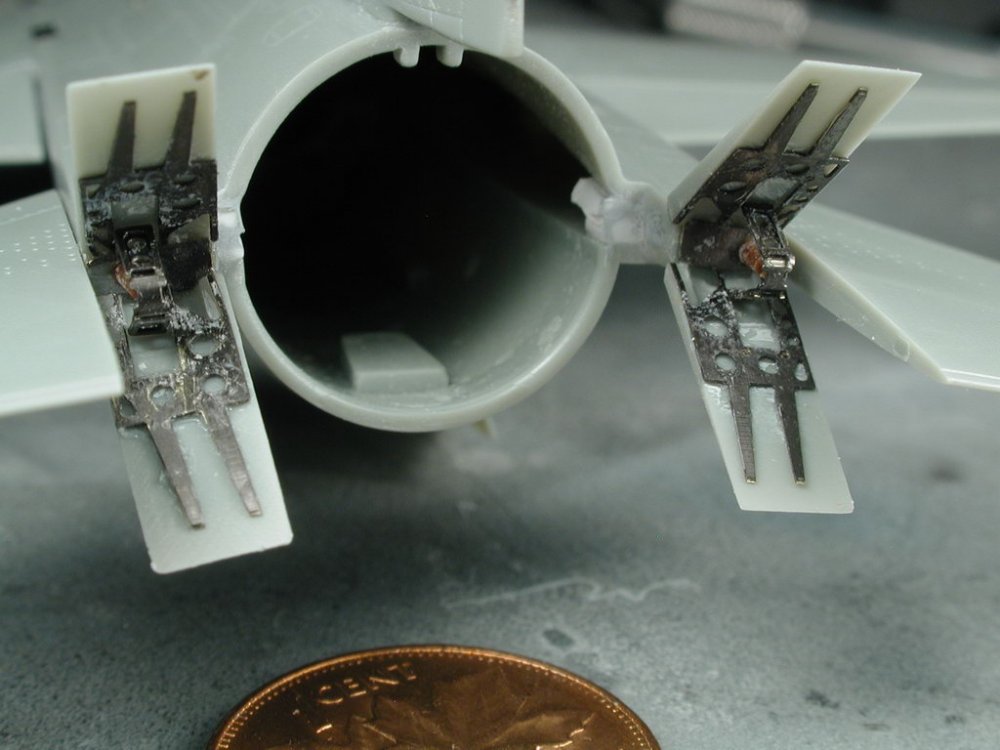
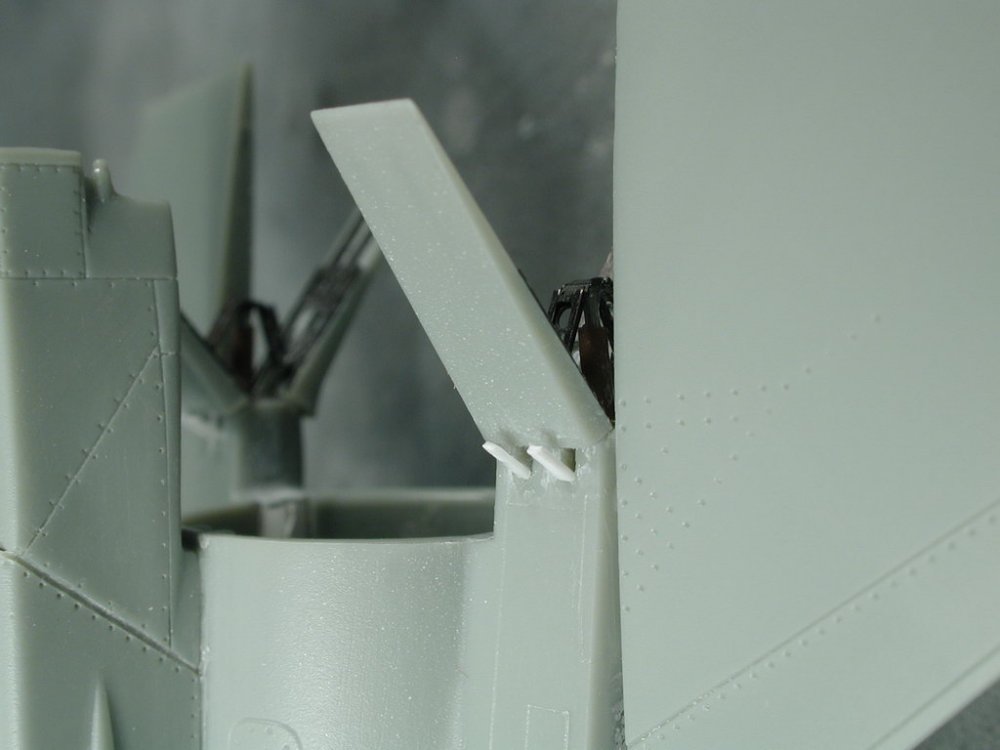
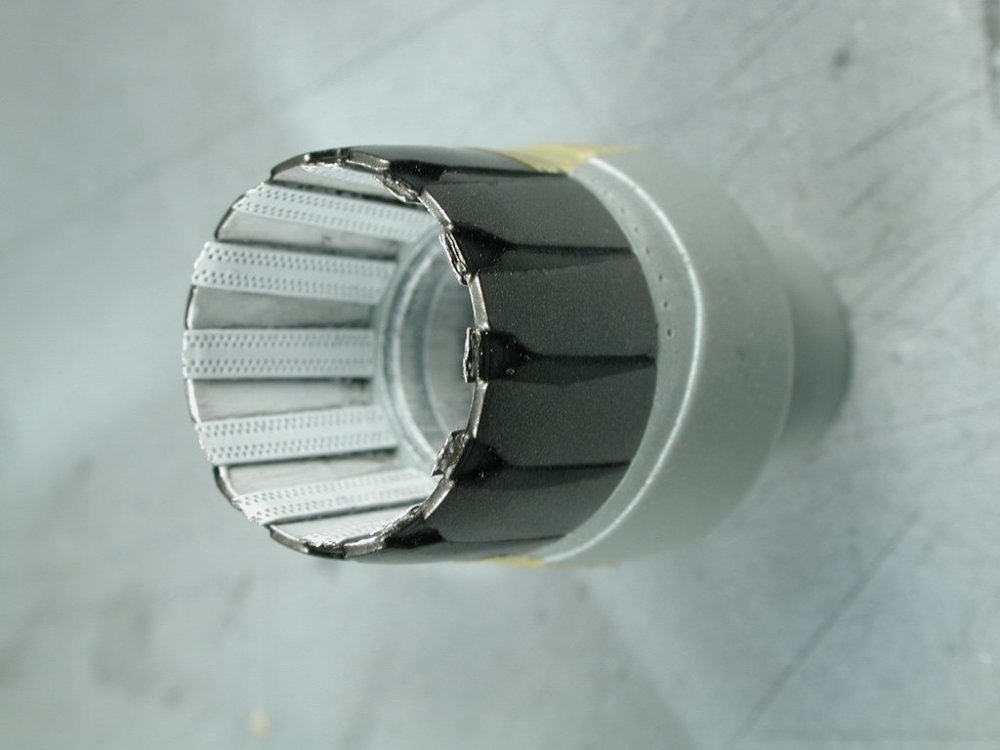
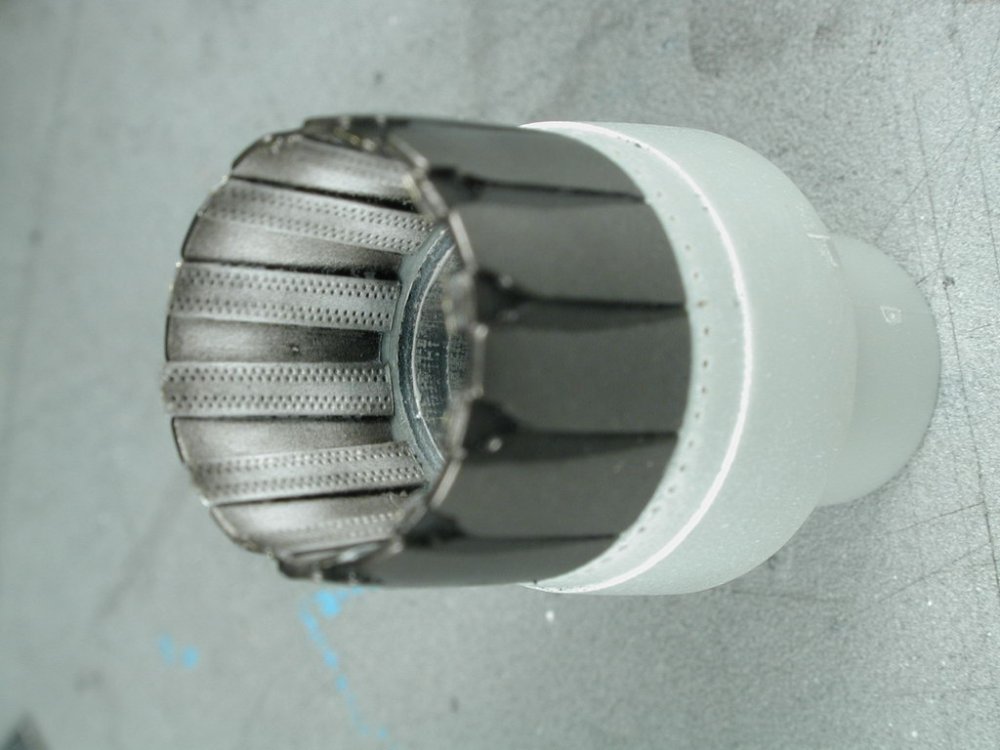
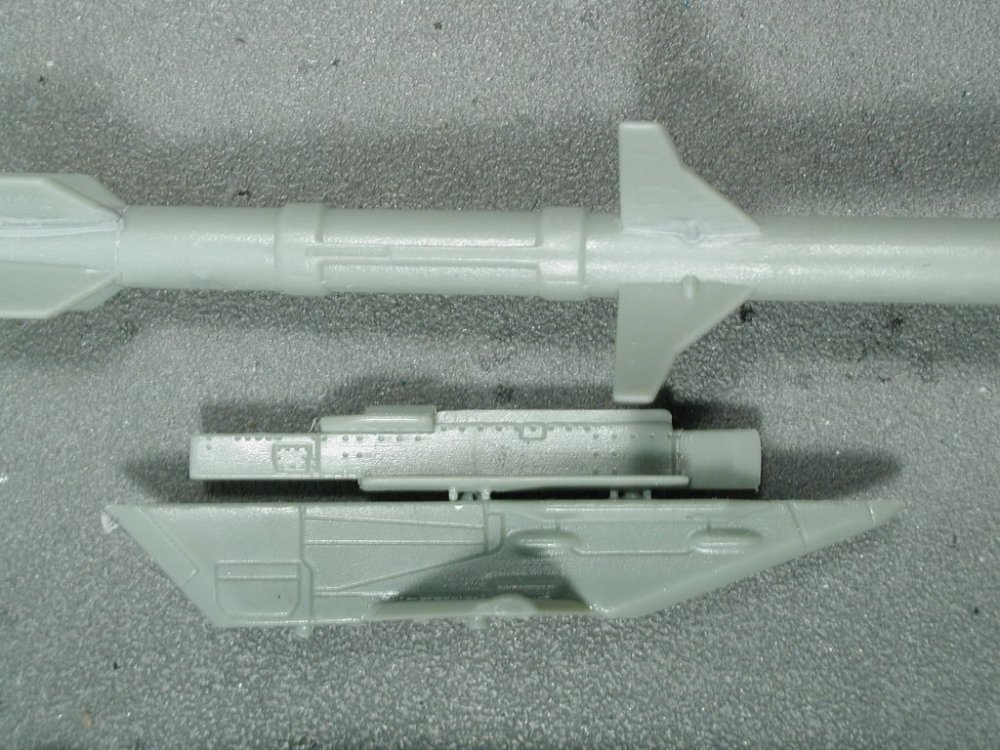
Hi guys, some more updates... Thanks for the info HWK MKII! I'll try to incorporate as much as I can (without redoing too much or damaging what I already have done). Some of the photos here show the exhaust can that I worked on. The Eduard photo-etched kit is for the older Hasegawa kit, so I had to modify the parts somewhat to fit into the Academy kit. I cut off the exhausted turkey feathers and glued them into the interior of the kits styrene can which is molded quite well for a stryrene kit, so its a hybrid thing which looks quite good given how small the part is. This is my planned weapons layout too (for our resident experts David & HWK MKII) Its what I tend to see in the photos online. However I originally wanted the Sidewinders on the wing tips, its seems more aesthetically pleasing to have the missiles diminish in size and mass as we get out to the wingtips. Any comments? Additionally, I started to drill some holes into the pylons (as per HWK MKII's suugestions) - but realized that the forward holes on the HARM pylons have nothing to contact with on the lower HARM adapter thingy? Hmm, I double checked the orientation of the glued part and its correct, I don't have any reference photos of the pylon attachment to the HARM missle do you have any? Thanks for all the info and suggestions so far! Wm (p.s. it really looks better in real-life, or maybe my eyes are just blurring the imperfections together, but all these MACRO photos really bring out the microscopic roughness of the paintjob that isn't seen in real life...) A comment about the kit so far; its really an excellent kit, the best I've but in a while, however some of the engraving is quite shallow so one must take care in sanding, there's a bit too much ejector pin marks for my taste, especially around some of the ordinance which I don't think is too complex that requires so many pin marks, and there seems to be a little over complex in terms of pieces, some really tiny avionics humps and bumps that should just be molded on are separate pieces requiring gluing or the tiny NAV lights on either side of the main intakes are clear pieces, but do we really need the extra hassle at this tiny scale? Sure its great for 1/32, but it all seems un-necessary.


-
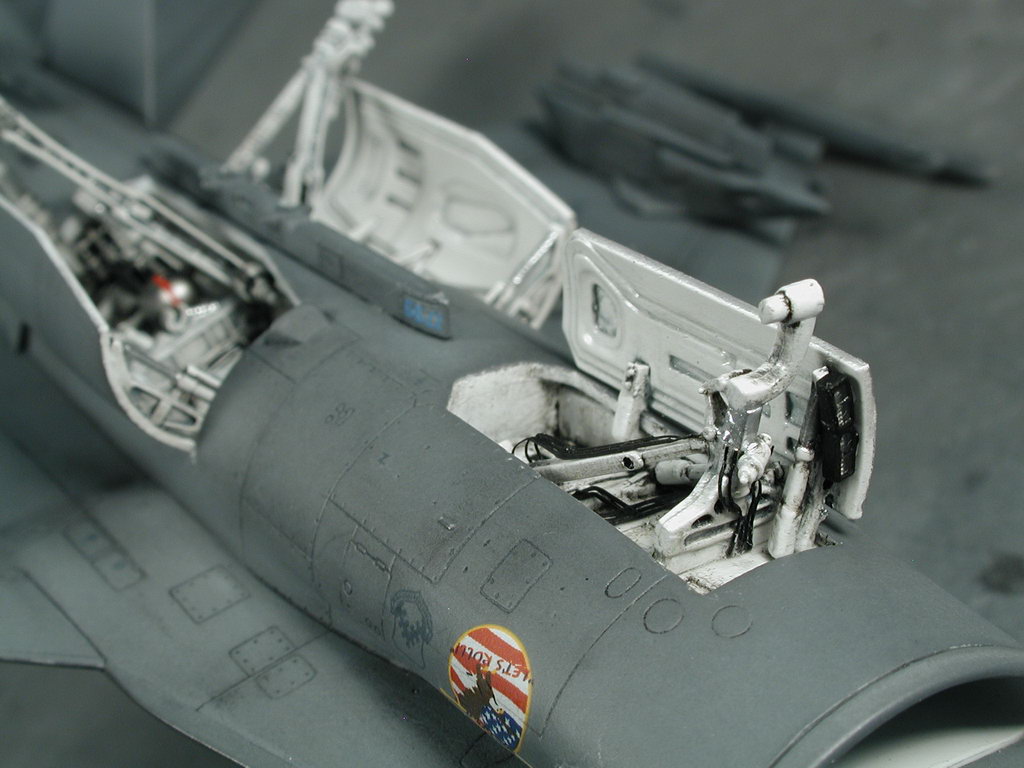
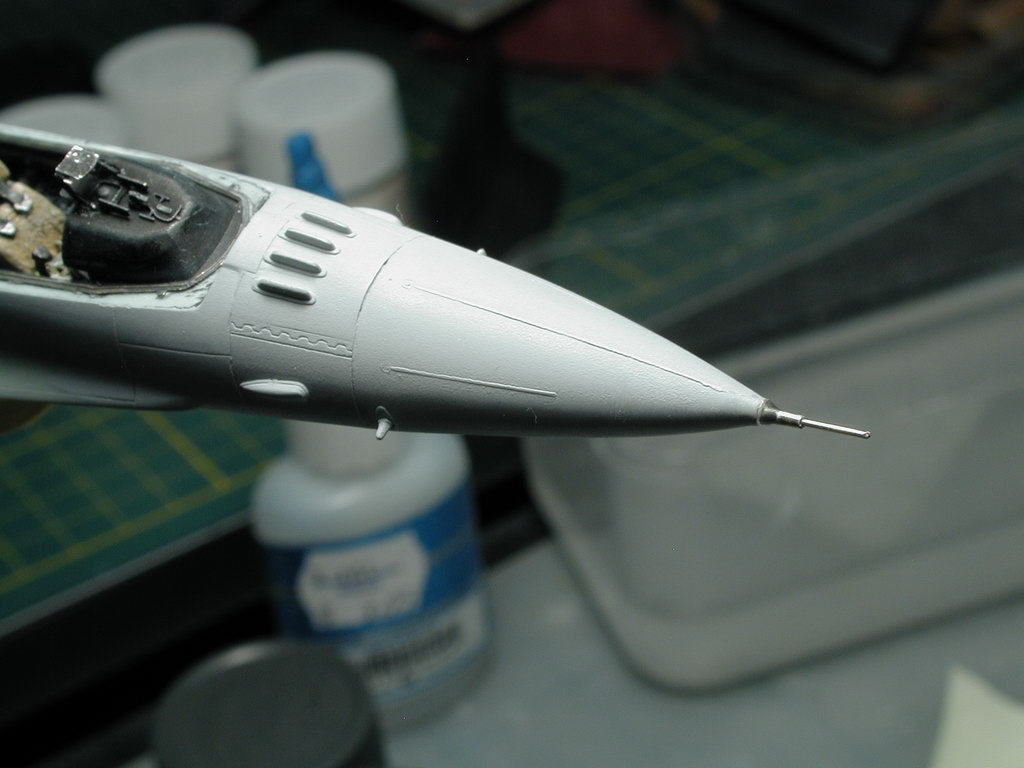
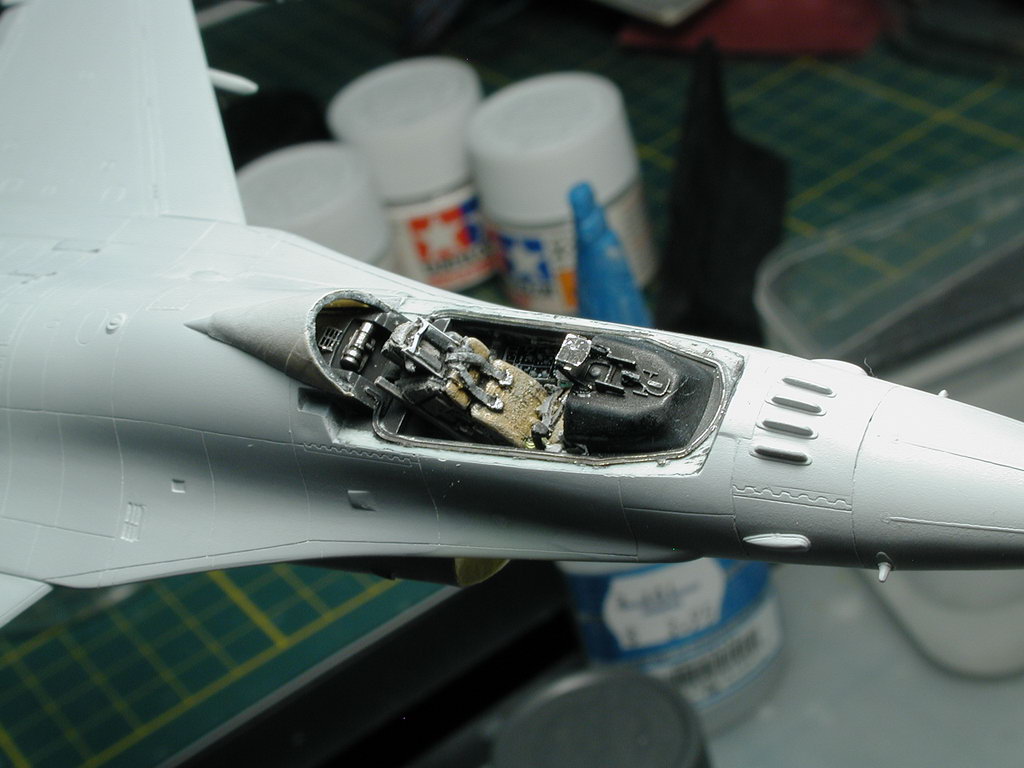
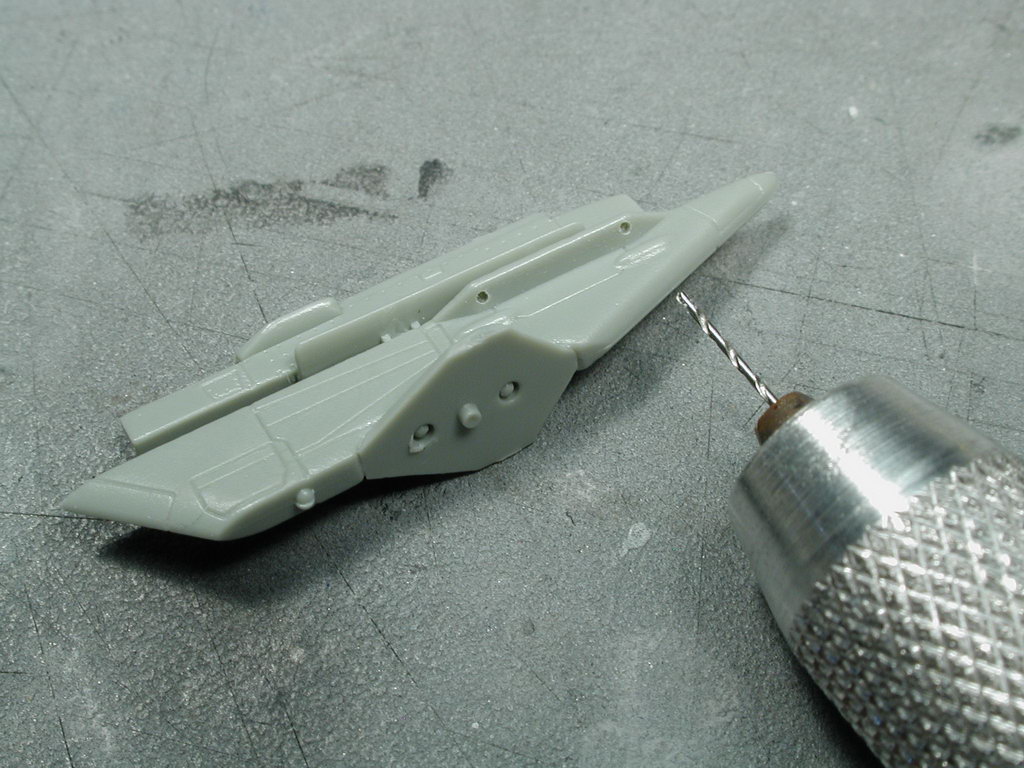
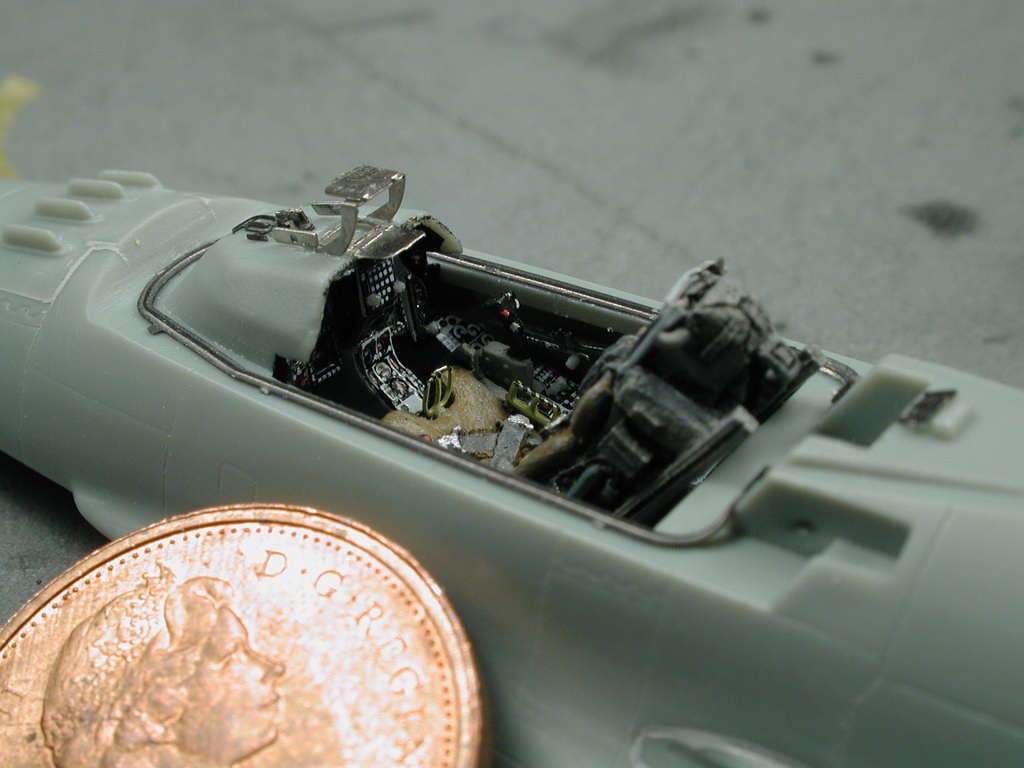
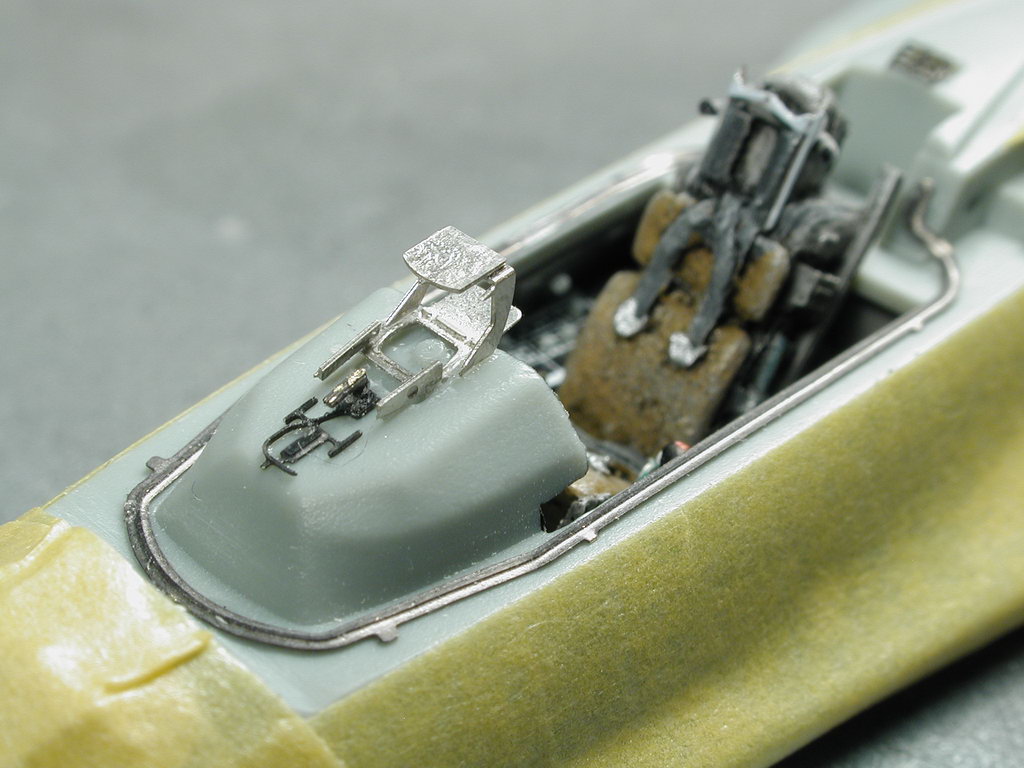
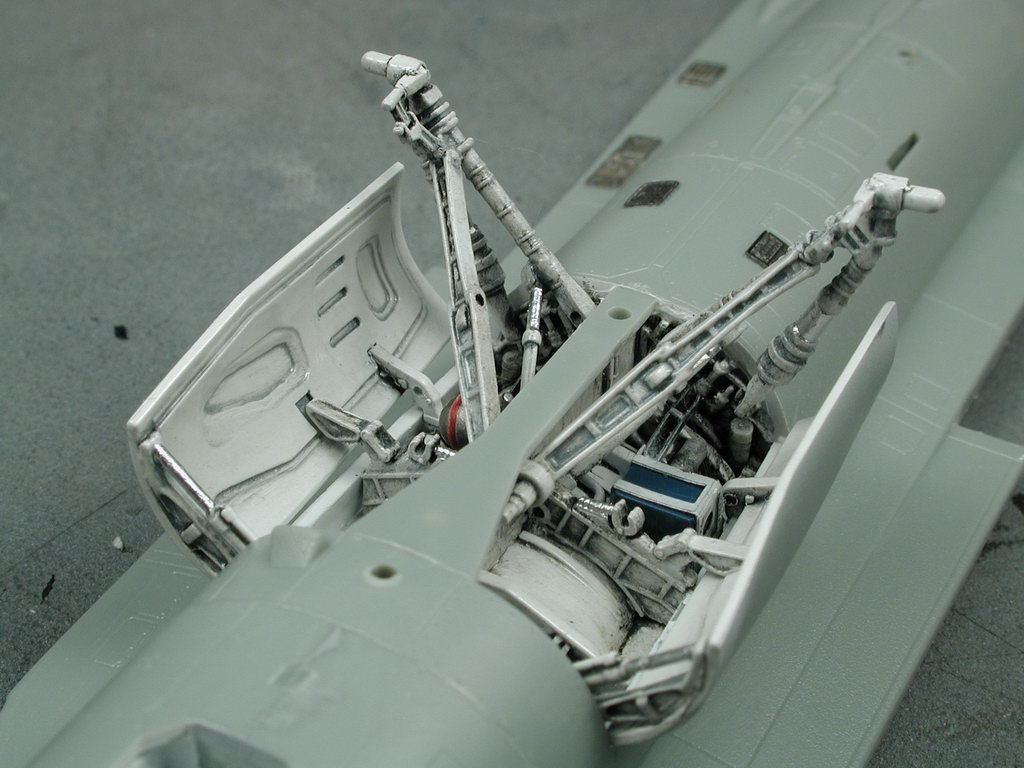
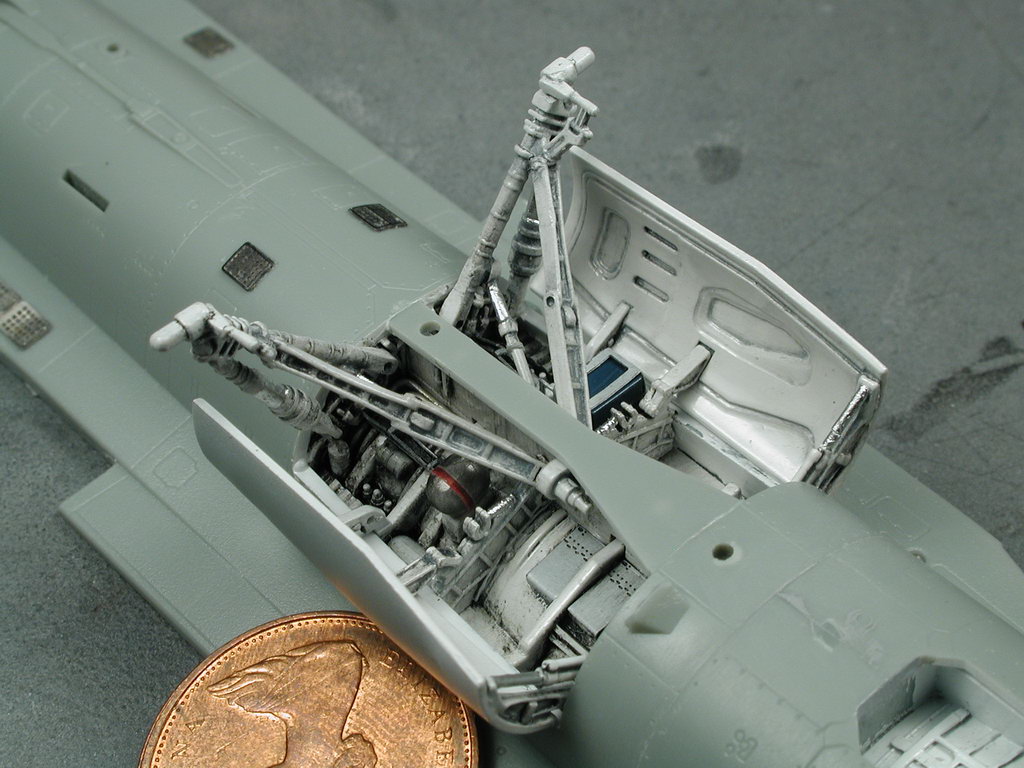
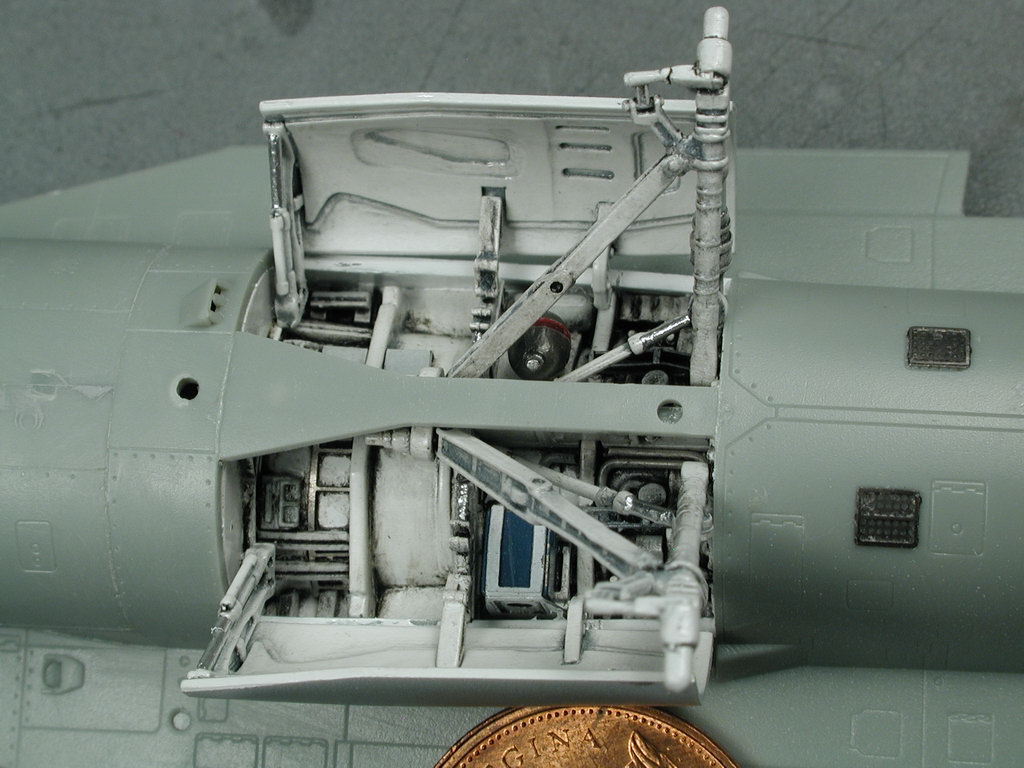
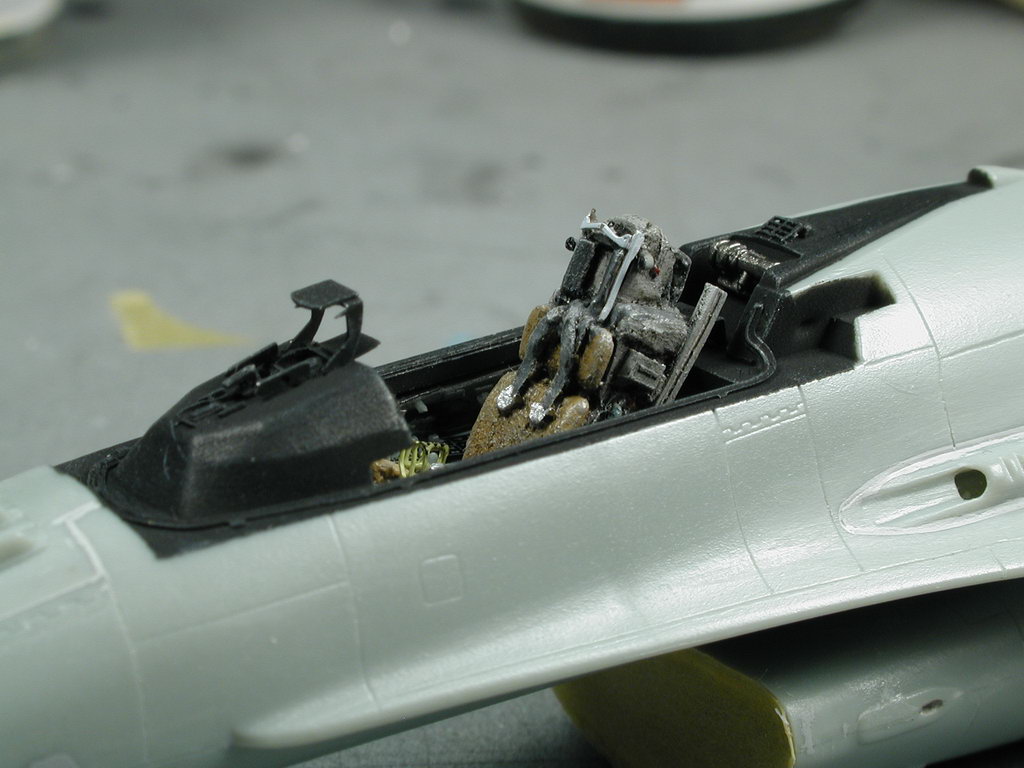
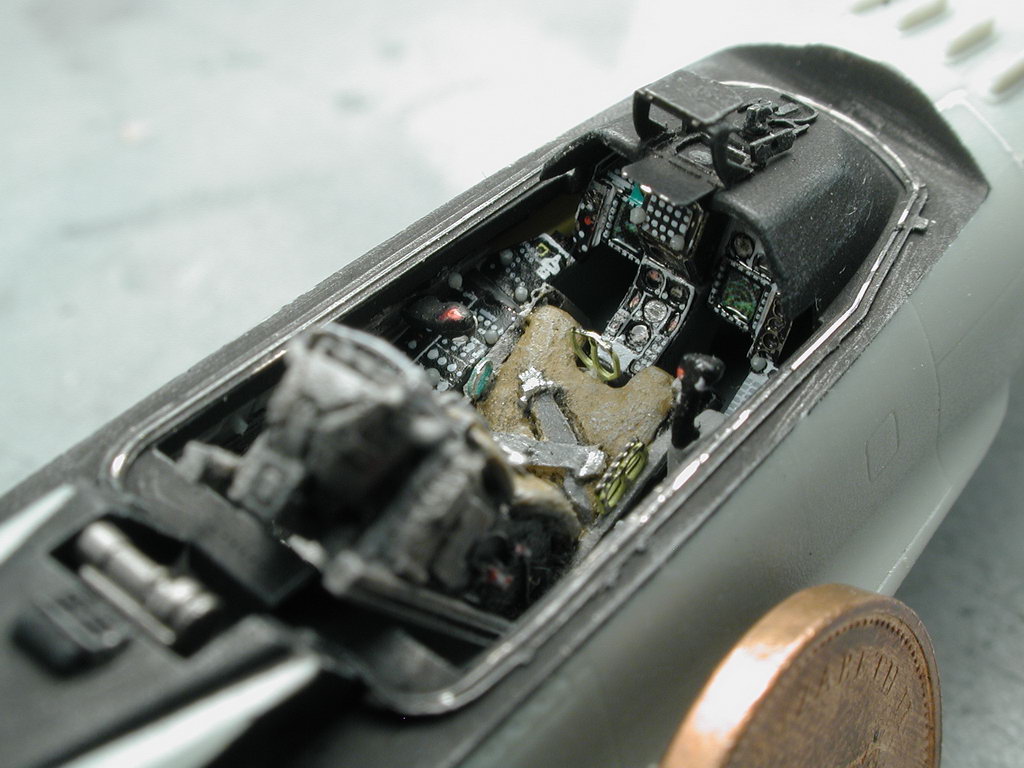
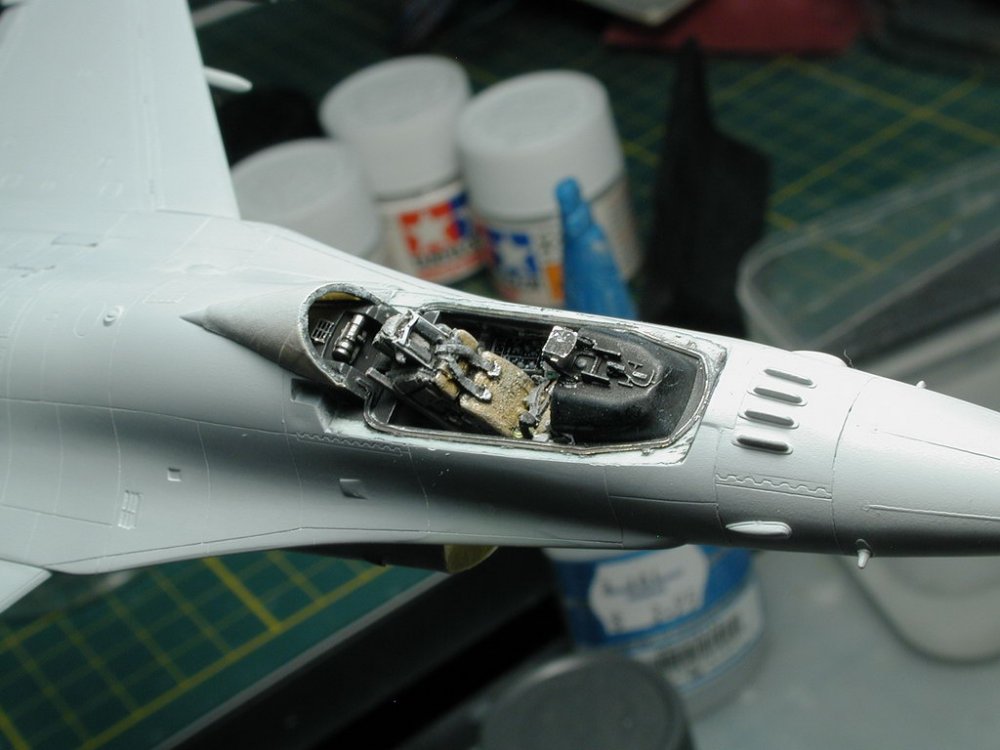
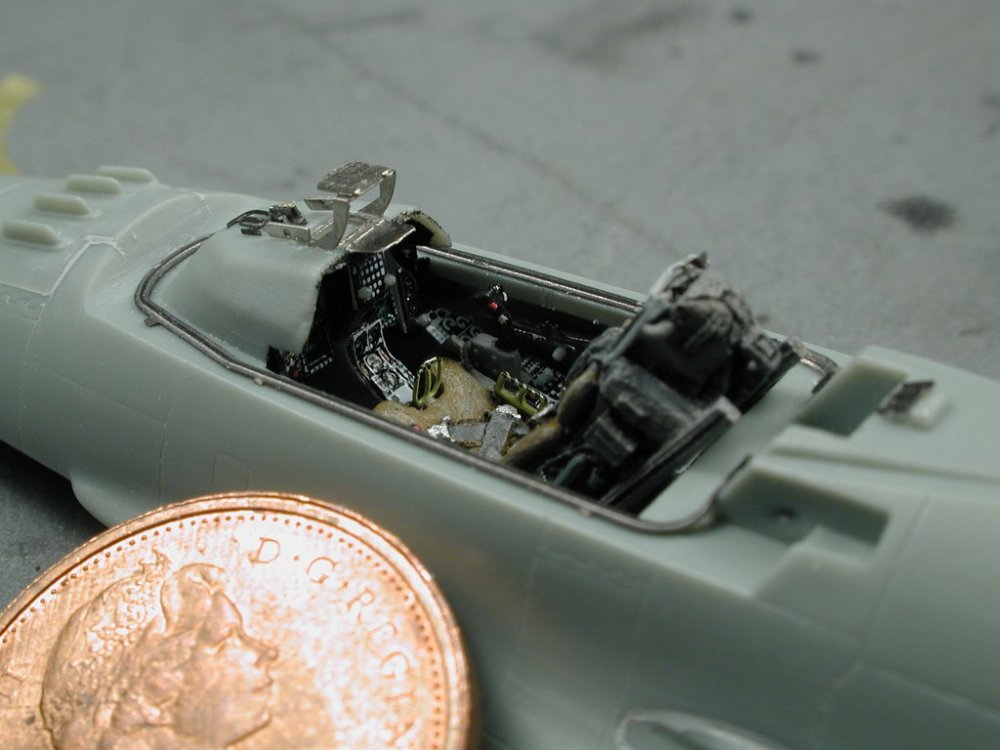
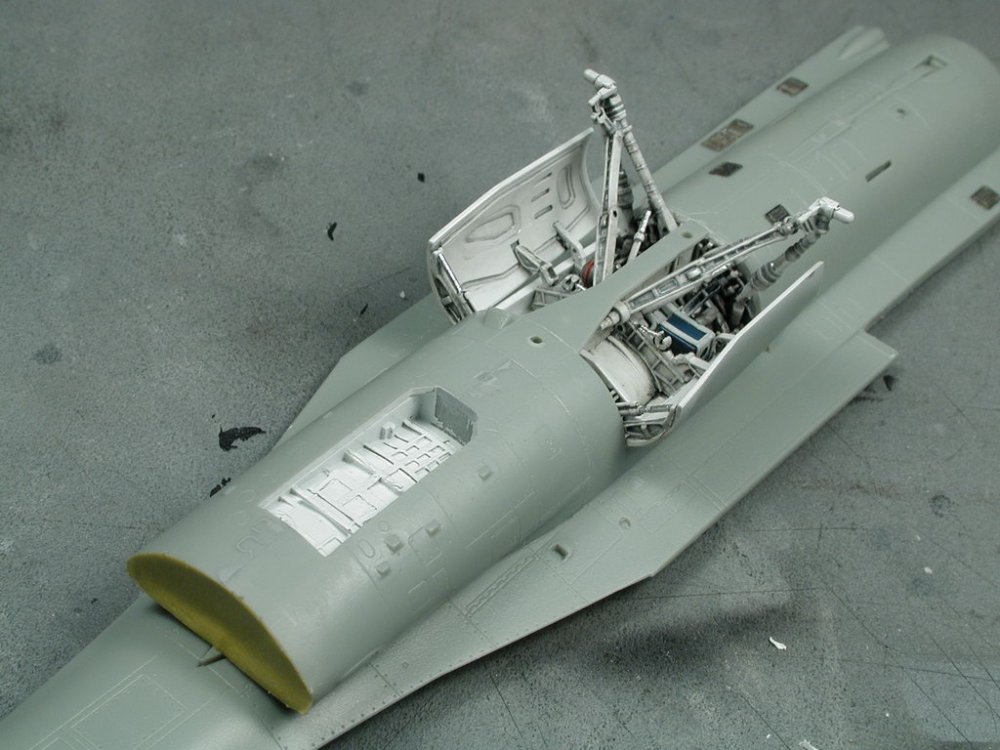
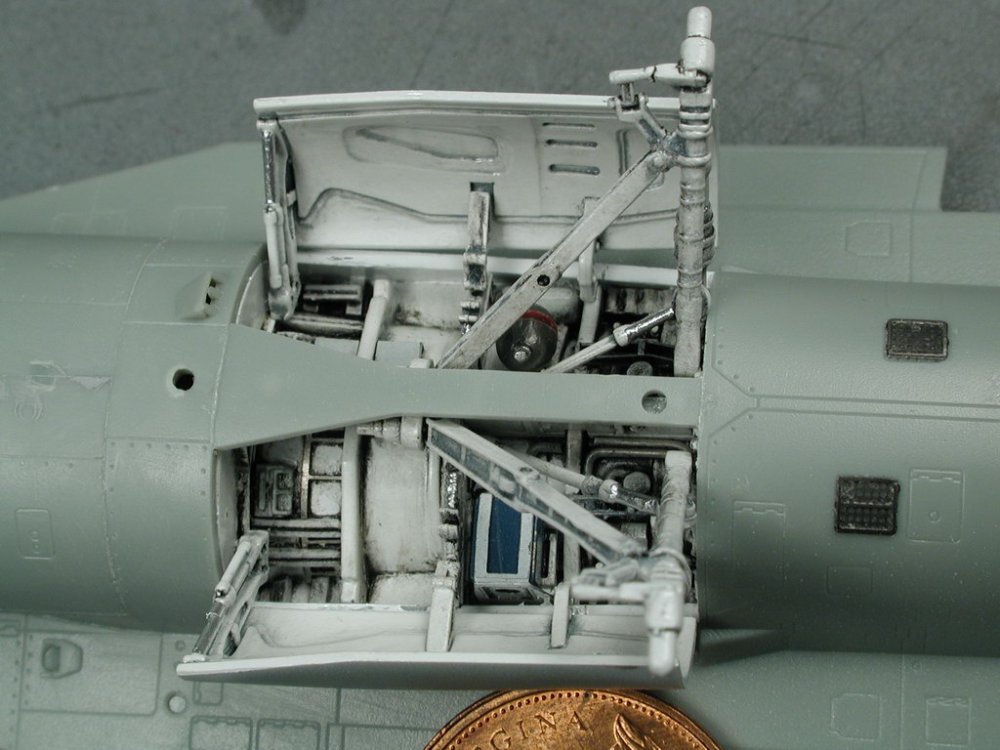
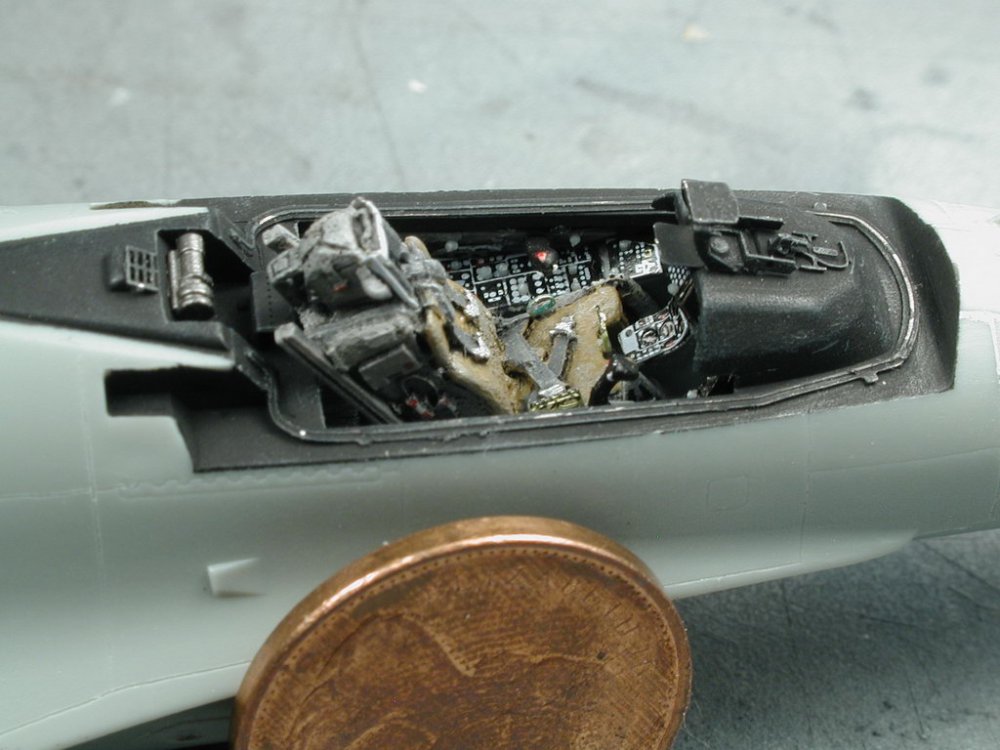
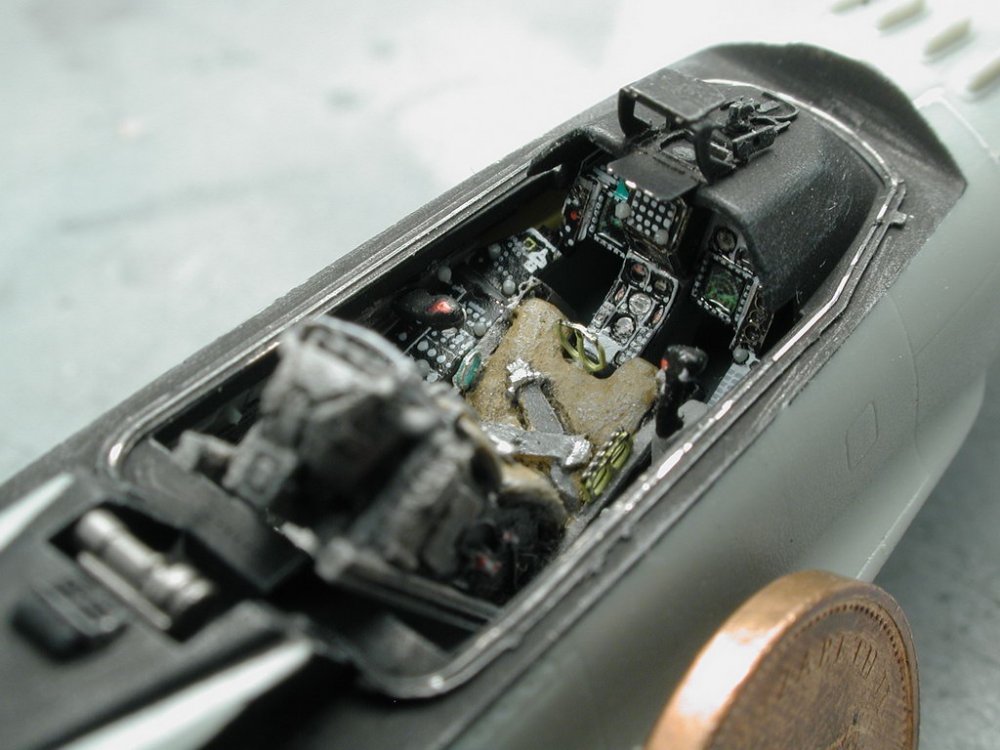
Hi all, I got a little more progress on my workbench... Boy, I'm feeling my age... gettin' old - these parts are so damn small!! I'm really happy about the Eduard Photo-etched kit I got for the F-16 and I'm learning a lot about applying the photo-etched parts to the cockpit. I love the HUD that's built up for the front console and the wrap around canopy gasket. Finally got past that damn intake!! After six separate tries and re-tries, finally got it together and looking decent, but there's still 3 flaws inside, but I've had enough - they will be flaws that I'll have to live with. I've learnt that there's no such thing as the perfect model (its the holy grail) that keeps me building for that hope one day... I've made a major mistake with detailing up the main undercarriage gears now. To get me onto something else other than that stupid intake, I started to work on the gears and got carried away before I started to look at my painting and assembly process. I should of waited and applied these details in the end, it would have been easier to mask a completely bare gear well when I came to painting the rest of the aircraft - oh well, live and learn, thats why I'm practicing in this piece of plastic and not a Valkyrie! So I've left off all the wiring, brake lines and hydraulic hoses till the end after the painting. You can get a sense of scale when you see the penny next to some of the images. Lastly, I just couldn't wait and wanted to paint up the fuselage portion of the cockpit and work the photo-etched parts into the rest of it with a very light bit of dry brushing to bring out the highlights and details. Well, a lot of sanding ahead of me! Finally the fuselage is together.


-
Bandai 1/72 Scale Macross Frontier Plastic Models
wm cheng replied to Graham's topic in Hall Of The Super Topics
Well, these seem to be a step in the right direction, at least the plane mode seems somewhat better than some of the prototype photos (not great, but the nose and canopy seem more in proportion to the rest of the plane). -
Thanks guys, I won't go into a step by step on this one... Its not really Macross related, plus I just want to get it done in what little time I can carve out for it! Thanks for the kudos and interest though. I'll periodically post any snaps I get as I get a chance. You can find info about Rosie the Riveter here; http://www.largescaleplanes.com/reviews/No...er/riveter.html Additionally I've found a cheaper alternative here (although I don't know how good it is); http://www.ares-server.com/Ares/Ares.asp?M...ct&ID=15200 Actually now doing a little research on it, I've also found a Hasegawa alternative; http://misc.kitreview.com/tools/rivetmakerreviewjh_1.htm They do get some getting used to - I practiced on a spare piece of styrene until I got the hang of it, but I still made a few mistakes which I had to sand over and fill with Mr. Surfacer to redo.