wm cheng
-
Posts
4346 -
Joined
-
Last visited
Content Type
Profiles
Forums
Events
Gallery
Everything posted by wm cheng
-
Thanks Dangard Ace, Never heard of HAWX, but it looks ok - has anyone here tried it? Might be worth the download. I wonder if it will work with the Ace Combat HOTAS system?
-
Is any hope of Ace Combat for PS3 dead? I haven't heard anything in so long. Is there any good Flight Sims for PS3?
-
 Wow! Great work everyone!! please keep posting, I'm amazed how much building everyone is getting. I can't even seem to finish my first one?! The best thing about this Bandai kit I feel is that its gotten a lot of potential modelers or toy enthusiasts building - which is great! I hope to get back to my model... someday, when the schedule of life permits... ;-(
 -
HAHA! I love it!!!
-
Its rock solid stable - no loss connections at all (I do have a wired Ethernet connection to the router though). Best part is that its able to stream DTS and DD 5.1 to the PS3 which was previously downmixed to Dolby Surround. I have it streaming 1080p MKV files with DTS 5.1 to my 100" screen in the basement being projected by a Panasonic PT-AE2000 (1080p) projector and the picture quality is almost indistinguishable from blu-ray!
-
Or try PS3 Media Server (I was using TVersity before, but this is much better!) http://code.google.com/p/ps3mediaserver/ Even supports folder.jpg and video file coverart. Plus it plays way more different formats.
-
Thanks alfye for posting those links, Upon studying the pictures and assembly instructions, I am quite disappointed with Bandai's design - essentially it seems obvious that it was an afterthought with the amount of disassembly and parts replacement involved. Just as the way they chose to break down the parts and assembly process of the Vf-25 itself, my painting and masking is painfully slow since I have to constantly break things apart and have other steps wait for the paint process (unlike Hasegawa who always breaks down the model with the modeler in mind and the steps required to paint and finish the kit properly). They are definitely not a modeler friendly company, they just want you to snap the parts together without paint like a toy. (they just want to produce toys without paying for the labour of someone assembling it first! argh) For anyone wanted to do more than that, they certainly don't make it easy! Personally, it has put a real damper on my very slow build of my VF-25 and according their instructions (its pretty frustrating to do properly), I may have to pry apart quite a few parts which I have glued together and filled and sanded away the seams. I hope that once I get the kit itself, I may be able to improvise some other alternative way of attachment of some of these pieces. Rant aside, its an amazing design (but that's not to credit Bandai) and will look fantastic when completed. The up-side of Bandai making these kits is that they have lured a lot of other people that would otherwise not build a model to start building something - and that's always good for the hobby. Plus you get a pretty decent looking toy for not much effort. I just wished a "real" model company like Hasegawa were to create Macross Frontier kits as well that were a little more friendly to build and finish properly. I'm just mad I have to probably undo so much of what I've done already to accommodate these packs ;-( (the real kicker is that I haven't done that much, its just what little I've done seems to be in the way of the packs - argh...)... just another thing to deter me from finishing it up!
-
I'm so glad someone re-surfaced this thread! I never caught it around the first time (daddy-hiatus!)... But WOW! Fantastic builds, they look absolutely beautiful. Keep up the great work and keep posting, it gives me my modeling fix even though I don't have time for anything right now. I absolutely love the VF-4! Love the canon scheme.
-
Wow! congrats Cool8or... what a fantastic collection. How could I have missed this thread... oh, yeah, my daughter was 1 year old when this thread started, so I was on a bit of a daddy-hiatus last year. Anyways, fantastic builds... I'm so glad you're building and enjoying your beautiful collection (instead of hoarding... hmm, I have too many things un-built ;-( Keep up the great work and I look forward to many more picture intensive postings! p.s. where did you get the decals for John's Pod? mine didn't come with decals...
-
Fantastic work so far KyeKye! Thanks for posting a WIP too, now I can get my fix too! Haven't had any time to work on mine yet, but this will do... I love how your last VF-25 turned out, keep up the good work. All these little details really make a huge difference.
-
1/72 Bandai VF-25F Messiah build-up step-by-step (sort of)
wm cheng replied to wm cheng's topic in The Workshop!
Nope, I didn't prime the parts with gloss black, however, they do look a lot better if you did that. Not even onto primer (which is recommended too) - I was in too much of a rush, it still turned out okay. With the Chrome or Polished Aluminum you must prime with gloss black first, but these darker colours (Steel & Dark Alumn.) you can get away with it if you're as lazy as me ;-) Yeah, I was thinking of the canopy and going that route, but it will be so much more sanding (I hate sanding more than anything else!) and polishing, I haven't decided yet. I originally planned to open up the cannon exhaust ports, but I got cold feet, I wanted to see if it would affect transformation first, then I got lazy... The biggest deal breaker for me is that I would have to thin the plastic down around the port openings so it would look like an aircraft skin in scale, the holes is easy, its thinning the surrounding openings evenly that is the trick to making it look "real". Its whenever you can see the thickness of the plastic that throws you out of the illusion of scale. Its not out of the question yet. Thanks for the vote of confidence on the decals, my painting skills aren't THAT good - plus I'm just not into self torture! ;-) I LOVE decals, and I would use decals for everything if I could (I used decals for the Hasegawa VF-1's tailfins, that's how lazy I am!). I wished we had decals for the canopy frames - Hasegawa spoiled me! Lastly, I don't think it's a vent in the picture, just some panel detail that I wanted to make silver (personal preference license). With all the metallic details hidden in the aircraft mode, I thought this was a good opportunity to liven the upper surface up a bit. Sorry, no update this weekend... Happy Chinese New Year!! -
AHHHHH... Argh!! SH$#!... sucks cause I just filled and sanded some seams, I just hope you don't have to take the shoulder cowling apart. I think that's the only area of concern for those of us trying to get rid of seams. I can't imagine any need for the forward nose cone to be touched, the forearms or the back of the knee joints. Any news about the actual parts that need to be disassembled would be greatly appreciated.
-
1/72 Bandai VF-25F Messiah build-up step-by-step (sort of)
wm cheng replied to wm cheng's topic in The Workshop!
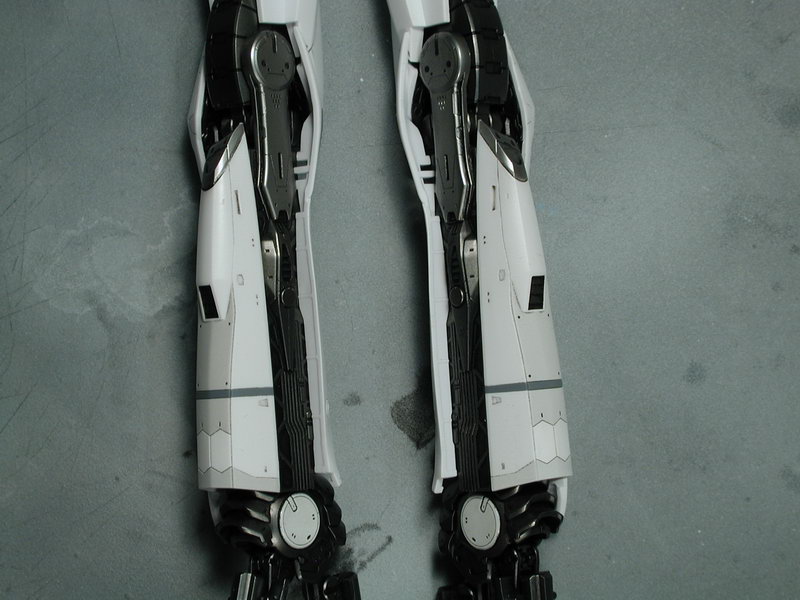
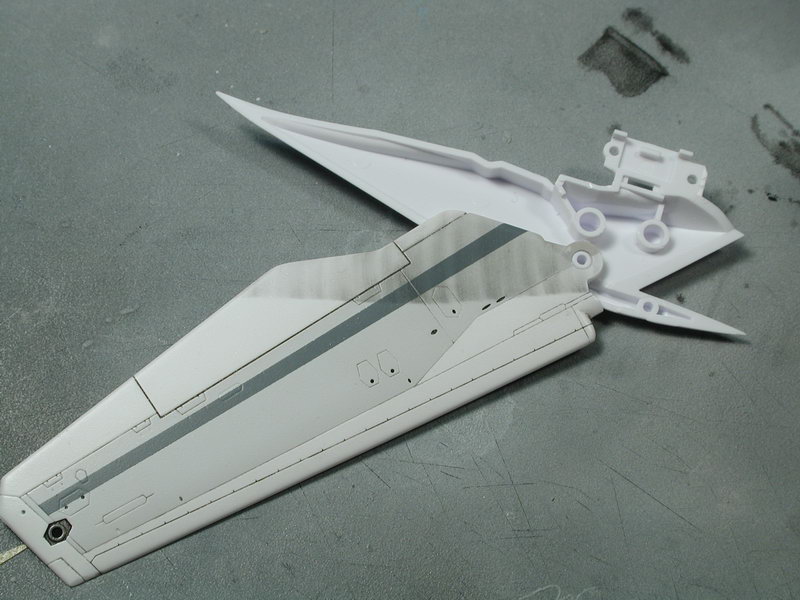
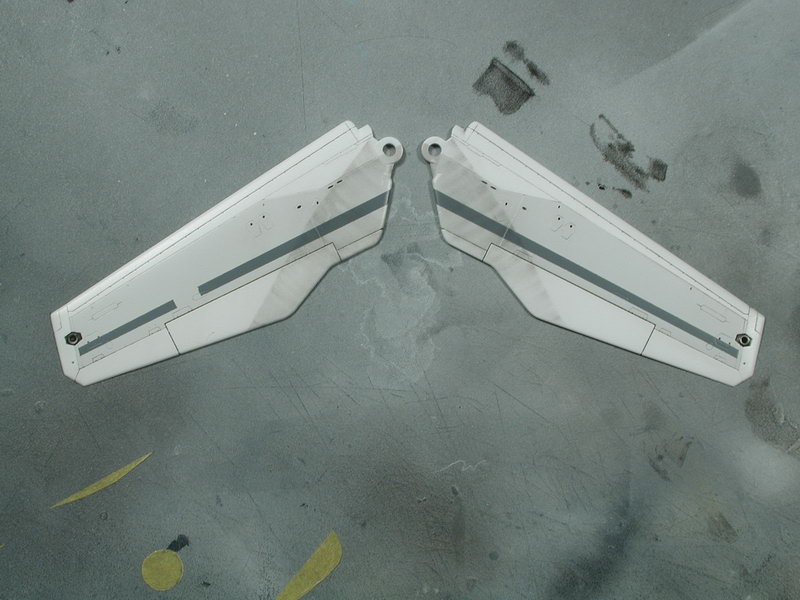
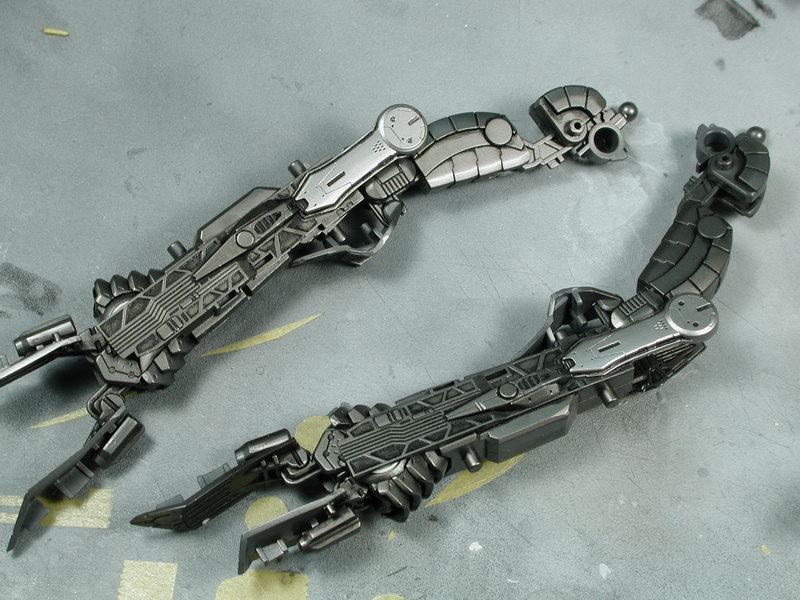
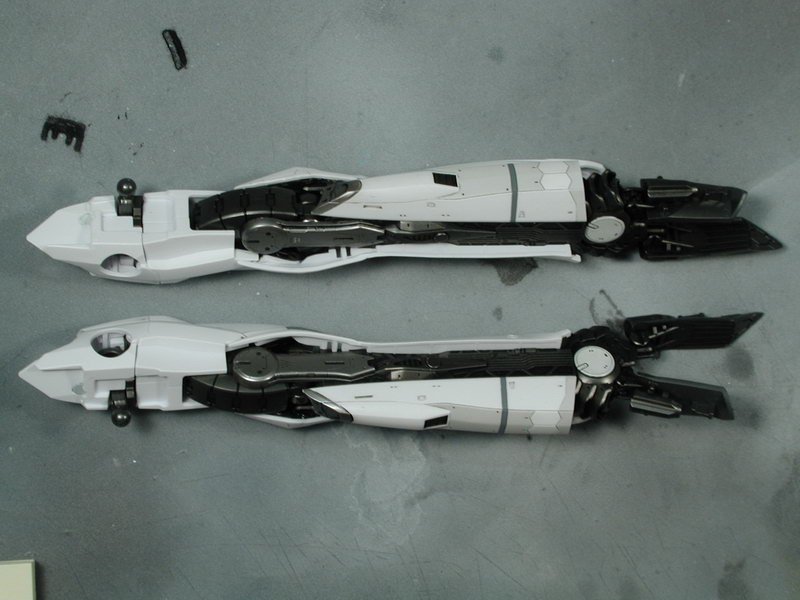
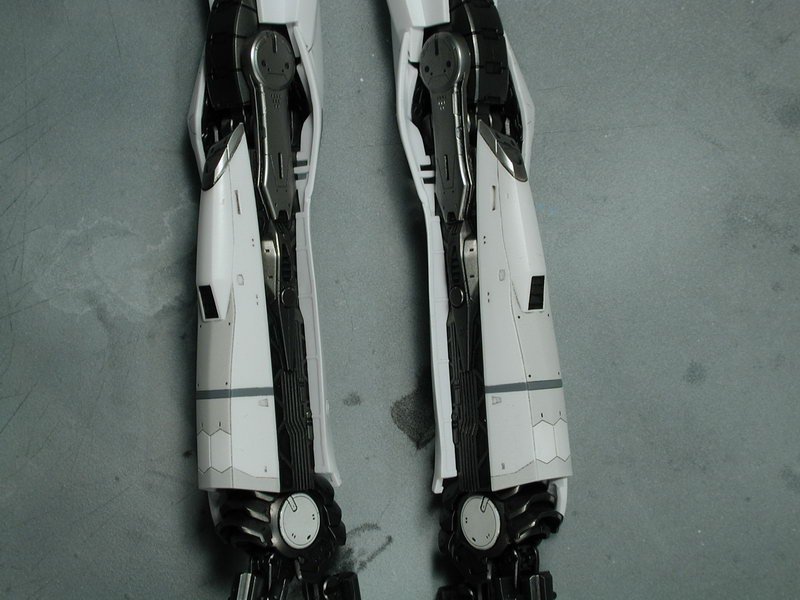
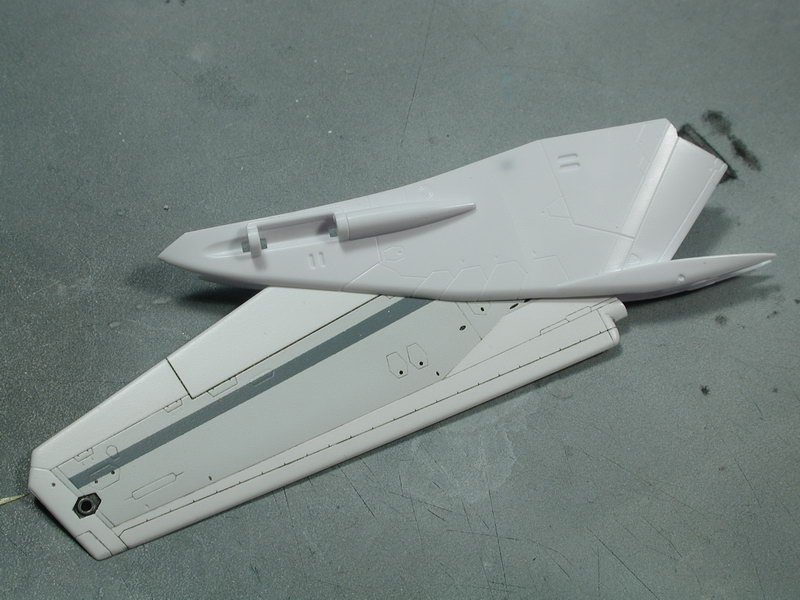
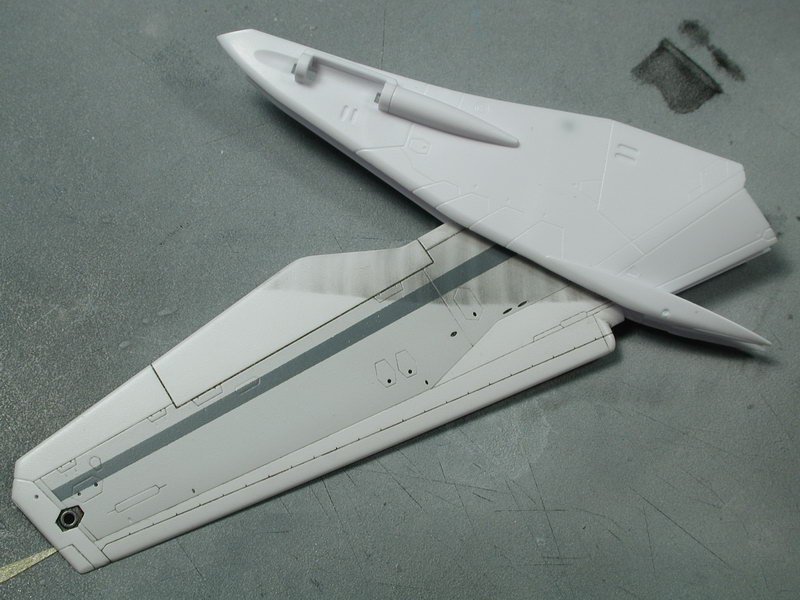
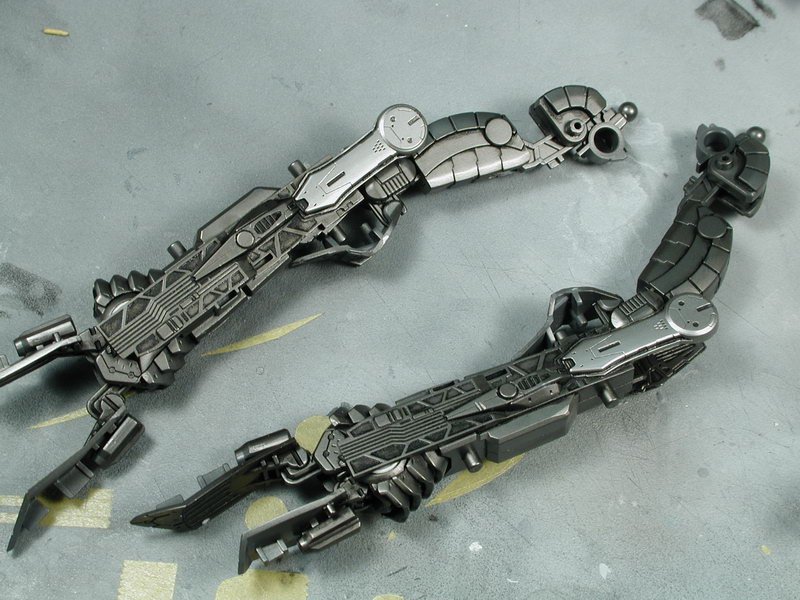
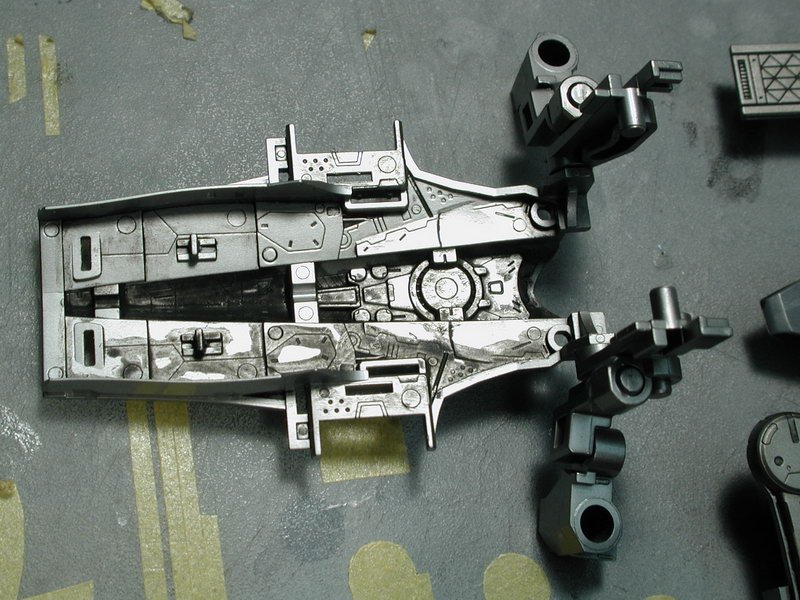
Lastly I started to re-assemble some of the leg pieces back together again to gauge the overall effect. The metallic steel on the leg split doesn't appear so dark in person, I think its the camera trying to adjust for the stark white panels so I took two exposures, one for the metal insert details, but the white details got blown out and another shot for the white panel details with all the subtle white panelization, but the darker metal insert details went too dark to see anything. There might be a bit too much contrast between the two, as the anime has it as just a medium grey (although anime has never really been able to portray a good metallic sheen yet) so I don't know if I'll do anything about it yet. I just enjoy seeing the pieces together for now, I'm liking how the arm is coming together. And I thought the wing swept areas were a bit dark, but I was counting on the stark high-contrast black decal stripes to offset the dirtied sweep areas. I think with the heavy bold black stripes next to the weathered sweep areas are just about right in terms of intensity. So I sealed it all in within a rather heavy clear coat again (to help protect the weather and the paint beneath from chipping - I think I've lost count of how many clear coats I sprayed on thsi plane, I'm obsessed with not wanting this model to chip! but I think it will be a lost cause!!). That's it for now... next steps are to mask the black areas and spray those as well as tint the canopy and sensors purple so I can start to assemble the fuselage together. And of course finally assemble the two wing glove areas to glue them in place and fill and sand the seam there so I can paint those as well. Its so awkward to assemble it this way, but its the only way Bandai has forced us to completely paint the wing and stripes and decals before the inner wings gets hidden away inside the wing glove slot.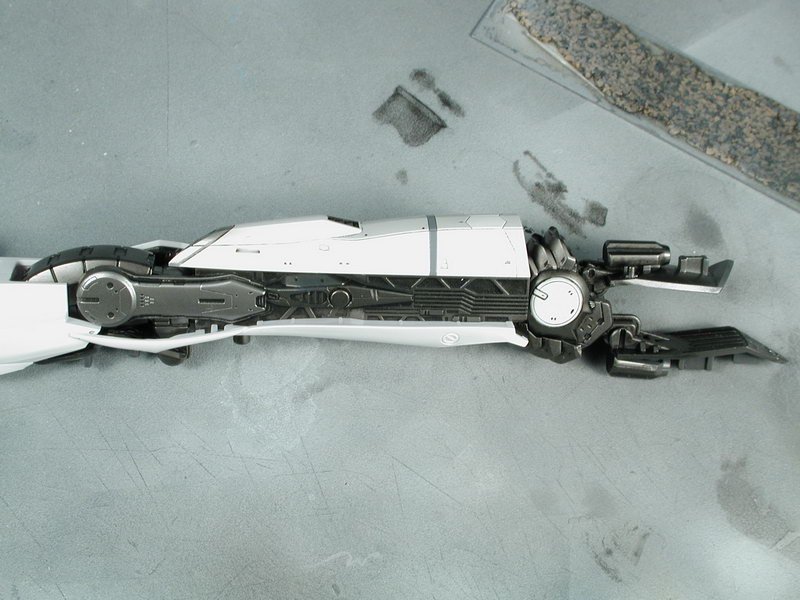

-
1/72 Bandai VF-25F Messiah build-up step-by-step (sort of)
wm cheng replied to wm cheng's topic in The Workshop!
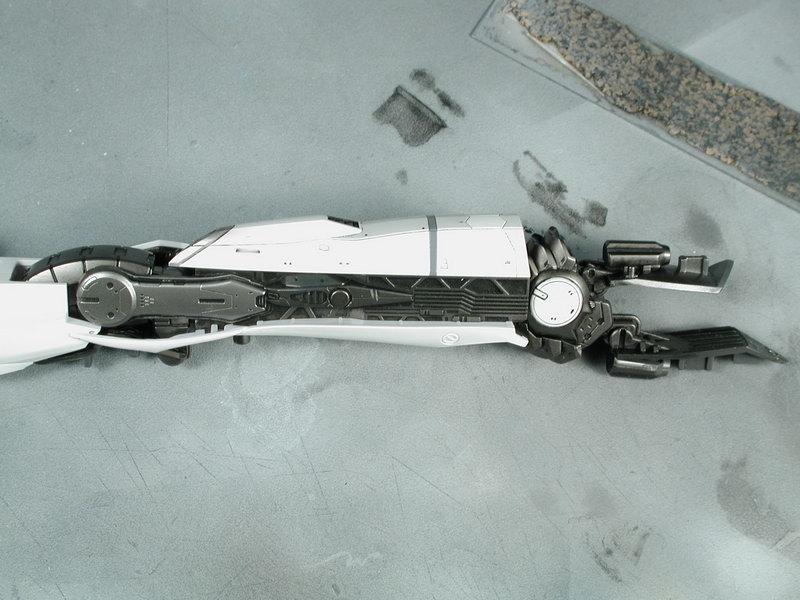
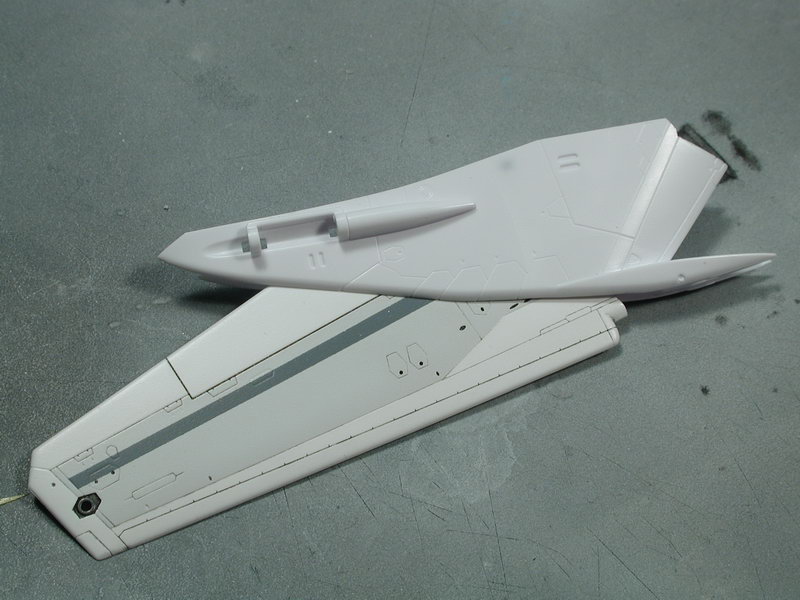
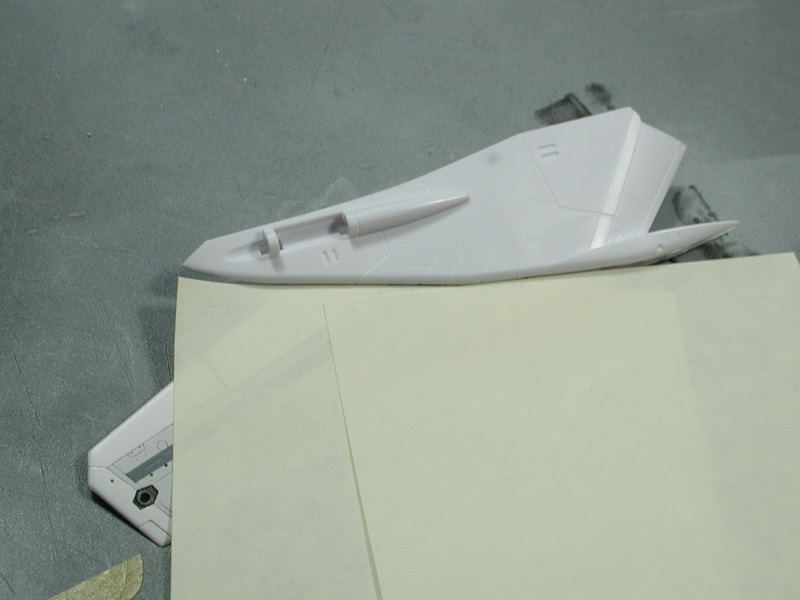
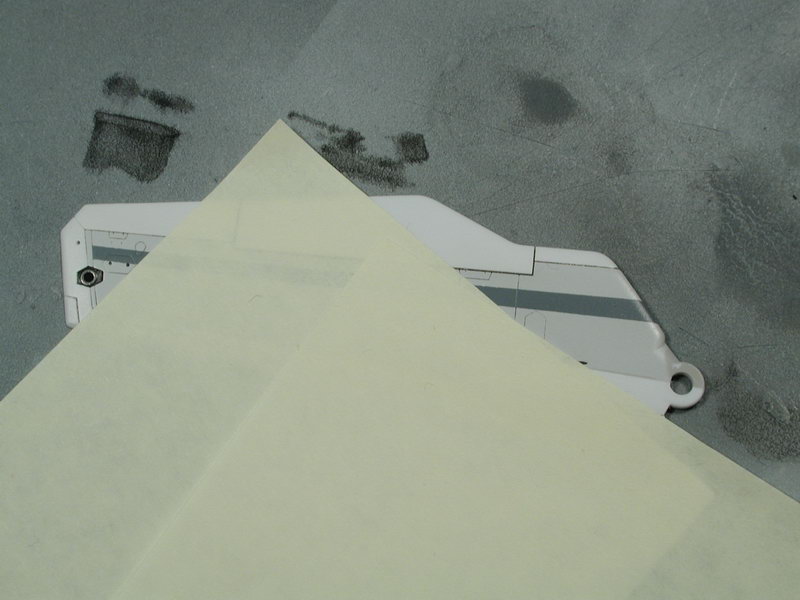
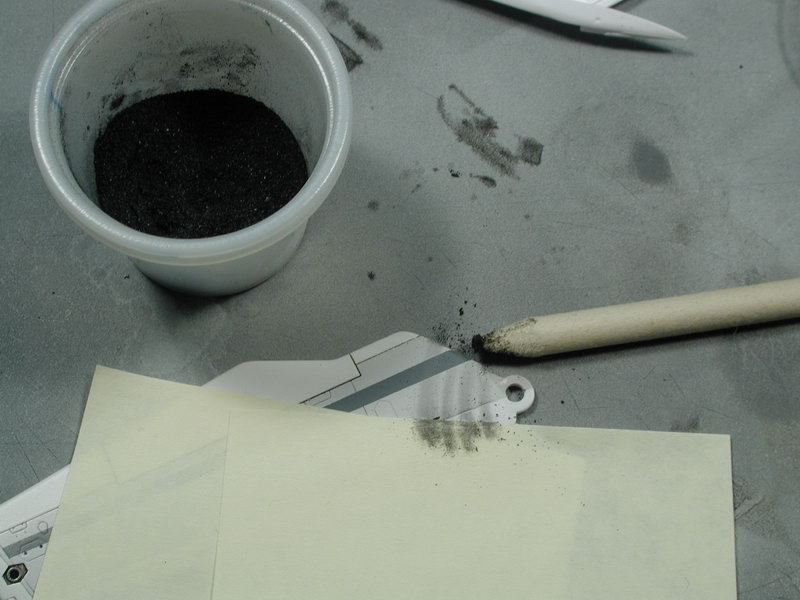
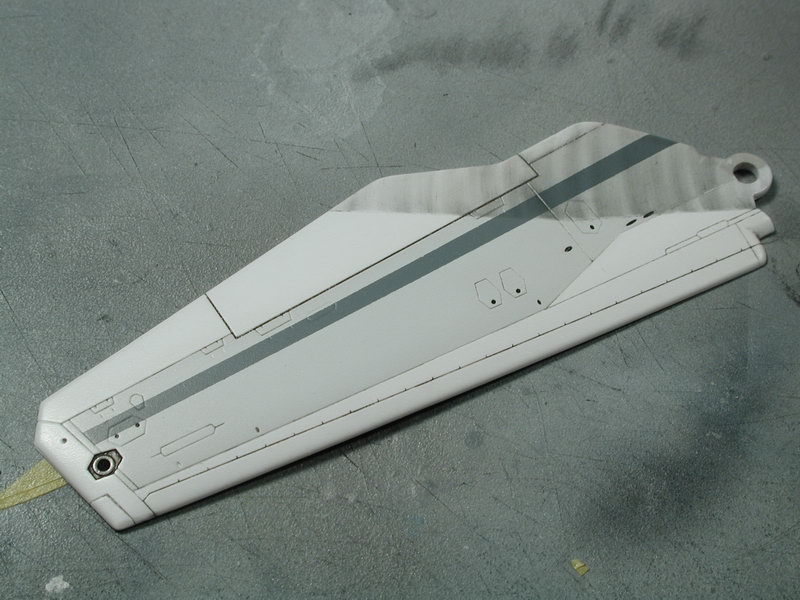
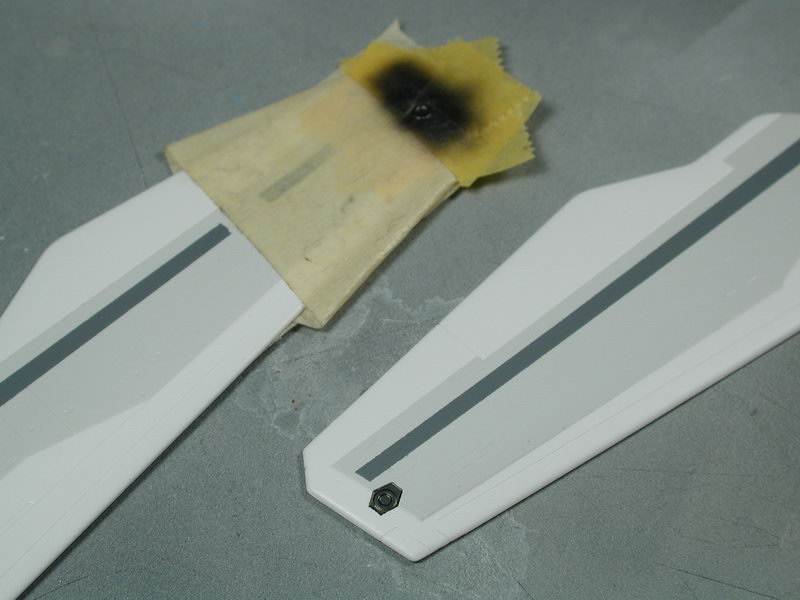
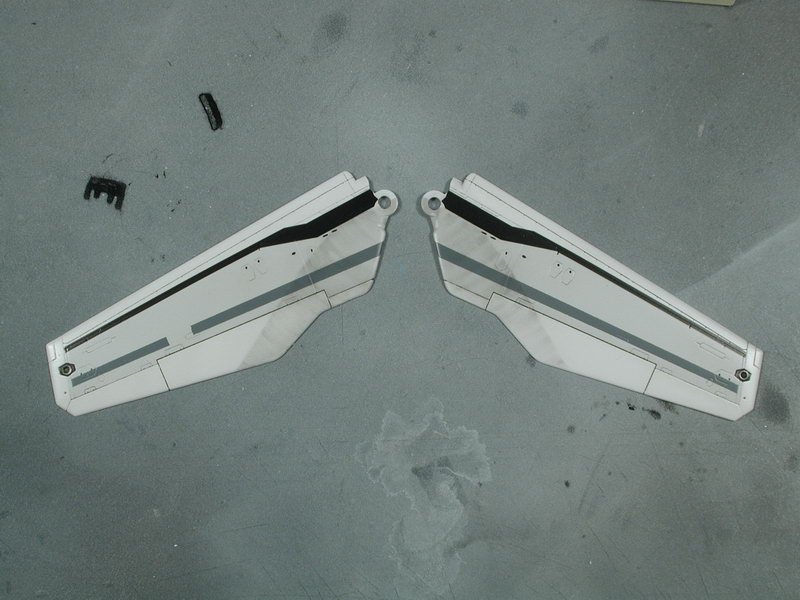
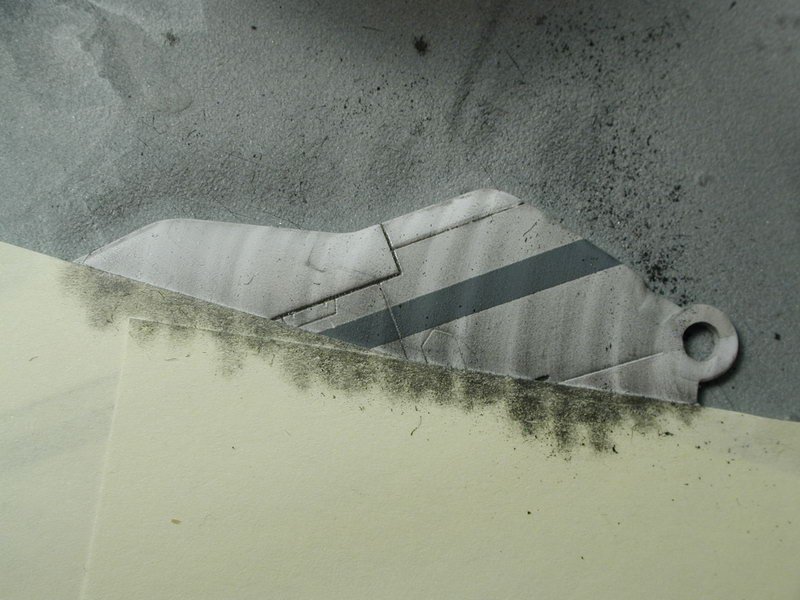
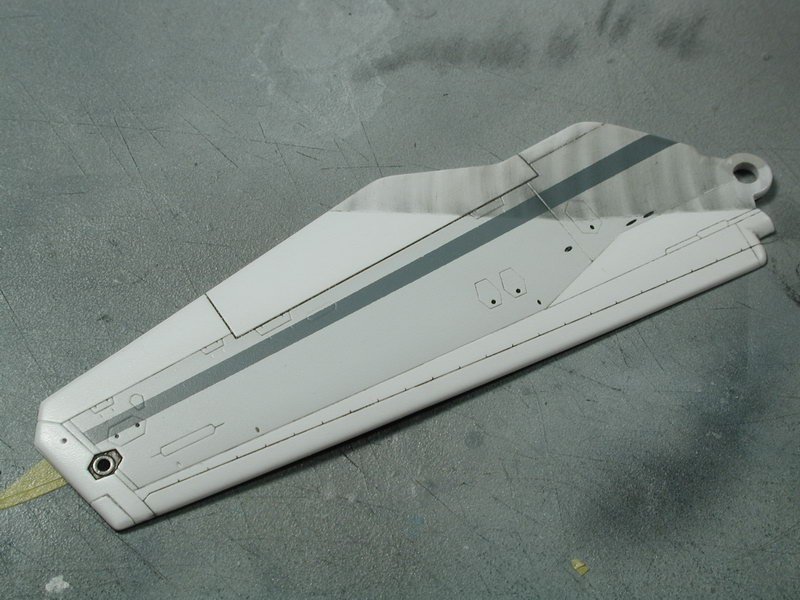
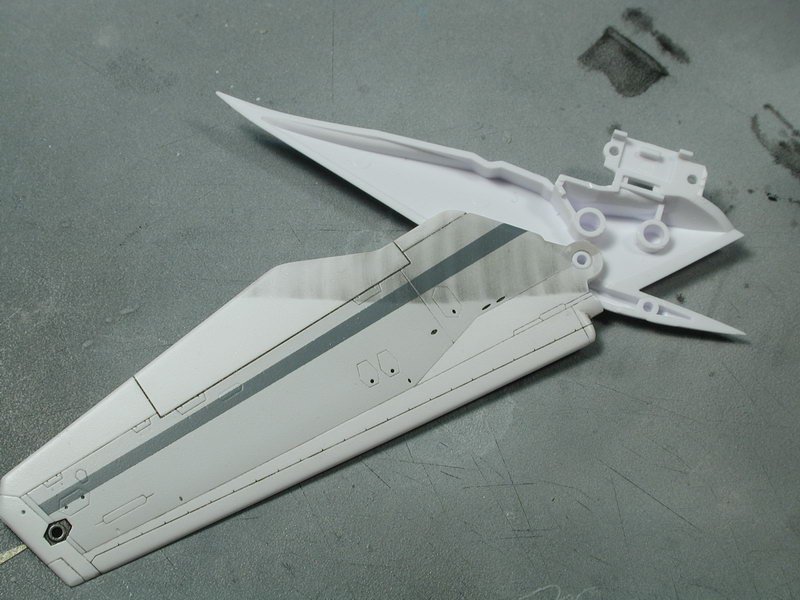
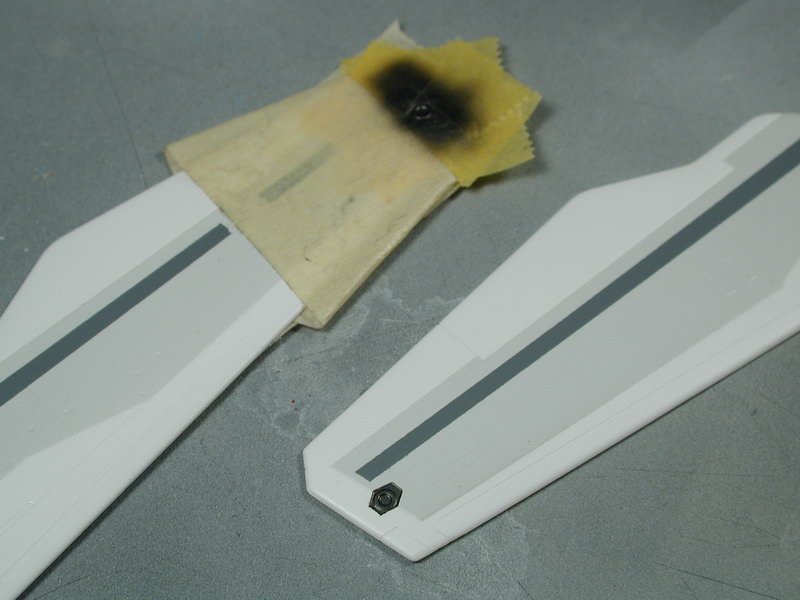
Next I thought I try my hand at some wing swept marks I first tried with the VF-0 that I ended up liking the results quite a bit. I wasn't sure at first since I wasn't going to weather this bird anywhere as much as the VF-0, but I thought it would add a bit of aircraft character and realism to a otherwise very "robotic" kit. First I included some real-world F-14 references... I first loosely assemble the wing-glove pieces to get a profile line to where the sweep marks should end. Here I took artistic license since the wings sweep back really far in Battroid mode, so much of the wing would be dirtied by the sweep, I picked an arbitrary point to stop it so that it only exposes some sweep marks without over-powering the entire wing surface. I then just used post-it notes (nice low tack) to "trace" the wing-glove edge and removed the wing from the wing-glove pieces to work on it. I then used some graphite (mechanical pencil) shavings I collected from a mechanical pencil sharpener and an artist smudge stick (its basically a pencil like stick made up of tightly wound paper that you can shave down with a knife to sharpen - they're really cheap at a local arts and crafts store) to "draw" the sweep arcs. They initially lay on a bit too dark, but I then just use a Kleenex to rub the excess out and keep rubbing until I get a level of lightness that I wanted. I repeated the procedure for the underside of the wing sweep area, except much lighter since not as much dirt gets trapped underneath as on top. Of course once you're satisfied with it, you have to seal it in with a clear coat, its only pencil smudges, so it will rub off if you're not careful. (hmm, for some reason... it doesn't display the images in the order in which I uploaded them - well you guys can make out the steps of the smudging right?)


-
1/72 Bandai VF-25F Messiah build-up step-by-step (sort of)
wm cheng replied to wm cheng's topic in The Workshop!
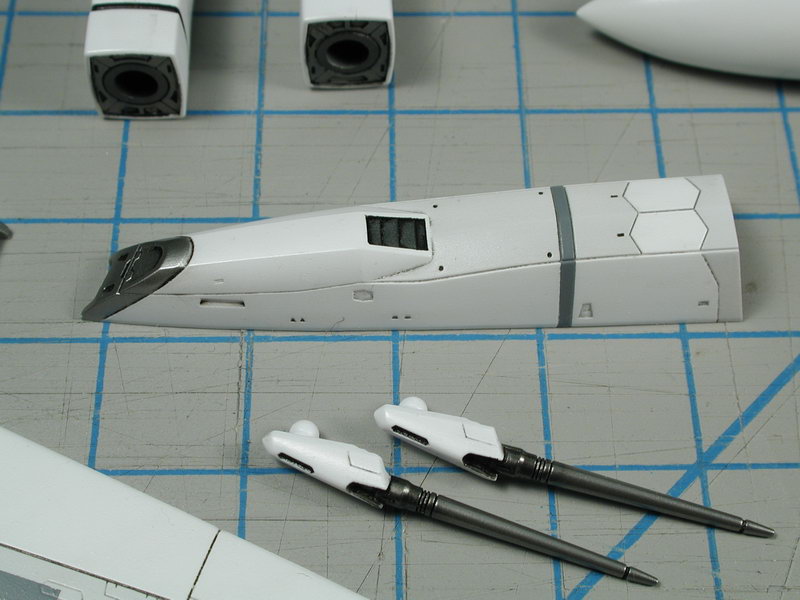
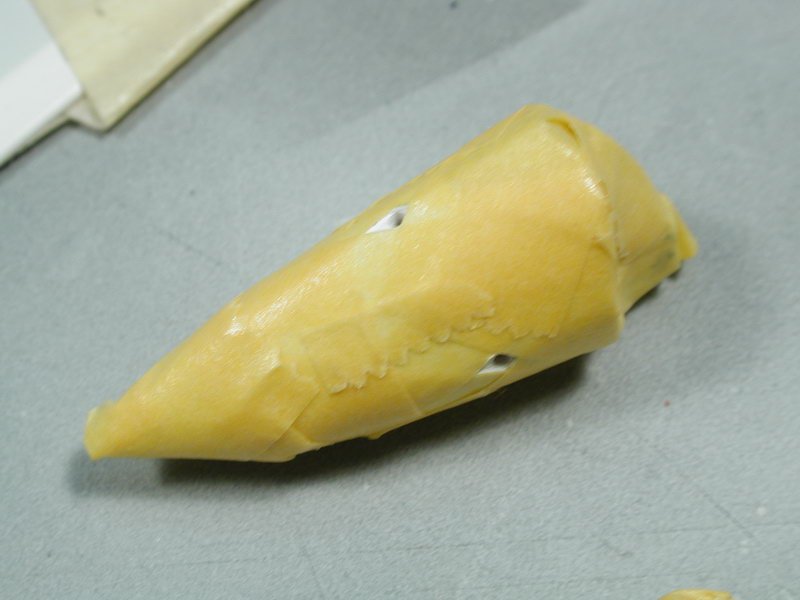
One of my favourite steps... removing the masking! Right up there with decaling and oil washes. The nose cone turned out pretty well - for me, the most important part of any plane is the nose cone and I will go to any lengths to get it absolutely flawless. To me its the first part I look at on any plane model and its usually jutting out in front, so any flaws will be magnified! I then got to do another favourite step, the oil wash! I usually do a black oil wash first to pick out the moveable surfaces (such as flaps, slats, airbrakes and such) and any grillage or vents. Then I follow up with a light grey oil wash to pick out the finer panel line details so there's a variation to the panel detailing.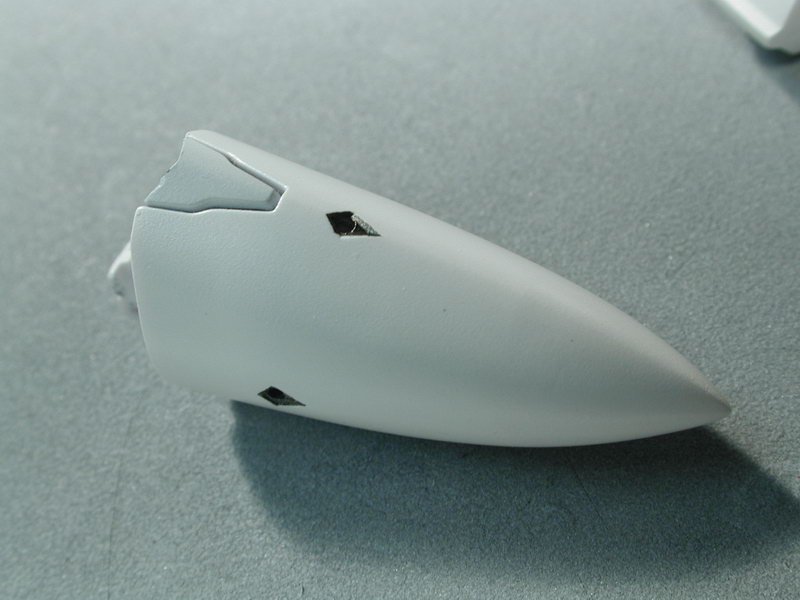
-
1/72 Bandai VF-25F Messiah build-up step-by-step (sort of)
wm cheng replied to wm cheng's topic in The Workshop!
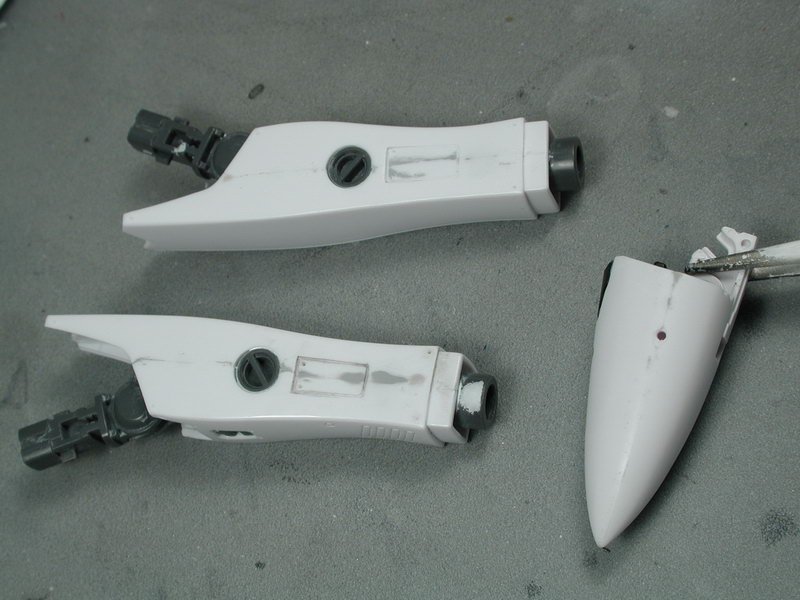
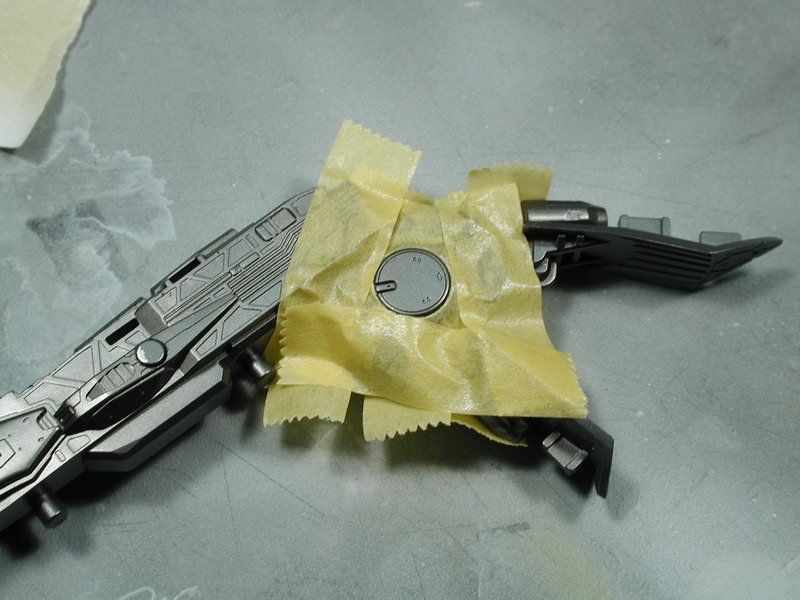
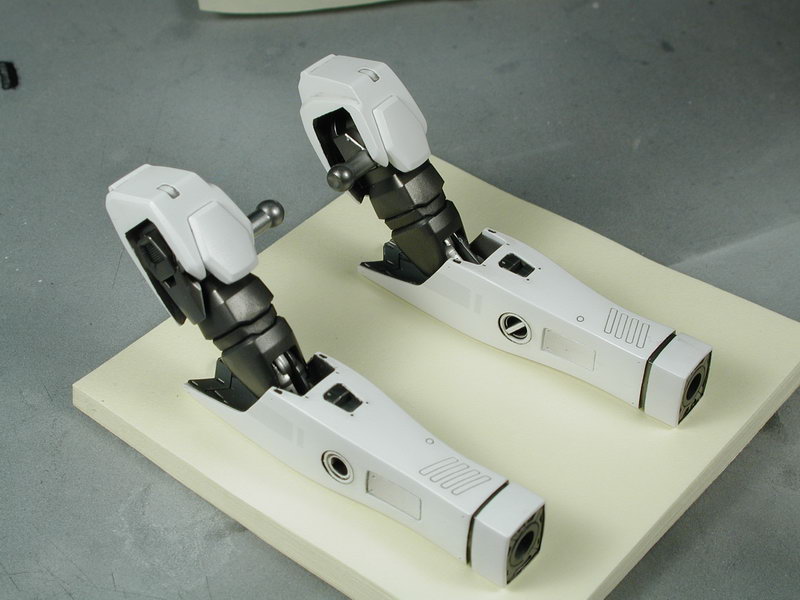
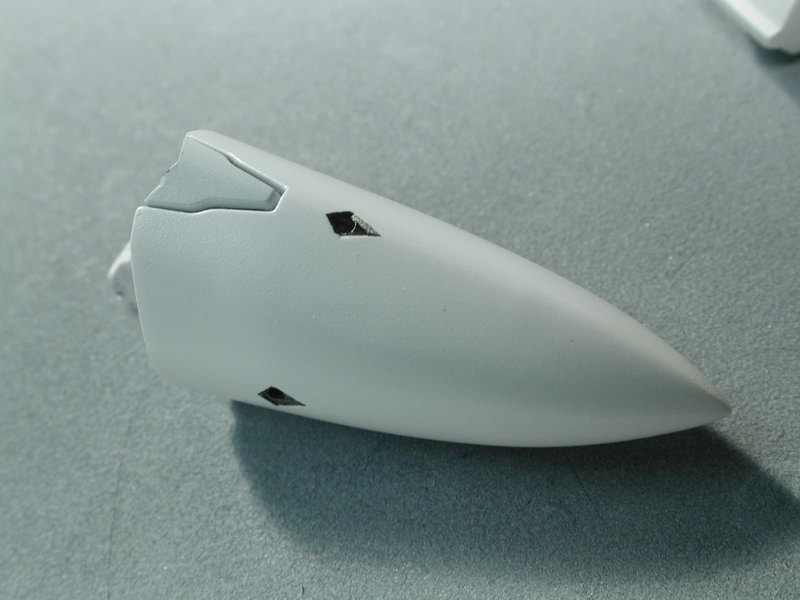
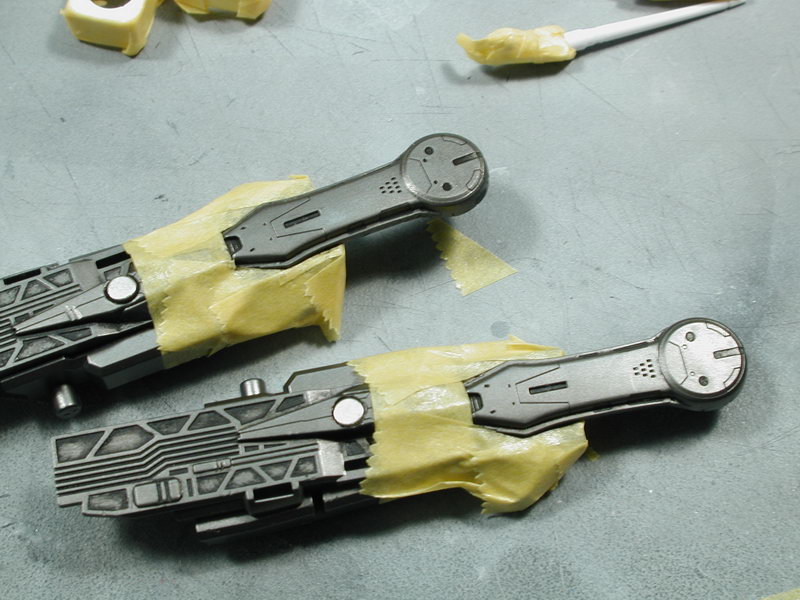
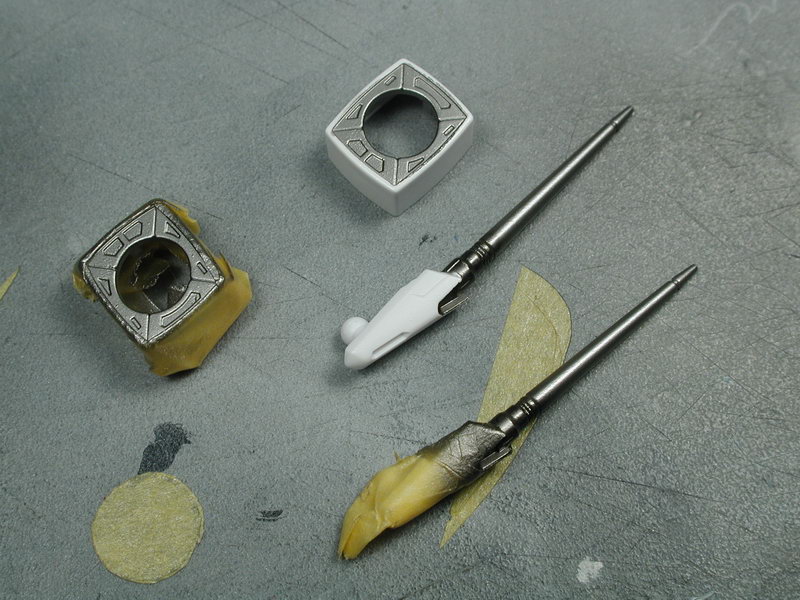
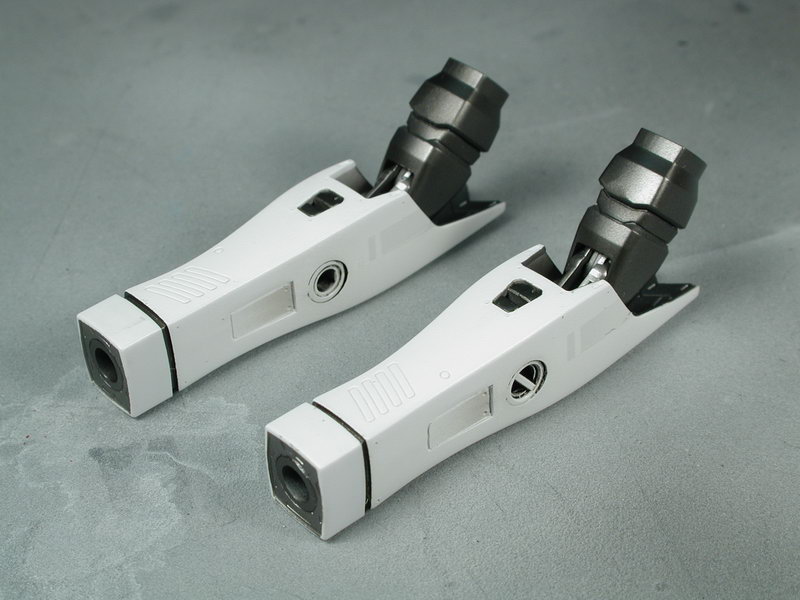
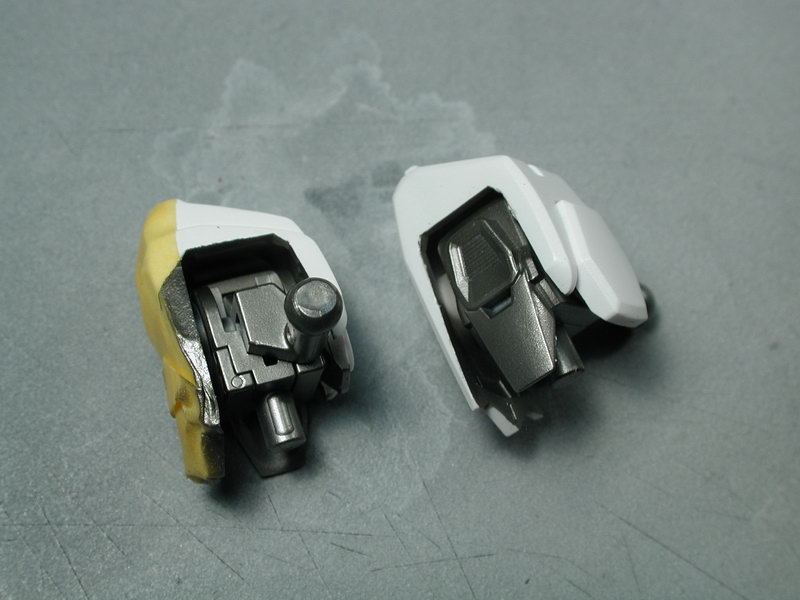
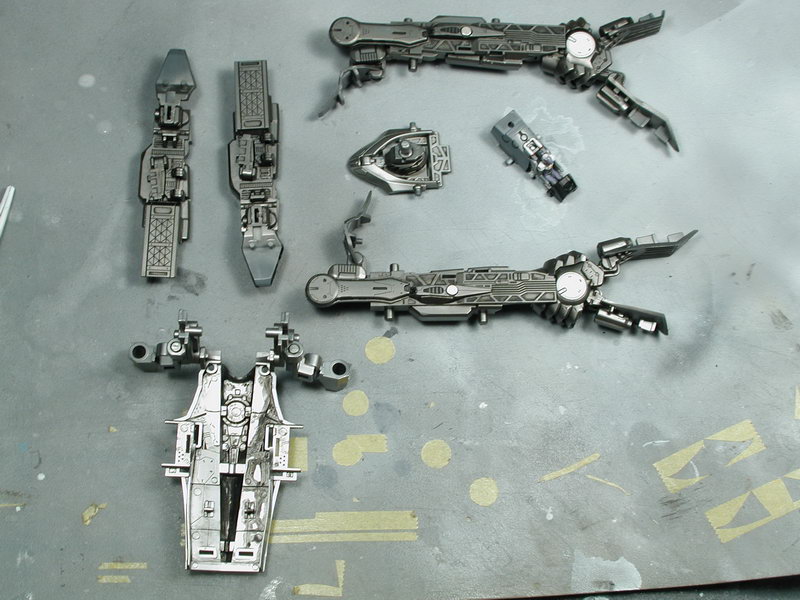
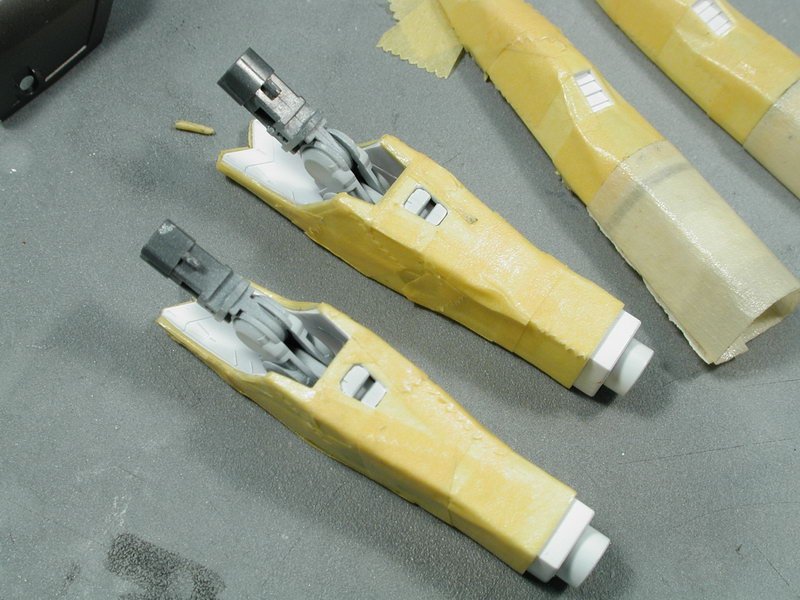
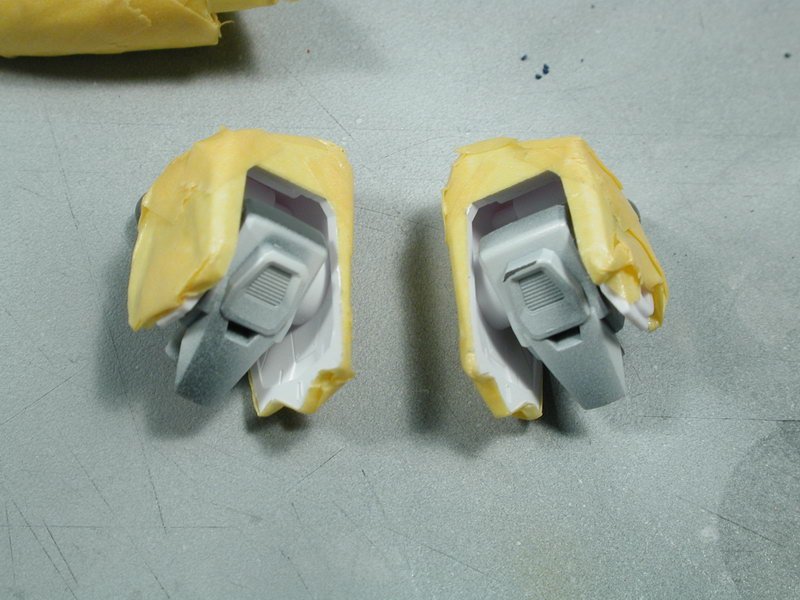
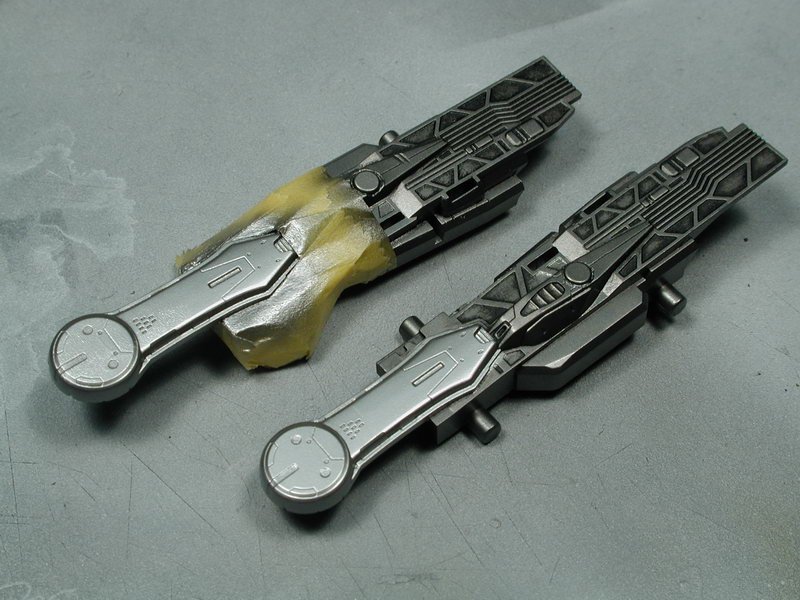
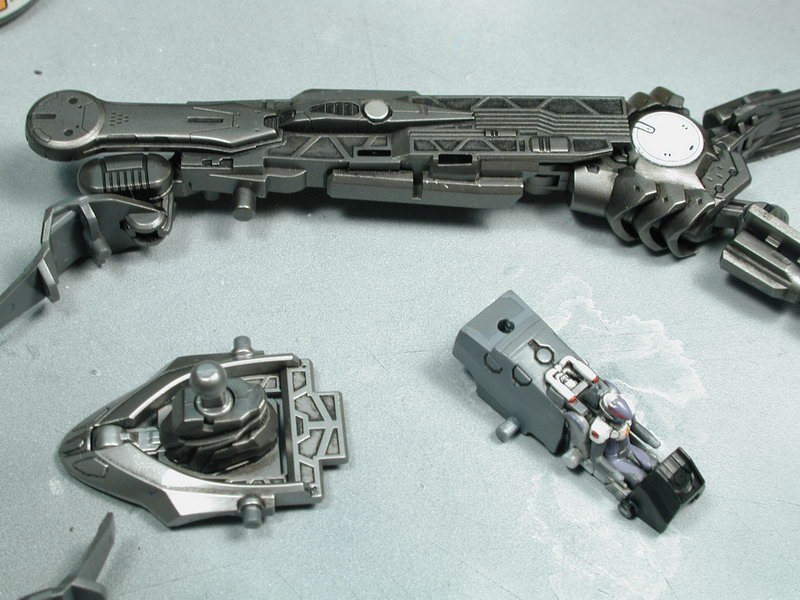
Next is masking mayhem! There's a lot of little details I wanted the Alclad metalizer on. I find the occasional glints of metal really goes a long wall to make a model feel like a piece of machinery that's been clad in a shell to hide complex internal mechanisms. Of course, Murphy's law means that this is an extremely tedious step! I masked areas that will be hit with Aclad's Steel and Dark Aluminum. Whenever possible I try to place these two metals next to each other to give a contrasting yet subtle sheen difference as though the mechanisms are made up of multiple alloys Unfortunately, the arm pieces weren't glued as well as I thought (they're quite thin) and that when I was pushing the forward arm collars in place, the pressure of my fingers gripping the part caused a slight crack to form where the parts were glued together - ARGH! - after I filled and sanded this seam! At this point, I think the repairs would be more obtrusive than just leaving the hairline cracks - fortunately the off-white tint panel details I invented on the upper elbow arm part kind of hides this breakage (which was what I wanted the off-white panels to do was delineate any flaws or imperfections in surface sanding). And I'm lazy (ok, thats the real answer! ;-) and I just want to get this done!! Did I mention I love Tamiya masking tape!! I should have bought stock in this miracle stuff. Yeah, the nose cone is a bit much eh?, but the little tiny diamond shapes turned out great!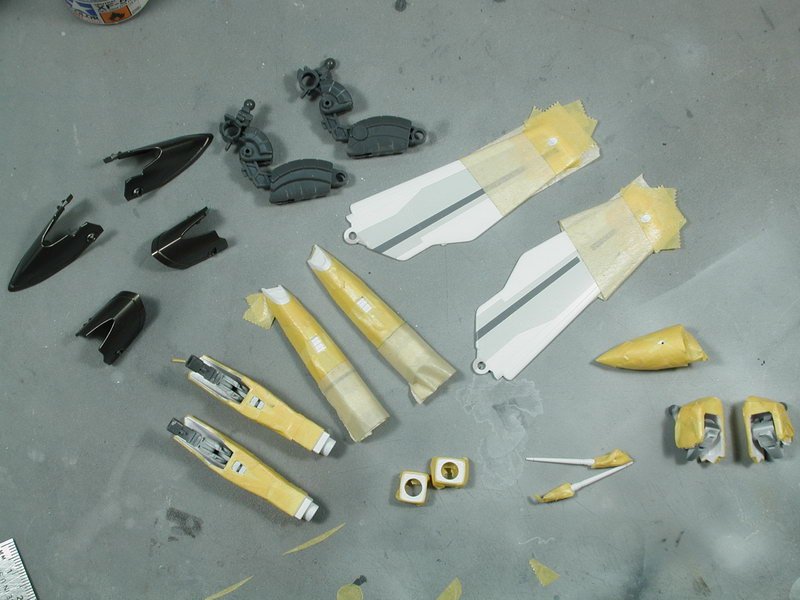


-
1/72 Bandai VF-25F Messiah build-up step-by-step (sort of)
wm cheng replied to wm cheng's topic in The Workshop!
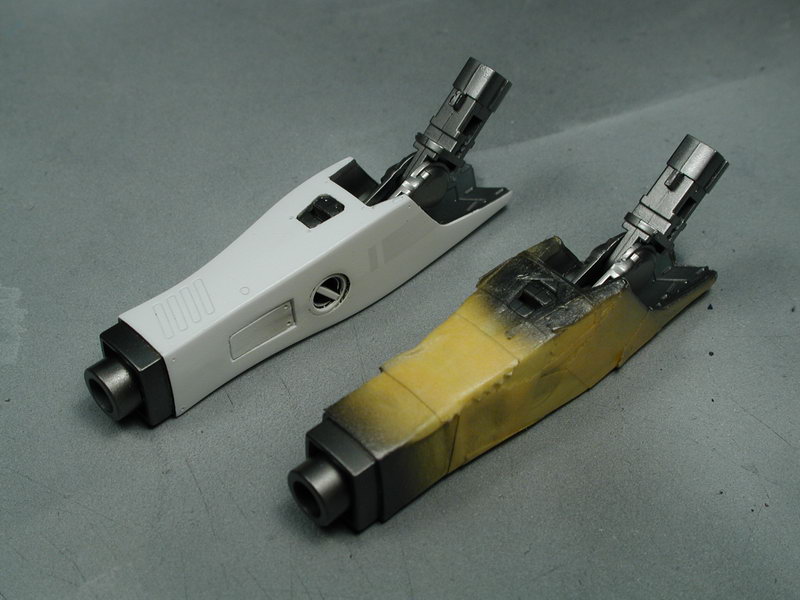
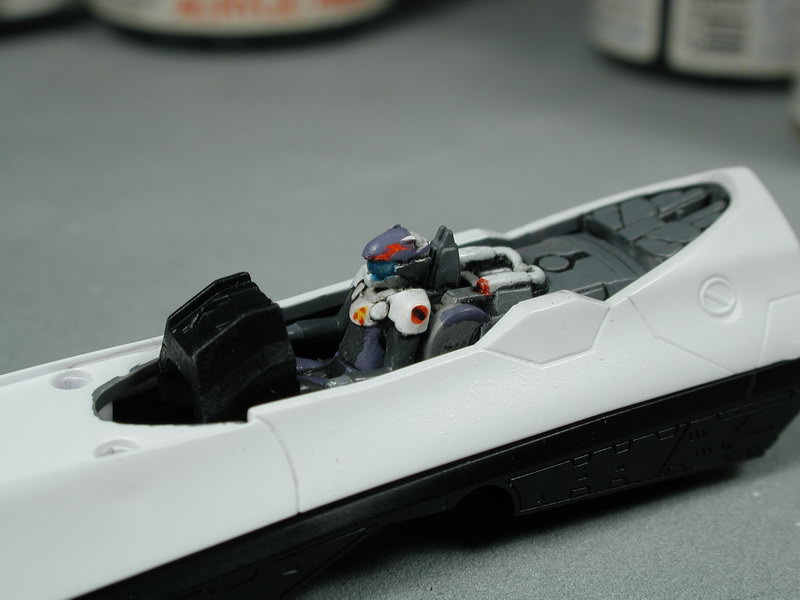
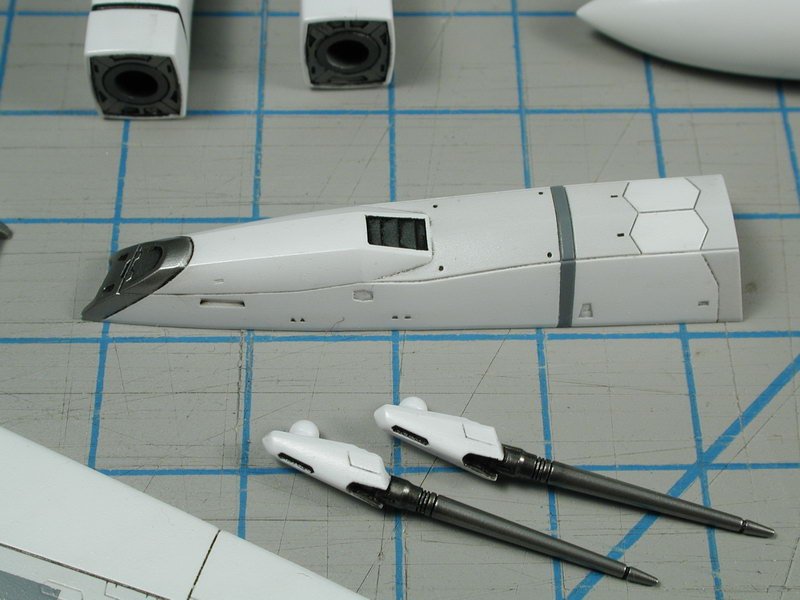
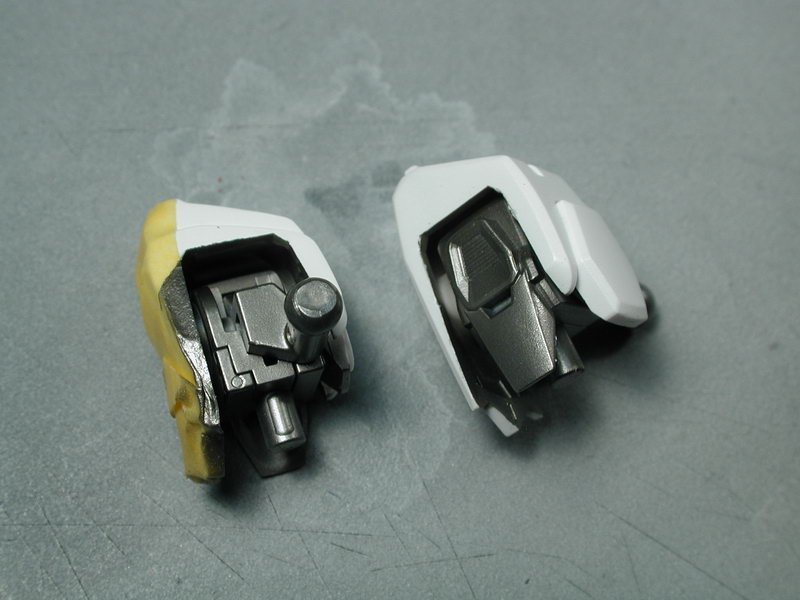
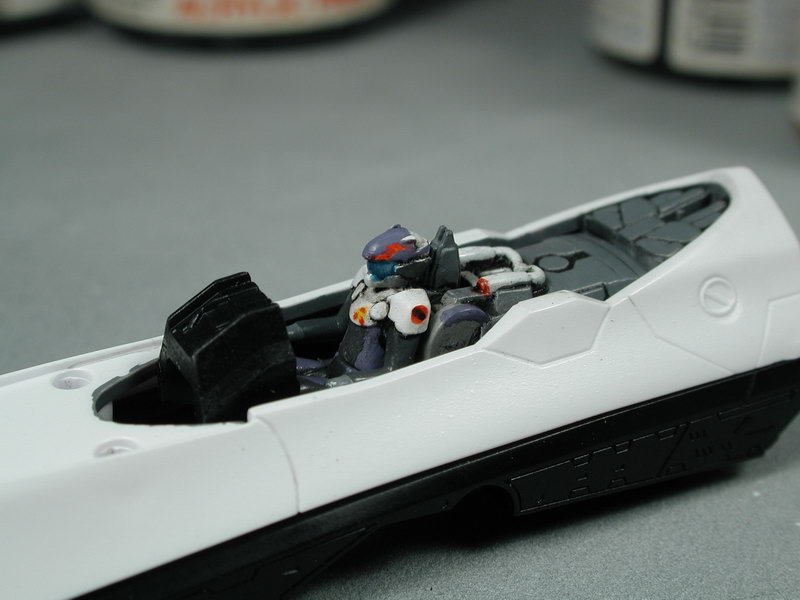
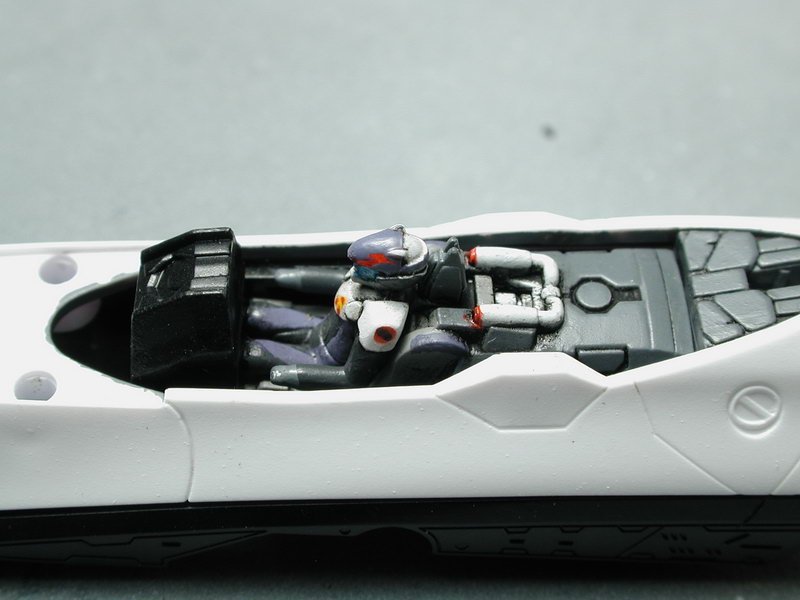
OK, got to sneak in a few hours over the weekend to work on this bird, its finally starting to come together - but boy, Bandai certainly doesn't make it easy for you if you want to paint this model! I first concentrated on masking the areas that the grey stripe decals would be, since they were relatively simple, the knee part would see a lot of rubbing, binding or chipping and the fact that I hate seeing screened decals on any model, it made sense to me to paint these details. I mixed up a bit of White with Neutral Grey (I was going to use Tamiya Sky Grey, but it had too much of a warm tint that it looked a bit brown next to the white of the plane). Unfortunately only after I removed the masking did it appear too dark compared to the decals supplied, however between the various animation cel references, they sometimes appeared quite dark too, so I decided to leave it alone for now instead of re-painting it. I then hand painted the small details in the cockpit and pilot area. I actually airbrushed the pilot and the area immediately behind him (the two cylinder details) flat white to get a good white coverage first, then hand painted the greys and purple stripes. Then I brushed a bit of gloss clearcoat (to prevent the next step of the oil wash from staining the flat white). The oil wash really picked out the details. I then brushed some gloss clear coat over the helmet and white shoulder pads and flat clearcoat over the grey/purple body suite which really played the contrast well. You'll probably not see any of this well after the purple tint is applied to the canopy in the end, but you never know, I'll know how much I should detail after this one for the Ozma bird. I wished there were decals for the chest SMS logo, I ended up have to approximate something with a yellow marker and a red sharpie marker - it's okay to the naked eye, but by no means great. Maybe it would be a good thing to do a custom decal for as well as the shoulder patches (again they were just drawn on with a sharpie marker). Lastly I did a thick black oil wash over all the metallic parts to pick out all the nicely engraved techno gak! I love this part... and Bandai doesn't disappoint here!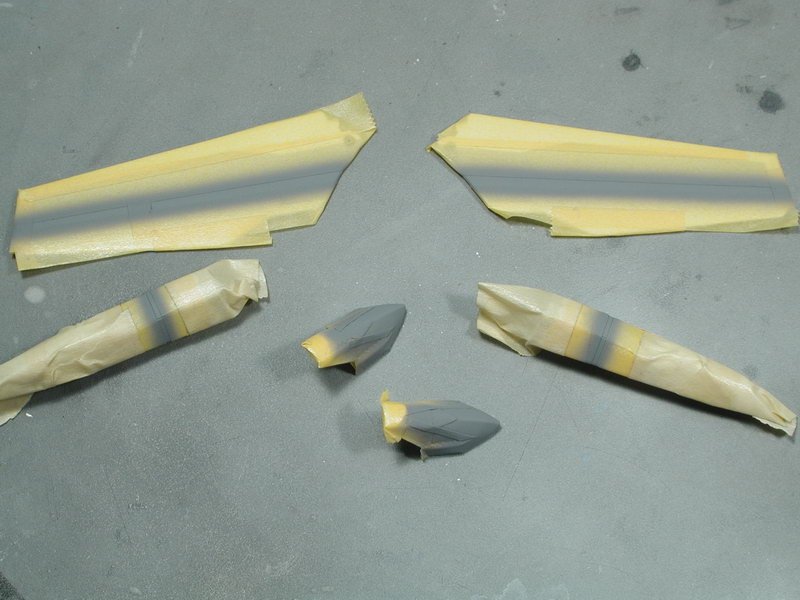

-
WoW! Absolutely fantastic build, definitely one of the better builds I've seen - really great work, especially those tiny nozzle replacements and the clear lenses for the lights, it really adds a lot to the overall impact! What were the tiny nozzles used? They look really great. So did you paint it white? or did you just clear coat the white plastic, couldn't really tell as there were some seams, but the finish was just too good to be bare plastic... great job! The chipping on the decals really worries me, seeing yours doesn't bode well for my build - I really don't think there is any way around it... just transform it less and get multiples to leave in the various modes. I plan on hand brushing additional coats of clearcoats over the edges of the really problematic areas before I transform it, but it would just delay the inevitable. Great warning stenciling decals peppered throughout the aircraft - really good placement too, very realistic. Keep it up, can't wait to see more! I love that you etched/engraved a panel line within the thickness of the chestpiece to reduce the monolithic thickness of the part, it really adds to the realism, I'm too chicken to do that to mine, that's one mode I wished I really did but when it came down to it, I just good cold feet. Kudos to you! and it turned out great! Another area that you did that turned out awesome was the chest intakes, another thing I was too chicken to do (these Gundam models seem so foreign to me - I've never built one before and the transformation process seems so complicated with all the moving parts, that I was intimidated to do much modding).
-
Any news or update for Ace Combat for PS3? Is there any other flight sims for the PS3?
-
Whats Lying on your Workbench MKIII
wm cheng replied to HWR MKII's topic in Hall Of The Super Topics
Argh! I feel your pain, it sucks to be so close and yet so far... well, at least its before the decals... -
Whats Lying on your Workbench MKIII
wm cheng replied to HWR MKII's topic in Hall Of The Super Topics
Hmm... so the Airfix is good eh? I never knew that (I'm a Japanese snob, love Tamiya & Hasegawa - shun away from Revel & Monogram). So is this a new tooling? Does it have engraved detailing? Its so hard to find 1/72 scale aftermarket stuff in North America, the selection is like 1/5 of 1/48 and 1/10 of 1/32... boo... Any good photos and reviews of this kit? -
Whats Lying on your Workbench MKIII
wm cheng replied to HWR MKII's topic in Hall Of The Super Topics
Wow! HWK MKII - all those aftermarket parts, it looks amazing, can't wait to see what you do with it! Is gotta be one of my favourite aircrafts (next to the F-14 of course!) - just wish there was a decent kit (with aftermarket stuff) in 1/72 scale... someday... Please post progress, the instruments are looking great! Can't wait to see more! -
1/72 Bandai VF-25F Messiah build-up step-by-step (sort of)
wm cheng replied to wm cheng's topic in The Workshop!
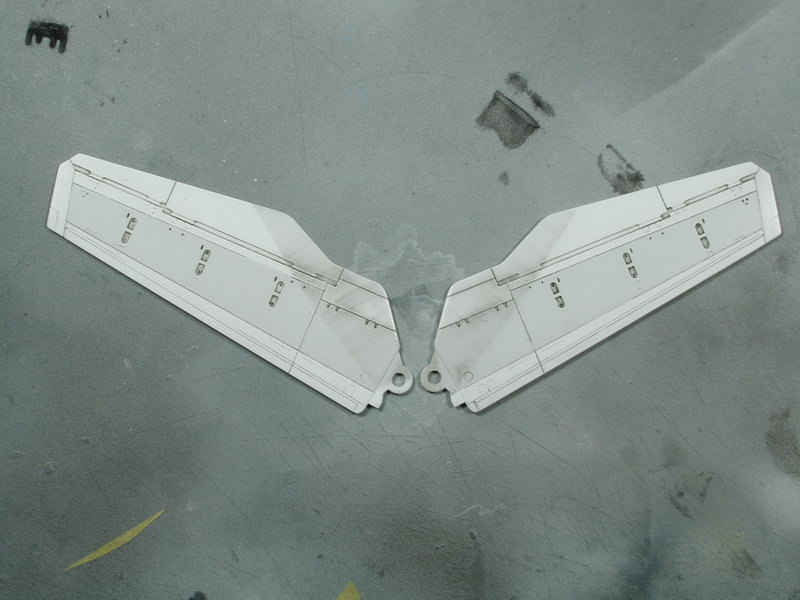
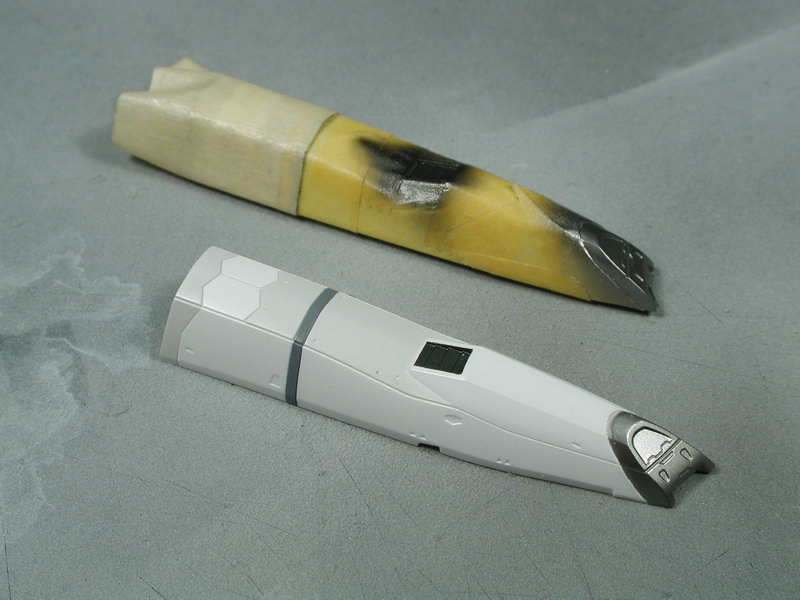
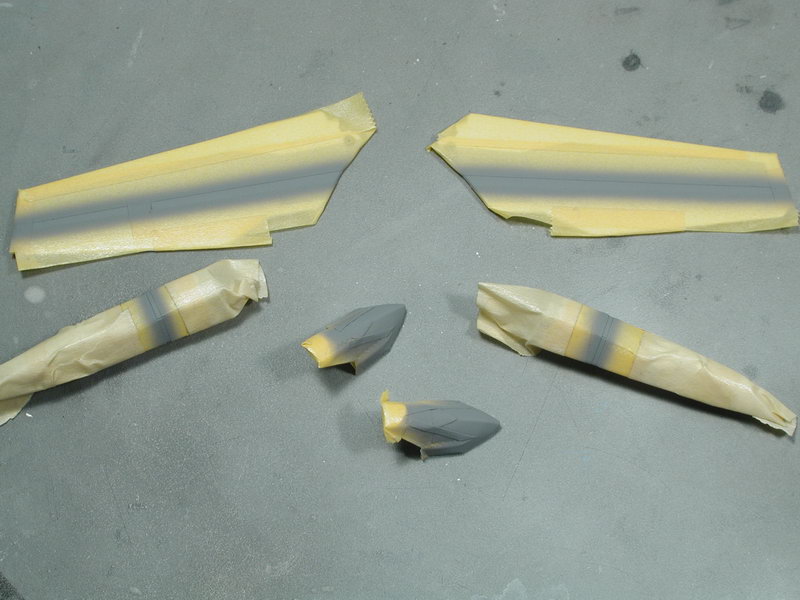
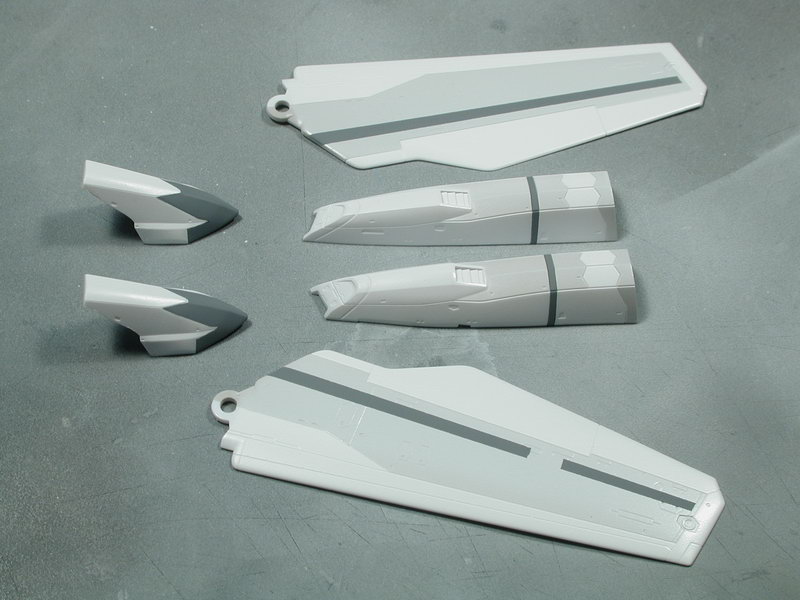
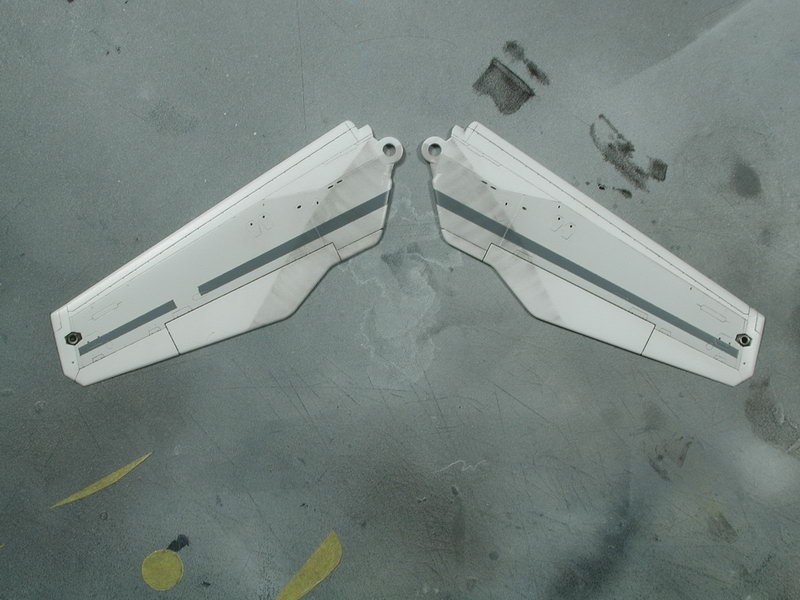
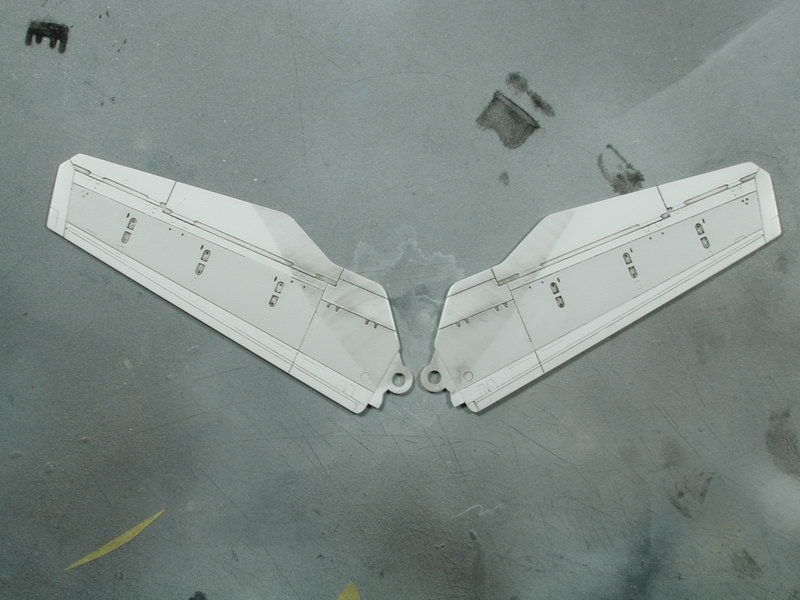
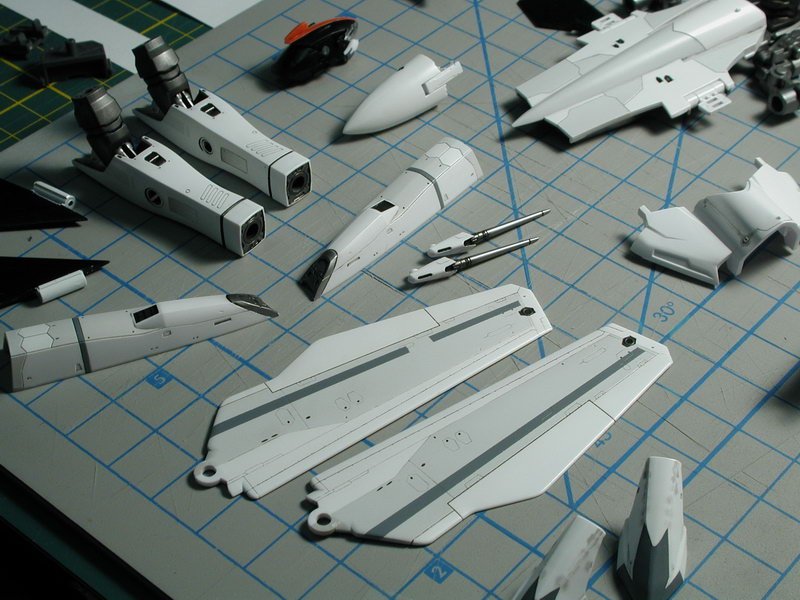
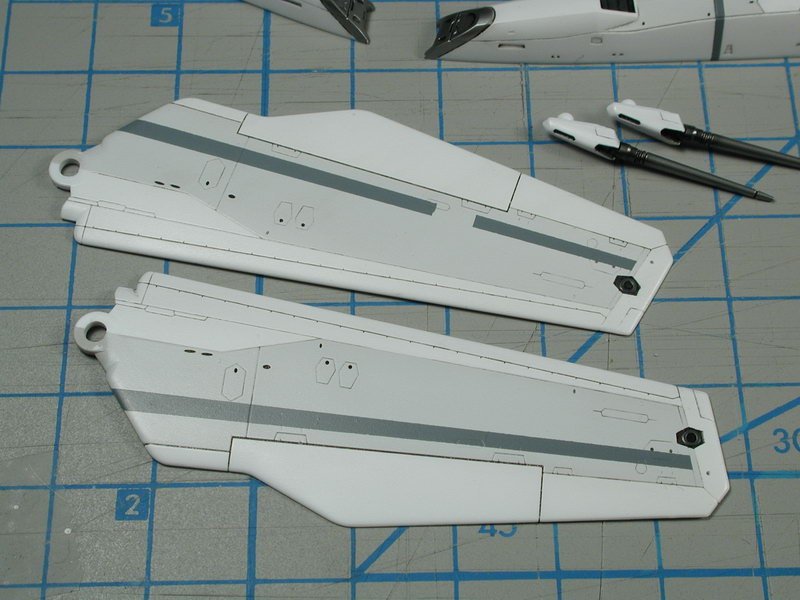
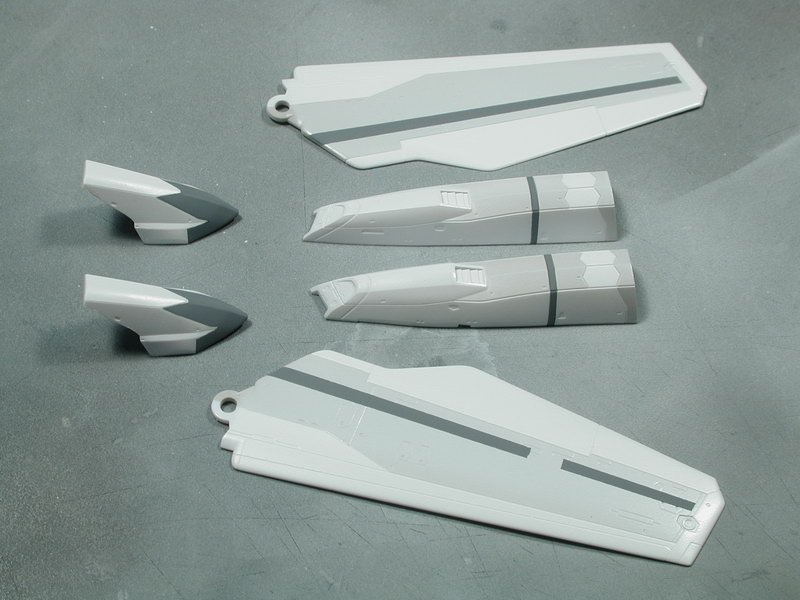
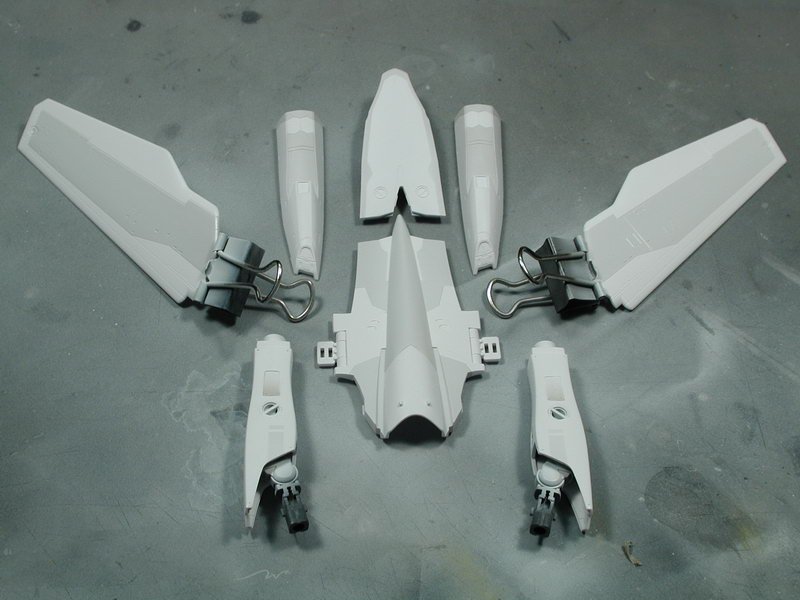
Just some photos of the grey panelization process. Found out that I liked it better (from my YF-21 & starship Enterprise) that if it was a fairly straightforward scheme like an all white or all blue scheme that it adds interest to vary the panel shadings a bit - so I wanted to get some off-white/greyish tints in there, the overall end result will still be a white plane close to the canon scheme, but I thought that it adds interest. My first attempt was just to tint the white with Tamiya Sky Grey (its warm) - it looked fine in the airbrush cup, but by the time it was evenly applied, it appeared way too dark against the white parts. So I mixed up a batch of thin white again, and airbrushed over it to lighten the grey panels so there was more subtlety in the shading. Its still a bit on the strong side, but I will "post-shade" the panel lines (which will further blurr the edge distinctions between the white and light grey) weather on top and the relatively high contrast decals will all fight with the grey panels in the end. I still want to see the effect. My past experience with the VF-0 showed me that by the time all those other layers were on top, the panel difference was so subtle that it hardly showed through, so this time I was going a bit more heavier. If its still too heavy in the end, I can still spray a light coat of white over the decals to tone them down a bit and tie everything together a bit more as well as lighten any overtly strong paneling. Well... at least thats the plan. Now the next step is to completely finish the wings so I can glue the wing gloves together and fill and sand that seam. I think I will paint the grey stripes on the wings, was well as any of the grey decalled areas such as the back of the leg stripe and the knee patch. Firstly, I hate seeing screened areas on the decals - and unfortunately, the Bandai grey on their decals is a screened element, plus the knee and wing glove will be a "high-traffic" area (lots of movement - so the decal will be more prone to scratching and chipping) - so the hope is that the painted grey will stand up better than the decals.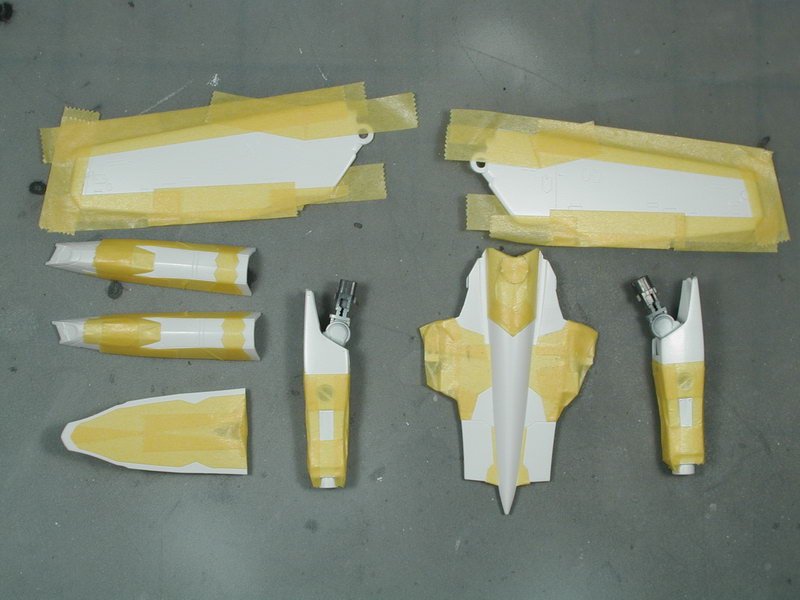
-
1/72 Bandai VF-25F Messiah build-up step-by-step (sort of)
wm cheng replied to wm cheng's topic in The Workshop!
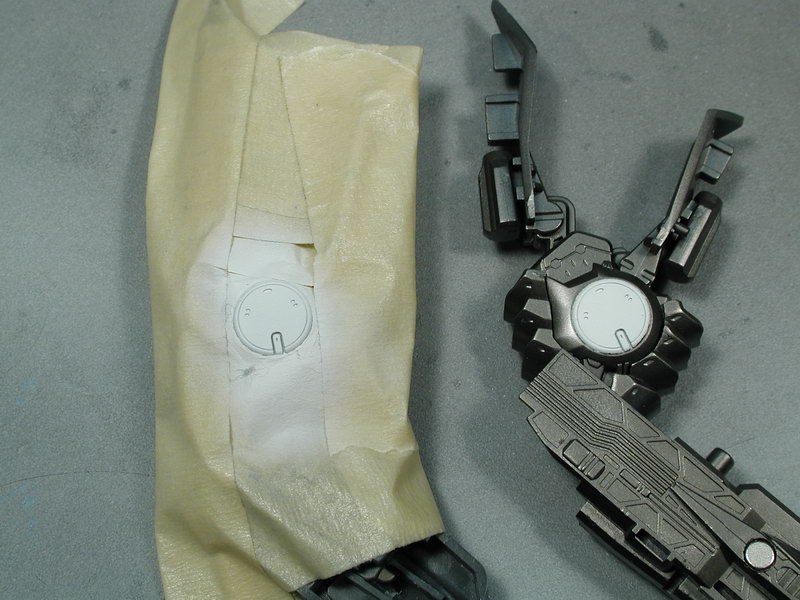
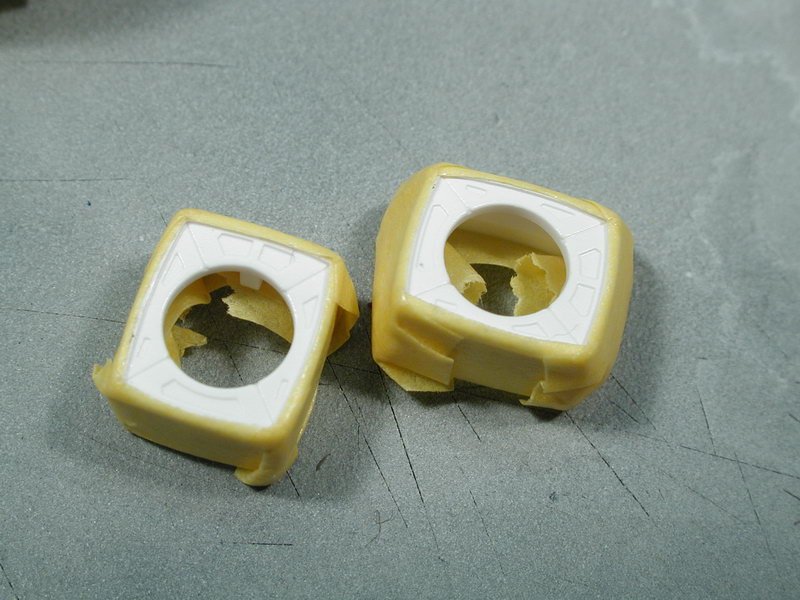
What I did was use the back of my x-acto knife (the fine no.11 one) to trace a rough circle in pencil, then I cut the circle out of the Tamiya masking tape. The size was not crucial, just close was good enough. As it happened, the hole cut out was a bit smaller than the circle I wanted to mask, so I cut a slit in one side of the hole to open it up, and I "stretched" and massaged the cut circular opening around the circular ankle detail until it matched the curvature. I've found that you don't necessarily need to match the curvature that much as long as you're close (it wasn't even a true circle, just a free hand one...) but with these masking tapes, you can push, nudge, pull and bend it to fit the proper curvature. Because I had to open it up a bit, there was a small portion unmasked which I filled in with a small thin piece - I found that this way it was easier than with many built up pieces and that the curvature was too tight to do it with a small thin strip. Sorry I didn't take any photos of this process, I didn't really think much of it - especially because the edge wasn't that crucial since its in a crevice and a dark wash will be applied so the oil wash will hide any masked messiness. -
1/72 Bandai VF-25F Messiah build-up step-by-step (sort of)
wm cheng replied to wm cheng's topic in The Workshop!
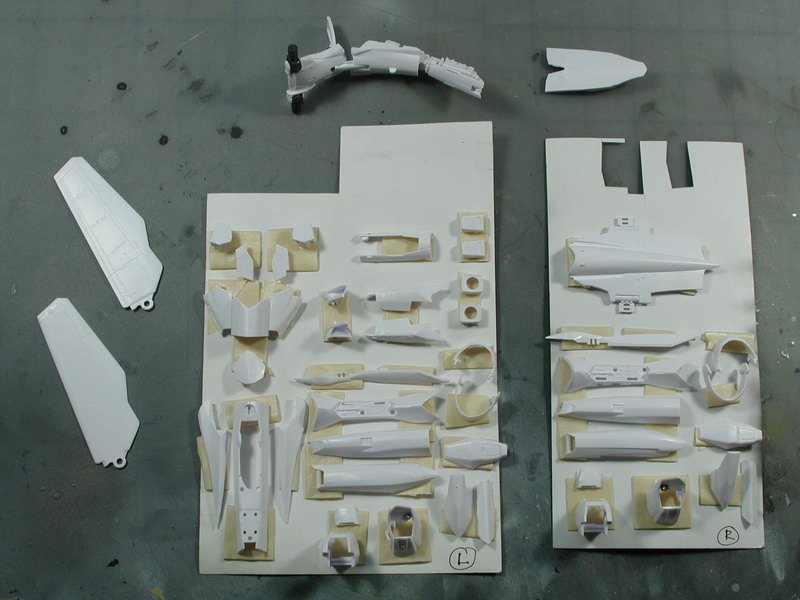
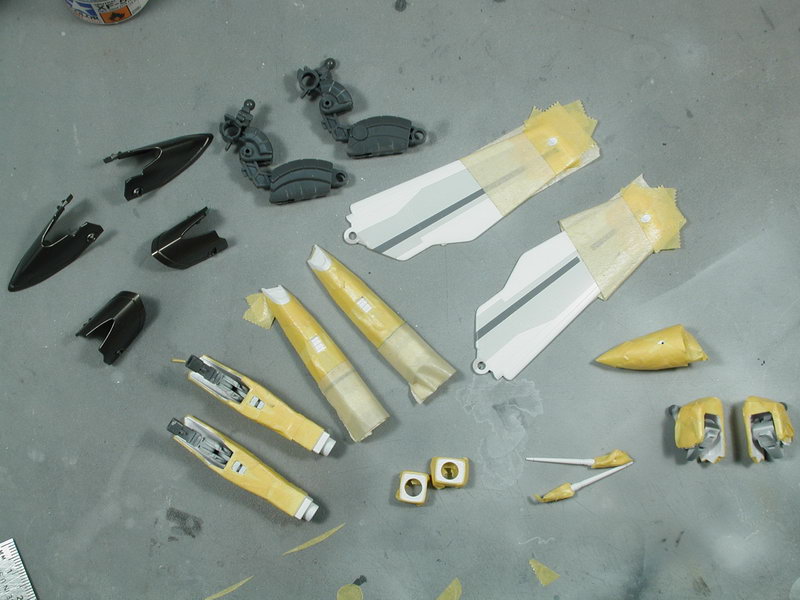
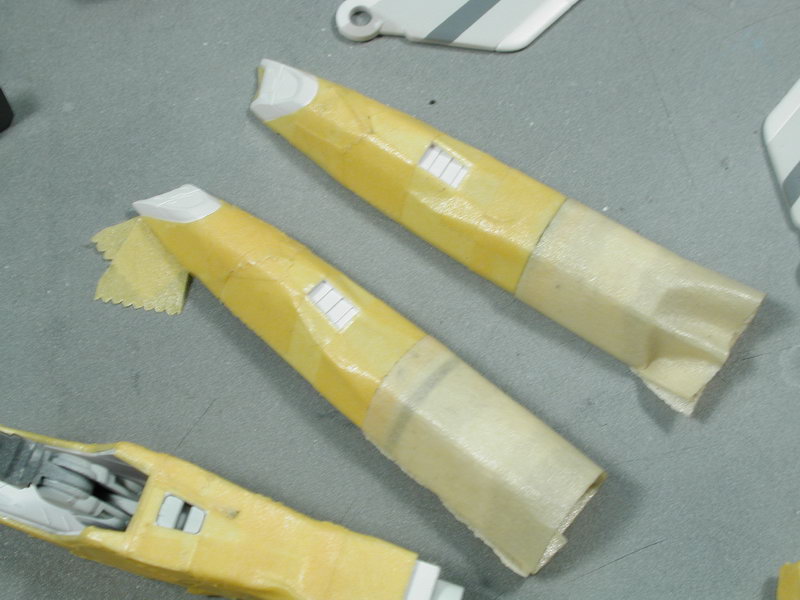
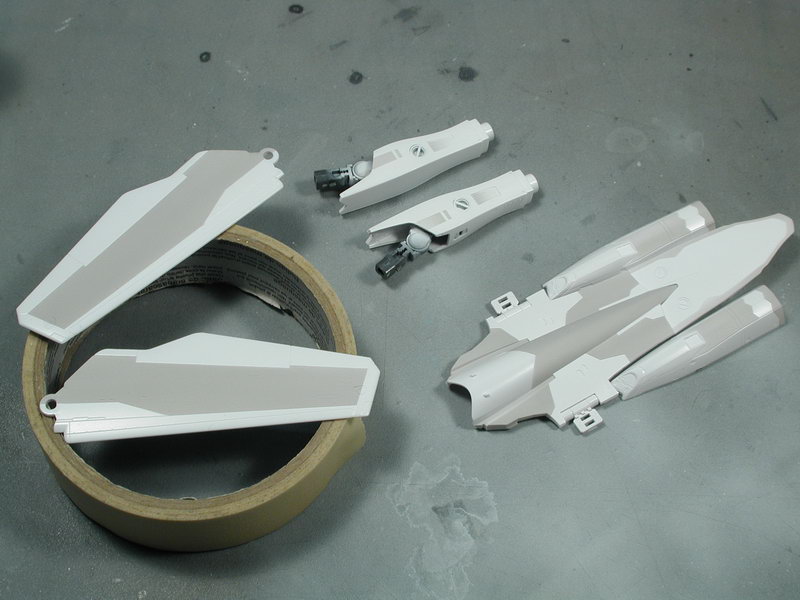
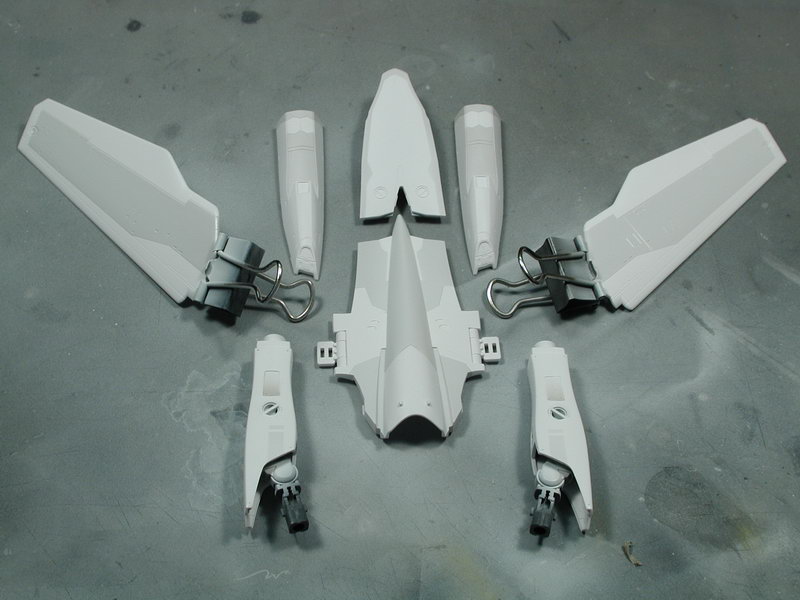
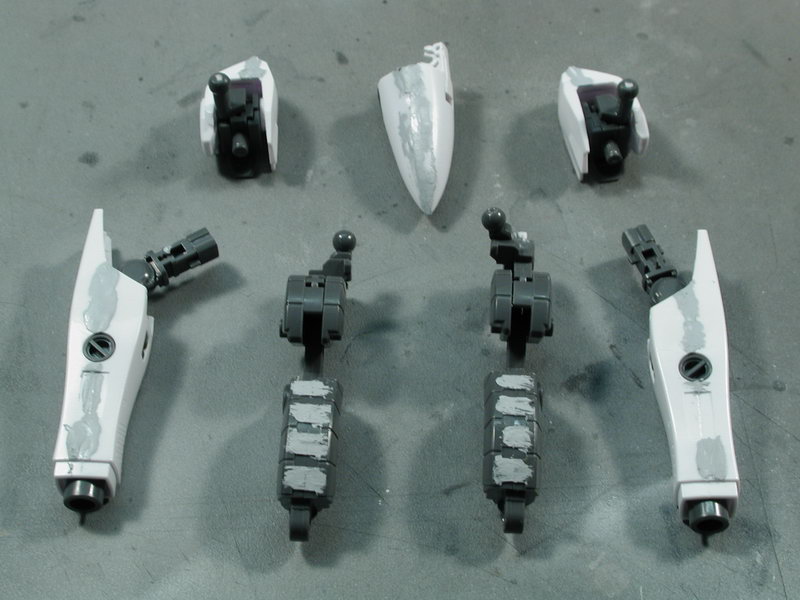
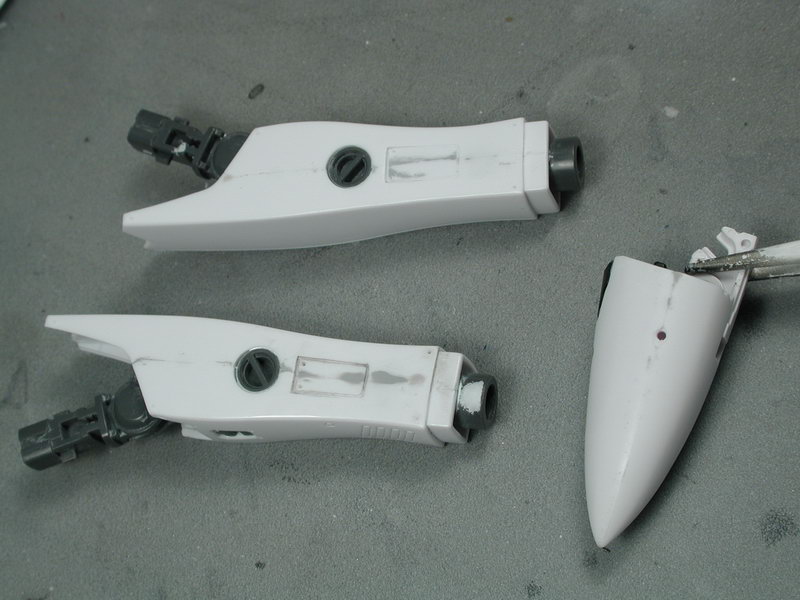
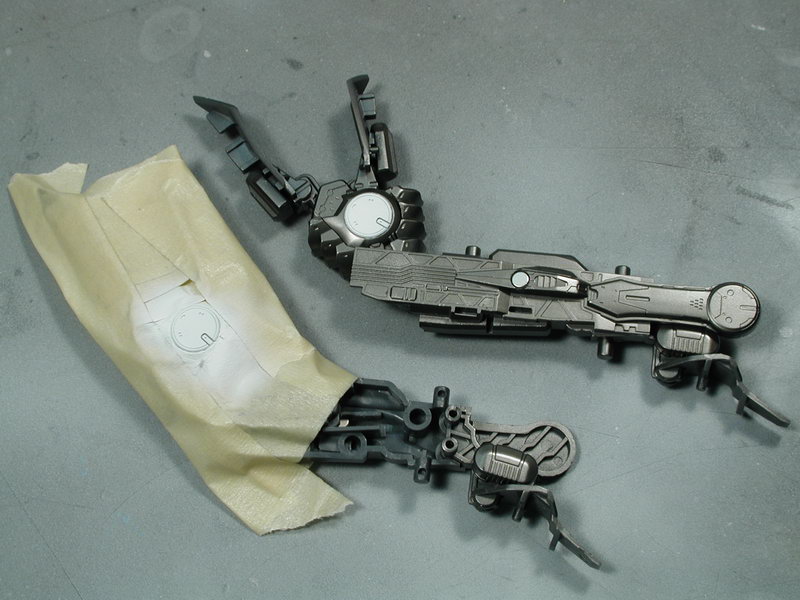
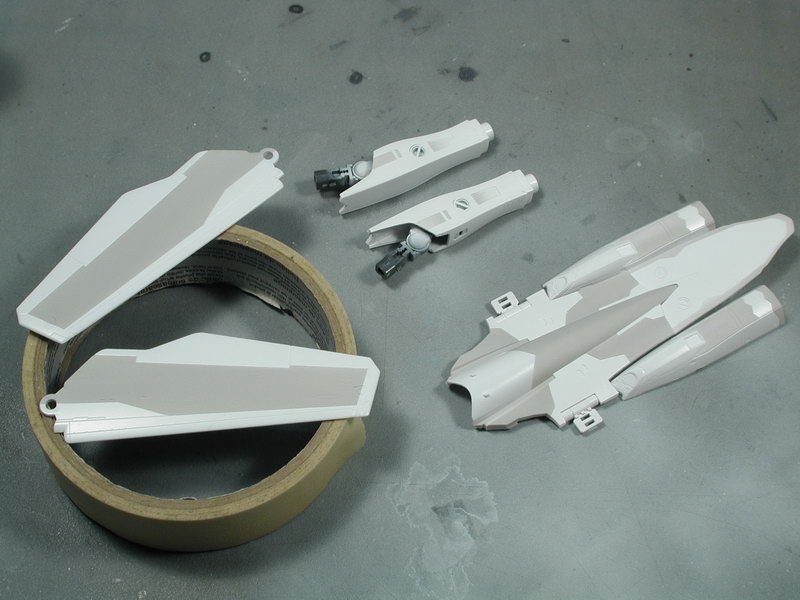
OK, as promised some photos of the recent work I've managed to sneak off to do (sorry its a bit anti-climatic after all this waiting...) Basically I've separated out all the parts that get a white spray (it takes away the slightly purplish cast that the Bandai white plastic has) and taped them to a cardboard tray for painting. The key thing here is that the wings need to be fully finished, clear coated, decaled and weathered before attaching them back into the wing glove pivots so that can then be glued and the seams be filled and sanded, then painted, so we have to basically re-paint and seal that part all over again after the wings are finished. I also broke down the parts that needed filling to get rid of the seam, I used Tamiya putty for the bigger stuff and Mr. Surfacer 500 for the smaller stuff. There's a shot after the sanding too. Lastly I sprayed everything else Steel from AlcladII metalizer paints as the base metal skeleton to be detailed over top of. Then I masked that little circle detail on the ankle - it would of been so simple for Bandai to mold this piece separately as an add-on later, but they weren't really thinking about people who paint (it was a bitch to mask decently, I'm still not happy with the demarkation between the colours, but once I do the black oil wash over this part, I think it will hide the masked line nicely (I hope!). Today I've clear coated the flat white. I used flat white (Tamiya Acrylics) because it seems to have a better coverage, I find gloss white to be too translucent and requires too many coats to cover anything underneath. I then used ModelMaster clear-coat semi-gloss with some gloss added into the mixture to cover the flat white. The flat white is fairly fragile and is prone to scratching off if not protected. If I use pure gloss, I find the shine too much that it attacts finger prints, this semi-gloss mixture I find is just smooth enough to take decals and an oil wash sucessfully, but not glossy enough to keep fingerprints. Also I want to mask the white areas to spray varying shades of off-white and grey because I find the overall white too flat or dull, but I don't want to stray from the canon scheme too much, so I think some off-white (tinted light grey) panels will make the white plane jump out a bit in terms of paint finish. This clear coat allows me to use the masking tape without fear that it might pull up some of the white paint (which has happened in the past). So not much to show today, just the clear coat which doesn't look any different.