nightmareB4macross
-
Posts
5645 -
Joined
-
Last visited
Content Type
Profiles
Forums
Events
Gallery
Everything posted by nightmareB4macross
-

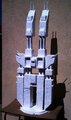
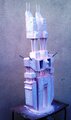
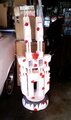
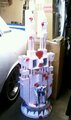
Virgin Road Wedding Cake SDF-1 (19).jpg
nightmareB4macross posted a gallery image in Miscellaneous Customs
From the album: 1/2? Scale Virgin Road Wedding Cake
-
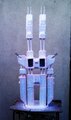
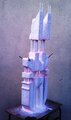
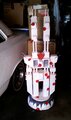
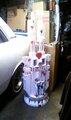
Virgin Road Wedding Cake SDF-1 (18).jpg
nightmareB4macross posted a gallery image in Miscellaneous Customs
From the album: 1/2? Scale Virgin Road Wedding Cake
-
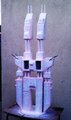
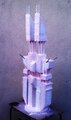
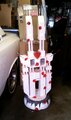
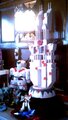
Virgin Road Wedding Cake SDF-1 (17).jpg
nightmareB4macross posted a gallery image in Miscellaneous Customs
From the album: 1/2? Scale Virgin Road Wedding Cake
-
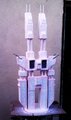
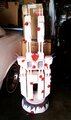
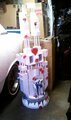
Virgin Road Wedding Cake SDF-1 (16).jpg
nightmareB4macross posted a gallery image in Miscellaneous Customs
From the album: 1/2? Scale Virgin Road Wedding Cake
-
Virgin Road Wedding Cake SDF-1 (15).jpg
nightmareB4macross posted a gallery image in Miscellaneous Customs
From the album: 1/2? Scale Virgin Road Wedding Cake
-
Virgin Road Wedding Cake SDF-1 (14).jpg
nightmareB4macross posted a gallery image in Miscellaneous Customs
From the album: 1/2? Scale Virgin Road Wedding Cake
-
Virgin Road Wedding Cake SDF-1 (13).jpg
nightmareB4macross posted a gallery image in Miscellaneous Customs
From the album: 1/2? Scale Virgin Road Wedding Cake
-
Virgin Road Wedding Cake SDF-1 (11).jpg
nightmareB4macross posted a gallery image in Miscellaneous Customs
From the album: 1/2? Scale Virgin Road Wedding Cake
-
Virgin Road Wedding Cake SDF-1 (10).jpg
nightmareB4macross posted a gallery image in Miscellaneous Customs

From the album: 1/2? Scale Virgin Road Wedding Cake
-
Virgin Road Wedding Cake SDF-1 (9).jpg
nightmareB4macross posted a gallery image in Miscellaneous Customs
From the album: 1/2? Scale Virgin Road Wedding Cake
-
Virgin Road Wedding Cake SDF-1 (8).jpg
nightmareB4macross posted a gallery image in Miscellaneous Customs
From the album: 1/2? Scale Virgin Road Wedding Cake
-
Virgin Road Wedding Cake SDF-1 (7).jpg
nightmareB4macross posted a gallery image in Miscellaneous Customs
From the album: 1/2? Scale Virgin Road Wedding Cake
-
Virgin Road Wedding Cake SDF-1 (6).jpg
nightmareB4macross posted a gallery image in Miscellaneous Customs
From the album: 1/2? Scale Virgin Road Wedding Cake
-
Virgin Road Wedding Cake SDF-1 (5).jpg
nightmareB4macross posted a gallery image in Miscellaneous Customs
From the album: 1/2? Scale Virgin Road Wedding Cake
-
Virgin Road Wedding Cake SDF-1 (4).jpg
nightmareB4macross posted a gallery image in Miscellaneous Customs
From the album: 1/2? Scale Virgin Road Wedding Cake
-
Virgin Road Wedding Cake SDF-1 (3).jpg
nightmareB4macross posted a gallery image in Miscellaneous Customs
From the album: 1/2? Scale Virgin Road Wedding Cake
-
Virgin Road Wedding Cake SDF-1 (2).jpg
nightmareB4macross posted a gallery image in Miscellaneous Customs
From the album: 1/2? Scale Virgin Road Wedding Cake
-
Virgin Road Wedding Cake SDF-1 (1).jpg
nightmareB4macross posted a gallery image in Miscellaneous Customs
From the album: 1/2? Scale Virgin Road Wedding Cake
-
Yamato 1/60 VF-19 Fire Valkyrie
nightmareB4macross replied to UN Spacy's topic in Hall Of The Super Topics
The Bandai in that pic looks scared sh!tless. It knows it will soon be replaced by something far superior. Then, off the bargain bin for the Bandai. -
OT, but yes he is. 7 and a half feet tall and fully articulate with a stand to help support it.
-
Poll - which 1/60 VF would you like to see next from Yamato?
nightmareB4macross replied to Graham's topic in Toys
Nice find. Now I'm wondering how Yamato will pull off the opening canopy. It doesn't open as a whole. -
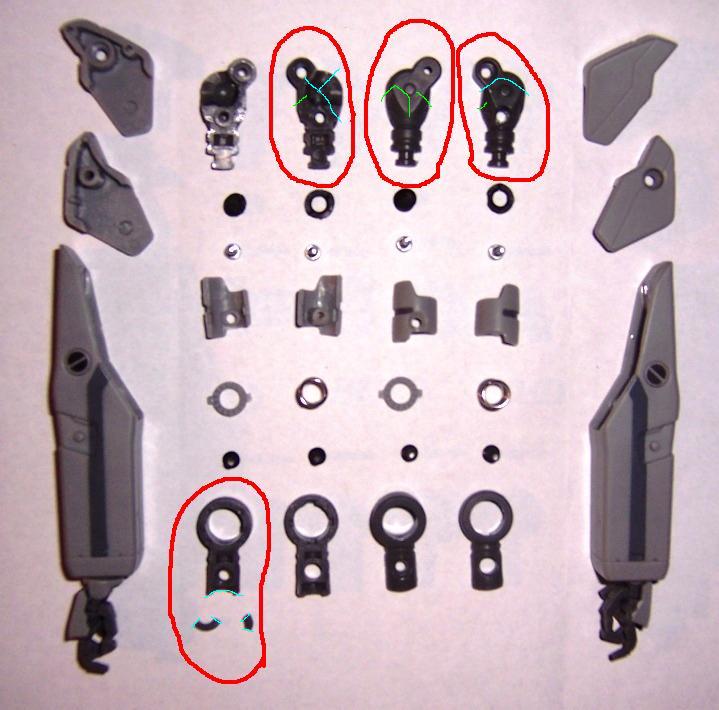
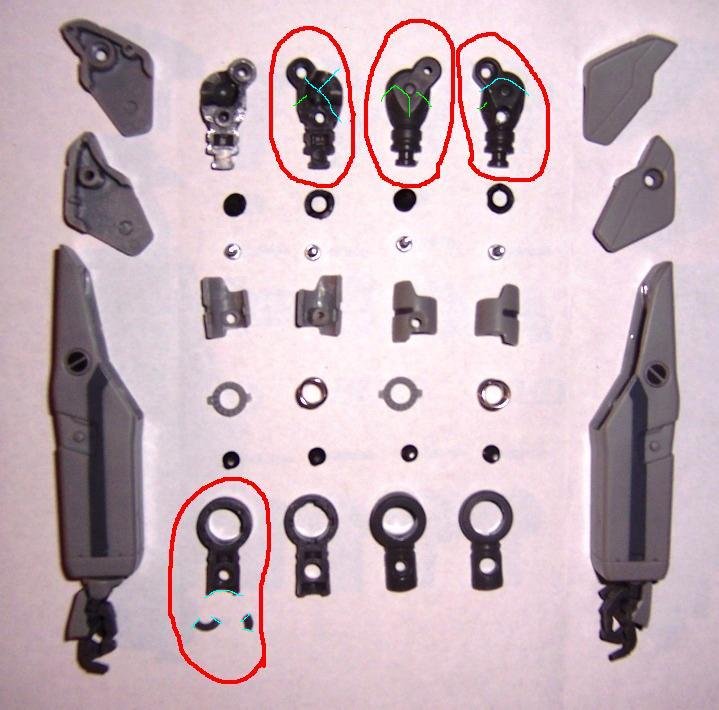
Which Plastruct glue in particular? ======>>>>Plastic Weld (bonds dissimilar plastics) Before you do anything, read this in it's entirety. Here's what you can do: *Place the PW in front of you where you can see it at all times. If this spills on plastic it will melt it. *MELTS PARTS at the point of contact. Dries quickly when applied thin. **A small application goes a long way. Over applicating will render the parts useless and turn them to goo. ***Use tweezers when making final placements. When your hands make contact with PW anything they touch right after will leaved imbedded fingerints. BROKEN PIECES: 1. Locate all the pieces. 2. Dry fit everything twice, first using you hands, then tweezers. This really helps. 3. Disassemble both biceps and both shoulders. Keep all parts at arms reach. 4. Open your bottle of PW. 5. Brush a brisk light coat on the first surface to be repaired. NOT ALL at parts are to be brushed at once, just the parts to be put together at this time. 6. Re-apply PW while leaving a tiny bead on the contact areas. 7. Re-attach and press the pieces firmly together. Do not add too much pressure, this will lead to warped parts. 8. Repeat steps 5 thru 6 until all parts are bonded together. 9. Allow to dry. 10. Brush a light coat over the exterior of all affected parts, resulting in a glossy finish. DO NOT APPLY PW INSIDE WHERE THE HALVES COME TOGETHER, PARTS WILL BE RUINED. 11. Once the parts are dry, re-assemble everything loosely. DO NOT OVERTIGHTEN. 12. Allow figure to remain untouched and loosely assembled for SEVEN DAYS. Trust me on this. You need the parts to fully dry and not mis-shape while drying. 13. On DAY EIGHT, screw down all parts as normal. DO NOT OVERTIGHTEN THE SHOULDERS or BICEPS. 14. TIGHTEN down on the SHOULDER COVERS ONLY. The pressure applied by these will be sufficient and maintain friction at the shoulder joints. ****Glossy finish can be lightly sanded for a satin finish, but is not necessary. REPAIRING STRESS MARKS - 1. Crack the part off or slightly pry the piece open and brush PW inside. 2. If you cannot open a stress mark, leave it and brush PW over it. 3. Repeat steps 9 thru 14 listed above. Attached pictures: RED - Affected areas BLUE - Stress Marks GREEN - Broken parts Hope this helps. It's worked great for me on various occasions for different Zero Phoenix(es).

-
WWhatever you do, do not use Crazy Glue to repair it. Go it and find Plastruct Glue. I have had great success repairing 0As with problems like these.
-
So second release could be eminent. Great news indeed.
-
Wow! That is an awesome, Cobra Commander! Just kidding, the colors look spot on to the box art. Great job! Can't wait to see this next to a completed 1/60 Regult.