geecie30
-
Posts
240 -
Joined
-
Last visited
Content Type
Profiles
Forums
Events
Gallery
Everything posted by geecie30
-
Thank you un marine,for your baco bits of insight to the salad of life, but wouldn't it be neat if some one just tried it so please twist the posibilities.Make the dream real,because with out a dream you cant have a dream come true Pleeeeease!! Also Exo,sorry to disrupt your train of thought and thread but it was just an idea that popped into my mind spun off from the whole destroid grain Whats more is that they really arent that far apart Structurally
-
can you sell me the 1/60 yamato skulls for the rear wings ?
-
I am a bit confused EXO ,You know how there is not a Gladiator in the conversion kit made by Takatoku ?Well, I wish they had this one as part of the kit.and I wish to see one,from scratch, that works with the skeleton.If you hadn't already told me this.
-
if you could make the 4th and missing gladiator for the set I would be game ,BIG TIME
-
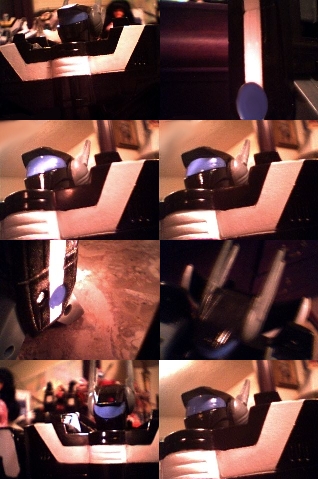
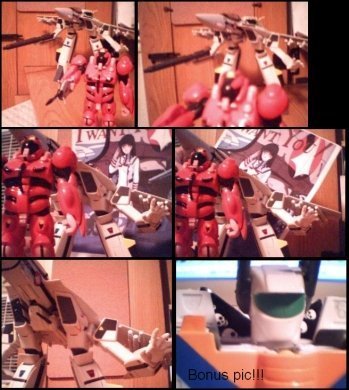
I will try to get some bigger closeups ,this project is a work in progress and I will gladlymake some available here .I still have a ways to go.Next idea is to get the tabs on the shoulders painted amber like the normal valks.Also to get the head lasers round module painted black as I mentioned before. I just need to get some paint.I have ,however painted the visor so I am submitting it with this reply By the way:The paint I used for the head visor is enamel,I think its more compatible with the black base coat (Well at least it dried fast and well in 8 hours),but Iam sure that "paint for plastic" acrylic would work link#1 I've used before <<<#2 same as #1 but in a smaller assortment (I wouldn't use the provided brush)

-
can i get the minmay please
-
I am so busy with things that, I scarcely have the time for learning curve for the inevitable immenent essential airbrush that I plan on using and purchasing.I love restoring things so, I have learned a bit about different things I could use,besides I didn't want to spend a mint on the custom that cost so little as in the case with this lil' bootleg nor would I ever spoil a Bandai Valk,all things aside it looks great to me and its a tough paint job not one of those crackin' paint jobbersons. The fine detail will be my pet project when Iam bored so I will get it done sooner than later but not as vigorously as the rest of my hobby priorities. If you care I will update this thread with upgrades as soon as I can
-
yeah,I was just wondering what the dvd contained. DYRL can be downloaded???
-
Does the macross 20th anniversary dvd have do you remember love? ? I am having trouble navigating through it?
-
Does any one know what that hatch thing is where the alphas butt is? Thanks
-
if i did panel lines it would probably use a micron pen by sakura for normal colored valks i use the micron pen with number 005 but for white colored ink for panel lines i would probably use Link Link#2
-
its a bit dark tonight so I will take some better pix later.I also need to complete some detail like the blue eyes on the head,and other assorted things and I must say that this paint is very durable and stood up to reassembly with no chipping, peeling,or any questionable quality.I was surprised.This is not like normal spray paint,I would never recommend normal spray paint on plastic but krylon fusion turned out real nice in my book and this krylon fusion is not "normal spray paint"I would also mention that you should never try to paint to the last drop of paint.Once the paint starts running out while spraying dont keep spraying because then the right mixture when the can is near the end is out of balance and mostly air or propellant and it adds a flatness to the paint.some people might be tempted to save money on paint but if you know that you are at the cusp of running out of paint in the can just stop.you can always use this last bit of paint on the bottom side of plastic on the some part that is underside like under the chest plate since you dont really need a great coat in that spot.
-
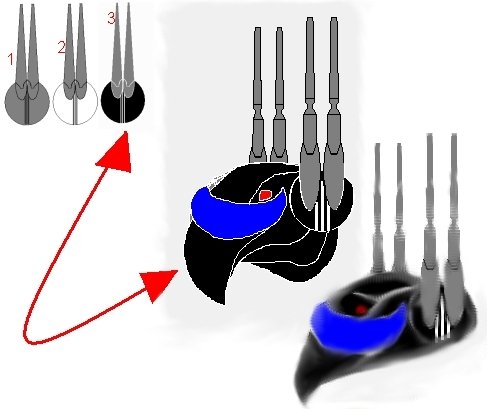
whats funny is how light the paint levels.If it were regular spray paint it would be thick .This paint is bizzare its real thin and strong I can barely understand it .real smooth.I notice with the joints that the tighter the screw is ,the tighter the joints get .I wont have to worry about loose joints on this particular robot.I will put it back together today.But the visor on the head will need to be painted in 6 days You ever notice that the bandai 1/55 has grey lasers on the head as in picture figure# (1)? when refering to the 1/55,Iam curious why I have never seen any one paint the head gear laser white like in the cartoon as in figure#(2) on the vf-1s Roy Fokker I will do number (3) my take on it for my custom
-
link link I have seen that as I was browsing one day too!the language is close to spanish but its Galician a romantic language from the iberian region.like a bit of Portuguese.This guy is a sculptor who offers courses in sao paulo so it must be Portuguese from Brazil he makes commercials out of claymation probably a professor of commercial sculpting and works on props for movies and makes stuff for theme parks like little robotic sharks ATENÇÃO: os modelos apresentados aqui no site NÃO ESTÃO A VENDA. means: attencion these models that are presented here at coala films web site no are for sale (not for sale )
-
The chest piece has been masked.I didn't mask the wings and leg stripes because the plastic was allready white.I didn't want to try to get the paint off the chest.Well,I tried but easy off oven cleaner wasn't strong enough ,so its ok I will have to paint the chest plate stripe.the stripe is kindof a hybrid cross between bandais' and yamatos style or a bit of my own.It also looks crooked here but it isn't I scanned this piece and the its kindof at an angle.Also, with krylon fusion if you want to paint any other color ontop of the krylon fusion you must paint it within 24 hours otherwise you must wait 7 days to paint anything on top of the krylon fusion. the first 24 hours the initial curing process hasn't been completed but after 24 hours a 7 day molecular hardening process is in effect.The krylon representitive told me that the krylon fusion turns into plastic and even though the paint is perfectly cured in 24 hours ,there still is a 7 day wait period for painting on top of fusion.I think I would rather wait 7 days to remove anydoubt,because the thinners that are in paints might thin the base coat(krylon fusion),causing it to maybe reliquify. So,basically make base coat in krylon fusion and wait 7 days to paint details,stripes ,and such.there are plenty of things you can do in the interim.like watch the olympics.

-
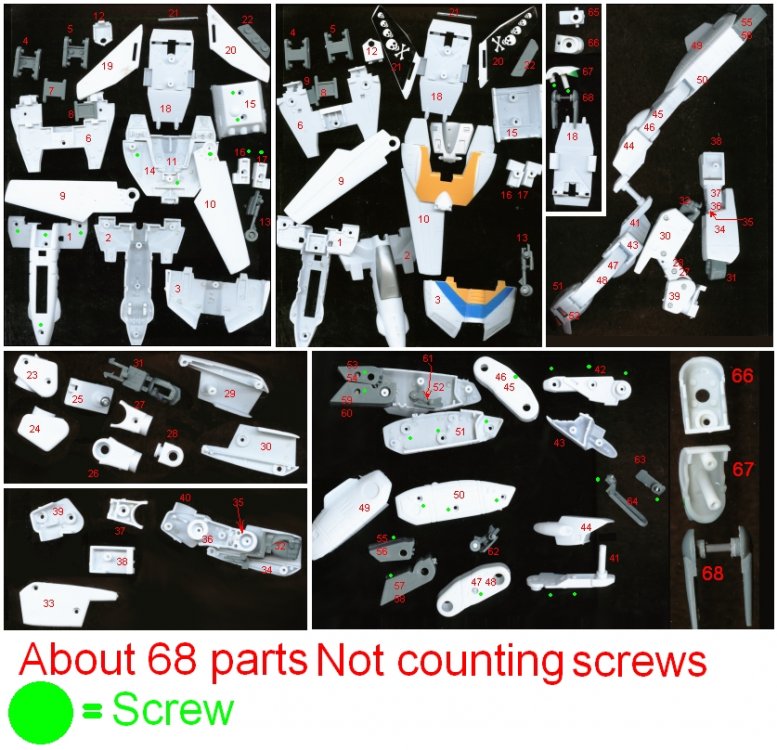
I wanted to get a good paint job so I took every part apart
-
well I have compared the original bandai against this replica and it is the same size in the canopy.The problem is that the canopy is molded onto the valk.This isn't really a major problem it would be easy to cut off the canopy and make one or reuse the cut off canopy.But,for me, since I have two cheapo valks I can make one in battroid mode and another valk that only transforms into gerwalk or fighter.for the fighter valk I would paint the canopy some blue color to appear like see through kindof like the mpc alpha prototype if you remember.but if you carefully cut off the canopy you could always use a canopy from another 1/55 that isnt in fighter mode Greatneck saws have been good for my mini cutting necessities I can always find these midget handsaw frames and blades at almost any hardwarestore.for plastic i look for the small teeth blades.the rest of the canopy cut off carefully with a razor

-
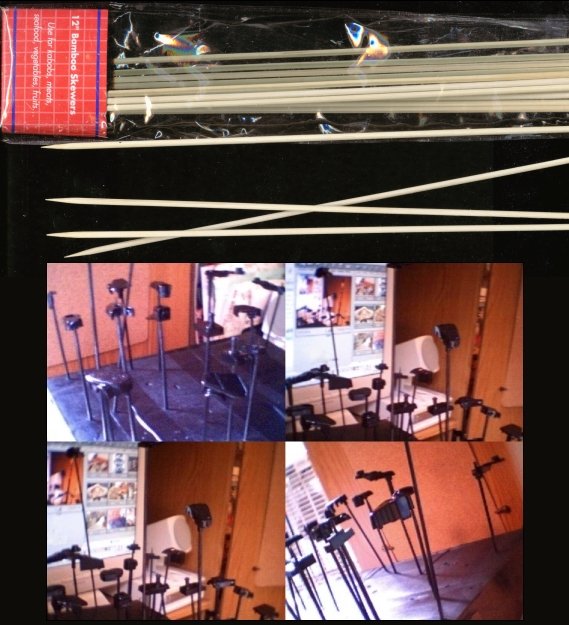
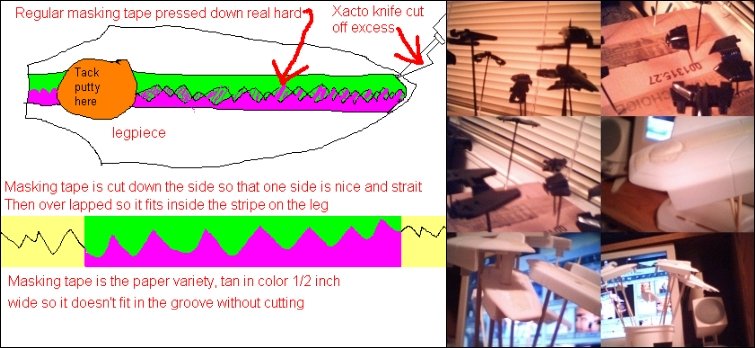
today was nice and hot and warm-windy which is perfect for spray painting outside.So that afforded me the window of opportunity to get the small pieces painted.I stabbed holes into my cardboard box with a chinese skewer.Then I impaled (usually put the sticks into the screw holes in the parts.), all the parts, with lots of those bamboo skewers and put the impaled parts on the sticks, in the holes in the box.The box was taped shut like a cube.so, I took the box with the little parts out side in the wind and painted them rotating the box four times on a little table that I covered in newspaper and the table was about hip level, so that I didnt have to bend. I pick an area where there are no shadows and glare.The little parts that have no where to anchor the sticks I just take some of that tack puttyto adhere the stick to. As you can see this is all black,The root of all evil is the heart of a black soul.it will have white stripes and a blue periscope camera instead of the green skull camera lens.(I dont know what they call it).I think the radar in back will be blue and the ankle holes will be blue as wellor maybe yellow but with no doubt the chest stripe will be white.kind of an inverted roy vf-1s .
-
Ok I heard about the krylon fusion argument and I went ahead and used it on my custom .This coat looks great and feels durable, so we will see I painted most of the model and saved the arms and legs for tommorro.But heres a wing,or do you prefer a thigh Finally by happenstance I've found a krylon fusion experimenter-Interesting insight
-
Point taken, duely noted, and agreed with
-
Here's the birdy
-
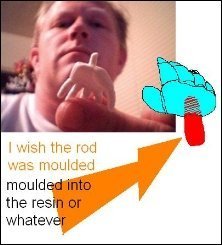
I took off the grey piece.Thank you EXO .I only have one 1/48 so this is my jem.I was initially affraid to pry the grey piece off..I thought perhaps it was glued from the factory.After getting the little guy out, I superglued the prong back on and shaved some of the prong down it.I even tryed to bend the part I glued ,to see if it would break but this time I waited a few hours for the glue to dry instead of a half hour like before.The hands seems to be ok now . I feel, fat-hands should be cast with steel rods of appropriate diameter.Just a sugestion if possible to any one recasting hands.Iam really not into the fist tv hands I like the open tv hands because they remind me of hikaru reaching out to pick up Minmay Iam also sick of My first chosen word "prong" I just couldn't think of a better word !!!
-
If its a must go ahead and snuff this post. no prob you are right about the grey piece being on the other side, EXO but thats where my question lies too.You communicated that the little grey piece can come off.I'm trying to figure out how. As far as Yamato is concerned ,this is no complaint about yamato.I was just surprised that the screw on the forearm had to hold all that pressure,and if you take that arm screw off there is alot of spring outward pressure,that makes reassembly kind of trickey.The fat-hand-prong broke off in the arm hole which doesn't reflect craftsmanship on yamatos.I love them.The tv fat hands are recasts.They were damaged during shipping I super glued the hands prong and waited an hour for the glue to dry.When I thought the glue was tough enough,I inserted the hands on the arm hole I was adjusting the hands to a nice position and the recast hands prong broke off in the hole. Myabe Exo will help me figure out how to separate the grey piece from the the white piece
-
about half is painted but I saved the arms and legs for last because they need the stripe done using tack putty to fill the round holes on the robot ankles
-
I did take the arm apart and the piece in the diagram was where the broken hand pole is stuck.i was wondering if the square piece in the arm can be taken apart the little grey piece feels like it is glued.the square piece is made of two parts as the diagram shows, so I'm still stuck