Jarrod
-
Posts
162 -
Joined
-
Last visited
Content Type
Profiles
Forums
Events
Gallery
Everything posted by Jarrod
-
Bandai 1/72 Scale Macross Frontier Plastic Models
Jarrod replied to Graham's topic in Hall Of The Super Topics
Yep, I noticed that too. In fact I glued them together wrong before noticed the error...and broke one when I tired to remove it -
Bandai 1/72 Scale Macross Frontier Plastic Models
Jarrod replied to Graham's topic in Hall Of The Super Topics
To answer both of your questions: In short, my normal build method: Paint, decal/sticker, wash, clearcoat to seal everything in. But for this kit it was: Paint, decal, clearcoat, wash. In more detail: First I completely snap assembled the kit, then I dissable into sub-assemblies for painting. For example, I left most of the the leg and arm frame assembled, but removed all the outer shell, etc. I generally do not paint my white plastics if its solid (non-translucent) enough, which means on this kit (and nearly every other Gundam kit I build) the white was bare plastic. The grey frame, feet, gunpod, and black wings were all fully painted. Next I reassembled the kit and applied the decals, so they all pretty much went on bare plastic. I used MicroSet to help the decals adhere, and then MicroSol to soften them and help them contour better. Let them dry for a day or so. And let me say, Bandai makes some damn good decals. They adhered very well, the fit was near perfect, and they were neither too thick nor too thin. Now normally at this point on a Gundam or resin kit I'd do my panel line wash, but I wanted to protect the decals as soon as possible (since just in the process of semi-transforming the kit to apply all the decals I managed to damage a few), I went ahead and clear coated the kit. I again disassembled the kit into parts, in this case a whole arm, whole leg, etc, and sprayed on Testors' Model Master Semi Gloss (normally I'll use straght gloss, but I was out..boo), with a second coat sprayed primarily on the decals. After the clear had dried for a day, I applied an oil wash. I use generic black oil paint (the kind you buy in a tube at Wal-Mart), thinned down to about the consistency of water, using Low Odor Mineral Spirits (also from Wal-Mart). You dab it in a panel line with a thin brush, and, for the most part, it spreads out into the lines. Then after it dries for a few mins, the excess is just wiped away. You have to be careful tho, because it will also flow around the edges and underneath stickers and decals, which could pose a problem on the wings of the VF-25 if you don't clearcoat before the wash. This is another reason I changed my normal routine and clearcoated befor the wash for this particular kit Now, it's really a good idea to apply any wash to a glossy surface, and yes, bare plastic works great too. In fact, pretty much every bit of white on my MG Gundam kits had the panel lines added to bare plastic, and it always comes out great. Again, I'd normally clearcoat after the wash to seal it in, but really didn't feel like adding another layer of paint to some parts. And I didn't feel the wash needed sealing as it already stuck very well to the near flat semi-gloss coat, so well in fact that I had to rub more than normal to remove the excess. Whew. Hope that helps. Jarrod -
Bandai 1/72 Scale Macross Frontier Plastic Models
Jarrod replied to Graham's topic in Hall Of The Super Topics
I used decals...expect a full gallery and review in the next few days:) Also, I clearcoated after assembly and decals, but before the wash. However, I've often put a wash on straight plastic with no issues. An yes Tamiya Clear Coat should be fine. For me, at least, the Testors' clear coat I put on had no adverse effects, and definitely did not creat a too think layer. Er...It's my original custom 1/72 Hasegawa VF-1 ...you can see a full gallery of it below in my sig. Jarrod -
Bandai 1/72 Scale Macross Frontier Plastic Models
Jarrod replied to Graham's topic in Hall Of The Super Topics
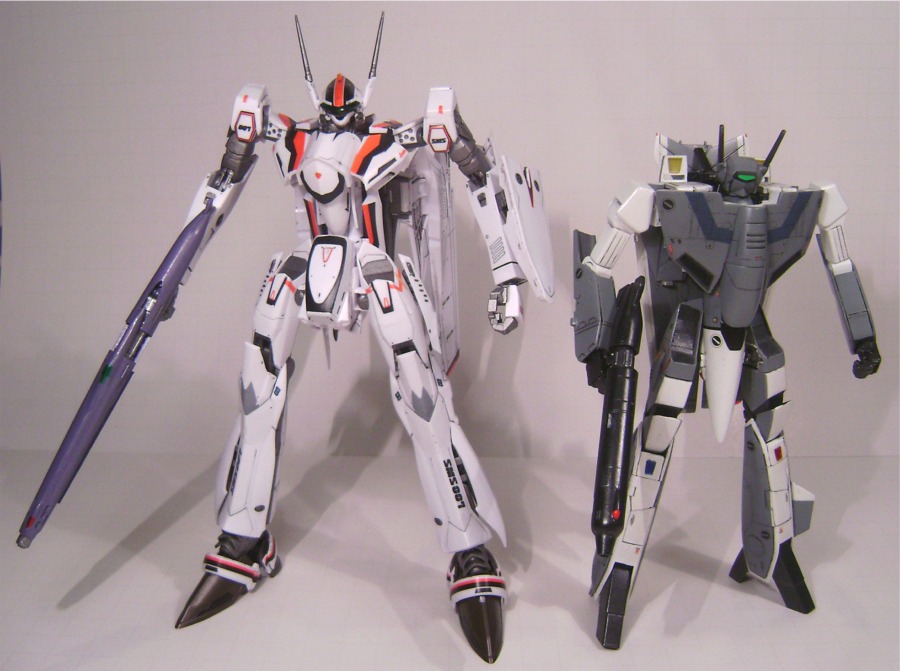
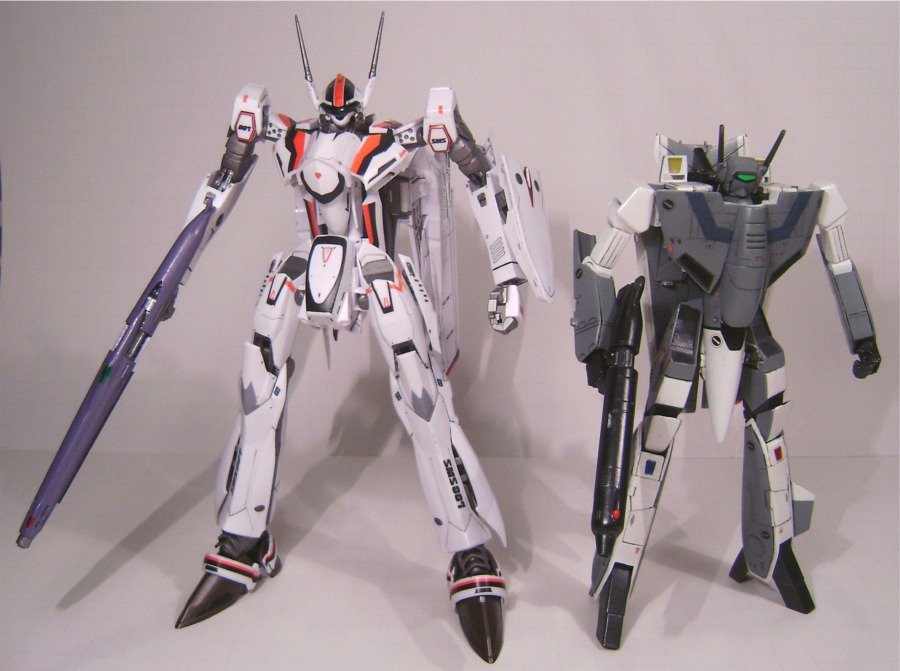
Next to my custom variable Hasegawa VF-1.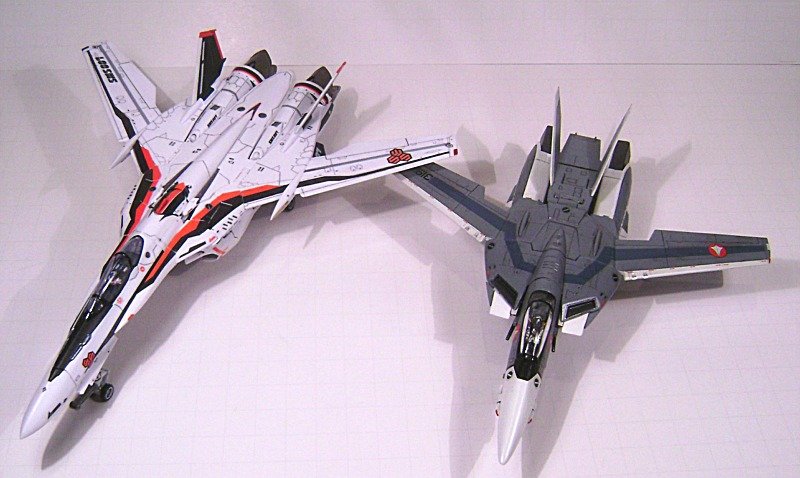
-
Bandai 1/72 Scale Macross Frontier Plastic Models
Jarrod replied to Graham's topic in Hall Of The Super Topics
Check again, there is indeed a waist joint! Well, its more of abdomen joint, but its there, and it rotates. I don't have any of the problems above, after numerous transformations...in fact I don't see HOW the anked joint pops out. It's totally enclosed, and has locking mechanism to keep it in the proper position. Should have pics of mine up on Wednesday or so. Jarrod -
Bandai 1/72 Scale Macross Frontier Plastic Models
Jarrod replied to Graham's topic in Hall Of The Super Topics
So, I got my kit today (Shipped EMS from HLJ), and spent all day assembling the kit, and then dissambled it for painting. Some thoughts: First things first, the fighter mode support stand is absolutely NOT needed! In fact, that area might be the most solid in fighter mode! That said, the wings and legs have no pegs or locking points whatsoever, and remain in place solely by the friction of thier joints. The parts fit in fighter mode is not perfect, but far from bad, and with a little caressing you can get those gaps and seems to nearly dissappear. Transformation is nicely complex, and it had a few "Oh so that how it works" moments. It is definitely a bit tricky in a few places, particularly getting the chest over the nosecone in battroid mode or putting the arms back in place in fighter mode. The lack of polycaps is so very refreshing! I'm totally a believer in ABS joints and this kit, along with the recent MG Turn-A for example, are perfect examples that ABS is the way to go for sturdy joints. Speaking of sturdiness, battroid mode is SOLID, and very nicely posable. Gerwalk mode is definitely the least stable of all three, but does look pretty good. As for the markings, you get three sheets. The first is a small set of foil stickers which contain stickers for the visor, gunpod sensor, and some white stickers to correctly color the pelvic piece(which is molded in black despite being mostly white with a small black section). The next two are identical sets, the first waterslide decals, and the second of the clear backing, pre-cut style similar to what comes with Yamato Valks or a MG Gundam. Either option you choose, expect to spend a few hours on them I should have this thing fully finished in the next few days, and I'll post a gallery then....any particular questions feel free to ask. Jarrod -
Bandai 1/72 Scale Macross Frontier Plastic Models
Jarrod replied to Graham's topic in Hall Of The Super Topics
I'd say bare plastic actually, judging by the visible sprue marks. Also, for the mods: When we members start getting the kits should we post our reviews/buildups in this current thread, or start our own new one? Jarrod -
Bandai 1/72 Scale Macross Frontier Plastic Models
Jarrod replied to Graham's topic in Hall Of The Super Topics
Well, I've had my transformable MG S Gundam for years, and its still totally solid. Same with both my Zeta Plus'. My Zeta Ver 2.0 was a bit floppy right out of the box, but still holds poses fine, and has not progressed any worse. I honestly have pretty high hopes for the VF-25 staying pretty solid. Bandai enigeering for transformable/extra feature type kits has really skyrocketed lately, due mostly, IMO, to use of so much ABS plastic. This allows for smaller, stronger, and tighter joints. Not to mention that Bandai can now mold far more intricate parts as a solid piece instead of two halves. Jarrod -
Oh, it is most definitely painted(Bandai foil stickers, FTL)! I applied the foil stickers first and scribed the lines on, then removed the stickers and had perfect lines to mask around. Possibly, however, I specifically used parts from the following sets: http://www.hlj.com/product/KBYD-721B http://www.hlj.com/product/KBYD-718B http://www.hlj.com/product/KBYD-107B
-
Without FPs And finally, with some other 1/100 scale kits for size comparison Thanks for looking!
-
With FPs Thats about as much as it can pose, about the same as the 1/144 Bandai kits...
-
Transformation is simple and straightforward The extra parts needed for Battroid mode(the shield is the same as Fighter, but does need to be removed and reattached)
-
Thanks again to Valk009 for providing these great recasts! Anyway, this kit was far less of a pleasure to build than the SHE VF-4. Parts fit was not that great, the engineering is simple (and seems half-assed) poseabilty was/is horrid, the sculpt clearly uses parts from the 1/144 Bandai kit, the instructions are nearly useless, especially for the tranformation, and finally the included recast polycaps were pretty useless(not that I expected resin recast PCs to be any use to begin with...) First thing I did was replace all the resin joints with some Kotobukiya polys I had laying around. This included adding hinge joints to the elbows and knees as opposed to the ball joints the instructions recommended. Then I added some actually hip joints. The kit orginally had the upper hips/intakes fixed to the waist/fuselage by a thin, fragile sheet of 2mm thick resin...which promptly broke. Then I had to remove a good deal of the rear of the head and shoulders so that everthing would fit properly in fighter mode...it seemed like IHP never actually checked to see if the head would fit in fighter mode! After that, I changed the position of the shield to attach to the top/inside of the arms in fighter mode instead of the bottom/outside as the kit seemed to suggest. I also added some extra pegs and holes so that the Fast Packs were interchangeable. Finally I mildly reshaped a number of parts for a better fit and added a clip for the heatshield so that it would attach in Battroid mode. And after all that, I am quite happy with it. Battroid mode looks fantastic, far better than any other VF-11 I own. Fighter mode is prety good too; the nose sculpt looks pretty close to perfect to me. Unfortunately the rear wings do not slant outward but only stick straight up, and the feet looke way to much like folded up feet instead of engines. Gerwalk mode is only mildly possible(the legs just dont bend near far enough forward), and it appears it was not even designed to do so. Anyway, on with the pics:
-
Make sure you drill those holes as straight as possible, and make sure you use the correct drill bit. Oh, and don't overtighten those screws, its just resin afterall. You may also have to sand a few of parts that come in close contact and rub against one another, before you paint to avoid some wear. Other than that it is a fairly straight forward, if tedious, build. Jarrod
-
Heh, as long as it took me to finally get ahold of a VF-4, it is defintely not for sale. I'd think some of the Kotobukyia polycaps would work well enough.
-
Egad, that thing is hideous....it also looks nothing like the pilot mold from the kit I'm working on. Ok, guess I'll make up my own:) Thanks anyway tho.
-
I'm looking for a pic of the standard pilot from Mac 7 in color and can't seem to find anything. Is it the same color as Gamlins? A variation of it maybe? If anyone can find one for me, I'd greatly appreciated it. Thanks in advance.
-
Thanks for all the great compliments everyone! Yeah, I just clipped off some of the prongs untill it sat securely. Actually, this kit is nearly exactly 1/72 scale, within a cm I believe.
-
And Battroid:
-
This is the kit that Valk009 offered sometime last year. I've actually had this finished for months and just keep putting off taking pics. The kit went together really well, and I only had to make a few very minor mods here and there to get things to fit (and hold) together properly. I didnt bother with adding any locking pegs like I'd orignally planned, as it does hold together rather well. There was one joint that really gave me problems tho, the sliding plate to allow the knee to extend out for Gerwalk mode. It just would not stay tight, and made the legs unstable. So I permantly attached it for Battroid and Fighter mode, which is ok since I'm really not all that fond of Gerwalk mode anyway. For paintscheme, I went with SHE's suggested light grey with blue stripes. The light grey came out a bit too blue-grey but I was happy with it after the stripes were added. The metallic grey is Gunze Sangyo's Steel, which is a beautiful dark metallic color in person. And finally, I apologize for the poor pics, I'm a modeler first, and a photographer a far distant....um fifth maybe. And I spend too much cash on mecha do get a decent camera:) Anyway, on with the pics: Figther mode:
-
Mine's almost done...I have to paint some small details, ink in the panel lines and give it a clear coat. The kit went together very well, though I did have to make a few minor adjustments here and there to get things to line up properly. Jarrod
-
I have. This kit has some issues, most of which I'm pretty sure are the fault of the original sculpt, but a few seem to be because its a recast. First and formost, the recast polycaps just don't work at all for me, but luckily I've got enough Kotobukiya sets to compensate. The other glaring problem I've run into is that the head just does not fit in fighter mode. I had to remove a good amount of the shoulder blocks and reshape the back of the head to even get a decent fit. Not to mention the shield is just completely the wrong size, shape(I'm prety sure its just a recast 1/144 Bandai shield), and positioning for fighter mode. Did the folks at IHP ever even transform the thing? There are a number of other little minor fixes I had to do as well...but they elude me at the moment... Those issues asside, it looks great in Battroid mode. And after I redo all the joints(proper hinges for elbows and knees), give it some actual hip joints(that paper thin resin bar just wont do), and make the fast packs interchangeable, I suspect it'll be a pretty damn good VF-11 Jarrod
-
Anybody have any other pics of the built kit? Like fighter mode maybe? Jarrod
-
Count me in for 1! Jarrod
-
Gathering interest on a variable VF-4 resin project!
Jarrod replied to Valk009's topic in Model kits
Got my kit today, thank you VERY much. The casting is superb, I've have never known it was a recast if I didn't alreay! If you ever decide to recast any other SHE kits, I'm definitely in. Jarrod