
GU-11
-
Posts
3014 -
Joined
-
Last visited
Content Type
Profiles
Forums
Events
Gallery
Everything posted by GU-11
-
Of the 3 movies, the one I really didn't like was the second one. The third one is my favorite, though. I was hoping for pteranodons in the original movie (which, sadly, didn't have any), but I got my wish in JP III. Not sure how I feel about the genetic hybrid thing, but I'll probably still watch it on HBO even if Jurassic World receives poor reviews.
-
@Reno: I love flanker paint schemes on "lanky" Valks like the SV-51 and YF-19. And that paint job on your -51 is gorgeously done too. Looking forward to seeing the final results!
-
No problem, man. BTW, if and when you decide to get an airbrush, another thing to consider is the compressor. I recommend getting one with a reservoir air tank--less taxing on the motor, which should help it last longer. Out of curiosity, did you use Tamiya's own brand of lacquer thinner? Their official website stresses that you should thin with their own brand of thinner. I think Tamiya's acrylics react negatively to "generic" lacquer thinner, like how Vallejo acrylics tend to gum up when thinned with anything other than water and their own brand of thinner. There's probably some sort of proprietary additive inside that causes it. I mean, if you thin their gloss paints with alcohol, it turns out matte. As for spray booths, kitchen hoods probably perform better than a lot of the hobby booths out in the market. BTW, do you use a filter for the overspray?
-
Glad to help. Yeah, acrylics are probably the best medium for beginners, as they're the easiest to clean and remove. The thing is, acrylic's strongest point is also it's weakest. It's the least toxic compared to lacquer and enamels (not to mention automotive paints), but that's because it's solvent has the least "tooth". I've had year-old, cured Tamiya matte acrylics scratching off with just a fingernail. Clear coating and priming go a long way in strengthening its durability, though. Just a word of caution in case you plan on using Tamiya's acrylics. They're horrible when hand painted, but are a joy to use in an airbrush. If you do choose to use acrylics when painting with a paint brush, try Vallejo-- I've heard good things about the brand, and you can actually thin them with water. Spray cans are fine if you're not planning on getting an AB yet. Unless you're planning on doing fine details, pre/post-shading and blending, a spray can will suffice. And even if you want to do the aforementioned stuff, there are "cheats" for them without using an AB. IMO, an airbrush's greatest plus point is that, coupled with the ability to control paint flow, it produces such a fine mist that you can save up to twice the paint you'd waste through overspray with a rattle can. Of course, the point is moot if you're painting really large surface areas like RC car bodies or larger scale Star Trek Enterprise model kits. You probably already know this, but do wear a respirator when spraying anything. The damage is cumulative, and many of the chemicals in paints are carcinogenic.
-
1. Usually, panel lines go first, especially if you're doing a panel wash. Then again, you can always clear coat your decals before a panel wash. 2. A convenient way to do it is to use a fine-tip Gundam marker, trace the panel lines and immediately wipe off the excess with tissue. Produces quick and clean panel lines. 3. If you don't plan on painting the whole kit, simply panel lining on bare plastic is fine. If the kit has been painted, do it on a gloss-coated surface. 4. Never tried using them, since the Gunpla I've built usually come with dry-transfer decals and stickers. 5. Usually, the same solvents you used to thin your paint. Removing lacquers is tricky, as they tend to eat into plastic. Enamels might be dissolved using turps or lighter fluid. Acrylics usually come off with IPA or methylated spirits aka denatured alcohol, unless you thinned Tamiya acrylics with lacquer thinner.
-
Sounds like dipping is a more reliable method after all. You're right; just dipping the parts and taking them out immediately seems to be the best of both worlds. I guess psychologically, it only seems like you're using less FFP when brushing it on, when in fact, it's actually the opposite. Yeah, FFP's ability to dissolve itself is both a blessing and a curse, depending on the situation. Thanks for the tip on canopies. While I don't usually build fighter jets (and I call myself a Macross fan ) the same general principals probably apply to TF alt mode windshields. It really depends on what you're mostly using. For airbrushes, even the most basic spray booths should be good enough, since they shoot such a fine mist. IIRC, the lowest recommended LFM of vapor a spray booth needs to remove is about 50 or so. If the booth's specs are at least that, then it should be fine for airbrushing. Rattle cans would require something with more suction, obviously--especially if you're using store-bought rattle cans. Which is why I'm experimenting with decanted spray paint for airbrushing, since my spray booth is a cheap Tamiya clone, the same one sold at TCP Global.
-
Yeah, I also noticed that the FFP tends to re-emulsify acrylic paint, even when I simply applied it using a q-tip on cured acrylic paint. With lacquers, it dries to a smooth finish in 3 days. With acrylics, it's still somewhat tacky after the same amount of time. I guess it's a good idea to avoid dipping in FFP if the parts are painted using acrylics. The credit is still yours, my friend, as I'm a big-time lurker at Finescale Modeler, and I never found the answer to all that until you told me.
-
Thanks for the explanations, guys! @modelglue: can you reuse any of the FFP after dipping plastic parts in it? This stuff is like liquid gold. BTW, the overturned container idea is genius. The lid's wider area makes it less likely for parts to bump into each other, and you can simply lift the container up to check on the parts.
-
Yeah, that does look like it needs more than a little bit of refining. Good luck on your project! Hope to see some update soon!
-
I recently did some tests on some painted spoons, trying to polish away the orange peel using toothpaste and a wet rag. Works surprisingly well. Sadly, after adding a clear coat of FFP, it's still somewhat mottled when you see reflections from a lightbulb on it up close. I'd say it's just about the same quality of an actual car's paint job. Mirror-like sheen from a medium distance, but slightly mottled when viewed really closely. I guess I'd still need to wet-sand with 1000 grit sandpaper before using toothpaste and finally clear coat using FFP. Should be good enough for TF's or mecha with glossy paint jobs. Still, I wonder if there's a way to make it even glossier. So my question is, can you actually polish FFP with toothpaste? And if so, how long do you have to wait before doing so?
-
I'm a little confused here. A paper toy? You mean like those TF figurines some people make by cutting up cardboard? Either way, the general shape is pretty good; just needs a bit of smoothing out. Can't wait to see the final results!
-
Nice! IIRC, the Makerbot uses only PLA, or do the newer versions now print ABS as well?
-
I saw something similar on Discovery Channel once, except in the show, the host got to do a full 3D scan at the facility itself, instead of just using a photo. IIRC, they use a 3d scanner to scan in your face and/or whole body, and then do the necessary mix-and-match on some software. From then on, it's just a matter of turning the CG model into a plastic representation.
-
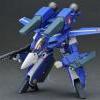
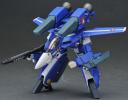
The LATEST Paint Experiment - VF-0S 1/72 Hasegawa
GU-11 replied to nostromorolls's topic in The Workshop!
That right there is a thing of beauty... -
Been a fan of Blomkamp's movies since District 9. Definitely looking forward to this one.
-
I see. While the Up Plus 2's manual and brochure says you can print details up to 0.15mm (150 microns), I guess that's a more of a best case scenario and more dependent on the orientation of the object when printed. And thanks for the heads-up; I'll try to keep panel lines at 0.2mm or more from now on. I generally avoid printing a "pre-assembled" object; it's cool, but not really worth the risk in case something fuses together. With separately printed parts, in case one of the parts's measurements needs adjustment, it's just a matter of reprinting that particular part.
-
Many thanks for explanation! It's crazy how so many 3d printing sites keep stressing 0.2mm clearance, but not a single one bothered to make it clear if it's the diameter or radius. I think Tiertime (the company behind the UP printers) is based in Beijing, and frankly, that's considered a pretty good command of English compared to some other Chinese companies. As for posting pics of 3d printed items, the stuff I printed are pretty small (deluxe TF weapons, heads etc.) and are pretty hard to take pics of. The fact that they're printed in white plastic makes it even harder. Sh!tty camera on my phone doesn't help either. I don't know about Formlab's printer being "not too far out," though. Sure, it's reasonable for STL technology, but extrusion printers are still far more affordable and there's less work to do after the print, compared to the UP printers at least. The STL-printed resin object needs to be washed in alcohol to clean off the liquid resin, and you'll need to periodically change the holding tray, as repeated use causes the laser to dull the clear plastic. On top of that, you still see very fine print-lines on the object, although the resolution on STL beats extrusion by a mile. BTW, again to UP Plus users out there, if (knocks on wood) there's a power outage in the middle of a print or when downloading an STL file, can you simply turn the power back on later and start again? I know there's no way to continue where you left off, but it wouldn't damage the printer in any way, would it? I'm asking because I'm thinking about getting a UPS (uninterruptible power supply) aka backup battery unit for use while printing. Even if the battery's charge might not last as long as a particular print, I can still safely stop the print and restart after the power comes back on. I probably won't bother if the printer can't be damaged by sudden power cuts.
-
So, it's 0.3mm for the diameter (meaning 0.15mm for the radius)? Thanks, I'll try that out! Many thanks! Seriously feeling a lot better about turning off the printer just like that. I kept looking at the interface software, looking for a button that says "off" or "shutdown", and the manual said nothing about it. Regarding the heating of the nozzle, yeah, removing the nozzle and soaking it is actually a more effective method. I just didn't want to go through the hassle of withdrawing the filament and putting it back in place afterwards. But come to think of it, heating up the nozzle might cause the filament to start extruding make even more of a mess. I have an idea: if I just soaked a rag in acetone and wiped at an unheated nozzle, will that work in cleaning the burnt plastic from the nozzle's sides? It'll probably take a little longer, but it's not that different from soaking. Would that work? BTW, the UP models have a new baby brother: It's definitely kind of pricy at 2700 USD (though not close to Form1 pricy), and the specs aren't that much of an improvement. Still, it does slightly finer details at 0.10 resolution and has a bigger build area. Lots of new conveniences, though, with everything enclosed in a cute little casing, and an air filter to keep your room from smelling like chlorine.
-
One more thing, for UP Plus users out there: I'm a little confused about the process of cleaning the nozzle. The manual says to heat the nozzle up by clicking on "extrude" and then "lowering the platform." How do I lower it? And after wiping down the nozzle with paper or cotton cloth, do I just shut down the printer? With such an expensive piece of machinery, I'm scared to simply shut it down by pressing the button on the back. The thing is, the manual just stops at "wipe down the nozzle with a cotton cloth", and doesn't say how to properly power down the printer. Or is it really just as simple as pressing the switch at the back?
-
Thanks, Chronocidal! I guess it's better to err on the side of caution; 3D printer plastic is pretty hard to sand.
-
Here's a questions I couldn't find the answer to for the longest time; when 3d rendering sites say to give a 0.2mm clearance between pegs and peg holes, do they mean 0.2mm on all sides, or the total diameter? For example, if I want to print a peg for a 10mm diameter peg hole, do I give the peg a 9.8mm diameter (0.1mm clearance on both sides) or 9.6mm diameter (0.2mm on both sides)?
-
The "non-Gundam" design was clearly at fault, but I still think the tipping point was the bike. That thing already looks like a human-scale cyborg/android--putting it on a bike emphasizes that even more. Well, I don't know anything about Warhammer 40K, so the first thing that came to my mind was: metal suit + horse = medieval knight.
-
Well, technically, the Meteor Hopper's a unicycle. Gundam designs have always looked somewhat like medieval armor anyway--IMO, it seems pretty fitting that they'd be "re-imagined" as knights on horses.
-
It might have been okay if he didn't add the bike. Still, it's an awesome looking build. Pity. Looks pretty cool, but yeah, it's not Gundam. More like a scratch-build from a piece of random futuristic cyborg concept art.
-
Beats me. I was asking Electric Indigo the same thing, since he was the one who posted the pic. Or were you asking him in the first place?