

Urashiman
-
Posts
762 -
Joined
-
Last visited
Content Type
Profiles
Forums
Events
Gallery
Posts posted by Urashiman
-
-
AWESOME!
-
17 hours ago, Sanity is Optional said:
That 171 is in desperate need of panel lining and some detail work.
Now I'm feeling a need to do the one I've got in my (gigantic) backlog.
Yeah, I just snapped it together. Going to airbrush this thing soon and panel lining will happen too. No worries

and ... I have a giant backlog myself with kits that need building since 1999 ...
-
16 hours ago, kajnrig said:
Nice review. I've a few of these lying around the house, in various states of doneness.
One thing to add: The NUNS logo on sticker 3 is backwards; they simply mirrored the stickers during the design phase. Here's my "decal" version of the stickers (to be printed on decal paper), with the orientation corrected.
Awesome - the decal sheet looks nice. I am going to use this if you don't mind.
-
finally got some new kits for my collection.
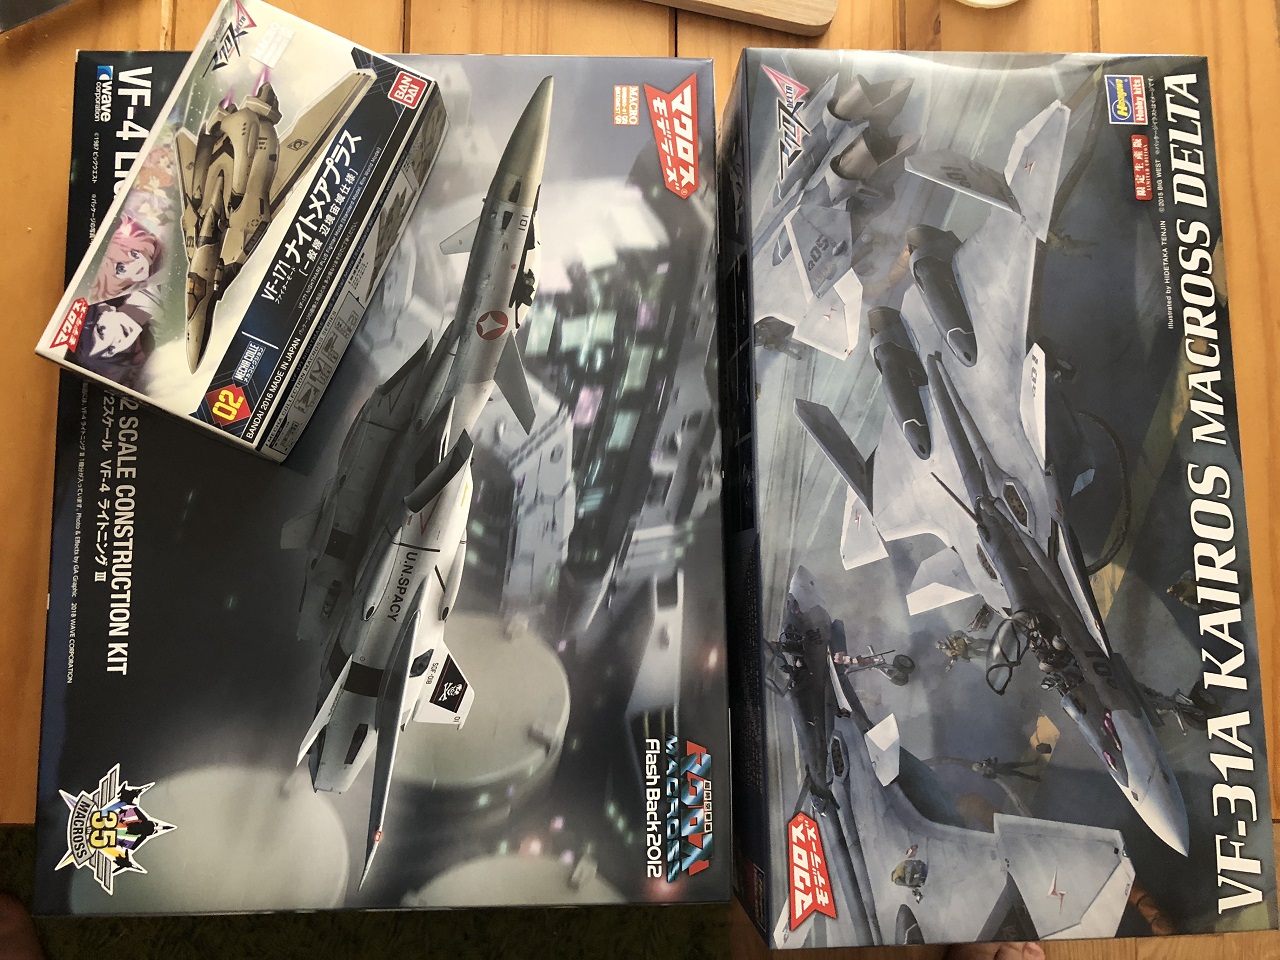
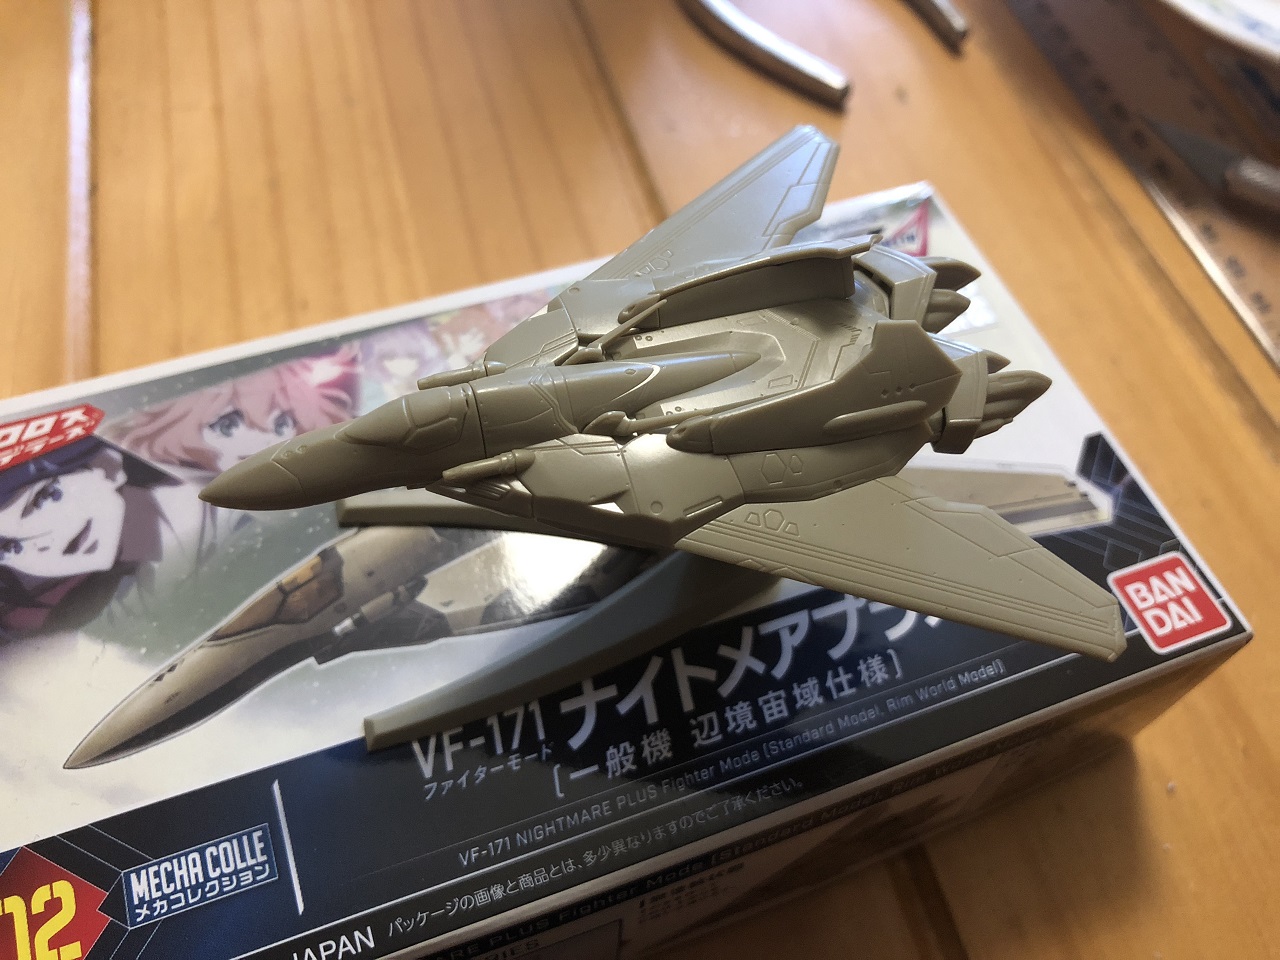
Snapped together the VF-171 already
-
Hello everyone,
Time for a short review on the Bandai VF-171 Nightmare Plus kit from Bandai. This is a non-scale mini snap kit. I haven't seen many people talking about this thing here, so I'd like to give my impressions on the mini kit.
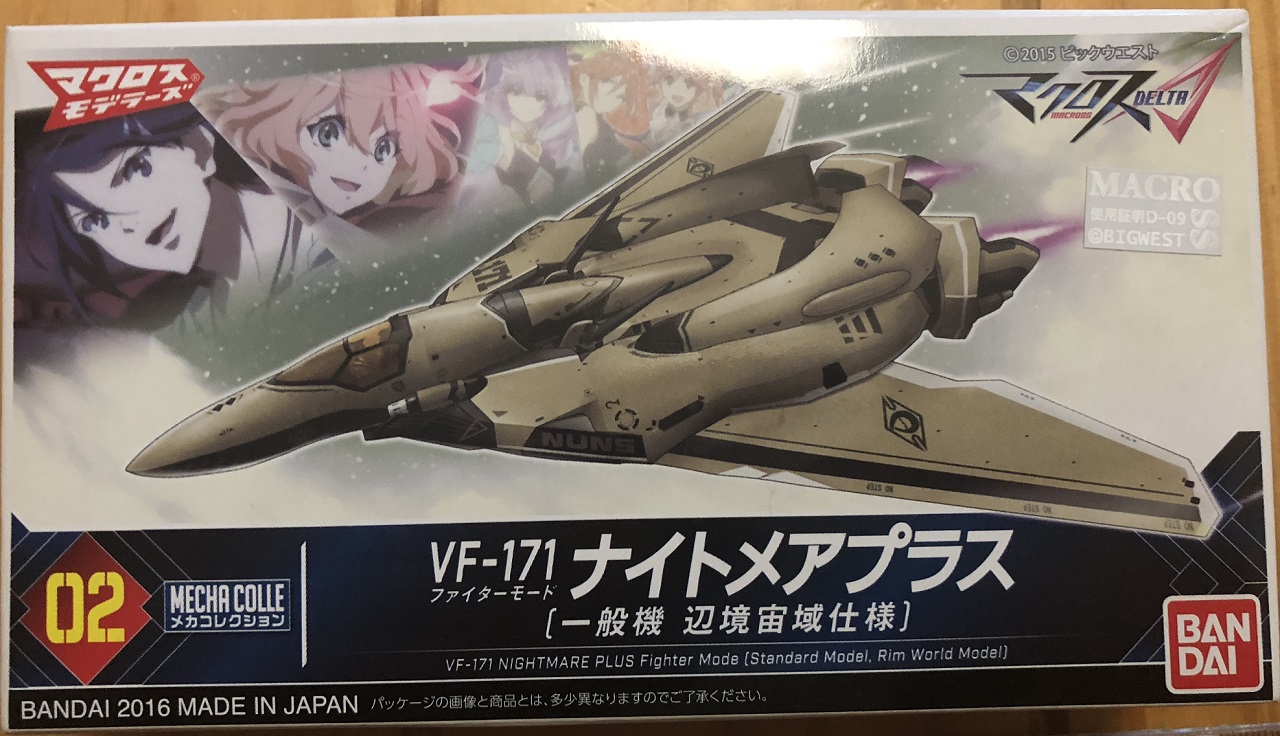
List price at HLJ is 500¥, I got it for 425¥ when I ordered it. The box size is 8.5cm x 15.1cm x 3.8cm. The model, when build, is 8.5cm in lenght and has a wingspan of 7.5cm.
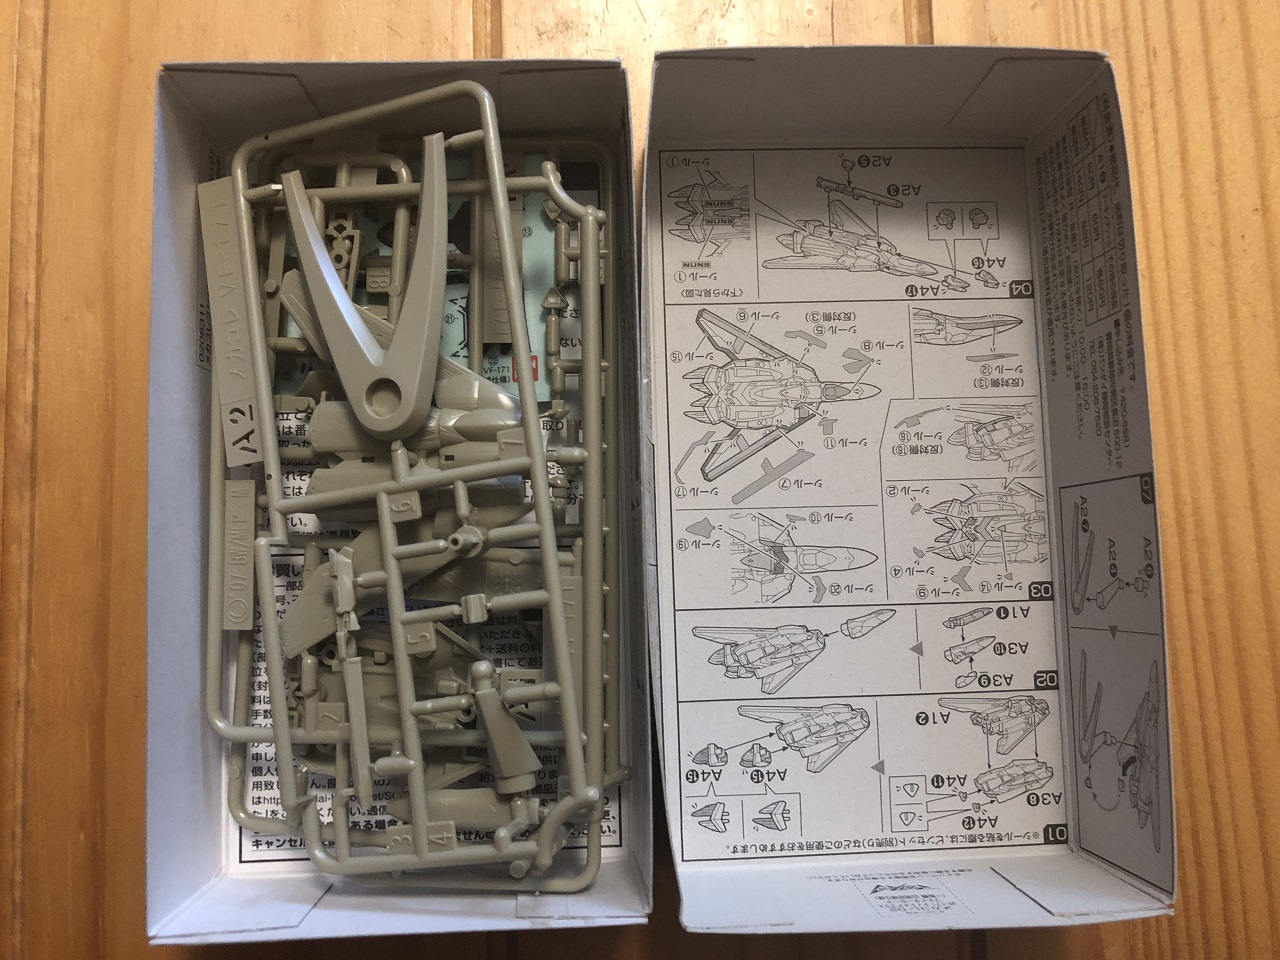
The manual is printed into the box, but easily readible. The plastic casting was in a plastic bag as usual.
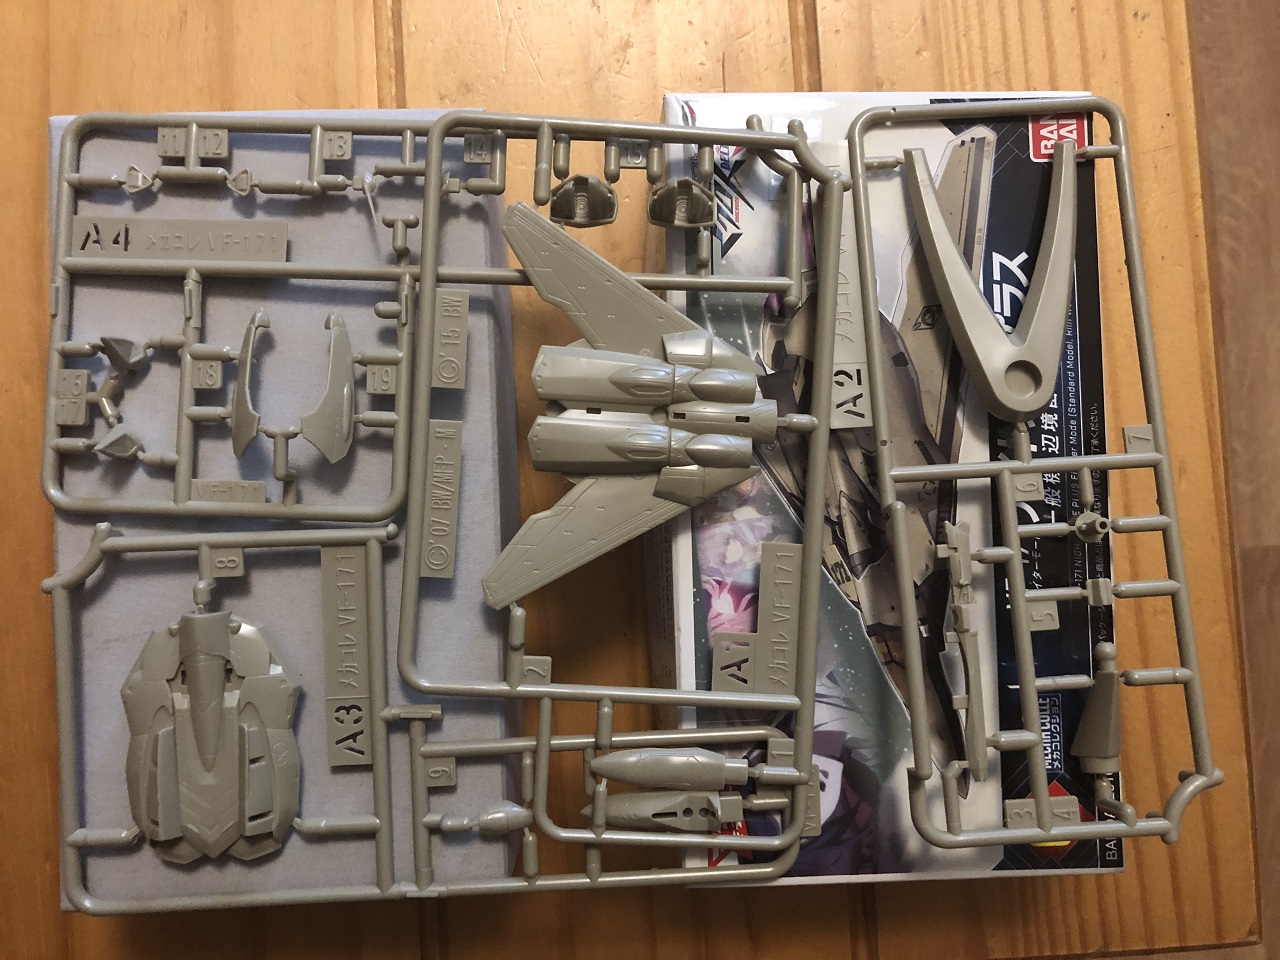
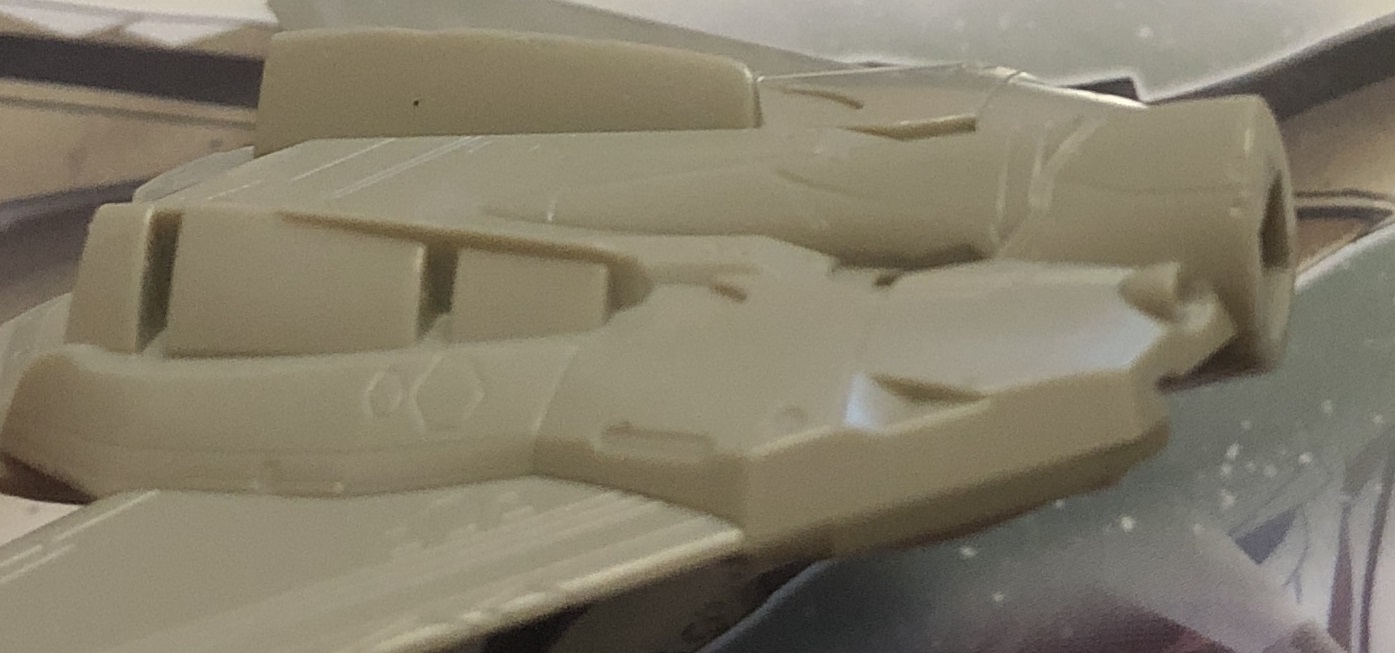
For the size of the kit, the detail is nice and fine. There aren't much parts in this kits, but that is okay. Some of the parts are really small, which I will show in another picture.
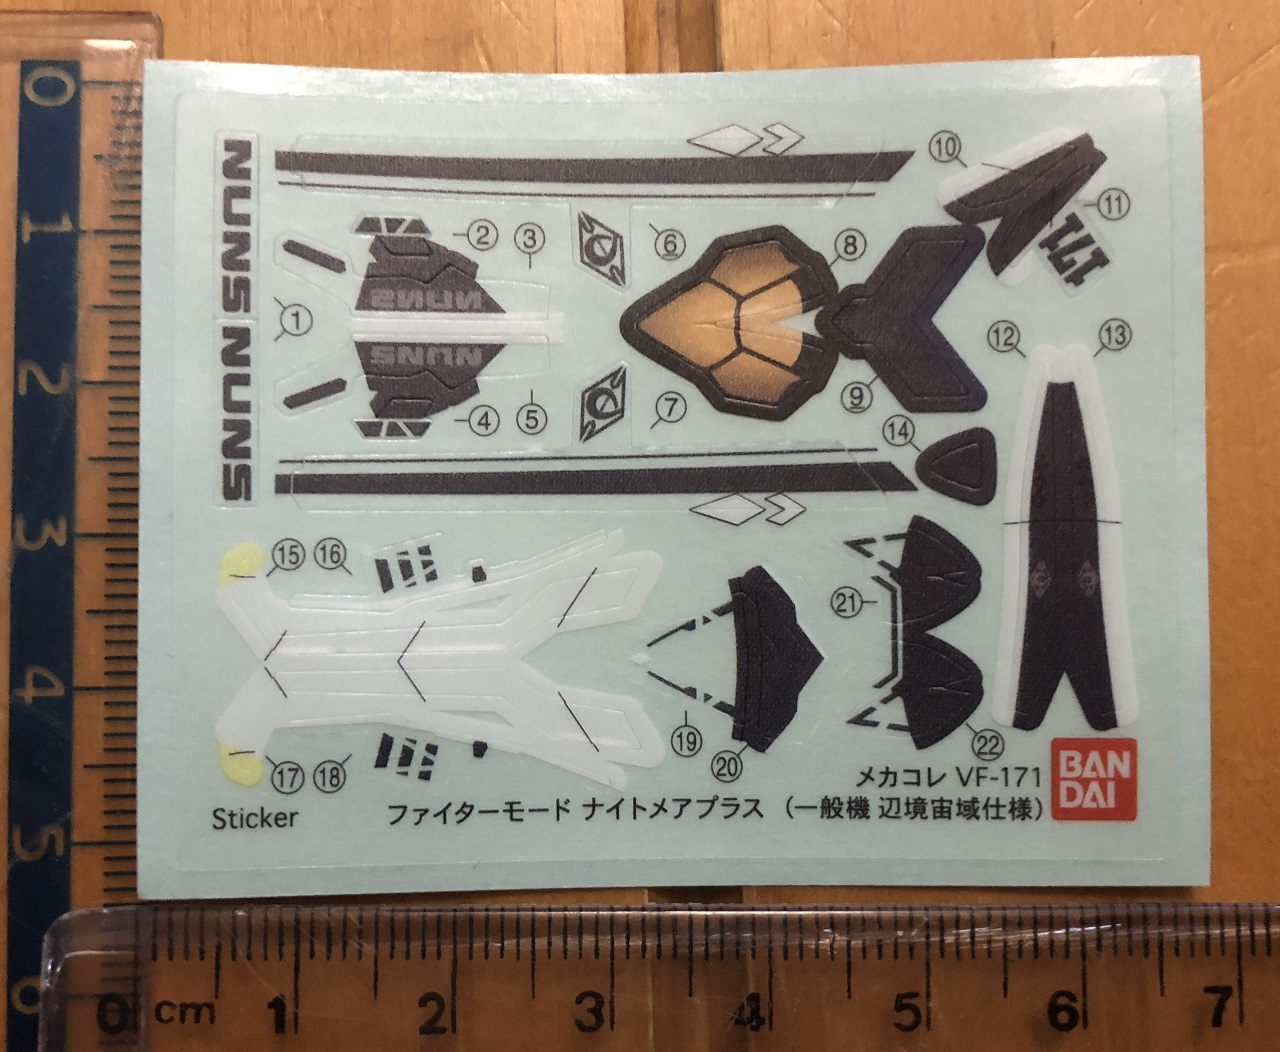
The decals are precutted self adhering stickers like in the 1/100 scale Macross Frontier model kits. As you can see the sickers are really small, so handling them might be tricky.
Sorry for the bad quality pic, but here you can see that the main body is snapping together nicely, leaving no gap. My experience from other Bandai kits (1/100 VF-25, 1/100 VF-2SS, 1/144 VF-17, VF-11 MAXL, VF-11B/C, VF-19 KAI, Gundam RX-78 and Gundam RX-78-2) is, that there will be some gaps here and there which will require glueing or filling paste.

There is a relatively large gap infront of the nose. Using glue can fix this easily.
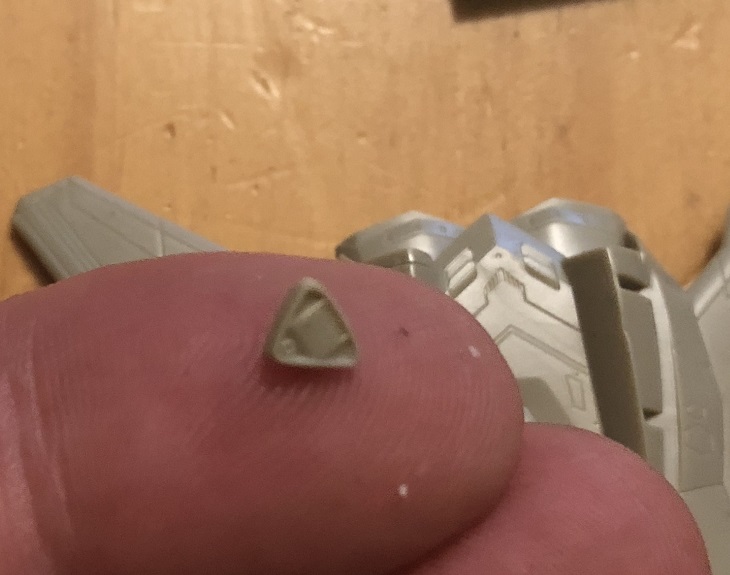
Here is one of the extremely small parts, just to give an example.

Done - Build time with taking pictures inbetween is ~15 minutes. I didn't attach the stickers yet as I want to airbrush that thing properly. The calculated scale for this small kit is 1/184.
Conclusion:
A nice little addition to my Macross Mecha collection. There isn't much love for the VF-171 in form of model kits, so this small kit makes me happy that I can have it in my shelf. If needed this kit could be painted in Macross Frontier colors. As far as I know there wasn't much change on the VF-171 design between Frontier and Delta. The kit isn't having much gaps that need filling. For the size the details are good, better than on the old Macross 7 1/144 kits. If you have sausage fingers like me, you will probably have trouble to handle the small parts, but nothing that tweezers couldn't handle.
I hope this will help to get an impression on this little gem. If you have any question regarding this kit, please let me know.
-
PCSX2 with any bios would work. Remember that you need to have a decent powered PC to run it on the Emulator. I played it in 3x resolution on emulator with i7 6700k@ 4.0GHz and a MSI GTX 1060 OC at a total stable framerate, no crashing issues or other annoyances. I have the original disc and ripped it to run from a SSD. Works faster with the loading times, but also works good from an USB3.0 external HDD. Loading from the original disc can lead to some disc skipping errors, which leads/can lead to crashes, so I highly recommend ripping it to HDD or SSD before playing.
Or, as everyone else said, get a modded ps2. I still have my original one with a stealth mod chip and it is working good.
...but that game with a better resolution on emulator looks so good - sometimes I think it looks better than Macross 30 because the design is really clean.
-
18 hours ago, arbit said:
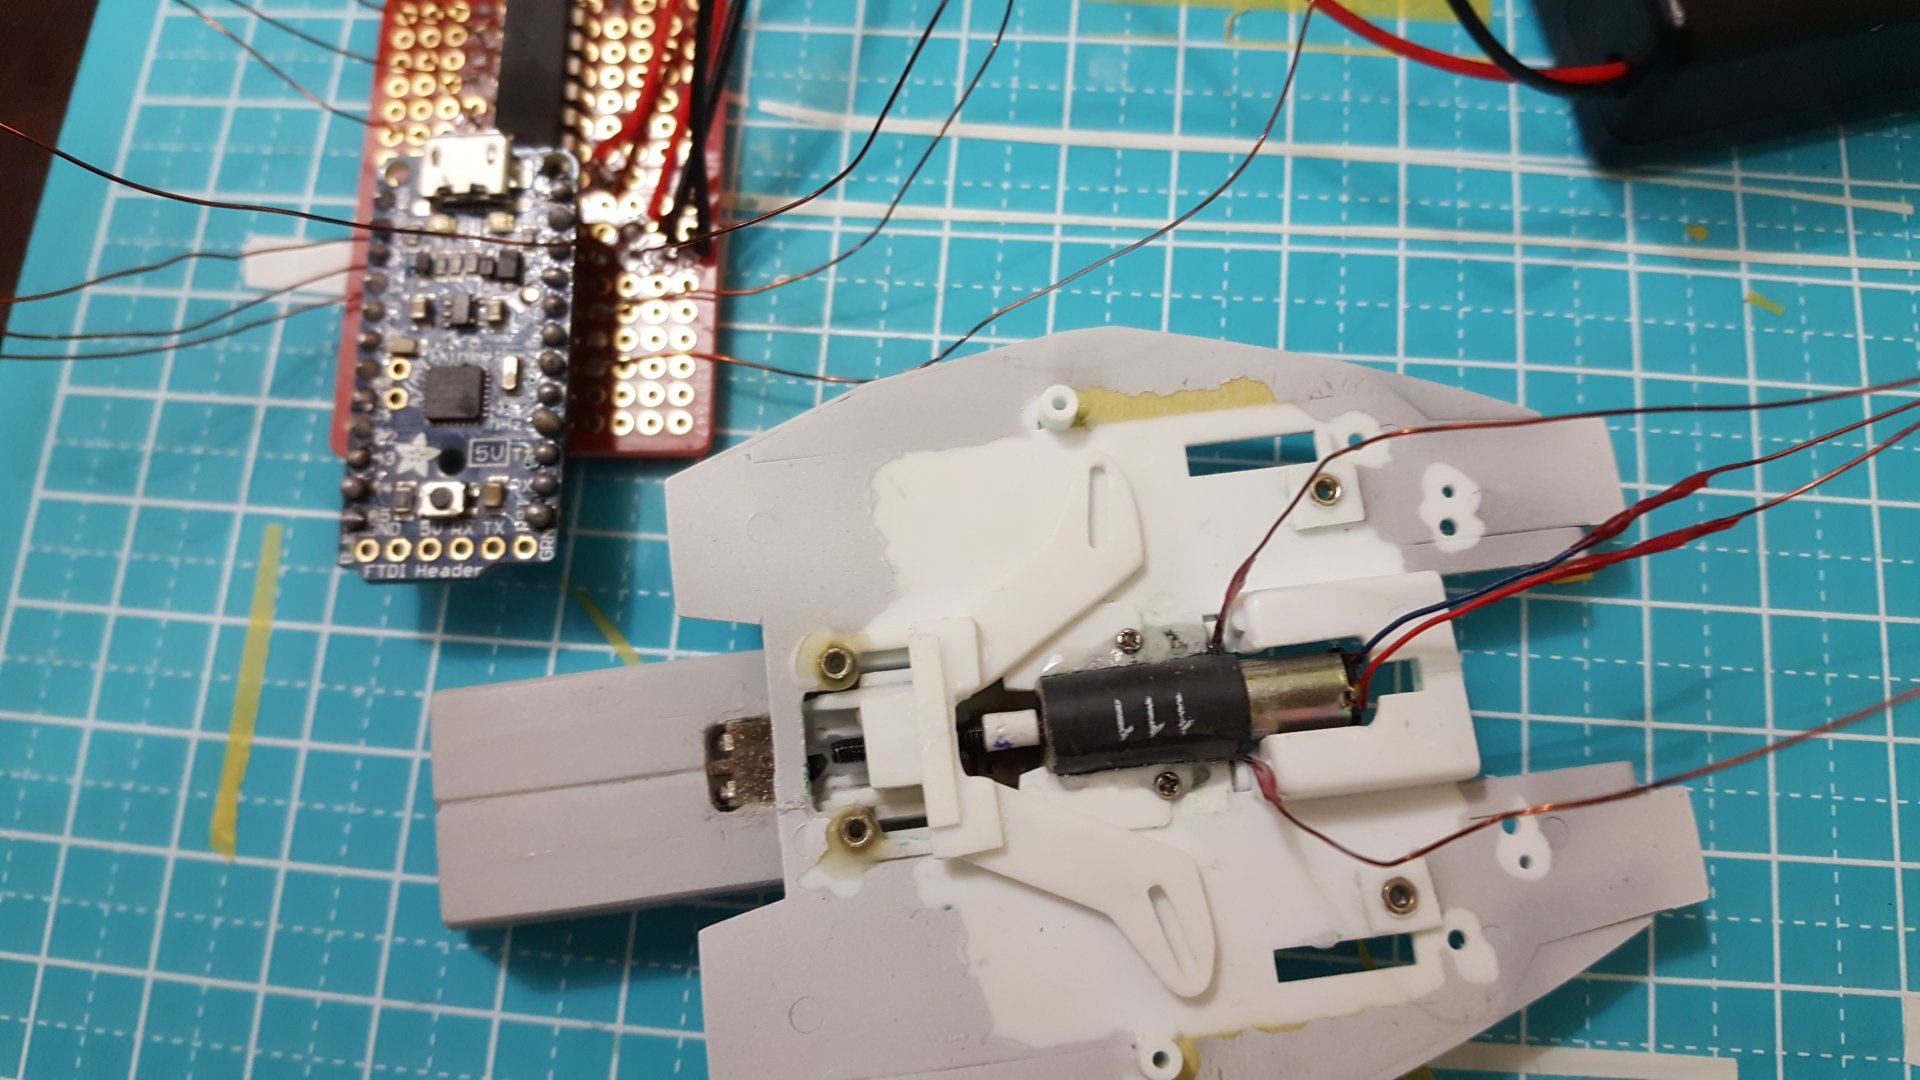
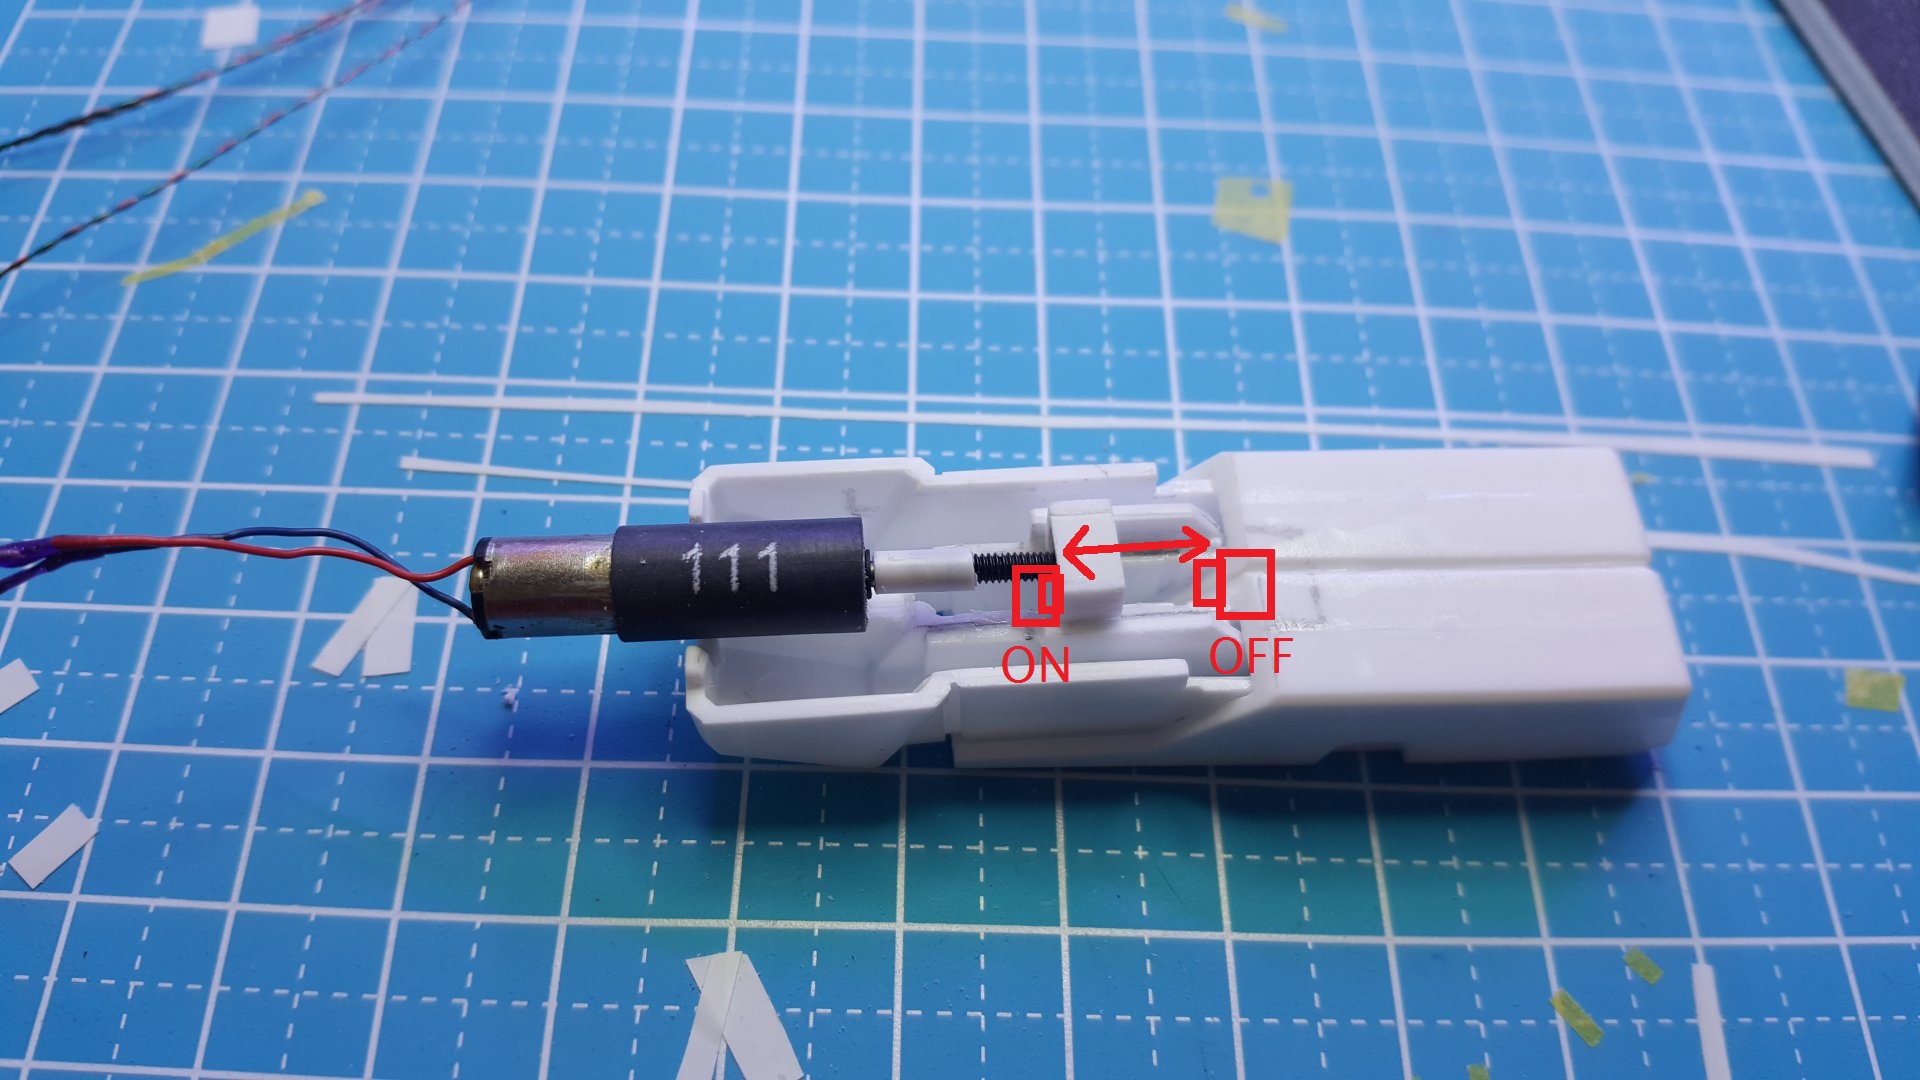
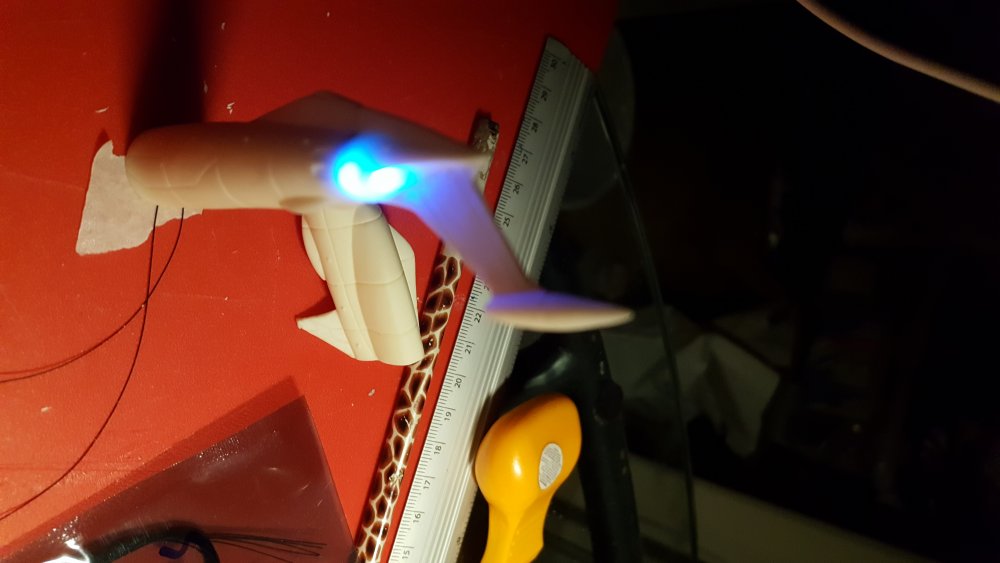
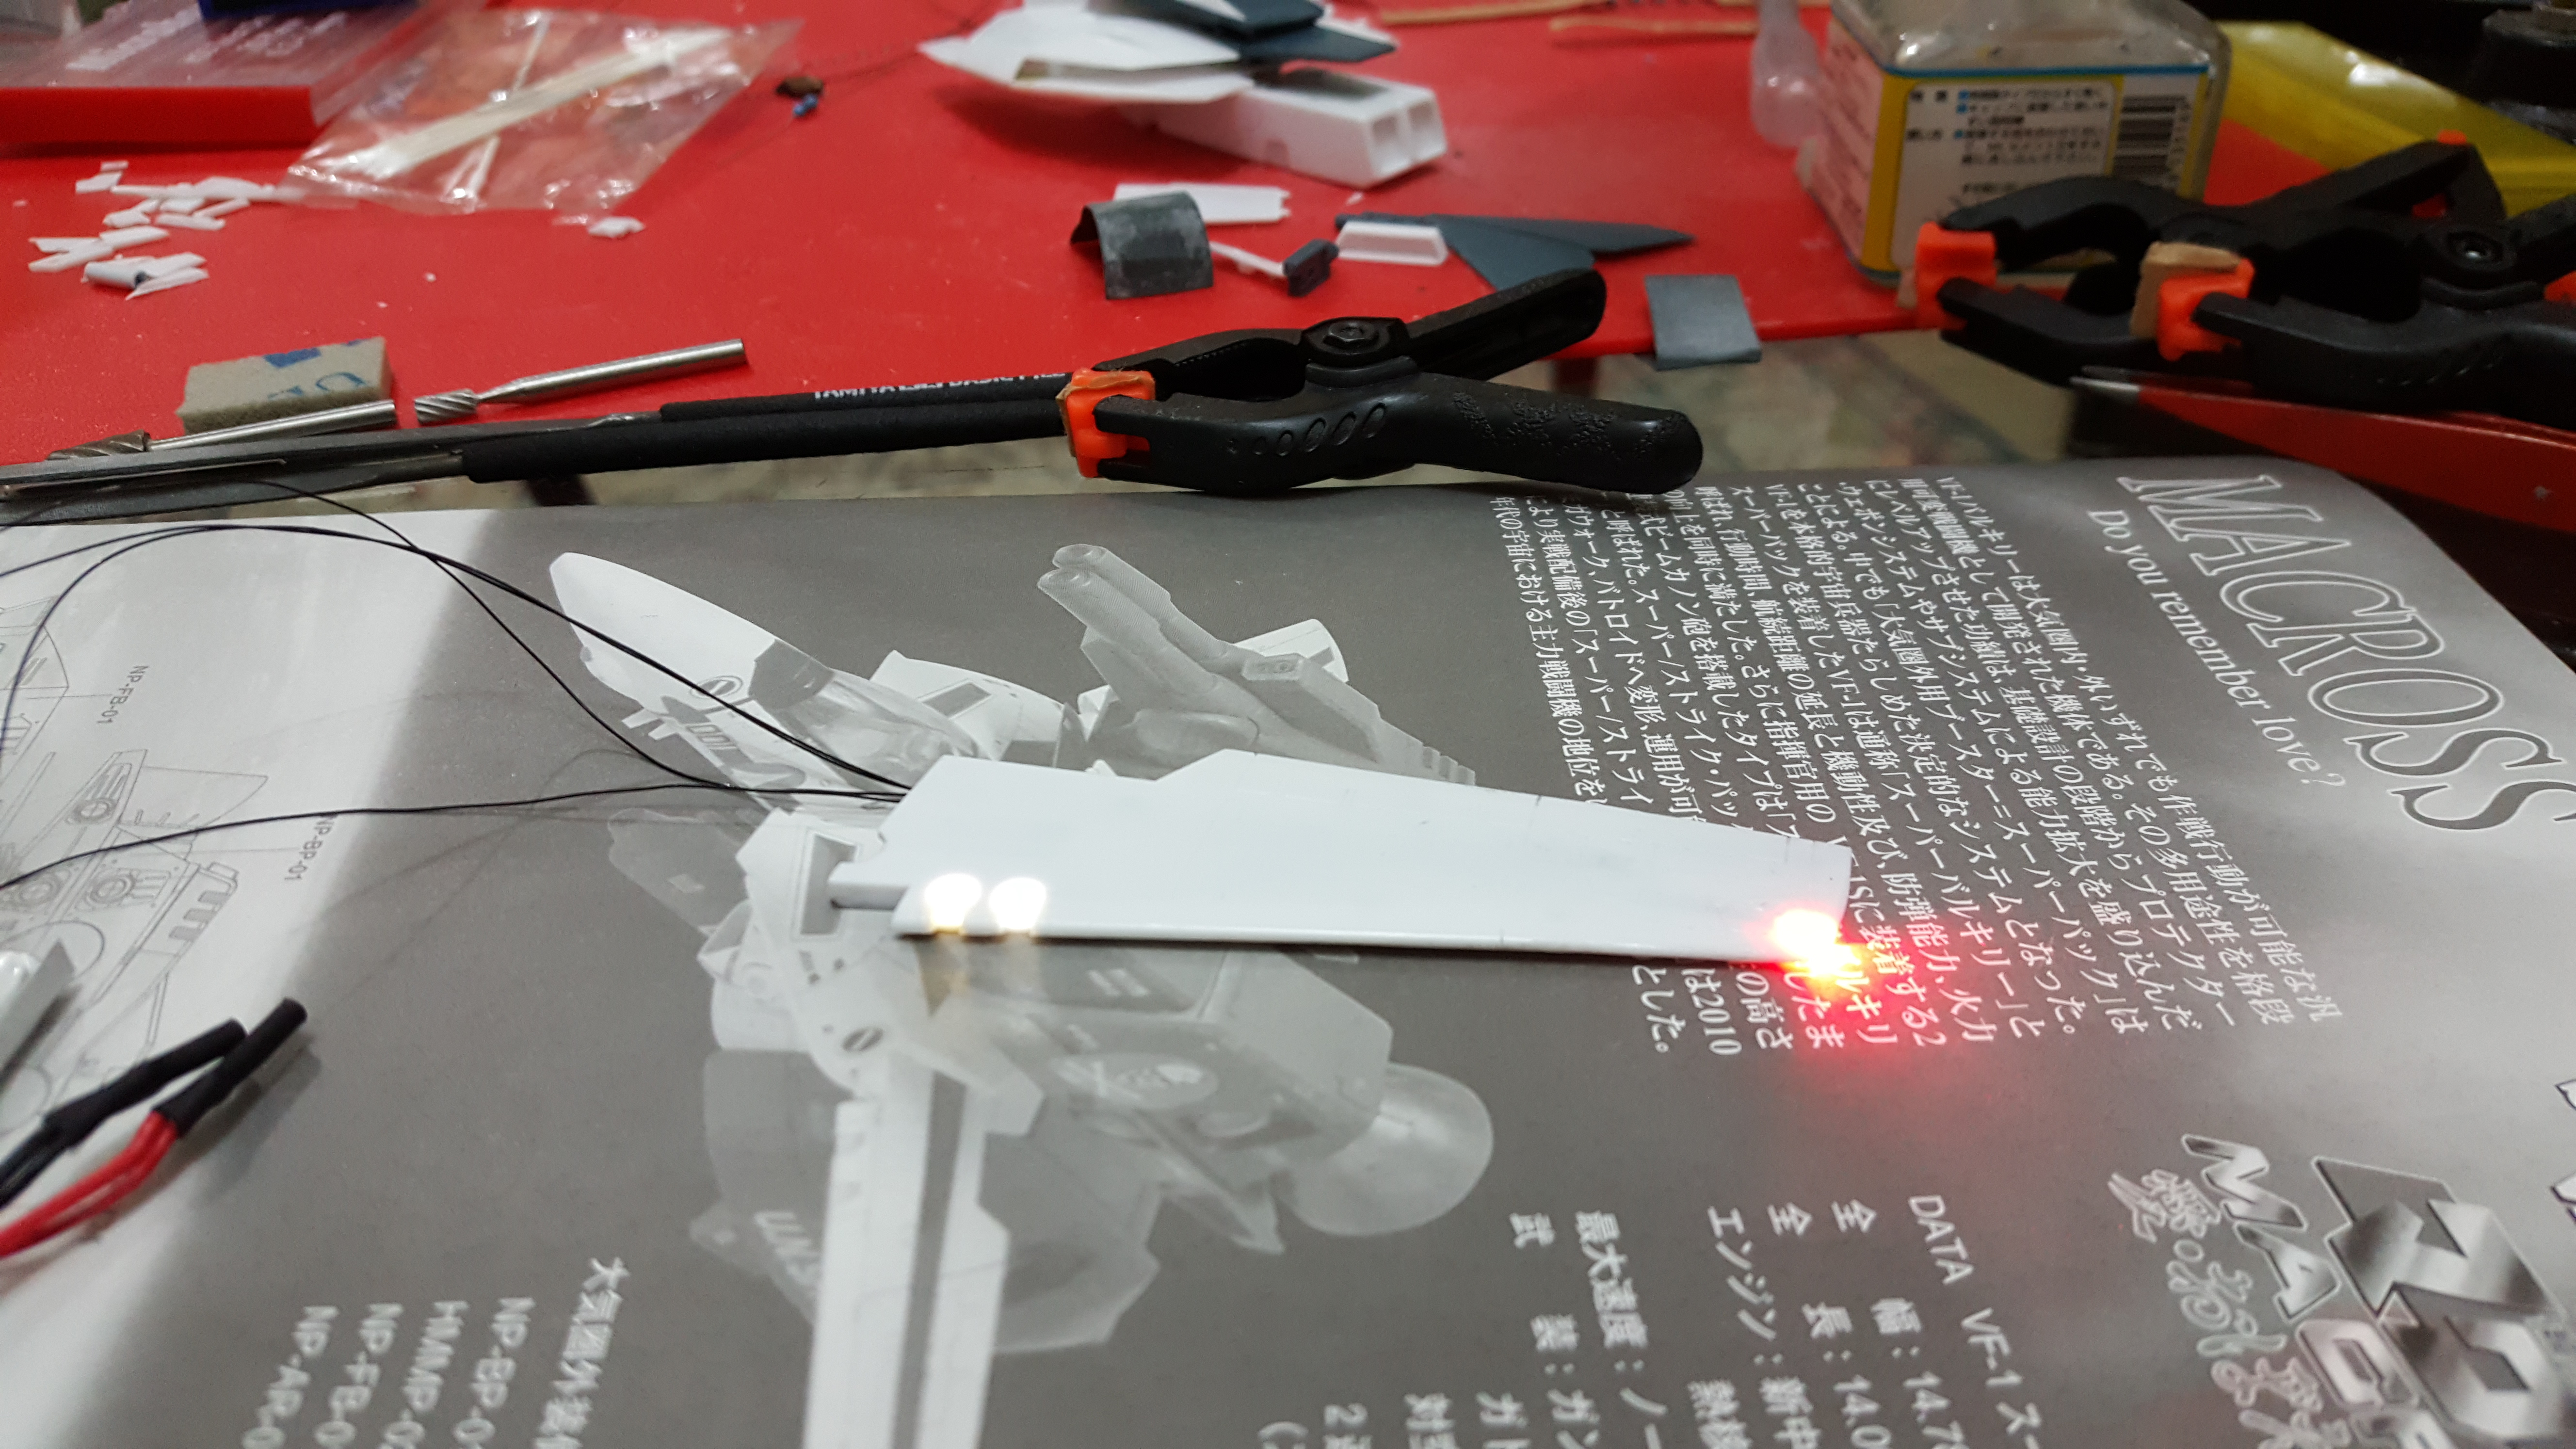
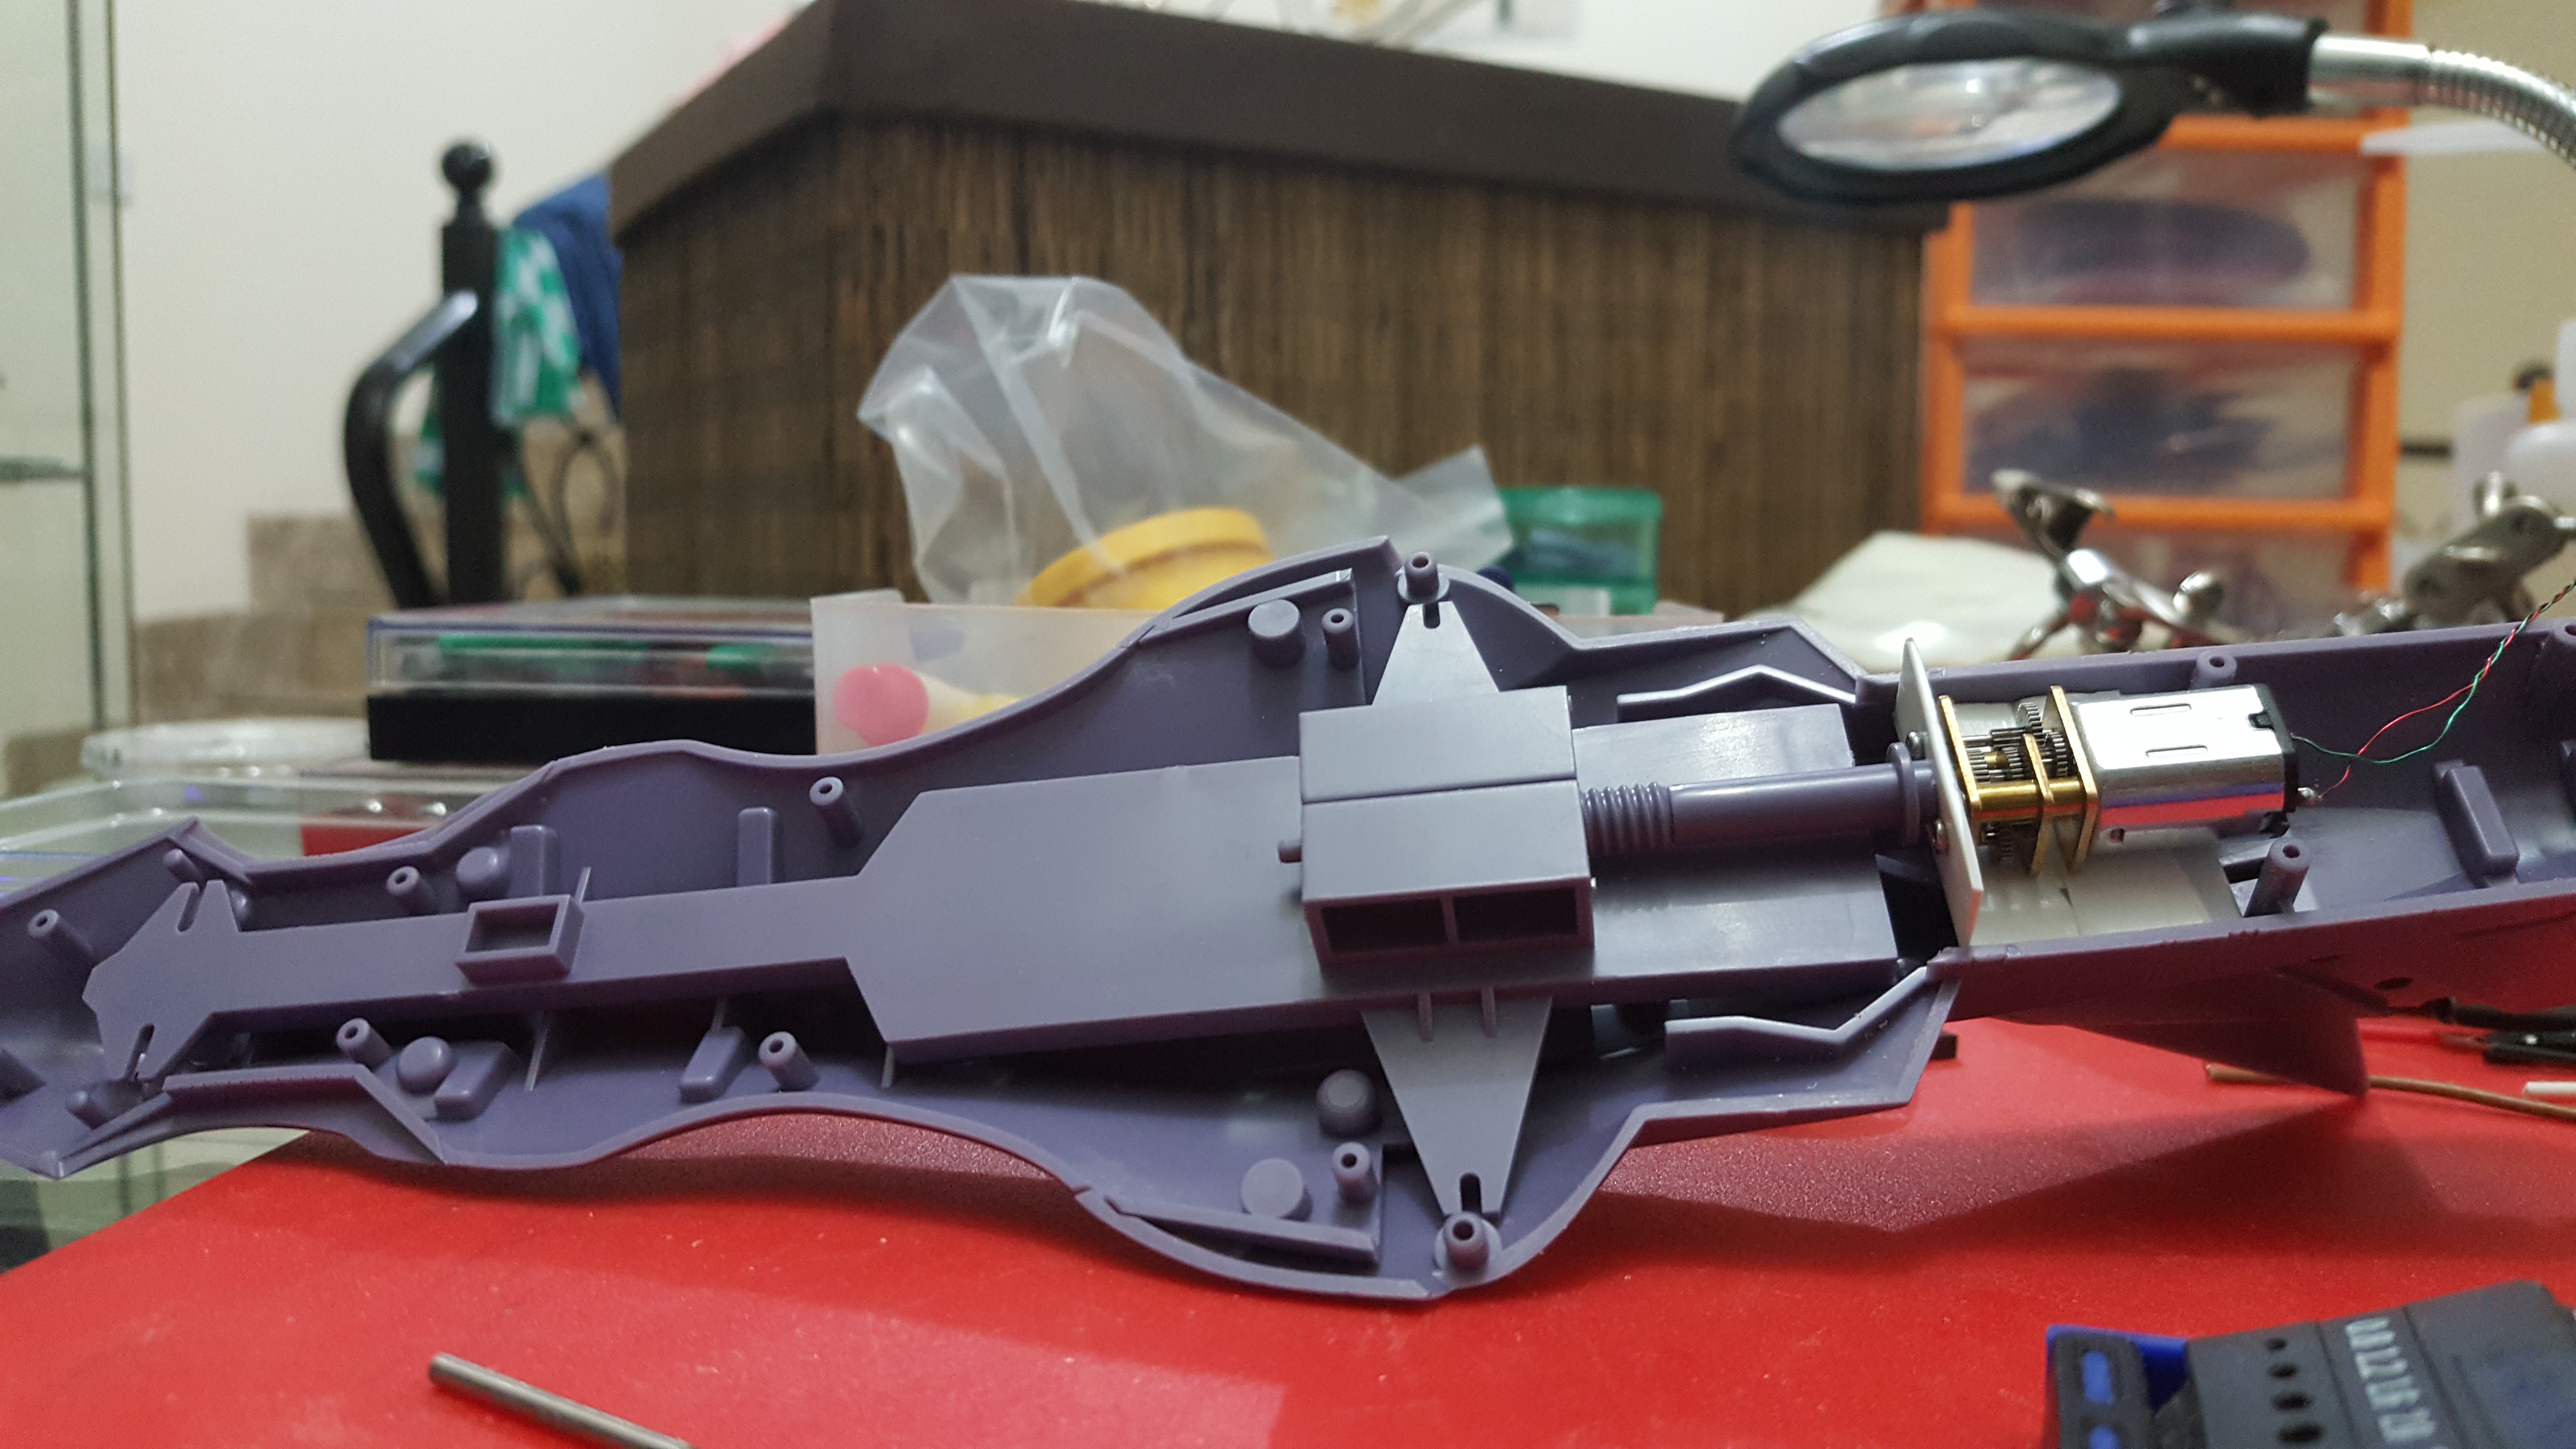
I've mounted the motor and limit switches and set up the motor driver IC with the Trinket. It is working (sometimes), and it is nice to have a solid package finally after weeks of work.
But it is very finicky. I have had to resuscitate it so many times, with so may different problems that I am not sure what the issue is. The main problem is that the limit switches seem to bounce: they work fine, then suddenly decide that they don't want to work and get stuck in a loop like someone banging their head against the wall. Another problem is the angle that the gear is hitting the switches has to be just right.
The motorized wings definitely will not have a long life span, unless I figure out what is wrong. I think I need to fix something with my delays in the coding of the Arduino sketch, so I hope there will be a solution before I destroy anything permanently.
So here are some learning points:
- Don't trust the breadboard. The connections are not clean enough for fine work, especially when your wimpy styrene model is at risk. Solder everything before running gears and motors. It is the only way to be sure your code is good and you are sending a clean signal.
- Super glue does not seem great around wires. Epoxy is better, but let it dry and fully cure before running anything.
- I accidentally epoxied the limit switch wires slightly touching the motor, and I am afraid the heat from the plastic casing of the motor will effect the wiring. But I am no electrician so I don't know if a little heat will effect the electric flow.
- These limit switches are not reliable. They are just springs. We need a better engineered switch at this size for our models. I think this limitation is why we don't see a lot of projects like this.
Awesome - so you are going with the arduino board now? This should make things much easier.
-
-
Just got my VF-31a payment notice from HLJ, too. Shipping should start the next days.
-
On 23.1.2018 at 2:23 PM, arbit said:
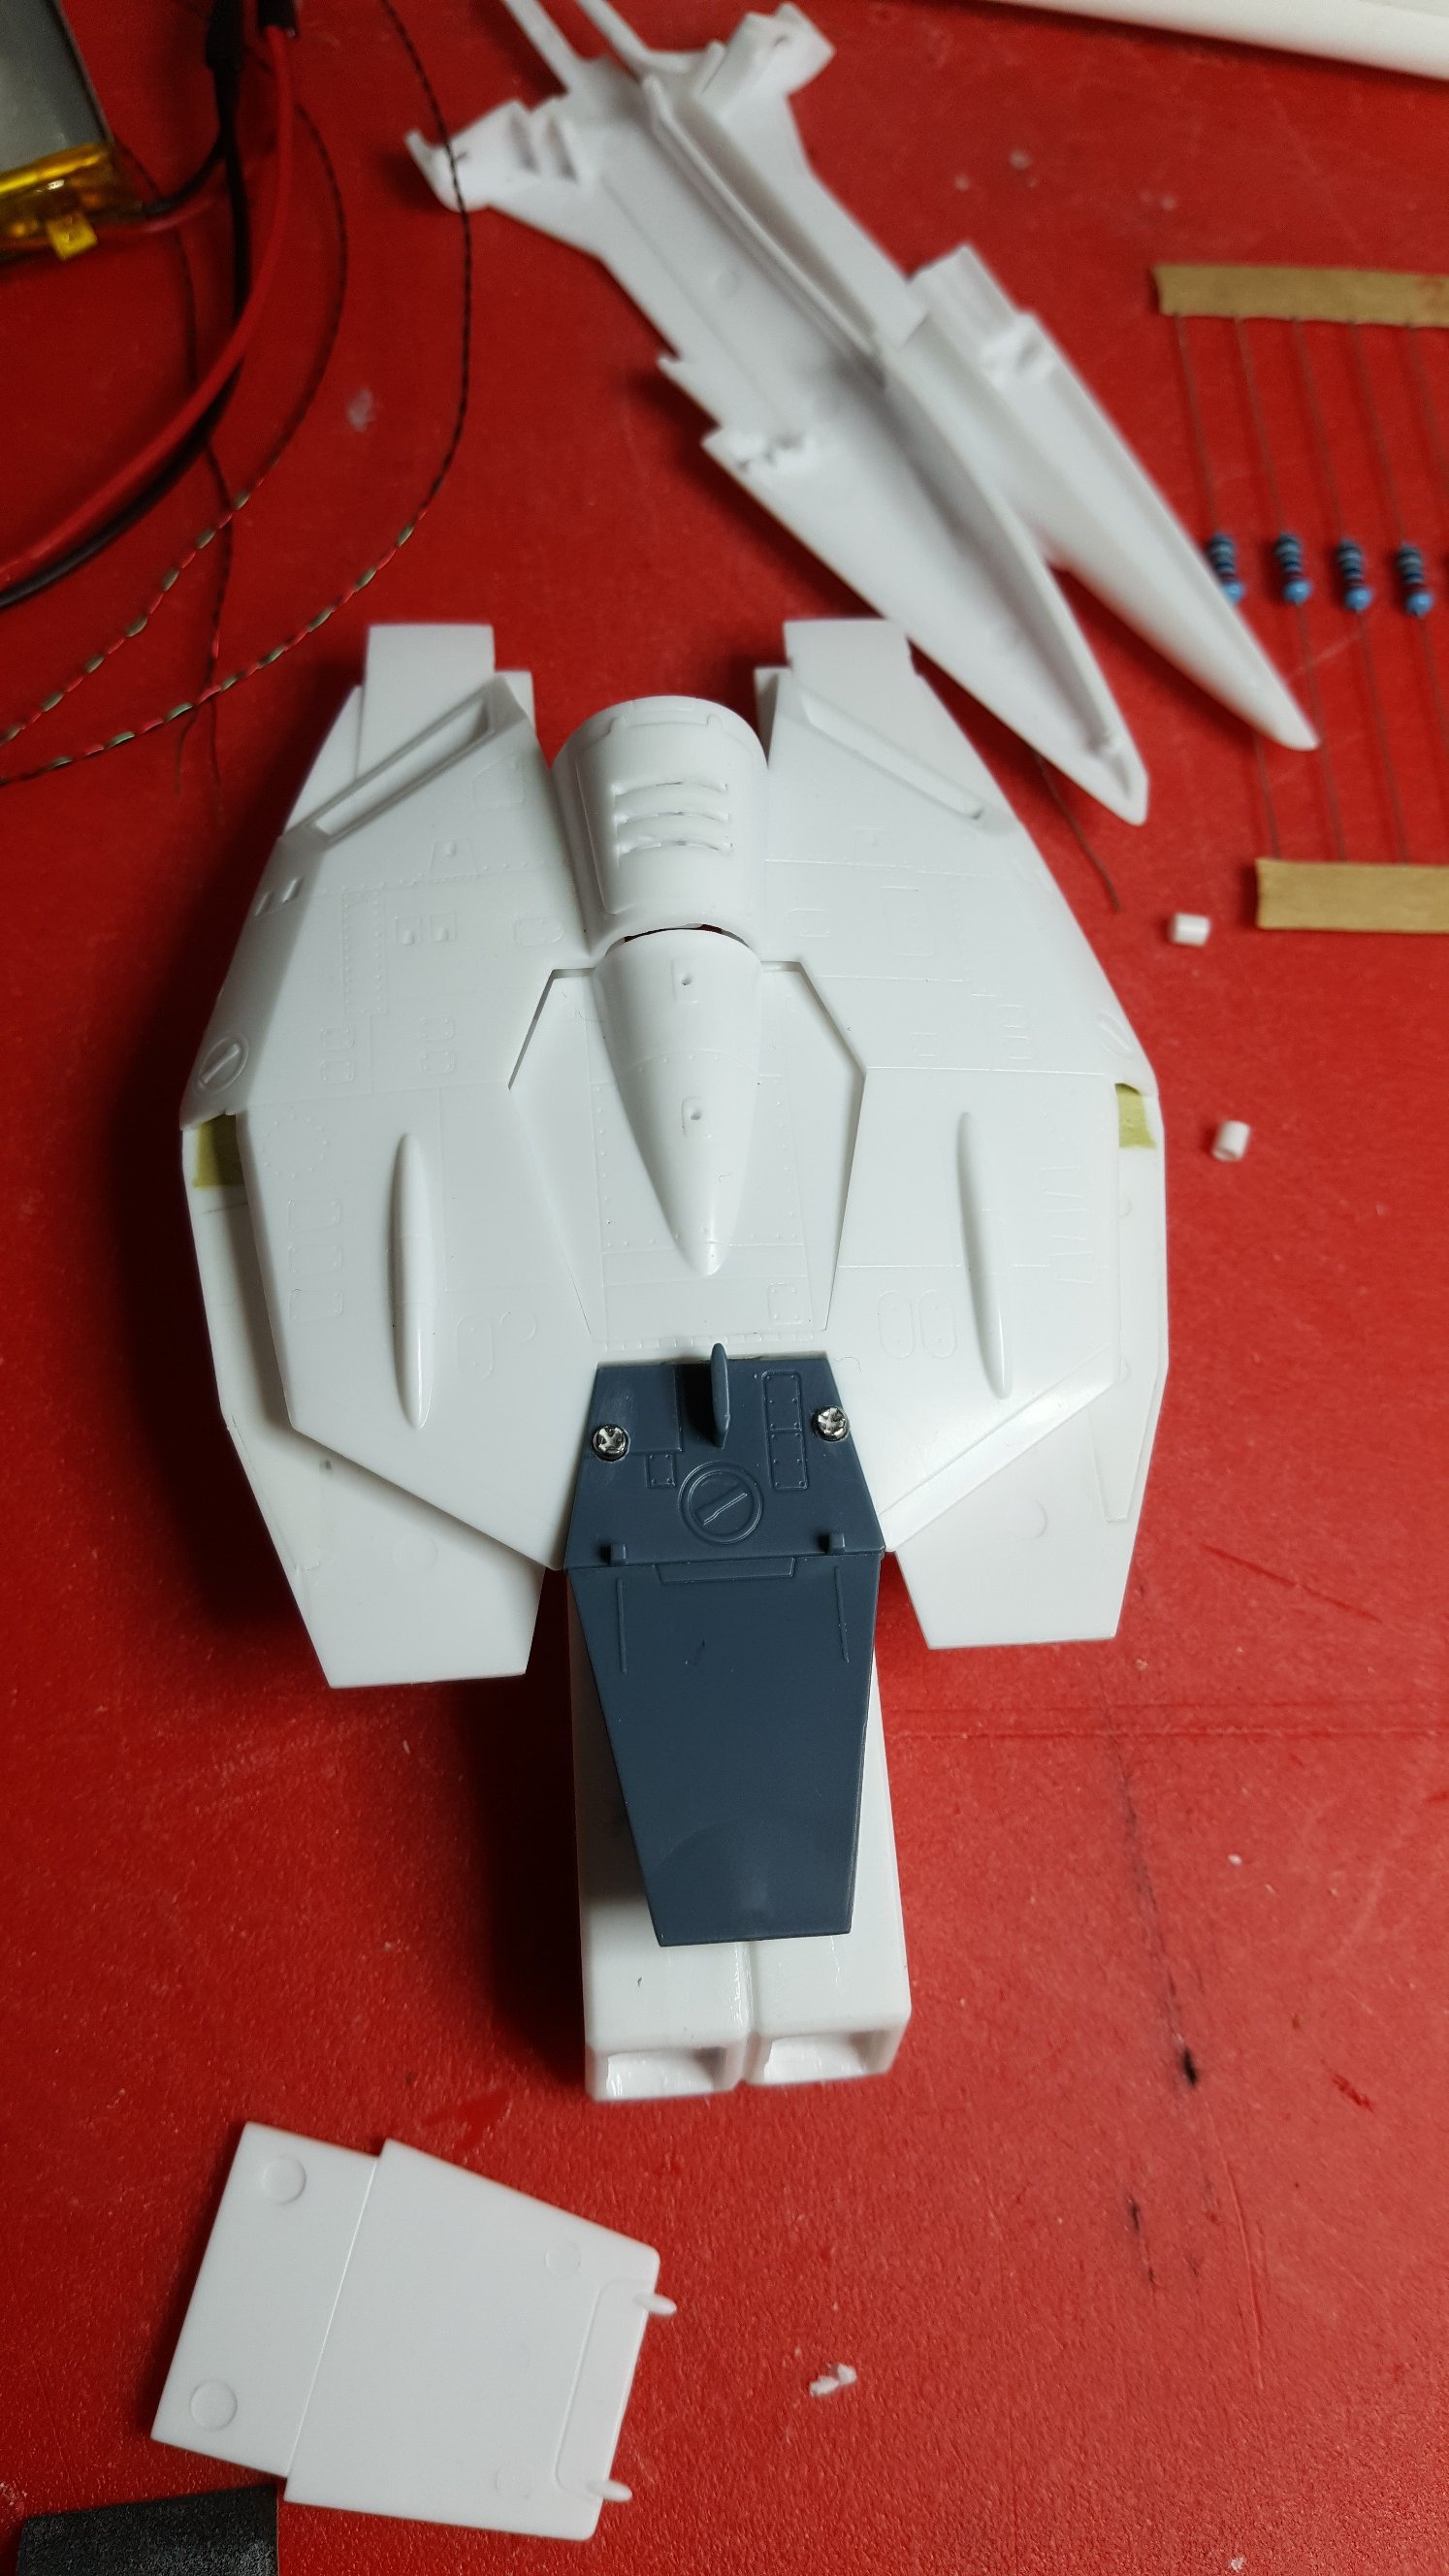
Got the left wing up.


I'm using screws to seal the body, in case I ever need to open it. The screws don't stress the plastic, they connect to bolts on the opposite end.
Now I need to figure out how to attach the backpack and super parts without glue. Maybe magnets.
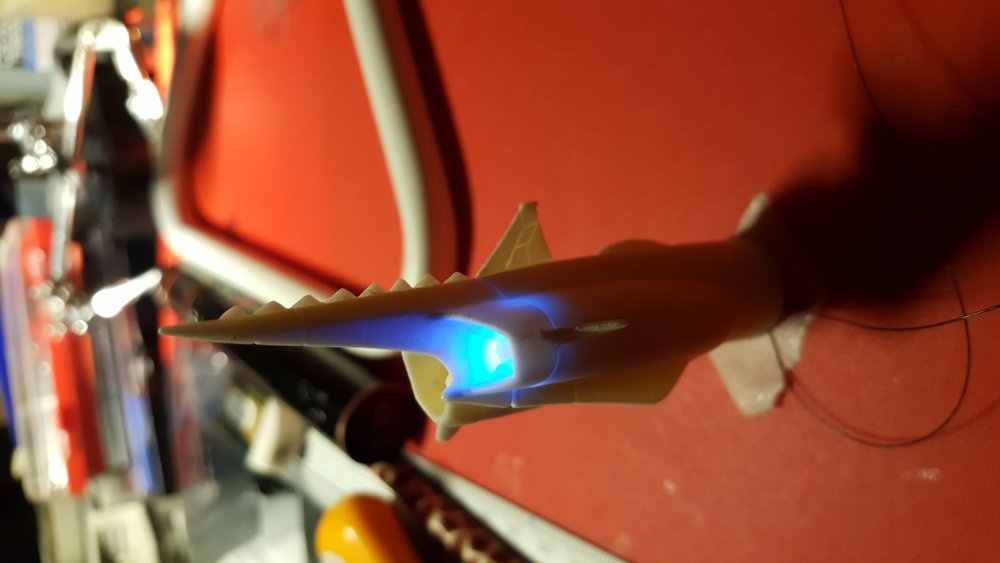
Hehe, I like the blue and red LEDs on the wings. Want to make them blink like on real planes?
Edit:
And yes - Magnet should be the best to accomplish this. My Warhammer player buddies do this with their tanks to change equipment. If you get high power magnets this will work good.
-
17 hours ago, Gabe Q said:
Sweet 7 pound baby jesus!
-
Okay, I think I got it now. I'll send you the explaination via PN.
-
okay, I modifies your circuit, but I am not sure if this will work correctly as I don't know how your arduino programming goes.
-
3 minutes ago, arbit said:
Thanks Urashiman.
1. I have to say that your "Not Gate" is hilarious. I am studying that and see how it goes. 2. The logic circuit is beyond me. Unfortunately I am just a nube.
3. I have one of those SMD switches. But the tactile click is too strong and needs a side lever too.
Haha
okay, well, I'll create the circuit plan for you using the ICs I have in mind and post it here when I am at home. Can you post a picture of how you plan to install the side switches?
-
3 hours ago, arbit said:
Cool. I would be really interested in what you have in mind. From what I have seen, the SMD side switches you mentioned are also Normally Open, so that doesn't improve my situation. But if you have seen any Normally Closed SMD side switches, that would solve the whole issue.
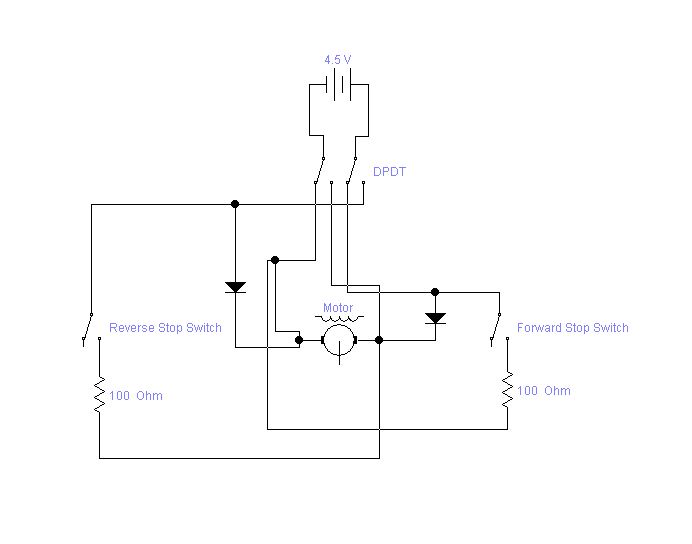
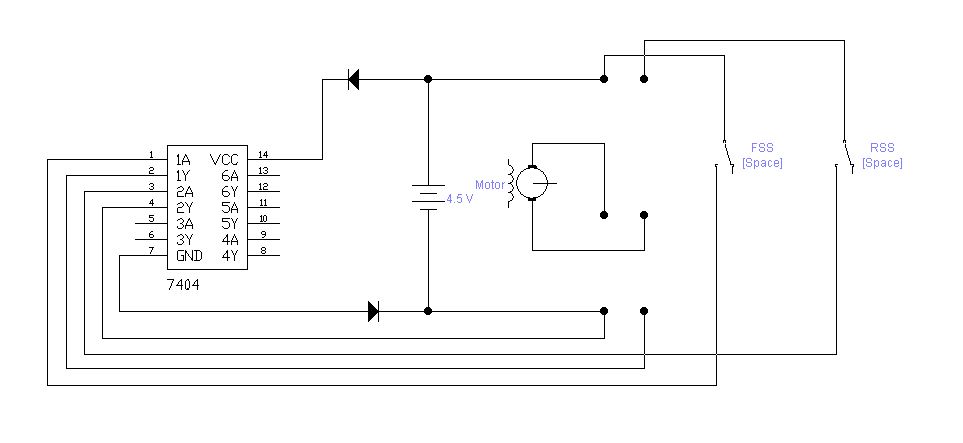
My Specs are: The DC motor is 3v-6v. The power source is a 4.5v LiPo battery. The limit switches are Normally Open.
Well, there are several different types of SMD switches. Either way, you could easily invert a signal for switches when using the arduino(pseudocode - while switch = 0 do nothing, While switch = 1 do something). If you want to use the switches you got and do a hardware change, the circuit would need a to have simple NOT IC added. IC 7404 can do that.
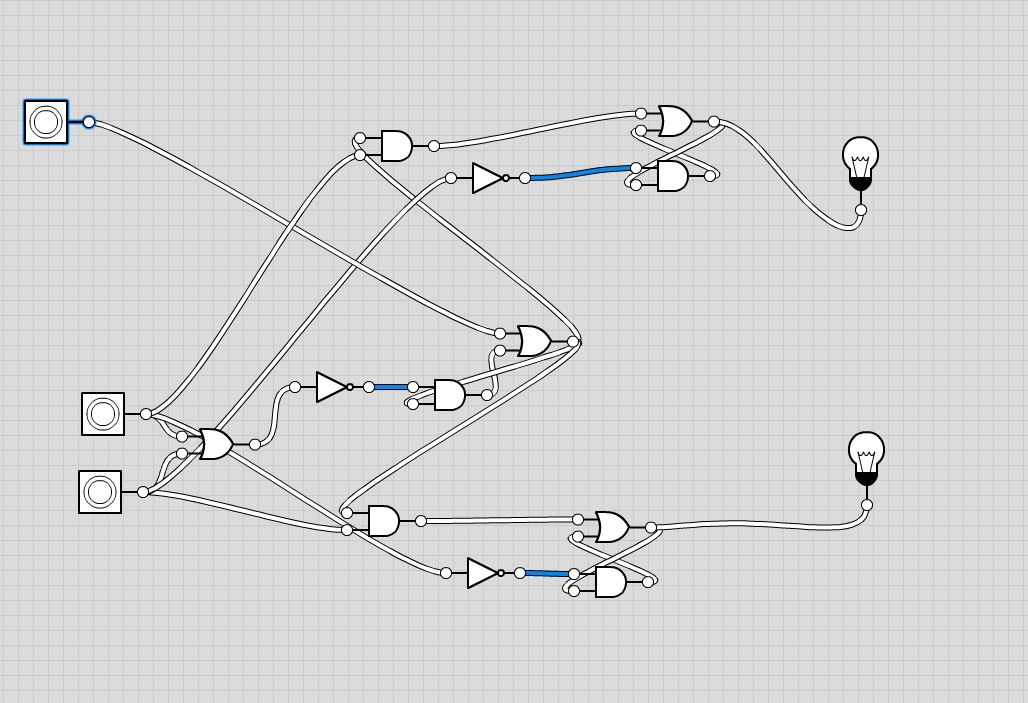
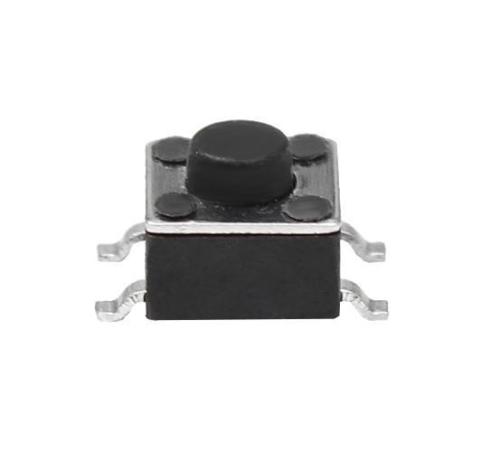
Anyway. I created the logic circuit below which is giving you the the behavior need. You would need one RS-flipflop IC (with 4 RS units) one AND IC (with at least 2 AND circuits), one OR IC (with at least one OR circuit) and two electrical switches. The ICs will do the "controlling" while the electrical switches will be used to control a commutator. I also attached a simple SMD switch that can be used. They could be installed to the moving block like in the picture.
No need to use an expensive Arduino. The price of the electrical components should be ~5€ without shipping.
-
13 hours ago, arbit said:
Thanks. But I have been trying to program it with Arduino for over a year, and haven't been able to crack it. The basics are easy, but I can't make it stop and reverse at a limit using this motor driver. I need an easy sketch I can copy and use, but haven't found a good answer on Arduino boards.
I might've got an idea how to solve your problem, but first of all I need some information. Can you please provide the following?
- Voltage and maximum power surge of the electric motor
- power source you are going to use
Also I would need to know how the phases go, I thought something like this is what you try to achieve:
- Push Main switch.
- Motor starts, pushing the wings out.
- Wings (or something on them) will push a switch.
- switch will turn off the motor.
- Circuit is idle.
- Push Main switch.
- Motor starts, going backwards, pulling the wings in.
- Wings (or something on them) will push another switch.
- switch will turn off the motor.
- Circuit is idle.
To accomplish this you need a different type of switch (basically SMD switches will work). I could design a small toggle switch flip flop circuit that will do the job, but you would need to stack up on electronic components.
-
Ordered a VF-31A too... great plane!
Sadly wasn't able to order the last time it was available, not going to happen this time. Muhahahaha!
-
6 hours ago, arbit said:
Did you customize the canopy to open close?
And I really doubted it would work, but here it is.
Great work arbit! Maybe using the electronics of a SG90 servo and a potentiometer could work wonders here to limit wing movement. Could be controlled by an arduino board or just a small selfmade circuit.
-
28 minutes ago, Convectuoso said:
That's not the "Version" warning, or you would read "Google Play" on it. Are you playing over wifi or mobile data?
I am actually playing it over ethernet, utilising a didicated 100mbit kabel line. I play Final Fantasy Brave Exvius over this line too and never had any issue. There is no connection issue as far as I know. I probably have to undust my japanese dictionary... :/
アプリケーンヨン工ラー

アプリケ一ンヨンーこ異常カ〝あります。
ゲ一ムを正常ーこ起重刀する事カ〝できません。
Roughtly translates to:
Application Error: There is an application error. It is not possible to initialize the game. -
Hey everyone,
got the latest version via QooApp (v.1.1.0) but I get this error when starting.
Any ideas how to fix this?Thanks

-
On 13.8.2017 at 0:08 PM, arbit said:
Cool. There are so many FSS Volks kits. One day I will study up on them.
I'm getting into my first resin kits with some small projects.
I need to get the learning curve up for some bigger projects I have in mind.
First up the the Garfish II, which I assume is an homage to the Mospeada Garfish.
Bottom line: Gas mask and lots of sanding. Noxious stuff!
OMG! Were did you got that Garfish II? I want one too
-
On 11.5.2017 at 3:15 AM, seti88 said:
ARE YOU READY......!!
YES!!!
-
Oh - Nice work. I did a papercraft YF-19 some years ago, but it was non transformable. Have fun!
-
On 6.4.2017 at 6:01 PM, arbit said:
Looks great Pengbuzz. Very sleek.
Fianally making some progress on my Nautilus after endless studying, thinking, measuring, re-measuring, stressing, anxiety-ing, and generally procrastinating.

Great - I like the N-Nautilus. I have it in my "need to be build someday" queue too. The kit is of really impressive quality. I am still busy building and doing paintjobs on alot of Warhammer 40K minifigs and a VF-1J in Kakizaki Colors... Too much to build, not enough time :S


MΔ - VF-9
in The Workshop!
Posted
I've been working on something similar some time ago. After fixing my Papercraft VF-9 I thought about doing a high detailed model in 3D to send to Shapeways and have it printed.
I had the HQ wings done and was working to get the mainframe done, but you know - I don't have much time, so this ended up in development hell. Maybe I have to take it up again. My idea was to have it in fighter mode in 1/72 to stand with my Hasegawa models.
@Xigfrid: I am thrilled to see your model printed and in action.