mickyg
-
Posts
2632 -
Joined
-
Last visited
Content Type
Profiles
Forums
Events
Gallery
Everything posted by mickyg
-

What happened to the rest of the 1/72 Frontier kits?
mickyg replied to bullet101's topic in Model kits
Amen to that! I just started on my VF-25F I got on sale from HLJ a month ago. While I'm not blown away by it, the price was right and it's great for the size. Why they didn't opt for a 1/72, non transformable will always annoy me. -
Looks gorgeous Chris! Hasegawa really needs to get on the bandwagon with this one. They need to follow Yamato's lead with the timing!
-
It's been a long, long time but I read all three and loved them! Thanks for the reminder!
-
I think it was here: http://auf-ewig.com/h-log/0911/091127.html but it looks as though the content has moved. That sucks because he did a remarkable job on it!
-
MickyG's Yamato VF-1S Unpainted, Unassembled Kit Build
mickyg replied to mickyg's topic in The Workshop!
What, on my VF-1D that isn't at all related to this thread in the slightest? Or are you referring to the 1S cockpit shot that I've got somewhere in all the other posts I've made? Either way, thanks! I'm hoping the cocpit comes up OK when it's all completed (both the 1D model kit and the 1S toy). -
If you need another volunteer for Australia, I'm happy to do it! I work in an office with a mail room so it's a piece of cake to ship any day and not even leave the building.
-
MickyG's Yamato VF-1S Unpainted, Unassembled Kit Build
mickyg replied to mickyg's topic in The Workshop!
Thanks guys! The project is currently sleeping. Just a lot on my plate at the moment and no free time to devote to this. I'll pick it up again in a few weeks. The whole start/stop thing annoys me but it's probably for the best. If I go too hard with it, I get frustrated and tend to rush. Regult: I totally understand your situation! I was thinking the other day how great it'd be to get a proper spray booth so I could paint inside the house instead of the garage. Then I remembered I have a very noisy air compressor! I can't imagine doing any of this in an apartment! Peter: I'm hoping to rectify the pain chipping issue. We'll see if it's possible. As I've probably mentioned before, some of the factory schemes (Max and Millia's VF-1J) have paint issues as well. So some is to be expected. Hopefully my approach works. Otherwise, I could have saved the money and bought a hasegawa kit! -
Looks like the 1/100 kit pilot is actually smaller but not by much! Hard to tell in the second pic with the gundam pilot being in the shadow but it does look to be the same size. Thanks for the comparison pic. I'm obviously still a bit confused as to whether we're actually getting correctly scaled pilots.
-
Thanks for indulging my curiosity!
-
MickyG's Yamato VF-1S Unpainted, Unassembled Kit Build
mickyg replied to mickyg's topic in The Workshop!
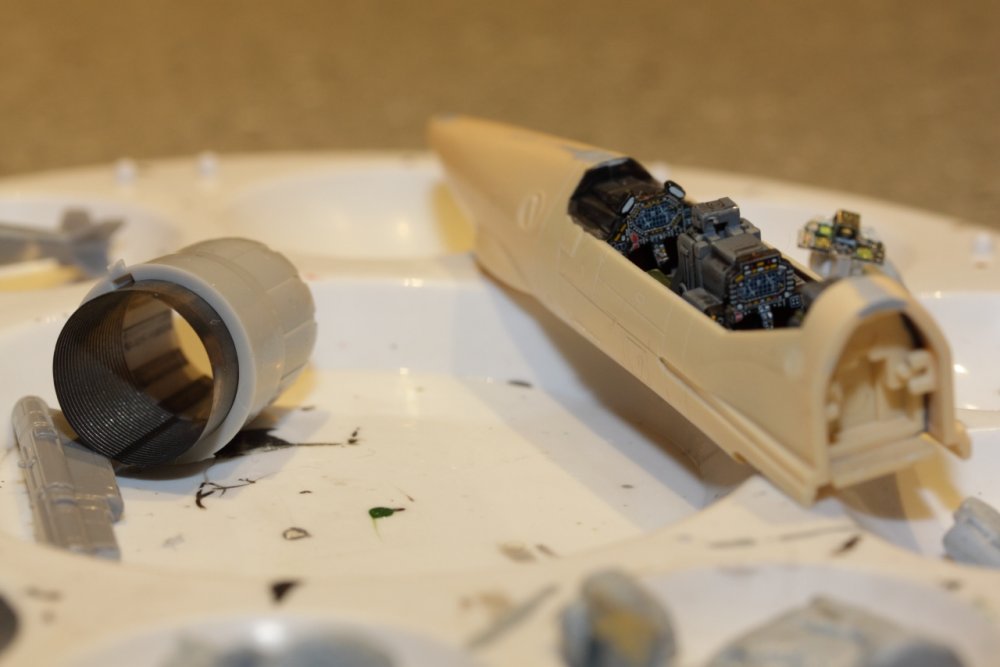
You don't know how many times I've thought that! I've even considered buying a low vis Roy but they're hard to find and way more expensive. Oh well... I don't know what I had intended on doing today, but here's what I ended up doing: That's my first experience with alclad and I love it! I probably didn't put it on quite heavily enough for the feet but I was afriad I'd cover up the preshaded black a bit too much. I think it looks like convincing steel as it is though and I doubt I'll go over it again. The fan blades are not at all appropriate for steel but I wanted them to have some sort of colour. I have some lighter silver that I might lightly put on. I don't know. Most fan blades I've seen on commercial aircraft are a dark, completely non-metallic grey sort of colour. So maybe the steel isn't so bad after all. Doesn't really matter as I'm likely to leave the intake covers on, such is my hatred for the fan faces being so close to the intake openings! That last pic is just a quick shot of my other on the go projects. An F-16 (GE) nozzle on the left, a VF-1D cockpit, which is almost ready to seal up, and the instrument cluster for the F-16 on the right (Eduard photo-etch). I have most definitely been bitten by the model bug - I'm a sick, sick individual!


-
Seriously impressive stuff! I've got a very good friend who graduated from Full Sail in FL that I had always hoped would do some of this. He stuck with modelling people and things for computer games. Always annoyed me that I couldn't see some of this stuff properly done. Now I can! One question - since you have to model this as a 3 dimensional, working sort of thing (with landing gear "fitting" and that sort of thing) has it ever bothered you about the intake fans being so close to the front? I've wanted to see a model (3d rendered, real, whatever) of where the intake faces really would sit. I fully appreciate how long this would take to even mock up, so I'm not asking you to redo your model, just for me. I'm more curious if it's ever been an issue for you.
-
Yamato 1/60 VF-17 Nightmare Diamond Force
mickyg replied to charger69's topic in Hall Of The Super Topics
OT for a moment: The Jack Archer "phenomena" was a very short animation mistake. True. But that was completely different to episode 35 (kanedaestes - huge thanks! My HDD is at work or I'd have provided some screen shots myself). The VF-1 mistake was transient. Sometimes you'd see it with three head lasers, other times there's be only one. And it was for a very short period of time. In episode 35 of Mac7, it's there the whole episode. It's intentional! The legs bend that way on purpose! But since you've stated you now want landing gear. I guess the argument is now null and void. I think Graham is away for a few weeks. We'll just have to wait... -
MickyG's Yamato VF-1S Unpainted, Unassembled Kit Build
mickyg replied to mickyg's topic in The Workshop!
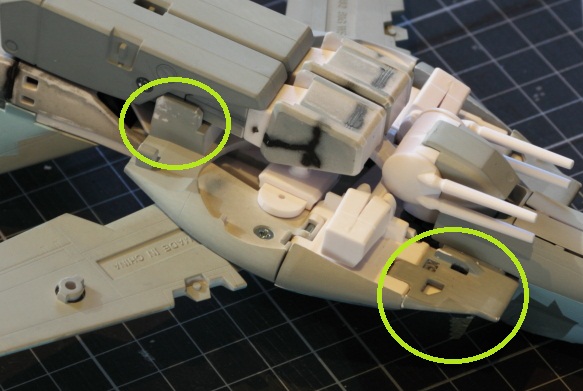
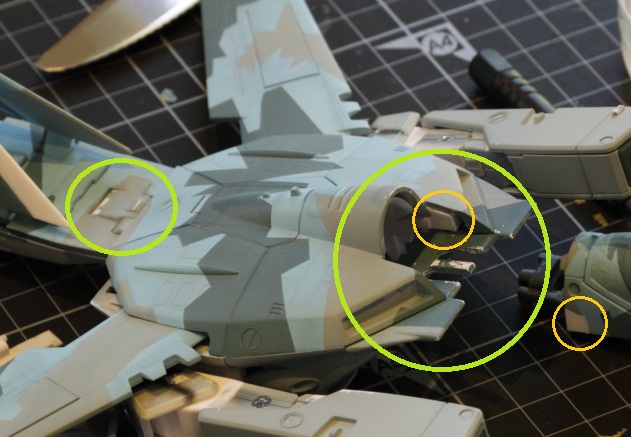
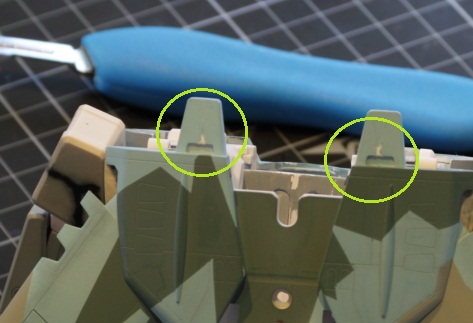
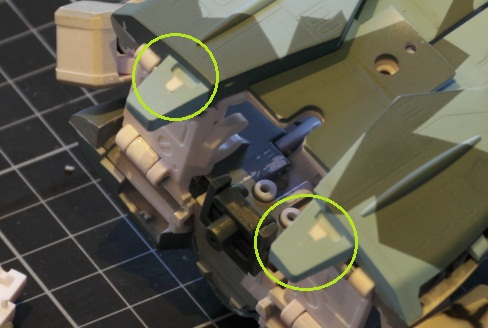
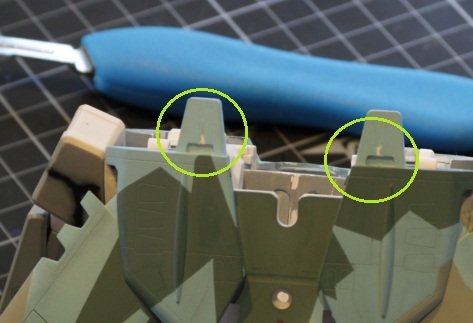
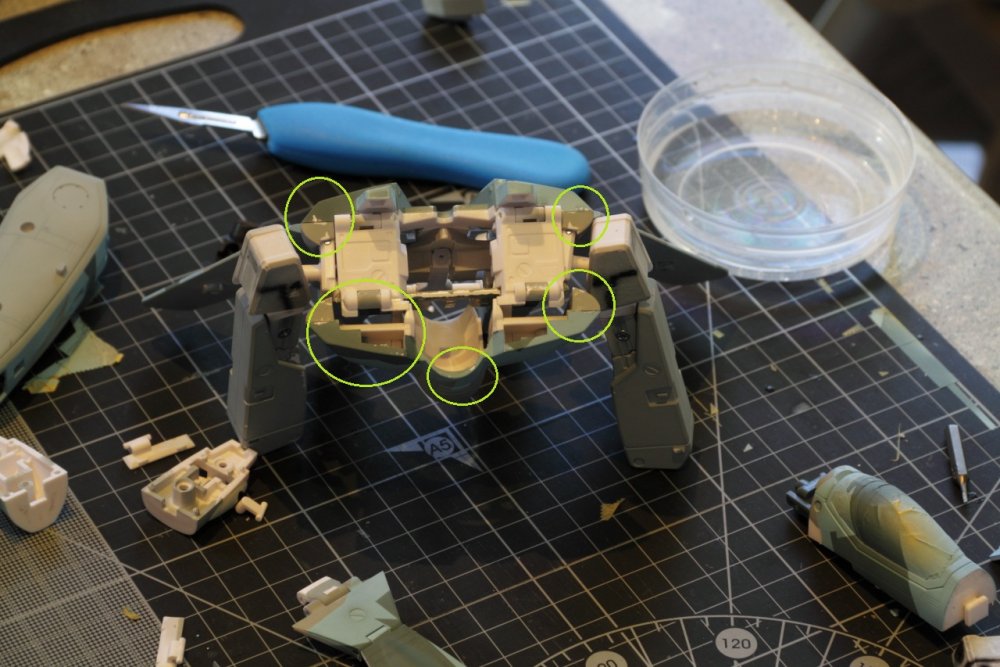
Now, for the "problem areas" I mentioned before. These areas are all prone to rubbing and chipping of the paint. It's mostly areas that you'd expect, like where the legs clip into the LERX, or where the arms clip into place. But then there are other places that you wouldn't expect to rub. Hopefully I've identified the most common ones for people to watch out for. That hinge for the backpack was another one I suspected would be a problem. I ended up sanding a lot of the plastic down so I could replace the lost bulk with paint. Hopefully that ends up working. The second item in the pic is more surprising. The back fo the fuselage rubs up against those two white pieces on either side in fighter (and I suspect battroid) mode. Since these aren't seen in either mode, I just sanded the paint away. It's not terribly bad to look at. That backs of the "shoulder light posts" since I don't know what else to call them are another trouble spot. They rub on the little fingers on the part that becomes the chest in battroid mode. Owners of the M&M VF-1J sets will know this is a problem even with the factory paint. My solution is the second pic. The insides of the folding areas on the back of the fighter are another area that surprised me. I didn't expect these to really rub. But since the parts are so tight, any added paint is going to rub. I don't know what I'll do for this yet. Maybe I'll sand it all off and try painting with an airbrush instead of hand brushing like I did before. I think the paint was just too thick. And the last one is another obvious one, the backpack hook. It fits tight and when it's used (I must admit to never using mine on my factory toys) it naturally scrapes along the parts it comes into contact with. The solution is probably to paint it in the closed position and never mess with it. That's all for now!


-
MickyG's Yamato VF-1S Unpainted, Unassembled Kit Build
mickyg replied to mickyg's topic in The Workshop!
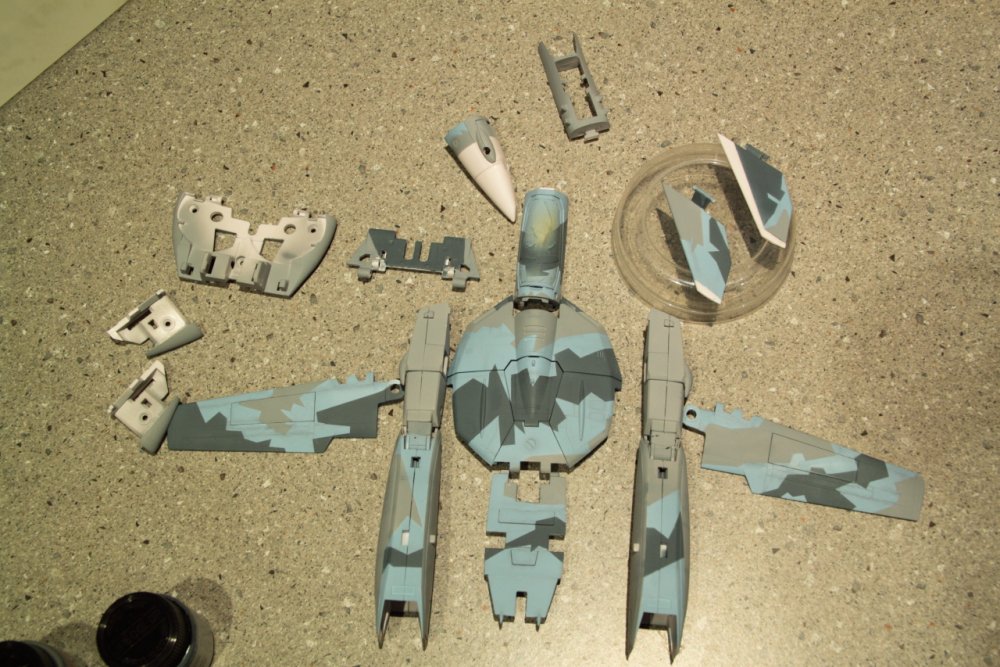
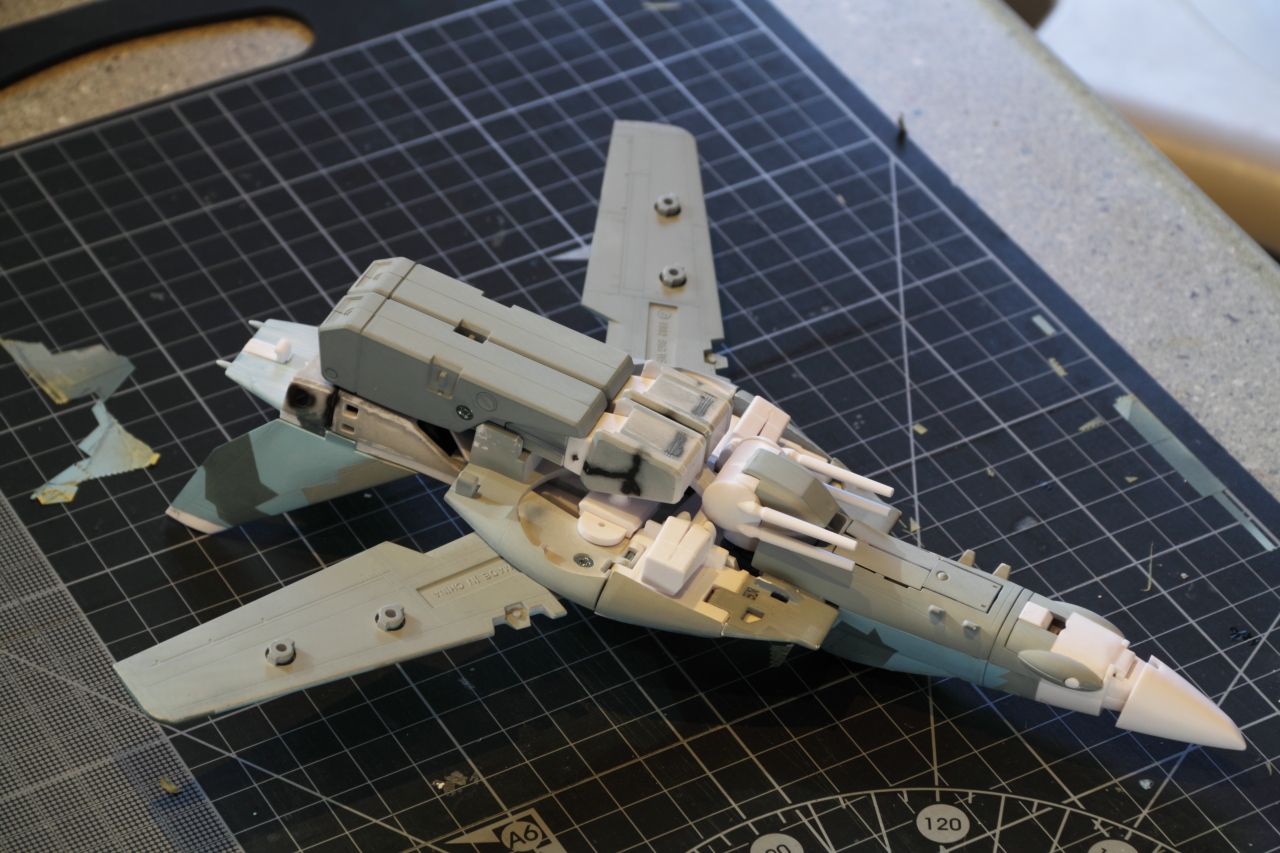
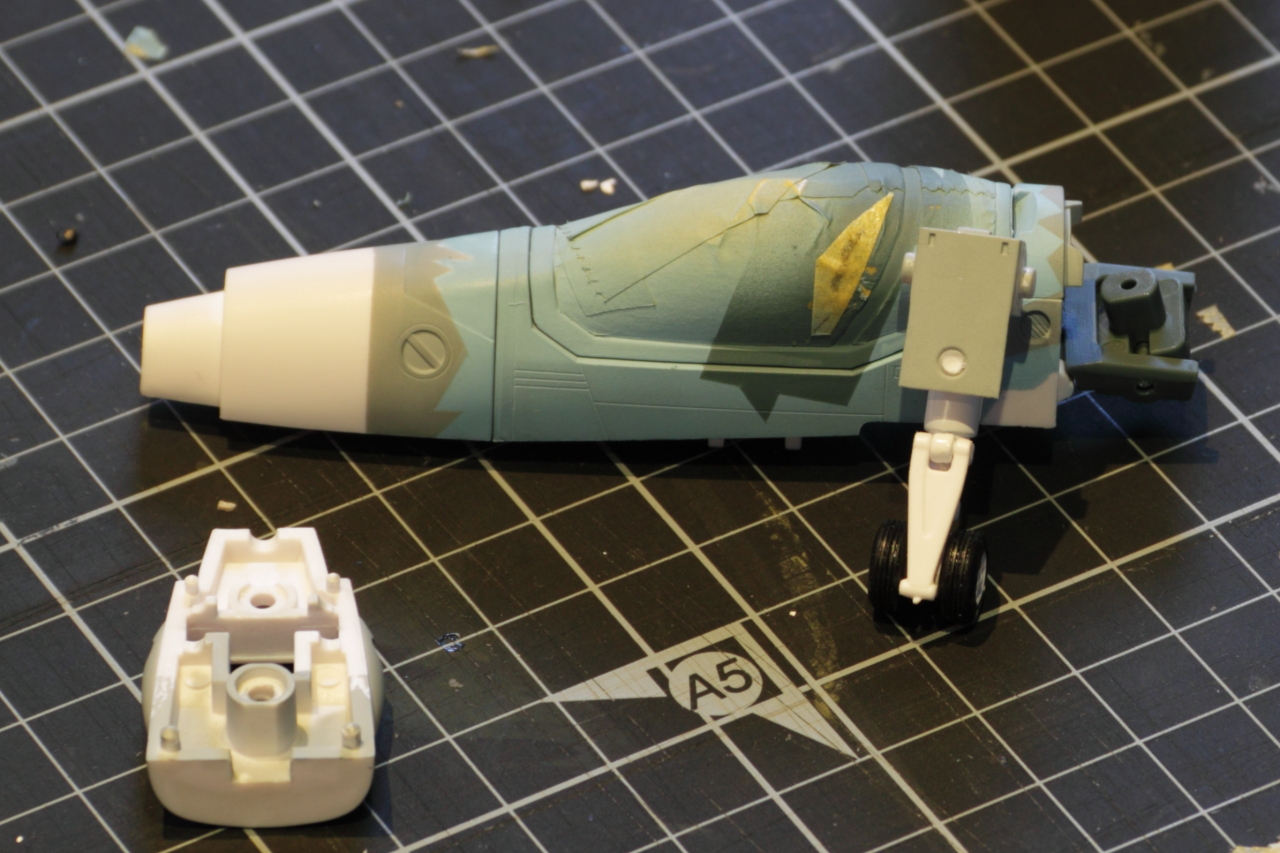
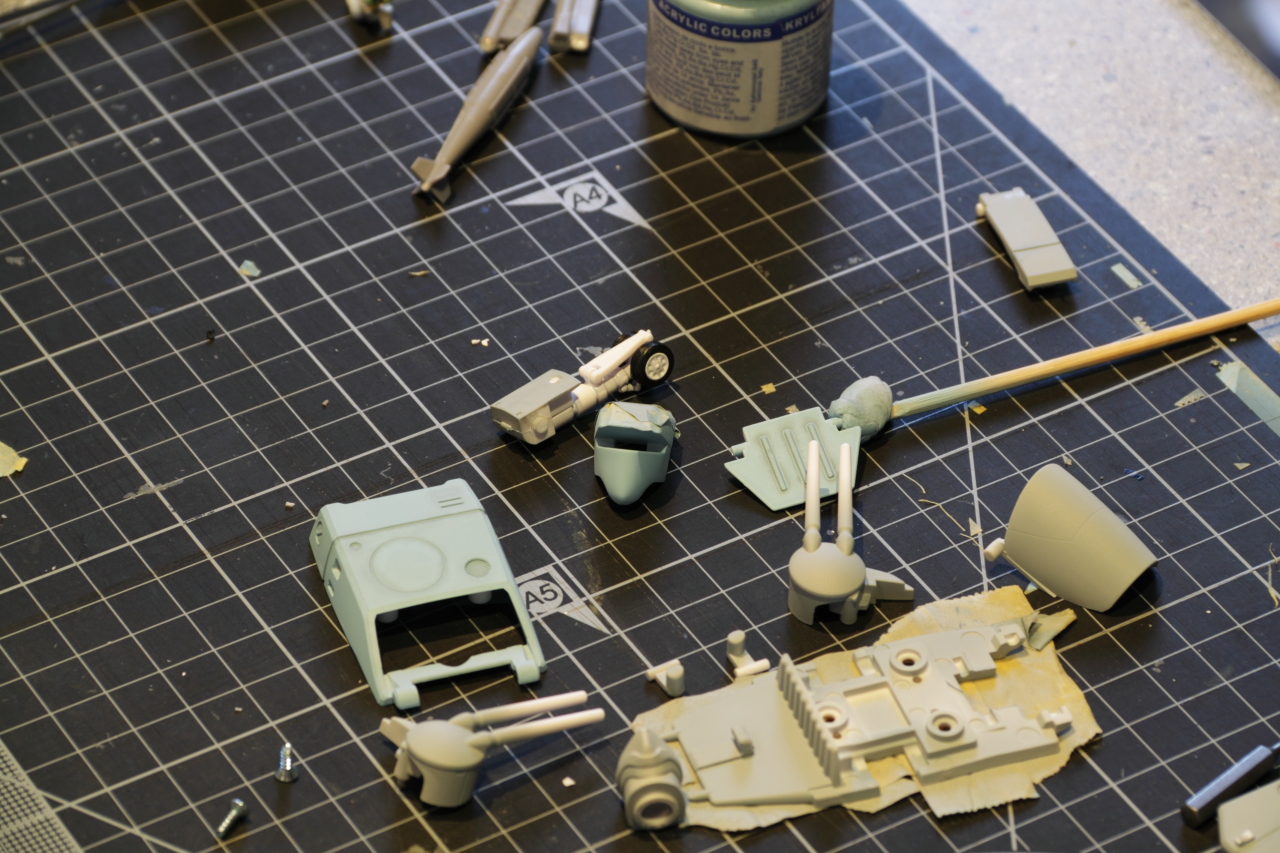
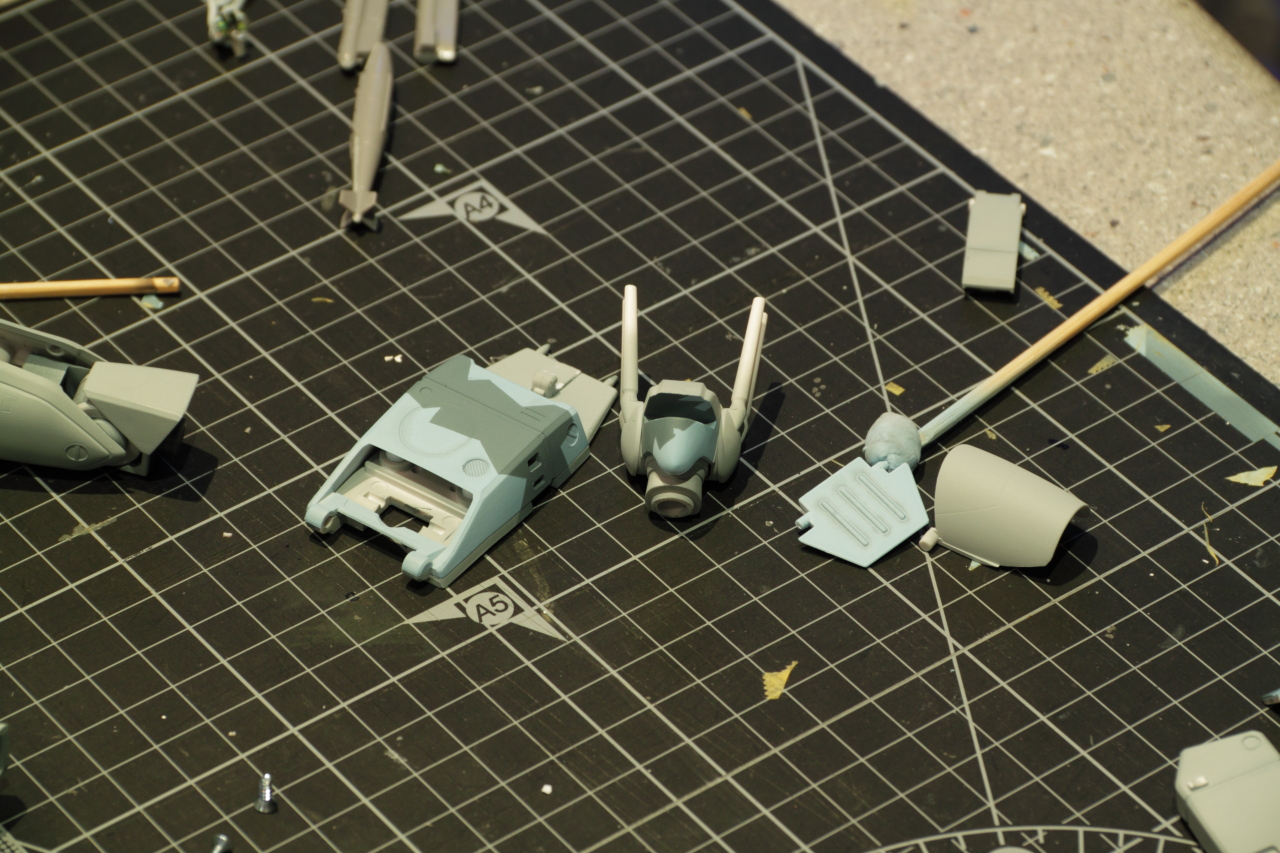
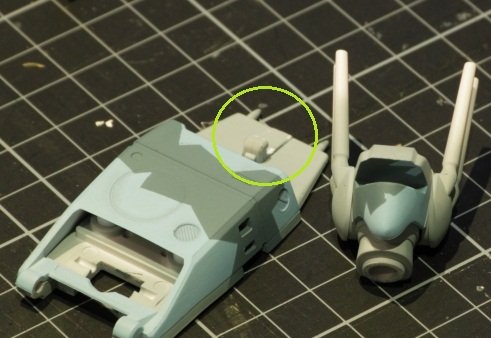
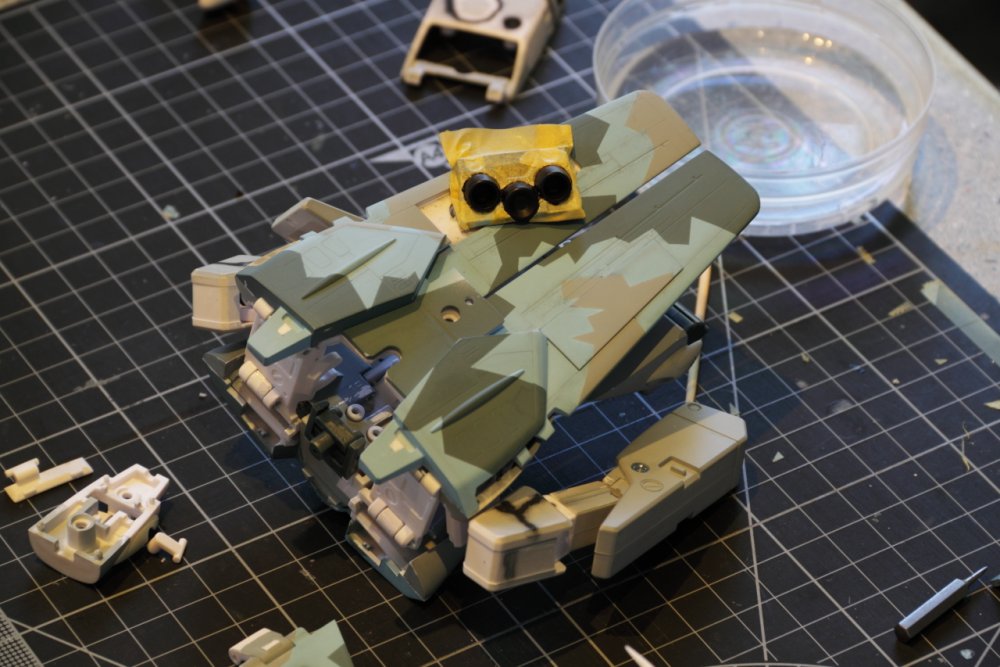
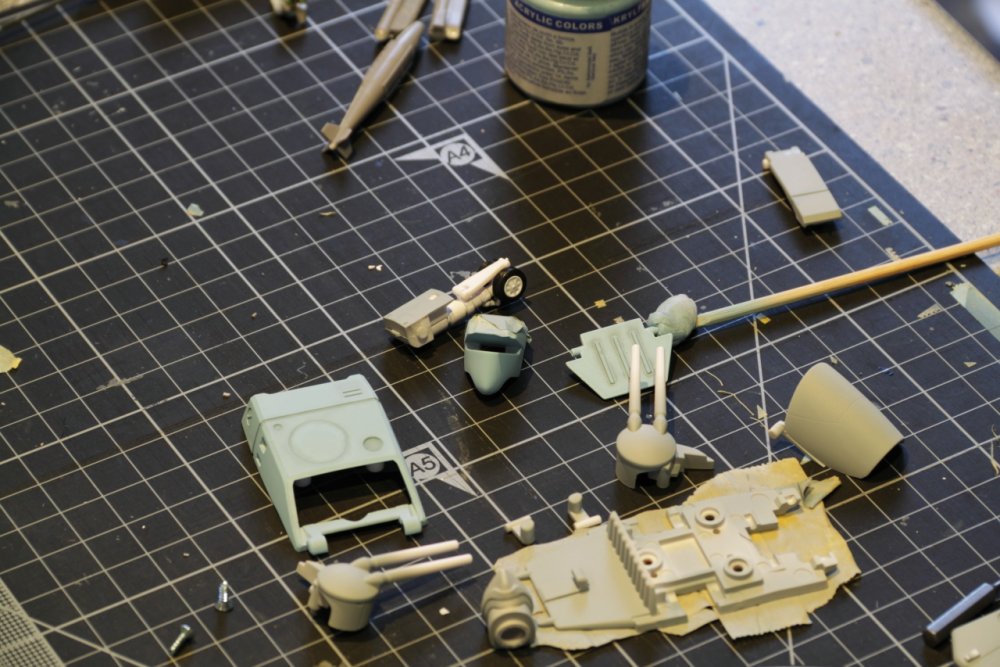
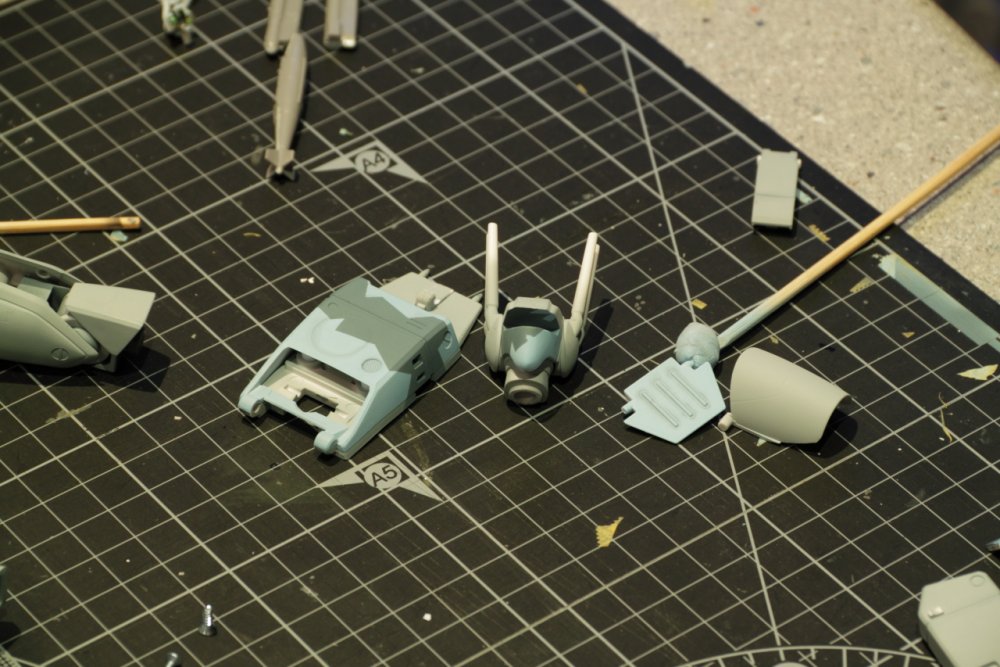
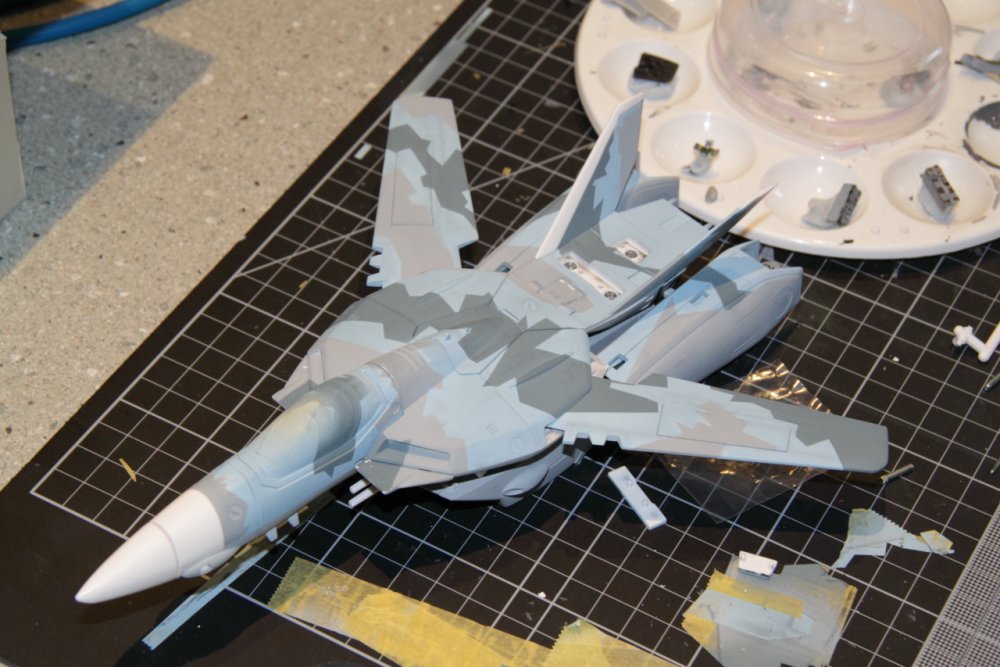
Seems I only get things done on this when I'm home from work by myself. That's when I'm on leave, or when when I'm sick. Yesterday and today, I'm sick. Seems like the year from hell for colds! I think I've been sick about 3 times in 6 months. I blame my 3 year old and the other kids he hangs out with. I got lots painted and did a bit of fact finding with the paint applications while I was at it. There are lots of parts that will rub and Yamato did a great job on their factory toys to apply very durable paint or simply mold the plastic in the correct colour so scratching and chipping are absent. Since the kit is molded in white, I don't really have that option. I've got lots of pictures but the uploader only allows 10 per post. So this first one is just a "here's what I did" post. The second will be more detailed. First a quick look at the bottom - why? Because it shows some items I'll point out in the next post. And also because it provides a quick look at the stuff I'll likely keep white. As you can see, with the "legs" on, you won't see any of this. Also, the "posts" that fit into the intakes are on the wrong sides. Proof that you have to follow the instructions very closely! I found out they were wrong after I pushed the assempbled legs on. They were a pain to get back off, let me tell you! The backpack engine nozzles. These are very complicated parts to mask. I'll paint these some sort of steel colour and the crappy job I did with masking will be (hopefully) covered by the black wash I'll do around the nozzles. Perfect masking would be better but I just couldn't get tape or a toothpick to push it down properly in these gaps! The nose/fuselage. The fresh masking tape is a "bandaid" for where it scraped on the cockpit shield for battroid mode. I had all kinds of issues getting things to sit correctly, and luckily the tape was scratched but not the paint on the frame for the canopy. The other item of note is the landing gear light. The toy has a molded "bump" that I've never been happy with. I was going to paint it silver and call it done but the perfectionist in me decided to make it difficult. So I've drilled out the bump (not perfectly on center either) and will pait it silver, then dab on a drop of future, let it dry, then do it again until I've built up some semblance to a lens effect. I may be barking up the wrong tree with this approach and might have to use some canopy glue instead. I just don't know if it'll dry clear enough. Backpack section and other minor parts that needed painting. The "back" of the backpack is hidden in fighter mode so I can camo it up as much as I want and it won't break up the light ghost grey scheme on the bottom. The blast shield for the canopy will be grey with dark blue splinter camo over it (which looks like very dark grey no matter what I do with the lighting correction in my photos). The head will be light ghost grey on the visor part, since that's what you see in fighter mode, and the rest of the "face" will be camo'd. I had decided to call it a day and had already cleaned the airbrush when I figured, what the heck, why not do the last bit of masking and painting for the darker blue. Here are the results: The masking on the face came out a bit soft but I'm not sure it'll be that obvious when it's all built. Then again, I'll probably end up fixing it now that I've seen it and proclaimed it to the world!

-
And your hard work has definitely paid off! Very nice! But I thought the 1/72 scale pilots were 1/100 anyway! Does that mean the 1/100 are even smaller (as in out of scale with the mecha)?
-
Yamato 1/60 VF-17 Nightmare Diamond Force
mickyg replied to charger69's topic in Hall Of The Super Topics
OK. I feel the need to clarify a few things. Here's my post from a few days/pages ago: Episode 35 is not an animation mistake. Find it. Watch it. "Regular" legs bent forward mode is there throughout the entire episode. For large chunks of time even. There's no way they made a mistake. The VF-17 definitely was designed to have a forward bend in the legs, based on this one episode alone. Come to think of it, I can't actually recall seeing an ep where the legs are in that weird, back, precarious position. I'm not for a second saying that because I can't remember it's not fact, mind you. I also haven't finished watching the series so there's a great chance there are plenty of scenes coming where the legs are in that weird, back stance. To recap: The legs can be positioned in the "regular, bent forward, nose down" configuration. So Yamato, if it's not too difficult, please at least make this leg mode into the finished product. Thank you, that is all from me. -
Yamato 1/60 VF-17 Nightmare Diamond Force
mickyg replied to charger69's topic in Hall Of The Super Topics
Bingo! Back to another item that keeps coming up-gerwalk mode and the legs. Back a page or two ago I mentioned proof of normal, "nose droop, legs bent forward" gerwalk mode. Does everyone want the legs back mode or are people still convinced that there is no legs forward mode? I'm confused. -
Yamato 1/60 VF-17 Nightmare Diamond Force
mickyg replied to charger69's topic in Hall Of The Super Topics
That's awesome! Does Yamato make that? -
MickyG's Yamato VF-1S Unpainted, Unassembled Kit Build
mickyg replied to mickyg's topic in The Workshop!
That's masking tape. I've left it on because I plan to overcoat it the same as everything else (gloss, followed by not quite matte) but don't want to screw up my glossy, future dipped canopy work underneath. Only, I'm a bit concerned that because I've left it on so long, the tape's gonna stick and leave behind marks. I don't have the stomach to remove it to see how it's holding up! -
MickyG's Yamato VF-1S Unpainted, Unassembled Kit Build
mickyg replied to mickyg's topic in The Workshop!
I certainly hope so! I plan to do some more work on it this afternoon. Hoping to get all the colours finally done at least. Need to paint all the insides too so you're not staring at ugly white on the inside of things. Some things will be left white, to accent the nose and tail white parts. I'm thinking the upper arms, where they rotate. -
MickyG's Yamato VF-1S Unpainted, Unassembled Kit Build
mickyg replied to mickyg's topic in The Workshop!
It is definitely far safer this way (on your sanity at least), that's for sure! Thanks for the comments everyone. Please keep 'em coming! -
Yamato 1/60 VF-17 Nightmare Diamond Force
mickyg replied to charger69's topic in Hall Of The Super Topics
Concerning the gerwalk leg thing and proof of a proper forward bend-it is there and it's episode 35 that you'll want to check out. Has it quite obviously for most of the episode even. -
MickyG's Yamato VF-1S Unpainted, Unassembled Kit Build
mickyg replied to mickyg's topic in The Workshop!
Thanks! I still feel like there's a long, long way to go. Hopefully I'll have the chance to eyeball everything sufficiently while it's together, so that I can be pretty efficient when I get it all painted up finally. Then it's a clearcoat, decals, panel line wash, matte coat, some drybrushing here and there, and a semi gloss final coat. By semi, I mean a slightly less than matte coat. I might mix matte and semi together to get the result I'm after. Matte (flat) is too flat to my eye at this scale. I think semi is more scale appropriate. I'll have to make doubly sure everything still mates up well and fits with all this painting. There's already some areas scuffing and taking some abuse and I'm only a third of the way there in terms of paint thickness! Most importantly, I'll need to make sure I don't get burnt out. There were some times yesterday where I definitely started having second thoughts! -
MickyG's Yamato VF-1S Unpainted, Unassembled Kit Build
mickyg replied to mickyg's topic in The Workshop!
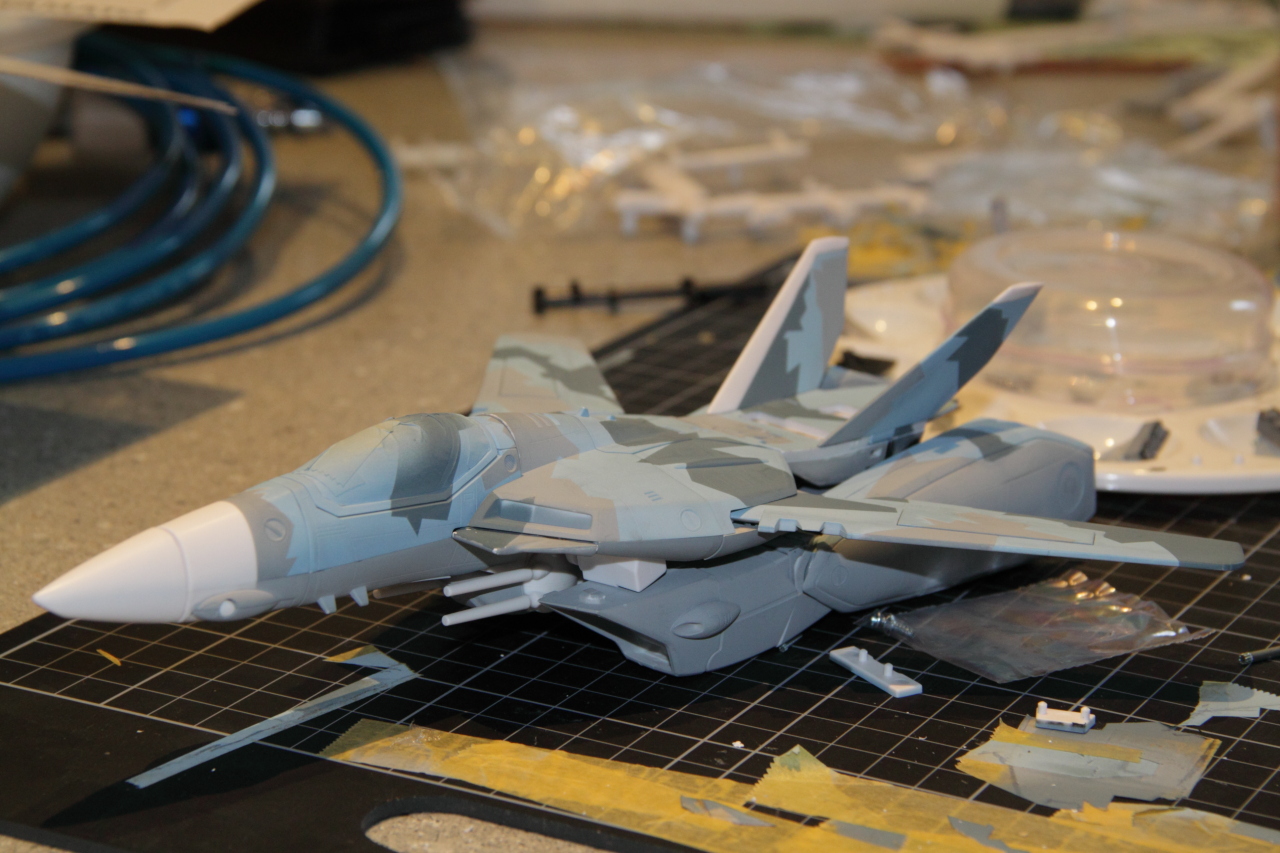
I got sick of dry fitting parts, only to find I'd missed some painting somewhere or scraped it off somewhere else. So today I (mostly) assembled the valk, so I could take photos and get an idea of what needs to be which colour and where. Plus, I was dying to see what this is going to look like and impatience has once again won out! I have to say, the pins on these kits are a major pain! I have needle nose pliers and that's about the only thing that seems to work to get the pins in. And only with some marring and scuffing of the opposite side of what you're trying to press the pin into. The factory must have some great tools to work with to protect the parts while pushing the pins in. Another interesting tidbit - there are two sets of pins in this kit, one with knurling, the other smooth. The instructions never tell you which one to use where (or if they do, it's in Japanese), only the length and diameter. I found the infamous shoulder pins had one of each type, smooth or knurled and both the exact same dimensions. So the solution for the shoulder issue on the kits? Use the smooth in the shoulders and the knurled in the other place (can't remember where it is now but it wasn't on any sort of weak plastic). Makes me wonder if the smooth pin was always meant to be in the shoulder and someone just swapped the pins on the first build run and the routine stuck! I guess we'll probably never know. But suffice to say, you can have non splitting shoulders on the VF-1S kit if you swap the smooth one in. Quick (as in non-tripod, non colour corrected) photos:
-
MickyG's Yamato VF-1S Unpainted, Unassembled Kit Build
mickyg replied to mickyg's topic in The Workshop!
Thanks! It's certainly a challenge to get it to look the way I want it. I had some more progress today, managed to get the nose painted (airbrush) and I think I like the look of it. I also realised I hadn't fixed the rest of the masking mishap mistakes so decided to tackle it with a normal brush. I've found flat acrylics seem to behave quite well when hand brushed so figured in the very small spots that needed attention, it was at least worth a shot. I had a cold day today and the thought of getting out the airbrush for another three colours sorta turned me off the idea! The results were pretty good actually. In fact, the bit that pops open to allow the head to come through, well I'd forgotten to paint the light blue on that one entirely. I tackled it with a brush and I was pretty impressed with the results. Granted, you end up with much more paint than with an airbrush but the convenience was a good tradeoff. Bear in mind, I airbrush in the garage, have a really loud compressor and it's almost never convenient to do it. So any chance to stay indoors and get acceptable results is very much welcomed! I also decided to bite the bullet and paint the LERX (brush painted as well). The edges were masked off just like for airbrushing and to my surprise, there was no running or leakage under the (tamiya) tape. Even though it's now been used about 3 times in different spots! Great stuff!