MacrossJunkie
-
Posts
3260 -
Joined
-
Last visited
Content Type
Profiles
Forums
Events
Gallery
Everything posted by MacrossJunkie
-

Yamato 1/60 VF-17 Nightmare Diamond Force (Thread no.2)
MacrossJunkie replied to IXTL's topic in Toys
Maybe about 5 complete transformations from fighter to battroid while stickering mine and panel lining and taking photos, then left it in battroid mode for months. Quite frankly, I'm appalled at what Yamato thought would be a good way to attach the leg. One fragile looking plastic peg with a tiny screw in it to hold the weight of the valk up plus endure the stress of movement from transformations and posing. I'm surprised the other leg didn't fall off too or that it hasn't happened to other people. However, the plastic peg on the other leg looked completely fine so I'm guessing the right leg had some faulty plastic that just degraded and crumbled. Fortunately the 17S I recently acquired has metal bars holding which the legs are attached to so I don't expect them to just fall off over time. There seems to be a great deal more use of metal in key joints, which makes me more confident about it. -
1/48+fp's, 1/60+fp's, 1/72, 1/2k, 1/3k,1/100 and now 1/144
MacrossJunkie replied to VF-18S Hornet's topic in Toys
Been too busy and lazy to put up new shots of stuff I've gotten in the past 6 months or so. too lazy to even work on them. Finally got off my butt and stickered up the valks, panel lined them, and did some varying degrees of weathering. I'm holding off on transforming Ozma's 25S again until I get some time to clear coat it. Edit: Removed dead links. -
My order at HLJ has been sitting at "This order is in processing and cannot be edited." for a while now. It normally hasn't taken them this long to do shipments for me. I'm not sure what's going on. And yes, the order is set to ship immediately.
-
Doh. In my case, my credit card company decided to deny the payment transaction as a possible fraud alert when HLJ tried to bill me, and the CC company called me to verify the transaction. This despite me having to do the very same thing earlier in the week for something I had bought during the Macross sale. I mean it's good that they're trying to protect their cardholders, but it's to the point where it's ridiculous when they're flagging things that aren't out of the ordinary since I have a long history of buying stuff from HLJ. So now I have to wait until next week until they ship mine. I had an email from them earlier in the week telling me to choose to ship immediately or use the warehouse for all future orders. Did you happen to get it too? I wonder if it wasn't responded to, then it defaulted to the warehouse. I got this on June 21st:
-
Yamato 1/60 VF-17 Nightmare Diamond Force (Thread no.2)
MacrossJunkie replied to IXTL's topic in Toys
Unfortunately I don't really know anyone in Japan that could help me. -
Yamato 1/60 VF-17 Nightmare Diamond Force (Thread no.2)
MacrossJunkie replied to IXTL's topic in Toys
Yup, ever since my VF-19S self destructing and having no honest way to get a replacement part, I'm only getting things from HLJ from now on for the peace of mind even if they may be more expensive than some other stores. In the end, the extra money spent getting it from HLJ and being able to get a replacement part would have been well worth the price instead of now being stuck with a ~$300 piece of broken junk. -
Photos posting photos?! That's just wrong. What is this world coming to?
-
Bah, HLJ dropped the 5% discount on the VF-25G and it still hasn't been made available for pre-order yet (that I know of).
-
Argh, I've had to turn on the update scanner because of the change to the website where they show random items at the bottom of the page now. So it goes off every few minutes. Will just have to rely on the alert box now.
-
At this point, is it too late for HLJ to put any pre-orders in? Is their page truly a placeholder or did they really sell out within the first couple minutes they put up the VF-25G page? It is strange that most other stores have had their pre-orders already, but we're still waiting on HLJ. They normally don't take this long to make pre-orders available. I blame Bandai for this situation. It gets worse and worse with each subsequent release. I had plenty of time to put in for the YF-29 preorder. I don't think I even did it the release day and I was able to get it from AmiAmi. Alto's 25F stuck around for a bit on AmiAmi, as in I didn't have to camp the site. Ozma's 25S wasn't entirely too bad in finding if going through HLJ. The VF-171EX took a lot of camping and luck. Now the 25G has thus far been unobtainable for pre-order through HLJ even after this long.
-
Yamato 1/60 VF-17 Nightmare Diamond Force (Thread no.2)
MacrossJunkie replied to IXTL's topic in Toys
Hmm, I like the drawn line art 17D head, but it doesn't seem to translate well into 3D I guess. I don't know what it is. I think the visor may be too small. The price with the FAST pack doesn't sit well with my wallet either. I may just end up getting a 17S at some point afterall. -
You can set it to ignore numbers.
-
Nice! Thanks again.
-
Awesome, thanks! It only allowed me to run it at 2 minute intervals as s shortest available though. Well, I've got both running now. Now, hopefully I'm at the computer when it comes up for sale
-
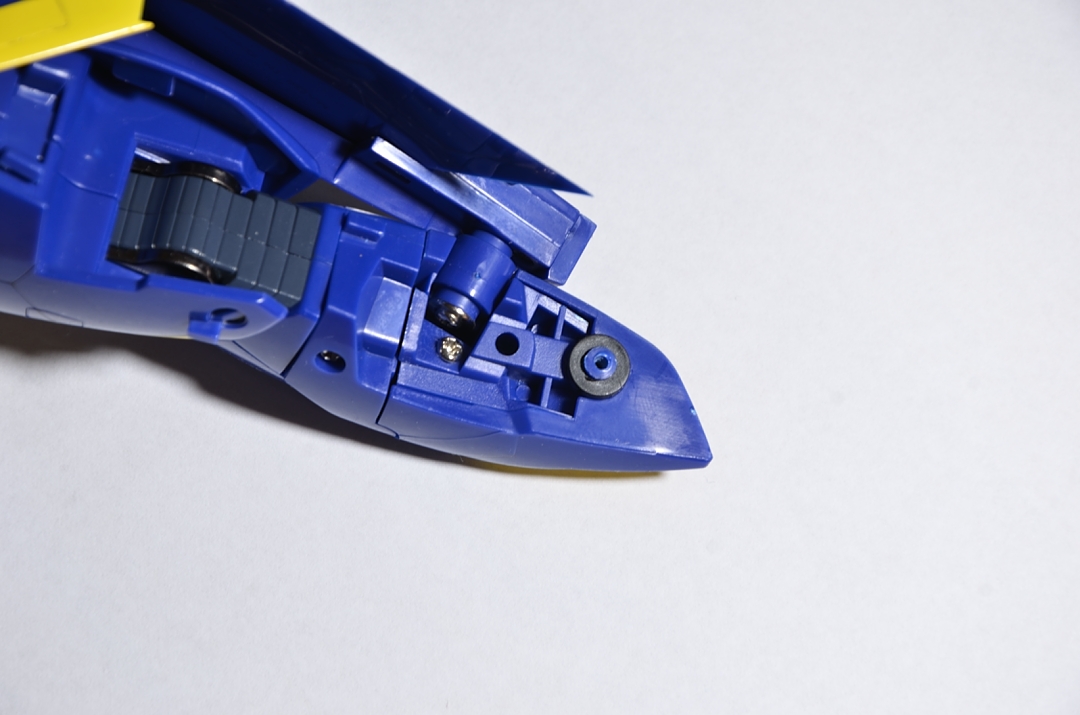
I'm not quite sure what you're saying. The first photo is of the leg that was not broken to illustrate what it ought to look like. If the black plastic spacer is removed, it's basically just a blue hollow peg that the screw goes into. On the broken leg, the screw is still attached and the majority of the peg and spacer are still attached to the screw. It's the plastic around the base of the hollow peg that had crumbled. I'm not sure if that clarifies or confuses more.
-
I left it in an "A" stance with regards to the legs. I don't think the washer being metal would have produced any different results though. The base of the peg is where it seemed to have degraded. Unfortunately, I got this one from AmiAmi, so I'm completely SOL =( Sigh... really wish I could get a replacement part. I'm pretty mad that it costs so much and it just falls apart in less than a year. Makes me not want to get the F or P if this could happen to me again. I'm getting everything from HLJ from now on just in case...
-
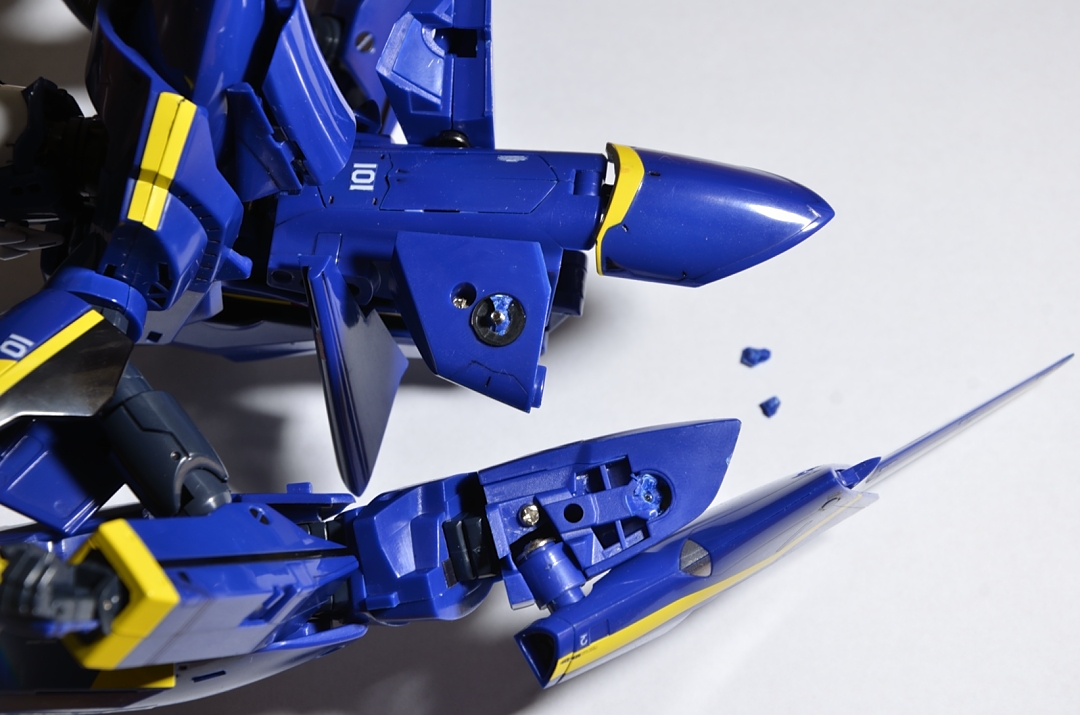
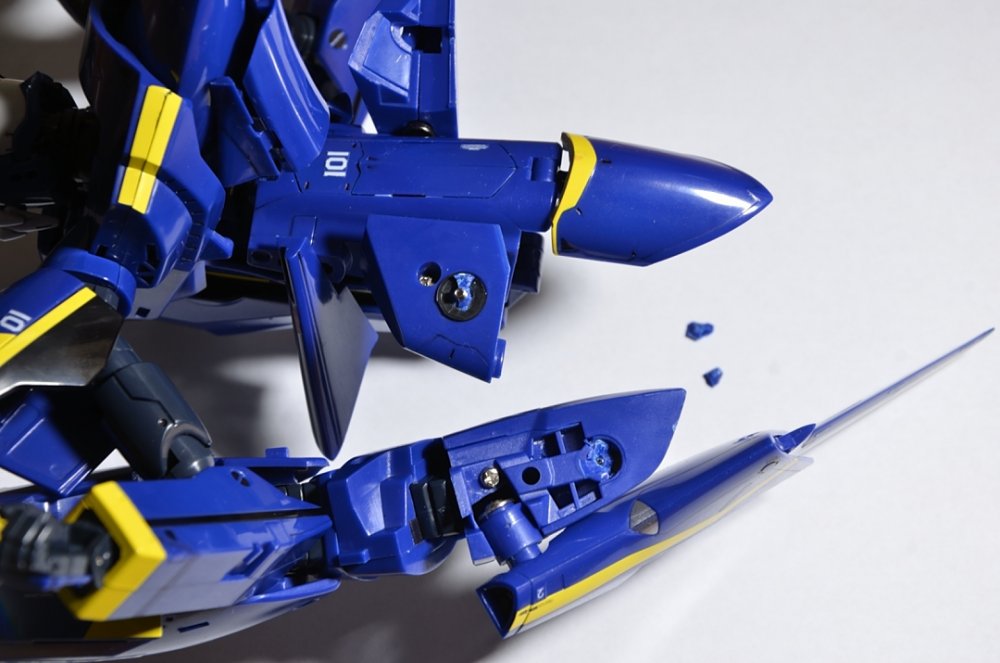
Ok, I figured out how to get the unbroken leg off to examine and take pics of it. I guess you can get to the screw without taking off other parts. Here is what it should look like: I took the black plastic washer/spacer off to examine the plastic and it looked seemingly fine. Not even any stress marks. Here is the broken piece: Notice how some bits of plastic are still stuck with the black plastic washer, other parts that I could find had crumbled off. It's generally not an even break at all. It's more consistent with the breaks I had with my VF-0A shoulders where the plastic degraded. Maybe the plastic in the right leg had a bad batch or something. I can't explain how it happened with one leg but the other is perfectly fine. Not sure how it could have happened.

-
No, not those screws. The screw I'm talking about wouldn't be visible normally. I'll illustrate when I can get home to take pics.
-
Small tip if you want to save your sanity (and your F5 key): Use the Update Scanner add-on (if you're using Firefox) to have it check the page every 5 minutes, the smallest interval it will go, for any changes and have it alert you when it finds something. There might be something similar for Chrome if you happen to be using that, but not sure what it is called.
-
I'll get some pics up when I get home from work today. I don't really transform my valks often. Other than the first few times while putting stickers, panel lining and taking pics, They usually go in or on top of my display cases after that. My VF-19S was probably transformed a max of 4-5 times since owning it. I had left it displayed in battroid mode. I saw it lying down and wondered how it fell down since it was in a stable position so I went to stand it back up and saw that one of the legs came off. I examined the joint and saw that the area at the back of the leg was missing chunks of plastic. I was able to find bits of it, but not enough to piece it back together or even how the bits I could find would go in since they were so irregularly shaped. The other leg's side to side motion is a bit floppy so the plastic in that joint might have started to weaken as well. I'll have to figure out how to take it apart so I can examine it.
-
Has anyone's VF-19S had their leg crumble yet? I noticed mine was lying on its side on top of my display case and picked it up to find that the leg had come off at the point where the leg swivels outwards, right behind the area where the intakes are. The plastic that the screw was screwed into to attach the leg had disintegrated. The other leg feels pretty loose too, so my guess is that one is about to come off soon as well. Too late for me to take pics right now. I'll find some time later to do it. I'm not sure what I can do. The part is not salvageable in any way with superglue as the plastic is in many tiny little bits like it had exploded and these things are pretty frickin expensive. Makes me very wary to buy the F when a $300+ toy just falls apart like that. I thought Yamato had gotten past that by now =(
-
I would think it would eventually work its way through the clearcoat and you would have a gunky mess on the tips that you wouldn't want in contact with your valks. At least it doesn't react with the plastic wrap and the plastic wrap itself will grab onto surfaces so you don't have to worry about things sliding off.
-
Not to derail this thread any further, but I've had my share of issues with the flexi display stands as well. However, I've solved the problem with the tips reacting to paint and clearcoat finishes by putting plastic wrap around the silicone tips.
-
I hope the battroid is just mistransformed in those pics and that the shoulders can be angled up like that without actually completely exposing the joints and hinges that the shoulder armor should be covering. It just looks really off like how it is in the pics. Looks pretty accurate otherwise.
-
In some cases it is better to have wished you watched, but never have, than to have watched and wished you hadn't.